DNABERT_2
1.0.0
リポジトリには次のものが含まれています。
埋め込み空間で異なる種のゲノムを自然にクラスターおよび分離するDNA埋め込みを生成するために特別に設計されたDNABERT-2に基づく基礎モデルであるDNABERT-Sを公開します。興味があればここでチェックしてください。
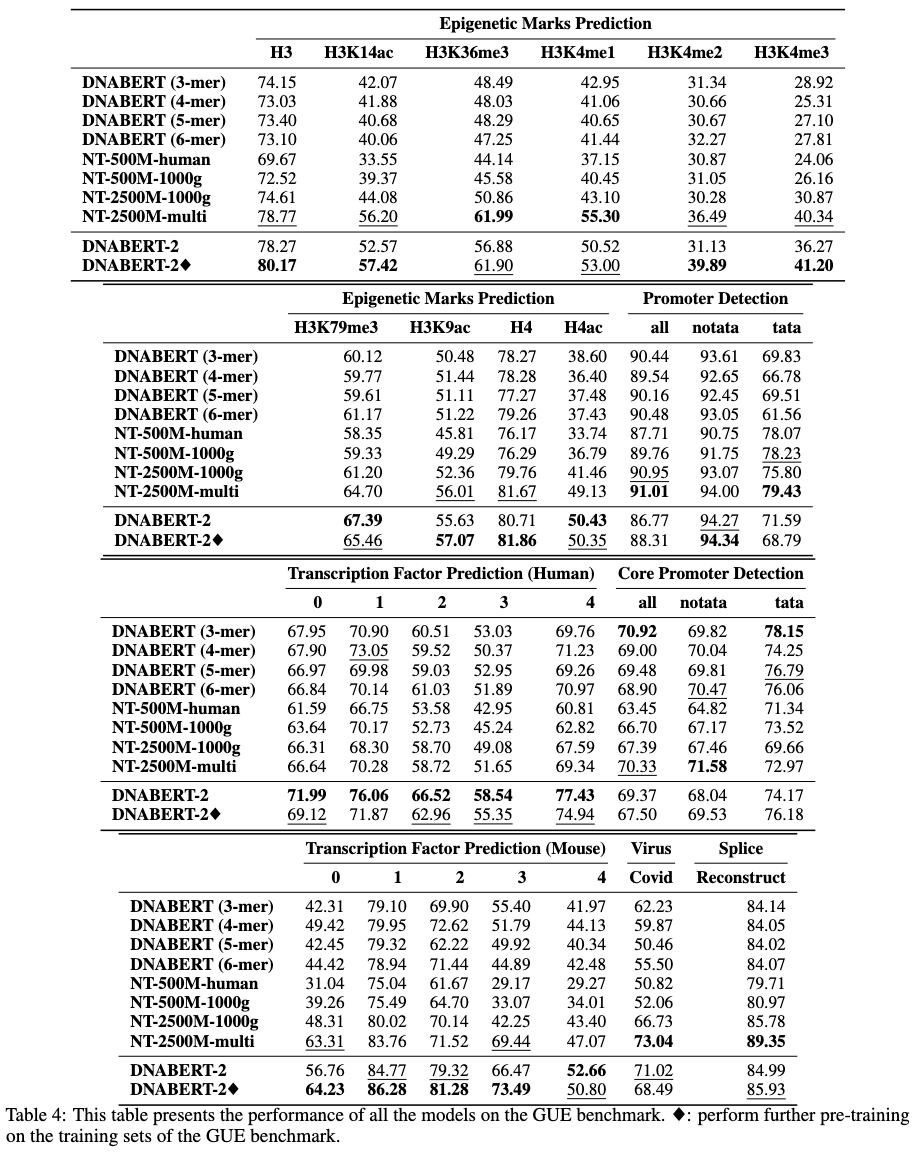
DNABERT-2は、最先端のパフォーマンスを達成する大規模な多種種ゲノムで訓練された基礎モデルです
事前に訓練されたモデルは、Huggingfaceでzhihan1996/DNABERT-2-117Mとして入手できます。 Huggingface ModelHubへのリンク。直接ダウンロード用のリンク。
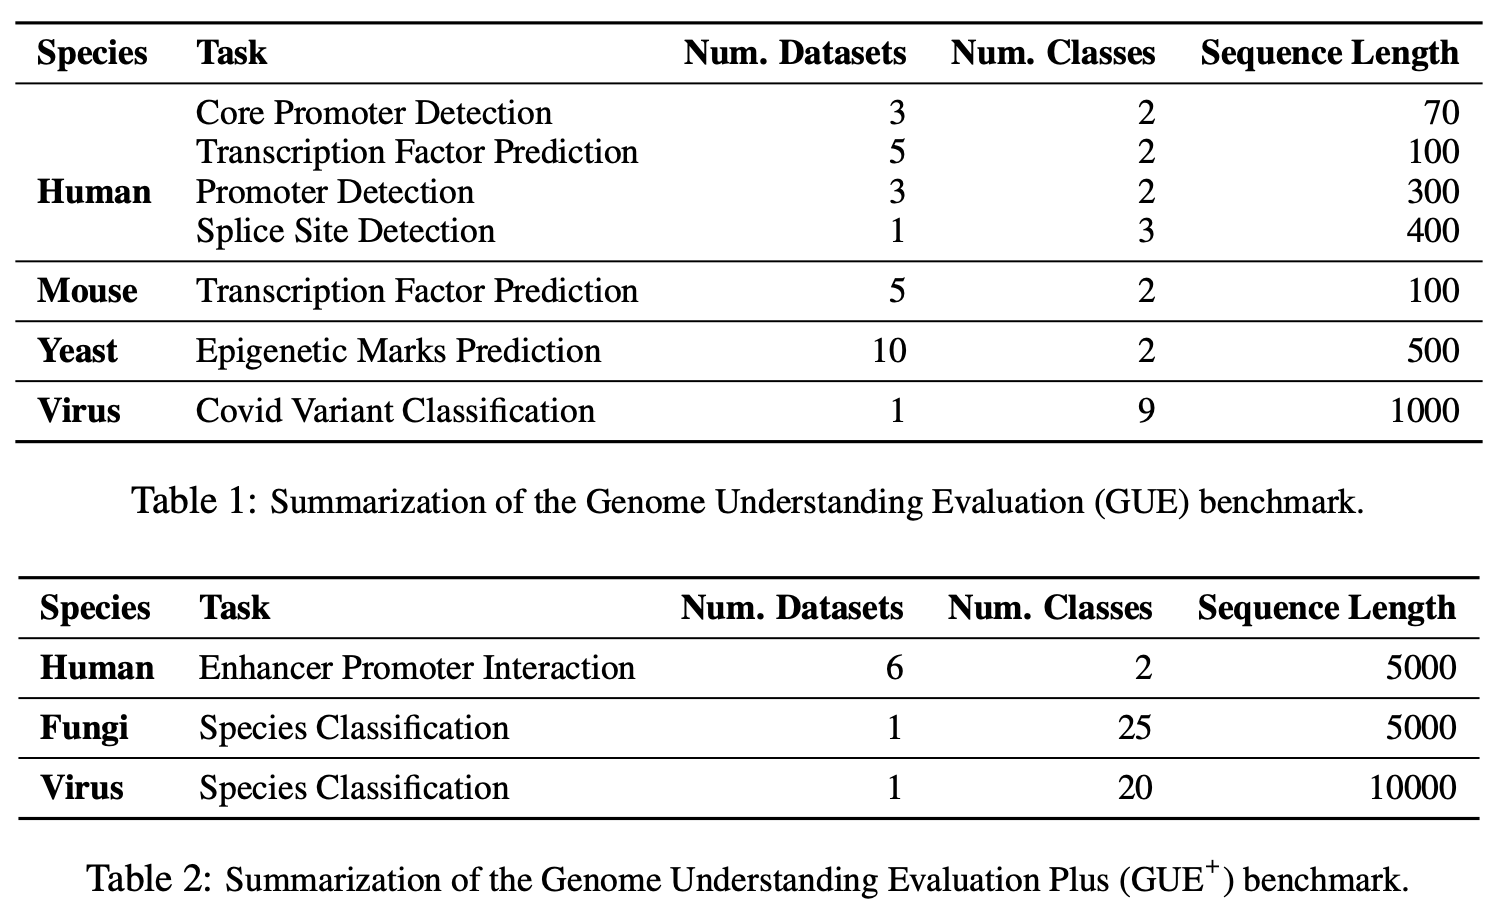
Gueは、ゲノム理解のための包括的なベンチマークです
 # create and activate virtual python environment
conda create -n dna python=3.8
conda activate dna

# (optional if you would like to use flash attention)
# install triton from source
git clone https://github.com/openai/triton.git;
cd triton/python;
pip install cmake; # build-time dependency
pip install -e .

# install required packages
python3 -m pip install -r requirements.txt
私たちのモデルは、トランスフォーマーパッケージで使いやすいです。
Huggingfaceからモデルをロードするには(バージョン4.28):
 import torch
from transformers import AutoTokenizer , AutoModel

tokenizer = AutoTokenizer . from_pretrained ( "zhihan1996/DNABERT-2-117M" , trust_remote_code = True )
model = AutoModel . from_pretrained ( "zhihan1996/DNABERT-2-117M" , trust_remote_code = True )
Huggingfaceからモデルをロードするには(バージョン> 4.28):
 from transformers . models . bert . configuration_bert import BertConfig

config = BertConfig . from_pretrained ( "zhihan1996/DNABERT-2-117M" )
model = AutoModel . from_pretrained ( "zhihan1996/DNABERT-2-117M" , trust_remote_code = True , config = config )
DNA配列の埋め込みを計算します
 dna = "ACGTAGCATCGGATCTATCTATCGACACTTGGTTATCGATCTACGAGCATCTCGTTAGC"
inputs = tokenizer(dna, return_tensors = 'pt')["input_ids"]
hidden_states = model(inputs)[0] # [1, sequence_length, 768]

# embedding with mean pooling
embedding_mean = torch.mean(hidden_states[0], dim=0)
print(embedding_mean.shape) # expect to be 768

# embedding with max pooling
embedding_max = torch.max(hidden_states[0], dim=0)[0]
print(embedding_max.shape) # expect to be 768
dnabert-2 https://github.com/mosaicml/examples/main/examples/benchmarks/bertのMosaicbert実装を使用し、わずかに変更しました。指示に従ってモデルトレーニングを再現できるはずです。
または、https://github.com/huggingface/tree/main/examples/pytorch/language-modelingでhttps://github.com/huggingface/transformersでrun_mlm.pyを使用できます。非常に類似したモデルを生成するはずです。
トレーニングデータはこちらから入手できます。
ここからGueデータセットを最初にダウンロードしてください。次に、スクリプトを実行して、すべてのタスクで評価します。
現在のスクリプトは、4 GPUでのトレーニングにDataParallelを使用するように設定されています。 GPUの数が異なる場合は、 per_device_train_batch_sizeとgradient_accumulation_stepsを変更して、グローバルバッチサイズを32に調整して、ペーパーの結果を再現してください。分散型マルチGPUトレーニング(たとえば、 DistributedDataParallel DataParalle)を実行したい場合は、 python torchrun --nproc_per_node ${n_gpu}に変更するだけです。
 export DATA_PATH=/path/to/GUE #(e.g., /home/user)
cd finetune

# Evaluate DNABERT-2 on GUE
sh scripts/run_dnabert2.sh DATA_PATH

# Evaluate DNABERT (e.g., DNABERT with 3-mer) on GUE
# 3 for 3-mer, 4 for 4-mer, 5 for 5-mer, 6 for 6-mer
sh scripts/run_dnabert1.sh DATA_PATH 3

# Evaluate Nucleotide Transformers on GUE
# 0 for 500m-1000g, 1 for 500m-human-ref, 2 for 2.5b-1000g, 3 for 2.5b-multi-species
sh scripts/run_nt.sh DATA_PATH 0
ここでは、独自のデータセットで微調整DNABERT2の例を示します。
まず、データセットから3つのcsvファイルを生成してください: train.csv 、 dev.csv 、およびtest.csv 。トレーニングプロセスでは、モデルはtrain.csvでトレーニングされ、 dev.csvファイルで評価されます。終了した場合、トレーニング後、 dev.csvファイルの最小の損失を伴うチェックポイントがロードされ、 test.csvで評価されます。検証セットがない場合は、 dev.csvとtest.csv同じようにしてください。
データ形式のサンプルについては、 sample_dataフォルダーを参照してください。各ファイルは同じ形式で、最初の行はドキュメントヘッドと名付けられたsequence, label付けている必要があります。次の行の各行には, (たとえば、 ACGTCAGTCAGCGTACGT, 1 )で連結されたDNA配列と数値ラベルが含まれている必要があります。
次に、次のコードを使用して、独自のデータセットでDNABERT-2をFintuneすることができます。
 cd finetune

export DATA_PATH=$path/to/data/folder  # e.g., ./sample_data
export MAX_LENGTH=100 # Please set the number as 0.25 * your sequence length.
											# e.g., set it as 250 if your DNA sequences have 1000 nucleotide bases
											# This is because the tokenized will reduce the sequence length by about 5 times
export LR=3e-5

# Training use DataParallel
python train.py
    --model_name_or_path zhihan1996/DNABERT-2-117M
    --data_path  ${DATA_PATH}
    --kmer -1
    --run_name DNABERT2_${DATA_PATH}
    --model_max_length ${MAX_LENGTH}
    --per_device_train_batch_size 8
    --per_device_eval_batch_size 16
    --gradient_accumulation_steps 1
    --learning_rate ${LR}
    --num_train_epochs 5
    --fp16
    --save_steps 200
    --output_dir output/dnabert2
    --evaluation_strategy steps
    --eval_steps 200
    --warmup_steps 50
    --logging_steps 100
    --overwrite_output_dir True
    --log_level info
    --find_unused_parameters False

# Training use DistributedDataParallel (more efficient)
export num_gpu=4 # please change the value based on your setup

torchrun --nproc_per_node=${num_gpu} train.py
    --model_name_or_path zhihan1996/DNABERT-2-117M
    --data_path  ${DATA_PATH}
    --kmer -1
    --run_name DNABERT2_${DATA_PATH}
    --model_max_length ${MAX_LENGTH}
    --per_device_train_batch_size 8
    --per_device_eval_batch_size 16
    --gradient_accumulation_steps 1
    --learning_rate ${LR}
    --num_train_epochs 5
    --fp16
    --save_steps 200
    --output_dir output/dnabert2
    --evaluation_strategy steps
    --eval_steps 200
    --warmup_steps 50
    --logging_steps 100
    --overwrite_output_dir True
    --log_level info
    --find_unused_parameters False
私たちの論文やコードに関する質問がある場合は、問題を自由に開始するか、[email protected])にメールしてください。
作品でDnabert-2を使用する場合は、私たちの論文を親切に引用してください。
dnabert-2
 @misc{zhou2023dnabert2,
      title={DNABERT-2: Efficient Foundation Model and Benchmark For Multi-Species Genome},
      author={Zhihan Zhou and Yanrong Ji and Weijian Li and Pratik Dutta and Ramana Davuluri and Han Liu},
      year={2023},
      eprint={2306.15006},
      archivePrefix={arXiv},
      primaryClass={q-bio.GN}
}
dnabert
 @article{ji2021dnabert,
    author = {Ji, Yanrong and Zhou, Zhihan and Liu, Han and Davuluri, Ramana V},
    title = "{DNABERT: pre-trained Bidirectional Encoder Representations from Transformers model for DNA-language in genome}",
    journal = {Bioinformatics},
    volume = {37},
    number = {15},
    pages = {2112-2120},
    year = {2021},
    month = {02},
    issn = {1367-4803},
    doi = {10.1093/bioinformatics/btab083},
    url = {https://doi.org/10.1093/bioinformatics/btab083},
    eprint = {https://academic.oup.com/bioinformatics/article-pdf/37/15/2112/50578892/btab083.pdf},
}


