generative ai cybersecurity
1.0.0
This repository contains the materials and scripts for the talk titled "Generative AI in Cybersecurity: Generating Offensive Code from Natural Language" by Pietro Liguori, University of Naples Federico II, DESSERT group. The talk is part of ARTISAN 2024: Summer School on the role and effects of ARTificial Intelligence in Secure ApplicatioNs.
Ensure you have Python installed on your system. If not, you can use a virtual environment with Anaconda to avoid working directly on your machine. Follow the steps below:
wget command to download the installer:
wget https://repo.anaconda.com/archive/Anaconda3-version-OS.shchmod +x Anaconda3-version-OS.shbash Anaconda3-version-OS.shbashrc file:
export PATH="/path_to_anaconda/anaconda3/bin:$PATH"Create a Python 3.9 virtual environment:
conda create -n yourenvname python=3.9yourenvname with your desired environment name.Activate the environment:
source activate yourenvnameYou are now ready to install dependencies and work within your virtual environment.
In the Violent-Python-functions folder, we have .in and .out files containing the NL (Natural Language) descriptions and the corresponding Python functions, respectively.
The Violent Python dataset is a manually curated dataset, where a sample contains a piece of Python code from an offensive software, and its corresponding description in natural language (plain English). We built the dataset using the popular book "Violent Python" by T.J. O'Connor, which presents several examples of offensive programs using the Python language.
We have included only the function-level descriptions, totaling 72 pairs of NL descriptions - Python functions.
Install Dependencies:
pip install -r requirements.txt --userSubset Extraction:
create_subset.py script with the following command:
python create_subset.pyscripts/results subfolder containing reference.in and reference.out files.reference.in file contains the 10 randomly extracted NL descriptions.reference.out file contains the corresponding 10 Python functions and serves as our ground truth for evaluation.Next, you will generate 10 outputs using generative AI models like ChatGPT or Claude Sonnet.
Caution
Pay attention to the structure of the code snippets. As you can see, the Python codes are all single-line. In fact, multi-line instructions are separated from each other with n.
Generate Outputs:
reference.in file to generate the 10 outputs using the AI models.output.out in the results folder.Example prompt:
Generate Python 10 functions starting from the following 10 natural language (NL) descriptions:

1. [NL description]
2. [NL description]
...
10. [NL description]

Each function should be generated in a single line, for a total of 10 lines.
Different instructions of the same function should be separated by the special character "n".
Do not use empty lines to separate functions.
Calculate Output Similarity Metrics:
scripts folder, run the python script output_similarity_metrics.py to calculate the output similarity metrics between the model predictions (output.out) and the ground truth reference (reference.out):
python output_similarity_metrics.py hypothesis_filehypothesis_file is the results/output.out file.The metrics will be generated in the results/output_metrics.txt file.
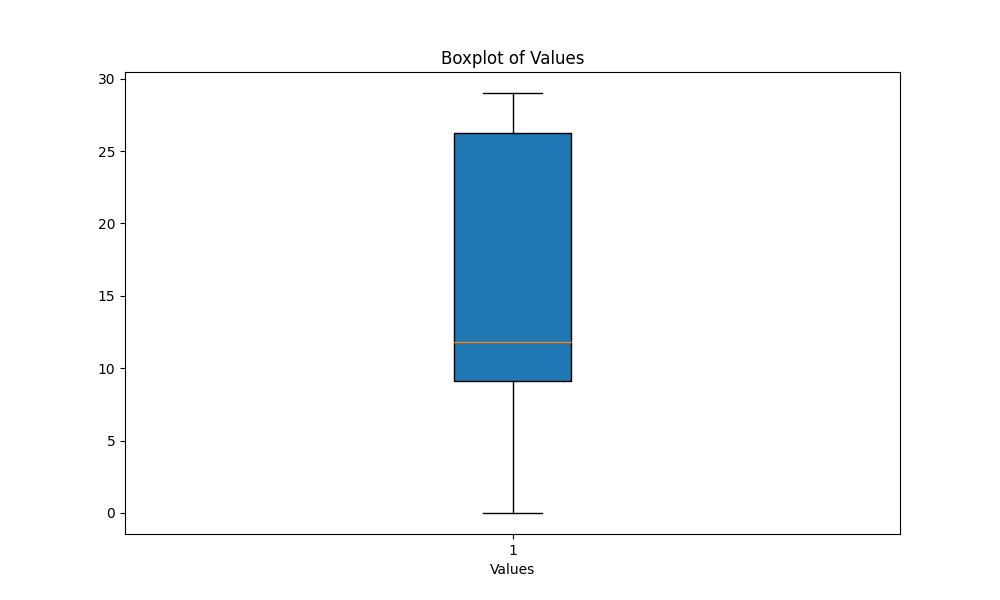
scripts folder, execute the script boxplot_metrics.py to visualize the variability of the metrics saved in the file results/output_metrics.txt:
python boxplot_metrics.pyBelow is an image showing the variability of the output similarity metrics with a boxplot:
results/output2.out file.output_similarity_metrics.py to calculate the output similarity metrics between the model predictions (output2.out) and the ground truth reference (reference.out):
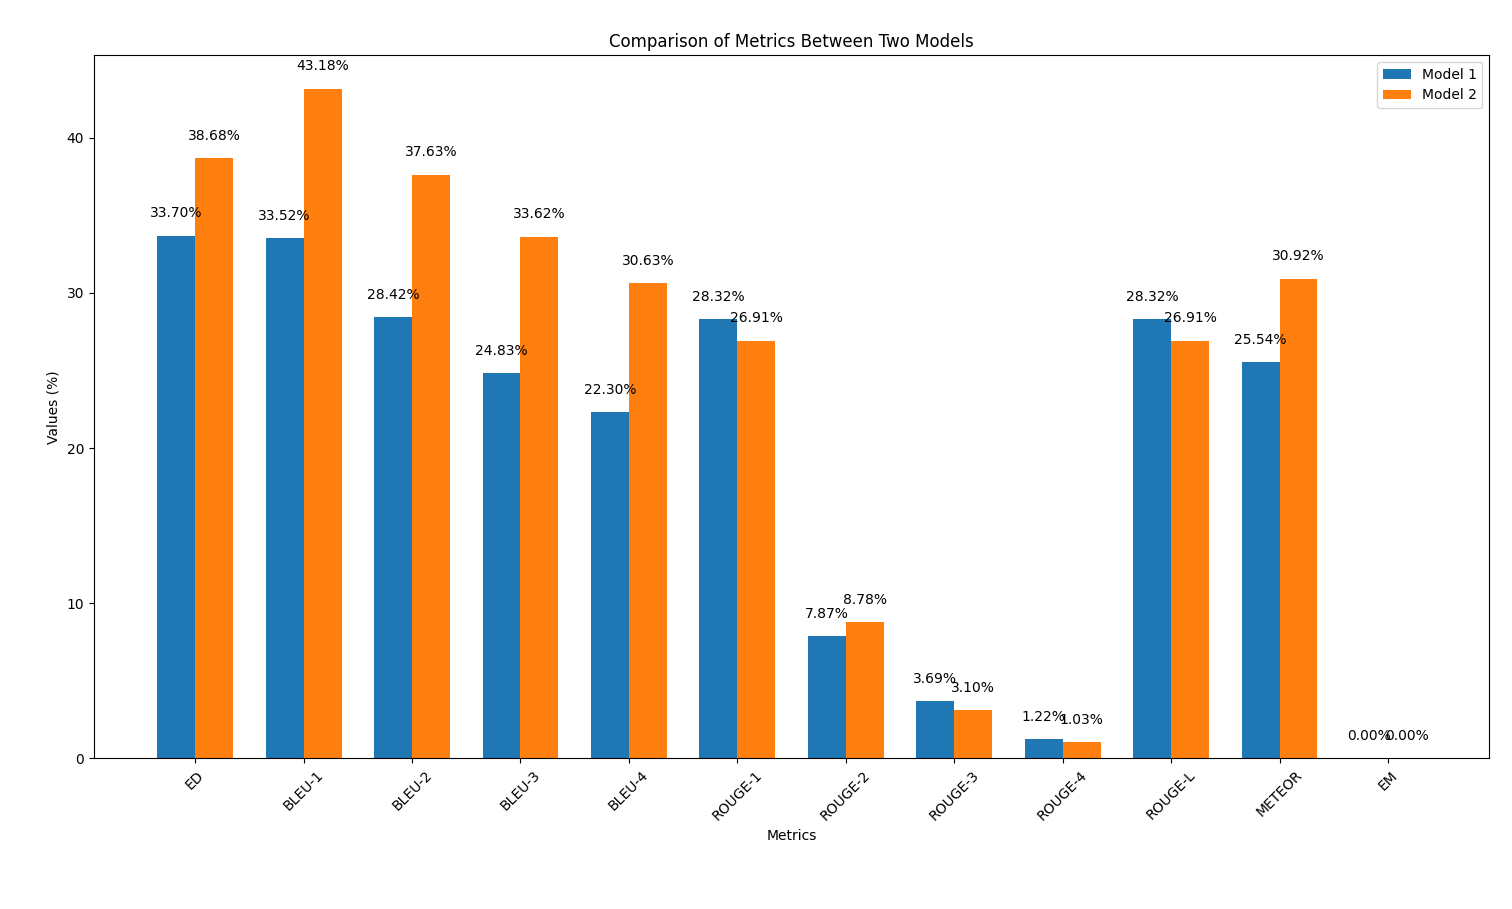
python output_similarity_metrics.py results/output2.outcompare_models.py to show the comparison of two models performance across two metrics
python compare_models.pyBelow is an example of the output:
In this part, we will repeat the code generation process using the AI models, but this time applying a prompt engineering technique discussed during the talk. The goal is to observe if this technique improves the quality of the generated code.
Apply Prompt Engineering:
reference.in file.Examples of prompts can be found in the scripts/prompt_examples folder.
Generate Outputs:
output_prompt_pattern.out in the scripts/results folder, where prompt_pattern is an identifier you want to use to specify the adopted pattern (e.g., output_persona.out, output_few_shot.out).Calculate Output Similarity Metrics:
scripts folder, run the script to calculate the output similarity metrics between the model predictions (output_prompt_pattern.out) and the ground truth reference (reference.out):python output_similarity_metrics.py hypothesis_filewhere hypothesis_file is the file generated with a prompt pattern (e.g., results/output_few_shot.out file).
scripts/results/output_prompt_engineering_metrics.txt file (e.g., scripts/results/output_few_shot_metrics.txt file).Compare Results:
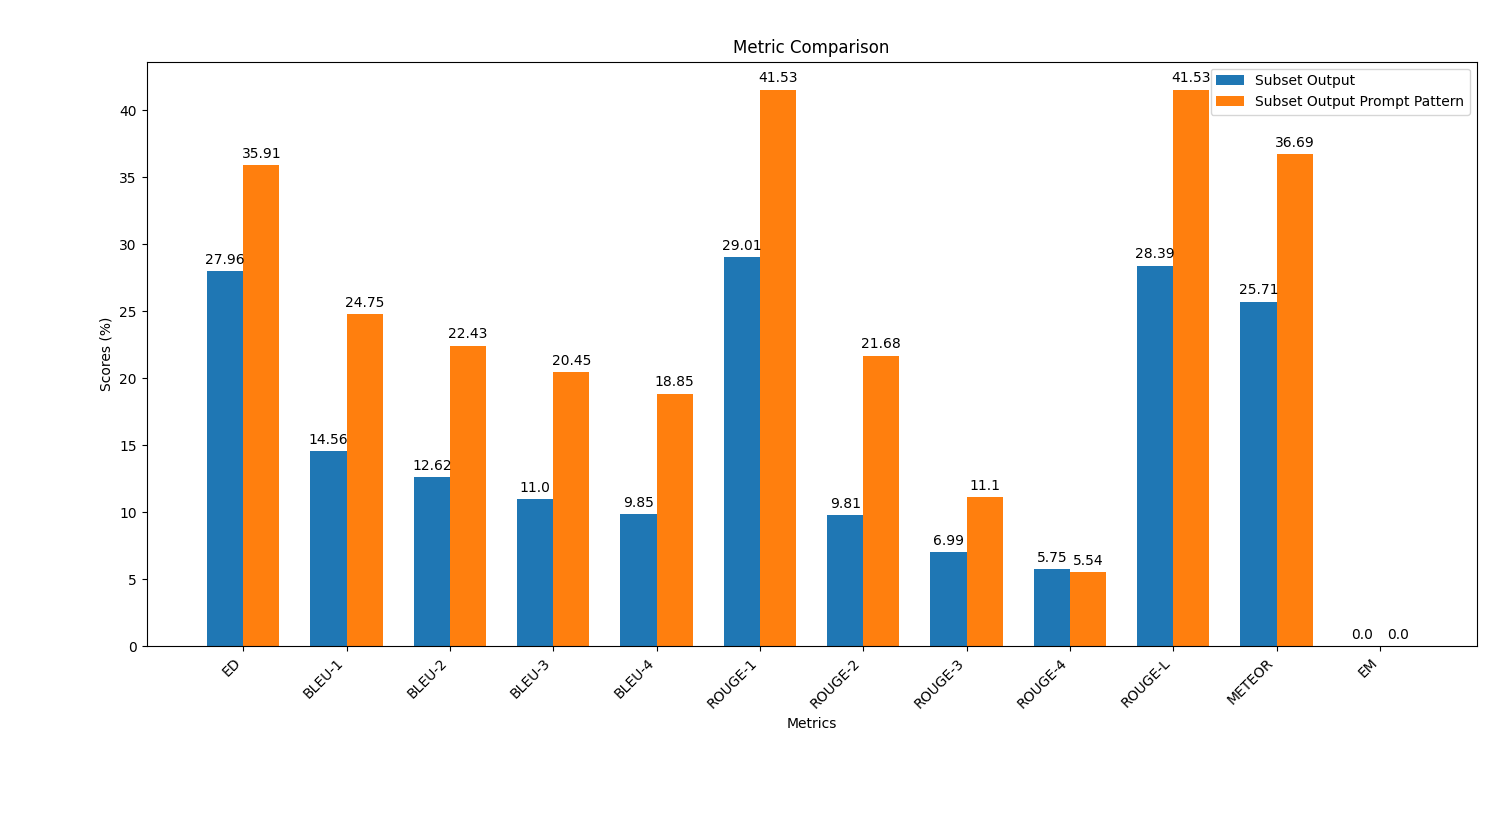
scripts folder, execute the script plot_metrics_comparison.py to compare the results:
python plot_metrics_comparison.py file_metricsfile_metrics is scripts/results/output_prompt_engineering_metrics.txt file.Below is an image showing the comparison of metrics between the outputs generated without prompt engineering and with few-shot prompt engineering:
Follow these steps to apply prompt engineering and evaluate its impact on the code generation quality.
In the saved_outputs folder, you will find examples generated with ChatGPT-4o. These examples illustrate how the model's outputs look like with different prompt engineering techniques applied.
This repository and the materials were developed by:


