Suitcase
Alpha 4: Interpreter Mode
เครื่องมือบรรทัดคำสั่งที่ยืดหยุ่นสำหรับการปรับใช้อินเทอร์เฟซผู้ใช้ทันทีสำหรับคำสั่งและสคริปต์อย่างง่าย
Suitcase เป็นเครื่องมือบรรทัดคำสั่งที่สามารถ "โปรแกรม" เพื่อแสดงอินเตอร์เฟส Swiftui ที่สามารถเรียกใช้คำสั่งและสคริปต์
- ดาวน์โหลด Suitcase Direct
มันคล้ายกับทางลัด แต่สำหรับ macOS และขับเคลื่อนด้วยบรรทัดคำสั่ง
เนื่องจากกระเป๋าเดินทางของ Swiftui Underpinnings เป็นพลเมือง Mac ชั้นหนึ่ง ด้วยการรองรับออกจากกล่อง, โหมดมืด, menubars และลากและวาง
พลังและความยืดหยุ่นของมันมาจากบรรทัดคำสั่ง Unix ที่พยายามและเชื่อถือได้ สิ่งที่คุณสามารถทำได้ในเทอร์มินัลที่คุณสามารถทำได้ในกระเป๋าเดินทาง แต่ด้วย UI และส่งออกคำสั่งเป็นไฟล์ .command เพื่อเช็คอินกับโครงการหรือแบ่งปันกับโลก
 OVERVIEW: A flexible command line tool for instantly deploying user interfaces
for simple commands and scripts.

USAGE: Suitcase <subcommand>

OPTIONS:
  --version               Show the version.
  -h, --help              Show help information.

SUBCOMMANDS:
  basic                   Launch a basic Suitcase process, that has a main menu
			  and an icon in the Dock when running.
  utility                 Launch a utility Suitcase process, without a Dock
			  icon or main menu.
basic กระบวนการกระเป๋าเดินทาง basic มีเมนูหลักและไอคอนในท่าเรือเมื่อทำงาน
ดูเอกสารฉบับเต็ม
กระบวนการ utility กระเป๋าเดินทางไม่มีไอคอน Dock หรือเมนูหลัก ประกอบด้วยเพียงแค่หน้าต่างหลัก
ดูเอกสารฉบับเต็ม
ตัวอย่างเหล่านี้เป็นพื้นฐานมาก แต่ควรให้ความคิดที่ดีเกี่ยวกับวิธีการใช้กระเป๋าเดินทาง ตัวอย่างรายละเอียดเพิ่มเติมสามารถดูได้ที่ตลาดสด หากคุณมีคำถามใด ๆ โปรดสร้างปัญหา หากคุณสร้างคำสั่งและคุณต้องการแบ่งปันให้เปิดประชาสัมพันธ์ที่ตลาดสด
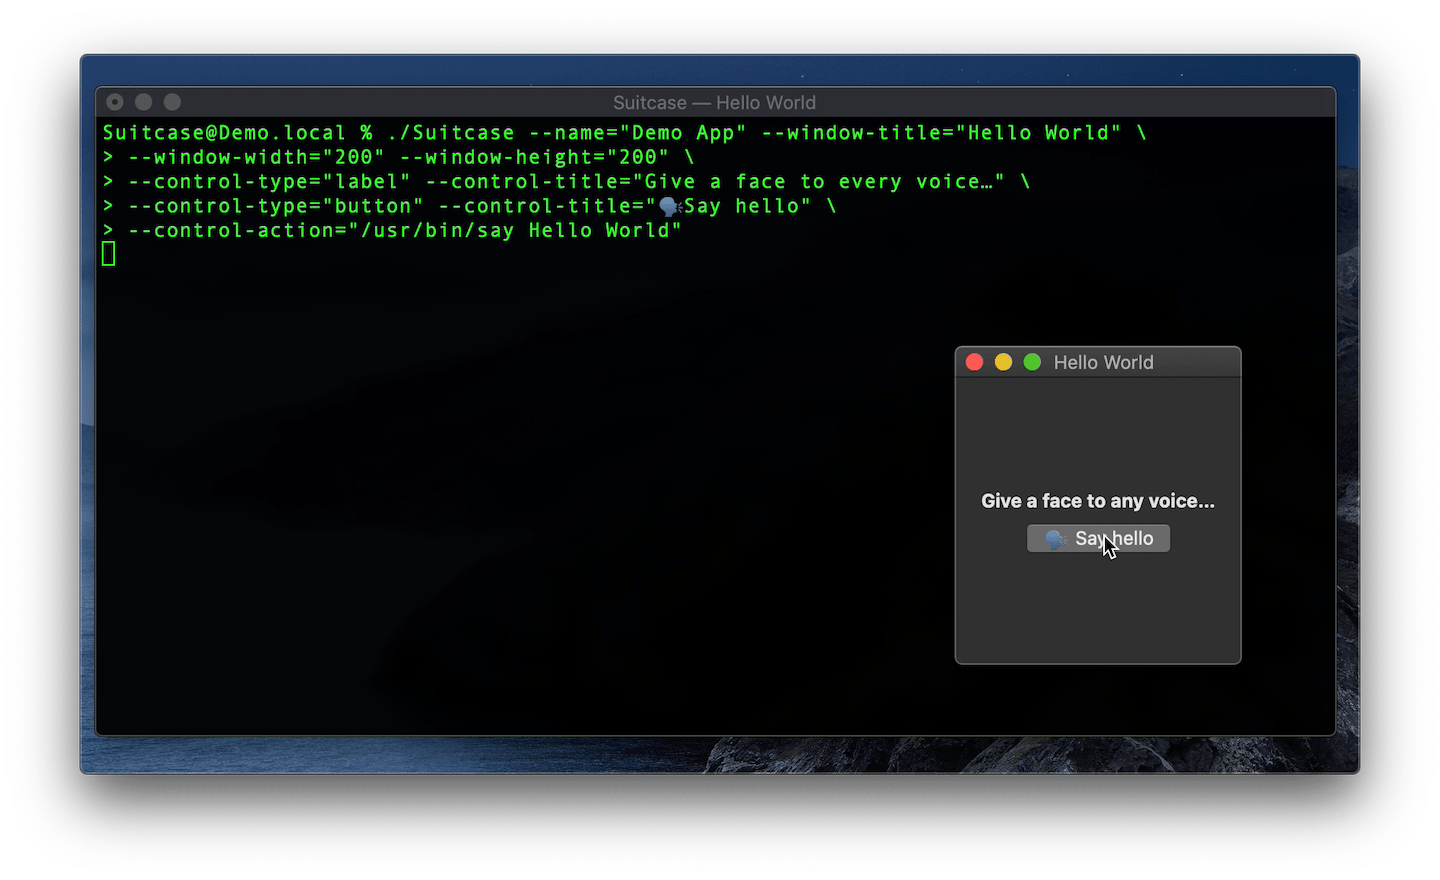
ตัวอย่างง่ายๆประกอบด้วยปุ่มเดียวที่เมื่อคลิกเรียกคำสั่ง say ดูวิดีโอของตัวอย่างนี้ในการดำเนินการมีตัวอย่าง say อย่างละเอียดที่ Suitcase Bazaar
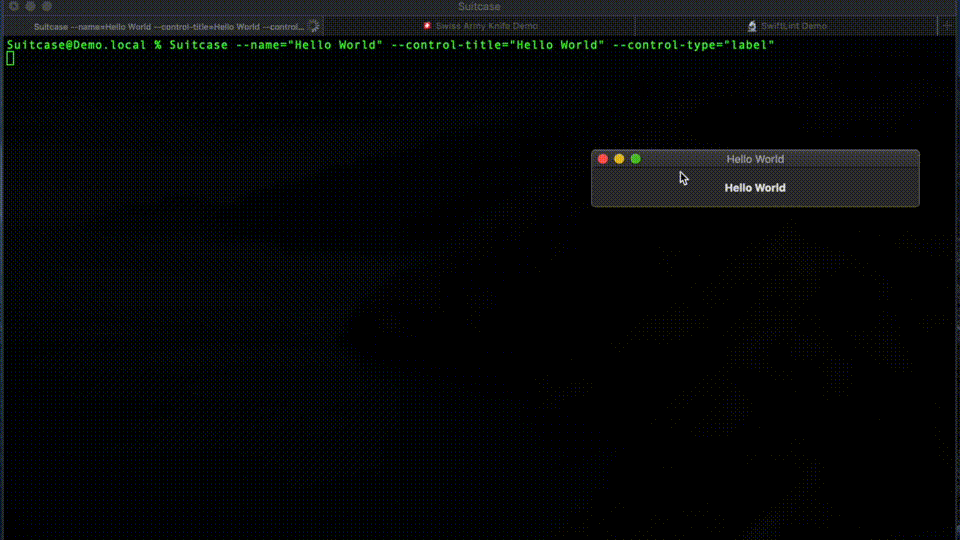
$ Suitcase --name= " Demo App " --window-title= " Hello World "
  --window-width= " 200 " --window-height= " 200 "
  --control-type= " label " --control-title= " Give a face to every voice… "
  --control-type= " button "
  --control-title= " ? Say hello "
--control-action= " /usr/bin/say Hello World " 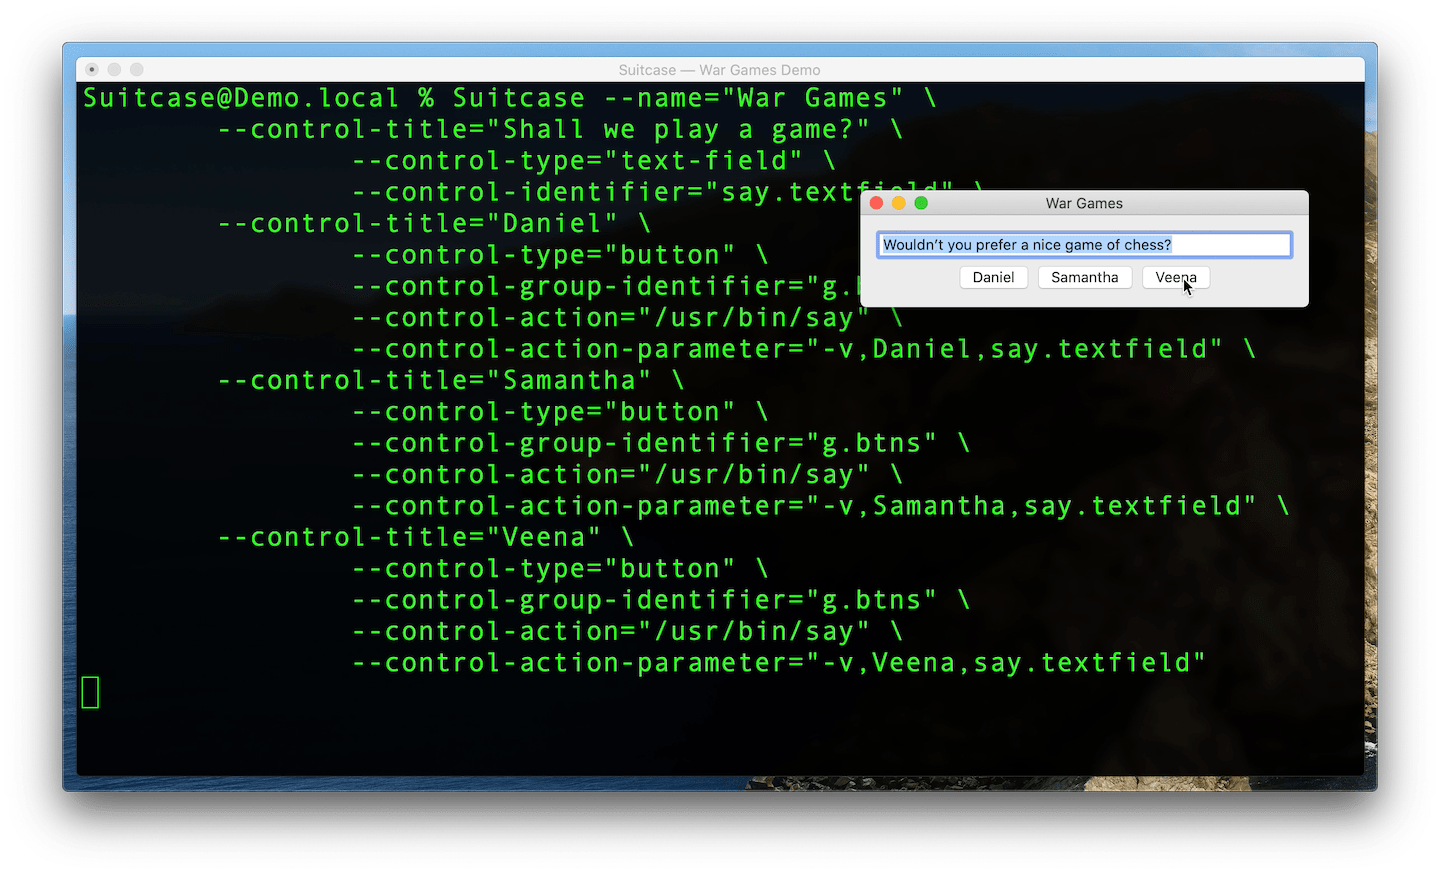
ตัวอย่างขั้นสูงมากขึ้นโดยใช้ปุ่มและพารามิเตอร์ผ่านไปยังคำสั่ง say คำอธิบายโดยละเอียดเกี่ยวกับเกมสงครามสามารถพบได้ที่กระเป๋าเดินทาง
$ Suitcase --name= " War Games "
 --control-title= " Shall we play a game? "
	--control-type= " text-field "
	--control-identifier= " say.textfield "
  --control-title= " Daniel "
	--control-type= " button "
	--control-group-identifier= " g.btns "
	--control-action= " /usr/bin/say "
	--control-action-parameter= " -v,Daniel,say.textfield "
  --control-title= " Samantha "
	--control-type= " button "
	--control-group-identifier= " g.btns "
	--control-action= " /usr/bin/say "
	--control-action-parameter= " -v,Samantha,say.textfield "
  --control-title= " Veena "
	--control-type= " button "
	--control-group-identifier= " g.btns "
	--control-action= " /usr/bin/say "
--control-action-parameter= " -v,Veena,say.textfield " 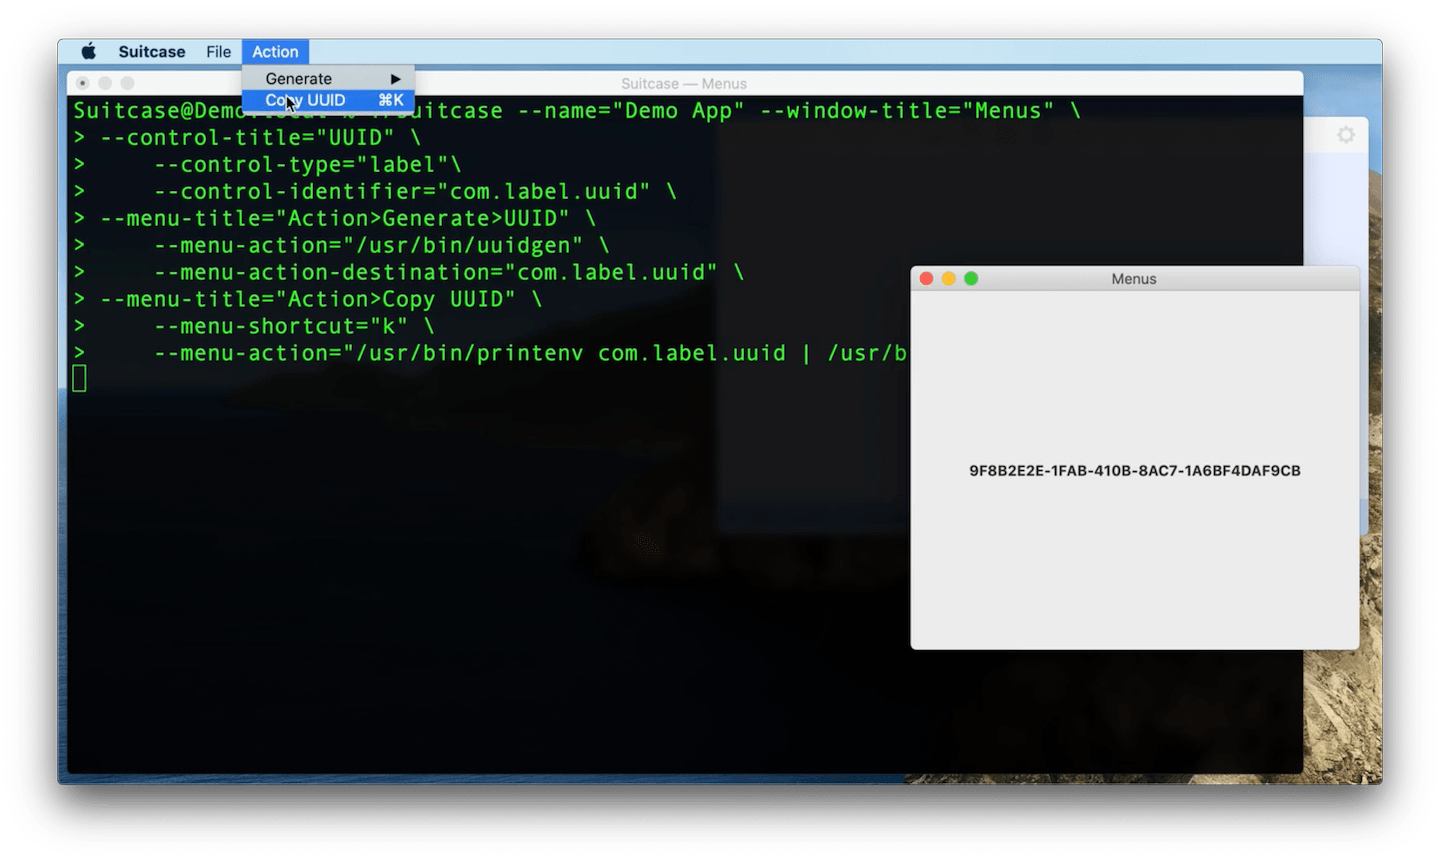
ตัวอย่างนี้แสดงวิธีสร้างเมนูและเมนูย่อย การกระทำสามารถแนบกับรายการเมนูใด ๆ ในลักษณะเดียวกับ button s ดูวิดีโอของตัวอย่างนี้ในการดำเนินการ
รายการเมนูยังสามารถกำหนดแป้นพิมพ์ลัด ดูเอกสารฉบับเต็มสำหรับรายละเอียดเพิ่มเติม
$ Suitcase --name= " Demo App " --window-title= " Menus "
  --control-title= " UUID "
	--control-type= " label " --control-identifier= " com.label.uuid "
  --menu-title= " Action>Generate>UUID "
	--menu-action= " /usr/bin/uuidgen "
	--menu-action-destination= " com.label.uuid "
  --menu-title= " Action>Copy UUID "
  --menu-shortcut= " k "
--menu-action= " /usr/bin/printenv com.label.uuid | /usr/bin/pbcopy " 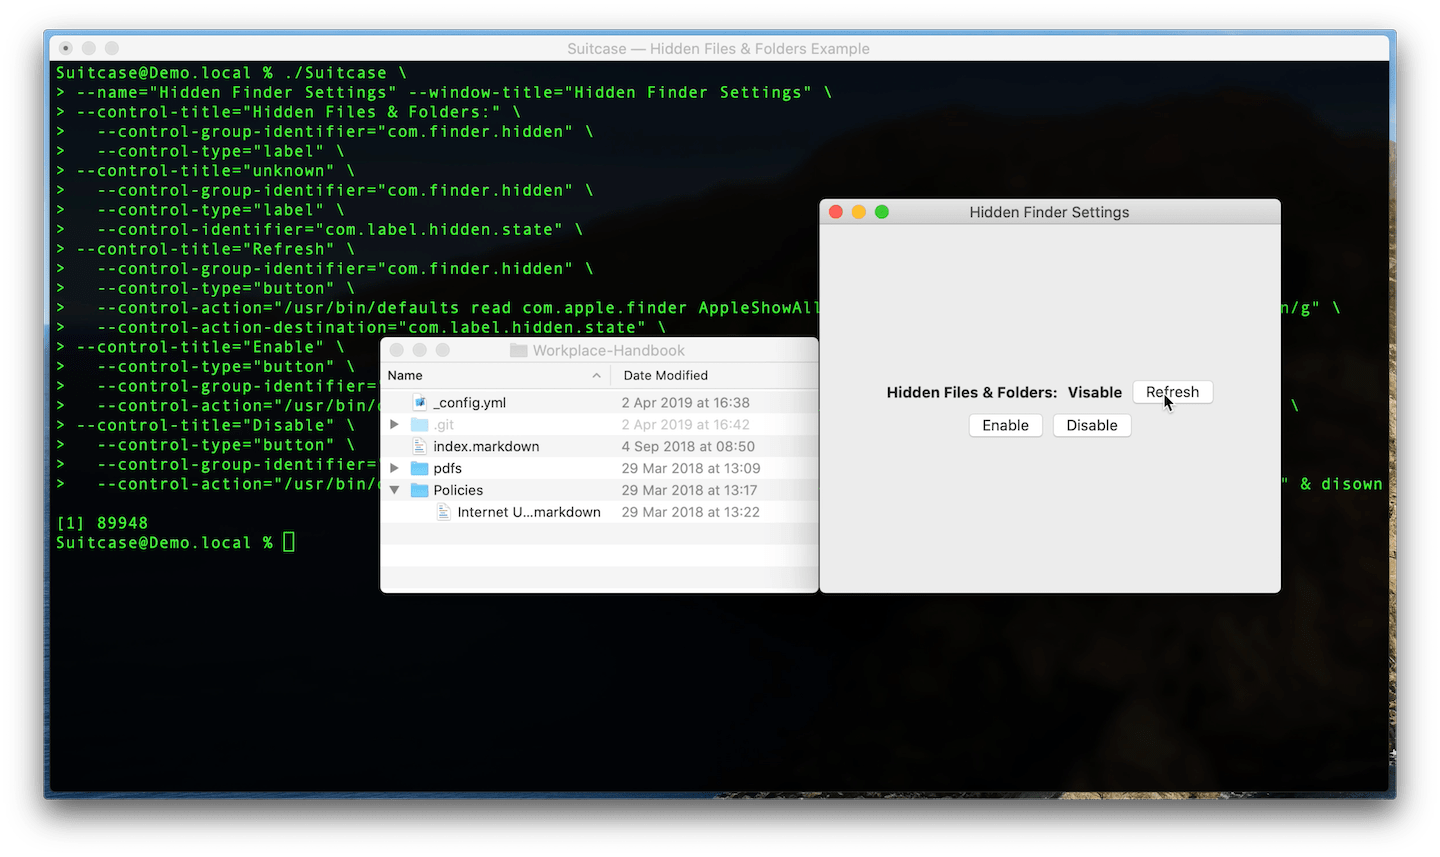
นี่เป็นตัวอย่างที่เกี่ยวข้องมากขึ้นที่ใช้ defaults ในการอ่านระบบค่าเริ่มต้นของผู้ใช้ MACOS และใช้ sed เพื่อตั้ง label สถานะ ดูวิดีโอของตัวอย่างนี้ในการดำเนินการ
$ Suitcase --name= " Hidden Finder Settings "
  --control-title= " Hidden Files & Folders: "
	--control-group-identifier= " com.finder.hidden "
	--control-type= " label "
  --control-title= " unknown "
	--control-group-identifier= " com.finder.hidden "
	--control-type= " label "
	--control-identifier= " com.label.hidden.state "
  --control-title= " Refresh "
	--control-group-identifier= " com.finder.hidden "
	--control-type= " button "
	--control-action= " /usr/bin/defaults read com.apple.finder AppleShowAllFiles | /usr/bin/sed s/1/Visible/g;s/0/Hidden/g "
	--control-action-destination= " com.label.hidden.state "
  --control-title= " Enable "
	--control-type= " button "
	--control-group-identifier= " com.finder.hidden.buttons "
	--control-action= " /usr/bin/defaults write com.apple.finder AppleShowAllFiles -bool TRUE & /usr/bin/killall Finder "
  --control-title= " Disable "
	--control-type= " button "
	--control-group-identifier= " com.finder.hidden.buttons "
	--control-action= " /usr/bin/defaults write com.apple.finder AppleShowAllFiles -bool FALSE & /usr/bin/killall Finder "
นี่คือวิธีที่คำสั่งจะทำงานในเทอร์มินัล
$ defaults read com.apple.finder AppleShowAllFiles | sed ' s/1/Visible/g;s/0/Hidden/g ' ปุ่มใช้ & เรียกใช้สองคำสั่งหนึ่งคำสั่งให้เขียนไปยังค่าเริ่มต้นของผู้ใช้และอีกที่สองในการเปิดตัว Finder:
$ defaults write com.apple.finder AppleShowAllFiles -bool TRUEฆ่าตัวค้นหาและเปิดใหม่:
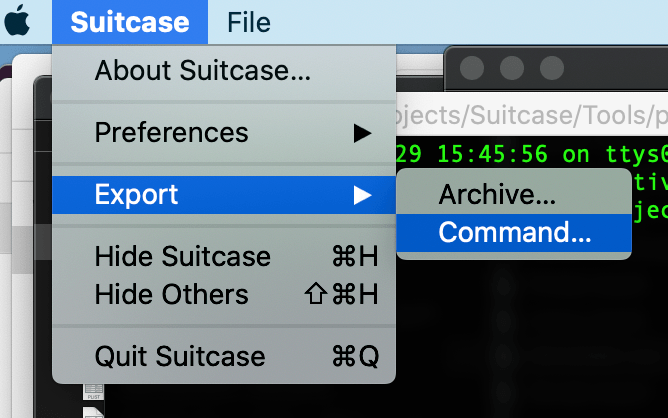
$ killall Finder.command คำสั่ง คำสั่งกระเป๋าเดินทางใด ๆ สามารถส่งออกเป็นไฟล์ .command ที่ทำงานด้วยตนเอง คุณสามารถดับเบิลคลิกไฟล์นี้เพื่อเรียกใช้กระเป๋าเดินทางหรือแชร์ไฟล์ (เป็นเพียงข้อความธรรมดา)
โปรดสร้างปัญหา
รีลีสและข่าว (@SuitCasecli) Richard Stelling (@RjStelling)


