Flutter AssetsAudioPlayer
1.0.0
เล่นเพลง / เสียงที่เก็บไว้ในไฟล์สินทรัพย์ (พร้อมกัน) โดยตรงจาก Flutter (Android / iOS / Web / MacOS)
นอกจากนี้คุณยังสามารถใช้ไฟล์ Audio Play จาก เครือข่าย โดยใช้ URL, Radios/LiveStream และ ไฟล์ท้องถิ่น ของพวกเขา
การแจ้งเตือนสามารถแสดงบน Android & iOS และการดำเนินการบลูทู ธ ได้รับการจัดการ
 flutter :
  assets :
    - assets/audios/
AssetsAudioPlayer . newPlayer (). open (
Audio ( "assets/audios/song1.mp3" ),
autoStart : true ,
showNotification : true ,
);
 dependencies :
  assets_audio_player : ^3.0.8
ทำงานร่วมกับ flutter: ">=3.3.0" อย่าลืมอัพเกรด SDK ของคุณ
คุณชอบแพ็คเกจ? ซื้อ kofi ให้ฉัน :)
| แหล่งกำเนิดเสียง | Android | iOS | เว็บ | แม็กอส |
|---|---|---|---|---|
| ไฟล์สินทรัพย์ (เส้นทางสินทรัพย์)? | ||||
| ไฟล์เครือข่าย (URL) | ||||
| - ไฟล์ท้องถิ่น (พา ธ ) | ||||
| - เครือข่าย Livestream / Radio (URL) ( ค่าเริ่มต้น, HLS, Dash, SmoothStream ) |
| คุณสมบัติ | Android | iOS | เว็บ | แม็กอส |
|---|---|---|---|---|
| - ผู้เล่นหลายคน | ||||
| - เปิดเพลย์ลิสต์ | ||||
| การแจ้งเตือนระบบ | ||||
| การกระทำของบลูทู ธ | ||||
| - เคารพโหมดระบบเงียบ | ||||
| - หยุดโทรศัพท์ชั่วคราว |
| คำสั่ง | Android | iOS | เว็บ | แม็กอส |
|---|---|---|---|---|
| ▶เล่น | ||||
| ⏸หยุดชั่วคราว | ||||
| ⏹หยุด | ||||
| ⏩ค้นหา (ตำแหน่ง) | ||||
| ⏪⏩ Seekby (ตำแหน่ง) | ||||
| ⏩ไปข้างหน้า (ความเร็ว) | ||||
| ⏪ย้อนกลับ (ความเร็ว) | ||||
| ⏭ถัดไป | ||||
| ⏮ prev |
| วิดเจ็ต | Android | iOS | เว็บ | แม็กอส |
|---|---|---|---|---|
| - วิดเจ็ตเสียง | ||||
| - ผู้สร้างวิดเจ็ต | ||||
| - ส่วนขยายผู้สร้างเครื่องเสียง |
| คุณสมบัติ | Android | iOS | เว็บ | แม็กอส |
|---|---|---|---|---|
| - วง | ||||
| - การสับเปลี่ยน | ||||
| - รับ/ตั้งค่าระดับเสียง | ||||
| ⏩รับ/ตั้งค่าความเร็วในการเล่น | ||||
| ⏩ get/set pitch |
| ผู้ฟัง | Android | iOS | เว็บ | แม็กอส |
|---|---|---|---|---|
| - Listener OnReady (เสร็จสมบูรณ์) | ||||
| - ผู้ฟังปัจจุบัน | ||||
| - ผู้ฟังเสร็จสิ้น | ||||
| - ผู้ฟังบัฟเฟอร์ | ||||
| - ปริมาณผู้ฟัง | ||||
| ? ผู้ฟังความเร็วเล่น | ||||
| ? ผู้ฟังพิทช์ |
ไม่จำเป็นต้องคัดลอกเพลงไปยังแคชสื่อด้วย essets_audio_player คุณสามารถเปิดได้โดยตรงจากสินทรัพย์
 flutter :
  assets :
- assets/audios/ final assetsAudioPlayer = AssetsAudioPlayer ();
assetsAudioPlayer. open (
Audio ( "assets/audios/song1.mp3" ),
);คุณยังสามารถเล่น เพลงเครือข่าย ได้จาก URL
 final assetsAudioPlayer = AssetsAudioPlayer ();

try {
    await assetsAudioPlayer. open (
        Audio . network ( "http://www.mysite.com/myMp3file.mp3" ),
    );
} catch (t) {
    //mp3 unreachable
}
สดชื่น / วิทยุ จาก URL
ความแตกต่างที่สำคัญกับเครือข่ายถ้าคุณหยุดชั่วคราว/เล่นบน Livestream มันจะกลับมาเป็นระยะเวลาแสดง
 final assetsAudioPlayer = AssetsAudioPlayer ();

try {
    await assetsAudioPlayer. open (
        Audio . liveStream ( MY_LIVESTREAM_URL ),
    );
} catch (t) {
    //stream unreachable
}
และเล่น เพลงจากไฟล์
 //create a new player
final assetsAudioPlayer = AssetsAudioPlayer ();

assetsAudioPlayer. open (
    Audio . file ( FILE_URI ),
);
สำหรับไฟล์ URI โปรดดูที่ https://pub.dev/packages/path_provider
assetsAudioPlayer. playOrPause ();
assetsAudioPlayer. play ();
assetsAudioPlayer. pause ();
assetsAudioPlayer. seek ( Duration to);
assetsAudioPlayer. seekBy ( Duration by);assetsAudioPlayer. forwardRewind ( double speed);
//if positive, forward, if negative, rewind assetsAudioPlayer. stop ();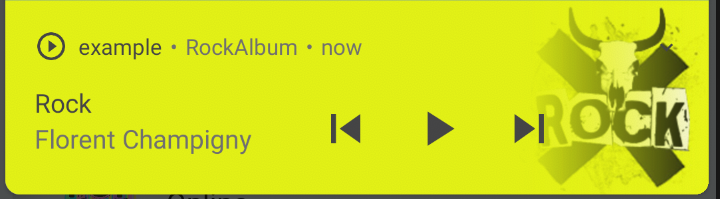
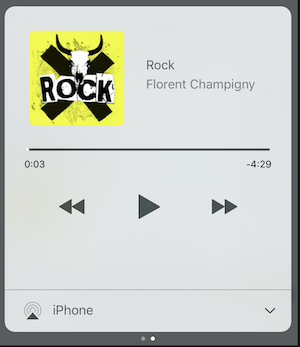
บน iOS มันจะใช้ MPNowPlayingInfoCenter
 final audio = Audio . network ( "/assets/audio/country.mp3" ,
    metas : Metas (
            title :  "Country" ,
            artist : "Florent Champigny" ,
            album : "CountryAlbum" ,
            image : MetasImage . asset ( "assets/images/country.jpg" ), //can be MetasImage.network
          ),
);showNotification: true _player. open (audio, showNotification : true )ไอคอนที่กำหนดเอง (Android เท่านั้น)
ตรวจสอบให้แน่ใจว่าคุณเพิ่มไอคอนเหล่านั้นภายใน android/res/drawable !!! ไม่ได้อยู่ในทรัพย์สิน Flutter !!!!
 await _assetsAudioPlayer. open (
        myAudio,
        showNotification : true ,
        notificationSettings : NotificationSettings (
            customStopIcon : AndroidResDrawable (name : "ic_stop_custom" ),
            customPauseIcon : AndroidResDrawable (name : "ic_pause_custom" ),
            customPlayIcon : AndroidResDrawable (name : "ic_play_custom" ),
            customPrevIcon : AndroidResDrawable (name : "ic_prev_custom" ),
            customNextIcon : AndroidResDrawable (name : "ic_next_custom" ),
        )
และอย่าลืมบอก Proguard เพื่อรักษาทรัพยากรเหล่านั้นไว้สำหรับโหมดการเปิดตัว
(ทรัพยากรการรักษาส่วน)
https://sites.google.com/a/android.com/tools/tech-docs/new-build-system/resource-shrinking
<? xml version = " 1.0 " encoding = " utf-8 " ?>
< resources xmlns : tools = " http://schemas.android.com/tools "
tools:keep= " @drawable/ic_next_custom, @drawable/ic_prev_custom, @drawable/ic_pause_custom, @drawable/ic_play_custom, @drawable/ic_stop_custom " /> เพิ่มไอคอนของคุณลงในโฟลเดอร์ res ของ Android (Android/App/Src/Main/Res)
อ้างอิงไอคอนนี้ลงใน AndroidManifest ของคุณ (Android/App/Src/Main/AndroidManifest.xml)
< meta-data
     android : name = " assets.audio.player.notification.icon "
     android : resource = " @drawable/ic_music_custom " />
นอกจากนี้คุณยังสามารถเปลี่ยนไอคอนการกระทำ
 <meta-data
    android:name="assets.audio.player.notification.icon.play"
    android:resource="@drawable/ic_play_custom"/>
<meta-data
    android:name="assets.audio.player.notification.icon.pause"
    android:resource="@drawable/ic_pause_custom"/>
<meta-data
    android:name="assets.audio.player.notification.icon.stop"
    android:resource="@drawable/ic_stop_custom"/>
<meta-data
    android:name="assets.audio.player.notification.icon.next"
    android:resource="@drawable/ic_next_custom"/>
<meta-data
    android:name="assets.audio.player.notification.icon.prev"
    android:resource="@drawable/ic_prev_custom"/>
เพิ่มในหลัก
 AssetsAudioPlayer . setupNotificationsOpenAction ((notification) {
    //custom action
    return true ; //true : handled, does not notify others listeners
                 //false : enable others listeners to handle it
});
ถ้าคุณต้องการการกระทำที่กำหนดเองบนวิดเจ็ต
 AssetsAudioPlayer . addNotificationOpenAction ((notification) {
   //custom action
   return false ; //true : handled, does not notify others listeners
                 //false : enable others listeners to handle it
});คุณสามารถเปิด/ปิดใช้งานการดำเนินการแจ้งเตือน
 open ( AUDIO ,
   showNotification : true ,
   notificationSettings : NotificationSettings (
       prevEnabled : false , //disable the previous button

       //and have a custom next action (will disable the default action)
       customNextAction : (player) {
         print ( "next" );
       }
   )

)หลังจากการสร้างเสียงของคุณเพียงแค่โทร
audio. updateMetas (
       player : _assetsAudioPlayer, //add the player if the audio is actually played
       title : "My new title" ,
       artist : "My new artist" ,
       //if I not provide a new album, it keep the old one
       image : MetasImage . network (
         //my new image url
       ),
);คุณต้องเปิดใช้งานการแจ้งเตือนเพื่อให้พวกเขาทำงานได้
คำสั่งระยะไกลที่มีอยู่:
(สำหรับ Android เท่านั้นตอนนี้)
ในขณะที่เปิดเพลง/เพลย์ลิสต์เพิ่มกลยุทธ์
assetsAudioPlayer. open (
   ...
  headPhoneStrategy : HeadPhoneStrategy .pauseOnUnplug,
  //headPhoneStrategy: HeadPhoneStrategy.none, //default
  //headPhoneStrategy: HeadPhoneStrategy.pauseOnUnplugPlayOnPlug,
)
หากคุณต้องการทำให้มันทำงานบนบลูทู ธ ด้วยคุณจะต้องเพิ่มใบอนุญาตบลูทู ธ ภายใน AndroidManifest.xml ของคุณ
< uses-permission android : name = " android.permission.BLUETOOTH " />คุณสามารถสร้าง essetsaudioplayer ใหม่โดยใช้ assetsaudioplayer.newplayer () ซึ่งจะเล่นเพลงในเครื่องเล่นสื่อพื้นเมืองที่แตกต่างกัน
สิ่งนี้จะช่วยให้เล่นสองเพลงพร้อมกัน
คุณสามารถมีผู้เล่นได้มากเท่าที่คุณต้องการ!
 ///play 3 songs in parallel
AssetsAudioPlayer . newPlayer (). open (
    Audio ( "assets/audios/song1.mp3" )
);
AssetsAudioPlayer . newPlayer (). open (
    Audio ( "assets/audios/song2.mp3" )
);

//another way, with create, open, play & dispose the player on finish
AssetsAudioPlayer . playAndForget (
    Audio ( "assets/audios/song3.mp3" )
);
ผู้เล่นแต่ละคนมี id ที่สร้างขึ้นที่ไม่ซ้ำกันคุณสามารถเรียกคืนหรือสร้างด้วยตนเองโดยใช้
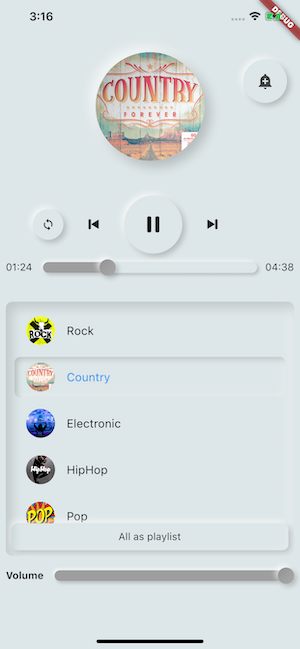
final player = AssetsAudioPlayer . withId (id : "MY_UNIQUE_ID" );assetsAudioPlayer. open (
Playlist (
audios : [
Audio ( "assets/audios/song1.mp3" ),
Audio ( "assets/audios/song2.mp3" )
]
),
loopMode : LoopMode .playlist //loop the full playlist
);
assetsAudioPlayer. next ();
assetsAudioPlayer. prev ();
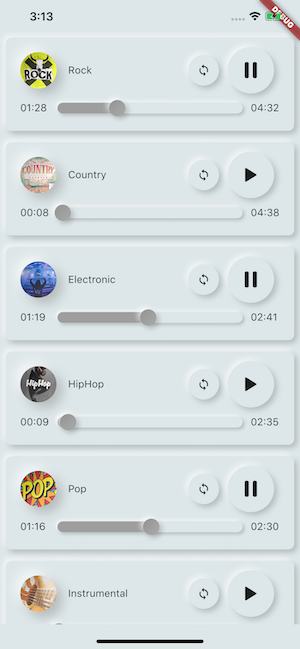
assetsAudioPlayer. playlistPlayAtIndex ( 1 ); หากคุณต้องการวิธีการเล่นเสียงให้มากขึ้นลอง AudioWidget !
 //inside a stateful widget

bool _play = false ;

@override
Widget build ( BuildContext context) {
  return AudioWidget . assets (
     path : "assets/audios/country.mp3" ,
     play : _play,
     child : RaisedButton (
           child : Text (
               _play ? "pause" : "play" ,
           ),
           onPressed : () {
               setState (() {
                 _play = ! _play;
               });
           }
      ),
      onReadyToPlay : (duration) {
          //onReadyToPlay
      },
      onPositionChanged : (current, duration) {
          //onPositionChanged
      },
  );
}
วิธี ? หยุด ? Audiowidget?
เพียงแค่ลบเสียงออกจากต้นไม้! หรือเพียงแค่ play: false
ผู้ฟังทุกคนเปิดเผยสตรีมโดยใช้ RXDART, AssetAdiPlayer ทำให้ผู้ฟังบางคนเป็น ValueObServable (สังเกตได้ซึ่งให้การเข้าถึงแบบซิงโครนัสไปยังรายการที่ปล่อยออกมาล่าสุด);
 //The current playing audio, filled with the total song duration
assetsAudioPlayer.current //ValueObservable<PlayingAudio>

//Retrieve directly the current played asset
final PlayingAudio playing = assetsAudioPlayer.current.value;

//Listen to the current playing song
assetsAudioPlayer.current. listen ((playingAudio){
    final asset = playingAudio.assetAudio;
    final songDuration = playingAudio.duration;
}) //Listen to the current playing song
final duration = assetsAudioPlayer.current.value.duration;assetsAudioPlayer.currentPosition //ValueObservable<Duration>
//retrieve directly the current song position
final Duration position = assetsAudioPlayer.currentPosition.value;
return StreamBuilder (
stream : assetsAudioPlayer.currentPosition,
builder : (context, asyncSnapshot) {
final Duration duration = asyncSnapshot.data;
return Text (duration. toString ());
}),หรือใช้เครื่องเล่นผู้เล่น!
 PlayerBuilder . currentPosition (
     player : _assetsAudioPlayer,
     builder : (context, duration) {
       return Text (duration. toString ());
     }
)
หรือส่วนขยายตัวสร้างผู้เล่น
_assetsAudioPlayer. builderCurrentPosition (
     builder : (context, duration) {
       return Text (duration. toString ());
     }
)บูลีนที่สังเกตได้ซึ่งเป็นตัวแทนของสถานะการเล่น mediaplayer ปัจจุบัน
assetsAudioPlayer.isPlaying // ValueObservable<bool>

//retrieve directly the current player state
final bool playing = assetsAudioPlayer.isPlaying.value;

//will follow the AssetsAudioPlayer playing state
return StreamBuilder (
    stream : assetsAudioPlayer.isPlaying,
    builder : (context, asyncSnapshot) {
        final bool isPlaying = asyncSnapshot.data;
        return Text (isPlaying ? "Pause" : "Play" );
    }),
หรือใช้เครื่องเล่นผู้เล่น!
 PlayerBuilder . isPlaying (
     player : _assetsAudioPlayer,
     builder : (context, isPlaying) {
       return Text (isPlaying ? "Pause" : "Play" );
     }
)
หรือส่วนขยายตัวสร้างผู้เล่น
_assetsAudioPlayer. builderIsPlaying (
     builder : (context, isPlaying) {
       return Text (isPlaying ? "Pause" : "Play" );
     }
)เปลี่ยนระดับเสียง (ระหว่าง 0.0 & 1.0)
assetsAudioPlayer. setVolume ( 0.5 ); เครื่องเล่นสื่อสามารถติดตามระบบ "โหมดระดับเสียง" (vibrate, ปิดเสียง, ปกติ) เพียงแค่ตั้งค่าพารามิเตอร์ตัวเลือกของ respectSilentMode เป็น true
_player. open ( PLAYABLE , respectSilentMode : true );https://developer.android.com/reference/android/media/audiomanager.html?hl=fr#getringermode ()
https://developer.apple.com/documentation/avfoundation/avaudiosessioncategorysoloambient
ฟังเล่ม
 return StreamBuilder (
    stream : assetsAudioPlayer.volume,
    builder : (context, asyncSnapshot) {
        final double volume = asyncSnapshot.data;
        return Text ( "volume : $ volume " );
    }),
หรือใช้เครื่องเล่นผู้เล่น!
 PlayerBuilder . volume (
     player : _assetsAudioPlayer,
     builder : (context, volume) {
       return Text ( "volume : $ volume " );
     }
)เรียกว่าเมื่อเพลงปัจจุบันเล่นเสร็จแล้ว
มันให้เสียงการเล่นที่เพิ่งเสร็จสิ้น
assetsAudioPlayer.playlistAudioFinished //ValueObservable<Playing>

assetsAudioPlayer.playlistAudioFinished. listen (( Playing playing){

})
เรียกว่าเมื่อเพลย์ลิสต์ที่สมบูรณ์ได้เล่นเสร็จแล้ว
assetsAudioPlayer.playlistFinished //ValueObservable<bool>

assetsAudioPlayer.playlistFinished. listen ((finished){

}) final LoopMode loopMode = assetsAudioPlayer.loop;
// possible values
// LoopMode.none : not looping
// LoopMode.single : looping a single audio
// LoopMode.playlist : looping the fyll playlist
assetsAudioPlayer. setLoopMode ( LoopMode .single);
assetsAudioPlayer.loopMode. listen ((loopMode){
//listen to loop
})
assetsAudioPlayer. toggleLoop (); //toggle the value of loopingassetsAudioPlayer. setPlaySpeed ( 1.5 );
assetsAudioPlayer.playSpeed. listen ((playSpeed){
//listen to playSpeed
})
//change play speed for a particular Audio
Audio audio = Audio . network (
url,
playSpeed : 1.5
);
assetsAudioPlayer. open (audio);assetsAudioPlayer. setPitch ( 1.2 );
assetsAudioPlayer.pitch. listen ((pitch){
//listen to pitch
})
//change pitch for a particular Audio
Audio audio = Audio . network (
url,
pitch : 1.2
);
assetsAudioPlayer. open (audio);โดยค่าเริ่มต้นเมื่อเล่นข้อผิดพลาดมันจะหยุดเสียง
แต่คุณสามารถเพิ่มพฤติกรรมที่กำหนดเองได้
_player.onErrorDo = (handler){
  handler.player. stop ();
};
เปิดเสียงอื่น
_player.onErrorDo = (handler){
  handler.player. open ( ANOTHER_AUDIO );
};
พยายามเปิดอีกครั้งในตำแหน่งเดียวกัน
_player.onErrorDo = (handler){
  handler.player. open (
      handler.playlist. copyWith (
        startIndex : handler.playlistIndex
      ),
      seek : handler.currentPosition
  );
}; Android อนุญาตให้โทร https เท่านั้นคุณจะมีข้อผิดพลาดหากคุณใช้ http อย่าลืมเพิ่มการอนุญาตอินเทอร์เน็ตและ seet usescleartexttraffic usesCleartextTraffic="true"
 <?xml version="1.0" encoding="utf-8"?>
<manifest ...>
    <uses-permission android:name="android.permission.INTERNET" />
    <application
        ...
        android:usesCleartextTraffic="true"
        ...>
        ...
    </application>
</manifest>
iOS อนุญาตให้โทร https เท่านั้นคุณจะมีข้อผิดพลาดหากคุณใช้ http อย่าลืมแก้ไข info.plist ของคุณและตั้งค่า NSAppTransportSecurity เป็น NSAllowsArbitraryLoads
 <key>NSAppTransportSecurity</key>
<dict>
    <key>NSAllowsArbitraryLoads</key>
    <true/>
</dict>
ในการเปิดใช้งานการโทร HTTP บน MacOS คุณต้องเพิ่มความสามารถในการโทรเข้า/เอาต์พุตลงใน info.plist
 <key>NSAppTransportSecurity</key>
<dict>
    <key>NSAllowsArbitraryLoads</key>
    <true/>
</dict>
<key>UIBackgroundModes</key>
<array>
    <string>audio</string>
    <string>fetch</string>
</array>
<key>com.apple.security.network.client</key>
<true/>
และในไฟล์
Runner/DebugProfile.entitlements
เพิ่ม
 <key>com.apple.security.network.client</key>
<true/>
เสร็จสิ้น Runner/DebugProfile.entitlements
 <?xml version="1.0" encoding="UTF-8"?>
<!DOCTYPE plist PUBLIC "-//Apple//DTD PLIST 1.0//EN" "http://www.apple.com/DTDs/PropertyList-1.0.dtd">
<plist version="1.0">
<dict>
	<key>com.apple.security.app-sandbox</key>
	<true/>
	<key>com.apple.security.cs.allow-jit</key>
	<true/>
	<key>com.apple.security.network.server</key>
	<true/>
	<key>com.apple.security.network.client</key>
	<true/>
</dict>
</plist>
เพลงทั้งหมดที่ใช้ในตัวอย่างมาจาก https://www.freemusicarchive.org/


