yolact
1.0.0
    ██╗   ██╗ ██████╗ ██╗      █████╗  ██████╗████████╗
    ╚██╗ ██╔╝██╔═══██╗██║     ██╔══██╗██╔════╝╚══██╔══╝
     ╚████╔╝ ██║   ██║██║     ███████║██║        ██║
      ╚██╔╝  ██║   ██║██║     ██╔══██║██║        ██║
       ██║   ╚██████╔╝███████╗██║  ██║╚██████╗   ██║
       ╚═╝    ╚═════╝ ╚══════╝╚═╝  ╚═╝ ╚═════╝   ╚═╝
實時實例分割的簡單,完全卷積的模型。這是我們論文的代碼:
Yolact ++的Resnet50型號在Titan XP上以33.5 fps的速度運行,並在可可的test-dev上獲得34.1地圖(在此處查看我們的期刊論文)。
為了使用yolact ++,請確保編譯DCNV2代碼。 (請參閱安裝)
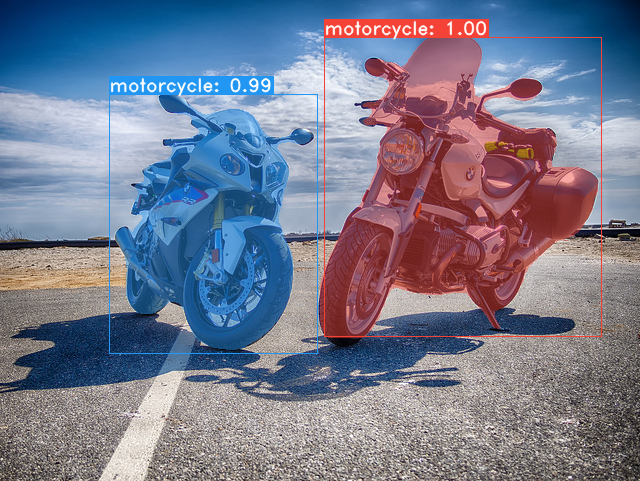
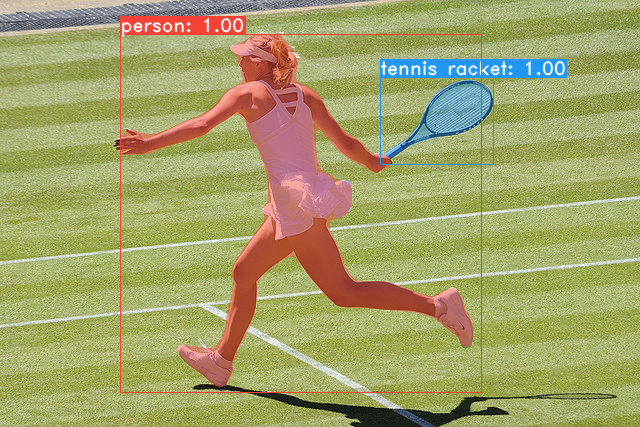
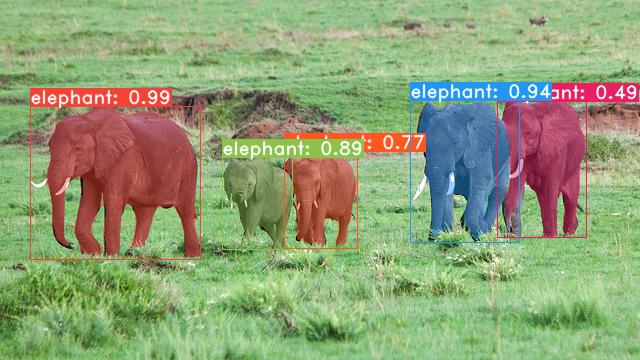
我們的Yolact基本模型中的一些示例(泰坦XP上的33.5 fps和可可的test-dev上的29.8 MAP):
git clone https://github.com/dbolya/yolact.git
cd yolactconda env create -f environment.yml # Cython needs to be installed before pycocotools
pip install cython
pip install opencv-python pillow pycocotools matplotlib ./data/coco中。 sh data/scripts/COCO.shtest-dev上的yoLact,請使用此腳本下載test-dev 。 sh data/scripts/COCO_test.sh cd external/DCNv2
python setup.py build develop這是我們的Yolact模型(2019年4月5日發布)以及他們在Titan XP上的FPS,並在test-dev上地圖:
| 圖像大小 | 骨幹 | FPS | 地圖 | 權重 | |
|---|---|---|---|---|---|
| 550 | Resnet50-FPN | 42.5 | 28.2 | yolact_resnet50_54_800000.pth | 鏡子 |
| 550 | darknet53-fpn | 40.0 | 28.7 | yolact_darknet53_54_800000.pth | 鏡子 |
| 550 | resnet101-fpn | 33.5 | 29.8 | yolact_base_54_800000.pth | 鏡子 |
| 700 | resnet101-fpn | 23.6 | 31.2 | yolact_im700_54_800000.pth | 鏡子 |
Yolact ++模型(2019年12月16日發布):
| 圖像大小 | 骨幹 | FPS | 地圖 | 權重 | |
|---|---|---|---|---|---|
| 550 | Resnet50-FPN | 33.5 | 34.1 | yolact_plus_resnet50_54_800000.pth | 鏡子 |
| 550 | resnet101-fpn | 27.3 | 34.6 | yolact_plus_base_54_800000.pth | 鏡子 |
要評估模型,請將相應的權重文件放入./weights目錄中,然後運行以下命令之一。每個配置的名稱是文件名中的數字之前的所有內容(例如, yolact_base_54_800000.pth的yolact_base )。
 # Quantitatively evaluate a trained model on the entire validation set. Make sure you have COCO downloaded as above.
# This should get 29.92 validation mask mAP last time I checked.
python eval.py --trained_model=weights/yolact_base_54_800000.pth

# Output a COCOEval json to submit to the website or to use the run_coco_eval.py script.
# This command will create './results/bbox_detections.json' and './results/mask_detections.json' for detection and instance segmentation respectively.
python eval.py --trained_model=weights/yolact_base_54_800000.pth --output_coco_json

# You can run COCOEval on the files created in the previous command. The performance should match my implementation in eval.py.
python run_coco_eval.py

# To output a coco json file for test-dev, make sure you have test-dev downloaded from above and go
python eval.py --trained_model=weights/yolact_base_54_800000.pth --output_coco_json --dataset=coco2017_testdev_dataset # Display qualitative results on COCO. From here on I'll use a confidence threshold of 0.15.
python eval.py --trained_model=weights/yolact_base_54_800000.pth --score_threshold=0.15 --top_k=15 --display # Run just the raw model on the first 1k images of the validation set
python eval.py --trained_model=weights/yolact_base_54_800000.pth --benchmark --max_images=1000 # Display qualitative results on the specified image.
python eval.py --trained_model=weights/yolact_base_54_800000.pth --score_threshold=0.15 --top_k=15 --image=my_image.png
# Process an image and save it to another file.
python eval.py --trained_model=weights/yolact_base_54_800000.pth --score_threshold=0.15 --top_k=15 --image=input_image.png:output_image.png
# Process a whole folder of images.
python eval.py --trained_model=weights/yolact_base_54_800000.pth --score_threshold=0.15 --top_k=15 --images=path/to/input/folder:path/to/output/folder # Display a video in real-time. "--video_multiframe" will process that many frames at once for improved performance.
# If you want, use "--display_fps" to draw the FPS directly on the frame.
python eval.py --trained_model=weights/yolact_base_54_800000.pth --score_threshold=0.15 --top_k=15 --video_multiframe=4 --video=my_video.mp4
# Display a webcam feed in real-time. If you have multiple webcams pass the index of the webcam you want instead of 0.
python eval.py --trained_model=weights/yolact_base_54_800000.pth --score_threshold=0.15 --top_k=15 --video_multiframe=4 --video=0
# Process a video and save it to another file. This uses the same pipeline as the ones above now, so it's fast!
python eval.py --trained_model=weights/yolact_base_54_800000.pth --score_threshold=0.15 --top_k=15 --video_multiframe=4 --video=input_video.mp4:output_video.mp4如您所知, eval.py可以做很多事情。運行--help命令以查看它可以做的一切。
python eval.py --help默認情況下,我們對可可進行培訓。確保使用上面的命令下載整個數據集。
./weights 。resnet101_reducedfc.pth 。resnet50-19c8e357.pth 。darknet53.pth 。*_interrupt.pth文件。./weights目錄中,並使用文件名<config>_<epoch>_<iter>.pth保存。 # Trains using the base config with a batch size of 8 (the default).
python train.py --config=yolact_base_config
# Trains yolact_base_config with a batch_size of 5. For the 550px models, 1 batch takes up around 1.5 gigs of VRAM, so specify accordingly.
python train.py --config=yolact_base_config --batch_size=5
# Resume training yolact_base with a specific weight file and start from the iteration specified in the weight file's name.
python train.py --config=yolact_base_config --resume=weights/yolact_base_10_32100.pth --start_iter=-1
# Use the help option to see a description of all available command line arguments
python train.py --helpYolact現在在培訓期間無縫支持多個GPU:
export CUDA_VISIBLE_DEVICES=[gpus]nvidia-smi檢查GPU的索引。8*num_gpus並在上面的訓練命令中將批量大小設置為8*num_gpus。培訓腳本將自動將超參數縮放到正確的值。--batch_alloc=[alloc] ,其中[Alloc]是一個逗號sepred列表,其中包含每個GPU上的圖像數。這必須總結到batch_size 。 YOLACT現在默認情況下記錄培訓和驗證信息。您可以使用--no_log禁用此功能。有關如何可視化這些日誌的指南即將到來,但是現在您可以在utils/logger.py中查看LogVizualizer尋求幫助。
我們還包括用於培訓Pascal SBD註釋的配置(用於快速實驗或與其他方法進行比較)。要在Pascal SBD上培訓,請繼續採取以下步驟:
benchmark.tgz )。dataset/img文件夾。創建Directory ./data/sbd (其中.是Yolact的根),然後將dataset/img複製為./data/sbd/img 。./data/sbd/中。--config=yolact_resnet50_pascal_config訓練。檢查該配置以查看如何將其擴展到其他型號。我將盡快用腳本自動化這一切,不用擔心。另外,如果您想要我用來轉換註釋的腳本,我將其放入./scripts/convert_sbd.py中,但是您必須檢查它如何工作才能使用它,因為我實際上還不記得這一點。
如果您想驗證我們的結果,可以從這裡下載我們的yolact_resnet50_pascal_config權重。該型號應獲得72.3 Mask AP_50和56.2 Mask AP_70。請注意,“ ALL” AP與Pascal的其他論文中報告的“ Vol” AP並不相同(它們以0.1的增量為0.1 - 0.9使用閾值的平均值,而不是可可使用的閾值)。
您也可以通過以下步驟在自己的數據集上訓練:
infoliscenseimage中: license, flickr_url, coco_url, date_capturedcategories (我們將自己的格式用於類別,請參見下文)data/config.py中的dataset_base下為數據集創建一個定義(有關每個字段的說明,請參見dataset_base中的註釋): my_custom_dataset = dataset_base . copy ({
'name' : 'My Dataset' ,
'train_images' : 'path_to_training_images' ,
'train_info' : 'path_to_training_annotation' ,
'valid_images' : 'path_to_validation_images' ,
'valid_info' : 'path_to_validation_annotation' ,
'has_gt' : True ,
'class_names' : ( 'my_class_id_1' , 'my_class_id_2' , 'my_class_id_3' , ...)
})class_names的順序依次增加。如果您的註釋文件不是這種情況(例如在可可中),請參見dataset_base中的字段label_map 。python train.py --help ), train.py將每2個時期的數據集中的前5000張圖像輸出驗證映射。yolact_base_config中,將'dataset'的值更改為'my_custom_dataset'或您命名上述配置對象的任何內容。然後,您可以在上一節中使用任何培訓命令。 有關如何註釋自定義數據集並準備與yolact一起使用的技巧,請參見 @amit12690的這篇不錯的帖子。
如果您在工作中使用yolact或此代碼基礎,請引用
 @inproceedings{yolact-iccv2019,
  author    = {Daniel Bolya and Chong Zhou and Fanyi Xiao and Yong Jae Lee},
  title     = {YOLACT: {Real-time} Instance Segmentation},
  booktitle = {ICCV},
  year      = {2019},
}
對於yolact ++,請引用
 @article{yolact-plus-tpami2020,
  author  = {Daniel Bolya and Chong Zhou and Fanyi Xiao and Yong Jae Lee},
  journal = {IEEE Transactions on Pattern Analysis and Machine Intelligence},
  title   = {YOLACT++: Better Real-time Instance Segmentation},
  year    = {2020},
}
有關我們的紙張或代碼的問題,請聯繫Daniel Bolya。


