yolact
1.0.0
    ██╗   ██╗ ██████╗ ██╗      █████╗  ██████╗████████╗
    ╚██╗ ██╔╝██╔═══██╗██║     ██╔══██╗██╔════╝╚══██╔══╝
     ╚████╔╝ ██║   ██║██║     ███████║██║        ██║
      ╚██╔╝  ██║   ██║██║     ██╔══██║██║        ██║
       ██║   ╚██████╔╝███████╗██║  ██║╚██████╗   ██║
       ╚═╝    ╚═════╝ ╚══════╝╚═╝  ╚═╝ ╚═════╝   ╚═╝
Model sederhana, sepenuhnya konvolusional untuk segmentasi instance real-time. Ini adalah kode untuk makalah kami:
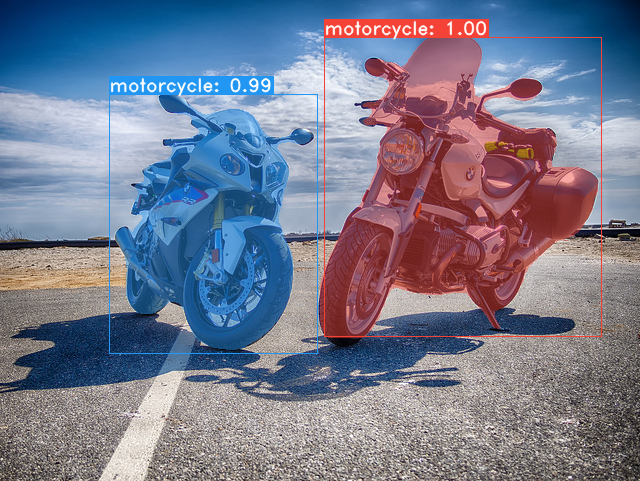
Model RESNET50 YOLACT ++ berjalan pada 33,5 fps pada Titan XP dan mencapai 34.1 peta pada test-dev Coco (lihat kertas jurnal kami di sini).
Untuk menggunakan YOLACT ++, pastikan Anda mengkompilasi kode DCNV2. (Lihat instalasi)
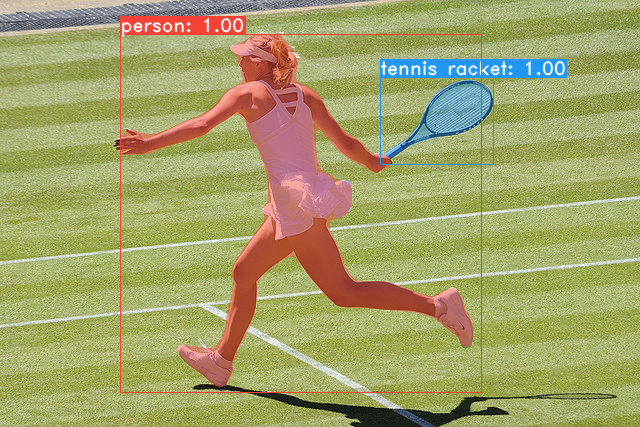
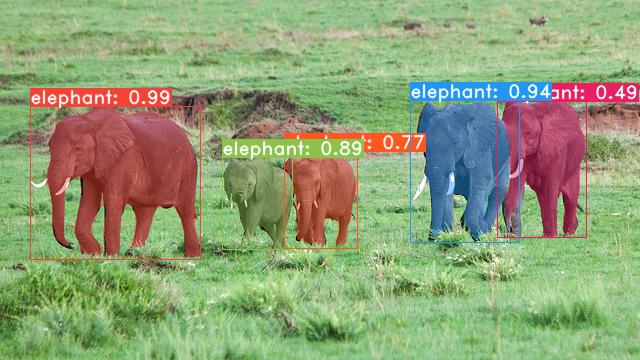
Beberapa contoh dari model dasar Yolact kami (33,5 fps pada Titan XP dan 29,8 peta pada test-dev Coco):
git clone https://github.com/dbolya/yolact.git
cd yolactconda env create -f environment.yml # Cython needs to be installed before pycocotools
pip install cython
pip install opencv-python pillow pycocotools matplotlib ./data/coco . sh data/scripts/COCO.shtest-dev , unduh test-dev dengan skrip ini. sh data/scripts/COCO_test.sh cd external/DCNv2
python setup.py build develop Berikut adalah model yolact kami (dirilis pada 5 April 2019) bersama dengan FPS mereka di Titan XP dan peta pada test-dev :
| Ukuran gambar | Tulang punggung | FPS | peta | Bobot | |
|---|---|---|---|---|---|
| 550 | Resnet50-fpn | 42.5 | 28.2 | yolact_resnet50_54_800000.pth | Cermin |
| 550 | Darknet53-fpn | 40.0 | 28.7 | yolact_darknet53_54_800000.pth | Cermin |
| 550 | Resnet101-fpn | 33.5 | 29.8 | yolact_base_54_800000.pth | Cermin |
| 700 | Resnet101-fpn | 23.6 | 31.2 | yolact_im700_54_800000.pth | Cermin |
Model Yolact ++ (dirilis pada 16 Desember 2019):
| Ukuran gambar | Tulang punggung | FPS | peta | Bobot | |
|---|---|---|---|---|---|
| 550 | Resnet50-fpn | 33.5 | 34.1 | yolact_plus_resnet50_54_800000.pth | Cermin |
| 550 | Resnet101-fpn | 27.3 | 34.6 | yolact_plus_base_54_800000.pth | Cermin |
Untuk mengevaluasi model, masukkan file bobot yang sesuai di direktori ./weights dan jalankan salah satu perintah berikut. Nama masing -masing konfigurasi adalah segalanya sebelum angka dalam nama file (misalnya, yolact_base untuk yolact_base_54_800000.pth ).
 # Quantitatively evaluate a trained model on the entire validation set. Make sure you have COCO downloaded as above.
# This should get 29.92 validation mask mAP last time I checked.
python eval.py --trained_model=weights/yolact_base_54_800000.pth

# Output a COCOEval json to submit to the website or to use the run_coco_eval.py script.
# This command will create './results/bbox_detections.json' and './results/mask_detections.json' for detection and instance segmentation respectively.
python eval.py --trained_model=weights/yolact_base_54_800000.pth --output_coco_json

# You can run COCOEval on the files created in the previous command. The performance should match my implementation in eval.py.
python run_coco_eval.py

# To output a coco json file for test-dev, make sure you have test-dev downloaded from above and go
python eval.py --trained_model=weights/yolact_base_54_800000.pth --output_coco_json --dataset=coco2017_testdev_dataset # Display qualitative results on COCO. From here on I'll use a confidence threshold of 0.15.
python eval.py --trained_model=weights/yolact_base_54_800000.pth --score_threshold=0.15 --top_k=15 --display # Run just the raw model on the first 1k images of the validation set
python eval.py --trained_model=weights/yolact_base_54_800000.pth --benchmark --max_images=1000 # Display qualitative results on the specified image.
python eval.py --trained_model=weights/yolact_base_54_800000.pth --score_threshold=0.15 --top_k=15 --image=my_image.png
# Process an image and save it to another file.
python eval.py --trained_model=weights/yolact_base_54_800000.pth --score_threshold=0.15 --top_k=15 --image=input_image.png:output_image.png
# Process a whole folder of images.
python eval.py --trained_model=weights/yolact_base_54_800000.pth --score_threshold=0.15 --top_k=15 --images=path/to/input/folder:path/to/output/folder # Display a video in real-time. "--video_multiframe" will process that many frames at once for improved performance.
# If you want, use "--display_fps" to draw the FPS directly on the frame.
python eval.py --trained_model=weights/yolact_base_54_800000.pth --score_threshold=0.15 --top_k=15 --video_multiframe=4 --video=my_video.mp4
# Display a webcam feed in real-time. If you have multiple webcams pass the index of the webcam you want instead of 0.
python eval.py --trained_model=weights/yolact_base_54_800000.pth --score_threshold=0.15 --top_k=15 --video_multiframe=4 --video=0
# Process a video and save it to another file. This uses the same pipeline as the ones above now, so it's fast!
python eval.py --trained_model=weights/yolact_base_54_800000.pth --score_threshold=0.15 --top_k=15 --video_multiframe=4 --video=input_video.mp4:output_video.mp4 Seperti yang Anda tahu, eval.py dapat melakukan banyak hal. Jalankan perintah --help untuk melihat semua yang bisa dilakukannya.
python eval.py --helpSecara default, kami berlatih di Coco. Pastikan untuk mengunduh seluruh dataset menggunakan perintah di atas.
./weights .resnet101_reducedfc.pth dari sini.resnet50-19c8e357.pth dari sini.darknet53.pth dari sini.*_interrupt.pth pada iterasi saat ini../weights secara default dengan nama file <config>_<epoch>_<iter>.pth . # Trains using the base config with a batch size of 8 (the default).
python train.py --config=yolact_base_config
# Trains yolact_base_config with a batch_size of 5. For the 550px models, 1 batch takes up around 1.5 gigs of VRAM, so specify accordingly.
python train.py --config=yolact_base_config --batch_size=5
# Resume training yolact_base with a specific weight file and start from the iteration specified in the weight file's name.
python train.py --config=yolact_base_config --resume=weights/yolact_base_10_32100.pth --start_iter=-1
# Use the help option to see a description of all available command line arguments
python train.py --helpYolact sekarang mendukung beberapa GPU dengan mulus selama pelatihan:
export CUDA_VISIBLE_DEVICES=[gpus]nvidia-smi .8*num_gpus dengan perintah pelatihan di atas. Script pelatihan akan secara otomatis mengukur hyperparameter ke nilai yang tepat.--batch_alloc=[alloc] di mana [Alloc] adalah daftar terpisah koma yang berisi jumlah gambar pada setiap GPU. Ini harus dijumlahkan ke batch_size . Yolact sekarang mencatat informasi pelatihan dan validasi secara default. Anda dapat menonaktifkan ini dengan --no_log . Panduan tentang cara memvisualisasikan log ini akan segera hadir, tetapi sekarang Anda dapat melihat LogVizualizer di utils/logger.py untuk bantuan.
Kami juga menyertakan konfigurasi untuk pelatihan anotasi Pascal SBD (untuk eksperimen cepat atau dibandingkan dengan metode lain). Untuk berlatih di Pascal SBD, lanjutkan dengan langkah -langkah berikut:
benchmark.tgz ).dataset/img . Buat direktori ./data/sbd (di mana . Adalah root yolact) dan salin dataset/img ke ./data/sbd/img ../data/sbd/ .--config=yolact_resnet50_pascal_config . Periksa konfigurasi itu untuk melihat cara memperluasnya ke model lain. Saya akan mengotomatiskan semua ini dengan skrip segera, jangan khawatir. Juga, jika Anda ingin skrip yang saya gunakan untuk mengonversi anotasi, saya memasukkannya ke dalam ./scripts/convert_sbd.py , tetapi Anda harus memeriksa cara kerjanya untuk dapat menggunakannya karena saya tidak benar -benar ingat pada titik ini.
Jika Anda ingin memverifikasi hasil kami, Anda dapat mengunduh bobot yolact_resnet50_pascal_config dari sini. Model ini harus mendapatkan 72.3 mask AP_50 dan 56.2 MASK AP_70. Perhatikan bahwa "semua" AP tidak sama dengan "Vol" AP yang dilaporkan dalam makalah lain untuk Pascal (mereka menggunakan rata -rata ambang batas dari 0.1 - 0.9 dengan kenaikan 0.1 alih -alih apa yang digunakan Coco).
Anda juga dapat berlatih di dataset Anda sendiri dengan mengikuti langkah -langkah ini:
infoliscenseimage : license, flickr_url, coco_url, date_capturedcategories (kami menggunakan format kami sendiri untuk kategori, lihat di bawah)dataset_base di data/config.py (lihat komentar di dataset_base untuk penjelasan setiap bidang): my_custom_dataset = dataset_base . copy ({
'name' : 'My Dataset' ,
'train_images' : 'path_to_training_images' ,
'train_info' : 'path_to_training_annotation' ,
'valid_images' : 'path_to_validation_images' ,
'valid_info' : 'path_to_validation_annotation' ,
'has_gt' : True ,
'class_names' : ( 'my_class_id_1' , 'my_class_id_2' , 'my_class_id_3' , ...)
})class_names . Jika ini bukan kasus untuk file anotasi Anda (seperti di Coco), lihat bidang label_map di dataset_base .python train.py --help ), train.py akan mengeluarkan peta validasi untuk 5000 gambar pertama dalam dataset setiap 2 zaman.yolact_base_config dalam file yang sama, ubah nilai untuk 'dataset' menjadi 'my_custom_dataset' atau apa pun yang Anda beri nama objek konfigurasi di atas. Kemudian Anda dapat menggunakan salah satu perintah pelatihan di bagian sebelumnya. Lihat posting yang bagus ini oleh @amit12690 untuk tips tentang cara membuat anotasi dataset khusus dan menyiapkannya untuk digunakan dengan yolact.
Jika Anda menggunakan yolact atau basis kode ini dalam pekerjaan Anda, silakan kutip
 @inproceedings{yolact-iccv2019,
  author    = {Daniel Bolya and Chong Zhou and Fanyi Xiao and Yong Jae Lee},
  title     = {YOLACT: {Real-time} Instance Segmentation},
  booktitle = {ICCV},
  year      = {2019},
}
Untuk yolact ++, silakan kutip
 @article{yolact-plus-tpami2020,
  author  = {Daniel Bolya and Chong Zhou and Fanyi Xiao and Yong Jae Lee},
  journal = {IEEE Transactions on Pattern Analysis and Machine Intelligence},
  title   = {YOLACT++: Better Real-time Instance Segmentation},
  year    = {2020},
}
Untuk pertanyaan tentang kertas atau kode kami, silakan hubungi Daniel Bolya.


