yolact
1.0.0
    ██╗   ██╗ ██████╗ ██╗      █████╗  ██████╗████████╗
    ╚██╗ ██╔╝██╔═══██╗██║     ██╔══██╗██╔════╝╚══██╔══╝
     ╚████╔╝ ██║   ██║██║     ███████║██║        ██║
      ╚██╔╝  ██║   ██║██║     ██╔══██║██║        ██║
       ██║   ╚██████╔╝███████╗██║  ██║╚██████╗   ██║
       ╚═╝    ╚═════╝ ╚══════╝╚═╝  ╚═╝ ╚═════╝   ╚═╝
Ein einfaches, vollständiges Faltungsmodell für die Echtzeit-Instanzsegmentierung. Dies ist der Code für unsere Papiere:
Das ResNet50-Modell von Yolact ++ läuft bei 33,5 fps auf einem Titan XP und erreicht 34.1 Karte auf test-dev von Coco (siehe unser Journalpapier hier).
Um Yolact ++ zu verwenden, stellen Sie sicher, dass Sie den DCNV2 -Code kompilieren. (Siehe Installation)
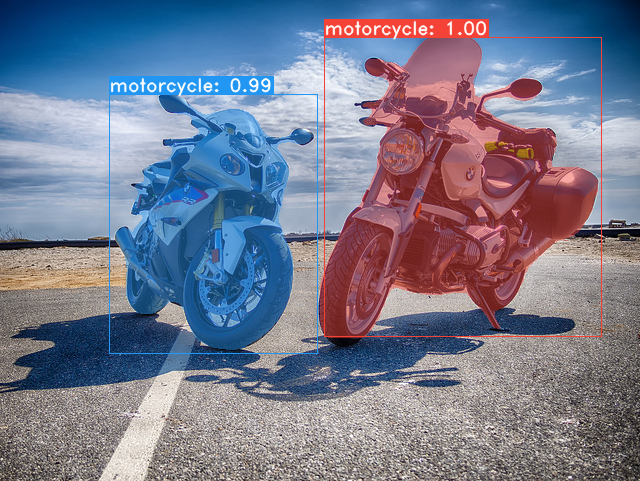
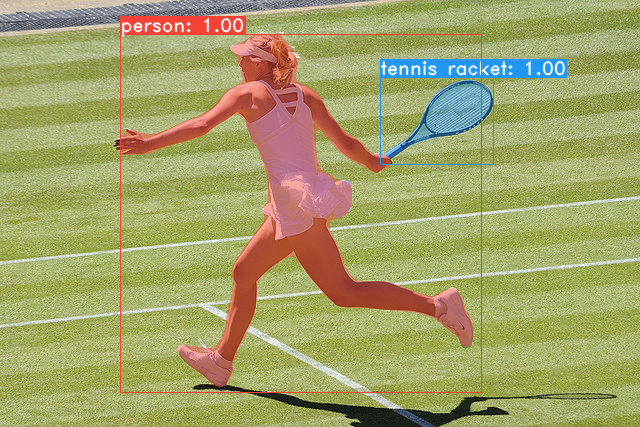
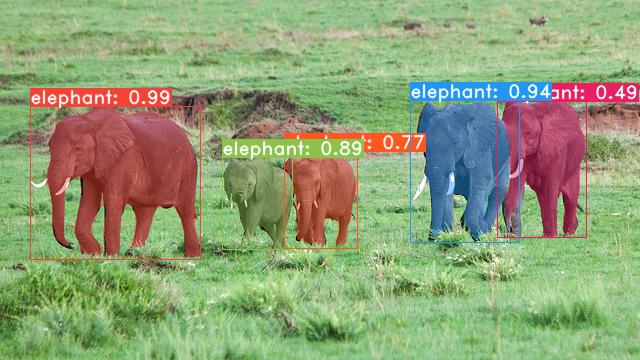
Einige Beispiele aus unserem Yolact-Basismodell (33,5 fps auf einem Titan XP und 29,8 Karte auf Coco's test-dev ):
git clone https://github.com/dbolya/yolact.git
cd yolactconda env create -f environment.yml # Cython needs to be installed before pycocotools
pip install cython
pip install opencv-python pillow pycocotools matplotlib ./data/coco abgeben wird. sh data/scripts/COCO.shtest-dev bewerten möchten, laden Sie test-dev mit diesem Skript herunter. sh data/scripts/COCO_test.sh cd external/DCNv2
python setup.py build develop Hier sind unsere Yolact-Modelle (veröffentlicht am 5. April 2019) zusammen mit ihrem FPS auf einem Titan XP und der Karte auf test-dev :
| Bildgröße | Rückgrat | Fps | Karte | Gewichte | |
|---|---|---|---|---|---|
| 550 | Resnet50-fpn | 42,5 | 28.2 | yolact_resnet50_54_800000.PTH | Spiegel |
| 550 | Darknet53-FPN | 40.0 | 28.7 | yolact_darknet53_54_800000.pth | Spiegel |
| 550 | Resnet101-fpn | 33.5 | 29.8 | yolact_base_54_800000.pth | Spiegel |
| 700 | Resnet101-fpn | 23.6 | 31.2 | yolact_im700_54_800000.pth | Spiegel |
Yolact ++ Modelle (veröffentlicht am 16. Dezember 2019):
| Bildgröße | Rückgrat | Fps | Karte | Gewichte | |
|---|---|---|---|---|---|
| 550 | Resnet50-fpn | 33.5 | 34.1 | yolact_plus_resnet50_54_800000.pth | Spiegel |
| 550 | Resnet101-fpn | 27.3 | 34.6 | yolact_plus_base_54_800000.pth | Spiegel |
Um das Modell zu bewerten, legen Sie die entsprechende Gewichtsdatei in das Verzeichnis ./weights und führen Sie einen der folgenden Befehle aus. Der Name jeder Konfiguration ist alles vor den Zahlen im Dateinamen (z. B. yolact_base für yolact_base_54_800000.pth ).
 # Quantitatively evaluate a trained model on the entire validation set. Make sure you have COCO downloaded as above.
# This should get 29.92 validation mask mAP last time I checked.
python eval.py --trained_model=weights/yolact_base_54_800000.pth

# Output a COCOEval json to submit to the website or to use the run_coco_eval.py script.
# This command will create './results/bbox_detections.json' and './results/mask_detections.json' for detection and instance segmentation respectively.
python eval.py --trained_model=weights/yolact_base_54_800000.pth --output_coco_json

# You can run COCOEval on the files created in the previous command. The performance should match my implementation in eval.py.
python run_coco_eval.py

# To output a coco json file for test-dev, make sure you have test-dev downloaded from above and go
python eval.py --trained_model=weights/yolact_base_54_800000.pth --output_coco_json --dataset=coco2017_testdev_dataset # Display qualitative results on COCO. From here on I'll use a confidence threshold of 0.15.
python eval.py --trained_model=weights/yolact_base_54_800000.pth --score_threshold=0.15 --top_k=15 --display # Run just the raw model on the first 1k images of the validation set
python eval.py --trained_model=weights/yolact_base_54_800000.pth --benchmark --max_images=1000 # Display qualitative results on the specified image.
python eval.py --trained_model=weights/yolact_base_54_800000.pth --score_threshold=0.15 --top_k=15 --image=my_image.png
# Process an image and save it to another file.
python eval.py --trained_model=weights/yolact_base_54_800000.pth --score_threshold=0.15 --top_k=15 --image=input_image.png:output_image.png
# Process a whole folder of images.
python eval.py --trained_model=weights/yolact_base_54_800000.pth --score_threshold=0.15 --top_k=15 --images=path/to/input/folder:path/to/output/folder # Display a video in real-time. "--video_multiframe" will process that many frames at once for improved performance.
# If you want, use "--display_fps" to draw the FPS directly on the frame.
python eval.py --trained_model=weights/yolact_base_54_800000.pth --score_threshold=0.15 --top_k=15 --video_multiframe=4 --video=my_video.mp4
# Display a webcam feed in real-time. If you have multiple webcams pass the index of the webcam you want instead of 0.
python eval.py --trained_model=weights/yolact_base_54_800000.pth --score_threshold=0.15 --top_k=15 --video_multiframe=4 --video=0
# Process a video and save it to another file. This uses the same pipeline as the ones above now, so it's fast!
python eval.py --trained_model=weights/yolact_base_54_800000.pth --score_threshold=0.15 --top_k=15 --video_multiframe=4 --video=input_video.mp4:output_video.mp4 Wie Sie beurteilen können, kann eval.py eine Menge Sachen machen. Führen Sie den Befehl --help aus, um alles zu sehen, was es kann.
python eval.py --helpStandardmäßig trainieren wir auf Coco. Stellen Sie sicher, dass Sie den gesamten Datensatz mit den obigen Befehlen herunterladen.
./weightsresnet101_reducedfc.pth .resnet50-19c8e357.pth .darknet53.pth von hier herunter.*_interrupt.pth -Datei in der aktuellen Iteration../weights mit dem Dateinamen <config>_<epoch>_<iter>.pth gespeichert. # Trains using the base config with a batch size of 8 (the default).
python train.py --config=yolact_base_config
# Trains yolact_base_config with a batch_size of 5. For the 550px models, 1 batch takes up around 1.5 gigs of VRAM, so specify accordingly.
python train.py --config=yolact_base_config --batch_size=5
# Resume training yolact_base with a specific weight file and start from the iteration specified in the weight file's name.
python train.py --config=yolact_base_config --resume=weights/yolact_base_10_32100.pth --start_iter=-1
# Use the help option to see a description of all available command line arguments
python train.py --helpYolact unterstützt jetzt während des Trainings mehrere GPUs nahtlos:
export CUDA_VISIBLE_DEVICES=[gpus]nvidia-smi überprüfen.8*num_gpus mit den obigen Trainingsbefehlen. Das Trainingsskript skaliert automatisch die Hyperparameter auf die richtigen Werte.--batch_alloc=[alloc] verwenden, wobei [Alloc] eine von Comma -separierte Liste ist, die die Anzahl der Bilder auf jeder GPU enthält. Dies muss zu batch_size summen. Yolact log jetzt standardmäßig Schulungs- und Validierungsinformationen an. Sie können dies mit --no_log deaktivieren. Eine Anleitung zum Visualisieren dieser Protokolle findet in Kürze statt. Jetzt können Sie sich LogVizualizer in utils/logger.py ansehen, um Hilfe zu erhalten.
Wir haben auch eine Konfiguration für das Training zu Pascal SBD -Annotationen (zum schnellen Experimentieren oder zum Vergleich mit anderen Methoden). Um auf Pascal SBD zu trainieren, fahren Sie mit den folgenden Schritten fort:
benchmark.tgz ).dataset/img geben. Erstellen Sie das Verzeichnis ./data/sbd ( . das Yolact -Root ist) und kopieren Sie dataset/img auf ./data/sbd/img ../data/sbd/ .--config=yolact_resnet50_pascal_config trainieren. Überprüfen Sie diese Konfiguration, um zu sehen, wie Sie sie auf andere Modelle erweitern. Ich werde das alles bald mit einem Skript automatisieren, mach dir keine Sorgen. Wenn Sie das Skript haben möchten, mit dem ich die Annotationen konvertierte, habe ich es eingerichtet ./scripts/convert_sbd.py
Wenn Sie unsere Ergebnisse überprüfen möchten, können Sie hier unsere yolact_resnet50_pascal_config herunterladen. Dieses Modell sollte 72,3 Mask AP_50 und 56.2 Mask AP_70 erhalten. Beachten Sie, dass der "All" AP nicht mit dem in anderen Papieren für Pascal gemeldeten "Vol" AP übereinstimmt (sie verwenden eine Durchschnittswerte der Schwellenwerte von 0.1 - 0.9 in Schritten von 0.1 anstatt von dem, was Coco verwendet).
Sie können auch in Ihrem eigenen Datensatz trainieren, indem Sie folgende Schritte folgen:
infoliscenseimage : license, flickr_url, coco_url, date_capturedcategories (wir verwenden unser eigenes Format für Kategorien, siehe unten)dataset_base in data/config.py (die Kommentare in dataset_base finden Sie in einer Erläuterung jedes Feldes): my_custom_dataset = dataset_base . copy ({
'name' : 'My Dataset' ,
'train_images' : 'path_to_training_images' ,
'train_info' : 'path_to_training_annotation' ,
'valid_images' : 'path_to_validation_images' ,
'valid_info' : 'path_to_validation_annotation' ,
'has_gt' : True ,
'class_names' : ( 'my_class_id_1' , 'my_class_id_2' , 'my_class_id_3' , ...)
})class_names erhöhen. Wenn dies für Ihre Annotationsdatei (wie in CoCO) nicht der Fall ist, finden Sie in der Field label_map in dataset_base .python train.py --help ) wird train.py alle 2 Epochen für die ersten 5000 Bilder im Datensatz Validierungskarte ausgeben.yolact_base_config in derselben Datei den Wert für 'dataset' in 'my_custom_dataset' oder was auch immer Sie das obige Konfigurationsobjekt benannt haben. Dann können Sie im vorherigen Abschnitt eine der Trainingsbefehle verwenden. In diesem schönen Beitrag von @amit12690 finden Sie Tipps zum Annotieren eines benutzerdefinierten Datensatzes und bereiten Sie ihn für die Verwendung mit Yolact vor.
Wenn Sie Yolact oder diese Codebasis in Ihrer Arbeit verwenden, zitieren Sie bitte
 @inproceedings{yolact-iccv2019,
  author    = {Daniel Bolya and Chong Zhou and Fanyi Xiao and Yong Jae Lee},
  title     = {YOLACT: {Real-time} Instance Segmentation},
  booktitle = {ICCV},
  year      = {2019},
}
Für Yolact ++ zitieren Sie bitte
 @article{yolact-plus-tpami2020,
  author  = {Daniel Bolya and Chong Zhou and Fanyi Xiao and Yong Jae Lee},
  journal = {IEEE Transactions on Pattern Analysis and Machine Intelligence},
  title   = {YOLACT++: Better Real-time Instance Segmentation},
  year    = {2020},
}
Für Fragen zu unserem Papier oder Code wenden Sie sich bitte an Daniel Bolya.


