yolact
1.0.0
    ██╗   ██╗ ██████╗ ██╗      █████╗  ██████╗████████╗
    ╚██╗ ██╔╝██╔═══██╗██║     ██╔══██╗██╔════╝╚══██╔══╝
     ╚████╔╝ ██║   ██║██║     ███████║██║        ██║
      ╚██╔╝  ██║   ██║██║     ██╔══██║██║        ██║
       ██║   ╚██████╔╝███████╗██║  ██║╚██████╗   ██║
       ╚═╝    ╚═════╝ ╚══════╝╚═╝  ╚═╝ ╚═════╝   ╚═╝
실시간 인스턴스 세분화를위한 간단하고 완전 컨볼 루션 모델. 이것은 논문의 코드입니다.
YOLACT ++의 RESNET50 모델은 타이탄 XP에서 33.5fps로 실행되며 Coco의 test-dev 에서 34.1 맵을 달성합니다 (여기서 저널 논문을 확인하십시오).
Yolact ++를 사용하려면 DCNV2 코드를 컴파일해야합니다. (설치 참조)
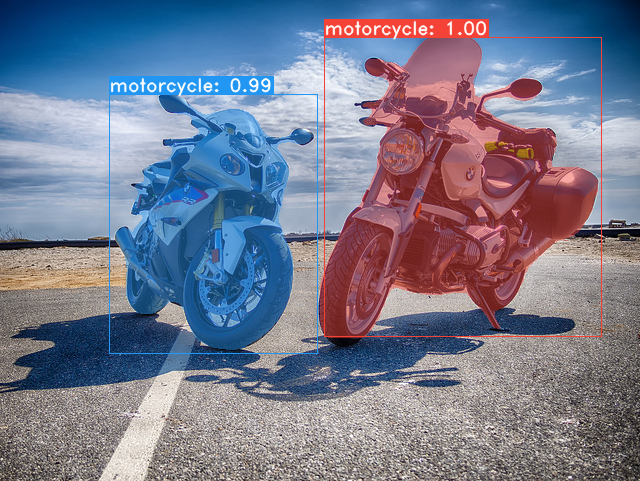
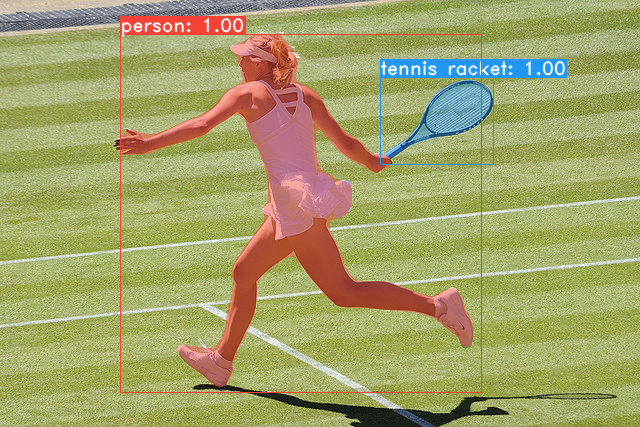
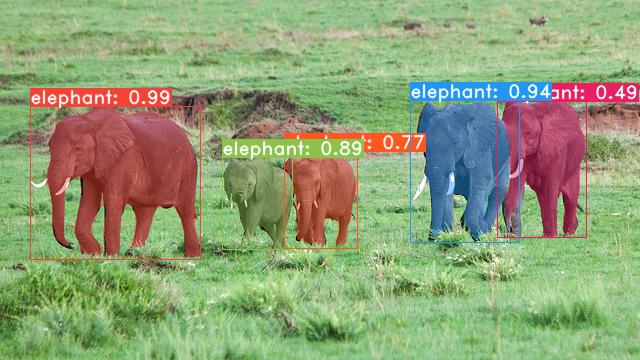
Yolact Base 모델의 일부 예제 (Titan XP의 33.5 FPS 및 Coco 's test-dev 의 29.8 맵) :
git clone https://github.com/dbolya/yolact.git
cd yolactconda env create -f environment.yml 실행하십시오 # Cython needs to be installed before pycocotools
pip install cython
pip install opencv-python pillow pycocotools matplotlib ./data/coco 로 덤프합니다. sh data/scripts/COCO.shtest-dev 에서 Yolact를 평가하려면이 스크립트를 사용하여 test-dev 다운로드하십시오. sh data/scripts/COCO_test.sh cd external/DCNv2
python setup.py build develop 다음은 Titan XP의 FPS 및 test-dev 의 MAP과 함께 YOLACT 모델 (2019 년 4 월 5 일에 출시)입니다.
| 이미지 크기 | 등뼈 | fps | 지도 | 무게 | |
|---|---|---|---|---|---|
| 550 | RESNET50-FPN | 42.5 | 28.2 | YOLACT_RESNET50_54_800000.pth | 거울 |
| 550 | DARKNET53-FPN | 40.0 | 28.7 | YOLACT_DARKNET53_54_800000.pth | 거울 |
| 550 | RESNET101-FPN | 33.5 | 29.8 | YOLACT_BASE_54_800000.PTH | 거울 |
| 700 | RESNET101-FPN | 23.6 | 31.2 | YOLACT_IM700_54_800000.pth | 거울 |
Yolact ++ 모델 (2019 년 12 월 16 일에 출시) :
| 이미지 크기 | 등뼈 | fps | 지도 | 무게 | |
|---|---|---|---|---|---|
| 550 | RESNET50-FPN | 33.5 | 34.1 | YOLACT_PLUS_RESNET50_54_800000.pth | 거울 |
| 550 | RESNET101-FPN | 27.3 | 34.6 | YOLACT_PLUS_BASE_54_800000.pth | 거울 |
모델을 평가하려면 해당 가중치 파일을 ./weights 디렉토리에 넣고 다음 명령 중 하나를 실행하십시오. 각 구성의 이름은 파일 이름의 숫자 앞의 모든 것입니다 (예 : yolact_base_54_800000.pth 의 yolact_base ).
 # Quantitatively evaluate a trained model on the entire validation set. Make sure you have COCO downloaded as above.
# This should get 29.92 validation mask mAP last time I checked.
python eval.py --trained_model=weights/yolact_base_54_800000.pth

# Output a COCOEval json to submit to the website or to use the run_coco_eval.py script.
# This command will create './results/bbox_detections.json' and './results/mask_detections.json' for detection and instance segmentation respectively.
python eval.py --trained_model=weights/yolact_base_54_800000.pth --output_coco_json

# You can run COCOEval on the files created in the previous command. The performance should match my implementation in eval.py.
python run_coco_eval.py

# To output a coco json file for test-dev, make sure you have test-dev downloaded from above and go
python eval.py --trained_model=weights/yolact_base_54_800000.pth --output_coco_json --dataset=coco2017_testdev_dataset # Display qualitative results on COCO. From here on I'll use a confidence threshold of 0.15.
python eval.py --trained_model=weights/yolact_base_54_800000.pth --score_threshold=0.15 --top_k=15 --display # Run just the raw model on the first 1k images of the validation set
python eval.py --trained_model=weights/yolact_base_54_800000.pth --benchmark --max_images=1000 # Display qualitative results on the specified image.
python eval.py --trained_model=weights/yolact_base_54_800000.pth --score_threshold=0.15 --top_k=15 --image=my_image.png
# Process an image and save it to another file.
python eval.py --trained_model=weights/yolact_base_54_800000.pth --score_threshold=0.15 --top_k=15 --image=input_image.png:output_image.png
# Process a whole folder of images.
python eval.py --trained_model=weights/yolact_base_54_800000.pth --score_threshold=0.15 --top_k=15 --images=path/to/input/folder:path/to/output/folder # Display a video in real-time. "--video_multiframe" will process that many frames at once for improved performance.
# If you want, use "--display_fps" to draw the FPS directly on the frame.
python eval.py --trained_model=weights/yolact_base_54_800000.pth --score_threshold=0.15 --top_k=15 --video_multiframe=4 --video=my_video.mp4
# Display a webcam feed in real-time. If you have multiple webcams pass the index of the webcam you want instead of 0.
python eval.py --trained_model=weights/yolact_base_54_800000.pth --score_threshold=0.15 --top_k=15 --video_multiframe=4 --video=0
# Process a video and save it to another file. This uses the same pipeline as the ones above now, so it's fast!
python eval.py --trained_model=weights/yolact_base_54_800000.pth --score_threshold=0.15 --top_k=15 --video_multiframe=4 --video=input_video.mp4:output_video.mp4 알 수 있듯이 eval.py 많은 일을 할 수 있습니다. --help 명령을 실행하여 할 수있는 모든 것을 볼 수 있습니다.
python eval.py --help기본적으로 Coco를 훈련시킵니다. 위의 명령을 사용하여 전체 데이터 세트를 다운로드하십시오.
./weights 에 넣으십시오.resnet101_reducedfc.pth 다운로드하십시오.resnet50-19c8e357.pth 다운로드하십시오.darknet53.pth 다운로드하십시오.*_interrupt.pth 파일을 저장합니다.<config>_<epoch>_<iter>.pth 와 함께 ./weights 디렉토리에 기본적으로 저장됩니다. # Trains using the base config with a batch size of 8 (the default).
python train.py --config=yolact_base_config
# Trains yolact_base_config with a batch_size of 5. For the 550px models, 1 batch takes up around 1.5 gigs of VRAM, so specify accordingly.
python train.py --config=yolact_base_config --batch_size=5
# Resume training yolact_base with a specific weight file and start from the iteration specified in the weight file's name.
python train.py --config=yolact_base_config --resume=weights/yolact_base_10_32100.pth --start_iter=-1
# Use the help option to see a description of all available command line arguments
python train.py --helpYOLACT는 이제 훈련 중에 여러 GPU를 완벽하게 지원합니다.
export CUDA_VISIBLE_DEVICES=[gpus]nvidia-smi 로 GPU의 지수를 확인할 수 있습니다.8*num_gpus 로 설정하십시오. 훈련 스크립트는 하이퍼 파라미터를 올바른 값으로 자동 스케일링합니다.--batch_alloc=[alloc] 사용할 수 있습니다. 이것은 batch_size 에 합산해야합니다. Yolact는 이제 기본적으로 교육 및 검증 정보를 기록합니다. --no_log 로 이것을 비활성화 할 수 있습니다. 이러한 로그를 시각화하는 방법에 대한 안내서는 곧 출시 될 예정이지만 이제 utils/logger.py 의 LogVizualizer 살펴보면 도움을받을 수 있습니다.
또한 Pascal SBD 주석에 대한 교육을위한 구성 (빠른 실험 또는 다른 방법과 비교)도 포함합니다. Pascal SBD를 훈련 시키려면 다음 단계를 진행하십시오.
benchmark.tgz 라고합니다).dataset/img 라는 폴더가 있어야합니다. 디렉토리 ./data/sbd (where . 는 Yolact 's root)를 작성하고 dataset/img ./data/sbd/img 로 복사하십시오../data/sbd/ 로 추출하십시오.--config=yolact_resnet50_pascal_config 사용하여 훈련 할 수 있습니다. 해당 구성을 확인하여 다른 모델로 확장하는 방법을 확인하십시오. 곧 스크립트 로이 모든 것을 자동화하겠습니다. 걱정하지 마십시오. 또한 주석을 변환하는 데 사용한 스크립트를 원한다면 ./scripts/convert_sbd.py 에 넣었지만이 시점에서 실제로 기억하지 못하기 때문에 사용할 수있는 방법을 확인해야합니다.
결과를 확인하려면 여기에서 yolact_resnet50_pascal_config 가중치를 다운로드 할 수 있습니다. 이 모델은 72.3 마스크 AP_50 및 56.2 마스크 AP_70을 가져와야합니다. "All"AP는 Pascal에 대한 다른 논문에서보고 된 "Vol"AP와 동일하지 않습니다 (Coco가 사용하는 대신 0.1 - 0.9 0.1 평균 임계 값을 사용합니다).
다음 단계에 따라 자신의 데이터 세트를 훈련시킬 수도 있습니다.
infoliscenseimage 아래 : license, flickr_url, coco_url, date_capturedcategories (카테고리에 자체 형식을 사용하고 아래 참조)data/config.py 에서 dataset_base 에서 데이터 세트에 대한 정의를 작성하십시오 (각 필드의 설명은 dataset_base 의 주석 참조) : my_custom_dataset = dataset_base . copy ({
'name' : 'My Dataset' ,
'train_images' : 'path_to_training_images' ,
'train_info' : 'path_to_training_annotation' ,
'valid_images' : 'path_to_validation_images' ,
'valid_info' : 'path_to_validation_annotation' ,
'has_gt' : True ,
'class_names' : ( 'my_class_id_1' , 'my_class_id_2' , 'my_class_id_3' , ...)
})class_names 순서에서 순차적으로 증가해야합니다. 그렇지 않은 경우 (코코와 같은) 주석 파일의 경우가 아닌 경우 dataset_base 의 Field label_map 참조하십시오.python train.py --help 참조), train.py 2 개의 에포크마다 데이터 세트의 첫 5000 이미지에 대한 유효성 검사 맵을 출력합니다.yolact_base_config 에서 'dataset' 의 값을 'my_custom_dataset' 또는 위의 구성 객체라는 이름으로 변경하십시오. 그런 다음 이전 섹션에서 교육 명령을 사용할 수 있습니다. 사용자 정의 데이터 세트에 주석을 달고 Yolact와 함께 사용할 수 있도록 준비하는 방법에 대한 팁은 @amit12690 의이 멋진 게시물을 참조하십시오.
작업에서 YOLACT 또는이 코드 기반을 사용하는 경우 인용하십시오.
 @inproceedings{yolact-iccv2019,
  author    = {Daniel Bolya and Chong Zhou and Fanyi Xiao and Yong Jae Lee},
  title     = {YOLACT: {Real-time} Instance Segmentation},
  booktitle = {ICCV},
  year      = {2019},
}
Yolact ++의 경우 인용하십시오
 @article{yolact-plus-tpami2020,
  author  = {Daniel Bolya and Chong Zhou and Fanyi Xiao and Yong Jae Lee},
  journal = {IEEE Transactions on Pattern Analysis and Machine Intelligence},
  title   = {YOLACT++: Better Real-time Instance Segmentation},
  year    = {2020},
}
당사의 논문이나 코드에 대한 질문은 Daniel Bolya에 문의하십시오.


