yolact
1.0.0
    ██╗   ██╗ ██████╗ ██╗      █████╗  ██████╗████████╗
    ╚██╗ ██╔╝██╔═══██╗██║     ██╔══██╗██╔════╝╚══██╔══╝
     ╚████╔╝ ██║   ██║██║     ███████║██║        ██║
      ╚██╔╝  ██║   ██║██║     ██╔══██║██║        ██║
       ██║   ╚██████╔╝███████╗██║  ██║╚██████╗   ██║
       ╚═╝    ╚═════╝ ╚══════╝╚═╝  ╚═╝ ╚═════╝   ╚═╝
แบบจำลองที่เรียบง่ายและสมบูรณ์แบบสำหรับการแบ่งกลุ่มอินสแตนซ์แบบเรียลไทม์ นี่คือรหัสสำหรับเอกสารของเรา:
โมเดล Resnet50 ของ Yolact ++ ทำงานที่ 33.5 fps บน Titan XP และบรรลุแผนที่ 34.1 บน test-dev ของ Coco (ตรวจสอบกระดาษวารสารของเราที่นี่)
ในการใช้ Yolact ++ ตรวจสอบให้แน่ใจว่าคุณรวบรวมรหัส DCNV2 (ดูการติดตั้ง)
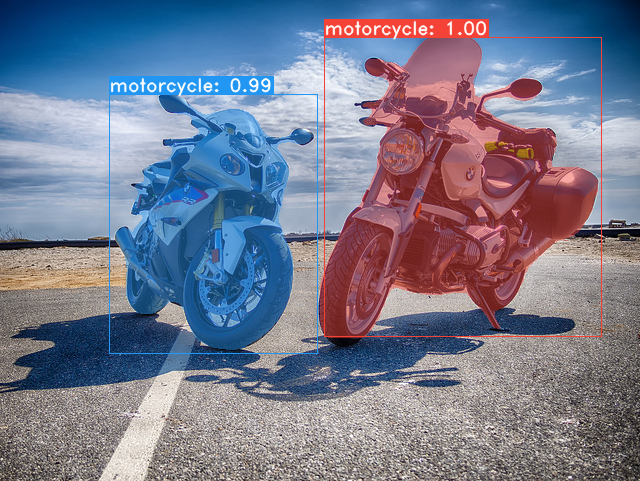
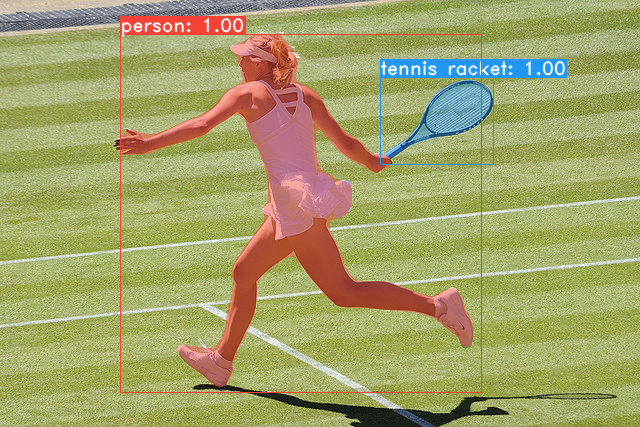
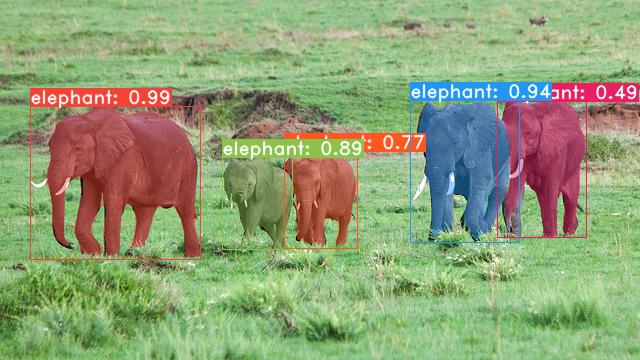
ตัวอย่างบางส่วนจากโมเดลฐานโยลค์ของเรา (33.5 fps บนแผนที่ Titan XP และ 29.8 บน test-dev ของ Coco):
git clone https://github.com/dbolya/yolact.git
cd yolactconda env create -f environment.yml # Cython needs to be installed before pycocotools
pip install cython
pip install opencv-python pillow pycocotools matplotlib ./data/coco coco sh data/scripts/COCO.shtest-dev ดาวน์โหลด test-dev ด้วยสคริปต์นี้ sh data/scripts/COCO_test.sh cd external/DCNv2
python setup.py build develop นี่คือโมเดลโยลค์ของเรา (วางจำหน่ายเมื่อวันที่ 5 เมษายน 2019) พร้อมกับ FPS ของพวกเขาใน Titan XP และแผนที่บน test-dev :
| ขนาดภาพ | กระดูกสันหลัง | FPS | แผนที่ | น้ำหนัก | |
|---|---|---|---|---|---|
| 550 | resnet50-fpn | 42.5 | 28.2 | yolact_resnet50_54_800000.pth | กระจกเงา |
| 550 | Darknet53-FPN | 40.0 | 28.7 | yolact_darknet53_54_800000.pth | กระจกเงา |
| 550 | resnet101-fpn | 33.5 | 29.8 | yolact_base_54_800000.pth | กระจกเงา |
| 700 | resnet101-fpn | 23.6 | 31.2 | yolact_im700_54_800000.pth | กระจกเงา |
Yolact ++ รุ่น (เปิดตัวเมื่อวันที่ 16 ธันวาคม 2019):
| ขนาดภาพ | กระดูกสันหลัง | FPS | แผนที่ | น้ำหนัก | |
|---|---|---|---|---|---|
| 550 | resnet50-fpn | 33.5 | 34.1 | yolact_plus_resnet50_54_800000.pth | กระจกเงา |
| 550 | resnet101-fpn | 27.3 | 34.6 | yolact_plus_base_54_800000.pth | กระจกเงา |
ในการประเมินโมเดลให้ใส่ไฟล์น้ำหนักที่สอดคล้องกันในไดเรกทอรี ./weights และเรียกใช้หนึ่งในคำสั่งต่อไปนี้ ชื่อของแต่ละการกำหนดค่าคือทุกอย่างก่อนที่ตัวเลขในชื่อไฟล์ (เช่น yolact_base สำหรับ yolact_base_54_800000.pth )
 # Quantitatively evaluate a trained model on the entire validation set. Make sure you have COCO downloaded as above.
# This should get 29.92 validation mask mAP last time I checked.
python eval.py --trained_model=weights/yolact_base_54_800000.pth

# Output a COCOEval json to submit to the website or to use the run_coco_eval.py script.
# This command will create './results/bbox_detections.json' and './results/mask_detections.json' for detection and instance segmentation respectively.
python eval.py --trained_model=weights/yolact_base_54_800000.pth --output_coco_json

# You can run COCOEval on the files created in the previous command. The performance should match my implementation in eval.py.
python run_coco_eval.py

# To output a coco json file for test-dev, make sure you have test-dev downloaded from above and go
python eval.py --trained_model=weights/yolact_base_54_800000.pth --output_coco_json --dataset=coco2017_testdev_dataset # Display qualitative results on COCO. From here on I'll use a confidence threshold of 0.15.
python eval.py --trained_model=weights/yolact_base_54_800000.pth --score_threshold=0.15 --top_k=15 --display # Run just the raw model on the first 1k images of the validation set
python eval.py --trained_model=weights/yolact_base_54_800000.pth --benchmark --max_images=1000 # Display qualitative results on the specified image.
python eval.py --trained_model=weights/yolact_base_54_800000.pth --score_threshold=0.15 --top_k=15 --image=my_image.png
# Process an image and save it to another file.
python eval.py --trained_model=weights/yolact_base_54_800000.pth --score_threshold=0.15 --top_k=15 --image=input_image.png:output_image.png
# Process a whole folder of images.
python eval.py --trained_model=weights/yolact_base_54_800000.pth --score_threshold=0.15 --top_k=15 --images=path/to/input/folder:path/to/output/folder # Display a video in real-time. "--video_multiframe" will process that many frames at once for improved performance.
# If you want, use "--display_fps" to draw the FPS directly on the frame.
python eval.py --trained_model=weights/yolact_base_54_800000.pth --score_threshold=0.15 --top_k=15 --video_multiframe=4 --video=my_video.mp4
# Display a webcam feed in real-time. If you have multiple webcams pass the index of the webcam you want instead of 0.
python eval.py --trained_model=weights/yolact_base_54_800000.pth --score_threshold=0.15 --top_k=15 --video_multiframe=4 --video=0
# Process a video and save it to another file. This uses the same pipeline as the ones above now, so it's fast!
python eval.py --trained_model=weights/yolact_base_54_800000.pth --score_threshold=0.15 --top_k=15 --video_multiframe=4 --video=input_video.mp4:output_video.mp4 อย่างที่คุณสามารถบอกได้ว่า eval.py สามารถทำสิ่งต่างๆได้มากมาย เรียกใช้คำสั่ง --help เพื่อดูทุกสิ่งที่ทำได้
python eval.py --helpโดยค่าเริ่มต้นเราฝึก Coco ตรวจสอบให้แน่ใจว่าได้ดาวน์โหลดชุดข้อมูลทั้งหมดโดยใช้คำสั่งด้านบน
./weights weightsresnet101_reducedfc.pth จากที่นี่resnet50-19c8e357.pth จากที่นี่darknet53.pth จากที่นี่*_interrupt.pth ที่การวนซ้ำปัจจุบัน./weights โดยค่าเริ่มต้นด้วยชื่อไฟล์ <config>_<epoch>_<iter>.pth # Trains using the base config with a batch size of 8 (the default).
python train.py --config=yolact_base_config
# Trains yolact_base_config with a batch_size of 5. For the 550px models, 1 batch takes up around 1.5 gigs of VRAM, so specify accordingly.
python train.py --config=yolact_base_config --batch_size=5
# Resume training yolact_base with a specific weight file and start from the iteration specified in the weight file's name.
python train.py --config=yolact_base_config --resume=weights/yolact_base_10_32100.pth --start_iter=-1
# Use the help option to see a description of all available command line arguments
python train.py --helpตอนนี้โยลค์รองรับ GPU หลายตัวได้อย่างราบรื่นในระหว่างการฝึกอบรม:
export CUDA_VISIBLE_DEVICES=[gpus]nvidia-smi8*num_gpus ด้วยคำสั่งการฝึกอบรมด้านบน สคริปต์การฝึกอบรมจะขยายพารามิเตอร์ไฮเปอร์พารามิเตอร์เป็นค่าที่เหมาะสมโดยอัตโนมัติ--batch_alloc=[alloc] โดยที่ [alloc] เป็นรายการ comma seprated ที่มีจำนวนภาพในแต่ละ GPU สิ่งนี้จะต้องรวมเป็น batch_size ตอนนี้โยลค์บันทึกข้อมูลการฝึกอบรมและการตรวจสอบโดยค่าเริ่มต้น คุณสามารถปิดการใช้งานสิ่งนี้ด้วย --no_log คำแนะนำเกี่ยวกับวิธีการแสดงภาพบันทึกเหล่านี้กำลังจะมาเร็ว ๆ นี้ แต่ตอนนี้คุณสามารถดูที่ LogVizualizer ใน utils/logger.py เพื่อขอความช่วยเหลือ
นอกจากนี้เรายังรวมถึงการกำหนดค่าสำหรับการฝึกอบรมเกี่ยวกับคำอธิบายประกอบ Pascal SBD (สำหรับการทดลองอย่างรวดเร็วหรือเปรียบเทียบกับวิธีอื่น ๆ ) ในการฝึกอบรม Pascal SBD ให้ดำเนินการตามขั้นตอนต่อไปนี้:
benchmark.tgz )dataset/img สร้างไดเรกทอรี ./data/sbd SBD ( . ที่รูตของโยลค์) และคัดลอก dataset/img ไปที่ ./data/sbd/img sbd/img./data/sbd/ SBD/--config=yolact_resnet50_pascal_config ตรวจสอบการกำหนดค่านั้นเพื่อดูวิธีขยายไปยังรุ่นอื่น ๆ ฉันจะทำให้ทุกอย่างเป็นไปโดยอัตโนมัติด้วยสคริปต์เร็ว ๆ นี้ไม่ต้องกังวล นอกจากนี้หากคุณต้องการสคริปต์ที่ฉันใช้ในการแปลงคำอธิบายประกอบฉันใส่ไว้ใน ./scripts/convert_sbd.py แต่คุณจะต้องตรวจสอบว่ามันทำงานอย่างไรเพื่อให้สามารถใช้งานได้เพราะฉันจำไม่ได้ในตอนนี้
หากคุณต้องการตรวจสอบผลลัพธ์ของเราคุณสามารถดาวน์โหลดน้ำหนัก yolact_resnet50_pascal_config ของเราได้จากที่นี่ รุ่นนี้ควรได้รับ 72.3 MASK AP_50 และ 56.2 MASK AP_70 โปรดทราบว่า "AL ทั้งหมด" AP นั้นไม่เหมือนกับ "Vol" AP ที่รายงานในเอกสารอื่น ๆ สำหรับ Pascal (พวกเขาใช้ค่าเฉลี่ยของเกณฑ์จาก 0.1 - 0.9 โดยเพิ่มขึ้น 0.1 แทนสิ่งที่ Coco ใช้)
นอกจากนี้คุณยังสามารถฝึกอบรมในชุดข้อมูลของคุณเองได้โดยทำตามขั้นตอนเหล่านี้:
infoliscenseimage : license, flickr_url, coco_url, date_capturedcategories (เราใช้รูปแบบของเราเองสำหรับหมวดหมู่ดูด้านล่าง)dataset_base ใน data/config.py (ดูความคิดเห็นใน dataset_base สำหรับคำอธิบายของแต่ละฟิลด์): my_custom_dataset = dataset_base . copy ({
'name' : 'My Dataset' ,
'train_images' : 'path_to_training_images' ,
'train_info' : 'path_to_training_annotation' ,
'valid_images' : 'path_to_validation_images' ,
'valid_info' : 'path_to_validation_annotation' ,
'has_gt' : True ,
'class_names' : ( 'my_class_id_1' , 'my_class_id_2' , 'my_class_id_3' , ...)
})class_names หากนี่ไม่ใช่กรณีของไฟล์คำอธิบายประกอบของคุณ (เช่นใน Coco) ให้ดูที่ Field label_map ใน dataset_basepython train.py --help ), train.py จะทำแผนที่การตรวจสอบความถูกต้องของเอาท์พุทสำหรับภาพ 5,000 ภาพแรกในชุดข้อมูลทุก 2 ยุคyolact_base_config ในไฟล์เดียวกันเปลี่ยนค่าสำหรับ 'dataset' เป็น 'my_custom_dataset' หรืออะไรก็ตามที่คุณตั้งชื่อวัตถุ config ด้านบน จากนั้นคุณสามารถใช้คำสั่งการฝึกอบรมใด ๆ ในส่วนก่อนหน้า ดูโพสต์ที่ดีนี้โดย @amit12690 สำหรับเคล็ดลับเกี่ยวกับวิธีการใส่คำอธิบายประกอบชุดข้อมูลที่กำหนดเองและเตรียมความพร้อมสำหรับใช้กับโยลค์
หากคุณใช้โยลแล็คหรือฐานรหัสนี้ในงานของคุณโปรดอ้างอิง
 @inproceedings{yolact-iccv2019,
  author    = {Daniel Bolya and Chong Zhou and Fanyi Xiao and Yong Jae Lee},
  title     = {YOLACT: {Real-time} Instance Segmentation},
  booktitle = {ICCV},
  year      = {2019},
}
สำหรับ Yolact ++ โปรดอ้างอิง
 @article{yolact-plus-tpami2020,
  author  = {Daniel Bolya and Chong Zhou and Fanyi Xiao and Yong Jae Lee},
  journal = {IEEE Transactions on Pattern Analysis and Machine Intelligence},
  title   = {YOLACT++: Better Real-time Instance Segmentation},
  year    = {2020},
}
สำหรับคำถามเกี่ยวกับกระดาษหรือรหัสของเราโปรดติดต่อ Daniel Bolya


