yolact
1.0.0
    ██╗   ██╗ ██████╗ ██╗      █████╗  ██████╗████████╗
    ╚██╗ ██╔╝██╔═══██╗██║     ██╔══██╗██╔════╝╚══██╔══╝
     ╚████╔╝ ██║   ██║██║     ███████║██║        ██║
      ╚██╔╝  ██║   ██║██║     ██╔══██║██║        ██║
       ██║   ╚██████╔╝███████╗██║  ██║╚██████╗   ██║
       ╚═╝    ╚═════╝ ╚══════╝╚═╝  ╚═╝ ╚═════╝   ╚═╝
リアルタイムインスタンスセグメンテーションのためのシンプルで完全な畳み込みモデル。これは私たちの論文のコードです:
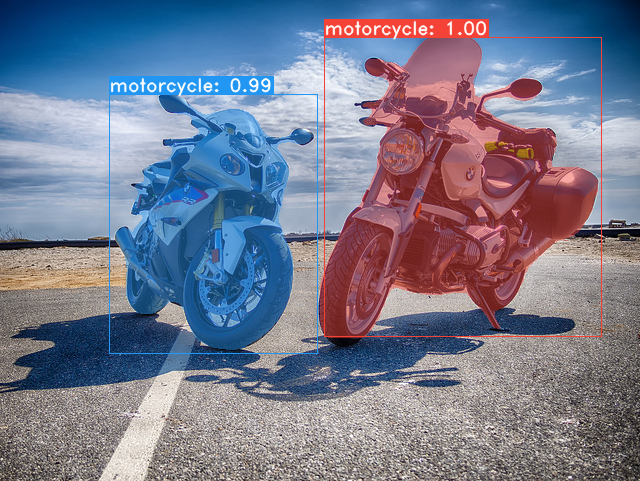
Yolact ++のResNet50モデルは、Titan XPで33.5 fpsで実行され、Cocoのtest-devで34.1マップを達成します(こちらのジャーナルペーパーをご覧ください)。
Yolact ++を使用するには、DCNV2コードをコンパイルしてください。 (インストールを参照)
Yolactベースモデルの例(Titan XPの33.5 fpsおよびCocoのtest-devの29.8マップ):
git clone https://github.com/dbolya/yolact.git
cd yolactconda env create -f environment.yml実行します # Cython needs to be installed before pycocotools
pip install cython
pip install opencv-python pillow pycocotools matplotlib ./data/cocoにダンプすることに注意してください。 sh data/scripts/COCO.shtest-devでyolactを評価したい場合は、このスクリプトでtest-devをダウンロードしてください。 sh data/scripts/COCO_test.sh cd external/DCNv2
python setup.py build developTitan XPでのFPSとtest-devのマップとともに、YOLACTモデル(2019年4月5日にリリース)とともに次のとおりです。
| 画像サイズ | バックボーン | FPS | 地図 | ウェイト | |
|---|---|---|---|---|---|
| 550 | resnet50-fpn | 42.5 | 28.2 | yolact_resnet50_54_800000.pth | 鏡 |
| 550 | darknet53-fpn | 40.0 | 28.7 | yolact_darknet53_54_800000.pth | 鏡 |
| 550 | resnet101-fpn | 33.5 | 29.8 | yolact_base_54_800000.pth | 鏡 |
| 700 | resnet101-fpn | 23.6 | 31.2 | Yolact_im700_54_800000.pth | 鏡 |
Yolact ++モデル(2019年12月16日にリリース):
| 画像サイズ | バックボーン | FPS | 地図 | ウェイト | |
|---|---|---|---|---|---|
| 550 | resnet50-fpn | 33.5 | 34.1 | yolact_plus_resnet50_54_800000.pth | 鏡 |
| 550 | resnet101-fpn | 27.3 | 34.6 | yolact_plus_base_54_800000.pth | 鏡 |
モデルを評価するには、対応するWeightsファイルを./weightsディレクトリに配置し、次のコマンドのいずれかを実行します。各構成の名前は、ファイル名の番号の前にすべてです(例: yolact_base_54_800000.pthのyolact_base )。
 # Quantitatively evaluate a trained model on the entire validation set. Make sure you have COCO downloaded as above.
# This should get 29.92 validation mask mAP last time I checked.
python eval.py --trained_model=weights/yolact_base_54_800000.pth

# Output a COCOEval json to submit to the website or to use the run_coco_eval.py script.
# This command will create './results/bbox_detections.json' and './results/mask_detections.json' for detection and instance segmentation respectively.
python eval.py --trained_model=weights/yolact_base_54_800000.pth --output_coco_json

# You can run COCOEval on the files created in the previous command. The performance should match my implementation in eval.py.
python run_coco_eval.py

# To output a coco json file for test-dev, make sure you have test-dev downloaded from above and go
python eval.py --trained_model=weights/yolact_base_54_800000.pth --output_coco_json --dataset=coco2017_testdev_dataset # Display qualitative results on COCO. From here on I'll use a confidence threshold of 0.15.
python eval.py --trained_model=weights/yolact_base_54_800000.pth --score_threshold=0.15 --top_k=15 --display # Run just the raw model on the first 1k images of the validation set
python eval.py --trained_model=weights/yolact_base_54_800000.pth --benchmark --max_images=1000 # Display qualitative results on the specified image.
python eval.py --trained_model=weights/yolact_base_54_800000.pth --score_threshold=0.15 --top_k=15 --image=my_image.png
# Process an image and save it to another file.
python eval.py --trained_model=weights/yolact_base_54_800000.pth --score_threshold=0.15 --top_k=15 --image=input_image.png:output_image.png
# Process a whole folder of images.
python eval.py --trained_model=weights/yolact_base_54_800000.pth --score_threshold=0.15 --top_k=15 --images=path/to/input/folder:path/to/output/folder # Display a video in real-time. "--video_multiframe" will process that many frames at once for improved performance.
# If you want, use "--display_fps" to draw the FPS directly on the frame.
python eval.py --trained_model=weights/yolact_base_54_800000.pth --score_threshold=0.15 --top_k=15 --video_multiframe=4 --video=my_video.mp4
# Display a webcam feed in real-time. If you have multiple webcams pass the index of the webcam you want instead of 0.
python eval.py --trained_model=weights/yolact_base_54_800000.pth --score_threshold=0.15 --top_k=15 --video_multiframe=4 --video=0
# Process a video and save it to another file. This uses the same pipeline as the ones above now, so it's fast!
python eval.py --trained_model=weights/yolact_base_54_800000.pth --score_threshold=0.15 --top_k=15 --video_multiframe=4 --video=input_video.mp4:output_video.mp4あなたが言うことができるように、 eval.pyたくさんのことをすることができます。 --helpコマンドを実行して、できるすべてのことを確認します。
python eval.py --helpデフォルトでは、ココでトレーニングします。上記のコマンドを使用して、必ずデータセットをダウンロードしてください。
./weightsに入れます。resnet101_reducedfc.pthをダウンロードしてください。resnet50-19c8e357.pthをダウンロードしてください。darknet53.pthをダウンロードしてください。*_interrupt.pthファイルを保存できることに注意してください。<config>_<epoch>_<iter>.pthでデフォルトで./weightsディレクトリに保存されます。 # Trains using the base config with a batch size of 8 (the default).
python train.py --config=yolact_base_config
# Trains yolact_base_config with a batch_size of 5. For the 550px models, 1 batch takes up around 1.5 gigs of VRAM, so specify accordingly.
python train.py --config=yolact_base_config --batch_size=5
# Resume training yolact_base with a specific weight file and start from the iteration specified in the weight file's name.
python train.py --config=yolact_base_config --resume=weights/yolact_base_10_32100.pth --start_iter=-1
# Use the help option to see a description of all available command line arguments
python train.py --helpYolactは、トレーニング中に複数のGPUをシームレスにサポートするようになりました。
export CUDA_VISIBLE_DEVICES=[gpus]nvidia-smiで確認できます。8*num_gpusに設定するだけです。トレーニングスクリプトは、ハイパーパラメーターを適切な値に自動的にスケーリングします。--batch_alloc=[alloc]を使用できます。ここで、[alloc]は各GPUの画像の数を含むコンマが発します。これはbatch_sizeに合計する必要があります。 Yolactは、デフォルトでトレーニングと検証情報を記録するようになりました。 --no_logでこれを無効にすることができます。これらのログを視覚化する方法に関するガイドはまもなく登場しますが、今ではutils/logger.pyのLogVizualizerをご覧ください。
また、Pascal SBDアノテーションに関するトレーニングの構成も含めます(迅速な実験または他の方法との比較用)。 Pascal SBDでトレーニングするには、次の手順を進めます。
benchmark.tgzと呼ばれます)。dataset/imgというフォルダーが必要です。ディレクトリ./data/sbd (ここ. yolactのルート)を作成し、 dataset/imgを./data/sbd/imgにコピーします。./data/sbd/に注釈を抽出します。--config=yolact_resnet50_pascal_configを使用してトレーニングできます。その構成を確認して、他のモデルに拡張する方法を確認してください。私はこれをすぐにスクリプトで自動化します、心配しないでください。また、アノテーションを変換するために使用したスクリプトが必要な場合は、 ./scripts/convert_sbd.py convert_sbd.pyに入れますが、実際に覚えていないため、使用できるように機能する方法を確認する必要があります。
結果を確認する場合は、 yolact_resnet50_pascal_configのウェイトをここからダウンロードできます。このモデルは、72.3マスクAP_50および56.2マスクAP_70を取得するはずです。 「All」APは、Pascalの他の論文で報告された「Vol」APと同じではないことに注意してください(CoCoが使用するものではなく0.1の増分で、 0.1 - 0.9でしきい値の平均を使用しています)。
また、次の手順に従って、自分のデータセットでトレーニングすることもできます。
infoliscenseimageの下: license, flickr_url, coco_url, date_capturedcategories (カテゴリに独自の形式を使用します。以下を参照)data/config.pyのdataset_baseの下にデータセットの定義を作成します(各フィールドの説明については、 dataset_baseのコメントを参照してください): my_custom_dataset = dataset_base . copy ({
'name' : 'My Dataset' ,
'train_images' : 'path_to_training_images' ,
'train_info' : 'path_to_training_annotation' ,
'valid_images' : 'path_to_validation_images' ,
'valid_info' : 'path_to_validation_annotation' ,
'has_gt' : True ,
'class_names' : ( 'my_class_id_1' , 'my_class_id_2' , 'my_class_id_3' , ...)
})class_namesの順序で順番に増加する必要があります。これがアノテーションファイル(COCOのように)に当てはまらない場合は、 dataset_baseのフィールドlabel_map参照してください。python train.py --helpを参照)、 train.py 、2つのエポックごとにデータセット内の最初の5000画像の検証マップを出力します。yolact_base_configで、 'dataset'の値を'my_custom_dataset'または上記のconfigオブジェクトに指定したものに変更します。次に、前のセクションでトレーニングコマンドを使用できます。 カスタムデータセットに注釈を付け、YOLACTで使用するために準備する方法のヒントについては、 @Amit12690によるこの素敵な投稿を参照してください。
仕事でYolactまたはこのコードベースを使用している場合は、引用してください
 @inproceedings{yolact-iccv2019,
  author    = {Daniel Bolya and Chong Zhou and Fanyi Xiao and Yong Jae Lee},
  title     = {YOLACT: {Real-time} Instance Segmentation},
  booktitle = {ICCV},
  year      = {2019},
}
Yolact ++については、引用してください
 @article{yolact-plus-tpami2020,
  author  = {Daniel Bolya and Chong Zhou and Fanyi Xiao and Yong Jae Lee},
  journal = {IEEE Transactions on Pattern Analysis and Machine Intelligence},
  title   = {YOLACT++: Better Real-time Instance Segmentation},
  year    = {2020},
}
私たちの論文またはコードに関する質問については、ダニエル・ボリャにお問い合わせください。


