ControlNet for Diffusers
1.0.0
该存储库为开发人员提供了最简单的教程代码,并在扩散器框架中而不是WebUI中使用ControlNet和基本模型。我们的作品基于其他出色的作品。尽管这些作品已经进行了一些尝试,但没有教程来支持扩散器中的多样化控制网。
我们还支持T2-apapter-for-fiffusers,洛拉 - 爆炸器。如果您对您有帮助,请不要刻薄给我们一个明星。
我们的目标是在扩散器框架中替换ControlNet的基本模型和推断。原始的控制网已在Pytorch_lightning中进行训练,并且仅以稳定 - 扩散1.5为基础模型的释放权重。但是,用户采用自己的基本模型而不是SD-1.5更灵活。现在,让我们以V3为例。我们将向您展示如何逐步实现这一目标(ControlNet-anythingv3)。我们确实提供了COLAB演示,但它仅适用于具有较大RAM的CoLab Pro用户。
幸运的是,ControlNet已经提供了将控制网络转移到任何其他社区模型的指南。背后的逻辑如下,我们保持增加的控制权重,仅替换基本模型。请注意,这可能不会始终工作,因为ControlNet可能在基本模型中具有一些火车重量。
NewBaseModel-ControlHint = NewBaseModel + OriginalBaseModel-ControlHint - OriginalBaseModel首先,我们从ControlNet克隆此仓库。
git clone https://github.com/lllyasviel/ControlNet.git
cd ControlNet
然后,我们必须准备原始basemodel(Path_sd15),OriginalBaseModel-controlhint(Path_sd_sd15_with_control),newBaseModel(path_input)的原始权重。您只需要下载以下权重,例如,我们将姿势用作ControlHint和任何v3作为我们的新基础模型。我们将所有权重放在内部./models中。
path_sd15 = ' ./models/v1-5-pruned.ckpt '
path_sd15_with_control = ' ./models/control_sd15_openpose.pth '
path_input = ' ./models/anything-v3-full.safetensors '
path_output = ' ./models/control_any3_openpose.pth '
最后,我们可以直接运行
python tool_transfer_control.py如果成功,您将获得新模型。该模型已经可以在ControlNet代码库中使用。
models/control_any3_openpose.pth如果您想尝试使用其他型号,则只需定义自己的path_sd15_with_control和path_input即可。如果PATH_INPUT是使用扩散器训练的,则可以使用Convert_diffusers_to_original_stable_diffusion.py首先将其转换为SafetEnsors。
感激地,Takuma Mori在最近的PR中支持了它,因此我们可以轻松实现这一目标。由于它仍然是不稳定的,因此它可能不稳定,因此我们必须使用特定的提交版本。我们注意到,扩散器已在3/2/2023合并了PR,我们将很快重新格式化教程。
git clone https://github.com/takuma104/diffusers.git
cd diffusers
git checkout 9a37409663a53f775fa380db332d37d7ea75c915
pip install .
给定步骤(1)中生成模型的路径,运行
python ./scripts/convert_controlnet_to_diffusers.py --checkpoint_path control_any3_openpose.pth --dump_path control_any3_openpose --device cpu我们在control_any3_openpose中具有保存的模型。现在我们可以定期测试。
 from diffusers import StableDiffusionControlNetPipeline
from diffusers . utils import load_image

pose_image = load_image ( 'https://huggingface.co/takuma104/controlnet_dev/resolve/main/pose.png' )
pipe = StableDiffusionControlNetPipeline . from_pretrained ( "control_any3_openpose" ). to ( "cuda" )

pipe . safety_checker = lambda images , clip_input : ( images , False )

image = pipe ( prompt = "1gril,masterpiece,graden" , controlnet_hint = pose_image ). images [ 0 ]
image . save ( "generated.png" )
生成的结果可能不够好,因为姿势很难。因此,为确保一切顺利,我们建议通过Posemaker产生正常的姿势,或在./images/pose.png中使用我们提供的姿势图像。

这是为了支持ControlNet,能够仅修改目标区域而不是完整的图像,就像稳定的扩散侵蚀一样。目前,我们会事先提供条件(姿势,分割图),但是您可以使用ControlNET中使用的预训练的检测器。
我们为使用提供了所需的管道。但是请注意,此文件在没有完整测试的情况下是脆弱的,我们将在以后正式的扩散器框架中考虑支持它。另外,我们发现ControlNet(基于SD1.5)与稳定 - 扩散2侵入不兼容,因为某些层具有不同的模块和尺寸,如果您强行加载权重并跳过这些无与伦比的层,则结果将是不好的
 # assume you already know the absolute path of installed diffusers
cp pipeline_stable_diffusion_controlnet_inpaint.py  PATH/pipelines/stable_diffusion
然后,您需要在相应的文件中导入此新添加的管道
 PATH/pipelines/__init__.py
PATH/__init__.py
现在,我们可以运行
import torch
from diffusers . utils import load_image
from diffusers import StableDiffusionInpaintPipeline , StableDiffusionControlNetInpaintPipeline
# we have downloaded models locally, you can also load from huggingface
# control_sd15_seg is converted from control_sd15_seg.safetensors using instructions above
pipe_control = StableDiffusionControlNetInpaintPipeline . from_pretrained ( "./diffusers/control_sd15_seg" , torch_dtype = torch . float16 ). to ( 'cuda' )
pipe_inpaint = StableDiffusionInpaintPipeline . from_pretrained ( "./diffusers/stable-diffusion-inpainting" , torch_dtype = torch . float16 ). to ( 'cuda' )
# yes, we can directly replace the UNet
pipe_control . unet = pipe_inpaint . unet
pipe_control . unet . in_channels = 4
# we also the same example as stable-diffusion-inpainting
image = load_image ( "https://raw.githubusercontent.com/CompVis/latent-diffusion/main/data/inpainting_examples/overture-creations-5sI6fQgYIuo.png" )
mask = load_image ( "https://raw.githubusercontent.com/CompVis/latent-diffusion/main/data/inpainting_examples/overture-creations-5sI6fQgYIuo_mask.png" )
# the segmentation result is generated from https://huggingface.co/spaces/hysts/ControlNet
control_image = load_image ( 'tmptvkkr0tg.png' )
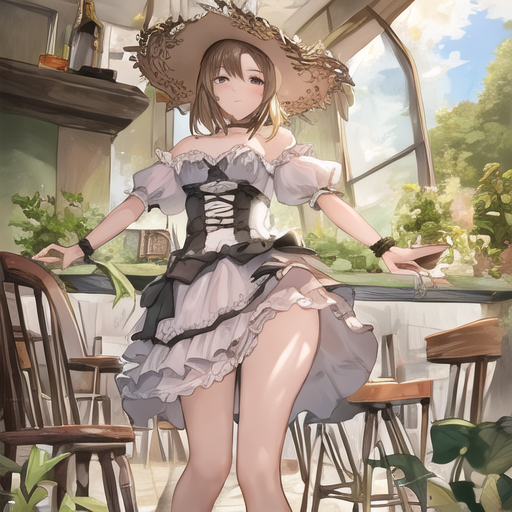
image = pipe_control ( prompt = "Face of a yellow cat, high resolution, sitting on a park bench" ,
negative_prompt = "lowres, bad anatomy, worst quality, low quality" ,
controlnet_hint = control_image ,
image = image ,
mask_image = mask ,
num_inference_steps = 100 ). images [ 0 ]
image . save ( "inpaint_seg.jpg" )以下图像是原始图像,掩码图像,分割(控制提示)并生成新图像。

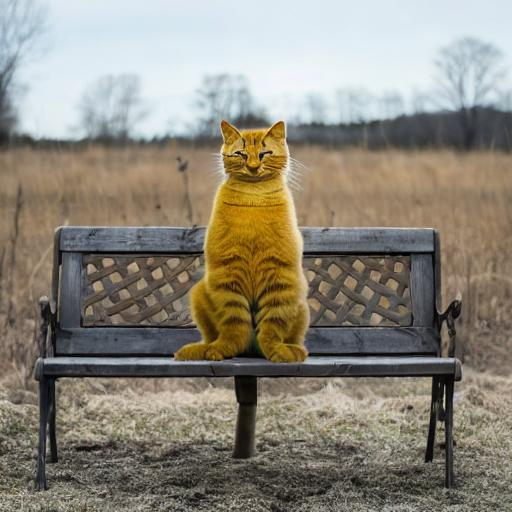
您也可以将姿势用作控制提示。但是请注意,建议使用openpose格式,这与培训过程一致。如果您只想在本地安装openpose的情况下测试一些图像,则可以直接使用ControlNet的在线演示来生成姿势图像,并给定评估尺寸的512x512输入。
 image = load_image ( "./images/pose_image.jpg" )
mask = load_image ( "./images/pose_mask.jpg" )
pose_image = load_image ( './images/pose_hint.png' )

image = pipe_control ( prompt = "Face of a young boy smiling" ,
                     negative_prompt = "lowres, bad anatomy, worst quality, low quality" ,
                     controlnet_hint = pose_image ,
                     image = image ,
                     mask_image = mask ,
                     num_inference_steps = 100 ). images [ 0 ]

image . save ( "inpaint_pos.jpg" )


我们已上传pipeline_stable_diffusion_controlnet_inpaint_img2img.py支持img2img。您可以遵循与本节相同的指令。
与T2-apapter相似,ControlNet还支持多个控制图像作为输入。背后的想法很简单,因为基本模型被冷冻,我们可以将ControlNet1和ControlNet2的输出组合在一起,并将其用作UNET的输入。在这里,我们提供伪代码供参考。您需要在下面修改管道。
 control1 = controlnet1 ( latent_model_input , t , encoder_hidden_states = prompt_embeds , controlnet_hint = controlnet_hint1 )
control2 = controlnet2 ( latent_model_input , t , encoder_hidden_states = prompt_embeds , controlnet_hint = controlnet_hint2 )

# please note that the weights should be adjusted accordingly
control1_weight = 1.00 # control_any3_openpose
control2_weight = 0.50 # control_sd15_depth

merged_control = []
for i in range ( len ( control1 )):
    merged_control . append ( control1_weight * control [ i ] + control2_weight * control_1 [ i ])
control = merged_control

noise_pred = unet ( latent_model_input , t , encoder_hidden_states = prompt_embeds , cross_attention_kwargs = cross_attention_kwargs , control = control ). sample
这是多控制的示例,我们使用姿势和深度图是控制提示。测试图像都将其归功于T2-apapter。
为了避免此仓库太肿,我们提供了有关火车控制式浸水者培训的教程。
我们首先感谢ControlNet的作者如此出色的工作,我们的转换代码是从这里借来的。我们还对扩散器中此拉的请求的贡献表示赞赏,因此我们可以将控制网络加载到扩散器中。
存储库仍在积极开发中,如果您在使用时遇到任何问题,请随时打开问题。


