RSKImageCropper
5.0.1
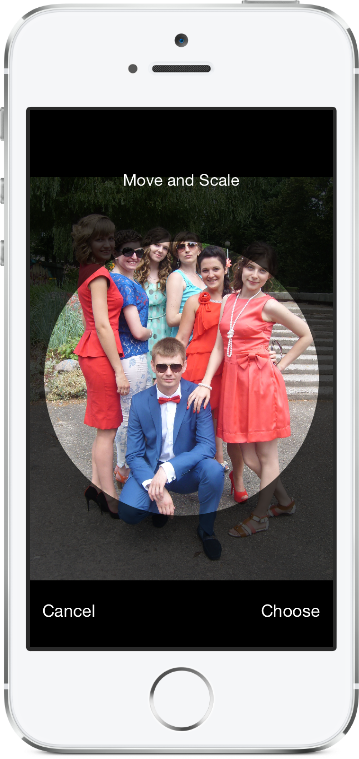
ภาพครอปเปอร์สำหรับ iOS เช่นในแอพติดต่อที่มีการสนับสนุนการวางแนวนอน
rskimagecropper ต้องการ iOS 12.0 หรือใหม่กว่า
ในการเพิ่มแพ็คเกจ RSKImageCropper ลงในโครงการ XCode ของคุณเลือกไฟล์> แพ็คเกจ Swift> เพิ่มการพึ่งพาแพ็คเกจและป้อน URL ที่เก็บ
https://github.com/ruslanskorb/RSKImageCropper.git
เพิ่ม pod RSKImageCropper ลงใน podfile ของคุณ
pod 'RSKImageCropper'
เรียกใช้ pod install จากเทอร์มินัลจากนั้นเปิดไฟล์ .xcworkspace ของแอปเพื่อเรียกใช้ XCode
นำเข้าส่วนหัว RSKImageCropper.h โดยทั่วไปควรเขียนเป็น #import <RSKImageCropper/RSKImageCropper.h>
เพิ่มโครงการ ruslanskorb/RSKImageCropper ลงใน CartFile ของคุณ
github "ruslanskorb/RSKImageCropper"
เรียกใช้ carthage update จากนั้นทำตามขั้นตอนเพิ่มเติมที่จำเป็นในการเพิ่มเฟรมเวิร์ก iOS และ/หรือ Mac ลงในโครงการของคุณ
นำเข้าเฟรมเวิร์ก/โมดูล rskimagecropper
@import RSKImageCropper#import <RSKImageCropper/RSKImageCropper.h> นำเข้าส่วนหัวชั้นเรียน
# import < RSKImageCropper/RSKImageCropper.h >เพียงสร้างคอนโทรลเลอร์มุมมองสำหรับการครอบตัดภาพและตั้งค่าตัวแทน
- ( IBAction )onButtonTouch:(UIButton *)sender
{
    UIImage *image = [UIImage imageNamed: @" image " ];
    RSKImageCropViewController *imageCropViewController = [[RSKImageCropViewController alloc ] initWithImage: image];
    imageCropViewController. delegate = self;
    [ self .navigationController pushViewController: imageCropViewController animated: YES ];
} RSKImageCropViewControllerDelegate ให้วิธีการแทนสามวิธี หากต้องการใช้งานให้ใช้ตัวแทนในคอนโทรลเลอร์มุมมองของคุณ
@interface ViewController () <RSKImageCropViewControllerDelegate>จากนั้นใช้ฟังก์ชั่นตัวแทน
 // Crop image has been canceled.
- ( void )imageCropViewControllerDidCancelCrop:(RSKImageCropViewController *)controller
{
    [ self .navigationController popViewControllerAnimated: YES ];
}

// The original image has been cropped. Additionally provides a rotation angle used to produce image.
- ( void )imageCropViewController:(RSKImageCropViewController *)controller
                   didCropImage:(UIImage *)croppedImage
                  usingCropRect:( CGRect )cropRect
                  rotationAngle:( CGFloat )rotationAngle
{
    self. imageView . image = croppedImage;
    [ self .navigationController popViewControllerAnimated: YES ];
}

// The original image will be cropped.
- ( void )imageCropViewController:(RSKImageCropViewController *)controller
                  willCropImage:(UIImage *)originalImage
{
    // Use when `applyMaskToCroppedImage` set to YES.
    [SVProgressHUD show ];
} RSKImageCropViewControllerDataSource ให้วิธีแหล่งข้อมูลสามวิธี วิธีการ imageCropViewControllerCustomMaskRect: ถามแหล่งข้อมูลสำหรับ rect ที่กำหนดเองสำหรับหน้ากาก วิธีการ imageCropViewControllerCustomMaskPath: ถามแหล่งข้อมูลสำหรับเส้นทางที่กำหนดเองสำหรับหน้ากาก วิธีการ imageCropViewControllerCustomMovementRect: ถามแหล่งข้อมูลสำหรับการกำหนดรูปแบบที่กำหนดเองซึ่งสามารถเคลื่อนย้ายภาพได้ หากต้องการใช้งานให้ใช้แหล่งข้อมูลในคอนโทรลเลอร์มุมมองของคุณ
@interface ViewController () <RSKImageCropViewControllerDataSource>จากนั้นใช้ฟังก์ชั่นแหล่งข้อมูล
 // Returns a custom rect for the mask.
- ( CGRect )imageCropViewControllerCustomMaskRect:(RSKImageCropViewController *)controller
{
    CGSize aspectRatio = CGSizeMake ( 16 . 0f , 9 . 0f );

    CGFloat viewWidth = CGRectGetWidth (controller. view . frame );
    CGFloat viewHeight = CGRectGetHeight (controller. view . frame );

    CGFloat maskWidth;
    if ([controller isPortraitInterfaceOrientation ]) {
        maskWidth = viewWidth;
    } else {
        maskWidth = viewHeight;
    }

    CGFloat maskHeight;
    do {
        maskHeight = maskWidth * aspectRatio. height / aspectRatio. width ;
        maskWidth -= 1 . 0f ;
    } while (maskHeight != floor (maskHeight));
    maskWidth += 1 . 0f ;

    CGSize maskSize = CGSizeMake (maskWidth, maskHeight);

    CGRect maskRect = CGRectMake ((viewWidth - maskSize. width ) * 0 . 5f ,
                                 (viewHeight - maskSize. height ) * 0 . 5f ,
                                 maskSize. width ,
                                 maskSize. height );

    return maskRect;
}

// Returns a custom path for the mask.
- (UIBezierPath *)imageCropViewControllerCustomMaskPath:(RSKImageCropViewController *)controller
{
    CGRect rect = controller. maskRect ;
    CGPoint point1 = CGPointMake ( CGRectGetMinX (rect), CGRectGetMaxY (rect));
    CGPoint point2 = CGPointMake ( CGRectGetMaxX (rect), CGRectGetMaxY (rect));
    CGPoint point3 = CGPointMake ( CGRectGetMaxX (rect), CGRectGetMinY (rect));
    CGPoint point4 = CGPointMake ( CGRectGetMinX (rect), CGRectGetMinY (rect));

    UIBezierPath *rectangle = [UIBezierPath bezierPath ];
    [rectangle moveToPoint: point1];
    [rectangle addLineToPoint: point2];
    [rectangle addLineToPoint: point3];
    [rectangle addLineToPoint: point4];
    [rectangle closePath ];

    return rectangle;
}

// Returns a custom rect in which the image can be moved.
- ( CGRect )imageCropViewControllerCustomMovementRect:(RSKImageCropViewController *)controller
{
    if (controller. rotationAngle == 0 ) {
        return controller. maskRect ;
    } else {
        CGRect maskRect = controller. maskRect ;
        CGFloat rotationAngle = controller. rotationAngle ;

        CGRect movementRect = CGRectZero ;

        movementRect. size . width = CGRectGetWidth (maskRect) * fabs ( cos (rotationAngle)) + CGRectGetHeight (maskRect) * fabs ( sin (rotationAngle));
        movementRect. size . height = CGRectGetHeight (maskRect) * fabs ( cos (rotationAngle)) + CGRectGetWidth (maskRect) * fabs ( sin (rotationAngle));

        movementRect. origin . x = CGRectGetMinX (maskRect) + ( CGRectGetWidth (maskRect) - CGRectGetWidth (movementRect)) * 0 . 5f ;
        movementRect. origin . y = CGRectGetMinY (maskRect) + ( CGRectGetHeight (maskRect) - CGRectGetHeight (movementRect)) * 0 . 5f ;

        movementRect. origin . x = floor ( CGRectGetMinX (movementRect));
        movementRect. origin . y = floor ( CGRectGetMinY (movementRect));
        movementRect = CGRectIntegral (movementRect);

        return movementRect;
    }
} สร้างและเรียกใช้โครงการ RSKImageCropperExample ใน xcode เพื่อดู RSKImageCropper ในการดำเนินการ มีความสุข. ส้อมและส่งคำขอดึง คิดหาตะขอสำหรับการปรับแต่ง
RSKImageCropper ไม่ต้องการความเป็นส่วนตัว จากข้อมูลที่ได้รับจาก Apple เราควรหลีกเลี่ยงการเพิ่มความเป็นส่วนตัวที่ว่างเปล่าลงในกรอบของเรา
Ruslan Skorb
โครงการนี้มีอยู่ภายใต้ใบอนุญาต MIT ดูไฟล์ใบอนุญาตสำหรับข้อมูลเพิ่มเติม การระบุแหล่งที่มาโดยการเชื่อมโยงไปยังหน้าโครงการได้รับการชื่นชม


