RSKImageCropper
5.0.1
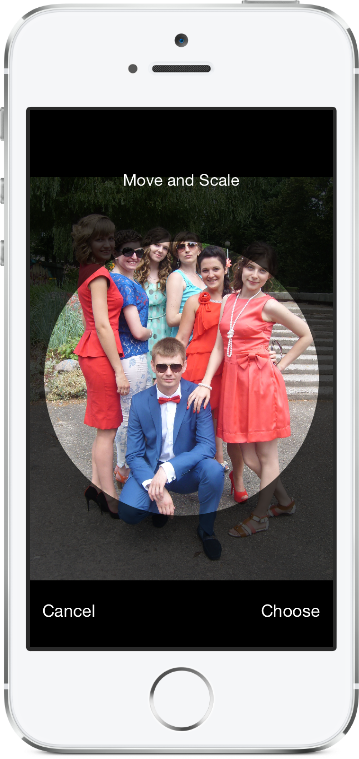
조경 방향을 지원하는 연락처 앱에서 iOS를위한 이미지 작물.
rskimagecropper는 iOS 12.0 이상이 필요합니다.
Xcode 프로젝트에 RSKImageCropper 패키지를 추가하려면 파일> Swift 패키지> 패키지 종속성을 추가하고 리포지토리 URL을 입력하십시오.
https://github.com/ruslanskorb/RSKImageCropper.git
포드 RSKImageCropper Podfile에 추가하십시오.
pod 'RSKImageCropper'
터미널에서 pod install 실행 한 다음 앱의 .xcworkspace 파일을 열어 Xcode를 시작하십시오.
RSKImageCropper.h 헤더를 가져옵니다. 일반적으로 이것은 #import <RSKImageCropper/RSKImageCropper.h> 로 작성해야합니다
ruslanskorb/RSKImageCropper 프로젝트를 Cartfile에 추가하십시오.
github "ruslanskorb/RSKImageCropper"
carthage update 실행 한 다음 프로젝트에 iOS 및/또는 Mac 프레임 워크를 추가하는 데 필요한 추가 단계를 따르십시오.
rskimagecropper 프레임 워크/모듈을 가져옵니다.
@import RSKImageCropper#import <RSKImageCropper/RSKImageCropper.h> 클래스 헤더를 가져옵니다.
# import < RSKImageCropper/RSKImageCropper.h >이미지 자르기를위한보기 컨트롤러를 만들고 대의원을 설정하십시오.
- ( IBAction )onButtonTouch:(UIButton *)sender
{
    UIImage *image = [UIImage imageNamed: @" image " ];
    RSKImageCropViewController *imageCropViewController = [[RSKImageCropViewController alloc ] initWithImage: image];
    imageCropViewController. delegate = self;
    [ self .navigationController pushViewController: imageCropViewController animated: YES ];
} RSKImageCropViewControllerDelegate 세 가지 대표 방법을 제공합니다. 이를 사용하려면 View Controller에서 대의원을 구현하십시오.
@interface ViewController () <RSKImageCropViewControllerDelegate>그런 다음 대의원 기능을 구현하십시오.
 // Crop image has been canceled.
- ( void )imageCropViewControllerDidCancelCrop:(RSKImageCropViewController *)controller
{
    [ self .navigationController popViewControllerAnimated: YES ];
}

// The original image has been cropped. Additionally provides a rotation angle used to produce image.
- ( void )imageCropViewController:(RSKImageCropViewController *)controller
                   didCropImage:(UIImage *)croppedImage
                  usingCropRect:( CGRect )cropRect
                  rotationAngle:( CGFloat )rotationAngle
{
    self. imageView . image = croppedImage;
    [ self .navigationController popViewControllerAnimated: YES ];
}

// The original image will be cropped.
- ( void )imageCropViewController:(RSKImageCropViewController *)controller
                  willCropImage:(UIImage *)originalImage
{
    // Use when `applyMaskToCroppedImage` set to YES.
    [SVProgressHUD show ];
} RSKImageCropViewControllerDataSource 세 가지 데이터 소스 방법을 제공합니다. imageCropViewControllerCustomMaskRect: 마스크에 대한 사용자 정의 rect에 대한 데이터 소스를 묻습니다. 메소드 imageCropViewControllerCustomMaskPath: 마스크에 대한 사용자 정의 경로에 대한 데이터 소스를 묻습니다. 메소드 imageCropViewControllerCustomMovementRect: 이미지를 이동할 수있는 사용자 정의 rect에 대해 데이터 소스를 요청합니다. 이를 사용하려면 View Controller에서 데이터 소스를 구현하십시오.
@interface ViewController () <RSKImageCropViewControllerDataSource>그런 다음 데이터 소스 기능을 구현하십시오.
 // Returns a custom rect for the mask.
- ( CGRect )imageCropViewControllerCustomMaskRect:(RSKImageCropViewController *)controller
{
    CGSize aspectRatio = CGSizeMake ( 16 . 0f , 9 . 0f );

    CGFloat viewWidth = CGRectGetWidth (controller. view . frame );
    CGFloat viewHeight = CGRectGetHeight (controller. view . frame );

    CGFloat maskWidth;
    if ([controller isPortraitInterfaceOrientation ]) {
        maskWidth = viewWidth;
    } else {
        maskWidth = viewHeight;
    }

    CGFloat maskHeight;
    do {
        maskHeight = maskWidth * aspectRatio. height / aspectRatio. width ;
        maskWidth -= 1 . 0f ;
    } while (maskHeight != floor (maskHeight));
    maskWidth += 1 . 0f ;

    CGSize maskSize = CGSizeMake (maskWidth, maskHeight);

    CGRect maskRect = CGRectMake ((viewWidth - maskSize. width ) * 0 . 5f ,
                                 (viewHeight - maskSize. height ) * 0 . 5f ,
                                 maskSize. width ,
                                 maskSize. height );

    return maskRect;
}

// Returns a custom path for the mask.
- (UIBezierPath *)imageCropViewControllerCustomMaskPath:(RSKImageCropViewController *)controller
{
    CGRect rect = controller. maskRect ;
    CGPoint point1 = CGPointMake ( CGRectGetMinX (rect), CGRectGetMaxY (rect));
    CGPoint point2 = CGPointMake ( CGRectGetMaxX (rect), CGRectGetMaxY (rect));
    CGPoint point3 = CGPointMake ( CGRectGetMaxX (rect), CGRectGetMinY (rect));
    CGPoint point4 = CGPointMake ( CGRectGetMinX (rect), CGRectGetMinY (rect));

    UIBezierPath *rectangle = [UIBezierPath bezierPath ];
    [rectangle moveToPoint: point1];
    [rectangle addLineToPoint: point2];
    [rectangle addLineToPoint: point3];
    [rectangle addLineToPoint: point4];
    [rectangle closePath ];

    return rectangle;
}

// Returns a custom rect in which the image can be moved.
- ( CGRect )imageCropViewControllerCustomMovementRect:(RSKImageCropViewController *)controller
{
    if (controller. rotationAngle == 0 ) {
        return controller. maskRect ;
    } else {
        CGRect maskRect = controller. maskRect ;
        CGFloat rotationAngle = controller. rotationAngle ;

        CGRect movementRect = CGRectZero ;

        movementRect. size . width = CGRectGetWidth (maskRect) * fabs ( cos (rotationAngle)) + CGRectGetHeight (maskRect) * fabs ( sin (rotationAngle));
        movementRect. size . height = CGRectGetHeight (maskRect) * fabs ( cos (rotationAngle)) + CGRectGetWidth (maskRect) * fabs ( sin (rotationAngle));

        movementRect. origin . x = CGRectGetMinX (maskRect) + ( CGRectGetWidth (maskRect) - CGRectGetWidth (movementRect)) * 0 . 5f ;
        movementRect. origin . y = CGRectGetMinY (maskRect) + ( CGRectGetHeight (maskRect) - CGRectGetHeight (movementRect)) * 0 . 5f ;

        movementRect. origin . x = floor ( CGRectGetMinX (movementRect));
        movementRect. origin . y = floor ( CGRectGetMinY (movementRect));
        movementRect = CGRectIntegral (movementRect);

        return movementRect;
    }
} Xcode에 RSKImageCropperExample 프로젝트를 작성하고 실행하여 RSKImageCropper 작동하는 것을 볼 수 있습니다. 재미있어. 포크 및 풀 요청을 보냅니다. 사용자 정의를위한 후크를 알아냅니다.
RSKImageCropper 개인 정보가 필요하지 않습니다. Apple로부터받은 정보에 따르면, 우리는 프레임 워크에 빈 개인 정보를 추가하지 않아야합니다.
Ruslan Skorb
이 프로젝트는 MIT 라이센스에 따라 제공됩니다. 자세한 내용은 라이센스 파일을 참조하십시오. 프로젝트 페이지에 링크하여 귀속에 감사드립니다.


