RSKImageCropper
5.0.1
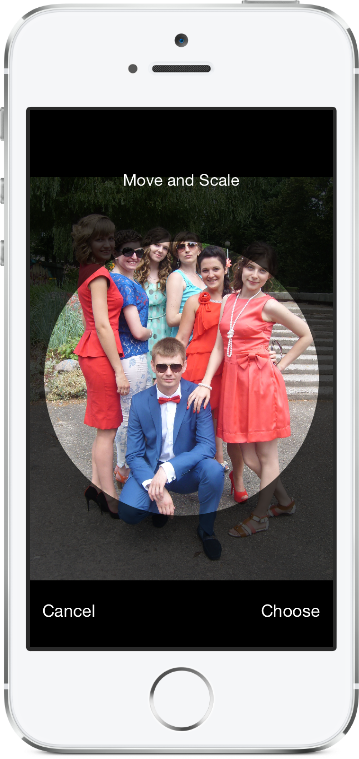
Изображение Cropper для iOS, как в приложении Contacts при поддержке ландшафтной ориентации.
RskimageCropper требует iOS 12,0 или более поздней версии.
Чтобы добавить пакет RSKImageCropper в свой проект Xcode, выберите «Файл»> «Свифт -пакеты»> «Добавить зависимость пакета» и введите URL -адрес репозитория.
https://github.com/ruslanskorb/RSKImageCropper.git
Добавьте Pod RSKImageCropper в свой Podfile.
pod 'RSKImageCropper'
Запустите pod install с терминала, затем откройте файл приложения .xcworkspace для запуска XCode.
Импортировать заголовок RSKImageCropper.h . Как правило, это должно быть написано как #import <RSKImageCropper/RSKImageCropper.h>
Добавьте проект ruslanskorb/RSKImageCropper в свой Cartfile.
github "ruslanskorb/RSKImageCropper"
Запустите carthage update , затем выполните дополнительные шаги, необходимые для добавления iOS и/или Mac Frameworks в ваш проект.
Импортируйте структуру/модуль RSKImageCropper.
@import RSKImageCropper#import <RSKImageCropper/RSKImageCropper.h> Импортировать заголовок класса.
# import < RSKImageCropper/RSKImageCropper.h >Просто создайте контроллер представления для обрезки изображения и установите делегат.
- ( IBAction )onButtonTouch:(UIButton *)sender
{
    UIImage *image = [UIImage imageNamed: @" image " ];
    RSKImageCropViewController *imageCropViewController = [[RSKImageCropViewController alloc ] initWithImage: image];
    imageCropViewController. delegate = self;
    [ self .navigationController pushViewController: imageCropViewController animated: YES ];
} RSKImageCropViewControllerDelegate предоставляет три метода делегата. Чтобы использовать их, реализуйте делегат в вашем контроллере представления.
@interface ViewController () <RSKImageCropViewControllerDelegate>Затем реализуйте функции делегата.
 // Crop image has been canceled.
- ( void )imageCropViewControllerDidCancelCrop:(RSKImageCropViewController *)controller
{
    [ self .navigationController popViewControllerAnimated: YES ];
}

// The original image has been cropped. Additionally provides a rotation angle used to produce image.
- ( void )imageCropViewController:(RSKImageCropViewController *)controller
                   didCropImage:(UIImage *)croppedImage
                  usingCropRect:( CGRect )cropRect
                  rotationAngle:( CGFloat )rotationAngle
{
    self. imageView . image = croppedImage;
    [ self .navigationController popViewControllerAnimated: YES ];
}

// The original image will be cropped.
- ( void )imageCropViewController:(RSKImageCropViewController *)controller
                  willCropImage:(UIImage *)originalImage
{
    // Use when `applyMaskToCroppedImage` set to YES.
    [SVProgressHUD show ];
} RSKImageCropViewControllerDataSource предоставляет три метода источника данных. Метод imageCropViewControllerCustomMaskRect: спрашивает источник данных для пользовательского прямоугольного для маски. Метод imageCropViewControllerCustomMaskPath: спрашивает источник данных для пользовательского пути для маски. Method imageCropViewControllerCustomMovementRect: спрашивает источник данных для пользовательского прямолинейного прямоугольного прямоугольного уровня, в котором можно перемещать изображение. Чтобы использовать их, реализуйте источник данных в вашем контроллере представления.
@interface ViewController () <RSKImageCropViewControllerDataSource>Затем реализуйте функции источника данных.
 // Returns a custom rect for the mask.
- ( CGRect )imageCropViewControllerCustomMaskRect:(RSKImageCropViewController *)controller
{
    CGSize aspectRatio = CGSizeMake ( 16 . 0f , 9 . 0f );

    CGFloat viewWidth = CGRectGetWidth (controller. view . frame );
    CGFloat viewHeight = CGRectGetHeight (controller. view . frame );

    CGFloat maskWidth;
    if ([controller isPortraitInterfaceOrientation ]) {
        maskWidth = viewWidth;
    } else {
        maskWidth = viewHeight;
    }

    CGFloat maskHeight;
    do {
        maskHeight = maskWidth * aspectRatio. height / aspectRatio. width ;
        maskWidth -= 1 . 0f ;
    } while (maskHeight != floor (maskHeight));
    maskWidth += 1 . 0f ;

    CGSize maskSize = CGSizeMake (maskWidth, maskHeight);

    CGRect maskRect = CGRectMake ((viewWidth - maskSize. width ) * 0 . 5f ,
                                 (viewHeight - maskSize. height ) * 0 . 5f ,
                                 maskSize. width ,
                                 maskSize. height );

    return maskRect;
}

// Returns a custom path for the mask.
- (UIBezierPath *)imageCropViewControllerCustomMaskPath:(RSKImageCropViewController *)controller
{
    CGRect rect = controller. maskRect ;
    CGPoint point1 = CGPointMake ( CGRectGetMinX (rect), CGRectGetMaxY (rect));
    CGPoint point2 = CGPointMake ( CGRectGetMaxX (rect), CGRectGetMaxY (rect));
    CGPoint point3 = CGPointMake ( CGRectGetMaxX (rect), CGRectGetMinY (rect));
    CGPoint point4 = CGPointMake ( CGRectGetMinX (rect), CGRectGetMinY (rect));

    UIBezierPath *rectangle = [UIBezierPath bezierPath ];
    [rectangle moveToPoint: point1];
    [rectangle addLineToPoint: point2];
    [rectangle addLineToPoint: point3];
    [rectangle addLineToPoint: point4];
    [rectangle closePath ];

    return rectangle;
}

// Returns a custom rect in which the image can be moved.
- ( CGRect )imageCropViewControllerCustomMovementRect:(RSKImageCropViewController *)controller
{
    if (controller. rotationAngle == 0 ) {
        return controller. maskRect ;
    } else {
        CGRect maskRect = controller. maskRect ;
        CGFloat rotationAngle = controller. rotationAngle ;

        CGRect movementRect = CGRectZero ;

        movementRect. size . width = CGRectGetWidth (maskRect) * fabs ( cos (rotationAngle)) + CGRectGetHeight (maskRect) * fabs ( sin (rotationAngle));
        movementRect. size . height = CGRectGetHeight (maskRect) * fabs ( cos (rotationAngle)) + CGRectGetWidth (maskRect) * fabs ( sin (rotationAngle));

        movementRect. origin . x = CGRectGetMinX (maskRect) + ( CGRectGetWidth (maskRect) - CGRectGetWidth (movementRect)) * 0 . 5f ;
        movementRect. origin . y = CGRectGetMinY (maskRect) + ( CGRectGetHeight (maskRect) - CGRectGetHeight (movementRect)) * 0 . 5f ;

        movementRect. origin . x = floor ( CGRectGetMinX (movementRect));
        movementRect. origin . y = floor ( CGRectGetMinY (movementRect));
        movementRect = CGRectIntegral (movementRect);

        return movementRect;
    }
} Создайте и запустите проект RSKImageCropperExample в Xcode, чтобы увидеть RSKImageCropper в действии. Веселиться. Вилка и отправьте запросы на привлечение. Выясните крючки для настройки.
RSKImageCropper не требует манифеста конфиденциальности. Согласно информации, полученной от Apple, мы должны избегать добавления пустого манифеста конфиденциальности в наши рамки.
Руслан Скорб
Этот проект доступен по лицензии MIT. Смотрите файл лицензии для получения дополнительной информации. Атрибуция, ссылаясь на страницу проекта.


