docsify this
v1.9.16: Merge pull request #161 from hibbitts-design
Magical Documentation Site Generator Docsify로 구축 된이 오픈 소스 웹 앱을 사용하면 자신의 웹 사이트를 설정하지 않고 온라인 마크 다운 파일을 웹 페이지로 게시 할 수 있습니다.
이 readme 파일을 최대 4 레벨의 제목을 포함하는 선택적인 사이드 바가있는 웹 페이지 로이 readme 파일을 볼 수 있도록 Docsify가 무엇을 할 수 있는지 확인하십시오!
그림 1. Docsify-this.net 웹 페이지 빌더.
Docsify를 사용해 보셨습니까? Docsify에 대한 의견을 공유하십시오
Docsify- 이는 웹 사이트 설정 또는 빌드 프로세스가 필요하지 않고 다양한 상황에서 마크 다운 컨텐츠를 쉽게 표시하고 공유 할 수있는 방법을 제공합니다. GitHub 또는 Codeberg에서 Markdown 파일을 호스팅하면 버전 제어 (변경 및 역전 기능)를 활용하고 협업을 활성화 할 수도 있습니다.
Docsify- 이것은 당신이 할 수 있습니다 :
Docsify- This는 URL 매개 변수를 통해 다음 형식으로 원격 마크 다운 파일을 렌더링하도록 구성된 사용자 정의 된 Docsify Open Publishing Starter Kit 사이트입니다.
https://docsify-this.net?basePath=URLpath&homepage=filename.md
Basepath Docsify 매개 변수는 렌더링 할 원시 소스 마크 다운 파일을 포함하는 URL 경로입니다. 파일의 이름이 예상 기본 readme.md 로 지정된 경우 다른 매개 변수가 필요하지 않으며, 그렇지 않으면 홈페이지 Docsify 매개 변수도 렌더링 할 파일 이름으로 설정되어 있어야합니다. 예를 들어 Docsify-이 URL은 다음과 같습니다
DocSify-이 파일은 마크 다운 파일의 내용을 웹 브라우저 내에서 볼 수있는 모든 곳에서 파일을 렌더링 할 수 있습니다.
위의 웹 페이지 빌더를 사용할 때 공개 github 저장소에 저장된 파일을 직접 렌더링하려면 파일을 볼 때 원시 버튼을 탭하여 해당 파일의 원시 소스 URL (예 : Raw.githubusercontent.com)을 사용해야합니다. 해당 리포지토리 내에서 GitHub 페이지를 활성화 한 다음 해당 파일의 GitHub 페이지 URL을 사용하여 개인 GitHub 저장소에 저장된 파일을 렌더링 할 수도 있습니다 (예 : username.github.io).
렌더링 된 마크 다운 파일의 모양은 옵션 URL 매개 변수와 소스 마크 다운 파일 내에서 사용 가능한 CSS 클래스 세트로 사용자 정의 할 수 있습니다. 표준 마크 다운을 지원하는 것 외에도 embed.ly, H5P, Latex 및 Mermaid 다이어그램이 포함되어 있습니다. 선택적으로 가설이있는 페이지 주석이 활성화 될 수 있습니다.
Docsify와의 출판에 대한 전반적인 소개를 찾고 계십니까? Docsify-This로 Markdown Publishing을 확인하십시오.
나는 당신이 (Markdown 파일) URL을 Docsify에 넣고 웹 페이지에 대한 URL을 다시 얻는다는 사실에 의해 날아 갔다. URL을 가져 가서 가십시오. 너무 완벽합니다.
-J. Groom, Reclaim Today 에피소드 39 (공동 창립자, Reclaim Hosting)
나는 Docsify를 사용하여 대학원 출판 프로덕션 과정을 위해 Markdown Publishing의 새로운 모델을 탐색하기 위해 부분적으로는 캔버스를 길들이기 위해 부분적으로는 어색하고 번거롭게 생각합니다. 내 코스 메모를 평범한 텍스트 파일로 유지하고 Github 및 Docsify를 통해 배포하는 것은 쉽고 코스 개발이 바람이 불고 있습니다. 또한 모든 재료를 현지에서 보관하고 캔버스에 의존하지 않고 재사용을 사용할 수 있습니다.
- J. Maxwell (Simon Fraser University의 출판 프로그램의 이사 및 부교수)
내가 몇 년 동안 찾은 최고의 도구 - 이것은 핵심으로 끝까지 방금 수행되는 창조물 중 하나입니다.
- D. Malawey (Texas A & M University의 다 분야 실험실 코디네이터)
Docsify- This는 GitHub 저장소에서 사용하는 것과 동일한 문서를 인터페이스에 원활하게 포함시켜 WordPress 테마를 크게 향상 시켰습니다. 이것은 차례로 더 나은 문서를 작성하게했습니다! 나는 Docsify가 사용하기 쉬운 웹 게시 도구로 할 수있는 일의 표면을 간신히 긁지 않았습니다.
- A. Levine AKA Cogdog (독립 교육 기술자)
Docsify- This는 2024 Open Education Awards for Excellence의 Open Infrastructure 카테고리에서 결선 진출 자로 인정 받았습니다. 모든 Docsify.js.org 관리자 및 기고자, 그리고 Open Publishers, Educators 및 Docsify를 통해 나머지 세계와 공개 콘텐츠를 공유하는 동료 공개 출판사, 교육자 및 제작자에게 감사합니다.
Docsify-이 웹 페이지로 표시되는 온라인 마크 다운 파일의 시각적 모양은 다음과 같은 두 가지 방식으로 변경 될 수 있습니다.
예를 들어, https://raw.githubusercontent.com/hibbitts-design/docsify-this-one-on-page-article/main/home.md에 위치한 Markdown 파일을 표시합니다.
https://docsify-this.net/?basePath=https://raw.githubusercontent.com/hibbitts-design/docsify-this-one-page-article/main&homepage=home.md&sidebar=true&maxLevel=3그리고 다음은 Docsify-this.net이 동일한 URL을 표시하는 방법입니다.
 Docsify-this.net이 표시하는 웹 페이지는 Docsify-This URL에서 지정된대로 최대 3 레벨의 제목을 포함하는 사이드 바가있는 Markdown 파일을 표시합니다.
아래의 각 기본 Docsify-이 URL 매개 변수에 대해 자세히 알아보고 URL 매개 변수와 온라인 마크 다운 파일을 즉시 사용 가능한 Docsify와 결합 할 때 가능한 것이 무엇인지 확인하십시오.
기본 URL 매개 변수 (표준 웹 페이지 빌더에 포함)
예를 들어 옵션 브라우저 타이틀 매개 변수로 웹 페이지의 브라우저 탭에서 사용자 정의 제목을 설정하십시오.
https://docsify-this.net?basepath=https://raw.githubusercontent.com/paulhibbitts/demo-grav-open-matter-course-hub/mas 페이지 "는"내%20 페이지 "입니다.
"이 페이지 편집"링크 (기본 위치는 페이지 하단입니다) 를 표시합니다.
https://docsify-this.net?basepath=https://raw.githubusercontent.com/hibbitts-design/docsify-open-course-starte r-kit/main & edit-link = https : //github.com/hibbitts-design/docsify-open-publishing-starter-kit/blob/main/readme.md
"이 페이지 편집"의 기본 텍스트를 옵션 Edit-Link-Text 매개 변수와 함께 링크하십시오.
https://docsify-this.net?basepath=https://raw.githubusercontent.com/hibbitts-design/docsify-open-course-starter-kit/main&edit-li nk = https : //github.com/hibbitts-design/docsify-open-publishing-starter-kit/blob/main/readme.md&edit-link-text=view%20AS%20Markdown 공백이있는 텍스트를 사용하려면 인코딩해야하므로 "Markdown으로보기"는 "View%20AS%20MARKDOWN"입니다.
"이 페이지 편집"링크의 위치를 페이지 하단에서 옵션 Edit-Link-Top 매개 변수로 페이지 상단으로 변경하십시오.
https://docsify-this.net?basepath=https://raw.githubusercontent.com/hibbitts-design/docsify-open-course-starter-kit/main&toc = true & edit-link = https : //github.com/hibbitts-design/docsify-open-publishing-starter-kit/blob/main/readme.md&edit-link-top=true
예를 들어 옵션 Font-Family 매개 변수로 웹 페이지의 사용자 정의 글꼴을 설정하십시오.
https://docsify-this.net?basepath=https://raw.githubusercontent.com/hibbitts-design/docsify-open-course-starter-kit/main/docs&homepage=resources.md&font-family=helvetica,-sans-serif. 이 매개 변수는 임베디드 컨텐츠의 시각적 프리젠 테이션을 대상 플랫폼과 더 잘 일치 시키려고 할 때 특히 유용 할 수 있습니다. 이름에 공간이있는 글꼴을 사용하려면 인코딩되어야하므로 "Courier New"는 "Courier%20new"입니다.
예를 들어 옵션 글꼴 크기 매개 변수로 웹 페이지의 사용자 정의 글꼴 크기를 설정하십시오.
https://docsify-this.net?basepath=https://raw.githubusercontent.com/hibbitts-design/docsify-open-course-starter-kit/main/docs&homepage=resources.md&font-size=1. 이 매개 변수는 임베디드 컨텐츠의 시각적 프리젠 테이션을 대상 플랫폼과 더 잘 일치 시키려고 할 때 특히 유용 할 수 있습니다. 글꼴 크기는 rem 단위로 설정되어 있습니다.
예를 들어 옵션 헤더 중심 매개 변수가있는 웹 페이지의 사용자 정의 헤더 글꼴 무게 (기본값은 400- 일반)를 설정하십시오.
https://docsify-this.net?basepath=https://raw.githubusercontent.com/hibbitts-design/docsify-open-course-starter-kit/main/docs&homepage=resources.md&header-weight=600.
예를 들어 옵션 Hide-Credits 매개 변수와 함께 표시된 모든 Docsify-이 페이지의 맨 아래에 표시된 크레딧을 숨 깁니다.
https://docsify-this.net?basepath=https://raw.githubusercontent.com/hibbitts-design/docsify-open-course-starter-kit/main/docs&homepage=resources.md&hide-credits=true.
가설을 사용하여 페이지 주석을 활성화하십시오. 예를 들어 선택적 가설 매개 변수가 있습니다.
https://docsify-this.net?basepath=https://raw.githubusercontent.com/hibbitts-design/docsify-open-course-starter-kit/main/docs&homepage=resources.md&hypothesis=true.
예를 들어 옵션 라인 높이 매개 변수로 웹 페이지의 사용자 정의 라인 높이를 설정하십시오.
https://docsify-this.net?basepath=https://raw.githubusercontent.com/hibbitts-design/docsify-open-course-starter-kit/main/docs&homepage=resources.md&line-height=1.5.
예를 들어 옵션 링크 색상 매개 변수가있는 '#'기호없이 표준 16 진수 형식을 사용하여 정의 된 모든 링크에 대한 사용자 정의 색상을 설정하십시오.
https://docsify-this.net?basepath=https://raw.githubusercontent.com/hibbitts-design/docsify-open-course-starter-kit/main/docs&homepage=resources.md&link-color=ccc0000.
옵션 Maxlevel Docsify 매개 변수로 Docsify 사이드 바의 최대 헤더 레벨을 설정하십시오.
https://docsify-this.net?basepath=https://raw.githubusercontent.com/hibbitts-design/docsify-open-publishing-starter-kit/main/docs&homepage=introduction.md&sidesbar=true&maxlevel=3
예를 들어 옵션 사이드 바 매개 변수로 docsify 사이드 바를 표시하십시오.
https://docsify-this.net?basepath=https://raw.githubusercontent.com/hibbitts-design/docsify-open-course-starter-kit/main&sidebar=true
예를 들어 옵션 TOC 매개 변수와 함께 페이지 목차를 표시하십시오.
https://docsify-this.net?basepath=https://raw.githubusercontent.com/hibbitts-design/docsify-open-publishing-starter-kit/main/docs&homepage=introduction.md&toc=true
예를 들어 옵션 Toc-Headings 매개 변수와 함께 페이지 목차에 포함될 페이지 제목 레벨 (예 : H1, H2 등)을 설정하십시오.
https://docsify-this.net?basepath=https://raw.githubusercontent.com/hibbitts-design/docsify-open-publishing-starter-kit/main/docs&homepage=introduction.md&toc=troc-headings=hh1,h1.
예를 들어 옵션 Toc-Narrow 매개 변수와 함께 덜 넓은 페이지 목차를 사용하십시오.
https://docsify-this.net?basepath=https://raw.githubusercontent.com/hibbitts-design/docsify-open-publishing-starter-kit/main/docs&homepage=introduction.md&toc-narrow=true. 이 매개 변수는 더 작은 화면 영역이있을 가능성이있는 컨텐츠를 포함시킬 때 특히 유용 할 수 있습니다.
옵션 Zoom-Images Docsify 매개 변수를 사용하여 이미지 줌을 활성화 (페이지 이미지를 탭하면).
https://docsify-this.net?basepath=https://raw.githubusercontent.com/paulhibbitts/docsify-this-markdown-content-demo/main&zoom-images=true. 이미지를 제외하려면 사용  .
다음과 같은 추가 URL 매개 변수는 Docsify-이 URL에 사용할 수 있으며 달리 표시되지 않는 한 고급 웹 페이지 빌더에 포함됩니다.
보충 URL 매개 변수 (고급 웹 페이지 빌더에 포함)
예를 들어 옵션 커버 페이지 매개 변수로 문서화 사용자 정의 커버 페이지를 표시하십시오.
https://docsify-this.net?basepath=https://raw.githubusercontent.com/hibbitts-design/docsify-open-publishing-starter-kit/main/docs&homepage=home.md&coverpage=_coverpage.md
예를 들어 옵션 커버 페이지 색상 매개 변수로 커버 페이지의 사용자 정의 색상을 설정하십시오.
https://docsify-this.net?basepath=https://raw.githubusercontent.com/hibbitts-design/docsify-open-publishing-starter-kit/main/docs&homepage=home.md&coverpage=_coverpage.md&coverpuge-col00
예를 들어 옵션 커버 페이지 컬러 어두운 모드 매개 변수로 다크 모드에서 커버 페이지의 사용자 정의 색상을 설정하십시오.
https://docsify-this.net?basepath=https://raw.githubusercontent.com/hibbitts-design/docsify-open-publishing-starter-kit/main/docs&homepage=home .md & dark-mode = true & link-color = cc0000 & link-color-dark-mode = ff9e9e & coverpage = _coverpage.md & coverpage-color = cc0000 & coverpage-color-dark-mode = 4d0000
예를 들어 시스템 OS 레벨 환경 설정을 기반으로 드림/다크 테마를 자동으로 전환합니다.
https://docsify-this.net?basepath=https://raw.githubusercontent.com/hibbitts-design/docsify-open-publishing-starter-kit/main/docs&homepage=introduction.md&dark-mode=true
"이 페이지 편집"에 대한 기본 이모티콘을 변경하십시오. 옵션 Edit-Link-Emoji 매개 변수 (고급 웹 페이지 빌더에 포함되지 않음).
https://docsify-this.net?basepath=https://raw.githubusercontent.com/hibbitts-design/docsify-open-course-starter-kit/main&edit-link=https://git hub.com/hibbitts-design/docsify-open-publishing-starter-kit/blob/main/readme.md&edit-link-text=view%20on%20github&edit-link-emoji=:file_folder :
예를 들어 옵션 Lazy-Load-Images 매개 변수 (Advanced Web Page Builder에는 포함되지 않음)를 사용하여 브라우저별로 이미지의 게으른로드를 활성화합니다.
https://docsify-this.net?basepath=https://raw.githubusercontent.com/hibbitts-design/docsify-open-publishing-starter-kit/main/docs&homepage=introduction.md&lazy-load-images alling을 위해 Encipice Logy encific에 유의하십시오. Docsify 사이드 바 등의 예제.
옵션 링크 콜로-자크 모드 매개 변수가있는 '#'기호없이 표준 16 진수 형식을 사용하여 정의 된 다크 모드에서 모든 링크에 대해 사용자 정의 색상을 설정하십시오.
https://docsify-this.net?basepath=https://raw.githubusercontent.com/hibbitts-design/docsify-open-course-starter-kit/main/docs&homepage=resources.md&link-color=ccccccccccccccccconcc0000<rtltrue=Trttruge=true-mode-mode mode=true 설정
옵션 링크 호버 컬러 매개 변수가있는 '#'기호없이 표준 16 진수 형식을 사용하여 정의 된 모든 링크에 대한 사용자 정의 호버 색상을 설정하십시오.
https://docsify-this.net?basepath=https://raw.githubusercontent.com/hibbitts-design/docsify-open-course-starter-kit/main/docs&homepage=resources.md&link-color=CCC0000.
예를 들어 옵션 링크-호버-컬러-모드 모드 매개 변수가있는 '#'기호없이 표준 16 진수 형식을 사용하여 정의 된 모든 링크에서 사용자 정의 호버 색상을 설정하십시오.
https://docsify-this.net?basepath=https://raw.githubusercontent.com/hibbitts-design/docsify-open-course-sta rter-kit/main/docs & homepage = resources.md & link-color = cc0000 & dark-mode = true & link-hover-color-dark-mode = ff9e9e.
예를 들어 옵션 링크 텍스트-디코레이션 매개 변수와 함께 모든 링크에 대한 사용자 정의 텍스트 장식을 설정하십시오.
https://docsify-this.net?basepath=https://raw.githubusercontent.com/hibbitts-design/docsify-open-course-starter-kit/main/docs&homepage=resources.md&link-text-decoration=none
예를 들어 옵션 링크 텍스트-디코레이션 호버 매개 변수와 함께 모든 링크에 대한 사용자 정의 호버 텍스트 장식을 설정하십시오.
https://docsify-this.net?basepath=https://raw.githubusercontent.com/hibbitts-design/docsify-open-course-starter-kit/main/docs&homepage=resources.md&link-text-decoration-hover= dunderlund
예를 들어 옵션 LoadFavicon 매개 변수에서 전달 된 이미지 파일에서 사용자 정의 Favicon을 설정할 수 있습니다.
https://docsify-this.net?basepath=https://raw.githubusercontent.com/paulhibbitts/docsify-this-markdown-content-demo/main&loadfavicon=open-access.png
예를 들어 옵션 로드 풋 Docsify 매개 변수와 함께 전달 된 현재 디렉토리의 Markdown 파일에서 Docsify 바닥 글을로드하십시오. https://docsify-this.net?basepath=https://raw.githubusercontent.com/hibbitts-design/docsify-open-publishing-starter-kit/main/docs&homepage=introduction.md&loadfooter.md
예를 들어 옵션 LoadNavbar Docsify 매개 변수와 함께 전달 된 Markdown 파일에서 Docsify Custom Navbar를로드하십시오.
https://docsify-this.net?basepath=https://raw.githubusercontent.com/hibbitts-design/docsify-open-publishing-starter-kit/main/docs&homepage=introduction.md&loadnavbar=_navbar.md
예를 들어 옵션 LoadsideBar Docsify 매개 변수와 함께 전달 된 Markdown 파일에서 Docsify 사용자 정의 사이드 바를로드하십시오.
https://docsify-this.net/?basepath=https://raw.githubusercontent.com/paulhibbitts/docsify-this-cmpt-363-222-site/main&homepage=home.md&sidebar=true&loadsidesbar=_sidebar-bar-with-home.md
옵션 로고 Docsify 매개 변수와 함께 Docsify Custom Sidebar (예 : 파일 'logo.png)에 웹 사이트의 로고 이미지를 표시하십시오.
https://docsify-this.net/?basepath=https://raw.githubusercontent.com/hibbitts-design/docsify-this-multiple-course- Site/Main & Homepage = Home.md & Sidebar = true & loadsidebar = _sidebar.md & loadnavbar = _navbar.md & name = cpt-363 & logo =/images/logo.png 전체 폴더 경로와 파일 이름을 제공해야합니다. 웹 사이트 이름도 제공되어야하며 로고의 대체 텍스트로 사용됩니다.
예를 들어 옵션 인 Mergenavbar Docsify 매개 변수가있는 작은 화면에서 Navbar 항목을 사이드 바 상단에 병합하십시오. https://docsify-this.net/?basepath=https://raw.githubusercontent.com/hibbitts-design/docsify-this-multiple-page-cours e-site/main & homepage = home.md & sidebar = true & loadsidebar = _sidebar.md & loadnavbar = _navbar.md & mergenavbar = true & name = cpt-363
Docsify Custom Sidebar (예 : _sidesbar.md)에 웹 사이트의 이름을 선택한 이름 Docsify 매개 변수로 표시하십시오.
https://docsify-this.net/?basepath=https://raw.githubusercontent.com/hibbitts-design/docsify-this-multiple-page-co urse-site/main & homepage = home.md & sidebar = true & loadsidebar = _sidebar.md & loadnavbar = _navbar.md & search = true & name = cpt-363 이 매개 변수가 제공되면 브라우저 탭 제목으로 자동 사용됩니다.
예를 들어 옵션 페이지 타이틀 매개 변수로 웹 페이지 상단에 사용자 정의 페이지 제목을 설정하십시오.
https://docsify-this.net?basepath=https://raw.githubusercontent.com/paulhibbitts/demo-grav-open-matter-course-hub/mas "내%20 페이지"가 되십시오.
예를 들어 페이지 컨텐츠 영역에 페이지 매김 버튼 표시 (예 : 옵션 Paglination 매개 변수)가있는 다음과 같습니다.
https://docsify-this.net?basepath=https://raw.githubusercontent.com/hibbitts-design/docsify-this-multiple-page-cour se-site/main & homepage = home.md & sidebar = true & loadsidebar = _sidebar.md & loadnavbar = _navbar.md & search = true & pagination = true
옵션 SearchBox Docsify 매개 변수가 포함 된 사용자 정의 사이드 바를 포함하여 여러 페이지 사이트에서 DocSify 검색 플러그인 (현재 텍스트 및 마크 업이 포함 된)을 활성화합니다.
https://docsify-this.net?basepath=https://raw.githubusercontent.com/hibbitts-design/docsify-this-multiple-pag e-course-site/main & homepage = home.md & sidebar = true & loadsidebar = _sidebar.md & loadnavbar = _navbar.md & searchbox = true
Docsify Custom Sidebar (예 : _sidesbar.md)에서 최대 자동 목차 헤더 레벨을 설정하여 SubmaxLevel Docsify 매개 변수를 설정하십시오.
https://docsify-this.net/?basepath=https://raw.githubusercontent.com/paulhibbitts/docsify-this-cmpt-363-222-site/main&homepage=home.md&sidebar=true&loadsidebar=_bar-bar-with-home.mdathome
예를 들어 옵션 SVG-ICONS 매개 변수 (고급 웹 페이지 빌더에 포함되지 않음)와 함께 웹 글꼴 대신 Font Awesome 아이콘의 SVG 버전을 사용하십시오.
https://v2.preview.docsify-this.net/?basepath=https://raw.githubusercontent.com/hibbitts-design/docsify-this-lms-content-pages/main&homepage=schedule.md&svg-icons=true
캔버스에 내용을 포함시킵니다
Docsify 컨텐츠를 원활하게 일치시키기위한 URL 매개 변수를 포함한 iframe 코드 예제 :
< p > < iframe style =" overflow: hidden; border: 0px #ffffff none; background: #ffffff; " src =" https://docsify-this.net?basePath=https://raw.githubusercontent.com/paulhibbitts/cmpt-363-222-pages/main&homepage=home.md&font-family=Lato%20Extended,Lato,Helvetica%20Neue,Helvetica,Arial,sans-serif&font-size=1&hide-credits=true " width =" 800px " height =" 1400px " allowfullscreen =" allowfullscreen " > </ iframe > </ p >스크롤 막대가있는 경우 iframe 코드를 다시 편집하고 "높이"값을 조정할 수 있습니다.
외부 URL을 모듈 항목으로 추가하려면 어떻게합니까?
모듈 외부 링크 예제, 페이지 목차 :
https://docsify-this.net?basePath=https://raw.githubusercontent.com/paulhibbitts/cmpt-363/main/docs/222&homepage=week-02.md&toc-narrow=true&font-family=Lato%20Extended,Lato,Helvetica%20Neue,Helvetica,Arial,sans-serif&font-size=1&hide-credits=true 리디렉션 도구를 사용하여 코스 내비게이션에서 사용자 정의 링크 작성
URL 필드 리디렉션 예제 :
https://docsify-this.net/?basePath=https://raw.githubusercontent.com/paulhibbitts/cmpt-363-222-pages/main&homepage=resources.md&edit-link=https://github.com/paulhibbitts/cmpt-363-222-pages/blob/main/resources.md&font-family=Lato%20Extended,Lato,Helvetica%20Neue,Helvetica,Arial,sans-serif&font-size=1&hide-credits=trueiframe (페이지 내에서 콘텐츠를 포함)
외부 도구 (코스 내비게이션 또는 요소에 링크 추가)
Docsify와 함께 가야 할 모든 것이 기본 Markdown 파일입니다. 아래는 Markdown, 이미지, URL 매개 변수 및 몇 개의 HTML 스 니펫으로 가능한 것을 보여줄 수있는 일부 템플릿입니다!
이 템플릿을 사용하려면 일반적으로 다음을 수행합니다 (템플릿 특정 지침은 각 템플릿에 포함되어 있음).
Github에 로그인하거나 아직 계정이없는 경우 계정을 만듭니다.
선택한 템플릿 저장소 에서이 템플릿을 사용한 다음 새 저장소 생성을 선택하십시오.
파일을 포함하려는 새 저장소 이름을 선택한 다음 저장소 작성을 탭하여 템플릿 파일을 자신의 github 계정으로 복사하십시오.
포함 된 Markdown 파일 (예 : Home.md )을보고 URL을 복사하십시오.
https://docsify-this.net으로 이동하여 복사 된 URL을 Markdown 파일 URL 필드에 붙여 넣으십시오.
원하는 페이지 옵션 (예 : Docsify Sidebar)을 선택하고 웹 페이지 버튼으로 게시 하여 Markdown 파일을 공유 또는 임베딩을위한 웹 페이지로 볼 수 있습니다.
GitHub에서 파일을 편집하려면 파일을 볼 때 오른쪽 상단의 연필 아이콘 (파일 편집)을 탭하고 변경 한 다음 Commit 변경 사항을 누르면 변경 사항을 저장하십시오.
한 페이지 기사 home.md 파일 Docsify-이 파일은 다음과 같습니다.
한 페이지 코스 home.md 파일 Docsify-이 파일은 다음과 같습니다.
Docsify에서 표시되는 Markdown CSS 클래스 header-image-full-width 사용을 포함하여 여러 페이지 사이트 Home.md 파일 : 다음과 같이 표시됩니다.

다중 페이지 열린 게시 사이트 Home.md 파일, Docsify-this에 의해 표시되는 Docsify 사용자 정의 측면 바 파일 사용을 포함하여 다음과 같이 표시됩니다.

Docsify-Docsify에서 표시되는 Docsify 사용자 정의 측면 바 파일 및 Docsify 사용자 정의 Navbar 파일 사용을 포함하여 다중 페이지 코스 사이트 Home.md 파일 : 다음과 같이 표시됩니다.

닥터 션 (Docsify)에 의해 표시된대로 font-family , font-size 및 hide-credits URL 매개 변수를 포함한 예제 페이지 : DocSify에서 표시합니다.
https://canvas.sfu.ca/courses/76692에서 docsify-이 컨텐츠를 사용하여 캔버스 LMS 사이트 예제를보십시오.

github Markdown 파일을 사용하여 Open 및 Collaborative Workflow를 열고 문서화합니다.
 Webserver Markdown 파일을 사용한 Docsify-this.net 워크 플로.
Docsify-This를 사용하여 Github 또는 Codeberg와 같은 GIT 기반 서비스에 위치한 Markdown 파일을 표시 할 때는 로컬 편집을 위해 데스크탑에 파일 (복제) 파일을 다운로드 한 다음 온라인 파일로 다시 업로드 (푸시)를 다시 업로드 할 수 있습니다.
예를 들어, 데스크탑에서 Github Markdown 파일을 편집하려면 다음을 수행합니다.
GitHub 데스크탑을 시작하는 것에 대해 자세히 알아보십시오.
다음 CSS 클래스는 자신의 Markdown 컨텐츠를 작성할 때 사용할 수 있습니다.
 < div class =" accordion " >

< details >
  < summary > Topic One </ summary >

  Topic one details here.

</ details >

< details >
  < summary > Topic Two </ summary >

  Topic two details here.

</ details >
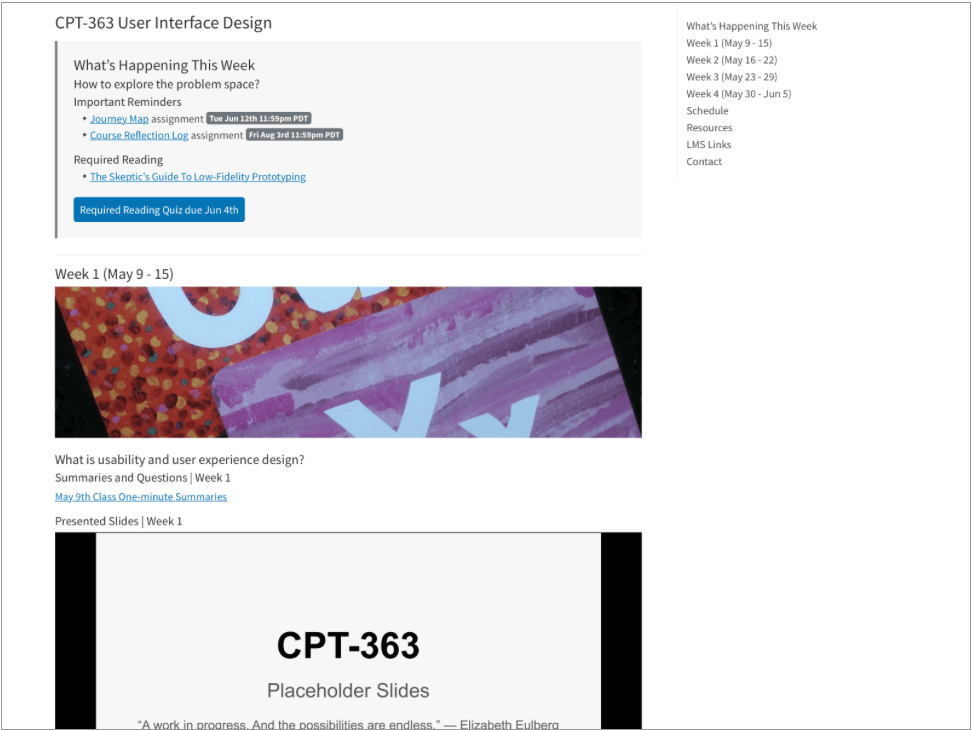
</ div > < span class =' badge ' > Tue Jun 12th 11:59pm PDT </ span > < span class =' badge ' style =' --badge-bg-color: #0164db; ' > Tue Jun 12th 11:59pm PDT </ span > < span class =' badge ' style =' --badge-bg-color: #e7c500; --badge-text-color: #000; ' > Tue Jun 12th 11:59pm PDT </ span > < span class =' badge ' > [Tue May 16 2:30pm PT](https://www.timeanddate.com/worldclock/fixedtime.html?msg=CMPT-363+Blackboard+Mini-lectures+and+Activities&iso=20220516T1430&p1=256&ah=1&am=50) </ span > 큰 화면에서 250px 높이, 작은 화면에서 125px로 잘라냅니다.
![ UX - User Experience ] ( images/12650723674_d5c85af332_k.jpg ' :class=banner-image ') 큰 화면에서 350px 높이로 자르고 작은 화면에서 175px.
![ UX - User Experience ] ( images/12650723674_d5c85af332_k.jpg ' :class=banner-tall-image ') [ Required Reading Quiz due Jun 4th ] ( https://canvas.sfu.ca/courses/44038/quizzes/166553 ' :class=button ') [ : fa fa-download fa-fw : Download ] ( https://creativecommons.org/wp-content/uploads/2019/02/ccheart_black.svg_.zip ' :class=button ') < a class =" button " href =" https://creativecommons.org/wp-content/uploads/2019/02/ccheart_black.svg_.zip " target =" _blank " > < i class =" fa fa-download fa-fw " > </ i > Download </ a > [ Required Reading Quiz due Jun 4th ] ( https://canvas.sfu.ca/courses/44038/quizzes/166553 ' :class=button-rounded ') [ : fa fa-download fa-fw : Download ] ( https://creativecommons.org/wp-content/uploads/2019/02/ccheart_black.svg_.zip ' :class=button-rounded ') < a class =" button-rounded " href =" https://creativecommons.org/wp-content/uploads/2019/02/ccheart_black.svg_.zip " target =" _blank " > < i class =" fa fa-download fa-fw " > </ i > Download </ a > [ Required Reading Quiz due Jun 4th ] ( https://canvas.sfu.ca/courses/44038/quizzes/166553 ' :class=button-secondary ') [ : fa fa-download fa-fw : Download ] ( https://creativecommons.org/wp-content/uploads/2019/02/ccheart_black.svg_.zip ' :class=button ') < a class =" button-secondary " href =" https://creativecommons.org/wp-content/uploads/2019/02/ccheart_black.svg_.zip " target =" _blank " > < i class =" fa fa-download fa-fw " > </ i > Download </ a > [ Required Reading Quiz due Jun 4th ] ( https://canvas.sfu.ca/courses/44038/quizzes/166553 ' :class=button-secondary-rounded ') [ : fa fa-download fa-fw : Download ] ( https://creativecommons.org/wp-content/uploads/2019/02/ccheart_black.svg_.zip ' :class=button-secondary-rounded ') < a class =" button-secondary-rounded " href =" https://creativecommons.org/wp-content/uploads/2019/02/ccheart_black.svg_.zip " target =" _blank " > < i class =" fa fa-download fa-fw " > </ i > Download </ a > 링크 된 기사 미리보기, 내장 된 슬라이드/비디오 등의 경우
< a class =" embedly-card " data-card-controls =" 0 " data-card-align =" left " href =" https://blog.prototypr.io/defining-usability-e7bf42e8abd0 " > Defining usability </ a > 1200px에서 2000px의 제안 된 폭
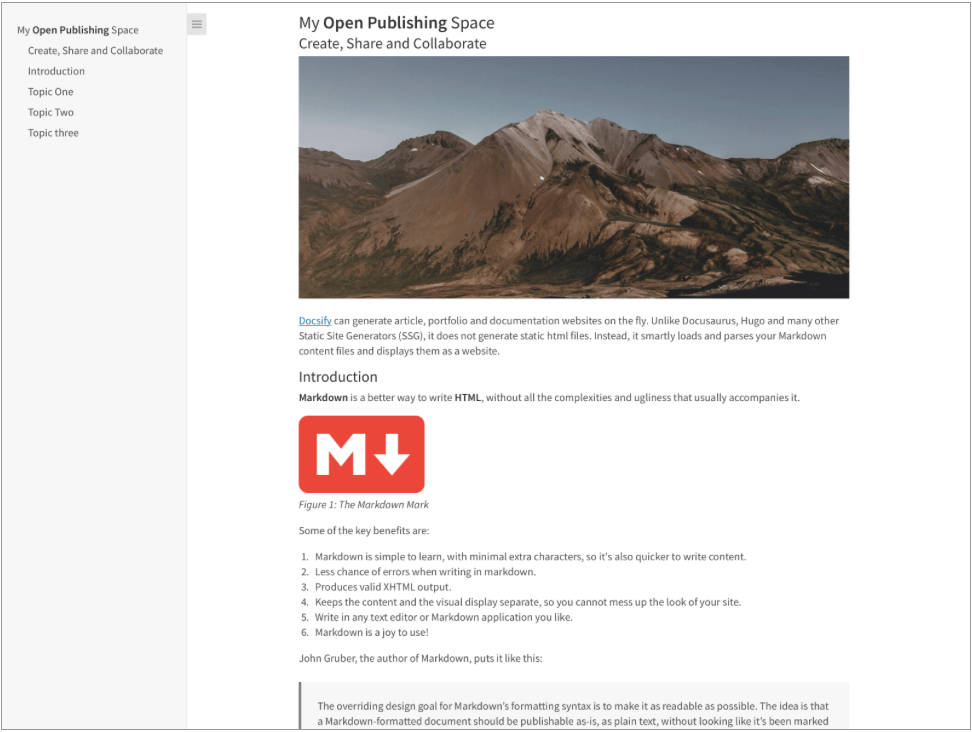
![ Photo of Mountain ] ( images/mountain.jpg ' :class=header-image-fade ') 제안 된 너비는 1200px ~ 2000px이며 목차 표시를 사용할 수 없습니다.
![ Photo of Mountain ] ( images/mountain.jpg ' :class=header-image-fade-full-width ') 제안 된 크기는 1200px ~ 2000px 너비, 400px ~ 600px 높이이며 목차 표시를 사용할 수 없습니다.
![ Photo of Mountain ] ( images/mountain.jpg ' :class=header-image ') 이미지를 %로 늘립니다.
![ Photo of Mountain ] ( images/mountain.jpg ' :class=image-75 ') 테두리를 가진 이미지를 %로 늘립니다.
![ Photo of Mountain ] ( images/mountain.jpg ' :class=image-75-border ') ![ Photo of Mountain ] ( images/mountain.jpg ' :class=image-border ') ![ Photo of Mountain ] ( images/mountain.jpg ' :class=image-border-rounded ') [ GitHub ] ( https://github.com/hibbitts-design/docsify-this ' :class=navpill ') [ : fab fa-github fa-fw : GitHub ] ( https://github.com/hibbitts-design/docsify-this ' :class=navpill ') < a class =" navpill " href =" https://github.com " target =" _blank " > < i class =" fab fa-github fa-fw " > </ i > GitHub </ a > 크기 치수를 포함하는 원시 HTML 이미지를 반응합니다.
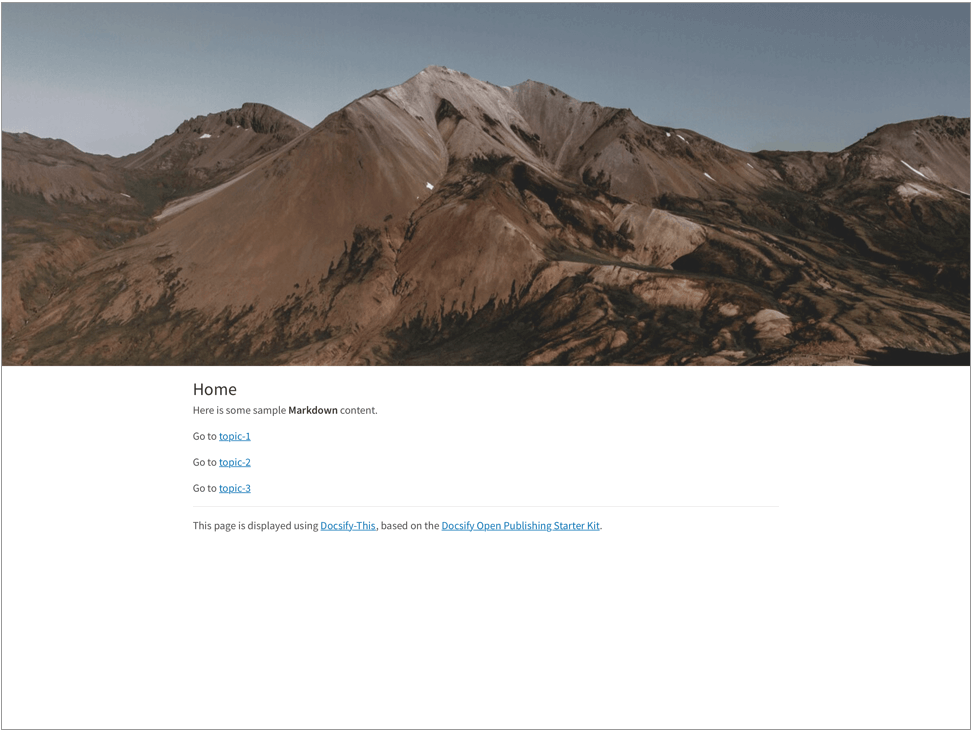
< img src =" https://raw.githubusercontent.com/hibbitts-design/publishing-with-docsify-this/main/images/docsify-this-web-page-builder.jpg " width =" 910 " height =" 682 " class =" responsive image-border " alt =" Docsify-This Web Page Builder " > < div class =" row " >
< div class =" column " >
Lorem ipsum dolor sit amet, consectetur adipiscing elit.
</ div >
< div class =" column " >
Lorem ipsum dolor sit amet, consectetur adipiscing elit.
</ div >
</ div > < div class =" row reverse-columns " >
< div class =" column " >
Lorem ipsum dolor sit amet, consectetur adipiscing elit.
</ div >
< div class =" column " >
Lorem ipsum dolor sit amet, consectetur adipiscing elit.
</ div >
</ div > < div class =" row " >
< div class =" column " >
Lorem ipsum dolor sit amet, consectetur adipiscing elit.
</ div >
< div class =" column-right " >
Lorem ipsum dolor sit amet, consectetur adipiscing elit.
</ div >
</ div > < div class =" video-container-4by3 " > < div class =" video-container-16by9 " > < iframe width =" 560 " height =" 315 " src =" https://www.youtube.com/embed/lJIrF4YjHfQ " > </ iframe > </ div > 소스 도메인 'YouTube.com'또는 'docs.google.com'을 사용하여 모든 iframes에 자동으로 추가됩니다.
< div class =" video-container-16by9 " > < iframe width =" 560 " height =" 315 " src =" https://www.youtube.com/embed/lJIrF4YjHfQ " > </ iframe > </ div > Docsify-This에서 지원하는 Markdown CSS 클래스 외에도 표시된 Markdown 파일 내에서 자신의 사용자 정의 클래스를 정의 할 수도 있습니다.
Markdown 파일의 CSS :
<style >
. markdown-section . mybutton , . markdown-section . mybutton : hover {
  cursor : pointer;
  color : # CC0000 ;
  height : auto;
  display : inline-block;
  border : 2 px solid # CC0000 ;
  border-radius : 4 rem ;
  margin : 2 px 0 px 2 px 0 px ;
  padding : 8 px 18 px 8 px 18 px ;
  line-height : 1.2 rem ;
  background-color : white;
  font-family : -apple-system , "Segoe UI" , "Helvetica Neue" , sans-serif;
  font-weight : bold;
  text-decoration : none;
}
< / style >
가격 인하:
[ Required Reading Quiz due Jun 4th ] ( https://canvas.sfu.ca/courses/44038/quizzes/166553 ' :class=mybutton ') Docsify- This는 하나 이상의 원격으로 호스팅 된 Markdown 파일을 빠르고 쉽게 표시하도록 설계되었습니다. 파일 렌더링을 더 많이 사용자 정의하고 일관된 가용성을 보장하려면 공개 Docsify-This.net 인스턴스를 더 이상 사용할 수 없더라도 Docsify 인스턴스를 호스팅 할 수 있습니다.
To host your own instance on GitHub Pages, which also supports the option of a custom domain, fork or clone the Docsify-This repository to your GitHub account. Then, enable GitHub Pages using the /docs folder.
You can also have an instance of Docsify-This run on Codeberg such as https://docsify-this.codeberg.page by creating a new repository called pages , then choosing paulhibbitts/docsify-this-app in the template dropdown menu, choosing the Git Content (Default Branch) option and then tapping the Create Repository button.
Alternatively, you can upload the files in the Docsify-This /docs folder into a newly created Codeberg repository and then manually enable Codeberg Pages. An example Docsify-This instance running on Codeberg is available at https://codeberg.org/paulhibbitts/docsify-this-app, which uses a Branch renamed to pages .
If you want to run Docsify-This on your own Websever, create a destination folder on your server and then copy the files within the Docsify-This folder /docs to your newly created server folder. You could also use this docs folder as a custom domain root.
A more future-friendly setup would be to fork the Docsify-This repository (to support getting upstream updates) and use a GitHub Action such as FTP-Deploy to deploy all changed repository files to a webserver.
You can limit the domains which remote files can be rendered from by locating the line var allowedDomains = ''; within the index.html file and include your list of allowed domains separated by commas, for example var allowedDomains = 'codeberg.org,raw.githubusercontent.com,hibbittsdesign.org'; .
If you want to further customize and control the presentation of your Markdown content, especially when rendering multiple page sites, you can install your own Docsify Open Publishing Starter Kit (that this hosted web app is based on) and store all Markdown files within that site. You can learn more about the capabilities of Docsify itself at Docsify.js.org.
Looking for some help with getting a Docsify custom-This instance up and running for your organization? Paul provides a range of professional services related to Docsify-This - contact him to learn more.
The display of Font Awesome Free icons within Markdown content is supported with the following format:
: fas fa-home fa-fw :
The above Markdown is equivalent to the HTML markup <i class="fas fa-home fa-fw" aria-hidden="true"></i> .
When using the above shortcode for Font Awesome icons, it is assumed to be for decorative purposes, and so for improved accessibility an aria-hidden="true" attribute is automatically added to the icon. For semantic purposes, it is recommended you refer to the Font Awesome Icons and Accessibility guidelines.
The following style prefixes are available with Docsify-This:
GitHub Training Manual Working Locally with Git Markdown file, displayed by Docsify-This as a:
Easy Markdown to Github Pages linked set of Markdown files, displayed by Docsify-This as:
A Collection of GitHub Markdown files used as course content within an SFU CMPT-363 Canvas LMS site.
A Collection of GitHub Markdown files with inline CSS used as a multiple page SFU CMPT-363 course site with SFU visual branding and the Docsify Search plugin enabled, multiple page SFU CMPT-363 course site with SFU visual branding and website logo, and an example single Markdown file with default visual styling for embeddeding.
GitHub Markdown Content Demo file, displayed by Docsify-This as a Web Page with 'Edit this Page' link using the new GitHub.dev web editor (currently in Beta).
GitHub Markdown Content Demo file, displayed by Docsify-This as a Web Page with 'View raw Markdown' link.
Codeberg Markdown Content Demo file, displayed by Docsify-This as a Web Page with 'View raw Markdown' link.
GitHub's LaTeX Support Examples Markdown file, displayed by Docsify-This as a Web Page with an 'Edit this Page' link.
Mermaid-Docsify Example GitHub Markdown file, displayed by Docsify-This as a Web Page with an 'Edit this Page' link.
Docsify-This Multi-language Site Template, displayed by Docsify-This as a:
Docsify-This Simple Visual Portfolio Template (based on Notion Portfolio Template), displayed by Docsify-This as a:
Docsify-This Visual Portfolio Template (based on Notion Portfolio Template), displayed by Docsify-This as a:
A simple Markdown Student Portfolio Starter Template (based on Markdown Student Portfolio Template by Justin Thoreson) which is viewable on both GitHub and with Docsify-This.net, displayed by Docsify-This as:
Introduction to Docsify–This
Introductory, beginner to intermediate.
An introduction of Markdown publishing using the open source project Docsify–This.
Self-Publishing with Docsify–This
Intermediate, with a mix of basic and advanced aspects.
An overview to self-publishing with Markdown using the open source project Docsify–This, with a focus on digital literacy.
Use a page inspector to identify the font family and font size used in the platform you are embedding Docsify-This content in, and then pass that font family using the font-family (encoded, where spaces are replaced with '%20') and font-size (REM units) URL parameters to Docsify-This. For example, to match fonts with the Canvas LMS:
https://docsify-this.net?basePath=https://raw.githubusercontent.com/paulhibbitts/cmpt-363-222-pages/main&homepage=topics.md&font-family=Lato%20Extended,Lato,Helvetica%20Neue,Helvetica,Arial,sans-serif&font-size=1
If you want to include a Page Table of Contents with embedded Docsify-This content, but the destination platform screen area is not very wide, you might want to try the optional toc-narrow display option. For example, to use a narrower Table of Contents area that includes a smaller screen breakpoint: https://docsify-this.net?basePath=https://raw.githubusercontent.com/paulhibbitts/cmpt-363/main/docs/222&homepage=week-01.md&toc-narrow=true
Using Prismjs code blocks with syntax highlighting is supported for the languages included with Docsify and as well Bash, Go, Java, Kotlin, PHP, Python and Swift. To embed a code block use the Markdown standard of triple backticks and start the block with the name of the language, for example to embed a block of Javascript code with syntax highlight the following would be used:
 ```javascript
function test() {
  console.log("Hello world!");
}
```
Which would then appear as:
 function test ( ) {
  console . log ( "Hello world!" ) ;
} The content of external Markdown files can be embedded into Docisfy-This web pages with the following:
[ included Markdown from same source location ] ( example.md ' :include ') [ included Markdown from URL ] ( https://raw.githubusercontent.com/paulhibbitts/Markdown-File-Tests/main/itworks.md ' :include ')For additional examples of including external content, view Docsify Embeded Files.
WikiLinks format for links and images are supported, as also found in the desktop editor Obsidian and other platforms.
The display of AsciiDoc files ('.adoc' extension) via DownDoc is possible by manually passing the relevant filenames within a Docsify-This URL (not available in the Docisfy-This.net Web Page Builder), for example: https://docsify-this.net/?basePath=https://raw.githubusercontent.com/asciidoctor/asciidoctor-pdf/main/examples&homepage=basic-example.adoc&edit-link=https://github.com/asciidoctor/asciidoctor-pdf/blob/main/examples/basic-example.adoc
You can support the display of AsciiDoc files in the Web Page Builder of your own instance of Docsify-This by locating the function getAllowedFileExtensions() within the index.html file and add the file extension '.adoc' to the return statement, for example return ".md,.adoc"; .
The display of HedgeDoc files containing basic Markdown (as well as Mermaid and MathJax elements) is possible by manually using 'download' for the homepage URL parameter within a Docsify-This URL (not available in the Docisfy-This.net Web Page Builder), for example: https://docsify-this.net/?basePath=https://demo.hedgedoc.org/crN3ispNQdejWkUXXIXYQA&homepage=download
Here is an additional example, using the HedgeDoc file https://demo.hedgedoc.org/oisWMy9ZS36PE6TvYhJC4A?both (seen in split-screen view) and and rendered as a web page by Docsify-This https://docsify-this.net/?basePath=https://demo.hedgedoc.org&homepage=oisWMy9ZS36PE6TvYhJC4A/download&edit-link=https://demo.hedgedoc.org/oisWMy9ZS36PE6TvYhJC4A?both&toc=true&edit-link-text=Edit%20this%20Page%20in%20HedgeDoc
You can support HedgeDoc URLs (eg https://demo.hedgedoc.org/ip4SRxZYTEKa6JHr62XTiA) in the Web Page Builder of your own instance of Docsify-This by locating the line var hedgedocInstances = ''; within the index.html file and include your HedgeDoc instances separated by commas, for example var hedgedocInstances = 'demo.hedgedoc.org'; . Try out a demo instance of Docsify-This with support for demo.hedgedoc.org files at https://hibbitts-design.github.io/hedgedoc-docsify-this.
You can use camel case instead of hyphens for the names of Docsify-This URL parameters if prefered. 예를 들어, https://docsify-this.net?basePath=https://raw.githubusercontent.com/hibbitts-design/docsify-this-one-page-article/main&homepage= home.md&toc=true&toc-headings=h2,h3&edit-link=https://github.com/hibbitts-design/docsify-this-one-page-article/blob/main/home.md 그리고 https://docsify-this.net?basePath=https://raw.githubusercontent.com/hibbitts-design/docsify-this-one-page-article/main&homepage =home.md&toc=true&tocHeadings=h2,h3&editLink=https://github.com/hibbitts-design/docsify-this-one-page-article/blob/main/home.md are equilivent.
To use the new GitHub.dev web editor (currently in Beta) for 'Edit this Page' links, change github.com to github.dev for GitHub.com files entered into the Web Page Builder Markdown File URL field.
There are multiple ways to get a raw Markdown file available online, here are three options to help you get started:
GitHub or Codeberg:
Gist (GitHub Gists):
.md (eg myfile.md )Personal or Organizational Website:
Some text editors, such as Microsoft Visual Studio (including the online GitHub.dev web editor), have the ability to link your own CSS so Markdown previews are more visually accurate. If your editor supports this ability, the below CSS files can be used.
Docsify-This (based on the Docsify Open Publishing Starter Kit) CSS:
https://docsify-this.net/assets/css/editor.css
FontAwesome CSS:
https://cdnjs.cloudflare.com/ajax/libs/font-awesome/4.7.0/css/font-awesome.css
Enhanced Previews with Microsoft Visual Studio
For an even closer visual representation of your Docsify-This pages in Microsoft Visual Studio, do the following:
docs folderTIP: If you change the VSCode setting for Workbench › Editor: Show Tabs to single then the docsify preview area will remain in place as you edit multiple Markdown files.
You can load custom default settings in the Docsify-This Web Page Builder using URL parameters. This ability is especially helpful for Docsify-This online sessions, workshops, or when users collaborate and assist one another. Along with the standard Docsify-This URL parameters, the Web Page Builder also offers the following specific parameters:
https://docsify-this.net/?url-field=https://codeberg.org/paulhibbitts/docsify-this-one-page-course/src/branch/main/home.mdhttps://docsify-this.net/?url-field=empty You can even just type docsify-this.net? in front of an online Markdown file URL that you are viewing (such as files hosted on GitHub, Codeberg, or raw source files) to instantly set up the Docsify-This Web Page Builder with that file. Once the Web Page Builder loads, press the Return key — no need to leave the keyboard — to see Docsify-This display the Markdown file as a web page! For example, https://docsify-this.net?https://github.com/hibbitts-design/docsify-this-one-page-course/blob/main/home.md .
https://docsify-this.net/?url-field=https://codeberg.org/paulhibbitts/docsify-this-one-page-course/src/branch/main/home.md&edit-link-checkbox=truehttps://docsify-this.net/?show-page-options=truehttps://docsify-this.net/?advanced=true For example, the following URL will display the Advanced Web Page Builder, with the Markdown file URL set to https://github.com/hibbitts-design/docsify-this-multiple-page-course-site/blob/main/home.md , the site name 'CPT-363' along with a Docsify custom Sidebar and Navbar to be included: https://docsify-this.net/?url-field=https://github.com/hibbitts-design/docsify-this-multiple-page-course-site/blob/main/home.md&sidebar=true&loadSidebar=true&loadNavbar=true&name=CPT-363
The quickest way to create such a shareable URL is to use the Docsify-This Web Page Builder to generate a Docisfy-This web page URL, and then replace the URL parameter basepath with url-field using the full path of the source Markdown file URL. For example, the URL https://docsify-this.net/?basePath=https://raw.githubusercontent.com/hibbitts-design/docsify-this-one-page-article/main&homepage=home.md&sidebar=true&maxLevel=3 would be changed to https://docsify-this.net/?url-field=https://github.com/hibbitts-design/docsify-this-one-page-article/blob/main/home.md&homepage=home.md&sidebar=true&maxLevel=3.
The provided basePath parameter and/or optional homepage parameter may not be correct, verify that these items lead to accessible content. This error message may also result from a Cross-Origin Resource Sharing (CORS) policy, which restricts resources on a web page to be requested from another domain. If possible, relocate files to a domain that supports cross-origin requests or alternatively if the domain in question is under your control explore re-configuring CORS related settings. You can confirm the cause of the 404 message by viewing the errors displayed in the Browser Javascript Console.
When displaying GitHub Markdown files, the branch name is assumed to be main , and other paths will likely cause a 404 file not found message. When displaying Codeberg Markdown files, the path is assumed to contain /src/branch/main and other paths will likely cause a 404 file not found message.
Due to not being able to update Navbar or custom Sidebar links before page rendering, 'Edit this Page' links cannot be automatically updated to their correct target pages. Manually pass a URL pointing to the Git Repository using the URL parameter edit-link as a workaround, for example https://docsify-this.net?basePath=https://raw.githubusercontent.com/hibbitts-design/docsify-this-multiple-page-site/main&homepage=home .md&loadNavbar=_navbar&edit-link=https://github.com/hibbitts-design/docsify-this-multiple-page-site&edit-link-text=GitHub%20Repository 그리고 https://docsify-this.net/?basePath=https://raw.githubusercontent.com/paulhibbitts/docsify-this-cmpt-363-222-site/main&homepage=home.md&loadNavbar=_navbar.m d&sidebar=true&loadSidebar=_sidebar.md&edit-link=https://github.com/paulhibbitts/docsify-this-cmpt-363-222-site/tree/main&edit-link-text=GitHub%20Repository
Docsify is likely displaying the last cached version. To ensure the most recent version of a file is loaded, do a hard refresh of your Browser cache.
The most likely cause for embedded images in Markdown not being displayed as expected is the use of relative paths (ie  ) - review image paths and ensure the full path to each image is used (ie  ). Likewise, if images in HTML are not being displayed as expected the likely cause is again the use of relative paths (ie <img src="images/filename.jpg" alt="Alt Text"> ) - use absolute URLs for HTML image sources (ie <img src="https://raw.githubusercontent.com/user/repository/main/images/filename.jpg" alt="Alt Text"> ).
Due to iframe cross-domain issues embedded content may not be able to be displayed. Use the included rich media embed service embed.ly as a workaround.
For example, the following iFrame HTML:
< iframe src =" https://docs.google.com/presentation/d/e/2PACX-1vRnnRFelgw1ksq_p8Eryg3dnyLCRRLPf5fBgdwdv9p-tCIwcxqWvzDGrGbjxGHL7HqEJVpmV26ntk3a/embed?start=false&loop=false&delayms=3000 " frameborder =" 0 " width = 780 " height="585" allowfullscreen="true" mozallowfullscreen="true" webkitallowfullscreen="true" > </ iframe >Would be changed to:
< a class =" embedly-card " data-card-controls =" 0 " data-card-align =" left " data-card-width =" 100% " href =" https://docs.google.com/presentation/d/1BLaaOTsGxDmNcAhg6pdx3hl9IvI8NErg8Oe5ceh83fw/edit?usp=sharing " > Grav and Docsify Slides Placeholder </ a > When displaying a Docsify Sidebar or custom Sidebar, it is expected that page header levels start with a H1 level header.
When the search field is enabled in a Docsify custom Sidebar, only pages listed and linked in the Sidebar will be indexed for the search. Any pages linked in an optional Navbar will not be included in searches.
Docsify-This (as with Docsify itself) will only execute the first script included in a Markdown page, as described in the Docsify documentation.
Have you tried out Docsify-This? Share your feedback about Docsify-This
By leveraging his extensive UX design expertise and systems-oriented approach, Paul helps teams and individuals utilize open content in a range of education and publication settings, especially in connection with his Markdown-based Docsify and Grav CMS open-source projects. Professional services include user experience and workflow consulting, premium support subscriptions, workshops, and custom development. Sound of interest? Send a note to [email protected].
This open source project is by Paul Hibbitts of HibbittsDesign.org.
??♂️Special Thanks
Beau Shaw for his Remote Docsify example.
Alan Levine for the inspiration of a consolidated ReadMe collection.


