Big Model Data Assistant
? Project Introduction
A lightweight, full-link and easy to secondary development large-scale application project
A one-stop big model application development project built on technologies such as Dify, Ollama&Vllm, Sanic and Text2SQL, using Vue3, TypeScript and Vite 5 to create a modern UI. It supports graphical data based on large-model data through ECharts?, and has the ability to process CSV file table questions and answers. At the same time, it can be convenient to connect to third-party open source RAG system retrieval systems, etc. to support a wide range of general knowledge questions and answers.
As a lightweight big model application development project, Sanic-Web supports rapid iteration and expansion, helping big model projects to quickly implement them.
? Live Demo
The online experience is about to be launched, so stay tuned!
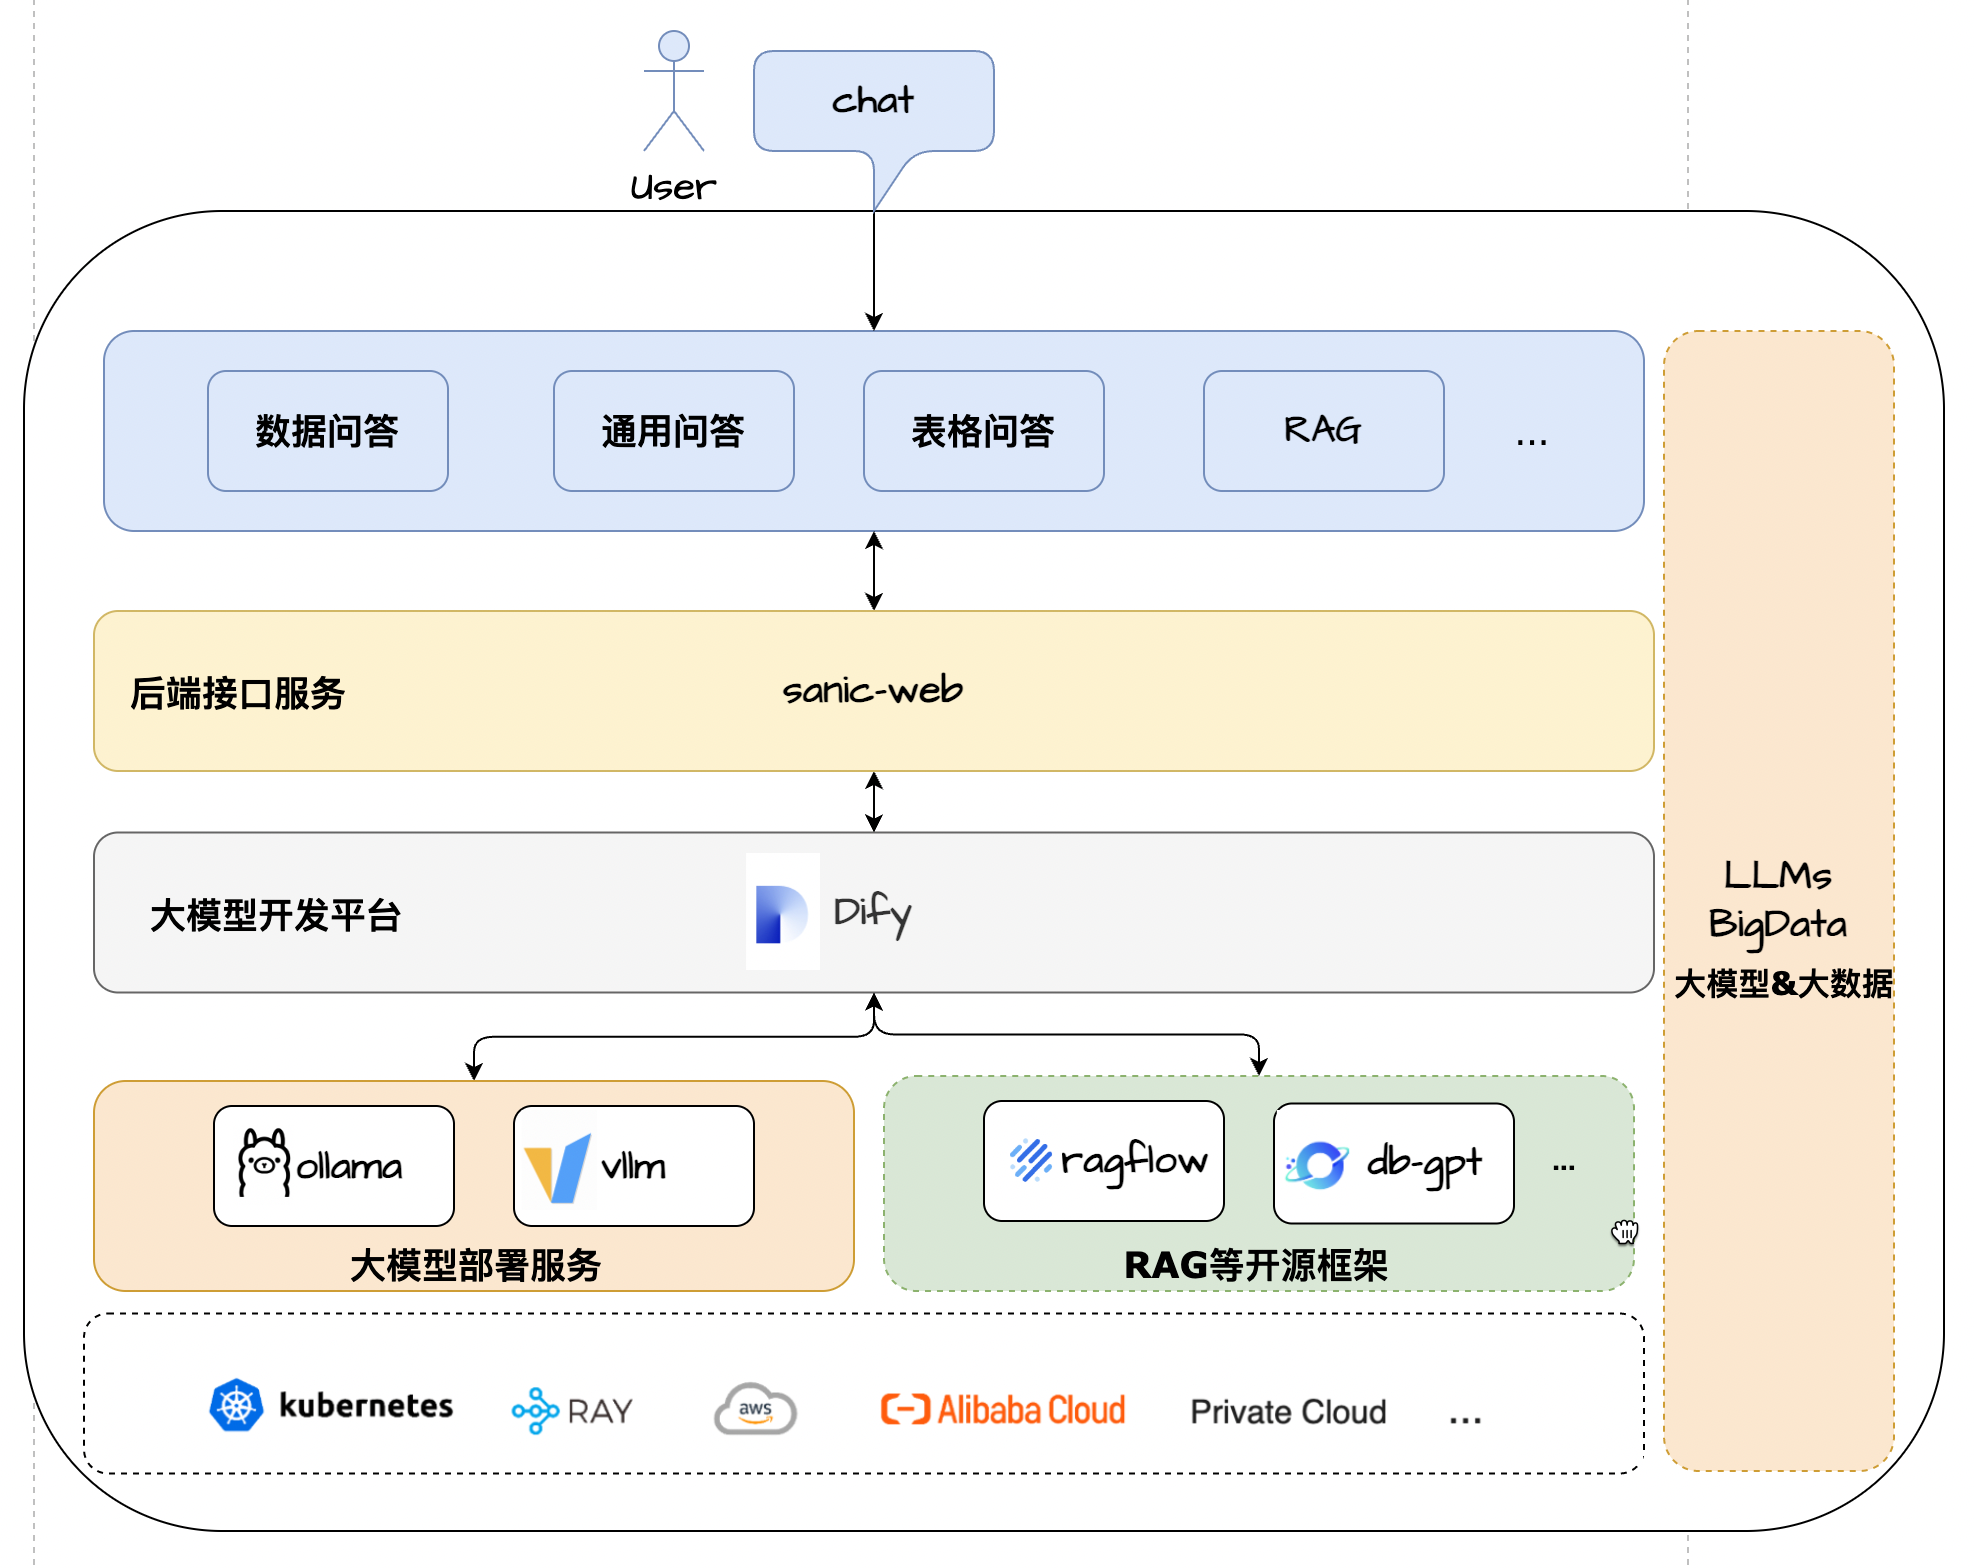
Architecture Solution
? characteristic
- Core technology stack : Dify + Ollama + RAG + LLM + Text2SQL
- UI framework : Vue 3 + TypeScript + Vite 5
- Data Q&A : Integrated ECharts model to realize Text2SQL lightweight graphical data Q&A display
- Table Q&A : Supports uploading of CSV format files and preprocessing based on big model summary and Text2SQL table data Q&A
- General Q&A : Supports general data form Q&A based on docking three-party RAG system + public network retrieval mode
- Application architecture : As a lightweight full-link one-stop large-scale model application development framework, convenient expansion and implementation
- Flexible deployment : Supports large-scale application development dependencies of various components docker-compose with one click to quickly deploy zero configuration
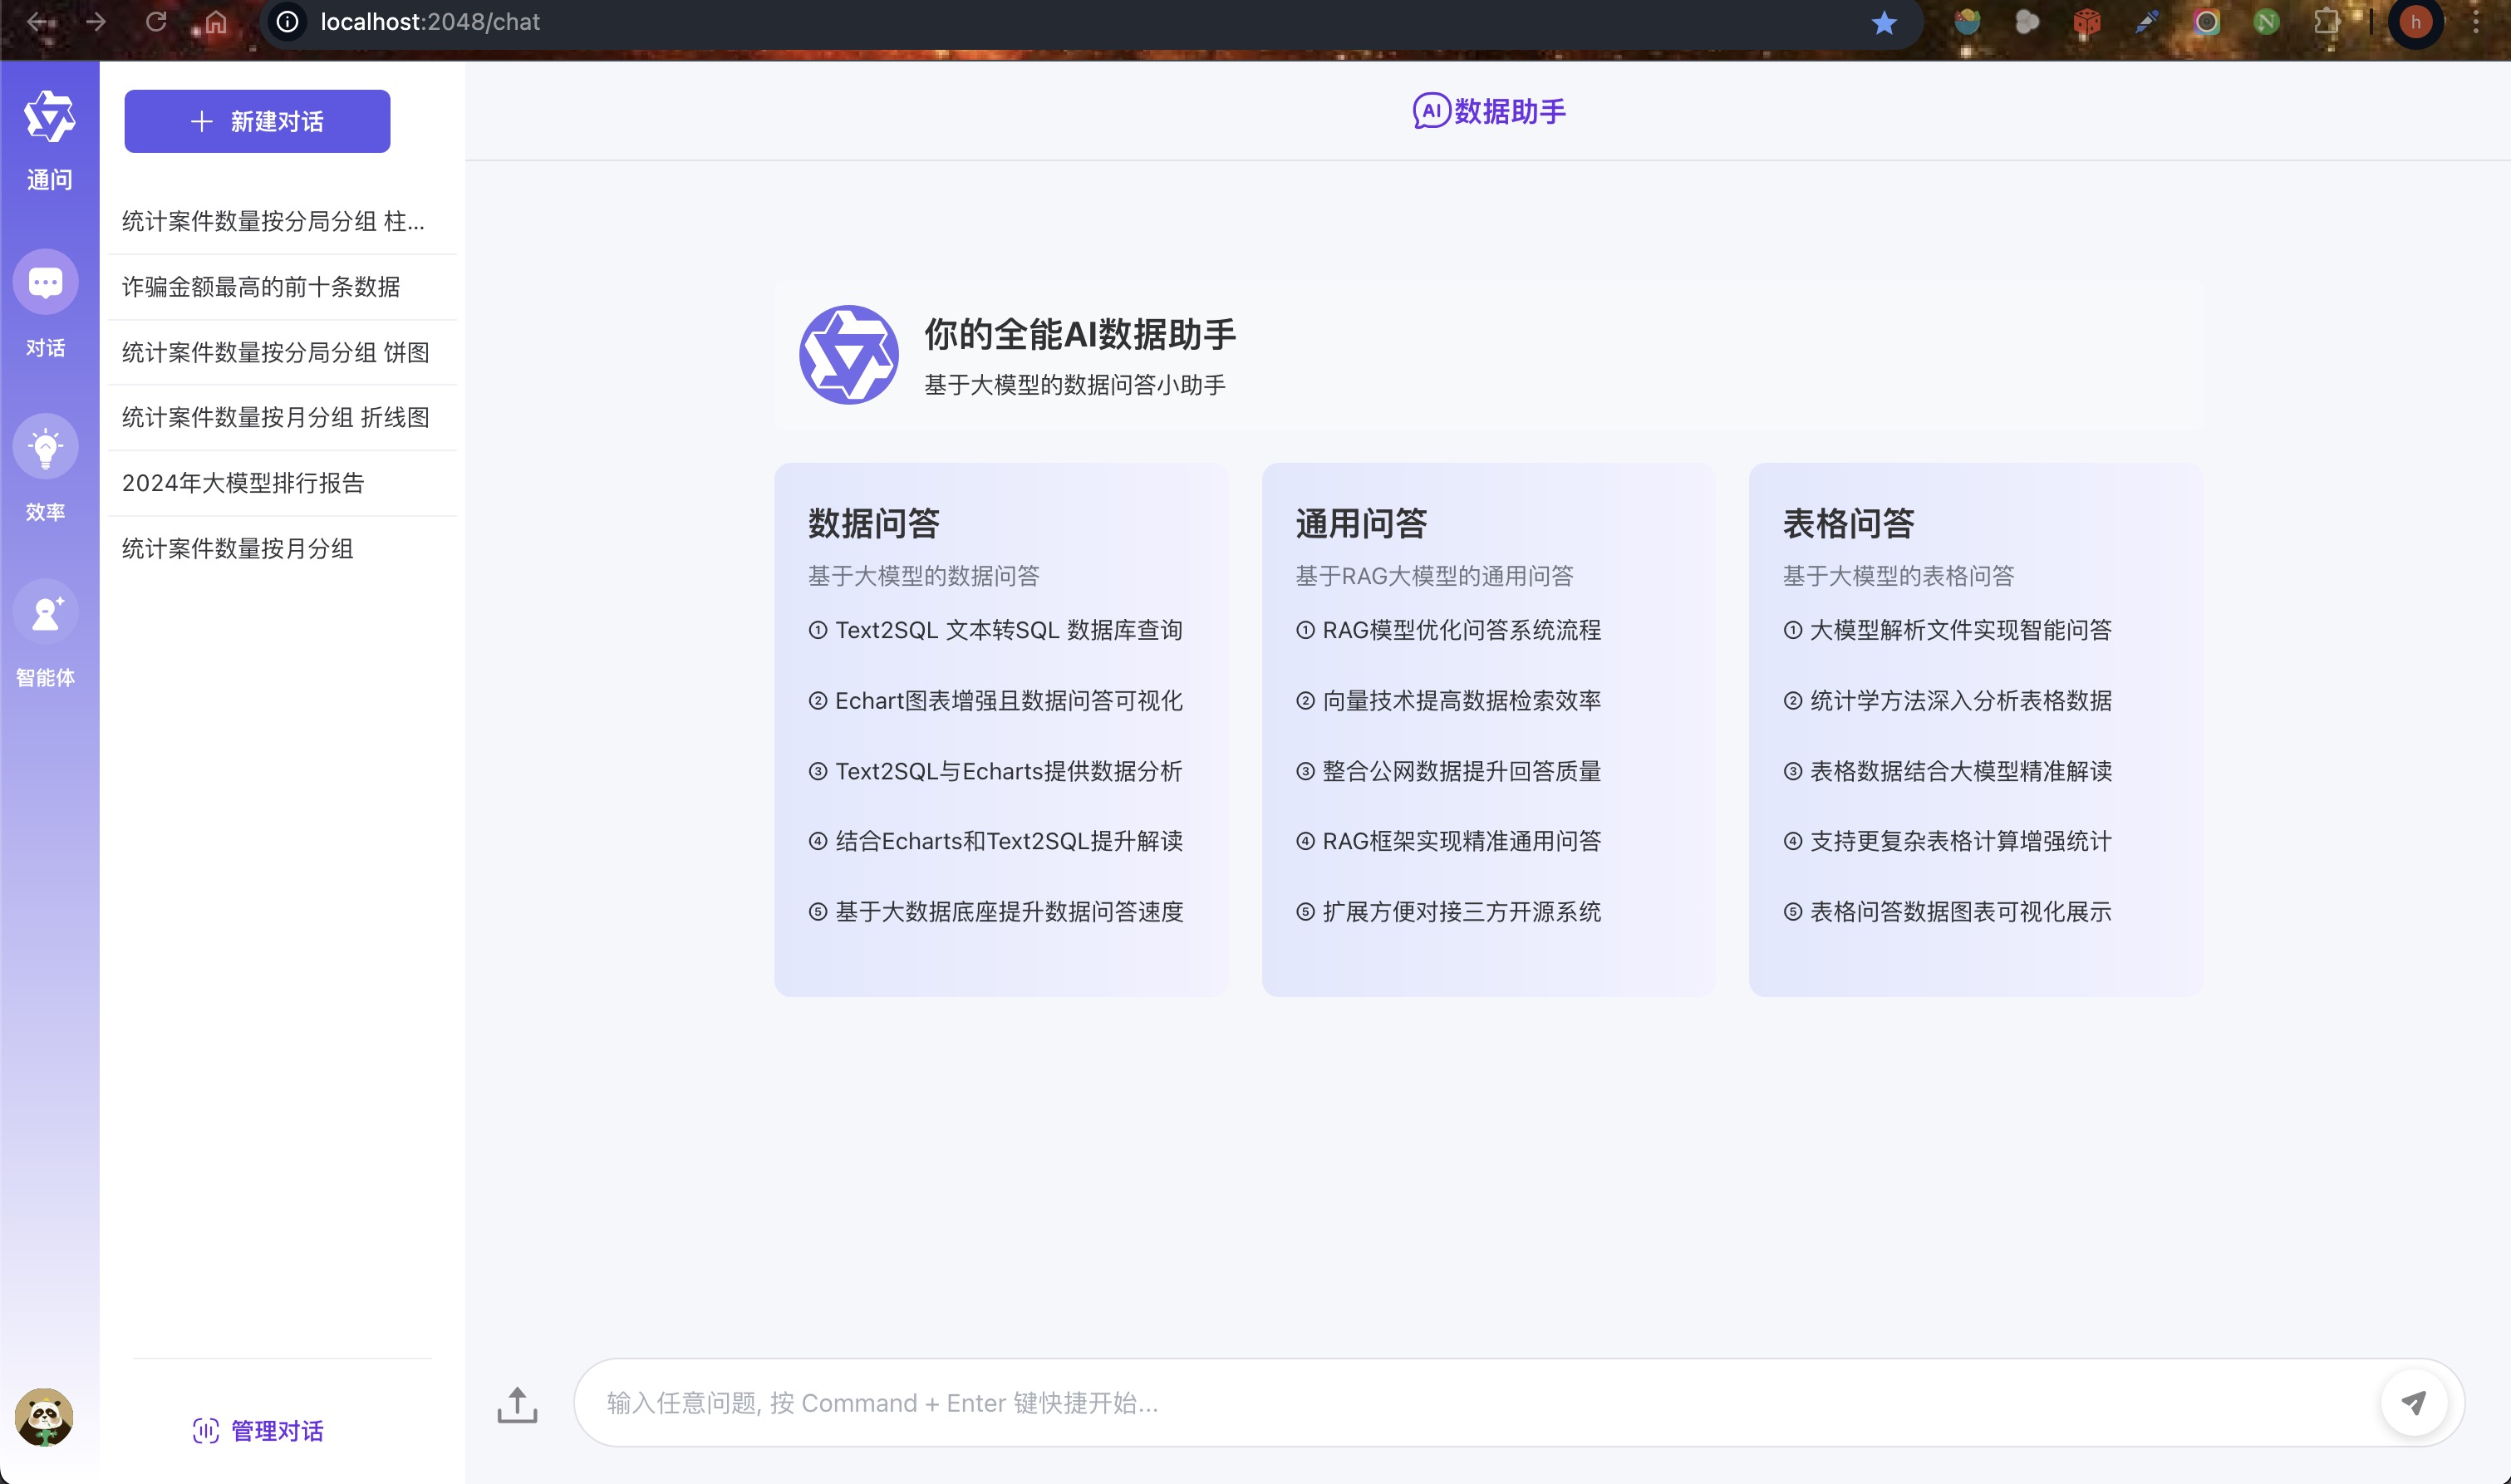
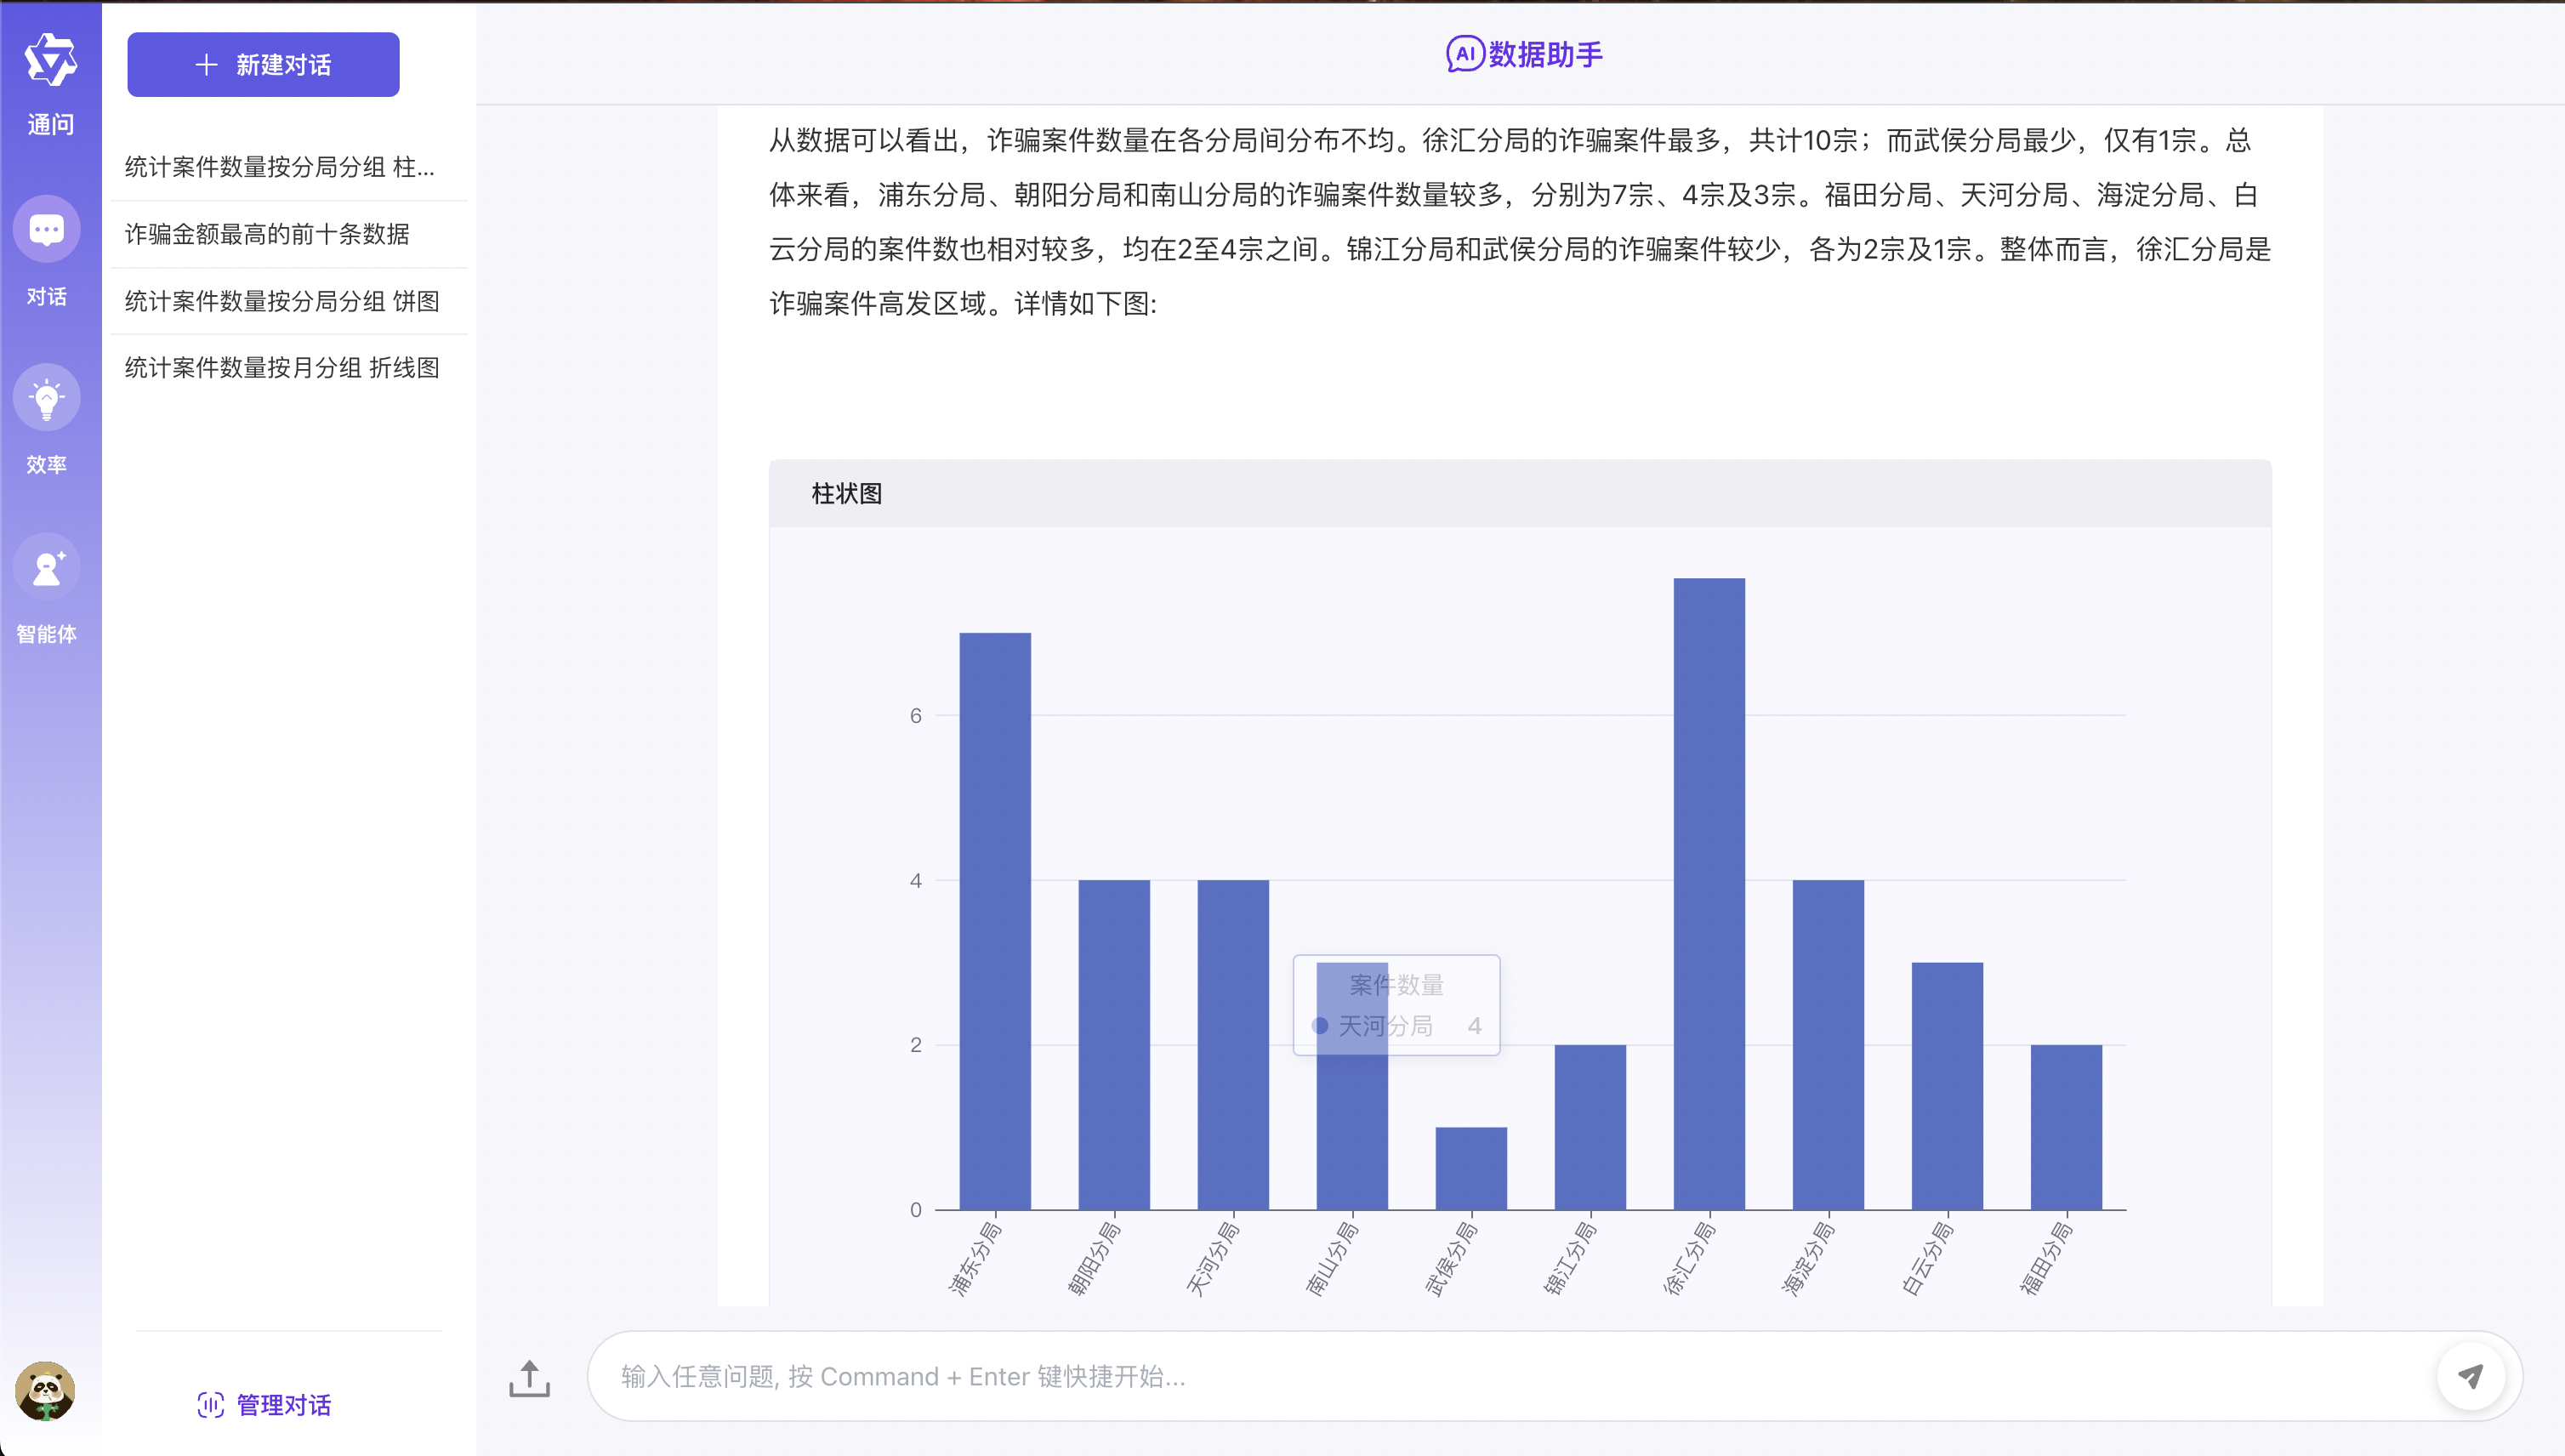
Running effect
Environment configuration requirements
Before you begin, make sure your development environment meets the following minimum configuration requirements:
- Operating system : Windows 10/11, macOs M series, Centos/Ubuntu
- GPU : Use Ollama to deploy locally, and it is recommended to use Nvidia graphics card or CPU mode.
- Memory : 8GB+
? Pre-conditions
- Python 3.8+
- Poetry 1.8.3+
- Dify 0.7.1+
- Mysql 8.0+
- Node.js 18.12.x+
- Pnpm 9.x
Large model deployment
- Refer to Ollama deployment
- Model: Qwen2.5
Dify environment configuration
Use project scripts to install Dify by default
- In order to take into account students who are exposed to big model applications for the first time, this project provides a one-click Dify service zero configuration and also start the service method to facilitate everyone to experience it quickly.
- Dify local access address: http://localhost Account: [email protected] Password: admin123
 # 拉起内置的dify服务
cd docker/dify/docker
docker-compose up -d
If the Dify environment has been installed
- If you already have a Dify environment, you can only modify the source code locally in this case to start the service!!!
- The first step is to directly import the docker/dify/data Q&A in the root directory of the project.yml canvas to Dify
- The second step is to modify the DATABASE_QA key in the source code DiFyAppEnum enum ( key is obtained from the diify process canvas )
- The third step is to modify the .env file in the project root directory and modify the actual Dify Rest service interface address according to the environment.
- Step 4 Modify the HttpRequest configuration in Dify canvas and modify the url address to the specific sanic-web service address
Install the latest version of Dify
- If you need to install the latest version of Dify, you can refer to the official document Dify official document.
Quick experience
- The specific steps are as follows:
- The first step is to clone the code to the local area
- The second step is to refer to the above big model deployment. First install Ollama to deploy the Qwen2.5 model.
- The third step is to directly refer to the Dify environment configuration in the above Dify environment configuration . In the first case, [using project scripts to install Dify by default] is very important!!!
- The specific steps for starting the service in the fourth step are as follows:
- Cloning the repository
git clone https://github.com/apconw/sanic-web.git
- Start the service
 # 拉起前后端服务和中间件
cd docker
docker compose up -d
- Data Initialization
 cd docker
./init.sh

或执行

cd docker
python3 ../common/initialize_mysql.py
- Access services
- Front-end service: http://localhost:8081
Local development
- The first step is to clone the code to the local area
- The second step is to refer to the above big model deployment. First install Ollama to deploy the Qwen2.5 model.
- The third step is to configure the local development environment Dify environment. Please refer to the above Dify environment configuration . You can choose the first or second situations by yourself.
- Step 4: Edit the .env file in the project root directory, modify ENV=dev , and database configuration information.
- Step 5: Install the front- and back-end project dependencies and start the front- and back-end services. The specific steps are as follows:
- Backend dependency installation
- Poetry installation reference poetry official documentation
 # 安装poetry
pip install poetry

# 安装依赖根目录执行
# 设置国内仓库
poetry source add --priority=default mirrors https://pypi.tuna.tsinghua.edu.cn/simple/
poetry install
- Install the database
docker run --name mysql-local
-p 13006:3306
-v /Users/lihuan/docker-mount/mysql:/var/lib/mysql
-e MYSQL_ROOT_PASSWORD=1
-d mysql:latest
- Initialize the database
- If you use the local environment mysql, you need to modify the source code initialize_mysql when initializing the data and modify the database connection information.
 cd docker
./init.sh

或执行

cd docker
python3 ../common/initialize_mysql.py
Front-end dependency installation
- The front-end is based on open source projects. You can refer to chatgpt-vue3-light-mvp to install the second opening.
 # 安装前端依赖&启动服务
cd web

#安装依赖
npm install -g pnpm

pnpm i

#启动服务
pnpm dev
Start backend service
Access services
- Front-end service: http://localhost:2048
? Build a mirror
- Edit the .env file in the project root directory, modify ENV=test , and save.
- Execute the build command:
 # 构建前端镜像
make web-build

# 构建后端镜像
make server-build
? support
If you like this project or find it useful, you can click Star in the upper right corner to support it. Your support is our driving force for continuous improvement, thank you! ^_^
If you find this project helpful to you, or you like what we do, please click the [️ Star] button in the upper right corner to support us! Every star of yours is a great encouragement to us and is also the driving force for our continuous improvement and development. Thank you for your support! ^_^
In addition, if you have any suggestions or want to participate in the development of the project, you are also welcome to contact us through the following methods:
- Submit Issue - If you find any issues or have suggestions for improvement, you can submit it in Issues.
- Join the Discussion - You can add to our discussion group to communicate and discuss. Participate in the discussion.
- Contribution Code - If you are interested in contributing code, you can refer to the Contribution Guide.
Thank you again for your support!
QA communication group
- Welcome to the big model application exchange group, welcome to join the group to discuss and share experience
- Follow the official account below and click on the WeChat group menu to add WeChat to bring you into the group
| WeChat group |
|---|
 |
License
MIT License | Copyright © 2024-PRESENT AiAdventurer


