dell5577medisable
1.0.0
More Info
Yes, it is now possible to disable intel ME, thanks to NSA and Positive Technologies. On request of NSA, Intel has provided a kill switch to safely disable ME, as it may cause various security issues, which was explored by security researchers at Positive Technologies and now even we can disable ME. Thankfully, Nicola Corna has developed a script me_cleaner to ease our work of modifying and making the changes in the BIOS firmware.
Read more
Currently, There are three ways to disable it:
Read more
This guide would tell you how I disabled ME through External Flashing with modified OEM firmware on my Dell Inspiron 15 5577 gaming laptop and other similar laptops.
WARNING
The process involved will require re-flashing your system's BIOS-chip firmware image, and will almost certainly void your system warranty. It may result in your machine becoming 'bricked'. On some (though not many) PCs, the ME is used to initialize or manage certain system peripherals and/or provide silicon workarounds — if that is the case on your target machine, you may lose functionality by disabling it. Although the most reliable method, external flashing does require you to open the case of your PC, an action that by itself is likely to void the warranty on non-desktop systems. Always observe proper ESD protective measures when working with exposed system boards, and ensure that you have all external power sources and batteries removed. Backup any important files before proceeding. Read all instructions carefully and proceed only if you are comfortable, and at your own risk. Do it completely at your own risk, I don't provide warranty of any kind and neither I'm responsible for any damage or losses.
Before proceeding further, I'd recommend to read these pages which I followed to understand the process,
So, What actually we are going to do? What are the steps? In short, we're going to read the BIOS firmware from the BIOS Flash IC on the motherboard into a file, we'll then verify the firmware read into the file. Then, we'll use me_cleaner to check the status of Intel ME in the firmware and disable it using either of the two last methods (See How to disable it ?) and write the modified firmware into a file. And, then we'll flash (write) the modified firmware with disabled ME back into the BIOS IC.
So, The entire process can be divided into the following steps:
It is recommended to go through the Gentoo wiki as it is the more detailed procedure, which guided me along with every precautions and safety to successfully perform this process.*
iomem=relaxed into grub entry 'Live' before booting Kali. (To add the kernel parameter: When the screen shows the list of booting options, highlight 'Live' option and press 'e' then add the parameter iomem=relaxed at the end of line starting with 'linux' and press F10 to boot )apt update && apt-get install libpci-dev zlib1g-dev to install the remaining required packages on Kali.iomem=relaxed in the kernel parameters (Not for those who did already using Kali above)git,gcc,make and development files (header files) for pciutils and zlib, if not already installed according to your distribution (Kali users skip this)git clone --depth=1 https://review.coreboot.org/coreboot
cd coreboot/util/intelmetool
make
sudo modprobe msr
sudo ./intelmetool -mbThe last command shows the status of Intel ME along with Intel Boot Guard.
If the line Current Working State: Normal shows 'Normal' then Intel ME is present and active.
To save the status execute :
sudo ./intelmetool -mb > mestatus-1.log(See output)
If the line ME Capability: BootGuard: ON shows ON then Intel Boot Guard is on and we can't remove and destroy ME modules but we can disable ME by just setting HAP-bit.
Remember, If Intel Boot Guard is ON, changing anything else in the firmware may lead to system being unbootable which can not be reversed.
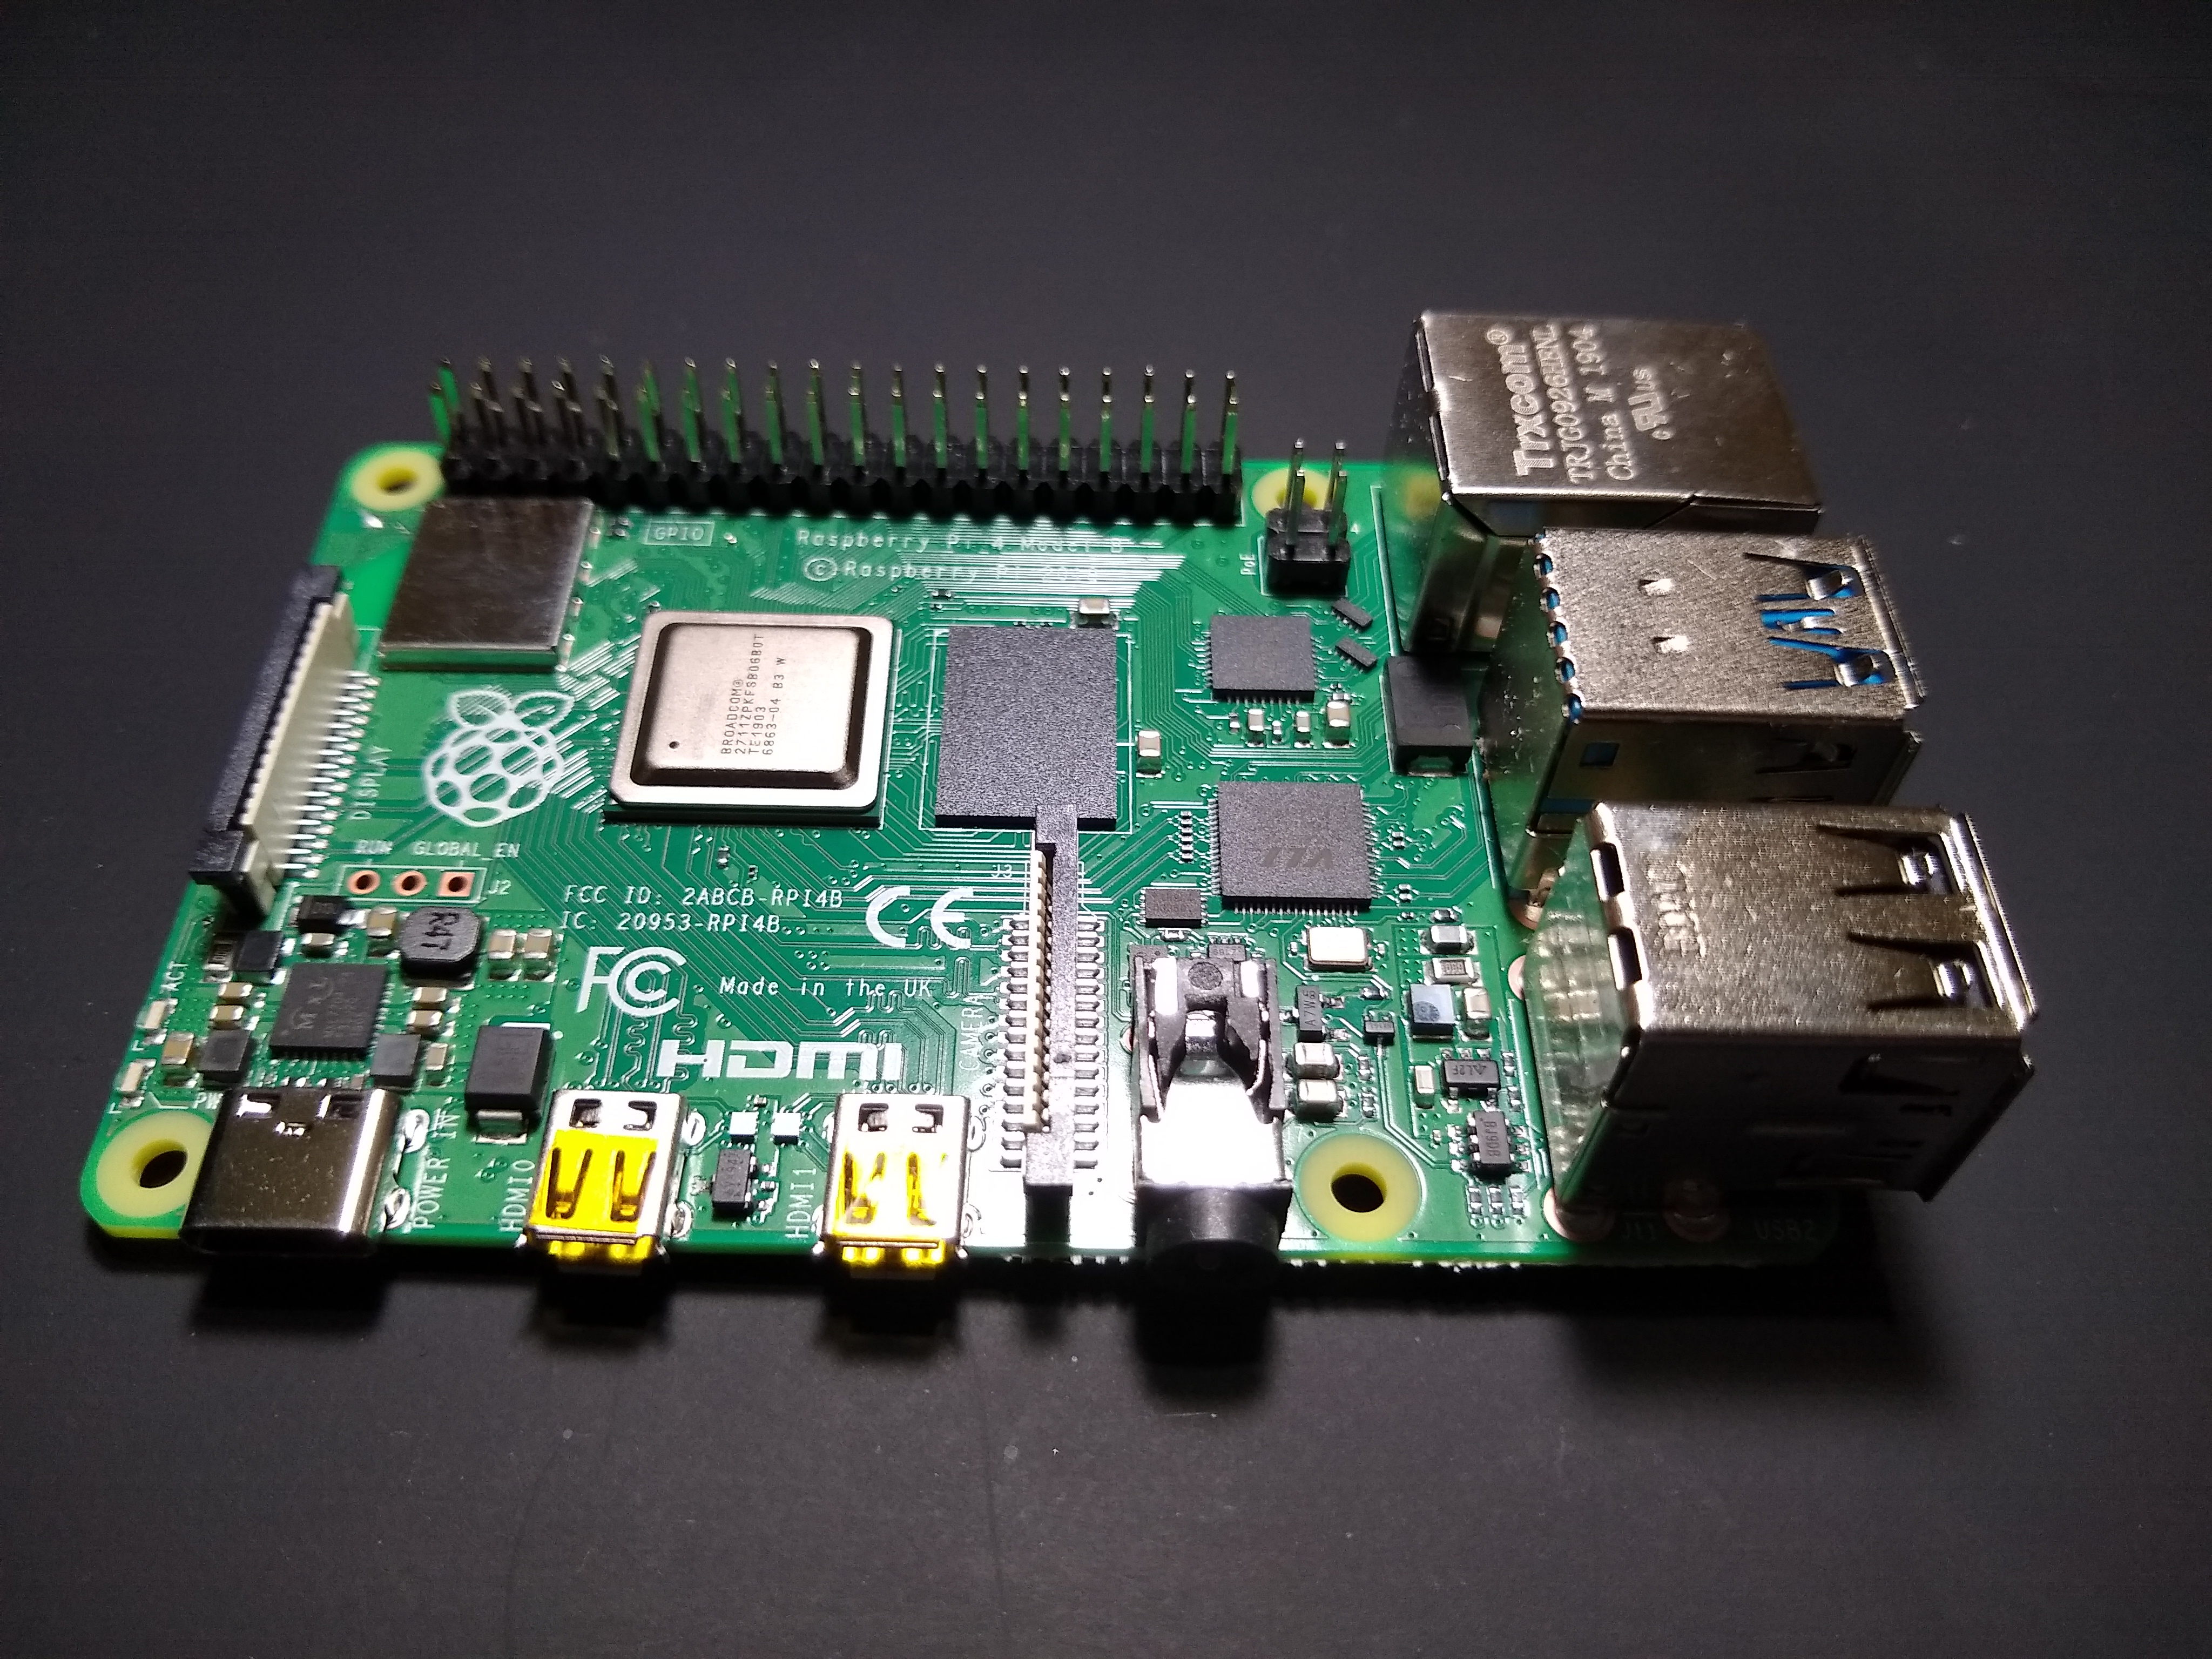
mestatus-1.log file safely to the device other than this PCI've used Raspberry PI 4B for my setup but you may use any Raspberry PI (2|3|4), you just need to install a linux operating system with SPI devices enabled. Here, we're installing Arch Linux ARM for our purpose.
sudo bashAnd, follow the steps to install Arch Linux ARM for your Raspberry Pi board till step 6 (i.e stop just before unmounting the boot and root partitions) : Raspberry Pi 2 Raspberry Pi 3 Raspberry Pi 4
device_tree_param=spi=on into the file boot/config.txt, this would enable the SPI interface for devices on the Raspberry PI,echo 'device_tree_param=spi=on' >> boot/config.txtCreate a file root/etc/wpa_supplicant/wpa_supplicant-wlan0.conf by the following, replace SSID with your Hotspot's SSID and PASSWORD with your wifi password:
wpa_passphrase "SSID" "PASSWORD" > root/etc/wpa_supplicant/wpa_supplicant-wlan0.confThen, enable the systemd services for auto connecting your Raspberry Pi to the wifi hotspot when it boots,
ln -svf /usr/lib/systemd/system/[email protected] root/etc/systemd/system/multi-user.target.wants/[email protected]
ln -svf /usr/lib/systemd/system/[email protected] root/etc/systemd/system/multi-user.target.wants/[email protected]To solve the issue, we'll add a few static ip addresses of NTP servers. Adding hostnames of the NTP servers instead of their static ip addresses would cause an issue in the DNS resolution of the given hostnames of the NTP servers, as the system time is already misconfigured to make requests to the DNS servers. That's why, it's important to add static ip addresses only. Here, these are the google's ntp servers, you may use any other server(s).
echo "FallbackNTP=216.239.35.0 216.239.35.4 216.239.35.8 216.239.35.12" >> root/etc/systemd/timesyncd.confNote: Use the official Raspberry Pi adapter to power the pi. Using an insufficient power supply will result in random, inexplicable errors and filesystem corruption.
Looking for the ip address of the Raspberry Pi over your wifi network can be a tedious job. If you use a wifi router then you can easily go to the router settings page through your browser and login to see the connected clients and find out the ip address of the hostname alarmpi.
However, if you have used other methods (like a smartphone's wifi hotspot) then you can install nmap on your linux distro to find out the ip addresses of clients connected to the wifi hotspot (Kali users already have nmap installed). First know your own ip address on the wifi by executing,
ip addrThis will list all the network interfaces, the interface name starting with wlan or wlp name is wifi interface and the ip address after the word inet is what we're looking for (ex: 192.168.0.142/24). Now we'll use this ip address to probe other devices connected to the network. Just by replacing the last byte of the address with 0 (ex: 192.168.0.142/24 to 192.168.0.0/24) and probing using nmap will fetch the list of connected devices.
nmap -sn 192.168.0.0/24Now, if you've connected just your laptop and Raspberry Pi to the wifi network, then the ip address other than your laptop's ip address in the output of nmap is the ip address of the Raspberry Pi.
If there are many devices connected on the network, then you can power off the Pi and probe using nmap and then power on and again probe using nmap, then simply compare the changes in the output of nmap to find out the ip address of the Pi.
Now, you can login to the Raspberry Pi through ssh. (install openssh if you don't have ssh client installed)
For example, if you've got the Raspberry Pi's ip address as 192.168.0.184, then you may login to it's ssh by executing,
su --login rootpacman-key --init
pacman-key --populate archlinuxarm
pacman -Syu
pacman -S python python-setuptools python-pip flashrom wget git base-devel
pip install RPi.GPIO
exitTo check if raspberry shows SPI devices execute ls /dev/spidev*, if the out says No such file or directory, then SPI devices is not yet enabled, check if /boot/config.txt contains the line device_tree_param=spi=on. Or else, everything is setup and ready, and you're good to go.
exit and get exit from the ssh shell.Make proper backup of all your important files before opening your laptop. Disconnect and remove the external power cables (and we've even got to remove the batteries after opening the laptop case as per in the service manual) and all other devices connected to the laptop.
Look for Dell's official service manual guide for your dell laptop and follow the steps carefully till "Remove the System Board", following all the prerequisites with proper care. You may also download the service manual for Inspiron 15 5577 here . If you aren't able to find the service manual, you can watch disassembly videos for your model on youtube and may take a risk to follow their instructions. Make sure to disconnect the batteries and CMOS cell from the motherboard while performing the disassembly.
Important Tips
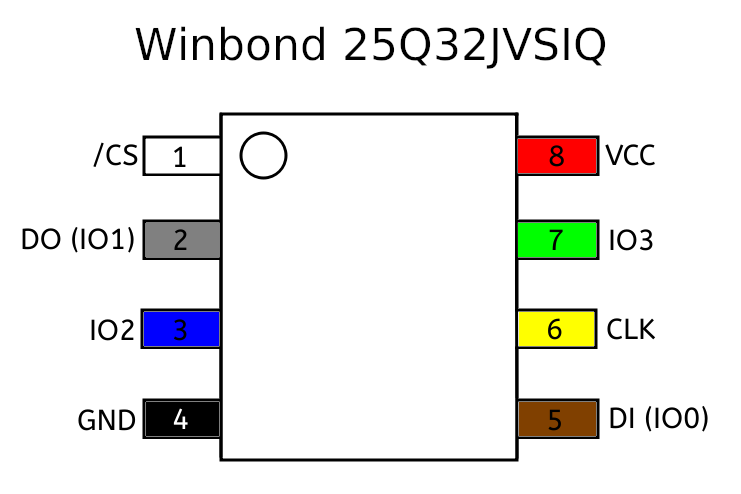
| PIN | Pin Name | Description |
|---|---|---|
| 1 | /CS | Chip Select; Drive low to enable the device operations |
| 2 | DO(IO1) | Data Output (Data Input Output 1); Data output from device for Standard SPI |
| 3 | IO2 | Data Input Output 2 |
| 4 | GND | Ground |
| 5 | DI(IO0) | Data Input (Data Input Output 0); Data input into device for Standard SPI |
| 6 | CLK | Serial Clock Input |
| 7 | IO3 | Data Input Output3 |
| 8 | Vcc | Power Supply |
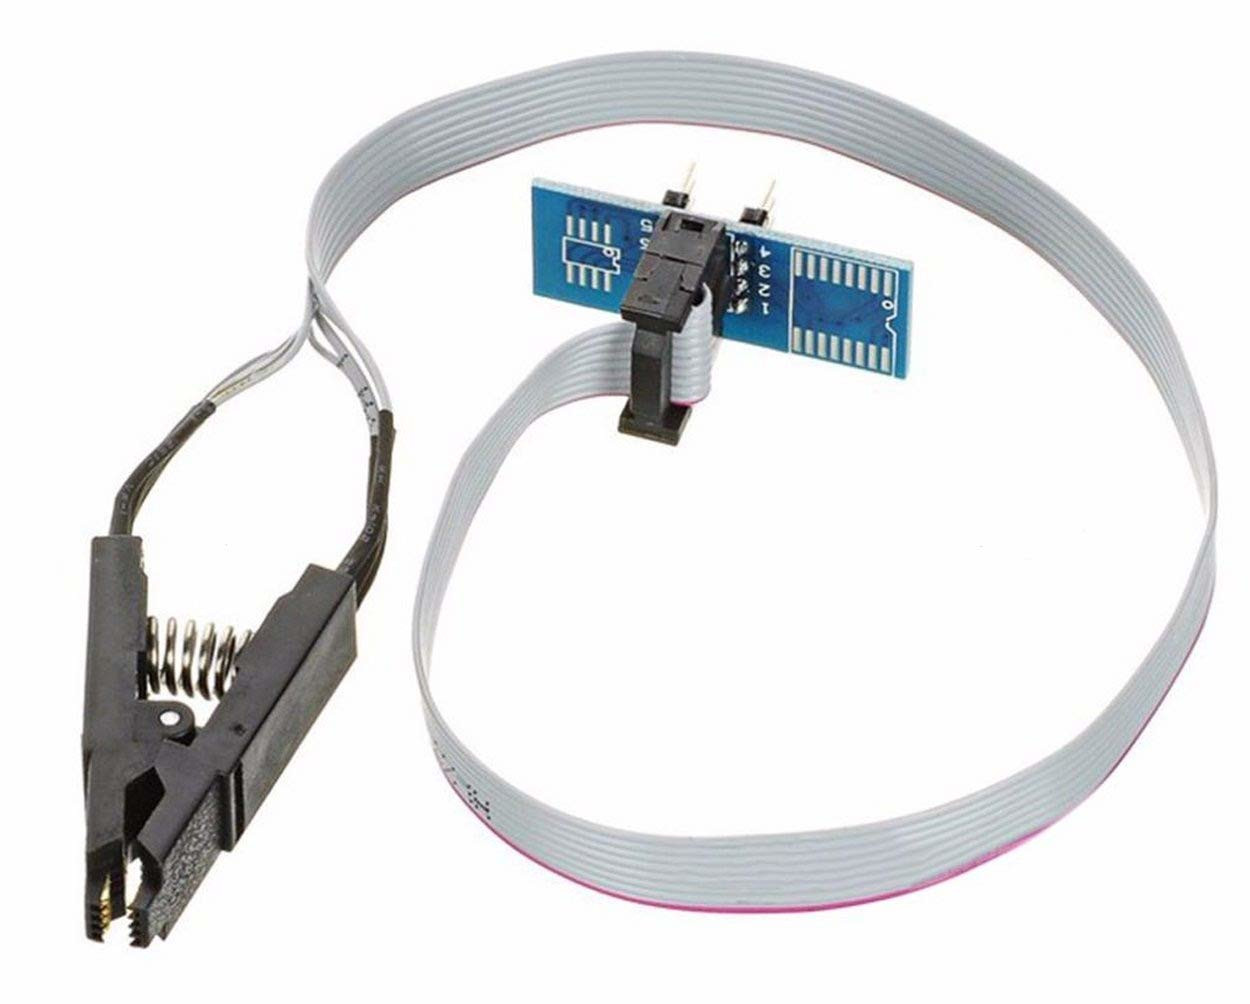
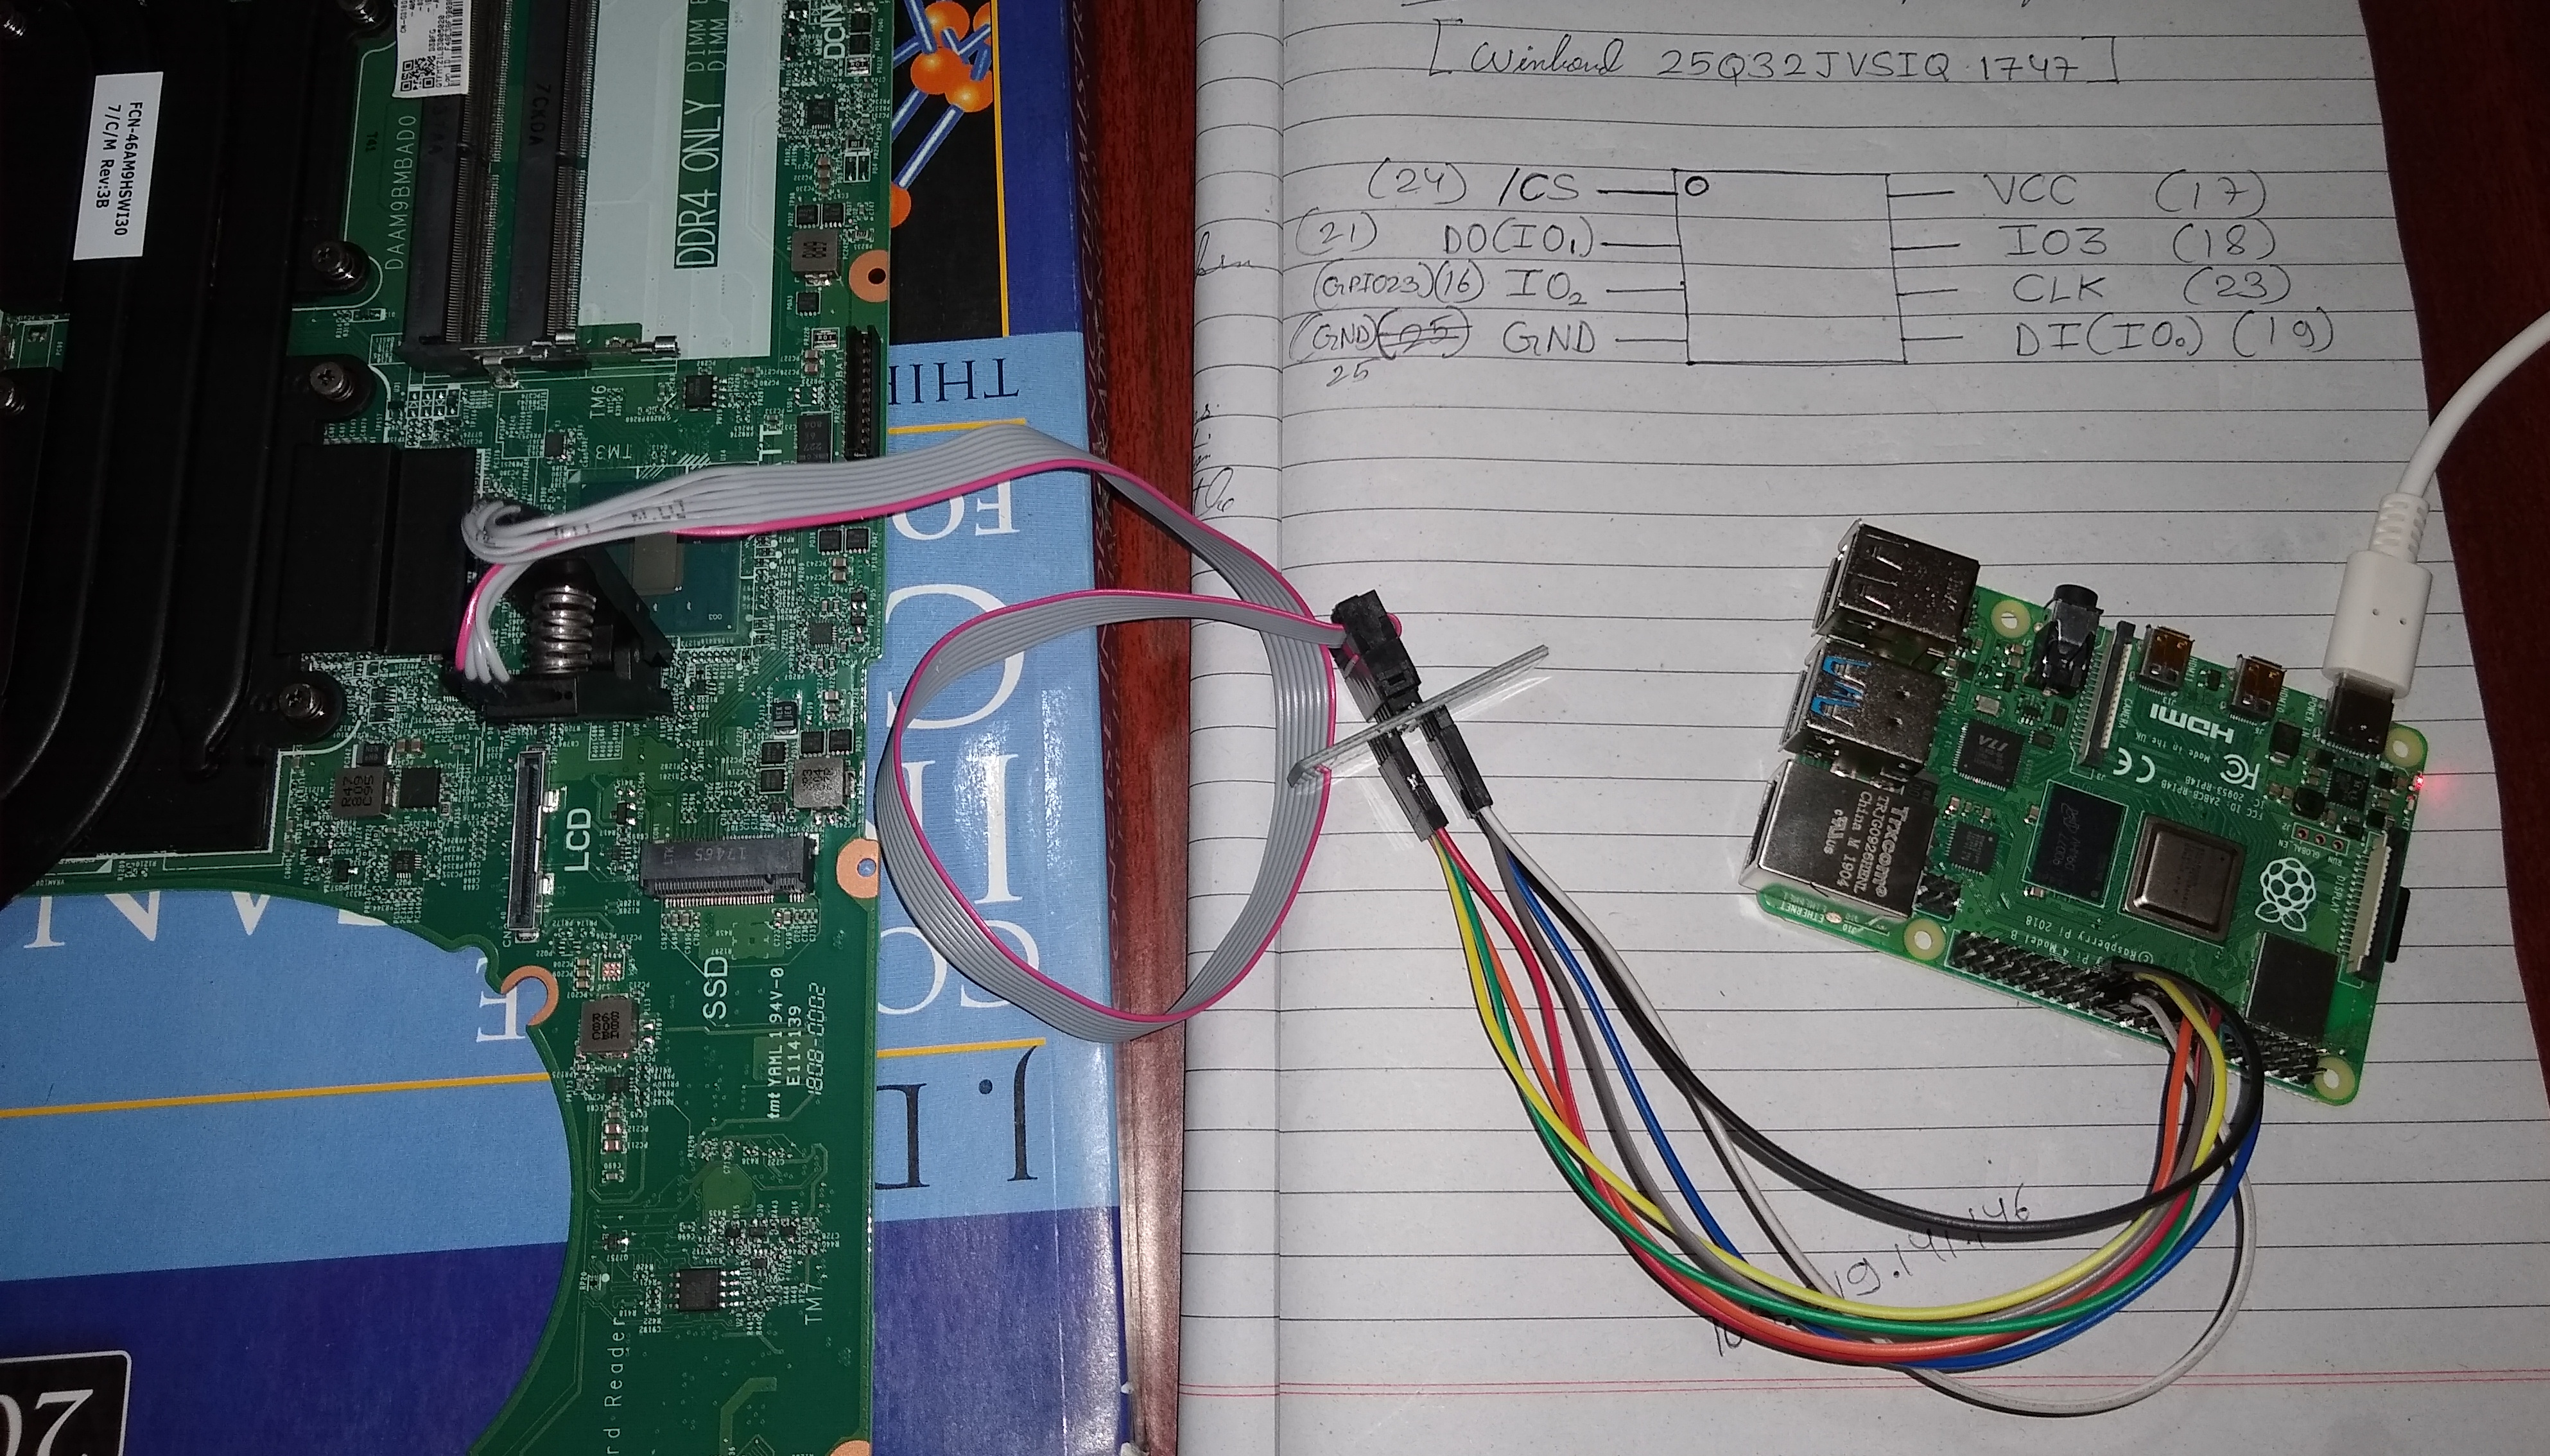
Mark the SOIC-8 flash chip test clip for the respective pin numbers of the IC to attach to, so that you don't get confused after wiring the clip with Raspberry Pi for which way to attach the clip and which side connects the top of IC.
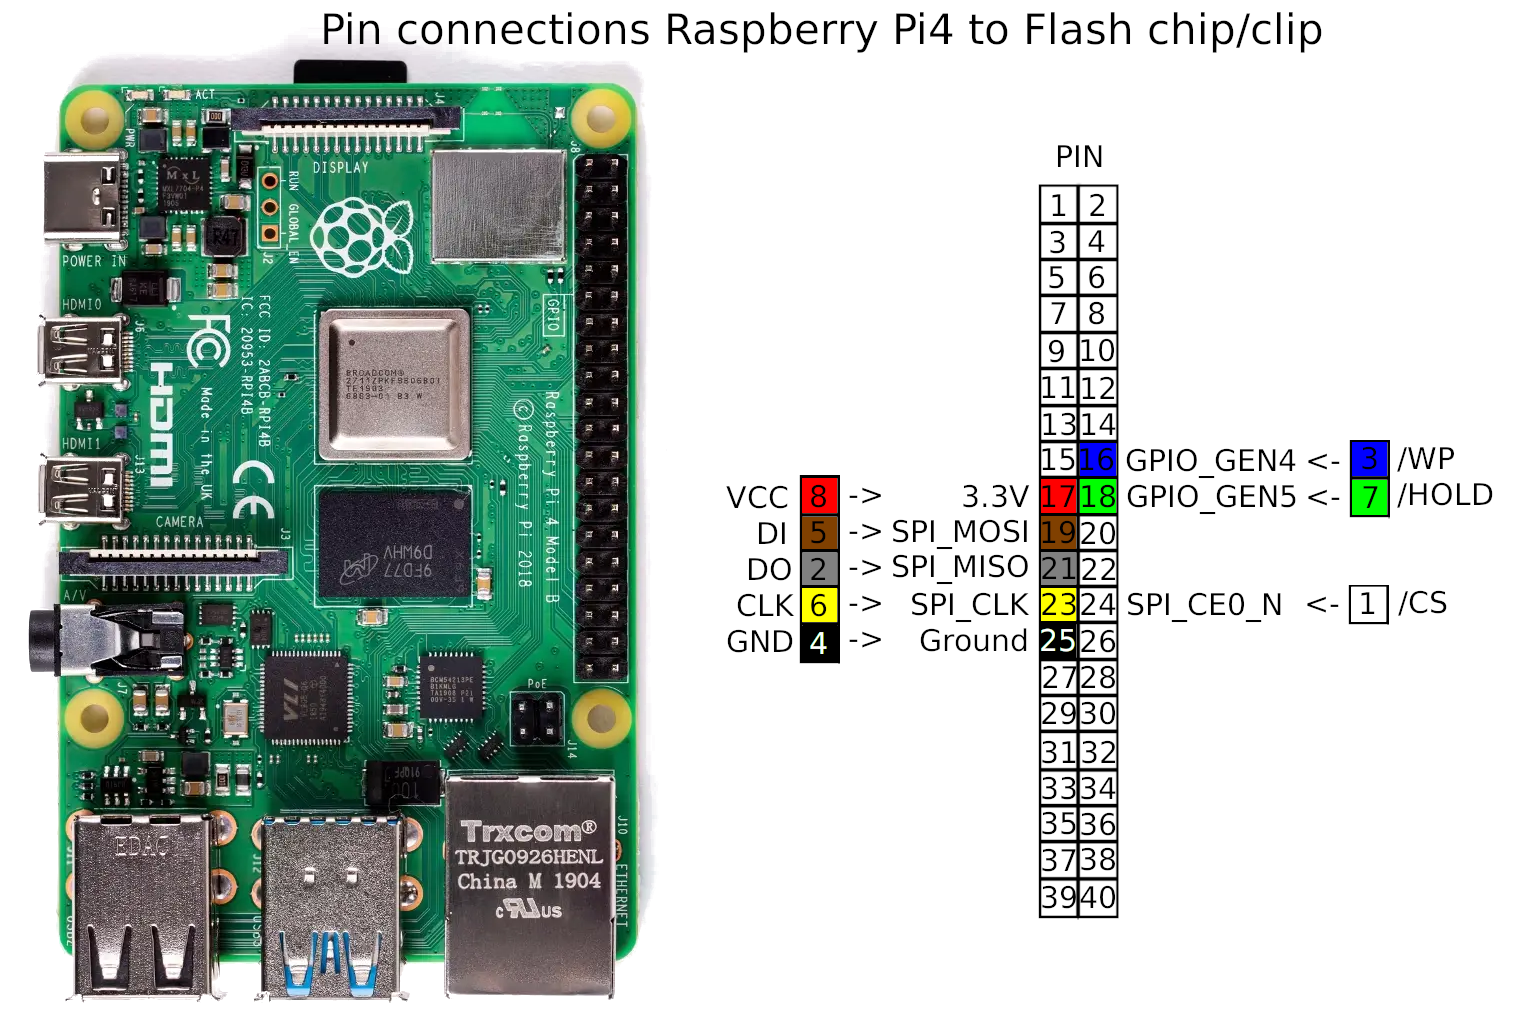
WARNING : Be very careful not to connect pins 2 or 4 on the RPi4's GPIO header to any pin of the IC clip - these are 5v (rather then 3.3v) and are likely to destroy your flash chip should you accidentally use them (See the datasheet to know about the appropriate input voltage).
| SOIC-8 Flash IC Pin | PIN | Raspberry Pi GPIO Pin | PIN |
|---|---|---|---|
| Vcc | 8 | 3.3v | 17 |
| GND | 4 | Ground | 25 |
| /CS | 1 | SPI0_CE0_N | 24 |
| CLK | 6 | SPI_CLK | 23 |
| DO | 2 | SPI_MISO | 21 |
| DI | 5 | SPI_MOSI | 19 |
| /WP (IO2) | 3 | GPIO_GEN4 | 16 |
| /HOLD (IO3) | 7 | GPIO_GEN5 | 18 |
Note: Don't attach the clip to the IC right now because it won't work as the Raspberry Pi is not ON and the pin modes are not yet set.
However, if you don't have a monitor and you're running the Raspberry PI headless, then we can access the Raspberry Pi's shell through ssh. If you've another PC or MAC, you can connect it to the same wifi and use an appropriate ssh client for the operating system to connect to the Raspberry Pi.
If you don't have another PC but you've an android smartphone or tablet, you can still access the Raspberry Pi through ssh. Connect the phone/tablet to the same wifi network (if your wifi hotspot is from the same phone/tablet, you're already on the same network) just install the Termux app from the the F-Droid and install openssh and nmap packages on termux and connect to the Raspberry Pi using ssh. To install the packages openssh and nmap on termux,
pkg install openssh nmapRefer the 2nd step to probe Raspberry Pi's ip address and connect using ssh
su --login root
ping -c 1 archlinux.orgwget https://raw.githubusercontent.com/darajnish/dell5577medisable/master/scripts/setup_gpio.py
python setup_gpio.pyIt should output the current value read from the pins 23 and 24 be set to 1, else something is wrong and you need to pull-up the pins by some other method and verify they're pulled up and then continue.

flashrom -p linux_spi:dev=/dev/spidev0.0,spispeed=8000The output should be something like,
flashrom v1.1 on Linux 4.19.67-1-ARCH (armv7l)
flashrom is free software, get the source code at https://flashrom.org
Using clock_gettime for delay loops (clk_id: 1, resolution: 1ns).
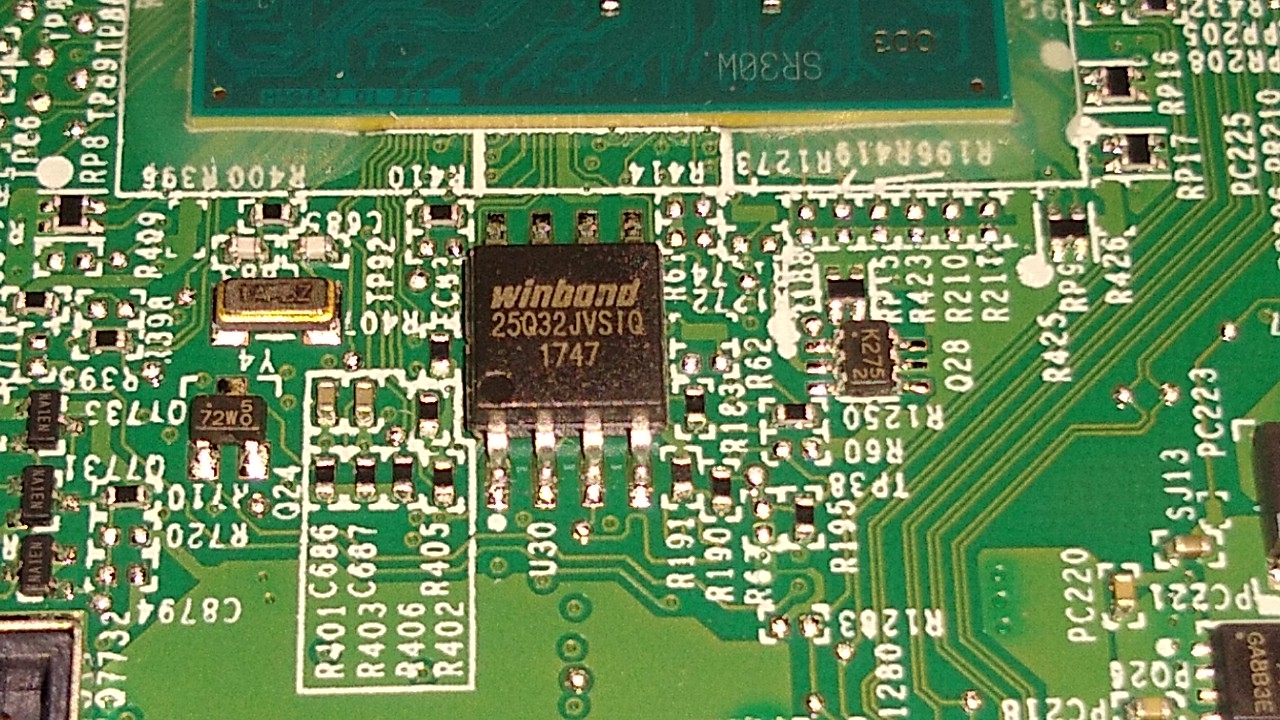
Found Winbond flash chip "W25Q32.V" (4096 kB, SPI) on linux_spi.
No operations were specified.
( See output )
But, if you get No EEPROM/flash device found then recheck the connections and alignment of the clip with the IC; remove and reattach the IC clip over the IC and repeat the above command until it gets detected.
WARNING: If flashrom reports that it has found a brand or make of chip that doesn't match what you expected, stop. Search online and only proceed if you are confident there is no ambiguity.
flashrom -p linux_spi:dev=/dev/spidev0.0,spispeed=8000 -r original.rom
flashrom -p linux_spi:dev=/dev/spidev0.0,spispeed=8000 -r original2.rom
flashrom -p linux_spi:dev=/dev/spidev0.0,spispeed=8000 -r original3.rom
Output should be something like,
flashrom v1.1 on Linux 4.19.67-1-ARCH (armv7l)
flashrom is free software, get the source code at https://flashrom.org

Using clock_gettime for delay loops (clk_id: 1, resolution: 1ns).
Found Winbond flash chip "W25Q32.V" (4096 kB, SPI) on linux_spi.
Reading flash... done.
( See output )
md5sum.md5sum original*WARNING: The hashes of the checksum of all the three should be identical. If any one of them is different then read the firmware again and again until the image files are identical. Make sure the IC clip is attached properly. You can reduce (adjust) the 'spispeed=' parameter value to what is given in the datasheet for your BIOS IC respectively. However, if you're still not able to read identical firmware data, PLEASE DO NOT PROCEED FURTHER UNTIL YOU'RE ABLE TO DO SO! Performing the 6th and 7th steps with such a dirty firmware image may result in a bricked system with your laptop unbootable, and there's no cure until you find a firmware image for your laptop's BIOS and correctly flash it again
git clone --depth=1 https://review.coreboot.org/coreboot
cd coreboot/util/ifdtool
make
cd ../../..
./coreboot/util/ifdtool/ifdtool -d original.rom
You should get the output something like this .
WARNING: If ifdtool -d reports an error, or states that No Flash Descriptor found in this image, stop. Repeat the read process until you have the identical copies and this ifdtool -d check. PLEASE DO NOT PROCEED FURTHER UNTIL YOU'RE ABLE TO READ THE FIRMWARE CORRECTLY!
Check if me_cleaner tool understands this image,
git clone https://github.com/corna/me_cleaner
python me_cleaner/me_cleaner.py --check original.rom
See output.
python me_cleaner/me_cleaner.py --soft-disable original.rom --output modified.rompython me_cleaner/me_cleaner.py --soft-disable-only original.rom --output modified.romSee output (for soft-disable-only)
python me_cleaner/me_cleaner.py --check modified.romIt shows The HAP bit is SET in the output.
original.rom file as it's the original firmware image of your BIOS, and it may be required later if the modified firmware causes some issue.flashrom -p linux_spi:dev=/dev/spidev0.0,spispeed=8000 -w modified.romflashrom should show output something like,
flashrom v1.1 on Linux 4.19.67-1-ARCH (armv7l)
flashrom is free software, get the source code at https://flashrom.org

Using clock_gettime for delay loops (clk_id: 1, resolution: 1ns).
Found Winbond flash chip "W25Q32.V" (4096 kB, SPI) on linux_spi.
Reading old flash chip contents... done.
Erasing and writing flash chip... Erase/write done.
Verifying flash... VERIFIED.
( See output )
WARNING: If flashrom reports an error here, or does not finish with the output Verifying flash... VERIFIED, stop. You almost surely have a corrupted flash. Try the write again, using a slower 'spispeed=' parameter, and if that also fails, try re-seating the IC clip on the IC.
If everything works without any error, then reassemble your laptop. Follow the procedure for "Replacing System Board" in the Dell Service manual. Power on the laptop. If it boots successfully, wait for 30 minutes to check if it auto shutdowns. If it doesn't auto shutdown and everything works fine then congratulations you've disabled Intel ME. Report your logs, system info and tell about problems you faced so that someone else may find it useful.
Follow Step 1 and check the status of ME again. It should be disabled.
WARNING: If it fails to boot or shutdowns unexpectedly then we must revert the original firmware back into the BIOS flash chip. Disassemble the laptop again taking all safety precautions and write the file original.rom back into the BIOS flash chip
python setup_gpio.py
flashrom -p linux_spi:dev=/dev/spidev0.0,spispeed=8000 -w original.romI hope this article helps anybody who is seeking information about Intel ME and the steps to disabling it. Feel Free to create an issue regarding any queries or doubt about any of the steps, and suggestions towards the improvement of this article are appreciated. I'm thankful to the Nicola Corna for me_cleaner and the basic wiki, and to Sakaki for Gentoo wiki* which guided me through the entire process.


