hierarchical language modeling
1.0.0
一個乾淨的模板來啟動您的深度學習項目⚡
單擊使用此模板來初始化新存儲庫。
總是歡迎建議!
為什麼您可能要使用它:
✅保存在樣板上
輕鬆地添加新的型號,數據集,任務,實驗和訓練不同的加速器,例如Multi-GPU,TPU或Slurm簇。
✅教育
徹底評論。您可以將此存儲庫用作學習資源。
✅可重複使用
收集有用的MLOPS工具,配置和代碼段。您可以將此存儲庫用作各種公用事業的參考。
為什麼您可能不想使用它:
事情不時破裂
閃電和九頭蛇仍在不斷發展並整合了許多庫,這意味著有時事情會破裂。有關當前已知問題的列表,請訪問此頁面。
未針對數據工程進行調整
對於構建彼此依賴的數據管道,並未真正調整模板。在現成數據上將其用於模型原型化更為有效。
過於簡單用例
構建配置設置是在簡單的閃電訓練中構建的。您可能需要付出一些努力來針對不同的用例(例如閃電面料)進行調整。
可能不支持您的工作流程
例如,您無法恢復基於Hydra的Multirun或Hypergarameter搜索。
注意:請記住,這是非正式的社區項目。
Pytorch Lightning-一款用於高性能AI研究的輕質Pytorch包裝紙。將其視為組織您的Pytorch代碼的框架。
Hydra-用於優雅配置複雜應用程序的框架。關鍵功能是能夠通過構圖動態創建層次結構配置,並通過配置文件和命令行覆蓋它。
新項目的目錄結構看起來像這樣:
 ├── .github                   <- Github Actions workflows
│
├── configs                   <- Hydra configs
│   ├── callbacks                <- Callbacks configs
│   ├── data                     <- Data configs
│   ├── debug                    <- Debugging configs
│   ├── experiment               <- Experiment configs
│   ├── extras                   <- Extra utilities configs
│   ├── hparams_search           <- Hyperparameter search configs
│   ├── hydra                    <- Hydra configs
│   ├── local                    <- Local configs
│   ├── logger                   <- Logger configs
│   ├── model                    <- Model configs
│   ├── paths                    <- Project paths configs
│   ├── trainer                  <- Trainer configs
│   │
│   ├── eval.yaml             <- Main config for evaluation
│   └── train.yaml            <- Main config for training
│
├── data                   <- Project data
│
├── logs                   <- Logs generated by hydra and lightning loggers
│
├── notebooks              <- Jupyter notebooks. Naming convention is a number (for ordering),
│                             the creator's initials, and a short `-` delimited description,
│                             e.g. `1.0-jqp-initial-data-exploration.ipynb`.
│
├── scripts                <- Shell scripts
│
├── src                    <- Source code
│   ├── data                     <- Data scripts
│   ├── models                   <- Model scripts
│   ├── utils                    <- Utility scripts
│   │
│   ├── eval.py                  <- Run evaluation
│   └── train.py                 <- Run training
│
├── tests                  <- Tests of any kind
│
├── .env.example              <- Example of file for storing private environment variables
├── .gitignore                <- List of files ignored by git
├── .pre-commit-config.yaml   <- Configuration of pre-commit hooks for code formatting
├── .project-root             <- File for inferring the position of project root directory
├── environment.yaml          <- File for installing conda environment
├── Makefile                  <- Makefile with commands like `make train` or `make test`
├── pyproject.toml            <- Configuration options for testing and linting
├── requirements.txt          <- File for installing python dependencies
├── setup.py                  <- File for installing project as a package
└── README.md
# clone project
git clone https://github.com/ashleve/lightning-hydra-template
cd lightning-hydra-template
# [OPTIONAL] create conda environment
conda create -n myenv python=3.9
conda activate myenv
# install pytorch according to instructions
# https://pytorch.org/get-started/
# install requirements
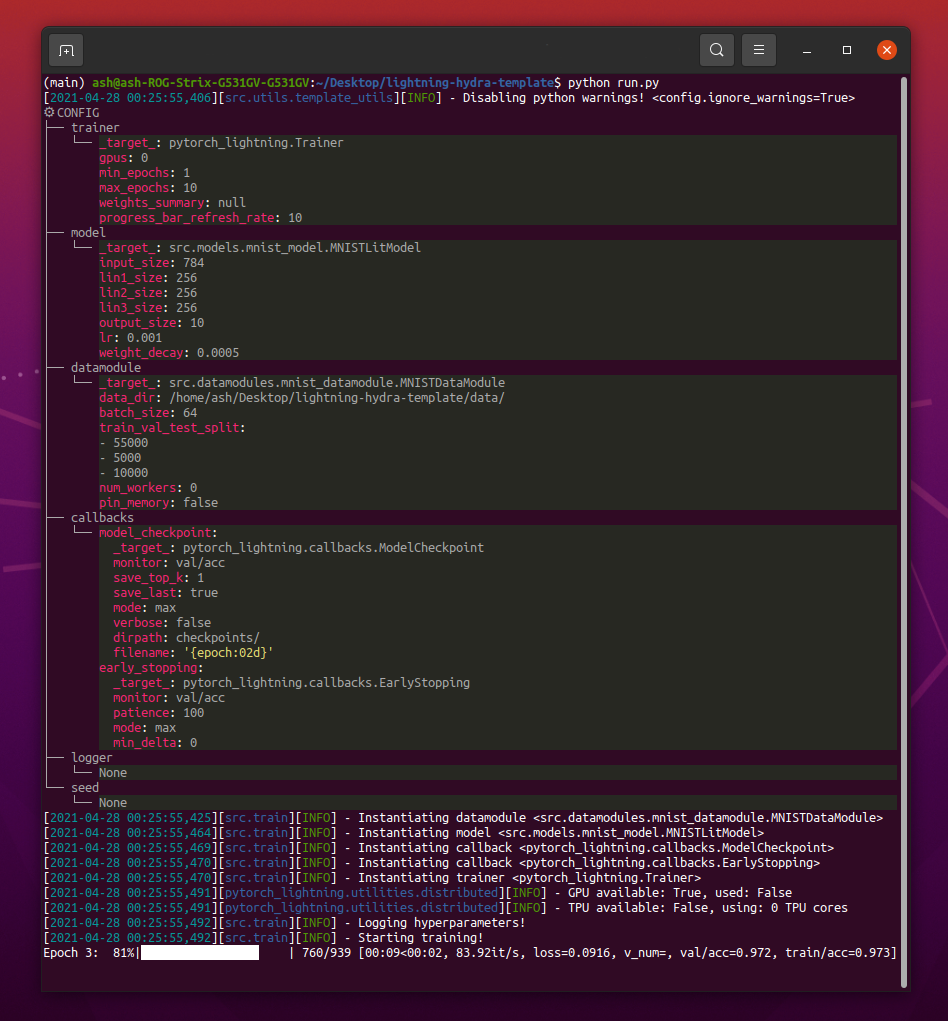
pip install -r requirements.txt模板包含具有MNIST分類的示例。
運行python src/train.py時,您應該看到這樣的東西:
python train.py trainer.max_epochs=20 model.optimizer.lr=1e-4注意:您還可以添加帶有
+標誌的新參數。
python train.py +model.new_param= " owo " # train on CPU
python train.py trainer=cpu
# train on 1 GPU
python train.py trainer=gpu
# train on TPU
python train.py +trainer.tpu_cores=8
# train with DDP (Distributed Data Parallel) (4 GPUs)
python train.py trainer=ddp trainer.devices=4
# train with DDP (Distributed Data Parallel) (8 GPUs, 2 nodes)
python train.py trainer=ddp trainer.devices=4 trainer.num_nodes=2
# simulate DDP on CPU processes
python train.py trainer=ddp_sim trainer.devices=2
# accelerate training on mac
python train.py trainer=mps警告:目前DDP模式存在問題,請閱讀此問題以了解更多信息。
 # train with pytorch native automatic mixed precision (AMP)
python train.py trainer=gpu +trainer.precision=16 # set project and entity names in `configs/logger/wandb`
wandb :
project : " your_project_name "
entity : " your_wandb_team_name " # train model with Weights&Biases (link to wandb dashboard should appear in the terminal)
python train.py logger=wandb注意:Lightning提供了最流行的記錄框架的方便集成。在這裡了解更多。
注意:使用wandb要求您首先設置帳戶。之後,只需完成如下的配置即可。
注意:單擊此處查看使用此模板生成的示例Wandb儀表板。
python train.py experiment=example注意:實驗配置放置在配置/實驗/中。
python train.py callbacks=default注意:可以將回調用於諸如模型檢查點,早期停止等的事物。
注意:回調配置放置在配置/回調/中。
 # gradient clipping may be enabled to avoid exploding gradients
python train.py +trainer.gradient_clip_val=0.5

# run validation loop 4 times during a training epoch
python train.py +trainer.val_check_interval=0.25

# accumulate gradients
python train.py +trainer.accumulate_grad_batches=10

# terminate training after 12 hours
python train.py +trainer.max_time="00:12:00:00"注意:Pytorch Lightning提供約40多個有用的教練標誌。
 # runs 1 epoch in default debugging mode
# changes logging directory to `logs/debugs/...`
# sets level of all command line loggers to 'DEBUG'
# enforces debug-friendly configuration
python train.py debug=default

# run 1 train, val and test loop, using only 1 batch
python train.py debug=fdr

# print execution time profiling
python train.py debug=profiler

# try overfitting to 1 batch
python train.py debug=overfit

# raise exception if there are any numerical anomalies in tensors, like NaN or +/-inf
python train.py +trainer.detect_anomaly=true

# use only 20% of the data
python train.py +trainer.limit_train_batches=0.2
+trainer.limit_val_batches=0.2 +trainer.limit_test_batches=0.2注意:有關不同的調試配置,請訪問configs/ debug/。
python train.py ckpt_path="/path/to/ckpt/name.ckpt"注意:檢查點可以是路徑或URL。
注意:當前加載CKPT並未恢復Logger實驗,但將在將來的閃電發布中支持。
python eval.py ckpt_path="/path/to/ckpt/name.ckpt"注意:檢查點可以是路徑或URL。
 # this will run 6 experiments one after the other,
# each with different combination of batch_size and learning rate
python train.py -m data.batch_size=32,64,128 model.lr=0.001,0.0005注意:Hydra在啟動時懶洋洋地撰寫配置。如果您在啟動作業/掃描後更改代碼或配置,則最終組合的配置可能會受到影響。
 # this will run hyperparameter search defined in `configs/hparams_search/mnist_optuna.yaml`
# over chosen experiment config
python train.py -m hparams_search=mnist_optuna experiment=example注意:使用Optuna掃地機不需要您將任何樣板添加到代碼中,而是在單個配置文件中定義的所有內容。
警告:Optuna掃除不是抗故障的(如果一個工作崩潰,那麼整個掃蕩崩潰)。
python train.py -m ' experiment=glob(*) '注意:Hydra提供了用於控制多次行為的特殊語法。在這裡了解更多。上面的命令執行來自configs/實驗/的所有實驗。
python train.py -m seed=1,2,3,4,5 trainer.deterministic=True logger=csv tags=[ " benchmark " ]注意:
trainer.deterministic=True使Pytorch更加確定性,但會影響性能。
注意:使用Ray AWS啟動器用於Hydra,應該可以通過簡單的配置來實現這一點。示例未在此模板中實現。
注意:Hydra允許您通過按
tab鍵在編寫殼牌時自動完成配置參數覆蓋。閱讀文檔。
pre-commit run -a注意:應用預加壓掛鉤來執行諸如自動形成代碼和配置,執行代碼分析或從Jupyter筆記本電腦中刪除輸出的事情。有關更多信息,請參見#最佳實踐。
在.pre-commit-config.yaml中更新前簽名版本:
pre-commit autoupdate # run all tests
pytest
# run tests from specific file
pytest tests/test_train.py
# run all tests except the ones marked as slow
pytest -k " not slow "每個實驗都應被標記,以便在文件或Logger UI中輕鬆過濾它們:
python train.py tags=[ " mnist " , " experiment_X " ]注意:您可能需要使用
python train.py tags=["mnist","experiment_X"]逃脫外殼中的括號字符。
如果沒有提供標籤,將要求您從命令行輸入它們:
>>> python train.py tags=[]
[2022-07-11 15:40:09,358][src.utils.utils][INFO] - Enforcing tags ! < cfg.extras.enforce_tags=True >
[2022-07-11 15:40:09,359][src.utils.rich_utils][WARNING] - No tags provided in config. Prompting user to input tags...
Enter a list of comma separated tags (dev):如果沒有為多室提供標籤,將會引起錯誤:
>>> python train.py -m +x=1,2,3 tags=[]
ValueError: Specify tags before launching a multirun !注意:Hydra目前不支持命令行的附加列表:(
由於所有貢獻的人,該項目的存在。
有問題嗎?找到一個錯誤?缺少特定功能?隨意提交新的問題,討論或公關,以各自的標題和描述。
在提出問題之前,請驗證:
main分支。總是歡迎提出改進的建議!
所有Pytorch Lightning模塊均通過Config中指定的模塊路徑動態實例化。示例模型配置:
_target_ : src.models.mnist_model.MNISTLitModule
lr : 0.001
net :
_target_ : src.models.components.simple_dense_net.SimpleDenseNet
input_size : 784
lin1_size : 256
lin2_size : 256
lin3_size : 256
output_size : 10使用此配置,我們可以使用以下行實例化對象:
model = hydra . utils . instantiate ( config . model )這使您可以輕鬆迭代新型號!每次創建新的時,只需在適當的配置文件中指定其模塊路徑和參數即可。
使用命令行參數之間的模型和數據模塊切換:
python train.py model=mnist示例管道管理實例邏輯:src/train.py。
位置:configs/train.yaml
主項目配置包含默認培訓配置。
它確定在簡單地執行命令python train.py時如何組成配置。
# order of defaults determines the order in which configs override each other
defaults :
- _self_
- data : mnist.yaml
- model : mnist.yaml
- callbacks : default.yaml
- logger : null # set logger here or use command line (e.g. `python train.py logger=csv`)
- trainer : default.yaml
- paths : default.yaml
- extras : default.yaml
- hydra : default.yaml
# experiment configs allow for version control of specific hyperparameters
# e.g. best hyperparameters for given model and datamodule
- experiment : null
# config for hyperparameter optimization
- hparams_search : null
# optional local config for machine/user specific settings
# it's optional since it doesn't need to exist and is excluded from version control
- optional local : default.yaml
# debugging config (enable through command line, e.g. `python train.py debug=default)
- debug : null
# task name, determines output directory path
task_name : " train "
# tags to help you identify your experiments
# you can overwrite this in experiment configs
# overwrite from command line with `python train.py tags="[first_tag, second_tag]"`
# appending lists from command line is currently not supported :(
# https://github.com/facebookresearch/hydra/issues/1547
tags : ["dev"]
# set False to skip model training
train : True
# evaluate on test set, using best model weights achieved during training
# lightning chooses best weights based on the metric specified in checkpoint callback
test : True
# simply provide checkpoint path to resume training
ckpt_path : null
# seed for random number generators in pytorch, numpy and python.random
seed : null 位置:配置/實驗
實驗配置允許您從主配置覆蓋參數。
例如,您可以使用它們來控制模型和數據集的每種組合的最佳超參數。
# @package _global_
# to execute this experiment run:
# python train.py experiment=example
defaults :
- override /data : mnist.yaml
- override /model : mnist.yaml
- override /callbacks : default.yaml
- override /trainer : default.yaml
# all parameters below will be merged with parameters from default configurations set above
# this allows you to overwrite only specified parameters
tags : ["mnist", "simple_dense_net"]
seed : 12345
trainer :
min_epochs : 10
max_epochs : 10
gradient_clip_val : 0.5
model :
optimizer :
lr : 0.002
net :
lin1_size : 128
lin2_size : 256
lin3_size : 64
data :
batch_size : 64
logger :
wandb :
tags : ${tags}
group : " mnist " 基本工作流程
python src/train.py experiment=experiment_name.yaml實驗設計
假設您想執行許多跑步,以繪製批量大小的準確性變化。
使用一些配置參數執行運行,該參數允許您輕鬆識別它們,例如標籤:
python train.py -m logger=csv data.batch_size=16,32,64,128 tags=[ " batch_size_exp " ]編寫一個腳本或筆記本,該腳本或筆記本在logs/文件夾上搜索,並從配置中包含給定標籤的運行中檢索CSV日誌。繪製結果。
Hydra為每個執行的運行創建新的輸出目錄。
默認記錄結構:
├── logs
│ ├── task_name
│ │ ├── runs # Logs generated by single runs
│ │ │ ├── YYYY-MM-DD_HH-MM-SS # Datetime of the run
│ │ │ │ ├── .hydra # Hydra logs
│ │ │ │ ├── csv # Csv logs
│ │ │ │ ├── wandb # Weights&Biases logs
│ │ │ │ ├── checkpoints # Training checkpoints
│ │ │ │ └── ... # Any other thing saved during training
│ │ │ └── ...
│ │ │
│ │ └── multiruns # Logs generated by multiruns
│ │ ├── YYYY-MM-DD_HH-MM-SS # Datetime of the multirun
│ │ │ ├──1 # Multirun job number
│ │ │ ├──2
│ │ │ └── ...
│ │ └── ...
│ │
│ └── debugs # Logs generated when debugging config is attached
│ └── ...
您可以通過修改Hydra配置中的路徑來更改此結構。
Pytorch Lightning支持許多流行的伐木框架:重量和偏見,海王星,彗星,MLFLOW,張量。
這些工具可幫助您跟踪超參數和輸出指標,並允許您比較和可視化結果。要使用其中之一,只需在Configs/Logger中完成其配置,然後運行:
python train.py logger=logger_name您可以一次使用許多(例如,請參見Configs/Logger/Many_loggers.yaml)。
您也可以編寫自己的記錄儀。
Lightning提供了方便的方法,用於從內部閃電模塊來記錄自定義指標。閱讀文檔或以MNIST示例為例。
模板帶有使用pytest實施的通用測試。
 # run all tests
pytest

# run tests from specific file
pytest tests/test_train.py

# run all tests except the ones marked as slow
pytest -k " not slow "大多數實施的測試都沒有檢查任何特定的輸出 - 它們的存在只是為了簡單地驗證執行某些命令並不最終會引發異常。您可以偶爾執行它們以加快開發的速度。
目前,測試涵蓋了:
還有許多其他。您應該能夠輕鬆地修改它們的用例。
還實施了@RunIf裝飾器,只有在滿足某些條件,例如GPU或系統不是Windows的情況下,才可以運行測試。請參閱示例。
您可以通過將新的配置文件添加到Configs/HParams_search來定義超參數搜索。
 # @package _global_

defaults :
  - override /hydra/sweeper : optuna

# choose metric which will be optimized by Optuna
# make sure this is the correct name of some metric logged in lightning module!
optimized_metric : " val/acc_best "

# here we define Optuna hyperparameter search
# it optimizes for value returned from function with @hydra.main decorator
hydra :
  sweeper :
    _target_ : hydra_plugins.hydra_optuna_sweeper.optuna_sweeper.OptunaSweeper

    # 'minimize' or 'maximize' the objective
    direction : maximize

    # total number of runs that will be executed
    n_trials : 20

    # choose Optuna hyperparameter sampler
    # docs: https://optuna.readthedocs.io/en/stable/reference/samplers.html
    sampler :
      _target_ : optuna.samplers.TPESampler
      seed : 1234
      n_startup_trials : 10 # number of random sampling runs before optimization starts

    # define hyperparameter search space
    params :
      model.optimizer.lr : interval(0.0001, 0.1)
      data.batch_size : choice(32, 64, 128, 256)
      model.net.lin1_size : choice(64, 128, 256)
      model.net.lin2_size : choice(64, 128, 256)
      model.net.lin3_size : choice(32, 64, 128, 256)
接下來,執行以下操作: python train.py -m hparams_search=mnist_optuna
使用此方法不需要將任何樣板添加到代碼中,所有內容都是在單個配置文件中定義的。唯一必要的事情是從啟動文件返回優化的度量值。
您可以使用與Hydra集成的不同優化框架,例如Optuna,Ax或Nevergrad。
optimization_results.yaml _Results.yaml將在logs/task_name/multirun文件夾下可用。
這種方法不支持恢復中斷的搜索和高級技術(如Prunning) - 對於更複雜的搜索和工作流程,您可能應該編寫專用的優化任務(沒有多室內功能)。
模板帶有GitHub操作中實現的CI工作流程:
.github/workflows/test.yaml :用pytest運行所有測試.github/workflows/code-quality-main.yaml.github/workflows/code-quality-pr.yaml 閃電支持多種進行分佈式培訓的方法。最常見的是DDP,它為每個GPU提供了單獨的過程,並在它們之間平均梯度。要了解其他方法,請閱讀閃電文檔。
您可以在MNIST示例上運行DDP,並以4個GPU這樣的方式運行DDP:
python train.py trainer=ddp注意:使用DDP時,您必須小心編寫模型的方式 - 閱讀文檔。
最簡單的方法是將Datamodule屬性直接傳遞到初始化的模型:
 # ./src/train.py
datamodule = hydra . utils . instantiate ( config . data )
model = hydra . utils . instantiate ( config . model , some_param = datamodule . some_param )注意:這不是一個非常健壯的解決方案,因為它假設您的所有數據模塊都有
some_param屬性可用。
同樣,您可以將整個Datamodule配置作為init參數傳遞:
 # ./src/train.py
model = hydra . utils . instantiate ( config . model , dm_conf = config . data , _recursive_ = False )
您還可以通過可變插值傳遞數據函數配置參數:
 # ./configs/model/my_model.yaml
_target_ : src.models.my_module.MyLitModule
lr : 0.01
some_param : ${data.some_param}
另一種方法是直接通過教練訪問LightningModule中的DataModule:
 # ./src/models/mnist_module.py
def on_train_start ( self ):
self . some_param = self . trainer . datamodule . some_param注意:這僅在訓練開始後起作用,因為否則培訓師在LightningModule中尚未可用。
通常不需要安裝完整的Anaconda環境,Minconda應該足夠(約80MB)。
CONDA的最大優勢是,它允許安裝軟件包,而無需系統中的某些編譯器或庫(因為它安裝了預編譯的二進製文件),因此通常會使安裝某些依賴關係更容易,例如cudatoolkit來獲得GPU支持。
它還使您可以在全球範圍內訪問環境,這可能比為每個項目創建新的本地環境更方便。
示例安裝:
wget https://repo.anaconda.com/miniconda/Miniconda3-latest-Linux-x86_64.sh
bash Miniconda3-latest-Linux-x86_64.sh
更新conda:
conda update -n base -c defaults conda創建新的Conda環境:
conda create -n myenv python=3.10
conda activate myenv使用預先承諾的鉤子標準化項目的代碼格式並節省精神能量。
只需使用:
pip install pre-commit接下來,從.pre-commit-config.yaml安裝鉤子:
pre-commit install之後,您的代碼將在每個新提交中自動重新格式化。
重新格式化項目使用命令中的所有文件:
pre-commit run -a在.pre-commit-config.yaml中更新掛鉤版本:
pre-commit autoupdate系統特定變量(例如,數據集的絕對路徑)不應在版本控制下,否則將導致不同用戶之間的衝突。您的私鑰也不應該版本,因為您不希望它們被洩漏。
模板包含.env.example文件,作為示例。創建一個名為.env的新文件(此名稱不包括在.gitignore中的版本控件中)。您應該將其用於存儲這樣的環境變量:
MY_VAR=/home/user/my_system_path
來自.env的所有變量都會自動加載在train.py中。
hydra允許您在類似的.yaml配置中引用任何ENV變量:
path_to_data : ${oc.env:MY_VAR}根據您使用的記錄器的不同,通常可以使用/字符定義公制名稱:
self . log ( "train/loss" , loss )這樣,伐木者將把您的指標視為屬於不同部分的指標,這有助於使它們在UI中組織起來。
使用官方的Torchmetrics庫來確保對指標的正確計算。這對於多GPU培訓尤其重要!
例如,您應該使用這樣的提供的Accuracy類,而不是自己計算準確性:
 from torchmetrics . classification . accuracy import Accuracy


class LitModel ( LightningModule ):
    def __init__ ( self )
        self . train_acc = Accuracy ()
        self . val_acc = Accuracy ()

    def training_step ( self , batch , batch_idx ):
        ...
        acc = self . train_acc ( predictions , targets )
        self . log ( "train/acc" , acc )
        ...

    def validation_step ( self , batch , batch_idx ):
        ...
        acc = self . val_acc ( predictions , targets )
        self . log ( "val/acc" , acc )
        ...
確保為每個步驟使用不同的度量實例,以確保對所有GPU過程的適當降低。
Torchmetrics為大多數用例提供指標,例如F1分數或混淆矩陣。閱讀文檔以獲取更多信息。
樣式指南可在此處找到。
在您的初始化中明確。嘗試定義所有相關默認值,以便用戶不必猜測。提供類型提示。這樣,您的模塊可以在各個項目中重複使用!
 class LitModel ( LightningModule ):
    def __init__ ( self , layer_size : int = 256 , lr : float = 0.001 ):
保留推薦的方法訂單。
 class LitModel ( LightningModule ):

    def __init__ ():
        ...

    def forward ():
        ...

    def training_step ():
        ...

    def training_step_end ():
        ...

    def on_train_epoch_end ():
        ...

    def validation_step ():
        ...

    def validation_step_end ():
        ...

    def on_validation_epoch_end ():
        ...

    def test_step ():
        ...

    def test_step_end ():
        ...

    def on_test_epoch_end ():
        ...

    def configure_optimizers ():
        ...

    def any_extra_hook ():
...使用DVC來控制大文件,例如您的數據或訓練有素的ML型號。
初始化DVC存儲庫:
dvc init要開始跟踪文件或目錄,請使用dvc add :
dvc add data/MNISTDVC將有關添加文件(或目錄)的信息存儲在名為data/mnist.dvc的特殊.DVC文件中,這是一個帶有人類可讀格式的小文本文件。該文件可以像git一樣輕鬆地將其像源代碼一樣,作為原始數據的佔位符:
git add data/MNIST.dvc data/.gitignore
git commit -m " Add raw data "它允許其他人輕鬆地在自己的項目中使用您的模塊。將src文件夾的名稱更改為您的項目名稱,然後完成setup.py文件。
現在,您的項目可以從本地文件安裝:
pip install -e .或直接來自GIT存儲庫:
pip install git+git://github.com/YourGithubName/your-repo-name.git --upgrade因此,任何文件都可以輕鬆導入到任何其他文件中:
 from project_name . models . mnist_module import MNISTLitModule
from project_name . data . mnist_datamodule import MNISTDataModule某些配置是特定於用戶/計算機/安裝的(例如,本地群集的配置或特定機器上的硬盤路徑)。對於這樣的情況,可以創建文件configs/local/default.yaml,該文件會自動加載但不通過git跟踪。
例如,您可以將其用於slurm cluster config:
 # @package _global_

defaults :
  - override /hydra/launcher@_here_ : submitit_slurm

data_dir : /mnt/scratch/data/

hydra :
  launcher :
    timeout_min : 1440
    gpus_per_task : 1
    gres : gpu:1
  job :
    env_set :
      MY_VAR : /home/user/my/system/path
MY_KEY : asdgjhawi8y23ihsghsueity23ihwd 該模板的靈感來自:
其他有用的存儲庫:
Lightning-Hydra-Template已獲得MIT許可證的許可。
 MIT License

Copyright (c) 2021 ashleve

Permission is hereby granted, free of charge, to any person obtaining a copy
of this software and associated documentation files (the "Software"), to deal
in the Software without restriction, including without limitation the rights
to use, copy, modify, merge, publish, distribute, sublicense, and/or sell
copies of the Software, and to permit persons to whom the Software is
furnished to do so, subject to the following conditions:

The above copyright notice and this permission notice shall be included in all
copies or substantial portions of the Software.

THE SOFTWARE IS PROVIDED "AS IS", WITHOUT WARRANTY OF ANY KIND, EXPRESS OR
IMPLIED, INCLUDING BUT NOT LIMITED TO THE WARRANTIES OF MERCHANTABILITY,
FITNESS FOR A PARTICULAR PURPOSE AND NONINFRINGEMENT. IN NO EVENT SHALL THE
AUTHORS OR COPYRIGHT HOLDERS BE LIABLE FOR ANY CLAIM, DAMAGES OR OTHER
LIABILITY, WHETHER IN AN ACTION OF CONTRACT, TORT OR OTHERWISE, ARISING FROM,
OUT OF OR IN CONNECTION WITH THE SOFTWARE OR THE USE OR OTHER DEALINGS IN THE
SOFTWARE.
刪除您項目上面的所有內容
它做什麼
 # clone project
git clone https://github.com/YourGithubName/your-repo-name
cd your-repo-name

# [OPTIONAL] create conda environment
conda create -n myenv python=3.9
conda activate myenv

# install pytorch according to instructions
# https://pytorch.org/get-started/

# install requirements
pip install -r requirements.txt # clone project
git clone https://github.com/YourGithubName/your-repo-name
cd your-repo-name
# create conda environment and install dependencies
conda env create -f environment.yaml -n myenv
# activate conda environment
conda activate myenv帶有默認配置的火車模型
 # train on CPU
python src/train.py trainer=cpu

# train on GPU
python src/train.py trainer=gpu
帶有配置/實驗/實驗選擇的訓練模型/
python src/train.py experiment=experiment_name.yaml您可以從命令行覆蓋任何參數
python src/train.py trainer.max_epochs=20 data.batch_size=64

