SkeletonView
? 1.31.0
คุณสมบัติ•คำแนะนำ•การติดตั้ง•การใช้งาน•เบ็ดเตล็ด•การสนับสนุน
- ReadMe มีให้บริการในภาษาอื่น: ?? - - - - - - - - - -
วันนี้แอพเกือบทั้งหมดมีกระบวนการ async เช่นคำขอ API กระบวนการทำงานระยะยาว ฯลฯ ในขณะที่กระบวนการทำงานมักจะนักพัฒนาวางมุมมองโหลดเพื่อแสดงให้ผู้ใช้แสดงว่ามีบางอย่างเกิดขึ้น
SkeletonView ได้รับการคิดเพื่อตอบสนองความต้องการนี้ซึ่งเป็นวิธีที่สง่างามในการแสดงให้ผู้ใช้เห็นว่ามีบางอย่างเกิดขึ้นและเตรียมความพร้อมให้กับเนื้อหาที่กำลังรออยู่
สนุกกับมัน! -
| คู่มือ SkeletonView - เริ่มต้นใช้งาน | วิธีสร้างมุมมองการโหลดด้วยมุมมองโครงกระดูกในสตูดิโอ IKH4ever Swift | สร้างมุมมองการโหลดโครงกระดูกในแอพ (Swift 5) - Xcode 11, 2020 โดย iOS Academy | Cómo Crear Una Animación de Carga de Datos en ios โดย Mouredev |
pod 'SkeletonView' github "Juanpe/SkeletonView"dependencies: [
. package ( url : " https://github.com/Juanpe/SkeletonView.git " , from : " 1.7.0 " )
]สำคัญ!
ตั้งแต่เวอร์ชัน 1.30.0
SkeletonViewรองรับ XCFrameworks ดังนั้นหากคุณต้องการติดตั้งเป็น XCFramework โปรดใช้ repo นี้แทน
ต้องใช้เพียง 3 ขั้นตอนในการใช้ SkeletonView :
1⃣นำเข้า SkeletonView ในสถานที่ที่เหมาะสม
import SkeletonView 2⃣ตอนนี้ตั้งค่ามุมมองที่จะเป็น skeletonables คุณทำสิ่งนี้ได้สองวิธี:
การใช้รหัส:
avatarImageView . isSkeletonable = trueใช้ IB/Storyboards:
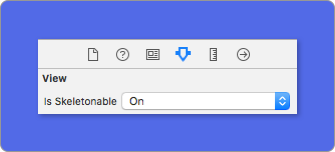
3⃣เมื่อคุณตั้งมุมมองคุณสามารถแสดง โครงกระดูก ได้ ในการทำเช่นนั้นคุณมี 4 ตัวเลือก:
 ( 1 ) view . showSkeleton ( )                 // Solid
( 2 ) view . showGradientSkeleton ( )         // Gradient
( 3 ) view . showAnimatedSkeleton ( )         // Solid animated
( 4 ) view . showAnimatedGradientSkeleton ( ) // Gradient animated
ดูตัวอย่าง
| แข็ง | การไล่ระดับสี | ภาพเคลื่อนไหวที่แข็งแกร่ง | การไล่ระดับสีอนิเมชั่น |
 |  |  |  |
สำคัญ!
SkeletonViewเป็นแบบเรียกซ้ำดังนั้นหากคุณต้องการแสดงโครงกระดูกในมุมมองที่สามารถใช้งานได้ทั้งหมดคุณจะต้องเรียกวิธีการแสดงในมุมมองคอนเทนเนอร์หลัก ตัวอย่างเช่นด้วยUIViewControllers
SkeletonView เข้ากันได้กับ UITableView และ UICollectionView
uitableview
หากคุณต้องการแสดงโครงกระดูกใน UITableView คุณจะต้องปฏิบัติตามโปรโตคอล SkeletonTableViewDataSource
 public protocol SkeletonTableViewDataSource : UITableViewDataSource {
    func numSections ( in collectionSkeletonView : UITableView ) -> Int // Default: 1
    func collectionSkeletonView ( _ skeletonView : UITableView , numberOfRowsInSection section : Int ) -> Int
    func collectionSkeletonView ( _ skeletonView : UITableView , cellIdentifierForRowAt indexPath : IndexPath ) -> ReusableCellIdentifier
    func collectionSkeletonView ( _ skeletonView : UITableView , skeletonCellForRowAt indexPath : IndexPath ) -> UITableViewCell ? // Default: nil
    func collectionSkeletonView ( _ skeletonView : UITableView , prepareCellForSkeleton cell : UITableViewCell , at indexPath : IndexPath )
}
อย่างที่คุณเห็นโปรโตคอลนี้สืบทอดมาจาก UITableViewDataSource ดังนั้นคุณสามารถแทนที่โปรโตคอลนี้ด้วยโปรโตคอลโครงกระดูก
โปรโตคอลนี้มีการใช้งานเริ่มต้นสำหรับบางวิธี ตัวอย่างเช่นจำนวนแถวสำหรับแต่ละส่วนจะคำนวณในรันไทม์:
 func collectionSkeletonView ( _ skeletonView : UITableView , numberOfRowsInSection section : Int ) -> Int
// Default:
// It calculates how many cells need to populate whole tableview
สำคัญ!
หากคุณส่งคืน
UITableView.automaticNumberOfSkeletonRowsในวิธีข้างต้นมันจะทำหน้าที่เหมือนพฤติกรรมเริ่มต้น (เช่นมันคำนวณจำนวนเซลล์ที่จำเป็นในการเติมเต็ม tableview ทั้งหมด)
มีเพียงวิธีเดียวที่คุณต้องใช้เพื่อให้โครงกระดูกทราบตัวระบุเซลล์ วิธีนี้ไม่มีการใช้งานเริ่มต้น:
 func collectionSkeletonView ( _ skeletonView : UITableView , cellIdentifierForRowAt indexPath : IndexPath ) -> ReusableCellIdentifier {
   return " CellIdentifier "
}
โดยค่าเริ่มต้นห้องสมุดจะแยกเซลล์ออกจากดัชนีแต่ละตัว แต่คุณสามารถทำได้หากคุณต้องการทำการเปลี่ยนแปลงบางอย่างก่อนที่โครงกระดูกจะปรากฏขึ้น:
 func collectionSkeletonView ( _ skeletonView : UITableView , skeletonCellForRowAt indexPath : IndexPath ) -> UITableViewCell ? {
    let cell = skeletonView . dequeueReusableCell ( withIdentifier : " CellIdentifier " , for : indexPath ) as? Cell
    cell ? . textField . isHidden = indexPath . row == 0
    return cell
}
หากคุณต้องการออกจากส่วน deque ไปยังไลบรารีคุณสามารถกำหนดค่าเซลล์โดยใช้วิธีนี้:
 func collectionSkeletonView ( _ skeletonView : UITableView , prepareCellForSkeleton cell : UITableViewCell , at indexPath : IndexPath ) {
    let cell = cell as? Cell
    cell ? . textField . isHidden = indexPath . row == 0
}
นอกจากนี้คุณสามารถทำโครงกระดูกทั้งส่วนหัวและส่วนท้าย คุณต้องปฏิบัติตามโปรโตคอล SkeletonTableViewDelegate
 public protocol SkeletonTableViewDelegate : UITableViewDelegate {
    func collectionSkeletonView ( _ skeletonView : UITableView , identifierForHeaderInSection section : Int ) -> ReusableHeaderFooterIdentifier ? // default: nil
    func collectionSkeletonView ( _ skeletonView : UITableView , identifierForFooterInSection section : Int ) -> ReusableHeaderFooterIdentifier ? // default: nil
}
สำคัญ!
1⃣หากคุณใช้เซลล์ที่ปรับขนาดได้ (
tableView.rowHeight = UITableViewAutomaticDimension) มันบังคับให้กำหนดestimatedRowHeight2⃣เมื่อคุณเพิ่มองค์ประกอบใน
UITableViewCellคุณควรเพิ่มลงในcontentViewและไม่เข้ากับเซลล์โดยตรงself . contentView . addSubview ( titleLabel ) ✅ self . addSubview ( titleLabel )
uicollectionView
สำหรับ UICollectionView คุณต้องปฏิบัติตามโปรโตคอล SkeletonCollectionViewDataSource
 public protocol SkeletonCollectionViewDataSource : UICollectionViewDataSource {
    func numSections ( in collectionSkeletonView : UICollectionView ) -> Int  // default: 1
    func collectionSkeletonView ( _ skeletonView : UICollectionView , numberOfItemsInSection section : Int ) -> Int
    func collectionSkeletonView ( _ skeletonView : UICollectionView , cellIdentifierForItemAt indexPath : IndexPath ) -> ReusableCellIdentifier
    func collectionSkeletonView ( _ skeletonView : UICollectionView , supplementaryViewIdentifierOfKind : String , at indexPath : IndexPath ) -> ReusableCellIdentifier ? // default: nil
    func collectionSkeletonView ( _ skeletonView : UICollectionView , skeletonCellForItemAt indexPath : IndexPath ) -> UICollectionViewCell ?  // default: nil
    func collectionSkeletonView ( _ skeletonView : UICollectionView , prepareCellForSkeleton cell : UICollectionViewCell , at indexPath : IndexPath )
    func collectionSkeletonView ( _ skeletonView : UICollectionView , prepareViewForSkeleton view : UICollectionReusableView , at indexPath : IndexPath )
}
ส่วนที่เหลือของกระบวนการเหมือนกับ UITableView
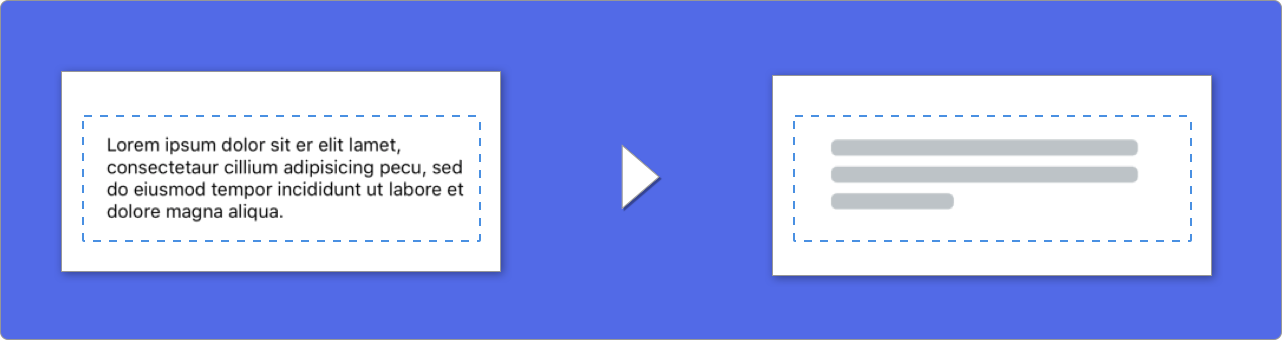
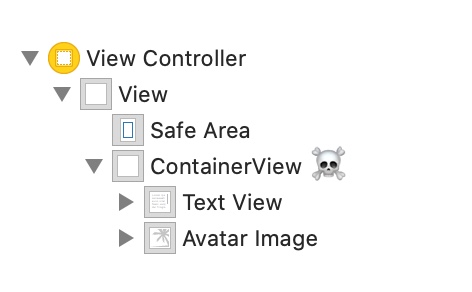
เมื่อใช้องค์ประกอบกับข้อความ SkeletonView จะวาดเส้นเพื่อจำลองข้อความ
คุณสามารถตั้งค่าคุณสมบัติบางอย่างสำหรับองค์ประกอบหลายสายพันธุ์
| คุณสมบัติ | พิมพ์ | ค่าเริ่มต้น | ดูตัวอย่าง |
|---|---|---|---|
| lastlinefillpercent | CGFloat | 70 |  |
| Linescornerradius | Int | 0 | 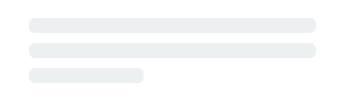 |
| SkeletonLinesping | CGFloat | 10 | 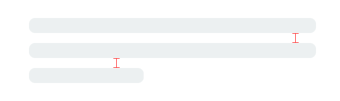 |
| SkeletonpaddingInsets | UIEdgeInsets | .zero | 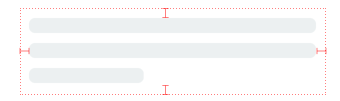 |
| SkeletonTextLineHeight | SkeletonTextLineHeight | .fixed(15) | 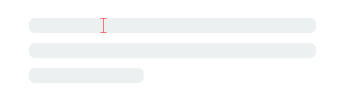 |
| SkeletonTextNumberOflines | SkeletonTextNumberOfLines | .inherited | |
หากต้องการปรับเปลี่ยนเปอร์เซ็นต์หรือรัศมี โดยใช้รหัส ให้ตั้งค่าคุณสมบัติ:
descriptionTextView . lastLineFillPercent = 50
descriptionTextView . linesCornerRadius = 5
หรือถ้าคุณต้องการใช้ IB/Storyboard :
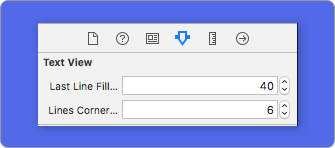
จะกำหนดจำนวนบรรทัดได้อย่างไร?
โดยค่าเริ่มต้นจำนวนบรรทัดจะเหมือนกับค่าของคุณสมบัติ numberOfLines และถ้ามันตั้งค่าเป็น ศูนย์ มันจะคำนวณจำนวนบรรทัดที่จำเป็นในการเติมโครงกระดูกทั้งหมดและวาดมัน
อย่างไรก็ตามหากคุณต้องการตั้งค่าเส้นโครงกระดูกจำนวนหนึ่งที่คุณสามารถทำได้โดยการตั้งค่าคุณสมบัติ skeletonTextNumberOfLines คุณสมบัตินี้มีค่าที่เป็นไปได้สองค่าที่ inherited ซึ่งส่งคืนค่า numberOfLines และ custom(Int) ซึ่งส่งคืนจำนวนบรรทัดที่ระบุเฉพาะที่ระบุเป็นค่าที่เกี่ยวข้อง
ตัวอย่างเช่น:
label . skeletonTextNumberOfLines = 3 // .custom(3)
เลิกจ้าง! usefontlineHeight เลิกใช้แล้ว คุณสามารถใช้ SkeletonTextLineHeight แทน:
descriptionTextView . skeletonTextLineHeight = . relativeToFont
สำคัญ!
โปรดทราบว่าสำหรับมุมมองที่ไม่มีหลายบรรทัดบรรทัดเดียวจะถูกพิจารณาว่าเป็นบรรทัดสุดท้าย
โครงกระดูกมีลักษณะเริ่มต้น ดังนั้นเมื่อคุณไม่ได้ระบุคุณสมบัติสีการไล่ระดับสีหรือพหุคูณ SkeletonView จะใช้ค่าเริ่มต้น
ค่าเริ่มต้น:
UIColor.skeletonDefault (เหมือนกับ .clouds แต่ปรับให้เข้ากับโหมดมืด)SkeletonGradient(baseColor: .skeletonDefault)CGFloatCGFloatIntIntCGFloat ในการรับค่าเริ่มต้นเหล่านี้คุณสามารถใช้ SkeletonAppearance.default การใช้คุณสมบัตินี้คุณสามารถตั้งค่าได้เช่นกัน:
 SkeletonAppearance . default . multilineHeight = 20
SkeletonAppearance . default . tintColor = . green
เลิกจ้าง! usefontlineHeight เลิกใช้แล้ว คุณสามารถใช้ textlineHeight แทน:
SkeletonAppearance . default . textLineHeight = . relativeToFont
คุณสามารถตัดสินใจได้ว่าสีใดที่มีการย้อมสีด้วยสี คุณจะต้องผ่านเป็นพารามิเตอร์สีหรือการไล่ระดับสีที่คุณต้องการ
ใช้สีทึบ
view . showSkeleton ( usingColor : UIColor . gray ) // Solid
// or
view . showSkeleton ( usingColor : UIColor ( red : 25.0 , green : 30.0 , blue : 255.0 , alpha : 1.0 ) )
ใช้การไล่ระดับสี
let gradient = SkeletonGradient ( baseColor : UIColor . midnightBlue )
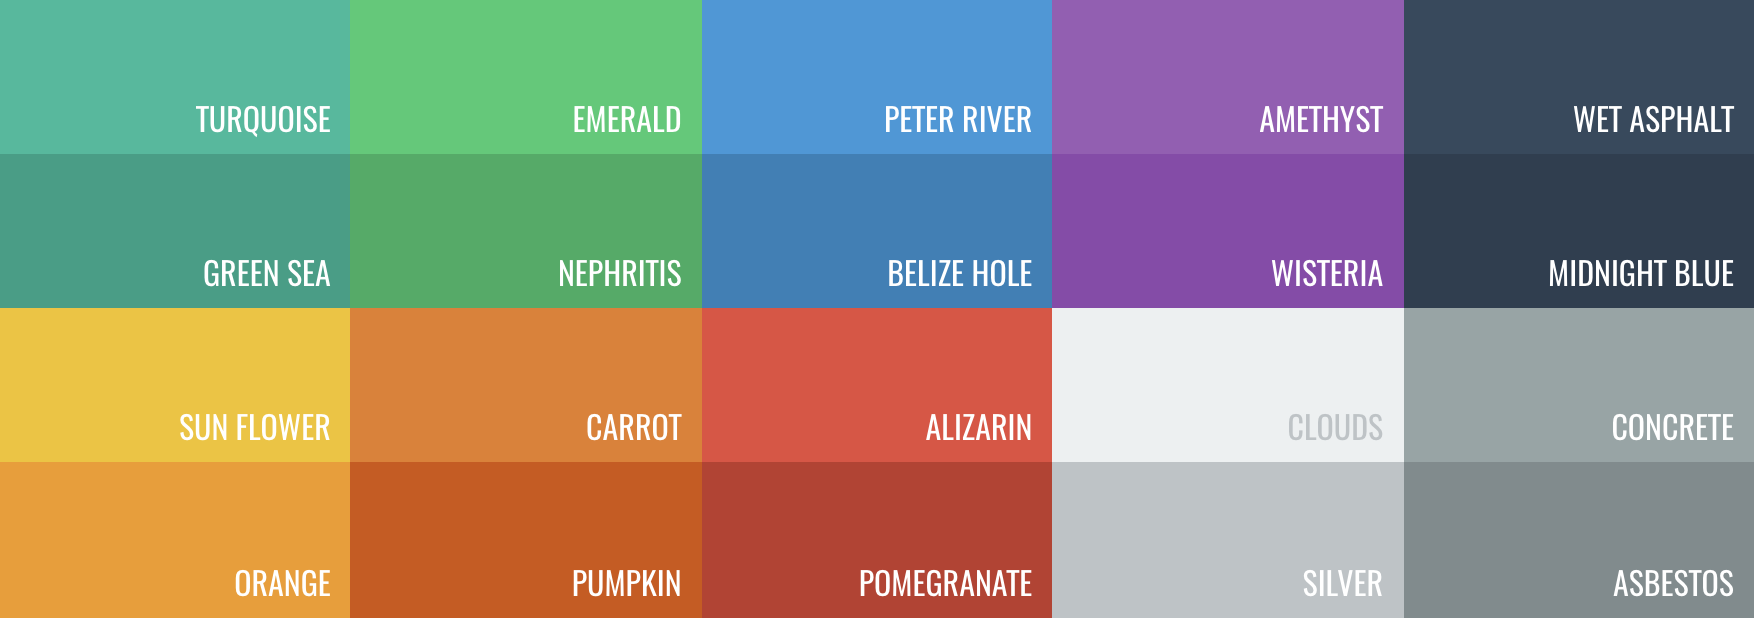
view . showGradientSkeleton ( usingGradient : gradient ) // Gradientนอกจากนี้ SkeletonView ยังมี 20 สีแบน ??
UIColor.turquoise, UIColor.greenSea, UIColor.sunFlower, UIColor.flatOrange ...
SkeletonView มีแอนิเมชั่นในตัวสอง ตัวพัลส์ สำหรับโครงกระดูกที่เป็นของแข็งและ เลื่อน สำหรับการไล่ระดับสี
นอกจากนี้หากคุณต้องการทำแอนิเมชั่นโครงกระดูกของคุณเองมันง่ายมาก
Skeleton มีฟังก์ชั่น showAnimatedSkeleton ซึ่งมีการปิด SkeletonLayerAnimation ซึ่งคุณสามารถกำหนดภาพเคลื่อนไหวที่กำหนดเองของคุณได้
public typealias SkeletonLayerAnimation = ( CALayer ) -> CAAnimationคุณสามารถเรียกฟังก์ชั่นเช่นนี้:
view . showAnimatedSkeleton { ( layer ) -> CAAnimation in
  let animation = CAAnimation ( )
  // Customize here your animation

  return animation
}
มี SkeletonAnimationBuilder ที่มีอยู่ มันเป็นผู้สร้างที่จะสร้าง SkeletonLayerAnimation
วันนี้คุณสามารถสร้าง ภาพเคลื่อนไหวเลื่อน สำหรับการไล่ระดับสีการตัดสินใจ ทิศทาง และการตั้งค่า ระยะเวลา ของภาพเคลื่อนไหว (default = 1.5s)
// func makeSlidingAnimation(withDirection direction: GradientDirection, duration: CFTimeInterval = 1.5) -> SkeletonLayerAnimation

let animation = SkeletonAnimationBuilder ( ) . makeSlidingAnimation ( withDirection : . leftToRight )
view . showAnimatedGradientSkeleton ( usingGradient : gradient , animation : animation )
GradientDirection เป็น enum โดยมีกรณีวิทยานิพนธ์:
| ทิศทาง | ดูตัวอย่าง |
|---|---|
| .leftright |  |
| . rightleft |  |
| .Topbottom |  |
| .BottomTop |  |
| .topleftbottomright |  |
| .Bottomrighttopleft |  |
เล่ห์เหลี่ยม!
มีอีกวิธีหนึ่งในการสร้างภาพเคลื่อนไหวแบบเลื่อนเพียงแค่ใช้ทางลัดนี้:
let animation = GradientDirection . leftToRight . slidingAnimation ( )
SkeletonView มีการเปลี่ยนแปลงในตัวเพื่อ แสดง หรือ ซ่อน โครงกระดูกอย่าง ราบรื่น หรือไม่?
ในการใช้การเปลี่ยนแปลงเพียงเพิ่มพารามิเตอร์ transition ไปยังฟังก์ชั่น showSkeleton() หรือ hideSkeleton() ของคุณด้วยเวลาการเปลี่ยนแปลงเช่นนี้:
view . showSkeleton ( transition : . crossDissolve ( 0.25 ) )     //Show skeleton cross dissolve transition with 0.25 seconds fade time
view . hideSkeleton ( transition : . crossDissolve ( 0.25 ) )     //Hide skeleton cross dissolve transition with 0.25 seconds fade time
ค่าเริ่มต้นคือ crossDissolve(0.25)
ดูตัวอย่าง
| ไม่มี | ข้ามละลาย |
 |  |
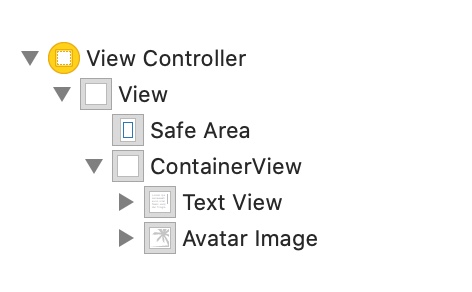
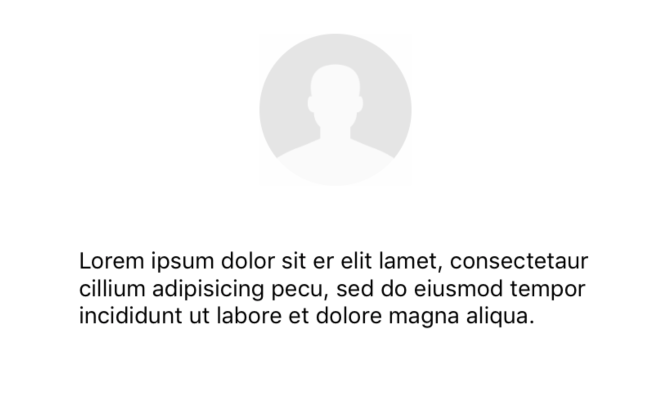
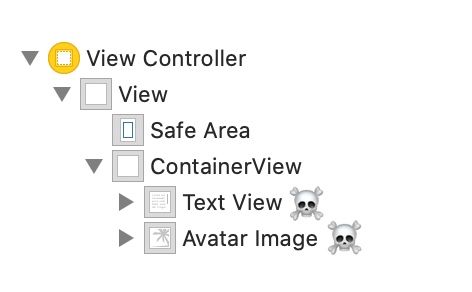
ลำดับชั้น
เนื่องจาก SkeletonView ถูกเรียกซ้ำและเราต้องการให้ Skeleton มีประสิทธิภาพมากเราจึงต้องการหยุดการเรียกซ้ำโดยเร็วที่สุด ด้วยเหตุผลนี้คุณต้องตั้งมุมมองคอนเทนเนอร์เป็น Skeletonable เพราะโครงกระดูกจะหยุดมองหามุมมองย่อย skeletonable ทันทีที่มุมมองไม่สามารถใช้โครงกระดูกได้
เพราะภาพมีค่าหนึ่งพันคำ:
ในตัวอย่างนี้เรามี UIViewController พร้อม ContainerView และ UITableView เมื่อมุมมองพร้อมเราจะแสดงโครงกระดูกโดยใช้วิธีนี้:
view.showSkeleton()
isSkeletonable= ☠
| การกำหนดค่า | ผลลัพธ์ |
|---|---|
 |  |
 | |
 |  |
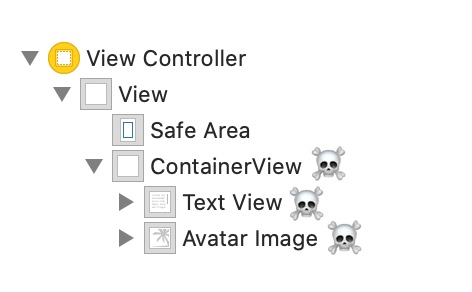 |  |
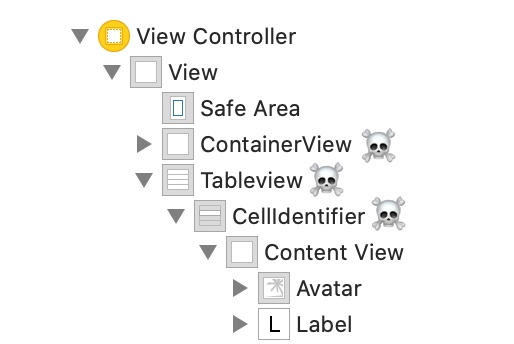 |  |
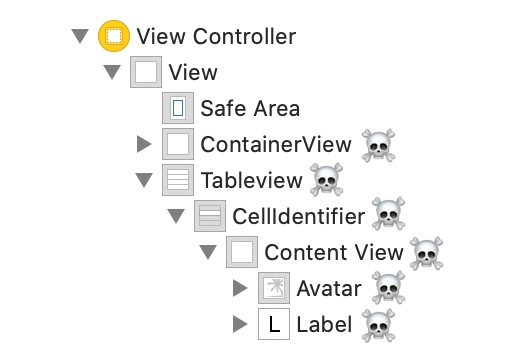 |  |
โครงร่างมุมมองโครงกระดูก
บางครั้งเค้าโครงโครงกระดูกอาจไม่พอดีกับเค้าโครงของคุณเนื่องจากขอบเขตมุมมองหลักมีการเปลี่ยนแปลง ตัวอย่างเช่นการหมุนอุปกรณ์
คุณสามารถถ่ายทอดมุมมองโครงกระดูกได้เช่นนี้:
 override func viewDidLayoutSubviews ( ) {
    view . layoutSkeletonIfNeeded ( )
}
สำคัญ!
คุณไม่ควรเรียกวิธีนี้ จาก เวอร์ชัน 1.8.1 คุณไม่จำเป็นต้องเรียกใช้วิธีนี้ไลบรารีจะทำโดยอัตโนมัติ ดังนั้นคุณสามารถใช้วิธีนี้ ได้เฉพาะ ในกรณีเมื่อคุณต้องการอัปเดตเลย์เอาต์ของโครงกระดูกด้วยตนเอง
อัปเดตโครงกระดูก
คุณสามารถเปลี่ยนการกำหนดค่าโครงกระดูกได้ตลอดเวลาเช่นสีภาพเคลื่อนไหว ฯลฯ ด้วยวิธีการต่อไปนี้:
 ( 1 ) view . updateSkeleton ( )                 // Solid
( 2 ) view . updateGradientSkeleton ( )         // Gradient
( 3 ) view . updateAnimatedSkeleton ( )         // Solid animated
( 4 ) view . updateAnimatedGradientSkeleton ( ) // Gradient animated
ซ่อนมุมมองเมื่อภาพเคลื่อนไหวเริ่มต้นขึ้น
บางครั้งคุณต้องการซ่อนมุมมองเมื่อภาพเคลื่อนไหวเริ่มต้นดังนั้นจึงมีคุณสมบัติด่วนที่คุณสามารถใช้เพื่อทำให้สิ่งนี้เกิดขึ้นได้:
view . isHiddenWhenSkeletonIsActive = true // This works only when isSkeletonable = trueอย่าแก้ไขการโต้ตอบของผู้ใช้เมื่อมีการใช้งานโครงกระดูก
โดยค่าเริ่มต้นการโต้ตอบของผู้ใช้จะถูกปิดใช้งานสำหรับรายการ skeletonized แต่ถ้าคุณไม่ต้องการแก้ไขตัวบ่งชี้การโต้ตอบของผู้ใช้เมื่อ Skeleton ทำงานอยู่คุณสามารถใช้คุณสมบัติ isUserInteractionDisabledWhenSkeletonIsActive :
view . isUserInteractionDisabledWhenSkeletonIsActive = false // The view will be active when the skeleton will be active.อย่าใช้ความสูงของสายตัวอักษรสำหรับเส้นโครงกระดูกในฉลาก
เท็จเพื่อปิดการใช้งานโครงกระดูกเพื่อปรับอัตโนมัติเป็นตัวอักษรความสูงสำหรับ UILabel หรือ UITextView โดยค่าเริ่มต้นความสูงของเส้นโครงกระดูกจะได้รับการปรับอัตโนมัติให้เป็นตัวอักษรความสูงเพื่อสะท้อนข้อความในฉลากที่ถูกต้องมากกว่าใช้กล่องขอบเขต
label . useFontLineHeight = falseโครงกระดูกแสดงล่าช้า
คุณสามารถชะลอการนำเสนอของโครงกระดูกได้หากมุมมองอัปเดตอย่างรวดเร็ว
 func showSkeleton ( usingColor : UIColor ,
                  animated : Bool ,
                  delay : TimeInterval ,
                  transition : SkeletonTransitionStyle )
func showGradientSkeleton ( usingGradient : SkeletonGradient ,
animated : Bool ,
delay : TimeInterval ,
transition : SkeletonTransitionStyle )การดีบัก
เพื่ออำนวยความสะดวกในการดีบักงานเมื่อบางสิ่งไม่ทำงานได้ดี SkeletonView มีเครื่องมือใหม่
ก่อนอื่น UIView มีคุณสมบัติที่มีข้อมูลโครงกระดูกของเขา:
var sk . skeletonTreeDescription : String นอกจากนี้คุณสามารถเปิดใช้งาน โหมดการดีบัก ใหม่ คุณเพียงแค่เพิ่มสภาพแวดล้อมตัวแปร SKELETON_DEBUG และเปิดใช้งาน
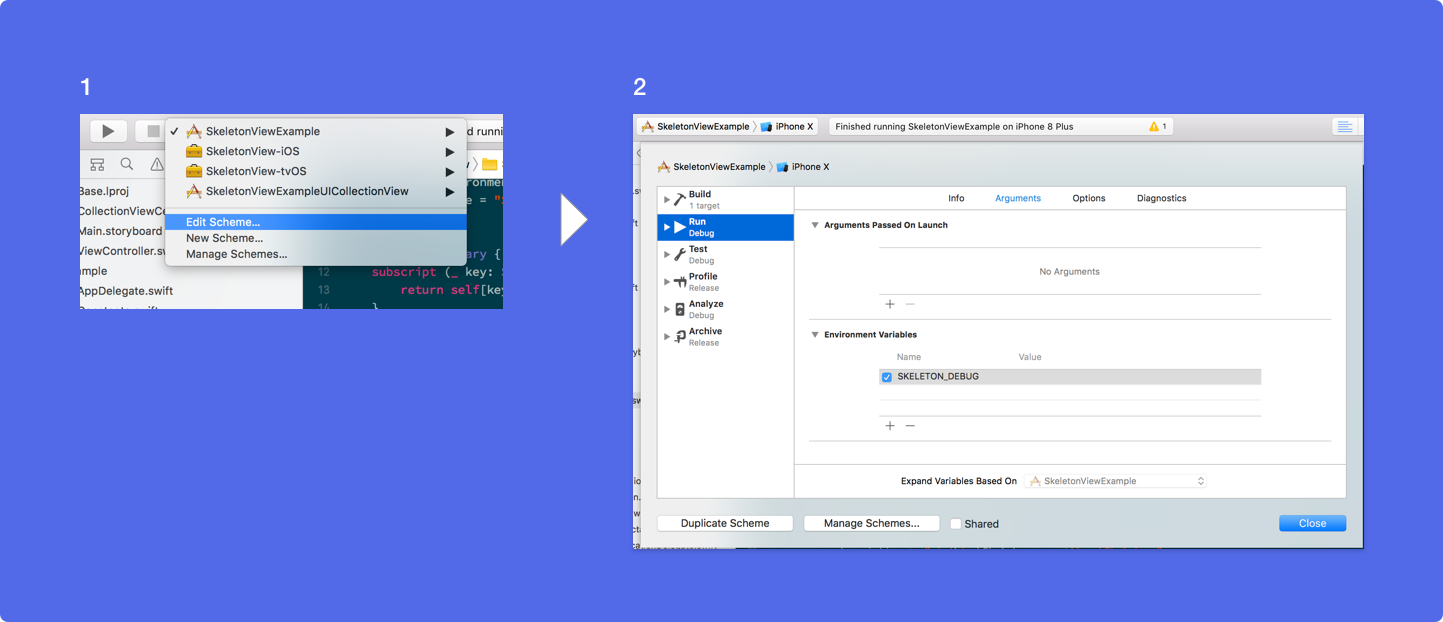
จากนั้นเมื่อโครงกระดูกปรากฏขึ้นคุณจะเห็นลำดับชั้นดูในคอนโซล XCode
 {
  "type" : "UIView", // UITableView, UILabel...
  "isSkeletonable" : true,
  "reference" : "0x000000014751ce30",
  "children" : [
    {
      "type" : "UIView",
      "isSkeletonable" : true,
      "children" : [ ... ],
      "reference" : "0x000000014751cfa0"
    }
  ]
}
เวอร์ชัน OS & SDK ที่รองรับ
นี่คือโครงการโอเพนซอร์สดังนั้นอย่าลังเลที่จะมีส่วนร่วม ยังไง?
ดูผู้มีส่วนร่วมทั้งหมด
สำหรับข้อมูลเพิ่มเติมโปรดอ่านแนวทางการสนับสนุน
โครงการโอเพ่นซอร์สไม่สามารถอยู่ได้นานหากคุณไม่ได้รับความช่วยเหลือ หากคุณพบว่า SkeletonView มีประโยชน์โปรดพิจารณาสนับสนุนโครงการนี้โดยการเป็นสปอนเซอร์
เป็นสปอนเซอร์ผ่านสปอนเซอร์ GitHub ❤
Juanpe Catalán
 MIT License

Copyright (c) 2017 Juanpe Catalán

Permission is hereby granted, free of charge, to any person obtaining a copy
of this software and associated documentation files (the "Software"), to deal
in the Software without restriction, including without limitation the rights
to use, copy, modify, merge, publish, distribute, sublicense, and/or sell
copies of the Software, and to permit persons to whom the Software is
furnished to do so, subject to the following conditions:

The above copyright notice and this permission notice shall be included in all
copies or substantial portions of the Software.

THE SOFTWARE IS PROVIDED "AS IS", WITHOUT WARRANTY OF ANY KIND, EXPRESS OR
IMPLIED, INCLUDING BUT NOT LIMITED TO THE WARRANTIES OF MERCHANTABILITY,
FITNESS FOR A PARTICULAR PURPOSE AND NONINFRINGEMENT. IN NO EVENT SHALL THE
AUTHORS OR COPYRIGHT HOLDERS BE LIABLE FOR ANY CLAIM, DAMAGES OR OTHER
LIABILITY, WHETHER IN AN ACTION OF CONTRACT, TORT OR OTHERWISE, ARISING FROM,
OUT OF OR IN CONNECTION WITH THE SOFTWARE OR THE USE OR OTHER DEALINGS IN THE
SOFTWARE.


