SkeletonView
? 1.31.0
機能•ガイド•インストール•使用法•その他•貢献
? readmeは他の言語で利用できます:?? 。 ?? 。 ?? 。 ?? 。 ?? 。 ??
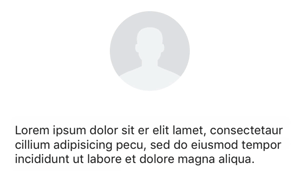
今日、ほとんどすべてのアプリには、API要求、長期実行プロセスなどの非同期プロセスがあります。プロセスが機能している間、開発者は何かが起こっていることをユーザーに示すためにロードビューを配置します。
SkeletOnviewは、このニーズに対処するために考えられています。これは、何かが起こっていることをユーザーに示すエレガントな方法であり、どのコンテンツが待っているかを準備するためのエレガントな方法です。
楽しめ! ?
| skeletonviewガイド - 始める | Ikh4ever StudioによるSwift 5.2のスケルトンビューでロードビューを作成する方法 | アプリでスケルトンロードビューを作成する(Swift 5)-XCode11、2020 IOS Academy | CómoCrearUnaanimacióndeargade datos en ios by mouredev |
pod 'SkeletonView' github "Juanpe/SkeletonView"dependencies: [
. package ( url : " https://github.com/Juanpe/SkeletonView.git " , from : " 1.7.0 " )
]重要!
バージョン1.30.0以来、
SkeletonViewXCFrameWorksをサポートしているため、 XCFrameworkとしてインストールする場合は、代わりにこのリポジトリを使用してください。
SkeletonViewを使用するために必要な3つのステップのみ:
1️⃣適切な場所にskeletonviewをインポートします。
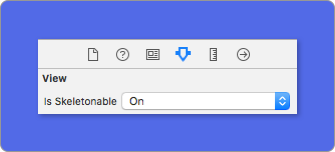
import SkeletonView 2なり、どのビューがskeletonablesになるかを設定します。あなたはこれを2つの方法で達成します:
コードの使用:
avatarImageView . isSkeletonable = trueIB/ストーリーボードの使用:
3️⃣ビューを設定したら、スケルトンを表示できます。そうするために、 4つの選択肢があります。
 ( 1 ) view . showSkeleton ( )                 // Solid
( 2 ) view . showGradientSkeleton ( )         // Gradient
( 3 ) view . showAnimatedSkeleton ( )         // Solid animated
( 4 ) view . showAnimatedGradientSkeleton ( ) // Gradient animated
プレビュー
| 固体 | 勾配 | 固体アニメーション | グラデーションアニメーション |
 |  |  |  |
重要!
SkeletonViewは再帰的です。したがって、すべてのスケルトン可能なビューでスケルトンを表示したい場合は、メインコンテナビューでshowメソッドを呼び出すだけです。たとえば、UIViewControllersで。
SkeletonView 、 UITableViewおよびUICollectionViewと互換性があります。
uitableview
UITableViewでスケルトンを表示したい場合は、 SkeletonTableViewDataSourceプロトコルに準拠する必要があります。
 public protocol SkeletonTableViewDataSource : UITableViewDataSource {
    func numSections ( in collectionSkeletonView : UITableView ) -> Int // Default: 1
    func collectionSkeletonView ( _ skeletonView : UITableView , numberOfRowsInSection section : Int ) -> Int
    func collectionSkeletonView ( _ skeletonView : UITableView , cellIdentifierForRowAt indexPath : IndexPath ) -> ReusableCellIdentifier
    func collectionSkeletonView ( _ skeletonView : UITableView , skeletonCellForRowAt indexPath : IndexPath ) -> UITableViewCell ? // Default: nil
    func collectionSkeletonView ( _ skeletonView : UITableView , prepareCellForSkeleton cell : UITableViewCell , at indexPath : IndexPath )
}ご覧のとおり、このプロトコルはUITableViewDataSourceから継承されるため、このプロトコルをスケルトンプロトコルに置き換えることができます。
このプロトコルには、いくつかの方法のデフォルトの実装があります。たとえば、各セクションの行数はランタイムで計算されます。
 func collectionSkeletonView ( _ skeletonView : UITableView , numberOfRowsInSection section : Int ) -> Int
// Default:
// It calculates how many cells need to populate whole tableview
重要!
上記の方法で
UITableView.automaticNumberOfSkeletonRowsを返すと、デフォルトの動作のように動作します(つまり、テーブルビュー全体を入力するために必要なセルの数を計算します)。
スケルトンにセル識別子を知らせるために実装する必要がある方法は1つだけです。この方法にはデフォルトの実装がありません。
 func collectionSkeletonView ( _ skeletonView : UITableView , cellIdentifierForRowAt indexPath : IndexPath ) -> ReusableCellIdentifier {
   return " CellIdentifier "
}
デフォルトでは、ライブラリは各IndexPathからセルをデキューしますが、スケルトンが表示される前にいくつかの変更を加えたい場合は、これを行うこともできます。
 func collectionSkeletonView ( _ skeletonView : UITableView , skeletonCellForRowAt indexPath : IndexPath ) -> UITableViewCell ? {
    let cell = skeletonView . dequeueReusableCell ( withIdentifier : " CellIdentifier " , for : indexPath ) as? Cell
    cell ? . textField . isHidden = indexPath . row == 0
    return cell
}
Deque部品をライブラリに残したい場合は、この方法を使用してセルを構成できます。
 func collectionSkeletonView ( _ skeletonView : UITableView , prepareCellForSkeleton cell : UITableViewCell , at indexPath : IndexPath ) {
    let cell = cell as? Cell
    cell ? . textField . isHidden = indexPath . row == 0
}
その上、ヘッダーとフッターの両方をスケルトン化できます。 SkeletonTableViewDelegateプロトコルに準拠する必要があります。
 public protocol SkeletonTableViewDelegate : UITableViewDelegate {
    func collectionSkeletonView ( _ skeletonView : UITableView , identifierForHeaderInSection section : Int ) -> ReusableHeaderFooterIdentifier ? // default: nil
    func collectionSkeletonView ( _ skeletonView : UITableView , identifierForFooterInSection section : Int ) -> ReusableHeaderFooterIdentifier ? // default: nil
}
重要!
1️⃣resizableセルを使用している場合(
tableView.rowHeight = UITableViewAutomaticDimension)、estimatedRowHeight必須で定義します。
UITableViewCellに要素を追加すると、セルに直接ではなく、contentViewに追加する必要があります。self . contentView . addSubview ( titleLabel ) ✅ self . addSubview ( titleLabel )
uicollectionView
UICollectionViewの場合、 SkeletonCollectionViewDataSourceプロトコルに準拠する必要があります。
 public protocol SkeletonCollectionViewDataSource : UICollectionViewDataSource {
    func numSections ( in collectionSkeletonView : UICollectionView ) -> Int  // default: 1
    func collectionSkeletonView ( _ skeletonView : UICollectionView , numberOfItemsInSection section : Int ) -> Int
    func collectionSkeletonView ( _ skeletonView : UICollectionView , cellIdentifierForItemAt indexPath : IndexPath ) -> ReusableCellIdentifier
    func collectionSkeletonView ( _ skeletonView : UICollectionView , supplementaryViewIdentifierOfKind : String , at indexPath : IndexPath ) -> ReusableCellIdentifier ? // default: nil
    func collectionSkeletonView ( _ skeletonView : UICollectionView , skeletonCellForItemAt indexPath : IndexPath ) -> UICollectionViewCell ?  // default: nil
    func collectionSkeletonView ( _ skeletonView : UICollectionView , prepareCellForSkeleton cell : UICollectionViewCell , at indexPath : IndexPath )
    func collectionSkeletonView ( _ skeletonView : UICollectionView , prepareViewForSkeleton view : UICollectionReusableView , at indexPath : IndexPath )
}残りのプロセスはUITableViewと同じです
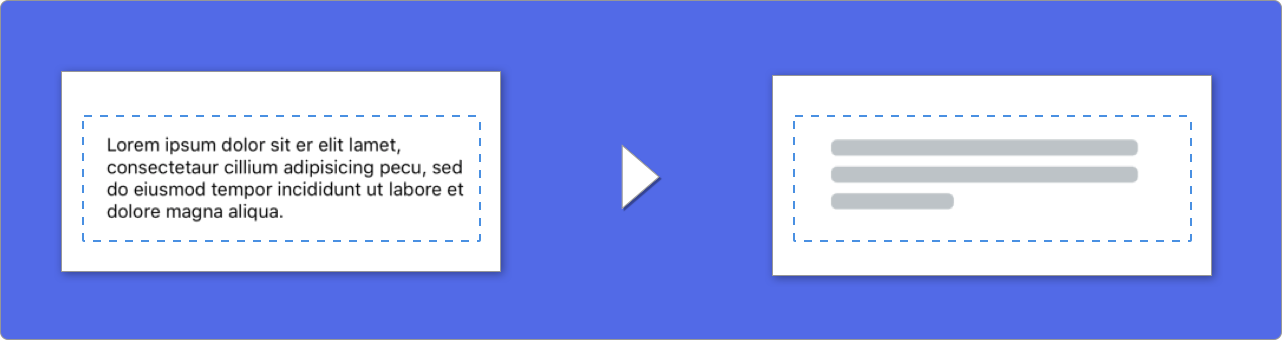
テキストの要素を使用する場合、 SkeletonViewを描画してテキストをシミュレートします。
マルチライン要素のプロパティを設定できます。
| 財産 | タイプ | デフォルト | プレビュー |
|---|---|---|---|
| LastLineFillpercent | CGFloat | 70 |  |
| linescornerradius | Int | 0 |  |
| スケルトンラインペーシング | CGFloat | 10 |  |
| skeletonpaddinginsets | UIEdgeInsets | .zero | 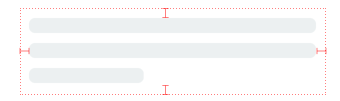 |
| skeletontextlineheight | SkeletonTextLineHeight | .fixed(15) | 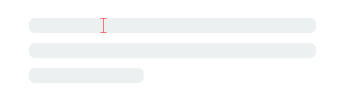 |
| skeletontextnumberflines | SkeletonTextNumberOfLines | .inherited | |
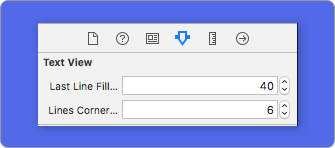
コードを使用してパーセントまたは半径を変更するには、プロパティを設定します。
descriptionTextView . lastLineFillPercent = 50
descriptionTextView . linesCornerRadius = 5
または、 IB/ストーリーボードを使用する場合は次のとおりです。
行の数を定義する方法は?
デフォルトでは、行の数はnumberOfLinesプロパティの値と同じです。また、ゼロに設定されている場合、スケルトン全体を埋め込んで描画するために必要な線の数を計算します。
ただし、特定の数のスケルトンラインを設定する場合は、 skeletonTextNumberOfLinesプロパティを設定することで実行できます。このプロパティには2つの可能な値があり、 numberOfLines値とcustom(Int)を返す継承されinherited継承された継承は、関連する値として指定された特定の行数を返します。
例えば:
label . skeletonTextNumberOfLines = 3 // .custom(3)
ショ和 非推奨!usefontlineheightは廃止されました。代わりにskeletontextlineheightを使用できます。
descriptionTextView . skeletonTextLineHeight = . relativeToFont
重要!
複数の行のないビューの場合、単一の行は最後の行と見なされることに注意してください。
スケルトンにはデフォルトの外観があります。したがって、色、勾配、またはマルチラインのプロパティを指定しない場合、 SkeletonViewデフォルト値を使用します。
デフォルト値:
UIColor.skeletonDefault ( .cloudsと同じですが、ダークモードに適応します)SkeletonGradient(baseColor: .skeletonDefault)CGFloatCGFloatIntIntCGFloat (ibinspectable)(角でスケルトンビューを作る)これらのデフォルト値を取得するには、 SkeletonAppearance.defaultを使用できます。このプロパティを使用すると、値も設定できます。
 SkeletonAppearance . default . multilineHeight = 20
SkeletonAppearance . default . tintColor = . green
ショ和 非推奨!usefontlineheightは廃止されました。代わりにtextlineheightを使用できます。
SkeletonAppearance . default . textLineHeight = . relativeToFont
スケルトンに着色されている色を決定できます。パラメーターとして、必要な色または勾配を渡すだけです。
固体を使用します
view . showSkeleton ( usingColor : UIColor . gray ) // Solid
// or
view . showSkeleton ( usingColor : UIColor ( red : 25.0 , green : 30.0 , blue : 255.0 , alpha : 1.0 ) )
勾配を使用します
let gradient = SkeletonGradient ( baseColor : UIColor . midnightBlue )
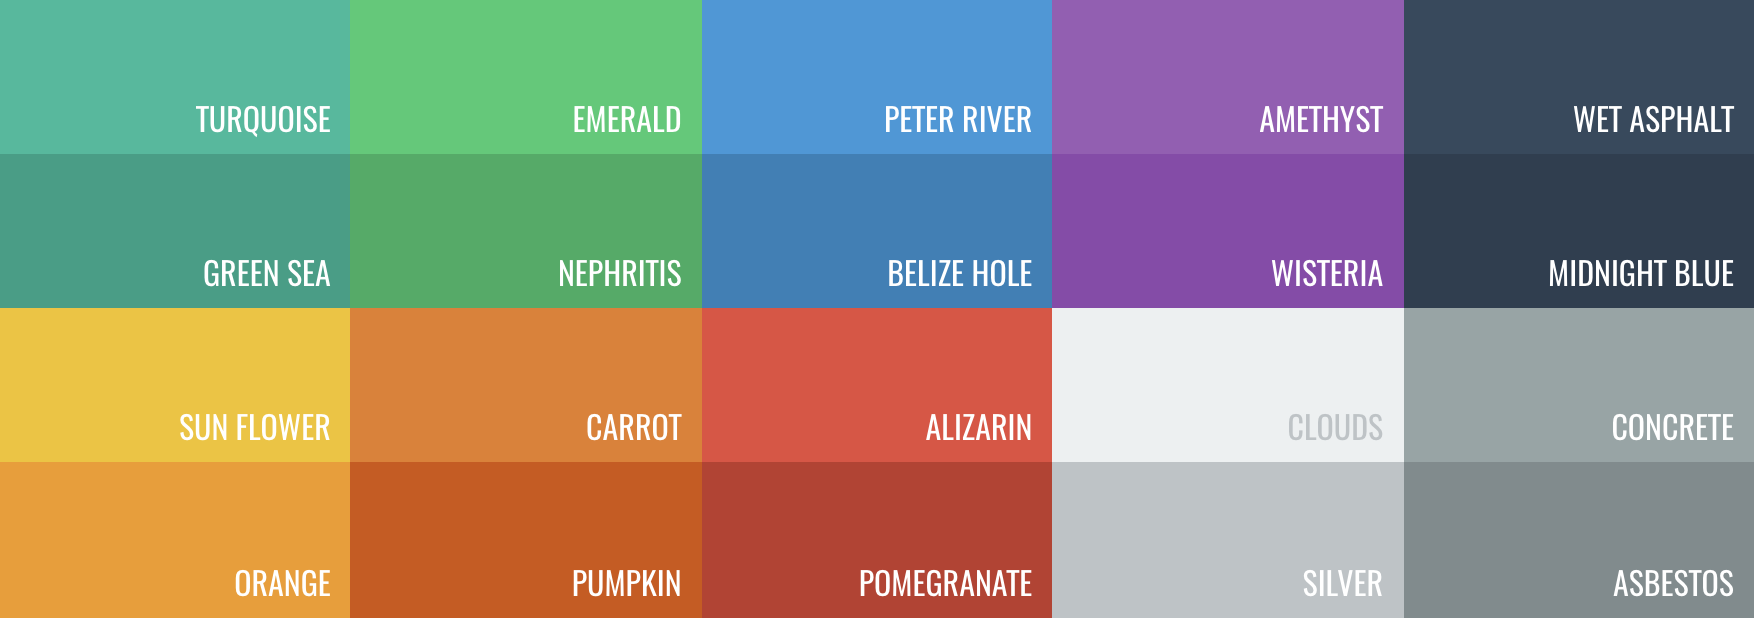
view . showGradientSkeleton ( usingGradient : gradient ) // Gradientその上、 skeletonviewには20個のフラットな色がありますか?
UIColor.turquoise, UIColor.greenSea, UIColor.sunFlower, UIColor.flatOrange ...
SkeLetonViewには、2つの組み込みアニメーションがあります。これは、固体スケルトン用のパルスとグラデーションのスライドです。
その上、あなたがあなた自身のスケルトンのアニメーションをやりたいなら、それは本当に簡単です。
Skeletonは、カスタムアニメーションを定義できるSkeletonLayerAnimation閉鎖を備えたshowAnimatedSkeleton関数を提供します。
public typealias SkeletonLayerAnimation = ( CALayer ) -> CAAnimationこのような関数を呼び出すことができます。
view . showAnimatedSkeleton { ( layer ) -> CAAnimation in
  let animation = CAAnimation ( )
  // Customize here your animation

  return animation
}利用可能なSkeletonAnimationBuilderです。 SkeletonLayerAnimationを作成するビルダーです。
今日、グラデーションのスライドアニメーションを作成し、方向を決定し、アニメーションの持続時間を設定できます(デフォルト= 1.5秒)。
// func makeSlidingAnimation(withDirection direction: GradientDirection, duration: CFTimeInterval = 1.5) -> SkeletonLayerAnimation

let animation = SkeletonAnimationBuilder ( ) . makeSlidingAnimation ( withDirection : . leftToRight )
view . showAnimatedGradientSkeleton ( usingGradient : gradient , animation : animation ) GradientDirectionは、これらのケースを備えた列挙です。
| 方向 | プレビュー |
|---|---|
| .leftright |  |
| .RightLeft |  |
| .topbottom | 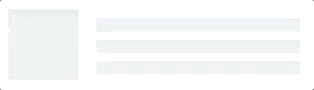 |
| .bottomtop | 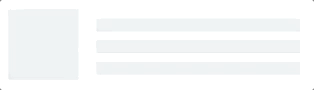 |
| .topleftbottomright | 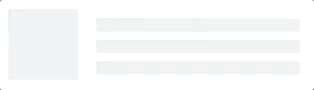 |
| .bottomrighttopleft |  |
トリック!
このショートカットを使用して、スライドアニメーションを作成する別の方法が存在します。
let animation = GradientDirection . leftToRight . slidingAnimation ( )
SkeletonViewには、スムーレトンをより滑らかな方法で表示または非表示にするための遷移が組み込まれていますか?
トランジションを使用するには、 transitionパラメーターをshowSkeleton()またはhideSkeleton()関数にこのような遷移時間に追加するだけです。
view . showSkeleton ( transition : . crossDissolve ( 0.25 ) )     //Show skeleton cross dissolve transition with 0.25 seconds fade time
view . hideSkeleton ( transition : . crossDissolve ( 0.25 ) ) //Hide skeleton cross dissolve transition with 0.25 seconds fade timeデフォルト値はcrossDissolve(0.25)です
プレビュー
| なし | クロス溶解します |
 |  |
階層
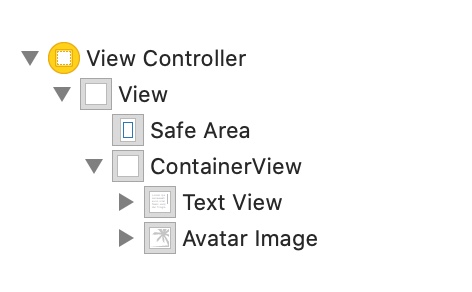
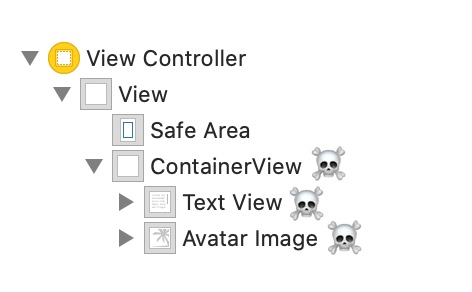
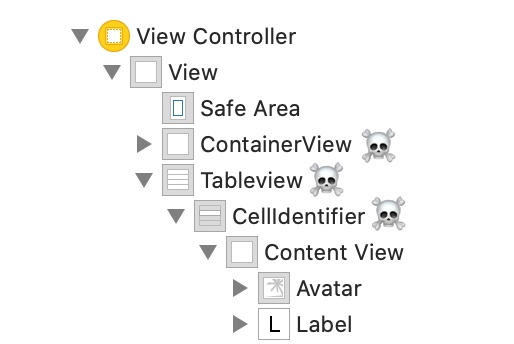
SkeletonView再帰的であり、Skeletonが非常に効率的であることを望んでいるため、できるだけ早く再帰を止めたいと考えています。このため、スケルトンはビューがスケルトンできなくなったらすぐにskeletonableサブビューを探すのをやめるため、コンテナビューをSkeletonableとして設定する必要があります。
画像は千の言葉の価値があるからです:
この例では、 ContainerViewとUITableViewを備えたUIViewControllerがあります。ビューの準備ができたら、この方法を使用してスケルトンを表示します。
view.showSkeleton()
isSkeletonable=☠️
| 構成 | 結果 |
|---|---|
 | 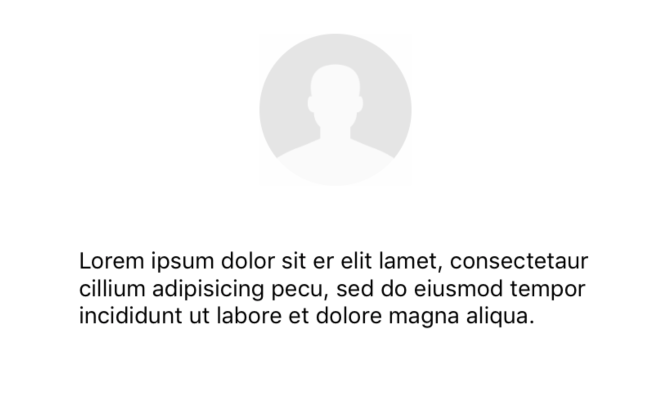 |
 | |
 |  |
 |  |
 |  |
 |  |
スケルトンはレイアウトを表示します
親ビューの境界が変更されたため、スケルトンレイアウトがレイアウトに適合しない場合があります。たとえば、デバイスの回転。
スケルトンビューのように中継することができます:
 override func viewDidLayoutSubviews ( ) {
    view . layoutSkeletonIfNeeded ( )
}
重要!
この方法を呼び出すべきではありません。バージョン1.8.1から、このメソッドを呼び出す必要はありません。ライブラリは自動的に行います。したがって、スケルトンのレイアウトを手動で更新する必要がある場合にのみ、この方法を使用できます。
スケルトンを更新します
次の方法で、スケルトンの構成をいつでも色、アニメーションなどのように変更できます。
 ( 1 ) view . updateSkeleton ( )                 // Solid
( 2 ) view . updateGradientSkeleton ( )         // Gradient
( 3 ) view . updateAnimatedSkeleton ( )         // Solid animated
( 4 ) view . updateAnimatedGradientSkeleton ( ) // Gradient animated
アニメーションが始まるときにビューを隠す
アニメーションが開始されたときにビューを隠したい場合があるため、これを実現するために使用できる簡単なプロパティがあります。
view . isHiddenWhenSkeletonIsActive = true // This works only when isSkeletonable = trueスケルトンがアクティブなときにユーザーのインタラクションを変更しないでください
デフォルトでは、スケルトン化されたアイテムのユーザーインタラクションは無効になりますが、スケルトンがアクティブなときにユーザーインタラクションインジケーターを変更したくない場合は、 isUserInteractionDisabledWhenSkeletonIsActiveを使用できます。
view . isUserInteractionDisabledWhenSkeletonIsActive = false // The view will be active when the skeleton will be active.ラベルのスケルトンラインのフォントラインの高さを使用しないでください
skeletonを無効にして、 UILabelまたはUITextViewのフォント高さに自動調整します。デフォルトでは、スケルトンラインの高さは、境界ボックスを使用するのではなく、ラベル長方のテキストをより正確に反映するために、フォントの高さに自動調整されます。
label . useFontLineHeight = falseショースケルトンの遅延
ビューがすばやく更新される場合、スケルトンのプレゼンテーションを遅らせることができます。
 func showSkeleton ( usingColor : UIColor ,
                  animated : Bool ,
                  delay : TimeInterval ,
                  transition : SkeletonTransitionStyle )
func showGradientSkeleton ( usingGradient : SkeletonGradient ,
animated : Bool ,
delay : TimeInterval ,
transition : SkeletonTransitionStyle )デバッグ
何かが正常に機能していないときにデバッグタスクを容易にするため。 SkeletonViewにはいくつかの新しいツールがあります。
まず、 UIView彼のスケルトン情報を備えたプロパティを利用できます。
var sk . skeletonTreeDescription : Stringまた、新しいデバッグモードをアクティブにすることができます。環境変数SKELETON_DEBUGを追加してアクティブ化するだけです。
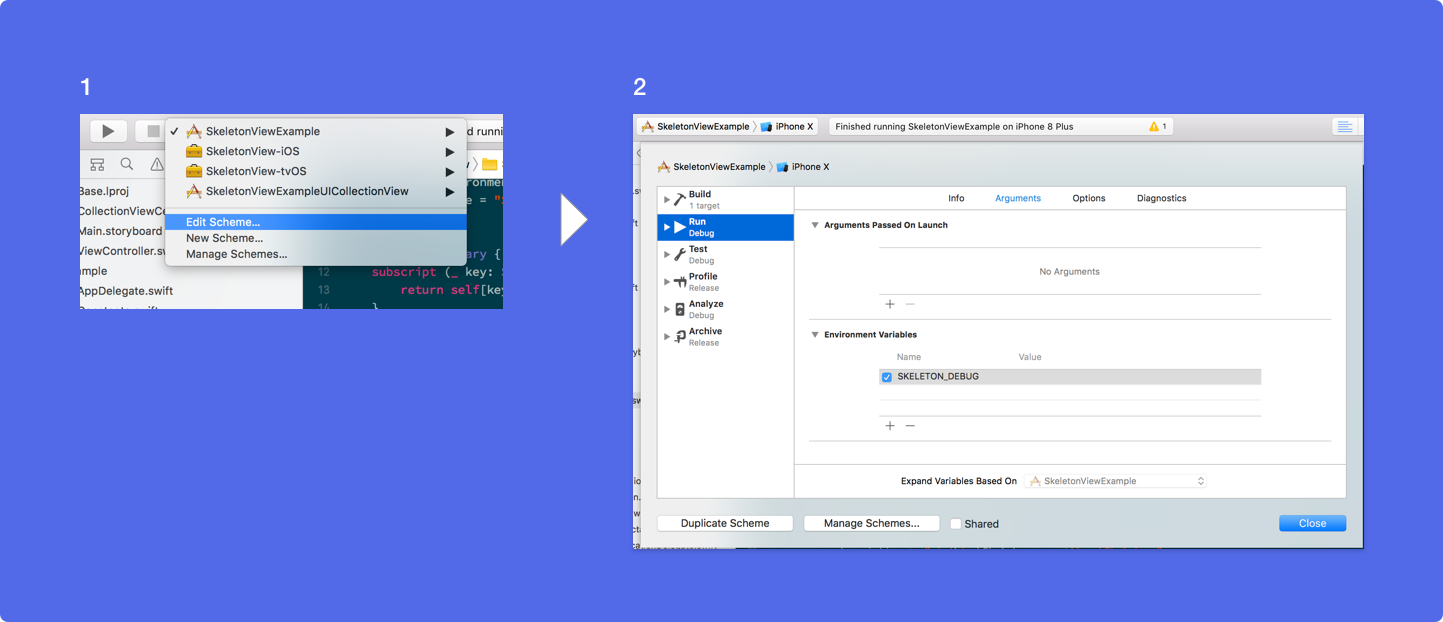
次に、スケルトンが表示されると、Xcodeコンソールのビュー階層を確認できます。
 {
  "type" : "UIView", // UITableView, UILabel...
  "isSkeletonable" : true,
  "reference" : "0x000000014751ce30",
  "children" : [
    {
      "type" : "UIView",
      "isSkeletonable" : true,
      "children" : [ ... ],
      "reference" : "0x000000014751cfa0"
    }
  ]
}
サポートされているOSおよびSDKバージョン
これはオープンソースプロジェクトですので、お気軽に貢献してください。どうやって?
すべての貢献者を参照してください
詳細については、貢献ガイドラインをお読みください。
オープンソースプロジェクトは、あなたの助けがなければ長生きすることはできません。 SkeLetonViewが役立つ場合は、スポンサーになってこのプロジェクトをサポートすることを検討してください。
GitHubスポンサーを介してスポンサーになります❤️
JuanpeCatalán
 MIT License

Copyright (c) 2017 Juanpe Catalán

Permission is hereby granted, free of charge, to any person obtaining a copy
of this software and associated documentation files (the "Software"), to deal
in the Software without restriction, including without limitation the rights
to use, copy, modify, merge, publish, distribute, sublicense, and/or sell
copies of the Software, and to permit persons to whom the Software is
furnished to do so, subject to the following conditions:

The above copyright notice and this permission notice shall be included in all
copies or substantial portions of the Software.

THE SOFTWARE IS PROVIDED "AS IS", WITHOUT WARRANTY OF ANY KIND, EXPRESS OR
IMPLIED, INCLUDING BUT NOT LIMITED TO THE WARRANTIES OF MERCHANTABILITY,
FITNESS FOR A PARTICULAR PURPOSE AND NONINFRINGEMENT. IN NO EVENT SHALL THE
AUTHORS OR COPYRIGHT HOLDERS BE LIABLE FOR ANY CLAIM, DAMAGES OR OTHER
LIABILITY, WHETHER IN AN ACTION OF CONTRACT, TORT OR OTHERWISE, ARISING FROM,
OUT OF OR IN CONNECTION WITH THE SOFTWARE OR THE USE OR OTHER DEALINGS IN THE
SOFTWARE.


