SkeletonView
? 1.31.0
Características • Guías • Instalación • Uso • Varios • Contribuir
? ReadMe está disponible en otros idiomas: ?? . ? . ? . ? . ? . ?
Hoy en día, casi todas las aplicaciones tienen procesos asíncronos, como solicitudes de API, procesos de ejecución larga, etc. Mientras los procesos funcionan, generalmente los desarrolladores colocan una vista de carga para mostrar a los usuarios que algo está sucediendo.
SkeletonView ha sido concebido para abordar esta necesidad, una forma elegante de mostrar a los usuarios que algo está sucediendo y también prepararlos para qué contenidos están esperando.
¡Disfrútala! ?
| SkeletonView Guides - Comenzando | Cómo crear una vista de carga con la vista Skeleton en Swift 5.2 por IKH4Ever Studio | Crear vista de carga de esqueleto en la aplicación (Swift 5) - Xcode 11, 2020 por iOS Academy | CÓMO CRAR UNA ANIMACIÓN DE CARGA DE DATOS EN ios por Mouredev |
pod 'SkeletonView' github "Juanpe/SkeletonView"dependencies: [
. package ( url : " https://github.com/Juanpe/SkeletonView.git " , from : " 1.7.0 " )
]¡IMPORTANTE!
Desde la versión 1.30.0,
SkeletonViewadmite XCFRameWorks , por lo que si desea instalarlo como un XCFRamework , utilice este repositorio en su lugar.
Solo se necesitan 3 pasos para usar SkeletonView :
1ansa importar SkeletonView en el lugar adecuado.
import SkeletonView 2minte⃣ Ahora, establezca qué vistas serán skeletonables . Logras esto de dos maneras:
Uso del código:
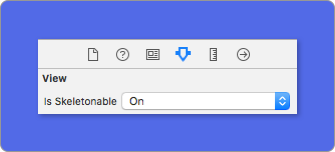
avatarImageView . isSkeletonable = trueUsando IB/Storyboards:
3️⃣ Una vez que haya establecido las vistas, puede mostrar el esqueleto . Para hacerlo, tienes 4 opciones:
 ( 1 ) view . showSkeleton ( )                 // Solid
( 2 ) view . showGradientSkeleton ( )         // Gradient
( 3 ) view . showAnimatedSkeleton ( )         // Solid animated
( 4 ) view . showAnimatedGradientSkeleton ( ) // Gradient animated
Avance
| Sólido | Gradiente | Sólido animado | Gradiente animado |
 |  |  |  |
¡IMPORTANTE!
SkeletonViewes recursivo, por lo que si desea mostrar el esqueleto en todas las vistas esqueléticas, solo necesita llamar al método del programa en la vista del contenedor principal. Por ejemplo, conUIViewControllers.
SkeletonView es compatible con UITableView y UICollectionView .
UITITYVIEW
Si desea mostrarle al esqueleto en una UITableView , debe ajustarse al protocolo SkeletonTableViewDataSource .
 public protocol SkeletonTableViewDataSource : UITableViewDataSource {
    func numSections ( in collectionSkeletonView : UITableView ) -> Int // Default: 1
    func collectionSkeletonView ( _ skeletonView : UITableView , numberOfRowsInSection section : Int ) -> Int
    func collectionSkeletonView ( _ skeletonView : UITableView , cellIdentifierForRowAt indexPath : IndexPath ) -> ReusableCellIdentifier
    func collectionSkeletonView ( _ skeletonView : UITableView , skeletonCellForRowAt indexPath : IndexPath ) -> UITableViewCell ? // Default: nil
    func collectionSkeletonView ( _ skeletonView : UITableView , prepareCellForSkeleton cell : UITableViewCell , at indexPath : IndexPath )
}
Como puede ver, este protocolo hereda de UITableViewDataSource , por lo que puede reemplazar este protocolo con el protocolo Skeleton.
Este protocolo tiene una implementación predeterminada para algunos métodos. Por ejemplo, el número de filas para cada sección se calcula en tiempo de ejecución:
 func collectionSkeletonView ( _ skeletonView : UITableView , numberOfRowsInSection section : Int ) -> Int
// Default:
// It calculates how many cells need to populate whole tableview
¡IMPORTANTE!
Si devuelve
UITableView.automaticNumberOfSkeletonRows.
Solo hay un método que debe implementar para que Skeleton conozca el identificador de la célula. Este método no tiene implementación predeterminada:
 func collectionSkeletonView ( _ skeletonView : UITableView , cellIdentifierForRowAt indexPath : IndexPath ) -> ReusableCellIdentifier {
   return " CellIdentifier "
}
De manera predeterminada, la biblioteca dequita las celdas de cada inexpath, pero también puede hacerlo si desea hacer algunos cambios antes de que aparezca el esqueleto:
 func collectionSkeletonView ( _ skeletonView : UITableView , skeletonCellForRowAt indexPath : IndexPath ) -> UITableViewCell ? {
    let cell = skeletonView . dequeueReusableCell ( withIdentifier : " CellIdentifier " , for : indexPath ) as? Cell
    cell ? . textField . isHidden = indexPath . row == 0
    return cell
}
Si prefiere dejar la pieza de Deque en la biblioteca, puede configurar la celda utilizando este método:
 func collectionSkeletonView ( _ skeletonView : UITableView , prepareCellForSkeleton cell : UITableViewCell , at indexPath : IndexPath ) {
    let cell = cell as? Cell
    cell ? . textField . isHidden = indexPath . row == 0
}
Además, puedes esqueletizar tanto los encabezados como los pies de página. Debe cumplir con el protocolo SkeletonTableViewDelegate .
 public protocol SkeletonTableViewDelegate : UITableViewDelegate {
    func collectionSkeletonView ( _ skeletonView : UITableView , identifierForHeaderInSection section : Int ) -> ReusableHeaderFooterIdentifier ? // default: nil
    func collectionSkeletonView ( _ skeletonView : UITableView , identifierForFooterInSection section : Int ) -> ReusableHeaderFooterIdentifier ? // default: nil
}
¡IMPORTANTE!
1minte⃣ Si está utilizando celdas resisables (
tableView.rowHeight = UITableViewAutomaticDimension), es obligatorio definir elestimatedRowHeight.2minte⃣ Cuando agrega elementos en
UITableViewCelldebe agregarlo acontentViewy no a la celda directamente.self . contentView . addSubview ( titleLabel ) ✅ self . addSubview ( titleLabel )
UicollectionView
Para UICollectionView , debe ajustarse al protocolo SkeletonCollectionViewDataSource .
 public protocol SkeletonCollectionViewDataSource : UICollectionViewDataSource {
    func numSections ( in collectionSkeletonView : UICollectionView ) -> Int  // default: 1
    func collectionSkeletonView ( _ skeletonView : UICollectionView , numberOfItemsInSection section : Int ) -> Int
    func collectionSkeletonView ( _ skeletonView : UICollectionView , cellIdentifierForItemAt indexPath : IndexPath ) -> ReusableCellIdentifier
    func collectionSkeletonView ( _ skeletonView : UICollectionView , supplementaryViewIdentifierOfKind : String , at indexPath : IndexPath ) -> ReusableCellIdentifier ? // default: nil
    func collectionSkeletonView ( _ skeletonView : UICollectionView , skeletonCellForItemAt indexPath : IndexPath ) -> UICollectionViewCell ?  // default: nil
    func collectionSkeletonView ( _ skeletonView : UICollectionView , prepareCellForSkeleton cell : UICollectionViewCell , at indexPath : IndexPath )
    func collectionSkeletonView ( _ skeletonView : UICollectionView , prepareViewForSkeleton view : UICollectionReusableView , at indexPath : IndexPath )
}
El resto del proceso es el mismo que UITableView
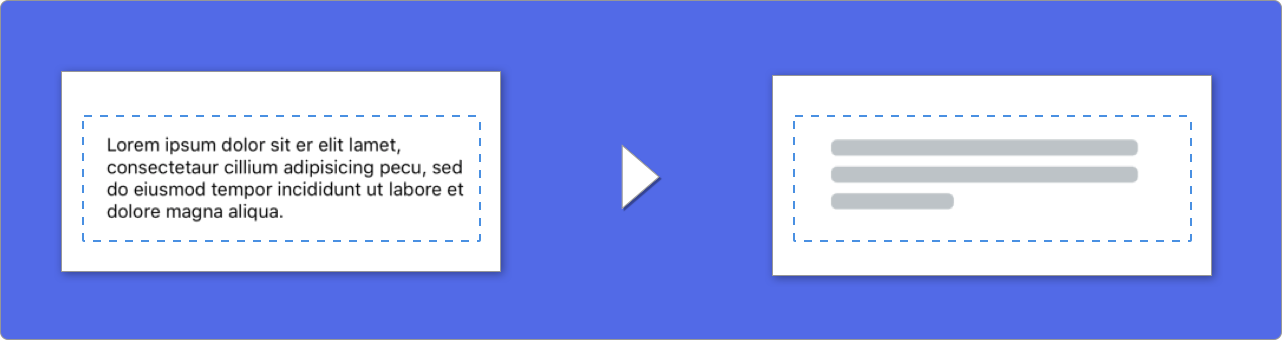
Al usar elementos con texto, SkeletonView dibuja líneas para simular el texto.
Puede establecer algunas propiedades para elementos múltiples.
| Propiedad | Tipo | Por defecto | Avance |
|---|---|---|---|
| último porcentaje | CGFloat | 70 |  |
| líneo | Int | 0 |  |
| multicia | CGFloat | 10 | 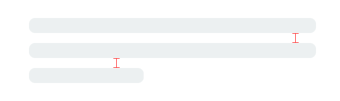 |
| SkeletonPaddingingInsets | UIEdgeInsets | .zero | 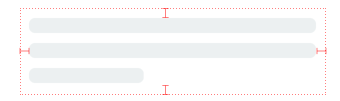 |
| skeletontextlineHeight | SkeletonTextLineHeight | .fixed(15) | 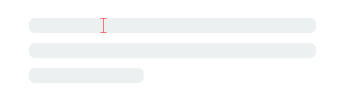 |
| esqueletontextnumberoflines | SkeletonTextNumberOfLines | .inherited | |
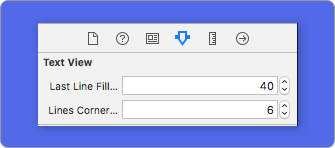
Para modificar el porcentaje o el radio usando el código , establezca las propiedades:
descriptionTextView . lastLineFillPercent = 50
descriptionTextView . linesCornerRadius = 5
O, si prefiere usar IB/Storyboard :
¿Cómo definir el número de líneas?
Por defecto, el número de líneas es el mismo que el valor de la propiedad numberOfLines . Y, si está configurado en cero , calculará cuántas líneas se necesitan para llenar todo el esqueleto y dibujarlo.
Sin embargo, si desea establecer un número específico de líneas de esqueleto, puede hacerlo configurando la propiedad skeletonTextNumberOfLines . Esta propiedad tiene dos valores posibles, inherited , lo que devuelve el valor numberOfLines y custom(Int) que devuelve el número específico de líneas especificadas como el valor asociado.
Por ejemplo:
label . skeletonTextNumberOfLines = 3 // .custom(3)
️ ¡Detenido!UseFontLineHeight ha sido desaprobado. Puede usar SkeletontextLineHeight en su lugar:
descriptionTextView . skeletonTextLineHeight = . relativeToFont
¡IMPORTANTE!
Tenga en cuenta que para las vistas sin múltiples líneas, la línea única se considerará como la última línea.
Los esqueletos tienen una apariencia predeterminada. Por lo tanto, cuando no especifica las propiedades de color, gradiente o multilines, SkeletonView usa los valores predeterminados.
Valores predeterminados:
UIColor.skeletonDefault (igual que .clouds pero adaptativo al modo oscuro)SkeletonGradient(baseColor: .skeletonDefault)CGFloatCGFloatIntIntCGFloat (ibinspectable) (Haz tu vista de esqueleto con la esquina) Para obtener estos valores predeterminados, puede usar SkeletonAppearance.default . Usando esta propiedad también puede establecer los valores:
 SkeletonAppearance . default . multilineHeight = 20
SkeletonAppearance . default . tintColor = . green
️ ¡Detenido!UseFontLineHeight ha sido desaprobado. Puede usar TextLineHeight en su lugar:
SkeletonAppearance . default . textLineHeight = . relativeToFont
Puedes decidir con qué color está el esqueleto con el tinte. Solo necesita pasar como parámetro el color o gradiente que desee.
Usando colores sólidos
view . showSkeleton ( usingColor : UIColor . gray ) // Solid
// or
view . showSkeleton ( usingColor : UIColor ( red : 25.0 , green : 30.0 , blue : 255.0 , alpha : 1.0 ) )
Usando gradientes
let gradient = SkeletonGradient ( baseColor : UIColor . midnightBlue )
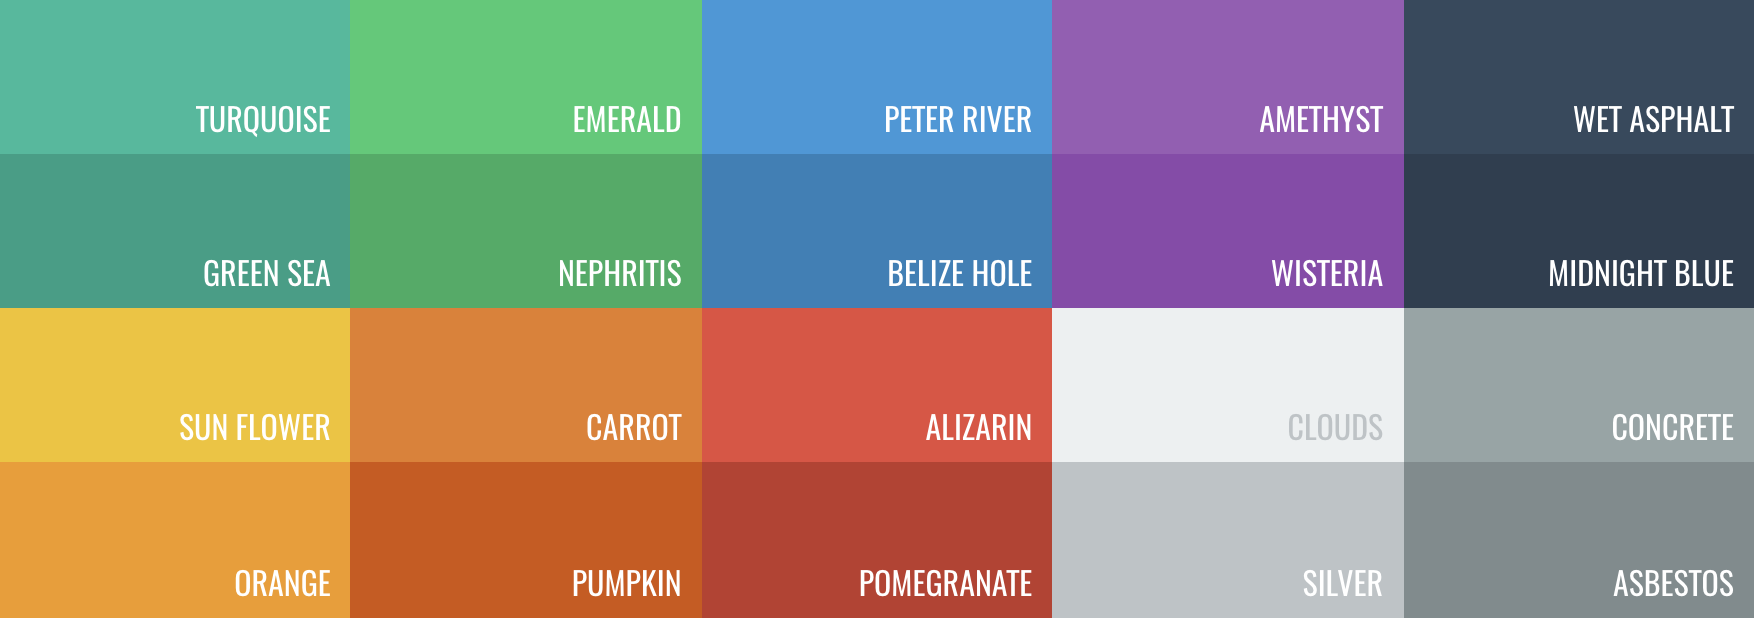
view . showGradientSkeleton ( usingGradient : gradient ) // GradientAdemás, SkeletonView cuenta con 20 colores planos?
UIColor.turquoise, UIColor.greenSea, UIColor.sunFlower, UIColor.flatOrange ...
SkeletonView tiene dos animaciones incorporadas, Pulse para esqueletos sólidos y deslizamiento para gradientes.
Además, si quieres hacer tu propia animación de esqueleto, es realmente fácil.
Skeleton proporciona la función showAnimatedSkeleton que tiene un cierre de SkeletonLayerAnimation donde puede definir su animación personalizada.
public typealias SkeletonLayerAnimation = ( CALayer ) -> CAAnimationPuede llamar a la función así:
view . showAnimatedSkeleton { ( layer ) -> CAAnimation in
  let animation = CAAnimation ( )
  // Customize here your animation

  return animation
}
Está disponible SkeletonAnimationBuilder . Es un constructor para hacer SkeletonLayerAnimation .
Hoy, puede crear animaciones deslizantes para gradientes, decidir la dirección y establecer la duración de la animación (predeterminada = 1.5s).
// func makeSlidingAnimation(withDirection direction: GradientDirection, duration: CFTimeInterval = 1.5) -> SkeletonLayerAnimation

let animation = SkeletonAnimationBuilder ( ) . makeSlidingAnimation ( withDirection : . leftToRight )
view . showAnimatedGradientSkeleton ( usingGradient : gradient , animation : animation )
GradientDirection es un enumio, con estos casos:
| Dirección | Avance |
|---|---|
| .leftright |  |
| . |  |
| .Topbottom |  |
| .bottomtop |  |
| .topleftbottomright |  |
| .bottomrighttopleft |  |
¡TRUCO!
Existe otra forma de crear animaciones deslizantes, solo usando este atajo:
let animation = GradientDirection . leftToRight . slidingAnimation ( )
SkeletonView tiene transiciones incorporadas para mostrar u ocultar los esqueletos de una manera más suave ?
Para usar la transición, simplemente agregue el parámetro transition a su función showSkeleton() o hideSkeleton() con el tiempo de transición, como este:
view . showSkeleton ( transition : . crossDissolve ( 0.25 ) )     //Show skeleton cross dissolve transition with 0.25 seconds fade time
view . hideSkeleton ( transition : . crossDissolve ( 0.25 ) )     //Hide skeleton cross dissolve transition with 0.25 seconds fade time
El valor predeterminado es crossDissolve(0.25)
Avance
| Ninguno | Cruz de disolver |
 |  |
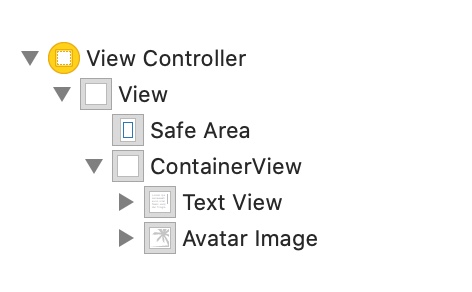
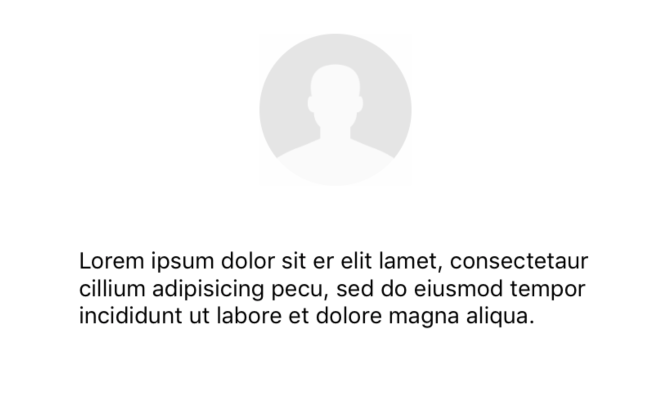
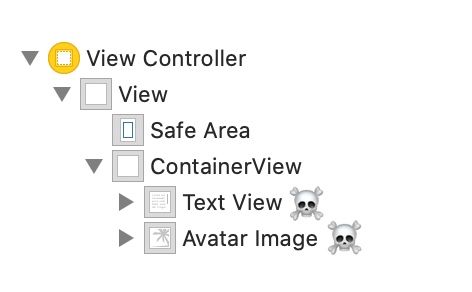
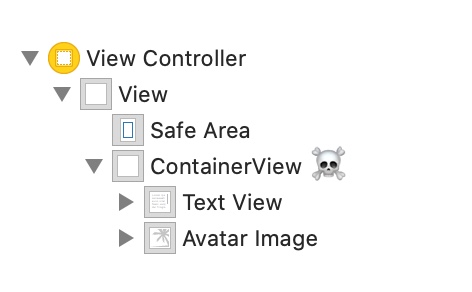
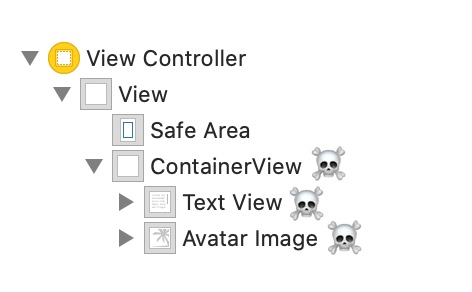
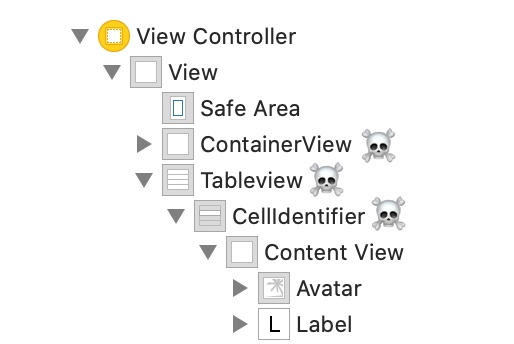
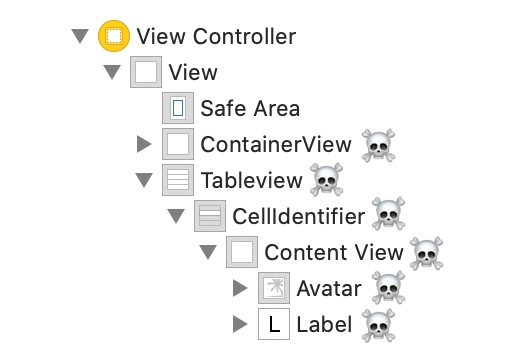
Jerarquía
Dado que SkeletonView es recursivo, y queremos que el esqueleto sea muy eficiente, queremos detener la recursión lo antes posible. Por esta razón, debe establecer la vista del contenedor como Skeletonable , porque el esqueleto dejará de buscar subvistas skeletonable tan pronto como una vista no sea esqueletable, rompiendo y luego la recursión.
Porque una imagen vale más que mil palabras:
En este ejemplo, tenemos un UIViewController con Con ContainerView y UITableView . Cuando la vista está lista, mostramos el esqueleto utilizando este método:
view.showSkeleton()
isSkeletonable= ☠️
| Configuración | Resultado |
|---|---|
 |  |
 | |
 |  |
 |  |
 |  |
 |  |
Diseño de vistas de esqueleto
A veces, el diseño del esqueleto puede no adaptarse a su diseño porque los límites de la vista padre han cambiado. Por ejemplo, girando el dispositivo.
Puede transmitir las vistas del esqueleto como así:
 override func viewDidLayoutSubviews ( ) {
    view . layoutSkeletonIfNeeded ( )
}
¡IMPORTANTE!
No debes llamar a este método. Desde la versión 1.8.1 no necesita llamar a este método, la biblioteca sí automáticamente. Por lo tanto, puede usar este método solo en los casos cuando necesita actualizar el diseño del esqueleto manualmente.
Actualizar esqueleto
Puede cambiar la configuración del esqueleto en cualquier momento como su color, animación, etc. Con los siguientes métodos:
 ( 1 ) view . updateSkeleton ( )                 // Solid
( 2 ) view . updateGradientSkeleton ( )         // Gradient
( 3 ) view . updateAnimatedSkeleton ( )         // Solid animated
( 4 ) view . updateAnimatedGradientSkeleton ( ) // Gradient animated
Ocultar vistas cuando comienza la animación
A veces quieres ocultar alguna vista cuando comience la animación, por lo que hay una propiedad rápida que puedes usar para que esto suceda:
view . isHiddenWhenSkeletonIsActive = true // This works only when isSkeletonable = trueNo modifique la interacción del usuario cuando el esqueleto está activo
De manera predeterminada, la interacción del usuario está deshabilitada para elementos esqueletizados, pero si no desea modificar el indicador de interacción del usuario cuando el esqueleto está activo, puede usar la propiedad isUserInteractionDisabledWhenSkeletonIsActive : Propiedad:
view . isUserInteractionDisabledWhenSkeletonIsActive = false // The view will be active when the skeleton will be active.No use la altura de la línea de fuente para las líneas de esqueleto en las etiquetas
Falso para deshabilitar el esqueleto para ajustar automáticamente a la altura de la fuente para un UILabel o UITextView . Por defecto, la altura de las líneas de esqueleto se ajusta automáticamente a la altura de la fuente para reflejar con mayor precisión el texto en el rect de etiqueta en lugar de usar el cuadro delimitador.
label . useFontLineHeight = falseEsqueleto de espectáculo retrasado
Puede retrasar la presentación del esqueleto si las vistas se actualizan rápidamente.
 func showSkeleton ( usingColor : UIColor ,
                  animated : Bool ,
                  delay : TimeInterval ,
                  transition : SkeletonTransitionStyle )
func showGradientSkeleton ( usingGradient : SkeletonGradient ,
animated : Bool ,
delay : TimeInterval ,
transition : SkeletonTransitionStyle )Depurar
Para facilitar las tareas de depuración cuando algo no funciona bien. SkeletonView tiene algunas herramientas nuevas.
Primero, UIView ha disponible una propiedad con su información de esqueleto:
var sk . skeletonTreeDescription : String Además, puede activar el nuevo modo de depuración . Simplemente agregue la variable de entorno SKELETON_DEBUG y lo active.
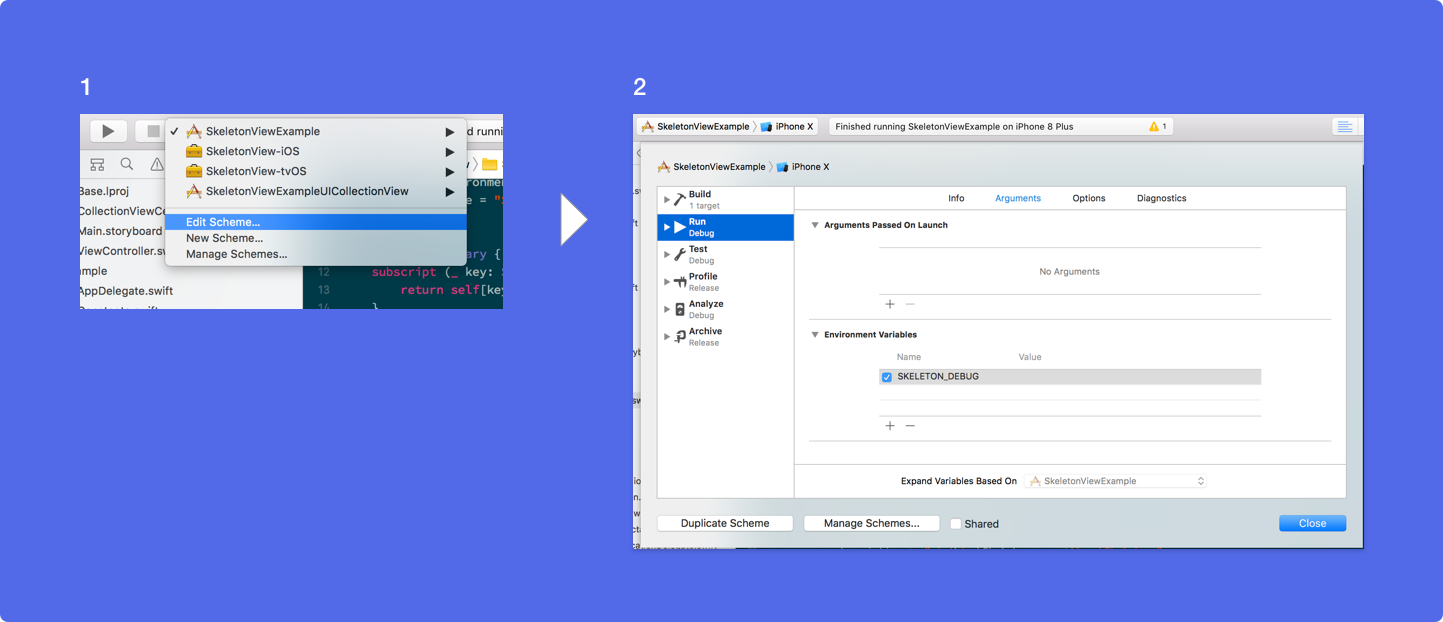
Luego, cuando aparece el esqueleto, puede ver la jerarquía de vista en la consola Xcode.
 {
  "type" : "UIView", // UITableView, UILabel...
  "isSkeletonable" : true,
  "reference" : "0x000000014751ce30",
  "children" : [
    {
      "type" : "UIView",
      "isSkeletonable" : true,
      "children" : [ ... ],
      "reference" : "0x000000014751cfa0"
    }
  ]
}
Versiones compatibles con OS y SDK
Este es un proyecto de código abierto, así que siéntase libre de contribuir. ¿Cómo?
Ver todos los contribuyentes
Para obtener más información, lea las pautas contribuyentes.
Los proyectos de código abierto no pueden vivir mucho sin su ayuda. Si encuentra que SkeletonView es útil, considere apoyar este proyecto convirtiéndose en patrocinador.
Conviértete en patrocinador a través de Github Patrocinadores ❤️
Juanpe Catalán
 MIT License

Copyright (c) 2017 Juanpe Catalán

Permission is hereby granted, free of charge, to any person obtaining a copy
of this software and associated documentation files (the "Software"), to deal
in the Software without restriction, including without limitation the rights
to use, copy, modify, merge, publish, distribute, sublicense, and/or sell
copies of the Software, and to permit persons to whom the Software is
furnished to do so, subject to the following conditions:

The above copyright notice and this permission notice shall be included in all
copies or substantial portions of the Software.

THE SOFTWARE IS PROVIDED "AS IS", WITHOUT WARRANTY OF ANY KIND, EXPRESS OR
IMPLIED, INCLUDING BUT NOT LIMITED TO THE WARRANTIES OF MERCHANTABILITY,
FITNESS FOR A PARTICULAR PURPOSE AND NONINFRINGEMENT. IN NO EVENT SHALL THE
AUTHORS OR COPYRIGHT HOLDERS BE LIABLE FOR ANY CLAIM, DAMAGES OR OTHER
LIABILITY, WHETHER IN AN ACTION OF CONTRACT, TORT OR OTHERWISE, ARISING FROM,
OUT OF OR IN CONNECTION WITH THE SOFTWARE OR THE USE OR OTHER DEALINGS IN THE
SOFTWARE.


