lightning hydra template
v2.0.3
딥 러닝 프로젝트를 시작하는 깨끗한 템플릿 ⚡
이 템플릿 사용을 클릭하여 새 저장소를 초기화하십시오.
제안은 항상 환영합니다!
사용하고 싶은 이유 :
✅ 보일러 플레이트를 저장하십시오
새로운 모델, 데이터 세트, 작업, 실험을 쉽게 추가하고 Multi-GPU, TPU 또는 Slurm 클러스터와 같은 다양한 가속기에 대한 교육.
✅ 교육
철저히 댓글을 달았습니다. 이 저장소를 학습 리소스로 사용할 수 있습니다.
✅ 재사용 가능성
유용한 MLOPS 도구, 구성 및 코드 스 니펫 모음. 이 repo를 다양한 유틸리티에 대한 참조로 사용할 수 있습니다.
사용하고 싶지 않은 이유 :
일이 때때로 깨졌습니다
Lightning과 Hydra는 여전히 진화하고 있으며 많은 라이브러리를 통합하므로 때로는 상황이 깨지는 것을 의미합니다. 현재 알려진 문제 목록은이 페이지를 방문하십시오.
데이터 엔지니어링에 맞게 조정되지 않았습니다
템플릿은 서로 의존하는 데이터 파이프 라인 구축에 대해 실제로 조정되지 않습니다. 즉시 사용 가능한 데이터에서 모델 프로토 타이핑에 사용하는 것이 더 효율적입니다.
간단한 유스 케이스에 과도하게 적합합니다
구성 설정은 간단한 번개 교육을 염두에두고 구축됩니다. 다른 사용 사례, 예를 들어 번개 직물에 대해 조정하려면 약간의 노력을 기울여야 할 수도 있습니다.
워크 플로를 지원하지 않을 수 있습니다
예를 들어 Hydra 기반 멀티 런 또는 하이퍼 파라미터 검색을 재개 할 수 없습니다.
참고 : 이것은 비공식 커뮤니티 프로젝트라는 것을 명심하십시오.
Pytorch Lightning- 고성능 AI 연구를위한 가벼운 파이터 래퍼. Pytorch 코드를 구성하기위한 프레임 워크로 생각하십시오.
Hydra- 복잡한 응용 프로그램을 우아하게 구성하기위한 프레임 워크. 주요 기능은 구성 파일 및 명령 줄을 통해 계층 구성을 동적으로 생성하고이를 재정의하는 기능입니다.
새로운 프로젝트의 디렉토리 구조는 다음과 같습니다.
 ├── .github                   <- Github Actions workflows
│
├── configs                   <- Hydra configs
│   ├── callbacks                <- Callbacks configs
│   ├── data                     <- Data configs
│   ├── debug                    <- Debugging configs
│   ├── experiment               <- Experiment configs
│   ├── extras                   <- Extra utilities configs
│   ├── hparams_search           <- Hyperparameter search configs
│   ├── hydra                    <- Hydra configs
│   ├── local                    <- Local configs
│   ├── logger                   <- Logger configs
│   ├── model                    <- Model configs
│   ├── paths                    <- Project paths configs
│   ├── trainer                  <- Trainer configs
│   │
│   ├── eval.yaml             <- Main config for evaluation
│   └── train.yaml            <- Main config for training
│
├── data                   <- Project data
│
├── logs                   <- Logs generated by hydra and lightning loggers
│
├── notebooks              <- Jupyter notebooks. Naming convention is a number (for ordering),
│                             the creator's initials, and a short `-` delimited description,
│                             e.g. `1.0-jqp-initial-data-exploration.ipynb`.
│
├── scripts                <- Shell scripts
│
├── src                    <- Source code
│   ├── data                     <- Data scripts
│   ├── models                   <- Model scripts
│   ├── utils                    <- Utility scripts
│   │
│   ├── eval.py                  <- Run evaluation
│   └── train.py                 <- Run training
│
├── tests                  <- Tests of any kind
│
├── .env.example              <- Example of file for storing private environment variables
├── .gitignore                <- List of files ignored by git
├── .pre-commit-config.yaml   <- Configuration of pre-commit hooks for code formatting
├── .project-root             <- File for inferring the position of project root directory
├── environment.yaml          <- File for installing conda environment
├── Makefile                  <- Makefile with commands like `make train` or `make test`
├── pyproject.toml            <- Configuration options for testing and linting
├── requirements.txt          <- File for installing python dependencies
├── setup.py                  <- File for installing project as a package
└── README.md
 # clone project
git clone https://github.com/ashleve/lightning-hydra-template
cd lightning-hydra-template

# [OPTIONAL] create conda environment
conda create -n myenv python=3.9
conda activate myenv

# install pytorch according to instructions
# https://pytorch.org/get-started/

# install requirements
pip install -r requirements.txt
템플릿에는 mnist 분류가 포함 된 예제가 포함되어 있습니다.
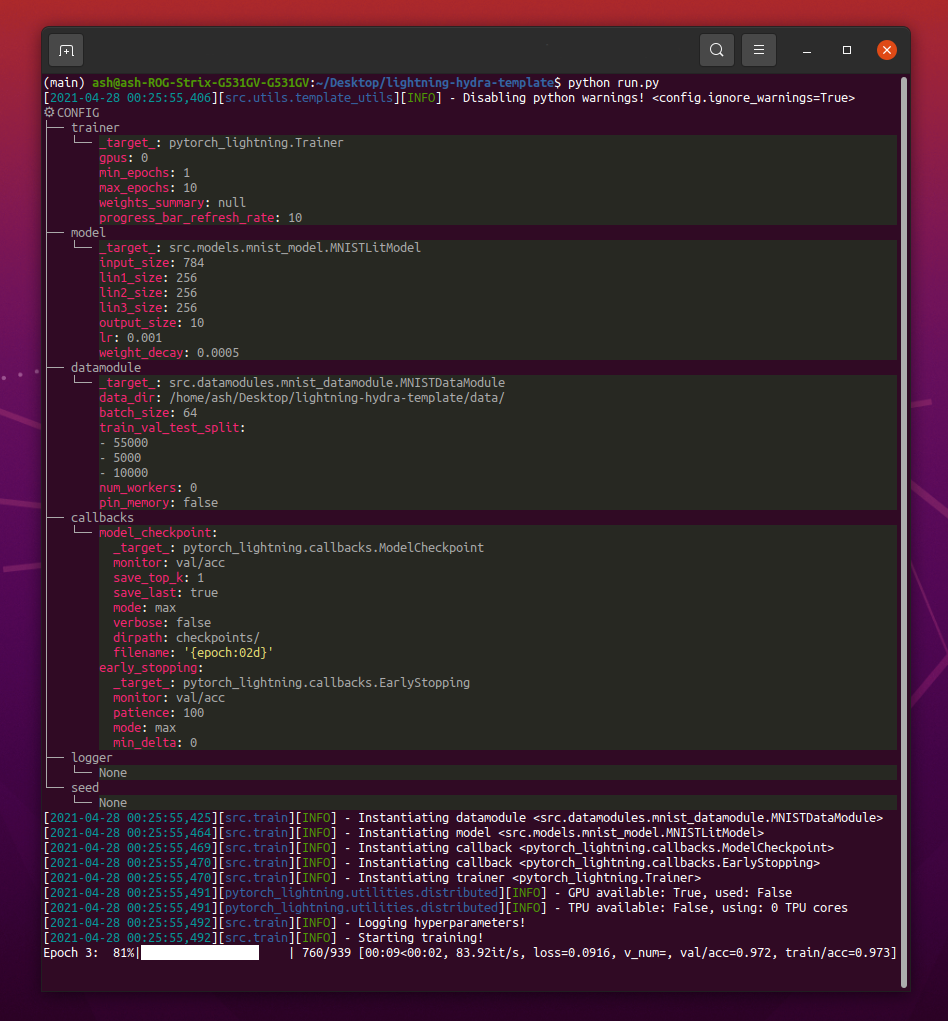
python src/train.py 를 실행할 때는 다음과 같은 것을 볼 수 있습니다.
python train.py trainer.max_epochs=20 model.optimizer.lr=1e-4참고 :
+부호로 새 매개 변수를 추가 할 수도 있습니다.
python train.py +model.new_param= " owo " # train on CPU
python train.py trainer=cpu
# train on 1 GPU
python train.py trainer=gpu
# train on TPU
python train.py +trainer.tpu_cores=8
# train with DDP (Distributed Data Parallel) (4 GPUs)
python train.py trainer=ddp trainer.devices=4
# train with DDP (Distributed Data Parallel) (8 GPUs, 2 nodes)
python train.py trainer=ddp trainer.devices=4 trainer.num_nodes=2
# simulate DDP on CPU processes
python train.py trainer=ddp_sim trainer.devices=2
# accelerate training on mac
python train.py trainer=mps경고 : 현재 DDP 모드에 문제가 있습니다. 자세한 내용을 알아 보려면이 문제를 읽으십시오.
 # train with pytorch native automatic mixed precision (AMP)
python train.py trainer=gpu +trainer.precision=16 # set project and entity names in `configs/logger/wandb`
wandb :
project : " your_project_name "
entity : " your_wandb_team_name " # train model with Weights&Biases (link to wandb dashboard should appear in the terminal)
python train.py logger=wandb참고 : Lightning은 가장 인기있는 로깅 프레임 워크와 편리한 통합을 제공합니다. 여기에서 자세히 알아보십시오.
참고 : WANDB를 사용하려면 먼저 계정을 설정해야합니다. 그 후 아래와 같이 구성을 완료하십시오.
참고 :이 템플릿으로 생성 된 예제 Wandb 대시 보드를 보려면 여기를 클릭하십시오.
python train.py experiment=example참고 : 실험 구성은 구성/실험/에 배치됩니다.
python train.py callbacks=default참고 : 콜백은 모델 검사 점, 조기 정지 등과 같은 것들에 사용할 수 있습니다.
참고 : 콜백 구성은 구성/콜백/에 배치됩니다.
 # gradient clipping may be enabled to avoid exploding gradients
python train.py +trainer.gradient_clip_val=0.5

# run validation loop 4 times during a training epoch
python train.py +trainer.val_check_interval=0.25

# accumulate gradients
python train.py +trainer.accumulate_grad_batches=10

# terminate training after 12 hours
python train.py +trainer.max_time="00:12:00:00"
참고 : Pytorch Lightning은 약 40 개 이상의 유용한 트레이너 플래그를 제공합니다.
 # runs 1 epoch in default debugging mode
# changes logging directory to `logs/debugs/...`
# sets level of all command line loggers to 'DEBUG'
# enforces debug-friendly configuration
python train.py debug=default

# run 1 train, val and test loop, using only 1 batch
python train.py debug=fdr

# print execution time profiling
python train.py debug=profiler

# try overfitting to 1 batch
python train.py debug=overfit

# raise exception if there are any numerical anomalies in tensors, like NaN or +/-inf
python train.py +trainer.detect_anomaly=true

# use only 20% of the data
python train.py +trainer.limit_train_batches=0.2
+trainer.limit_val_batches=0.2 +trainer.limit_test_batches=0.2
참고 : 다른 디버깅 구성을 보려면 configs/ debug/를 방문하십시오.
python train.py ckpt_path="/path/to/ckpt/name.ckpt"참고 : 체크 포인트는 경로 또는 URL 일 수 있습니다.
참고 : 현재 CKPT를로드하는 것은 로거 실험을 재개하지 않지만 향후 번개 릴리스에서 지원됩니다.
python eval.py ckpt_path="/path/to/ckpt/name.ckpt"참고 : 체크 포인트는 경로 또는 URL 일 수 있습니다.
 # this will run 6 experiments one after the other,
# each with different combination of batch_size and learning rate
python train.py -m data.batch_size=32,64,128 model.lr=0.001,0.0005
참고 : Hydra는 작업 시작 시간에 게으르게 구성을 작곡합니다. 작업/스윕을 시작한 후 코드 또는 구성을 변경하면 최종 구성된 구성에 영향을 줄 수 있습니다.
 # this will run hyperparameter search defined in `configs/hparams_search/mnist_optuna.yaml`
# over chosen experiment config
python train.py -m hparams_search=mnist_optuna experiment=example
참고 : Optuna 스위퍼를 사용하면 코드에 보일러 플레이트를 추가 할 필요는 없으므로 모든 것이 단일 구성 파일로 정의됩니다.
경고 : Optuna 스윕은 장애가 발생하지 않습니다 (한 작업 충돌이 발생하면 전체 스윕 충돌이 발생합니다).
python train.py -m ' experiment=glob(*) '참고 : Hydra는 멀티 런의 동작을 제어하기위한 특수 구문을 제공합니다. 여기에서 자세히 알아보십시오. 위의 명령은 구성/실험/에서 모든 실험을 실행합니다.
python train.py -m seed=1,2,3,4,5 trainer.deterministic=True logger=csv tags=[ " benchmark " ]참고 :
trainer.deterministic=True는 Pytorch를 더 결정적이지만 성능에 영향을 미칩니다.
참고 : Hydra 용 Ray AWS 런처를 사용하여 간단한 구성으로 달성 할 수 있어야합니다. 이 템플릿에서는 예제가 구현되지 않습니다.
참고 : Hydra를 사용하면
tab키를 눌러 쉘에서 자동 완성 된 구성 인수를 쉘에서 우선시 할 수 있습니다. 문서를 읽으십시오.
pre-commit run -a참고 : 사전 커밋 후크를 적용하여 자동 형식화 코드 및 구성, 코드 분석 수행 또는 Jupyter 노트북의 출력 제거와 같은 작업을 수행하십시오. 자세한 내용은 모범 사례를 참조하십시오.
.pre-commit-config.yaml 에서 사전 커밋 후크 버전을 업데이트하십시오.
pre-commit autoupdate # run all tests
pytest
# run tests from specific file
pytest tests/test_train.py
# run all tests except the ones marked as slow
pytest -k " not slow "파일 또는 Logger UI에서 쉽게 필터링하려면 각 실험에 태그가 지정되어야합니다.
python train.py tags=[ " mnist " , " experiment_X " ]참고 :
python train.py tags=["mnist","experiment_X"]로 쉘의 브래킷 문자를 피해야 할 수도 있습니다.
태그가 제공되지 않으면 명령 줄에서 태그를 입력하라는 메시지가 표시됩니다.
>>> python train.py tags=[]
[2022-07-11 15:40:09,358][src.utils.utils][INFO] - Enforcing tags ! < cfg.extras.enforce_tags=True >
[2022-07-11 15:40:09,359][src.utils.rich_utils][WARNING] - No tags provided in config. Prompting user to input tags...
Enter a list of comma separated tags (dev):Multirun에 대한 태그가 제공되지 않으면 오류가 발생합니다.
>>> python train.py -m +x=1,2,3 tags=[]
ValueError: Specify tags before launching a multirun !참고 : 명령 줄의 추가 목록은 현재 Hydra에서 지원되지 않습니다.
이 프로젝트는 기부 한 모든 사람들 덕분에 존재합니다.
질문이 있습니까? 버그를 찾았습니까? 특정 기능이 누락 되었습니까? 각 제목 및 설명과 함께 새로운 문제, 토론 또는 PR을 자유롭게 제출하십시오.
문제를 해결하기 전에 다음을 확인하십시오.
main 브랜치에 존재합니다.개선에 대한 제안은 항상 환영합니다!
모든 Pytorch Lightning 모듈은 구성에 지정된 모듈 경로에서 동적으로 인스턴스화됩니다. 예제 모델 구성 :
_target_ : src.models.mnist_model.MNISTLitModule
lr : 0.001
net :
_target_ : src.models.components.simple_dense_net.SimpleDenseNet
input_size : 784
lin1_size : 256
lin2_size : 256
lin3_size : 256
output_size : 10이 구성을 사용하여 다음 줄로 개체를 인스턴스화 할 수 있습니다.
model = hydra . utils . instantiate ( config . model ) 이를 통해 새로운 모델을 쉽게 반복 할 수 있습니다! 새 제품을 만들 때마다 적절한 구성 파일에 모듈 경로와 매개 변수를 지정하십시오.
명령 줄 인수로 모델과 데이터 모드 사이를 전환합니다.
python train.py model=mnist인스턴스화 로직 관리 : SRC/TRAIN.PY 예제 파이프 라인.
위치 : configs/train.yaml
기본 프로젝트 구성에는 기본 교육 구성이 포함되어 있습니다.
명령 python train.py 간단히 실행할 때 구성이 어떻게 구성되는지 결정합니다.
# order of defaults determines the order in which configs override each other
defaults :
- _self_
- data : mnist.yaml
- model : mnist.yaml
- callbacks : default.yaml
- logger : null # set logger here or use command line (e.g. `python train.py logger=csv`)
- trainer : default.yaml
- paths : default.yaml
- extras : default.yaml
- hydra : default.yaml
# experiment configs allow for version control of specific hyperparameters
# e.g. best hyperparameters for given model and datamodule
- experiment : null
# config for hyperparameter optimization
- hparams_search : null
# optional local config for machine/user specific settings
# it's optional since it doesn't need to exist and is excluded from version control
- optional local : default.yaml
# debugging config (enable through command line, e.g. `python train.py debug=default)
- debug : null
# task name, determines output directory path
task_name : " train "
# tags to help you identify your experiments
# you can overwrite this in experiment configs
# overwrite from command line with `python train.py tags="[first_tag, second_tag]"`
# appending lists from command line is currently not supported :(
# https://github.com/facebookresearch/hydra/issues/1547
tags : ["dev"]
# set False to skip model training
train : True
# evaluate on test set, using best model weights achieved during training
# lightning chooses best weights based on the metric specified in checkpoint callback
test : True
# simply provide checkpoint path to resume training
ckpt_path : null
# seed for random number generators in pytorch, numpy and python.random
seed : null 위치 : 구성/실험
실험 구성을 사용하면 기본 구성에서 매개 변수를 덮어 쓸 수 있습니다.
예를 들어,이를 사용하여 모델과 데이터 세트의 각 조합에 대해 최고의 하이퍼 파라미터를 제어 할 수 있습니다.
# @package _global_
# to execute this experiment run:
# python train.py experiment=example
defaults :
- override /data : mnist.yaml
- override /model : mnist.yaml
- override /callbacks : default.yaml
- override /trainer : default.yaml
# all parameters below will be merged with parameters from default configurations set above
# this allows you to overwrite only specified parameters
tags : ["mnist", "simple_dense_net"]
seed : 12345
trainer :
min_epochs : 10
max_epochs : 10
gradient_clip_val : 0.5
model :
optimizer :
lr : 0.002
net :
lin1_size : 128
lin2_size : 256
lin3_size : 64
data :
batch_size : 64
logger :
wandb :
tags : ${tags}
group : " mnist " 기본 워크 플로
python src/train.py experiment=experiment_name.yaml실험 설계
배치 크기와 관련하여 정확도가 어떻게 변하는 지 플롯하기 위해 많은 실행을 실행하고 싶다고 가정 해 봅시다.
태그와 같이 쉽게 식별 할 수있는 일부 구성 매개 변수로 실행을 실행하십시오.
python train.py -m logger=csv data.batch_size=16,32,64,128 tags=[ " batch_size_exp " ] logs/ 폴더를 통해 검색하고 구성에 주어진 태그가 포함 된 실행에서 CSV 로그를 검색하는 스크립트 또는 노트북을 작성하십시오. 결과를 표시하십시오.
Hydra는 실행 된 모든 실행에 대한 새 출력 디렉토리를 만듭니다.
기본 로깅 구조 :
├── logs
│ ├── task_name
│ │ ├── runs # Logs generated by single runs
│ │ │ ├── YYYY-MM-DD_HH-MM-SS # Datetime of the run
│ │ │ │ ├── .hydra # Hydra logs
│ │ │ │ ├── csv # Csv logs
│ │ │ │ ├── wandb # Weights&Biases logs
│ │ │ │ ├── checkpoints # Training checkpoints
│ │ │ │ └── ... # Any other thing saved during training
│ │ │ └── ...
│ │ │
│ │ └── multiruns # Logs generated by multiruns
│ │ ├── YYYY-MM-DD_HH-MM-SS # Datetime of the multirun
│ │ │ ├──1 # Multirun job number
│ │ │ ├──2
│ │ │ └── ...
│ │ └── ...
│ │
│ └── debugs # Logs generated when debugging config is attached
│ └── ...
Hydra 구성에서 경로를 수정 하여이 구조를 변경할 수 있습니다.
Pytorch Lightning은 웨이트 및 바이어스, 해왕성, 혜성, MLFLOW, Tensorboard의 많은 인기있는 벌목 프레임 워크를 지원합니다.
이 도구를 사용하면 초 파라미터 및 출력 메트릭을 추적하고 결과를 비교하고 시각화 할 수 있습니다. 그중 하나를 사용하려면 구성/로거에서 구성을 완료하고 실행합니다.
python train.py logger=logger_name한 번에 많은 것을 사용할 수 있습니다 (예 : configs/logger/many_loggers.yaml 참조).
자신의 로거를 쓸 수도 있습니다.
Lightning은 LightningModule 내부에서 사용자 정의 메트릭을 기록하는 편리한 방법을 제공합니다. 문서를 읽거나 mnist 예제를 살펴보십시오.
템플릿에는 pytest 와 함께 구현 된 일반 테스트가 제공됩니다.
 # run all tests
pytest

# run tests from specific file
pytest tests/test_train.py

# run all tests except the ones marked as slow
pytest -k " not slow "구현 된 테스트의 대부분은 특정 출력을 확인하지 않습니다. 일부 명령을 실행하는 것이 예외를 던지지 않는지 확인하기 위해 존재합니다. 개발 속도를 높이기 위해 가끔씩 실행할 수 있습니다.
현재 테스트는 다음과 같은 사례를 보장합니다.
그리고 다른 많은 사람들. 사용 사례를 위해 쉽게 수정할 수 있어야합니다.
@RunIf Decorator도 구현되어있어 특정 조건이 충족되는 경우에만 테스트를 실행할 수 있습니다. 예 : GPU를 사용할 수 있거나 시스템이 Windows가 아닙니다. 예제를 참조하십시오.
configs/hparams_search에 새 구성 파일을 추가하여 하이퍼 파라미터 검색을 정의 할 수 있습니다.
 # @package _global_

defaults :
  - override /hydra/sweeper : optuna

# choose metric which will be optimized by Optuna
# make sure this is the correct name of some metric logged in lightning module!
optimized_metric : " val/acc_best "

# here we define Optuna hyperparameter search
# it optimizes for value returned from function with @hydra.main decorator
hydra :
  sweeper :
    _target_ : hydra_plugins.hydra_optuna_sweeper.optuna_sweeper.OptunaSweeper

    # 'minimize' or 'maximize' the objective
    direction : maximize

    # total number of runs that will be executed
    n_trials : 20

    # choose Optuna hyperparameter sampler
    # docs: https://optuna.readthedocs.io/en/stable/reference/samplers.html
    sampler :
      _target_ : optuna.samplers.TPESampler
      seed : 1234
      n_startup_trials : 10 # number of random sampling runs before optimization starts

    # define hyperparameter search space
    params :
      model.optimizer.lr : interval(0.0001, 0.1)
      data.batch_size : choice(32, 64, 128, 256)
      model.net.lin1_size : choice(64, 128, 256)
      model.net.lin2_size : choice(64, 128, 256)
      model.net.lin3_size : choice(32, 64, 128, 256)
다음으로 : python train.py -m hparams_search=mnist_optuna 로 실행하십시오
이 접근법을 사용하면 코드에 보일러 플레이트를 추가 할 필요는 없으므로 모든 것이 단일 구성 파일로 정의됩니다. 필요한 유일한 것은 시작 파일에서 최적화 된 메트릭 값을 반환하는 것입니다.
Optuna, Ax 또는 Never Grad와 같은 Hydra와 통합 된 다양한 최적화 프레임 워크를 사용할 수 있습니다.
optimization_results.yaml 은 logs/task_name/multirun 폴더에서 사용할 수 있습니다.
이 접근법은 중단 된 검색 및 고급 기술을 재개하는 것을 지원하지 않습니다.보다 정교한 검색 및 워크 플로를 위해서는 전용 최적화 작업 (멀티 런 기능없이)을 작성해야합니다.
템플릿은 GitHub 작업에서 구현 된 CI 워크 플로와 함께 제공됩니다.
.github/workflows/test.yaml : pytest로 모든 테스트를 실행합니다.github/workflows/code-quality-main.yaml : 모든 파일의 기본 지점에서 사전 커뮤트 실행.github/workflows/code-quality-pr.yaml : 수정 된 파일에 대한 풀 요청에서 사전 커밋 실행 Lightning은 분산 교육을 수행하는 여러 가지 방법을 지원합니다. 가장 일반적인 것은 DDP이며, 각 GPU에 대해 별도의 프로세스와 그 사이의 평균 그라디언트를 스폰합니다. 다른 접근법에 대해 배우려면 번개 문서를 읽으십시오.
다음과 같은 4 개의 GPU로 MNIST 예제에서 DDP를 실행할 수 있습니다.
python train.py trainer=ddp참고 : DDP를 사용하는 경우 모델 작성 방법을주의해야합니다. 문서를 읽으십시오.
가장 간단한 방법은 초기화에 대한 모델로 직접 데이터 모드 속성을 전달하는 것입니다.
 # ./src/train.py
datamodule = hydra . utils . instantiate ( config . data )
model = hydra . utils . instantiate ( config . model , some_param = datamodule . some_param )
참고 : 모든 데이터 모드에는
some_paramDatamodules가 사용할 수 있다고 가정하기 때문에 매우 강력한 솔루션은 아닙니다.
마찬가지로 전체 데이터 모드 구성을 Init 매개 변수로 전달할 수 있습니다.
 # ./src/train.py
model = hydra . utils . instantiate ( config . model , dm_conf = config . data , _recursive_ = False )
가변 보간을 통해 데이터 모드 구성 매개 변수를 모델에 전달할 수도 있습니다.
 # ./configs/model/my_model.yaml
_target_ : src.models.my_module.MyLitModule
lr : 0.01
some_param : ${data.some_param}
또 다른 방법은 트레이너를 통해 직접 LightningModule의 DatamoDule에 액세스하는 것입니다.
 # ./src/models/mnist_module.py
def on_train_start ( self ):
  self . some_param = self . trainer . datamodule . some_param
참고 : 교육이 시작된 후에 만 작동하지 않으면 트레이너가 아직 LightningModule에서 사용할 수 없습니다.
일반적으로 완전한 아나콘다 환경을 설치하는 것은 불필요합니다. 미니콘다는 충분해야합니다 (약 80MB).
Conda의 큰 장점은 특정 컴파일러 또는 라이브러리를 시스템에 사용할 수 있도록 패키지를 설치할 수 없다는 것입니다 (사전 컴파일 된 바이너리를 설치하므로) 종종 GPU 지원을 위해 Cudatoolkit (예 : Cudatoolkit)을 더 쉽게 설치할 수 있습니다.
또한 모든 프로젝트에 새로운 지역 환경을 만드는 것보다 더 편리 할 수있는 전 세계 환경에 액세스 할 수 있습니다.
예제 설치 :
wget https://repo.anaconda.com/miniconda/Miniconda3-latest-Linux-x86_64.sh
bash Miniconda3-latest-Linux-x86_64.sh
콘다 업데이트 :
conda update -n base -c defaults conda새로운 콘다 환경 만들기 :
conda create -n myenv python=3.10
conda activate myenv 사전 커밋 후크를 사용하여 프로젝트의 코드 형식을 표준화하고 정신 에너지를 절약하십시오.
다음과 같이 사전 커밋 패키지를 설치하기 만하면됩니다.
pip install pre-commit다음으로 .pre-commit-config.yaml에서 후크를 설치하십시오.
pre-commit install그 후 귀하의 코드는 모든 새로운 커밋에서 자동으로 재구성됩니다.
프로젝트에서 모든 파일을 재구성하려면 사용 명령을 사용합니다.
pre-commit run -a.pre-commit-config.yaml에서 후크 버전을 업데이트하려면 :
pre-commit autoupdate 시스템 별 변수 (예 : 데이터 세트에 대한 절대 경로)는 버전 제어 중이거나 다른 사용자 간의 충돌을 초래하지 않아야합니다. 유출을 원하지 않기 때문에 개인 키도 버전을 사용해서는 안됩니다.
템플릿에는 .env.example 파일이 포함되어 있으며 예제로 사용됩니다. .env 라는 새 파일을 만듭니다 (이 이름은 .gitignore의 버전 컨트롤에서 제외). 이와 같은 환경 변수를 저장하는 데 사용해야합니다.
MY_VAR=/home/user/my_system_path
.env 의 모든 변수는 train.py 에 자동으로로드됩니다.
Hydra는 다음과 같은 .yaml 구성에서 ENV 변수를 참조 할 수 있습니다.
path_to_data : ${oc.env:MY_VAR} 사용중인 로거에 따라 / 문자로 메트릭 이름을 정의하는 것이 종종 유용합니다.
self . log ( "train/loss" , loss )이런 식으로 로거는 메트릭을 다른 섹션에 속하는 것으로 취급하여 UI로 구성하는 데 도움이됩니다.
공식 Torchmetrics 라이브러리를 사용하여 메트릭을 올바르게 계산하십시오. 이것은 다중 GPU 교육에 특히 중요합니다!
예를 들어, 정확도를 직접 계산하는 대신 제공된 Accuracy 클래스를 사용해야합니다.
 from torchmetrics . classification . accuracy import Accuracy


class LitModel ( LightningModule ):
    def __init__ ( self )
        self . train_acc = Accuracy ()
        self . val_acc = Accuracy ()

    def training_step ( self , batch , batch_idx ):
        ...
        acc = self . train_acc ( predictions , targets )
        self . log ( "train/acc" , acc )
        ...

    def validation_step ( self , batch , batch_idx ):
        ...
        acc = self . val_acc ( predictions , targets )
        self . log ( "val/acc" , acc )
        ...
각 단계마다 다른 메트릭 인스턴스를 사용하여 모든 GPU 프로세스에 비해 적절한 가치 감소를 보장하십시오.
Torchmetrics는 F1 점수 또는 혼동 행렬과 같은 대부분의 사용 사례에 대한 메트릭을 제공합니다. 자세한 내용은 문서를 읽으십시오.
스타일 가이드는 여기에서 제공됩니다.
당신의 초기에 명시하십시오. 사용자가 추측 할 필요가 없도록 모든 관련 기본값을 정의하십시오. 유형 힌트를 제공합니다. 이렇게하면 프로젝트에서 모듈이 재사용됩니다!
 class LitModel ( LightningModule ):
    def __init__ ( self , layer_size : int = 256 , lr : float = 0.001 ):
권장 방법 순서를 유지하십시오.
 class LitModel ( LightningModule ):

    def __init__ ():
        ...

    def forward ():
        ...

    def training_step ():
        ...

    def training_step_end ():
        ...

    def on_train_epoch_end ():
        ...

    def validation_step ():
        ...

    def validation_step_end ():
        ...

    def on_validation_epoch_end ():
        ...

    def test_step ():
        ...

    def test_step_end ():
        ...

    def on_test_epoch_end ():
        ...

    def configure_optimizers ():
        ...

    def any_extra_hook ():
... DVC를 사용하여 데이터 또는 훈련 된 ML 모델과 같은 큰 파일을 제어하십시오.
DVC 저장소를 초기화하려면 :
dvc init 파일 또는 디렉토리 추적을 시작하려면 dvc add 사용하십시오.
dvc add data/MNISTDVC는 인간이 읽을 수있는 형식의 작은 텍스트 파일 인 data/mnist.dvc라는 특수 .dvc 파일에 추가 된 파일 (또는 디렉토리)에 대한 정보를 저장합니다. 이 파일은 원래 데이터의 자리 표시 자로 git을 사용하여 소스 코드처럼 쉽게 버전으로 만들 수 있습니다.
git add data/MNIST.dvc data/.gitignore
git commit -m " Add raw data " 다른 사람들이 자신의 프로젝트에서 모듈을 쉽게 사용할 수 있습니다. src 폴더의 이름을 프로젝트 이름으로 변경하고 setup.py 파일을 작성하십시오.
이제 프로젝트를 로컬 파일에서 설치할 수 있습니다.
pip install -e .또는 git 저장소에서 직접 :
pip install git+git://github.com/YourGithubName/your-repo-name.git --upgrade따라서 모든 파일을 다른 파일로 쉽게 가져올 수 있습니다.
 from project_name . models . mnist_module import MNISTLitModule
from project_name . data . mnist_datamodule import MNISTDataModule일부 구성은 사용자/머신/설치 특정 (예 : 로컬 클러스터 구성 또는 특정 시스템의 하드 드라이브 경로)입니다. 이러한 시나리오의 경우 파일 구성/로컬/Default.yaml이 자동으로로드되지만 GIT에서 추적하지는 않습니다.
예를 들어 Slurm 클러스터 구성에 사용할 수 있습니다.
 # @package _global_

defaults :
  - override /hydra/launcher@_here_ : submitit_slurm

data_dir : /mnt/scratch/data/

hydra :
  launcher :
    timeout_min : 1440
    gpus_per_task : 1
    gres : gpu:1
  job :
    env_set :
      MY_VAR : /home/user/my/system/path
MY_KEY : asdgjhawi8y23ihsghsueity23ihwd 이 템플릿은 다음에서 영감을 얻었습니다.
기타 유용한 저장소 :
Lightning-Hydra-Template는 MIT 라이센스에 따라 라이센스가 부여됩니다.
 MIT License

Copyright (c) 2021 ashleve

Permission is hereby granted, free of charge, to any person obtaining a copy
of this software and associated documentation files (the "Software"), to deal
in the Software without restriction, including without limitation the rights
to use, copy, modify, merge, publish, distribute, sublicense, and/or sell
copies of the Software, and to permit persons to whom the Software is
furnished to do so, subject to the following conditions:

The above copyright notice and this permission notice shall be included in all
copies or substantial portions of the Software.

THE SOFTWARE IS PROVIDED "AS IS", WITHOUT WARRANTY OF ANY KIND, EXPRESS OR
IMPLIED, INCLUDING BUT NOT LIMITED TO THE WARRANTIES OF MERCHANTABILITY,
FITNESS FOR A PARTICULAR PURPOSE AND NONINFRINGEMENT. IN NO EVENT SHALL THE
AUTHORS OR COPYRIGHT HOLDERS BE LIABLE FOR ANY CLAIM, DAMAGES OR OTHER
LIABILITY, WHETHER IN AN ACTION OF CONTRACT, TORT OR OTHERWISE, ARISING FROM,
OUT OF OR IN CONNECTION WITH THE SOFTWARE OR THE USE OR OTHER DEALINGS IN THE
SOFTWARE.
프로젝트의 위의 모든 것을 삭제하십시오
그것이하는 일
 # clone project
git clone https://github.com/YourGithubName/your-repo-name
cd your-repo-name

# [OPTIONAL] create conda environment
conda create -n myenv python=3.9
conda activate myenv

# install pytorch according to instructions
# https://pytorch.org/get-started/

# install requirements
pip install -r requirements.txt # clone project
git clone https://github.com/YourGithubName/your-repo-name
cd your-repo-name
# create conda environment and install dependencies
conda env create -f environment.yaml -n myenv
# activate conda environment
conda activate myenv기본 구성이있는 열차 모델
 # train on CPU
python src/train.py trainer=cpu

# train on GPU
python src/train.py trainer=gpu
구성/실험에서 선택한 실험 구성을 가진 열차 모델/
python src/train.py experiment=experiment_name.yaml이와 같이 명령 줄에서 모든 매개 변수를 재정의 할 수 있습니다.
python src/train.py trainer.max_epochs=20 data.batch_size=64

