pynotif
1.0.0
libnotify 액세스하기위한 또 다른 Python API와 알림 사운드 지원 ( vlc 백엔드 포함) .
주의 : 항상 선호하는 선택이 아닐 수도 있습니다. 그러나 그것은 꽤 확실합니다. 당신은 새로운 것을 배우게 될 것입니다.
Solus Linux 에서 설치 절차를 시연하겠습니다.
gcc , glibc , glibc-devel 설치되어 있는지 확인하십시오. gcc 9.3.0 사용하겠습니다. $ sudo eopkg it gcc, glibc, glibc-devel
$ gcc --version # check versionCython 설치하려면 pip 도 설치하겠습니다. Python3.7.6 사용하고 있습니다. $ sudo eopkg it python3, python3-devel, pip
$ python3 --version
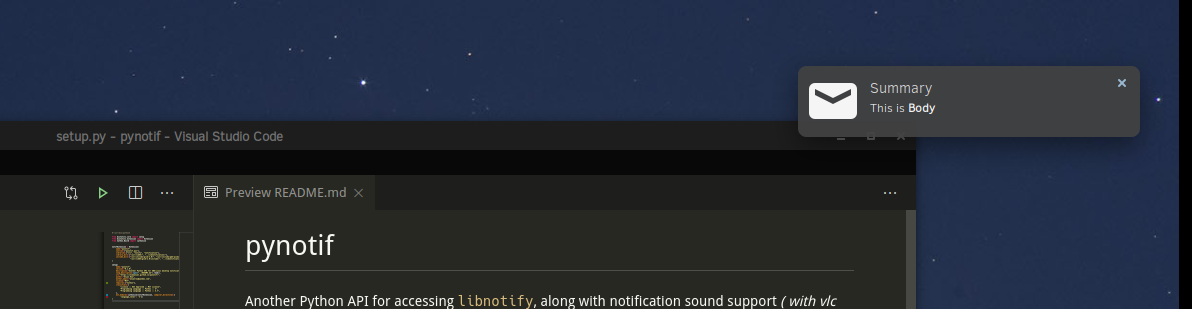
$ python3 -m pip install --user Cythonlibnotify , libnotify-devel 설치하겠습니다. 이는 C-Library에서 Libnotify와 대화하기위한 프로그래밍 방식 인터페이스를 제공 할 것입니다. $ sudo eopkg it libnotify libnotify-devel$ notify-send " Summary " " Body of Notification "vlc 는 사용자를 알리는 데 도움이 될 수 있습니다. $ sudo eopkg it vlc vlc-devel먼저 기계의 디렉토리 계층 구조에서 편리한 위치로 이동 하여이 repo를 복제하고 작업을 시작할 수 있습니다.
$ git clone https://github.com/itzmeanjan/pynotif.git pynotif 디렉토리에 들어가서 디렉토리의 내용을 확인하십시오.
$ cd pynotif
$ tree -h
.
├── [4.0K]  libnotification
│   ├── [2.4K]  play_sound.c
│   ├── [  45]  play_sound.h
│   ├── [2.4K]  send_notification.c
│   └── [ 235]  send_notification.h
├── [1.0K]  LICENSE
├── [4.0K]  pynotif
│   ├── [1.5K]  pynotif.pyx
│   └── [1.1K]  setup.py
├── [7.0K]  README.md
├── [4.0K]  sound
│   ├── [ 30K]  button_sound.wav
│   └── [ 29K]  when.mp3
└── [4.0K]  ss
    └── [ 71K]  screenshot.png

4 directories, 11 files
먼저 우리는 정적 C- 라이브러리로 편집 될 수있는 libnotification 에 갈 것입니다. 파일 이름은 어떤 목적으로 봉사하는지에 대해 매우 자명합니다.
$ cd libnotification
$ ls
play_sound.c  play_sound.h  send_notification.c  send_notification.h
이러한 각 C 파일을 컴파일하고 객체 코드를 생성 할 시간입니다.
$ gcc -c play_sound.c
$ gcc -I /usr/include/glib-2.0/ -I /usr/include/gdk-pixbuf-2.0/ -I /usr/lib64/glib-2.0/include/ -c send_notification.c
이제이 객체 파일을 정적 라이브러리로 보관해야하며 Cython Code (*.pyx 파일) 에서 호출됩니다.
$ ar rcs libnotification.a play_sound.o send_notification.o정적 라이브러리를 얻었으므로 컴파일 된 객체 코드를 지금 제거 할 수 있습니다. 생성 된 정적 라이브러리의 종류를 확인하는 것을 고려할 수 있습니다.
$ rm * .o
$ file libnotification.a
libnotification.a: current ar archive
이제 C-Library, libnotification.a 대화하는 데 필요한 Cython 코드를 보유한 pynotif 디렉토리에 들어갑니다.
$ cd ../pynotif
$ ls
pynotif.pyx  setup.py
pynotif.pyx libnotification.a 와 인터페이스를위한 Cython 코드를 보유하고 있으며, 이는 동등한 C 코드 (Cython 컴파일러 사용) 로 컴파일됩니다. 그런 다음 Python에서 호출 할 수있는 C Extension Library (동적으로 연결된 라이브러리) 를 구축 할 것입니다.
$ python3 setup.py build_ext --inplace
Compiling pynotif.pyx because it changed.
[1/1] Cythonizing pynotif.pyx
running build_ext
building ' pynotif ' extension
creating build
creating build/temp.linux-x86_64-3.7
x86_64-solus-linux-gcc -pthread -Wno-unused-result -Wsign-compare -DNDEBUG -g -fwrapv -O3 -Wall -mtune=generic -march=x86-64 -g2 -pipe -fPIC -Wformat -Wformat-security -D_FORTIFY_SOURCE=2 -fstack-protector-strong --param ssp-buffer-size=32 -fasynchronous-unwind-tables -ftree-vectorize -feliminate-unused-debug-types -Wall -Wno-error -Wp,-D_REENTRANT -fno-semantic-interposition -O3 -falign-functions=32 -I/usr/include -mtune=generic -march=x86-64 -g2 -pipe -fPIC -Wformat -Wformat-security -D_FORTIFY_SOURCE=2 -fstack-protector-strong --param ssp-buffer-size=32 -fasynchronous-unwind-tables -ftree-vectorize -feliminate-unused-debug-types -Wall -Wno-error -Wp,-D_REENTRANT -fno-semantic-interposition -O3 -falign-functions=32 -fPIC -I/usr/include/glib-2.0/ -I/usr/include/gdk-pixbuf-2.0/ -I/usr/lib64/glib-2.0/include/ -I../libnotification/ -I/usr/include/python3.7m -c pynotif.c -o build/temp.linux-x86_64-3.7/pynotif.o
x86_64-solus-linux-gcc -pthread -shared -Wl,--copy-dt-needed-entries -Wl,-O1 -Wl,-z,relro -Wl,-z,now -Wl,-z,max-page-size=0x1000 -Wl,-Bsymbolic-functions -Wl,--sort-common -Wl,--copy-dt-needed-entries -Wl,-O1 -Wl,-z,relro -Wl,-z,now -Wl,-z,max-page-size=0x1000 -Wl,-Bsymbolic-functions -Wl,--sort-common build/temp.linux-x86_64-3.7/pynotif.o -L/usr/lib64/ -L../libnotification/ -L/usr/lib64 -lvlc -lnotify -lnotification -lpython3.7m -o /home/anjan/Documents/my_programs/still_working/open/pynotif/pynotif/pynotif.cpython-37m-x86_64-linux-gnu.so

$ tree -h
.
├── [4.0K]  build
│   └── [4.0K]  temp.linux-x86_64-3.7
│       └── [203K]  pynotif.o
├── [125K]  pynotif.c
├── [146K]  pynotif.cpython-37m-x86_64-linux-gnu.so
├── [1.5K]  pynotif.pyx
└── [1.1K]  setup.py

2 directories, 5 files
pynotif.*.so 있습니다. ./build directory & pynotif.c 삭제할 수 있습니다. 그러나 Cython 컴파일러에 의해 pynotif.pyx 에서 C 코드를 생성 한 pynotif.c 를 살펴 보는 데 관심이있을 수 있습니다.
$ rm build/ pynotif.c -rv
$ file pynotif.cpython- * .so # check it out
이제 pynotif 사용할 수 있지만이 작업 디렉토리에서만 사용할 수 있습니다. 먼저 확인하겠습니다.
$ python3
>>> import pynotif
>>> pynotif.__version__
' 0.1.0 '
>>> pynotif.startNotif(b " My Application " )
1
>>> pynotif.sendNotif(b " Summary " , b " Body of Notification " , 2, 1, b " /path/to/icon/file " , b " /path/to/notification/sound/file " )
1
>> pynotif.stopNotif ()
>>> help ()
help > pynotif # shows you API documentation
...
그러나 우리는이 컴퓨터에 설치된 모든 스크립트에서 사용할 수 있도록하고 싶습니다. 그런 다음이 라이브러리를 일부 표준 위치에 설치합니다.
$ python3 setup.py install --user 이제 $HOME 디렉토리로 이동하여 Python3 Relp 프롬프트를 호출하십시오.
$ cd
$ python3
>> import pynotif # and it works as expected
축하합니다. C-Library에서 pynotif 성공적으로 구축하고 설치했습니다. 이제 원하는대로 사용하십시오.
감사합니다


