tvision
1.0.0
텍스트 기반 사용자 인터페이스를위한 전형적인 프레임 워크 인 Turbo Vision 2.0의 현대 포트. 이제 크로스 플랫폼 및 유니 코드 지원이 있습니다.
나는 이것을 2018 년 말에 개인 프로젝트로 시작했습니다. 2020 년 5 월까지 나는 그것이 원본과의 패리티와 매우 가깝다고 생각하고 그것을 개방하기로 결정했습니다.
이 프로젝트의 원래 목표는 다음과 같습니다.
어느 시점에서 내가 충분히 해냈다 고 생각했고, 라이브러리를 개조하고 원래 제한을 극복하려는 시도는 API를 확장하거나 뒤로 호환되는 것을 필요로하며 주요 재 작성이 가장 필요할 것입니다.
그러나 2020 년 7 월과 8 월 사이에 본격적인 유니 코드 지원을 기존 아키텍처에 통합하는 방법을 찾았고 터보 텍스트 편집기를 썼으며 Windows에서 새로운 기능을 사용할 수있었습니다. 따라서 Turbo Vision은 이제 현대 사용자와 프로그래머의 많은 기대를 충족시킬 수 있다고 확신합니다.
이 프로젝트의 원래 위치는 https://github.com/magiblot/tvision입니다.
Borland가 90 년대 초에 Turbo Vision을 만든 이후로 많은 변화가있었습니다. 오늘날 많은 GUI 도구는 동작 사양과 별도의 모양 사양을 분리하고, 오류에 대해 구분하지 않는 안전하거나 동적 언어를 사용하며, 병렬 또는 비동기 프로그래밍 또는 둘 다를 지원합니다.
터보 비전은 그 중 어느 것도 탁월하지 않지만 터미널 응용 프로그램을 작성할 때 프로그래머가 여전히 직면하는 많은 문제를 확실히 극복합니다.
터미널 기능과 직접 터미널 I/O를 잊어 버리십시오. Turbo Vision 응용 프로그램을 작성할 때 신경 쓰는 것은 응용 프로그램의 행동과 모양입니다. 코드에 해결 방법을 추가 할 필요가 없습니다. Turbo Vision은 모든 환경에서 동일한 결과를 얻으려고 최선을 다합니다. 예를 들어, Linux 콘솔에서 밝은 배경색을 얻으려면 Blink 속성을 설정해야합니다. 터보 비전은 당신을 위해 이것을합니다.
이미 수행 된 일을 재사용하십시오. Turbo Vision은 RESIZAL, 중첩 창, 풀다운 메뉴, 대화 상자, 버튼, 스크롤 막대, 입력 상자, 확인란 및 라디오 버튼을 포함하여 많은 위젯 클래스 ( 보기 라고도 함)를 제공합니다. 당신은 이것을 사용하고 확장 할 수 있습니다. 그러나 자신만의 생성을 선호하더라도 터보 비전은 이미 이벤트 파견, 풀폭 유니 코드 문자 표시 등을 처리합니다.
Linux와 Windows에서 작동하는 텍스트 기반 인터페이스 (따라서 크로스 플랫폼)에서 #ifdef 가없는 상자가없는 텍스트 기반 인터페이스를 작성하는 것을 상상할 수 있습니까? 터보 비전은 이것을 가능하게 만듭니다. 첫째 : Turbo Vision은 구현 정의 및 플랫폼 의존적 wchar_t 또는 TCHAR 에 의존하는 대신 char Array를 계속 사용합니다. 두 번째 : 최근 Microsoft의 RTL 버전에서 setlocale 의 UTF-8 지원 덕분에 다음과 같은 코드는 다음과 같습니다.
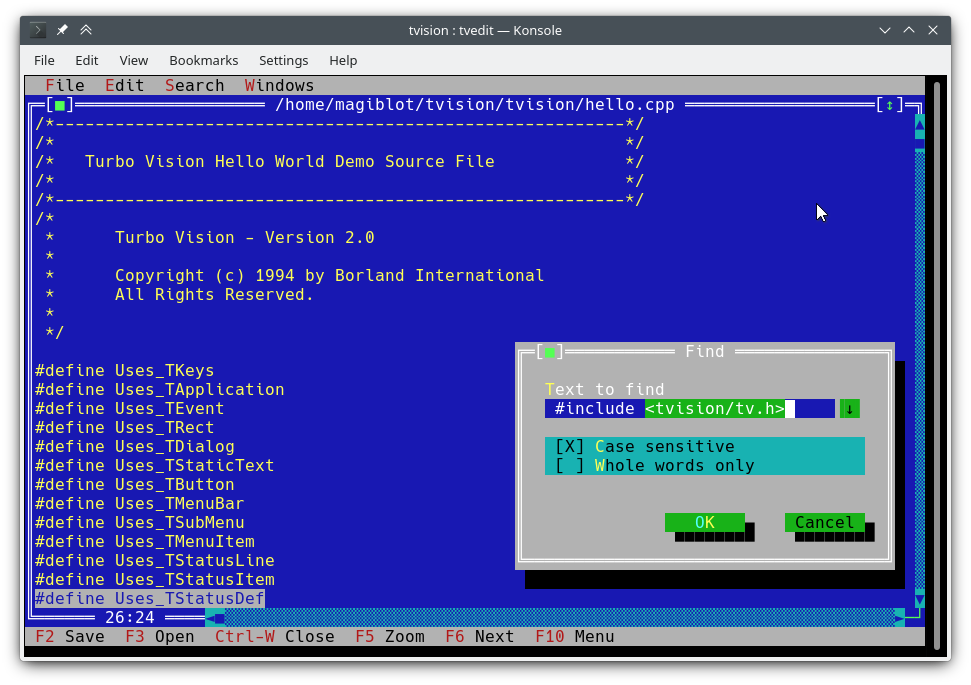
std::ifstream f ( "コンピュータ.txt " ); // On Windows, the RTL converts this to the system encoding on-the-fly. C ++ 사용자 가이드의 터보 비전을 시작하고 샘플 응용 프로그램 hello , tvdemo 및 tvedit 살펴보십시오. 기본 사항을 파악하면 Turbo Vision 2.0 프로그래밍 안내서를 살펴 보는 것이 좋습니다. 이는 제 생각에 Pascal을 사용하더라도 더 직관적이고 이해하기 쉽습니다. 그때까지 palette 예제에 관심이있을 것입니다. 여기에는 팔레트 사용 방법에 대한 자세한 설명이 포함되어 있습니다.
기능 및 API 변경 섹션도 확인하는 것을 잊지 마십시오.
이 프로젝트에는 당분간 안정적인 릴리스가 없습니다. 개발자 인 경우 최신 커밋을 고수하고 업그레이드하는 동안 찾은 문제를보고하십시오.
데모 애플리케이션을 테스트하려는 경우 :
examples-dos32.zip : Borland C ++로 제작 된 32 비트 실행 파일. 유니 코드 지원이 없습니다.examples-x86.zip : MSVC로 구축 된 32 비트 실행 파일. Windows Vista 이상이 필요합니다.examples-x64.zip : MSVC로 구축 된 64 비트 실행 파일. X64 Windows Vista 이상이 필요합니다. 터보 비전은 CMake 및 GCC/Clang을 갖춘 정적 라이브러리로 구축 할 수 있습니다.
cmake . -B ./build -DCMAKE_BUILD_TYPE=Release && # Could also be 'Debug', 'MinSizeRel' or 'RelWithDebInfo'.
cmake --build ./build # or `cd ./build; make`
3.13보다 오래된 CMAKE 버전은 -B 옵션을 지원하지 않을 수 있습니다. 대신 다음을 시도 할 수 있습니다.
mkdir -p build ; cd build
cmake .. -DCMAKE_BUILD_TYPE=Release &&
cmake --build .
위는 다음 파일을 생성합니다.
libtvision.a , Turbo Vision Library입니다.hello , tvdemo , tvedit , tvdir 은 원래 터보 비전과 함께 번들로 제공되었습니다 (일부는 몇 가지 개선 사항이 있지만).mmenu 및 Borland의 기술 지원의 palette .tvhc , 터보 비전 도움말 컴파일러. 라이브러리 및 실행 파일은 ./build 에서 찾을 수 있습니다.
빌드 요구 사항은 다음과 같습니다.
libncursesw ( 'w'참고).libgpm (선택 사항). 배포판이 별도의 개발 패키지 (예 : libncurses-dev , Debian 기반 배포판의 libgpm-dev )를 제공하는 경우 이것도 설치하십시오.
런타임 요구 사항은 다음과 같습니다.
xsel 또는 xclip .wl-clipboard . 이 프로젝트의 루트에서 터보 비전 응용 프로그램 (예 : hello.cpp )을 구축하는 데 필요한 최소 명령 줄은 다음과 같습니다.
g++ -std=c++14 -o hello hello.cpp ./build/libtvision.a -Iinclude -lncursesw -lgpm또한 필요할 수도 있습니다.
-Iinclude/tvision 응용 프로그램에 터보 비전을 사용하는 경우 1.x가 포함됩니다 ( #include <tv.h> #include <tvision/tv.h> ).
-Iinclude/tvision/compat/borland 응용 프로그램에 Borland 헤더 ( dir.h , iostream.h 등)가 포함 된 경우.
gentoo (및 아마도 다른 사람들) : -ltinfow libtinfo.so 와 libtinfow.so 가 시스템에서 사용할 수 있다면. 그렇지 않으면 터보 비전 응용 프로그램 (#11)을 실행할 때 세분화 오류가 발생할 수 있습니다. tinfo ncurses 와 함께 번들로 제공됩니다.
-lgpm Turbo Vision이 libgpm 지원으로 구축 된 경우에만 필요합니다.
include/tvision/compat/borland 의 후진 호환 헤더는 Borland C ++ RTL을 모방합니다. Turbo Vision의 소스 코드는 여전히 그것에 의존하며 이전 응용 프로그램을 포팅하는 경우 유용 할 수 있습니다. 이것은 또한 tvision/tv.h 포함하여 여러 std 이름을 글로벌 네임 스페이스에 가져올 것임을 의미합니다.
MSVC를 사용한 빌드 프로세스는 더 많은 옵션 중에서 선택할 수 있으므로 약간 더 복잡합니다. 다른 대상 아키텍처에 대해 다른 빌드 디렉토리가 필요합니다. 예를 들어, 최적화 된 바이너리를 생성합니다.
cmake . -B ./build && # Add '-A x64' (64-bit) or '-A Win32' (32-bit) to override the default platform.
cmake --build ./build --config Release # Could also be 'Debug', 'MinSizeRel' or 'RelWithDebInfo'.
위의 예에서, tvision.lib 및 예제 응용 프로그램은 ./build/Release 에 배치됩니다.
Turbo Vision을 Microsoft의 런타임 라이브러리 ( /MT 대신 /MD )와 정적으로 연결하려면 TV_USE_STATIC_RTL 옵션 ( cmake 호출 할 때 -DTV_USE_STATIC_RTL=ON ) TV_USE_STATIC_RTL 옵션을 활성화하십시오.
Turbo Vision에 응용 프로그램을 연결하려면 MSVC를 사용하면 / /MD /MT 혼합하거나 비 데그 이항과 디버그 할 수 없습니다. 모든 구성 요소는 RTL에 동일한 방식으로 연결되어야합니다.
자신의 Turbo Vision Application을 개발하는 경우 다음 컴파일러 플래그를 활성화하십시오. 그렇지 않으면 <tvision/tv.h> 포함 할 때 컴파일 오류가 발생합니다.
 /permissive-
/Zc:__cplusplus
Turbo Vision을 CMAKE 하위 모듈로 사용하면이 플래그가 자동으로 활성화됩니다.
참고 : Turbo Vision은 setlocale 사용하여 UTF-8 모드에서 RTL 기능을 설정합니다. 기존 버전의 RTL을 사용하는 경우 작동하지 않습니다.
RTL이 정적으로 연결되어 있고 setlocale 에서 UTF-8이 지원되는 경우 Turbo Vision Applications는 휴대용이며 Windows Vista 에서 기본적으로 작동합니다.
MINGW 환경이 올바르게 설정되면 Linux와 유사한 방식으로 빌드가 수행됩니다.
cmake . -B ./build -G " MinGW Makefiles " -DCMAKE_BUILD_TYPE=Release &&
cmake --build ./build
위의 예에서는 libtvision.a 및 모든 예제가 ./build 에 있습니다. TV_BUILD_EXAMPLES 옵션이 ON 있습니다 (기본값).
Turbo Vision에 응용 프로그램을 연결하려면 -L./build/lib -ltvision 링커에 추가하고 컴파일러에 -I./include 추가하십시오.
터보 비전은 여전히 Borland C ++가있는 DOS 또는 Windows 라이브러리로 제작할 수 있습니다. 분명히 여기에는 유니 코드 지원이 없습니다.
빌드 프로세스가 다음과 같이 작동하는 것을 확인할 수 있습니다.
빌드 환경에 따라 다른 문제에 직면 할 수 있습니다. 예를 들어, 터보 어셈블러는 Windows 95에서 작동하기 위해 패치가 필요합니다. Windows XP에서는 모든 것이 잘 작동하는 것 같습니다. Windows 10에서 Make Make는 Fatal: Command arguments too long Borland C ++ 5.x로 번들로 연결하여 만들 수 있습니다.
예, 이것은 64 비트 Windows 10에서 작동합니다. 작동하지 않는 것은 16 비트 응용 프로그램 인 Borland C ++ 설치 프로그램입니다. 다른 환경에서 실행하거나 WineVDM으로 운을 시험해보아야합니다.
Borland Makefile은 project 디렉토리에서 찾을 수 있습니다. 빌드는 다음을 통해 수행 할 수 있습니다.
 cd project
make.exe < options >
여기서 <options> 될 수있는 곳 :
-DDOS32 (64 비트 창에서 여전히 작동).-DWIN32 farcoreleft() 및 기타 유물에 의존하는 TVDEMO에는 불가능).-DDEBUG 애플리케이션 및 라이브러리의 디버그 버전을 작성합니다.-DTVDEBUG 애플리케이션을 디버그 버전의 라이브러리와 연결합니다.-DOVERLAY , -DALIGNMENT={2,4} , -DEXCEPTION , -DNO_STREAMABLE , -DNOTASM 은 내가 사용하지 않았지만 원래 makefiles에 나타났습니다. 이렇게하면 라이브러리를 project 옆의 LIB 디렉토리로 컴파일하고 해당 examples/* 디렉토리에서 데모 애플리케이션을 위해 실행 파일을 컴파일합니다.
죄송합니다. 루트 MakeFile은 project 디렉토리에서 실행되었다고 가정합니다. 다른 설정을 사용하려는 경우 원래 MakeFiles를 직접 ( source/tvision 및 examples/* ) 직접 실행할 수 있습니다.
Turbo Vision은 VCPKG Dependency Manager를 사용하여 구축 및 설치할 수 있습니다.
git clone https://github.com/Microsoft/vcpkg.git
cd vcpkg
./bootstrap-vcpkg.sh
./vcpkg integrate install
./vcpkg install tvision
VCPKG의 tvision 포트는 Microsoft 팀원 및 커뮤니티 기고자가 최신 상태로 유지됩니다. 구식이 아닌 경우 VCPKG 저장소에서 문제 또는 요청을 가져 오십시오.
애플리케이션을 위해 CMAKE 빌드 시스템을 선택하면 터보 비전과 연결하는 두 가지 주요 방법이 있습니다.
터보 비전 설치 및 find_package 로 가져 오기. 설치는 생성기 유형에 따라 다릅니다.
먼저 설치 접두사를 결정하십시오. 기본값은 상자 밖으로 작동하지만 일반적으로 관리자 권한이 필요합니다. UNIX 시스템에서는 대신 $HOME/.local 사용할 수 있습니다. Windows에서는 원하는 사용자 정의 경로를 사용할 수 있지만 응용 프로그램을 구축 할 때 CMAKE_PREFIX_PATH 환경에 추가해야합니다.
Mono-Config Generator ( Unix Makefiles , Ninja ...)의 경우 한 번만 빌드하고 설치하면됩니다.
cmake . -B ./build # '-DCMAKE_INSTALL_PREFIX=...' to override the install prefix.
cmake --build ./build
cmake --install ./build
Multi-Config Generator ( Visual Studio , Ninja Multi-Config ...)의 경우 모든 구성을 빌드하고 설치해야합니다.
cmake . -B ./build # '-DCMAKE_INSTALL_PREFIX=...' to override the install prefix.
cmake --build ./build --config Release
cmake --build ./build --config Debug --target tvision
cmake --build ./build --config RelWithDebInfo --target tvision
cmake --build ./build --config MinSizeRel --target tvision
cmake --install ./build --config Release
cmake --install ./build --config Debug --component library
cmake --install ./build --config RelWithDebInfo --component library
cmake --install ./build --config MinSizeRel --component library
그런 다음 응용 프로그램의 CMakeLists.txt 에서 다음과 같이 가져올 수 있습니다.
 find_package (tvision CONFIG)
target_link_libraries (my_application tvision::tvision)
저장소의 서브 모드에 터보 비전을 가지고 add_subdirectory 로 가져 오십시오.
 add_subdirectory (tvision) # Assuming Turbo Vision is in the 'tvision' directory.
target_link_libraries (my_application tvision)
두 경우 모두 <tvision/tv.h> 컴파일 중에 응용 프로그램의 포함 경로에서 사용할 수 있으며 응용 프로그램은 필요한 라이브러리 (NCURSES, GPM ...)에 자동으로 연결됩니다.
tvedit 응용 프로그램에서 시도해 볼 수 있습니다.~/ $HOME 으로 확장 할 수 있습니다.stdin / stdout / stderr 의 리디렉션은 터미널 I / O를 방해하지 않습니다.모든 터보 비전 응용 프로그램의 동작에 영향을 미치는 몇 가지 환경 변수가 있습니다.
TVISION_MAX_FPS : 최대 새로 고침 비율, 기본 60 . 이를 통해 박스를 드러내는 문자를 완벽하게 처리하여 터미널 에뮬레이터의 부드러움을 유지하는 데 도움이 될 수 있습니다. 이 옵션의 특수 값은 0 , 새로 고침 속도 제한을 비활성화하는 0, -1 은 실제로 THardwareInfo::screenWrite (디버깅 할 때 유용함)에서 실제로 터미널에 그리기 위해 -1입니다.
TVISION_CODEPAGE : 터보 비전이 내부적으로 사용하여 확장 된 ASCII를 유니 코드로 변환하기 위해 내부적으로 사용했습니다. 현재 유효한 값은 437 과 850 이며 437 기본값이지만 더 많은 노력을 기울이지 않아도됩니다.
win32-input-mode (WSL에서 사용 가능) 지원.TIOCLINUX 를 통해) 및 마우스 (GPM을 통해)를 지원합니다.stderr 이 TTY 일 때, 그 메시지가 작성된 메시지는 버퍼로 리디렉션되어 디스플레이를 엉망으로 만들지 않으며 응용 프로그램을 종료하거나 일시 중지 할 때 결국 콘솔에 인쇄됩니다.stderr 에 쓰기가 실패합니다. stderr 모두 보존하려면 2> 있는 명령 줄에서 파일로 리디렉션하십시오.다음 환경 변수도 고려됩니다.
TERM : NCURSES는이를 사용하여 터미널 기능을 결정합니다. 터미널 에뮬레이터에 의해 자동으로 설정됩니다.
COLORTERM : truecolor 또는 24bit 설정되면 터보 비전은 터미널 에뮬레이터가 24 비트 색상을 지원한다고 가정합니다. 이를 지원하는 터미널 에뮬레이터에 의해 자동으로 설정됩니다.
ESCDELAY : ESC 키 프레스, 기본 10 수신 한 후 대기 할 밀리 초 수. 이 지연 중에 다른 키를 누르면 ALT+키 조합으로 해석됩니다. 더 큰 값을 사용하면 터미널이 ALT 키를 지원하지 않을 때 유용합니다.
TVISION_USE_STDIO : 비어 있지 않으면 터미널 I / O가 stdin / stdout 을 통해 수행되므로 쉘에서 리디렉션 할 수 있습니다. 기본적으로 Turbo Vision은 터미널 I/O를 통해 /dev/tty 수행하여 사용자가 응용 프로그램의 안정성에 영향을 미치지 않고 필요에 따라 stdin , stdout 및 stderr 리디렉션 할 수 있습니다.
예를 들어, 다음은 꺼집니다 out.txt empty :
tvdemo | tee out.txt 다음은 응용 프로그램에 의해 인쇄 된 모든 탈출 시퀀스와 텍스트를 out.txt 에 덤프합니다.
TVISION_USE_STDIO=1 tvdemo | tee out.txtBorland C ++로 컴파일 할 때 다음은 사용할 수 없습니다.
wchar_t 변형을 사용할 필요가 없습니다. 참고 : Turbo Vision은 UTF-8 텍스트를 Windows 콘솔에 직접 씁니다. 콘솔이 레거시 모드로 설정되고 비트 맵 글꼴을 사용하는 경우 유니 코드 문자가 제대로 표시되지 않습니다 (사진). 이를 피하기 위해 Turbo Vision은 이러한 상황을 감지하고 콘솔 글꼴을 Consolas 또는 Lucida Console 로 변경하려고합니다.
다음은 Borland의 Turbo Vision 릴리스 또는 이전 오픈 소스 포트 (Sigala, Set)에서 사용할 수없는 새로운 기능입니다.
TInputLine S는 더 이상 Focus/Focus에서 텍스트 표시를 스크롤하지 않으므로 관련 텍스트가 표시 될 수 있습니다.TFileViewer ( tvdemo ) 및 TEditor ( tvedit )의 LF 라인 엔딩 지원. TEditor 파일 저장으로 끝나는 줄을 보존하지만 새로 생성 된 모든 파일은 기본적으로 CRLF를 사용합니다.TEditor : 마우스 오른쪽 버튼을 클릭하십시오.TEditor : 중간 마우스 버튼으로 스크롤을 드래그하십시오.TEditor , TInputLine : kbAltBack , kbCtrlBack 및 kbCtrlDel 로 전체 단어를 삭제합니다.TEditor : 홈 키는 선의 시작과 들여 쓰기 텍스트의 시작 사이에 토글됩니다.TEditor : 32 비트 또는 64 비트 빌드에서 64 개보다 큰 파일을 지원합니다.tvdemo : 이벤트 뷰어 애플릿 이벤트 디버깅에 유용합니다.tvdemo : 배경 패턴을 변경하는 옵션. 스크린 쓰기는 버퍼링되며 일반적으로 활성 이벤트 루프의 반복마다 한 번 터미널로 전송됩니다 ( TVISION_MAX_FPS 참조). 바쁜 루프 중에 화면을 업데이트 해야하는 경우 TScreen::flushScreen() 사용할 수 있습니다.
TDrawBuffer 더 이상 고정 길이 배열이 아니며 그 방법으로 과거 배열이 접근 할 수 있습니다. 따라서 sizeof(TDrawBuffer)/sizeof(ushort) 에 대한 비교를 포함하는 이전 코드는 더 이상 유효하지 않습니다. 이러한 수표는 제거해야합니다.
TApplication 이제 dosShell() , cascade() 및 tile() 제공하고 기본적으로 cmDosShell , cmCascade 및 cmTile 처리합니다. 이러한 기능은 getTileRect() 및 writeShellMsg() 재정의하여 사용자 정의 할 수 있습니다. 이것은 Pascal 버전에서와 동일한 동작입니다.
마우스 휠 지지대 : 새로운 마우스 이벤트 evMouseWheel . 휠 방향은 New Field event.mouse.wheel 에 지정되어 있으며, 가능한 값은 mwUp , mwDown , mwLeft 또는 mwRight 입니다.
중간 마우스 버튼 지원 : 새 마우스 버튼 플래그 mbMiddleButton .
evMouseUp 이벤트의 buttons 필드는 더 이상 비어 있지 않습니다. 이제 어떤 버튼이 출시되었는지를 나타냅니다.
트리플 클릭 지원 : 새로운 마우스 이벤트 플래그 meTripleClick .
TRect 방법은 move , grow , intersect , Union 이제 TRect& void 되는 대신 묶을 수 있도록 반환합니다.
TOutlineViewer 이제 루트 노드에 형제 자매를 가질 수있게합니다.
새로운 기능 ushort popupMenu(TPoint where, TMenuItem &aMenu, TGroup *receiver=0) 는 데스크탑에서 TMenuPopup 을 스폰합니다. source/tvision/popupmnu.cpp 참조하십시오.
새로운 가상 메소드 TMenuItem& TEditor::initContextMenu(TPoint p) 는 TEditor 에서 마우스 오른쪽 버튼 클릭 컨텍스트 메뉴의 항목을 결정합니다.
fexpand 이제 두 번째 매개 변수 relativeTo 취할 수 있습니다.
std::string_view 에서 영감을 얻은 새로운 클래스 TStringView .
TStringView 받습니다. TStringView 는 std::string_view , std::string 및 const char * (심지어 nullptr )와 호환됩니다. std::span 에서 영감을 얻은 새로운 클래스 TSpan<T> .
새로운 클래스 TDrawSurface 및 TSurfaceView , <tvision/surface.h> 참조하십시오.
시스템 통합 서브 시스템 ( THardwareInfo , TScreen , TEventQueue ...)은 이제 main 이전이 아닌 처음으로 TApplication 구성 할 때 초기화됩니다. 그들은 여전히 main 에서 출구로 파괴됩니다.
새로운 방법 TVMemMgr::reallocateDiscardable() 은 allocateDiscardable 가능하고 freeDiscardable 따라 사용할 수 있습니다.
새로운 방법 TView::textEvent() 는 효율적인 방식으로 텍스트를 수신 할 수 있습니다. 클립 보드 상호 작용을 참조하십시오.
새로운 클래스 TClipboard , 클립 보드 상호 작용을 참조하십시오.
유니 코드 지원, 유니 코드를 참조하십시오.
진정한 색상 지원, 확장 된 색상을 참조하십시오.
새로운 방법 static void TEventQueue::waitForEvents(int timeoutMs) 는 입력 이벤트를 기다리는 밀리 timeoutMs 까지까지 차단할 수 있습니다. 부정적인 timeoutMs 사용하여 피로 대기 할 수 있습니다. 차단하면 플러싱 화면 업데이트의 부작용이 있습니다 ( TScreen::flushScreen() 을 통해). 이벤트 루프가 100% CPU를 소비하는 바쁜 루프로 바뀌지 않도록 TProgram::getEvent() 에 의해 static int TProgram::eventTimeoutMs (기본값 20 )를 인수합니다.
새로운 메소드 static void TEventQueue::wakeUp() TEventQueue::waitForEvents() 에서 차단되면 이벤트 루프가 실행을 재개하게합니다. 이 메소드는 스레드 안전입니다. 목적은 보조 스레드에서 이벤트 루프를 차단하지 않기 때문입니다.
새로운 방법 void TView::getEvent(TEvent &, int timeoutMs) 는 사용자가 제공 한 시간 초과 ( TProgram::eventTimeoutMs 대신)로 이벤트를 기다릴 수 있습니다.
이제 TInputLine 에서 최대 텍스트 너비 또는 최대 문자 수를 지정할 수 있습니다. 이는 TInputLine 의 생성자 인 ushort limitMode 의 새로운 매개 변수를 통해 수행되며, 이는 두 번째 생성자 매개 변수 인 uint limit 이 처리되는 방식을 제어합니다. ilXXXX 상수는 limitMode 의 가능한 값을 정의합니다.
ilMaxBytes (기본값) : 텍스트는 널 터미네이터를 포함하여 바이트 길이를 limit 할 수 있습니다.ilMaxWidth : 텍스트는 열을 넓게 limit 할 수 있습니다.ilMaxChars : 텍스트에는 비전동 문자 또는 그래프 멤버를 limit 위해 텍스트가 포함될 수 있습니다. 런타임에서 터보 비전 상수의 이름을 얻을 수있는 새로운 기능 (예 : evCommand , kbShiftIns 등) :
 void printKeyCode (ostream &, ushort keyCode);
void printControlKeyState (ostream &, ushort controlKeyState);
void printEventCode (ostream &, ushort eventCode);
void printMouseButtonState (ostream &, ushort buttonState);
void printMouseWheelState (ostream &, ushort wheelState);
void printMouseEventFlags (ostream &, ushort eventFlags);
키 코드와 키 수정 자의 마스크를 지정하여 새로운 키 조합 (예 : Shift+Alt+Up )을 정의하는 데 사용할 수있는 새로운 클래스 TKey :
 auto kbShiftAltUp = TKey(kbUp, kbShift | kbAltShift);
assert (kbCtrlA == TKey( ' A ' , kbCtrlShift));
assert (TKey(kbCtrlTab, kbShift) == TKey(kbTab, kbShift | kbCtrlShift));
// Create menu hotkeys.
new TMenuItem( " ~R~estart " , cmRestart, TKey(kbDel, kbCtrlShift | kbAltShift), hcNoContext, " Ctrl-Alt-Del " )
// Examine KeyDown events:
if (event.keyDown == TKey(kbEnter, kbShift))
    doStuff ();
시간이 정한 이벤트를 사용할 수있는 새로운 방법 :
TTimerId TView::setTimer ( uint timeoutMs, int periodMs = - 1 );
void TView::killTimer (TTimerId id);
setTimer timeoutMs 밀리 초에 처음으로 출발 한 다음 모든 periodMs Milliseconds의 타이머를 시작합니다.
periodMs 음수 인 경우 타이머는 한 번만 한 번만 시간을 보내고 자동으로 정리됩니다. 그렇지 않으면 killTimer 호출 될 때까지 주기적으로시기를 유지합니다.
타이머가 시간을 초과하면 cmTimerExpired 명령이있는 evBroadcast 이벤트가 방출되고 message.infoPtr 만료 된 타이머의 TTimerId 로 설정됩니다.
시간 초과 이벤트는 TProgram::idle() 에서 생성됩니다. 따라서 키보드 나 마우스 이벤트가없는 경우에만 처리됩니다.
여기에서 스크린 샷을 찾을 수 있습니다. 자신만의 추가하십시오!
소스 코드가 손실되지 않았고 이로 인해 혜택을 누릴 수있는 터보 비전 응용 프로그램을 알고 있다면 알려주십시오.
응용 프로그램 이이 프로젝트를 기반으로하고 다음 목록에 표시되기를 원한다면 알려주십시오.
터보 비전 API는 유니 코드 입력을 수신하고 유니 코드 텍스트를 표시하도록 확장되었습니다. 지원되는 인코딩은 여러 가지 이유로 UTF-8입니다.
char * )과 호환되므로 기존 코드에 대한 방해가 필요하지 않습니다.Borland C ++로 구축 된 경우 Turbo Vision은 유니 코드를 지원하지 않습니다. 그러나 API 확장은 인코딩-공수 코드를 허용하도록 설계 되었기 때문에 Turbo Vision Applications가 작성되는 방식에는 영향을 미치지 않습니다.
주요 프레스 이벤트에서 텍스트를 얻는 전통적인 방법은 다음과 같습니다.
 // 'ev' is a TEvent, and 'ev.what' equals 'evKeyDown'.
switch (ev.keyDown.keyCode) {
    // Key shortcuts are usually checked first.
    // ...
    default : {
        // The character is encoded in the current codepage
        // (CP437 by default).
        char c = ev. keyDown . charScan . charCode ;
        // ...
    }
}
텍스트 입력을 다루는 기존 터보 비전 클래스 중 일부는 여전히 변경되지 않은이 방법론에 의존합니다. 현재 CodePage에서 표현할 수있는 단일 바이트 문자는 ev.keyDown.charScan.charCode 에서 계속 사용할 수 있습니다.
유니 코드 지원은 ev.keyDown struct KeyDownEvent 두 개의 새로운 필드로 구성됩니다.
char text[4] : 일반적으로 UTF-8 시퀀스이지만 아마도 모든 종류의 원시 데이터.text 에서 사용 가능한 데이터의 바이트 수인 uchar textLength 는 0에서 4까지입니다. text 문자열은 무효가 끝나지 않습니다. getText() 메소드를 사용하여 KeyDownEvent 에서 TStringView 얻을 수 있습니다.
따라서 유니 코드 문자는 다음과 같은 방식으로 TEvent 에서 검색 할 수 있습니다.
 switch (ev.keyDown.keyCode) {
    // ...
    default : {
        std::string_view sv = ev. keyDown . getText ();
        processText (sv);
    }
}
다른 관점에서 보자. 사용자가 ñ 입력하면 다음 keyDown 구조로 TEvent 생성됩니다.
KeyDownEvent {
    union {
        . keyCode = 0xA4 ,
        . charScan = CharScanType {
            . charCode = 164 ( ' ñ ' ), // In CP437
            . scanCode = 0
        }
    },
    . controlKeyState = 0x200 (kbInsState),
    . text = { ' xC3 ' , ' xB1 ' }, // In UTF-8
    . textLength = 2
}
그러나 € 입력하면 다음이 발생합니다.
KeyDownEvent {
    union {
        . keyCode = 0x0 (kbNoKey), // '€' not part of CP437
        . charScan = CharScanType {
            . charCode = 0 ,
            . scanCode = 0
        }
    },
    . controlKeyState = 0x200 (kbInsState),
    . text = { ' xE2 ' , ' x82 ' , ' xAC ' }, // In UTF-8
    . textLength = 3
}
키 단축키가 대신 누르면 text 비어 있습니다.
KeyDownEvent {
    union {
        . keyCode = 0xB (kbCtrlK),
        . charScan = CharScanType {
            . charCode = 11 ( ' ♂ ' ),
            . scanCode = 0
        }
    },
    . controlKeyState = 0x20C (kbCtrlShift | kbInsState),
    . text = {},
    . textLength = 0
}
간단히 말해서 : 유니 코드 입력을 염두에두고 설계된 뷰는 이전과 같이 정확히 정확하게 작동하며, 유니 코드를 인식하고자하는 뷰는 그렇게 문제가 없습니다.
Turbo Vision의 원래 디자인은 16 비트를 사용하여 화면 셀을 나타냅니다 - 문자의 경우 8 비트, BIOS 색상 속성의 경우 8 비트입니다.
새로운 TScreenCell 유형은 <tvision/scrncell.h> 에 정의되어 있으며, 이는 확장 된 속성 (굵게, 밑줄, 이탤릭체 ...) 외에 제한된 수의 UTF-8 코드 포인트를 보유 할 수 있습니다. 그러나 TScreenCell 에 직접 텍스트를 작성해서는 안되지만 대신 유니 코드 인식 API 기능을 사용해야합니다.
텍스트 표시를 다루는 터보 비전 API 기능에 대한 인수로 제공되는 문자는 다음과 같이 해석됩니다.
0x00 ~ 0xFF 범위의 인쇄 할 수없는 문자는 활성 코드 페지의 문자로 해석됩니다. 예를 들어, CP437을 사용하는 경우 0x7F ⌂ 및 0xF0 으로 ≡ 로 표시됩니다. 예외적으로 0x00 항상 일반 공간으로 표시됩니다. 이 문자는 모두 하나의 열입니다. 예를 들어, 문자열 "╔[xFE]╗" ╔[■]╗ 로 표시 될 수 있습니다. 이는 Box-Drawing 캐릭터가 일반적으로 UTF-8과 혼합 될 수 있음을 의미하며, 이는 후진 호환성에 유용합니다. 그러나이 동작에 의존하는 경우 예기치 않은 결과를 얻을 수 있습니다. 예를 들어 "xC4xBF" 는 유효한 UTF-8 시퀀스이며 ─┐ 대신 Ŀ 로 표시됩니다.
유니 코드 지원의 문제 중 하나는 이중 너비 문자와 문자를 결합하는 것입니다. 이것은 화면이 각각 단일 특성에 의해 차지하는 세포의 그리드라는 Turbo Vision의 원래 가정과 충돌합니다. 그럼에도 불구하고 이러한 경우는 다음과 같은 방식으로 처리됩니다.
이중 폭은 화면의 어느 곳에서나 그려 질 수 있으며 다른 문자와 부분적으로 겹치면 나쁜 일이 발생하지 않습니다.
제로 폭의 문자는 이전 문자를 오버레이합니다. 예를 들어, 시퀀스 में 단일 폭의 문자 म 와 결합 문자 े 및 ं 로 구성됩니다. 이 경우, 3 개의 유니 코드 코드 포인트는 동일한 셀에 맞습니다.
ZERO WIDTH JOINER ( U+200D )는 너무 많이 복잡하기 때문에 항상 생략됩니다. 예를 들어 "??" 와 같은 문자열을 돌릴 수 있습니다. (4 열) "??" (폭 2 열). 모든 터미널 에뮬레이터가 ZWJ를 존중하는 것은 아니므로 예측 가능한 결과를 생성하기 위해 터보 비전은 "??" 그리고 "??" 처럼 ?? .
터미널 에뮬레이터가 wcwidth 로 측정 한대로 문자 너비를 존중하는 한 주목할만한 그래픽 글리치는 발생하지 않습니다.
다음은 터보 텍스트 편집기의 이러한 문자의 예입니다. 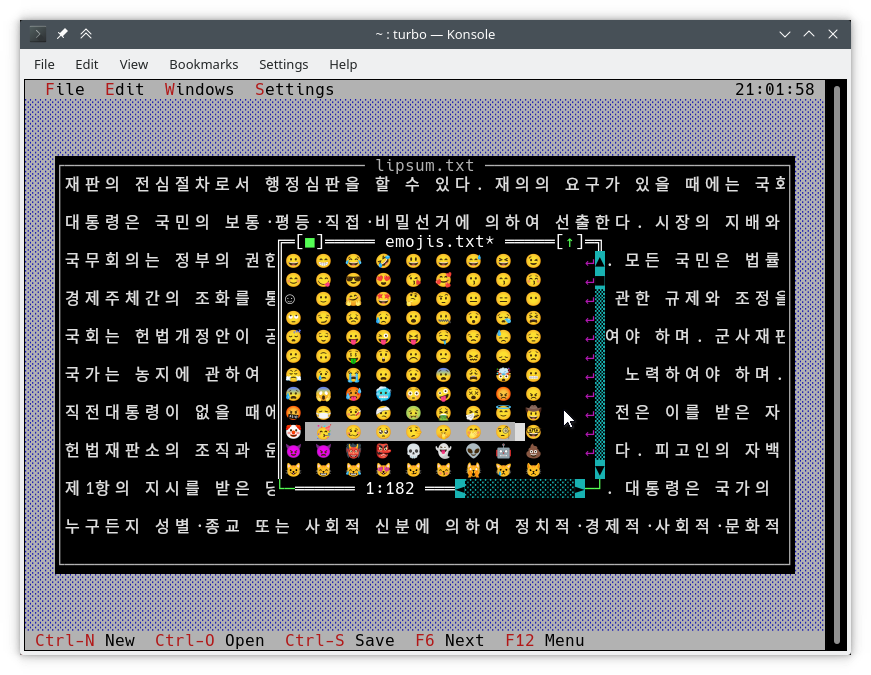
화면에 글을 쓰는 일반적인 방법은 TDrawBuffer 사용하는 것입니다. 몇 가지 방법이 추가되었고 다른 방법이 의미를 바꿨습니다.
 void TDrawBuffer::moveChar ( ushort indent, char c, TColorAttr attr, ushort count);
void TDrawBuffer::putChar ( ushort indent, char c);
c 는 항상 활성 코드 페지에서 캐릭터로 해석됩니다.
 ushort TDrawBuffer::moveStr ( ushort indent, TStringView str, TColorAttr attr);
ushort TDrawBuffer::moveCStr ( ushort indent, TStringView str, TAttrPair attrs);
str 이전에 노출 된 규칙에 따라 해석됩니다.
 ushort TDrawBuffer::moveStr ( ushort indent, TStringView str, TColorAttr attr, ushort maxWidth, ushort strOffset = 0 ); // New
ushort TDrawBuffer::moveCStr ( ushort indent, TStringView str, TColorAttr attr, ushort maxWidth, ushort strOffset = 0 ); // New
str 이전에 노출 된 규칙에 따라 해석되지만 :
maxWidth 텍스트 너비 (바이트가 아닌)로 측정 된 str 에서 복사 해야하는 최대 텍스트의 양을 지정합니다.strOffset 텍스트 너비 (바이트가 아님)로 측정 된 str 에서 초기 위치를 지정합니다. 이것은 수평 스크롤에 유용합니다. strOffset 이중 폭의 문자의 중간을 가리키면, 그러한 일을 할 수는 없기 때문에 이중 폭의 오른쪽 절반 대신 공간이 복사됩니다.반환 값은 실제로 텍스트로 채워진 버퍼의 셀 수 (복사 된 텍스트의 너비와 동일)입니다.
void TDrawBuffer::moveBuf ( ushort indent, const void *source, TColorAttr attr, ushort count); 이 기능의 이름은 오해의 소지가 있습니다. 원래 구현에서도 source 문자열로 취급됩니다. 따라서 moveStr(indent, TStringView((const char*) source, count), attr) 와 같습니다.
유용한 유용한 유니 코드 인식 기능이 있습니다.
int cstrlen (TStringView s); 위에서 언급 한 규칙에 따라 표시된 s 길이를 반환하고 ~ 문자를 폐기합니다.
int strwidth (TStringView s); // New 표시된 s 의 길이를 반환합니다.
Borland C ++에서 이러한 방법은 단일 바이트 인코딩과 모든 문자가 하나의 열로 가정합니다. 이를 통해 단일 #ifdef 없이 두 플랫폼에서 작동하는 인코딩-응용 프로그램 draw() 및 handleEvent() 메소드를 작성할 수 있습니다.
위의 기능은 다른 API 확장자 인 TText 네임 스페이스의 함수를 사용하여 구현됩니다. TScreenCell 객체를 수동으로 채우려면 직접 사용해야합니다. 예를 들어, 아래는 TText 함수 중 일부입니다. <tvision/ttext.h> 에서 완전한 설명으로 모든 것을 찾을 수 있습니다.
 size_t TText::next (TStringView text);
size_t TText::prev (TStringView text, size_t index);
void TText::drawChar (TSpan<TScreenCell> cells, char c);
size_t TText::drawStr (TSpan<TScreenCell> cells, size_t indent, TStringView text, int textIndent);
bool TText::drawOne (TSpan<TScreenCell> cells, size_t &i, TStringView text, size_t &j);
TScreenCell 버퍼를보기에 그리기 위해서는 다음 방법을 사용할 수 있습니다.
 void TView::writeBuf ( short x, short y, short w, short h, const TScreenCell *b); // New
void TView::writeLine ( short x, short y, short w, short h, const TScreenCell *b); // New 그것은 가능한 한 간단합니다. 다음과 같이 hello.cpp 수정합시다.
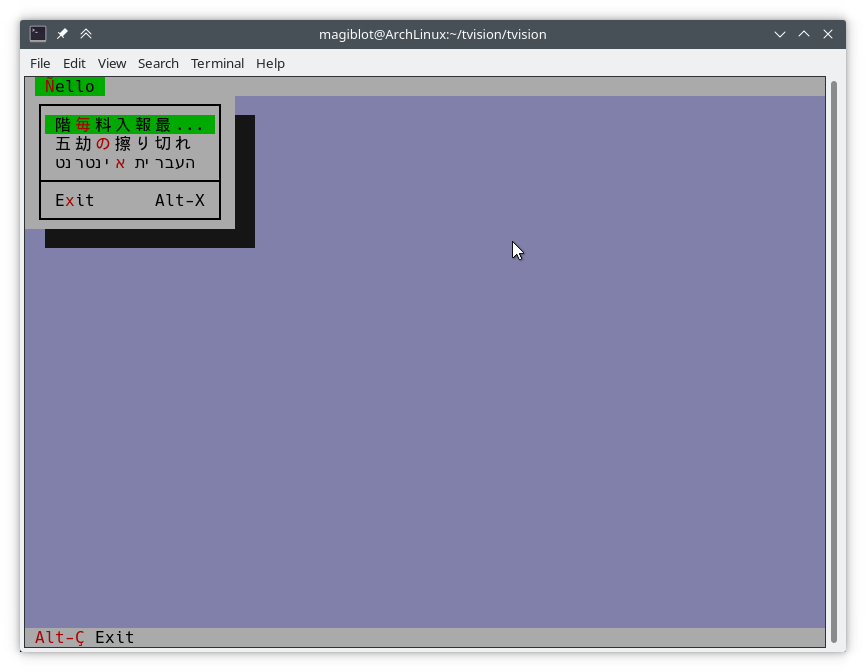
TMenuBar * THelloApp::initMenuBar ( TRect r )
{
    r. b . y = r. a . y + 1 ;
    return new TMenuBar ( r,
      * new TSubMenu ( " ~Ñ~ello " , kbAltH ) +
        * new TMenuItem ( "階~毎~料入報最... " , GreetThemCmd, kbAltG ) +
        * new TMenuItem ( "五劫~の~擦り切れ" , cmYes, kbNoKey, hcNoContext ) +
        * new TMenuItem ( " העברית ~א~ינטרנט " , cmNo, kbNoKey, hcNoContext ) +
         newLine () +
        * new TMenuItem ( " E~x~it " , cmQuit, cmQuit, hcNoContext, " Alt-X " )
        );
}

TStatusLine * THelloApp::initStatusLine ( TRect r )
{
    r. a . y = r. b . y - 1 ;
    return new TStatusLine ( r,
        * new TStatusDef ( 0 , 0xFFFF ) +
            * new TStatusItem ( " ~Alt-Ç~ Exit " , kbAltX, cmQuit ) +
            * new TStatusItem ( 0 , kbF10, cmMenu )
            );
}
다음은 다음과 같습니다.
draw() 메소드 작성 다음은 TFileViewer::draw() ( tvdemo 응용 프로그램의 일부)의 오래된 구현에서 발췌 한 것입니다.
 if (delta.y + i < fileLines-> getCount ()) {
    char s[maxLineLength+ 1 ];
    p = ( char *)(fileLines-> at (delta. y +i));
    if (p == 0 || strlen (p) < delta. x )
        s[ 0 ] = EOS;
    else
        strnzcpy (s, p+delta. x , maxLineLength+ 1 );
    b. moveStr ( 0 , s, c);
}
writeBuf ( 0 , i, size.x, 1 , b );
fileLines 의 문자열의 일부를 b TDrawBuffer 옮기는 것입니다. delta 는 텍스트보기에서 스크롤 오프셋을 나타내는 TPoint 이며, i 가시 선이 처리되는 인덱스입니다. c 는 텍스트 색상입니다. 몇 가지 문제가 있습니다.
TDrawBuffer::moveStr(ushort, const char *, TColorAttr) 무효가 종결 된 문자열을 취합니다. 전류 선의 하위 스트링을 전달하기 위해 버퍼 오버런의 위험에 따라 사본이 s 로 만들어집니다. 선이 s 에 맞지 않는 경우는 처리되지 않으므로 최대 maxLineLenght 문자가 복사됩니다. 또한 maxLineLength 위치 근처의 멀티 바이트 문자는 불완전하게 복사되어 쓰레기로 표시 될 수 있습니다.delta.x 는 첫 번째 가시 열입니다. 멀티 바이트 인코딩 된 텍스트를 사용하면 더 이상 이러한 열이 문자열의 위치 delta.x 에서 시작되는 것은 사실이 아닙니다.아래는 유니 코드를 올바르게 처리하는 위의 코드의 수정 된 버전입니다.
 if (delta.y + i < fileLines-> getCount ()) {
    p = ( char *)(fileLines-> at (delta. y +i));
    if (p)
        b. moveStr ( 0 , p, c, size. x , delta. x );
}
writeBuf ( 0 , i, size.x, 1 , b );
여기에 사용 된 moveStr 의 과부하는 TDrawBuffer::moveStr(ushort indent, TStringView str, TColorAttr attr, ushort width, ushort begin) . 이 기능은 유니 코드 지원을 제공 할뿐만 아니라 클리너 코드를 작성하고 이전에 존재하는 일부 제한 사항을 극복하는 데 도움이됩니다.
maxLineLength 바이트에 국한되지 않습니다.moveStr 열 delta.x 에서 시작하는 문자열 인쇄를 처리합니다. 우리는 delta.x 열에 얼마나 많은 바이트가 해당하는지 걱정할 필요조차 없습니다.moveStr is instructed to copy at most size.x columns of text without us having to care about how many bytes that is nor dealing with edge cases. The code is written in an encoding-agnostic way and will work whether multibyte characters are being considered or not.TView::writeBuf already takes care of not writing beyond it. Yet it is interesting to see how an unnecessary step not only was limiting functionality but also was prone to bugs. Support for creating Unicode-aware views is in place, and most views in the original Turbo Vision library have been adapted to handle Unicode.
The following views can display Unicode text properly. Some of them also do horizontal scrolling or word wrapping; all of that should work fine.
TStaticText ( 7b15d45d ). TFrame ( 81066ee5 ). TStatusLine ( 477b3ae9 ). THistoryViewer ( 81066ee5 ). THelpViewer ( 81066ee5 , 8c7dac2a , 20f331e3 ). TListViewer ( 81066ee5 ). TMenuBox ( 81066ee5 ). TTerminal ( ee821b69 ). TOutlineViewer ( 6cc8cd38 ). TFileViewer (from the tvdemo application) ( 068bbf7a ). TFilePane (from the tvdir application) ( 9bcd897c ).The following views can, in addition, process Unicode text or user input:
TInputLine ( 81066ee5 , cb489d42 ). TEditor ( 702114dc ). Instances are in UTF-8 mode by default. You may switch back to single-byte mode by pressing Ctrl+P . This only changes how the document is displayed and the encoding of user input; it does not alter the document. This class is used in the tvedit application; you may test it there.Views not in this list may not have needed any corrections or I simply forgot to fix them. Please submit an issue if you notice anything not working as expected.
Use cases where Unicode is not supported (not an exhaustive list):
TMenuBox , TStatusLine , TButton ...). Originally, Turbo Vision offered no integration with the system clipboard, since there was no such thing on MS-DOS.
It did offer the possibility of using an instance of TEditor as an internal clipboard, via the TEditor::clipboard static member. However, TEditor was the only class able to interact with this clipboard. It was not possible to use it with TInputLine , for example.
Turbo Vision applications are now most likely to be ran in a graphical environment through a terminal emulator. In this context, it would be desirable to interact with the system clipboard in the same way as a regular GUI application would do.
To deal with this, a new class TClipboard has been added which allows accessing the system clipboard. If the system clipboard is not accessible, it will instead use an internal clipboard.
On Windows (including WSL) and macOS, clipboard integration is supported out-of-the-box.
On Unix systems other than macOS, it is necessary to install some external dependencies. See runtime requirements.
For applications running remotely (eg through SSH), clipboard integration is supported in the following situations:
ssh -X ).allowWindowOps option is enabled. Additionally, it is always possible to paste text using your terminal emulator's own Paste command (usually Ctrl+Shift+V or Cmd+V ).
To use the TClipboard class, define the macro Uses_TClipboard before including <tvision/tv.h> .
static void TClipboard::setText (TStringView text); Sets the contents of the system clipboard to text . If the system clipboard is not accessible, an internal clipboard is used instead.
static void TClipboard::requestText (); Requests the contents of the system clipboard asynchronously, which will be later received in the form of regular evKeyDown events. If the system clipboard is not accessible, an internal clipboard is used instead.
A Turbo Vision application may receive a Paste event for two different reasons:
TClipboard::requestText() was invoked. In both cases the application will receive the clipboard contents in the form of regular evKeyDown events. These events will have a kbPaste flag in keyDown.controlKeyState so that they can be distinguished from regular key presses.
Therefore, if your view can handle user input it will also handle Paste events by default. However, if the user pastes 5000 characters, the application will behave as if the user pressed the keyboard 5000 times. This involves drawing views, completing the event loop, updating the screen..., which is far from optimal if your view is a text editing component, for example.
For the purpose of dealing with this situation, another function has been added:
bool TView::textEvent (TEvent &event, TSpan< char > dest, size_t &length); textEvent() attempts to read text from consecutive evKeyDown events and stores it in a user-provided buffer dest . It returns false when no more events are available or if a non-text event is found, in which case this event is saved with putEvent() so that it can be processed in the next iteration of the event loop. Finally, it calls clearEvent(event) .
The exact number of bytes read is stored in the output parameter length , which will never be larger than dest.size() .
Here is an example on how to use it:
 // 'ev' is a TEvent, and 'ev.what' equals 'evKeyDown'.
// If we received text from the clipboard...
if (ev.keyDown.controlKeyState & kbPaste) {
    char buf[ 512 ];
    size_t length;
    // Fill 'buf' with the text in 'ev' and in
    // upcoming events from the input queue.
    while ( textEvent (ev, buf, length)) {
        // Process 'length' bytes of text in 'buf'...
    }
} The standard views TEditor and TInputLine react to the cmCut , cmCopy and cmPaste commands. However, your application first has to be set up to use these commands. 예를 들어:
TStatusLine * TMyApplication::initStatusLine ( TRect r )
{
    r. a . y = r. b . y - 1 ;
    return new TStatusLine ( r,
        * new TStatusDef ( 0 , 0xFFFF ) +
            // ...
            * new TStatusItem ( 0 , kbCtrlX, cmCut ) +
            * new TStatusItem ( 0 , kbCtrlC, cmCopy ) +
            * new TStatusItem ( 0 , kbCtrlV, cmPaste ) +
            // ...
    );
}
TEditor and TInputLine automatically enable and disable these commands. For example, if a TEditor or TInputLine is focused, the cmPaste command will be enabled. If there is selected text, the cmCut and cmCopy commands will also be enabled. If no TEditor or TInputLine s are focused, then these commands will be disabled.
The Turbo Vision API has been extended to allow more than the original 16 colors.
Colors can be specified using any of the following formats:
xterm-256color palette indices (8-bit).Although Turbo Vision applications are likely to be ran in a terminal emulator, the API makes no assumptions about the display device. That is to say, the complexity of dealing with terminal emulators is hidden from the programmer and managed by Turbo Vision itself.
For example: color support varies among terminals. If the programmer uses a color format not supported by the terminal emulator, Turbo Vision will quantize it to what the terminal can display. The following images represent the quantization of a 24-bit RGB picture to 256, 16 and 8 color palettes:
| 24-bit color (original) | 256 colors |
|---|---|
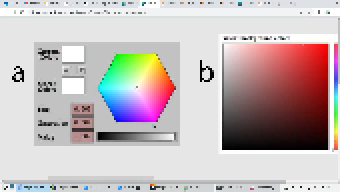 | 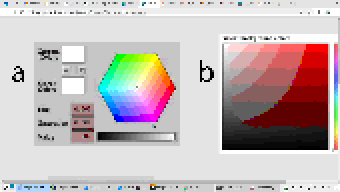 |
| 16 colors | 8 colors (bold as bright) |
|---|---|
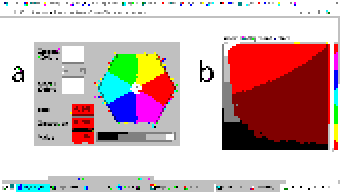 | 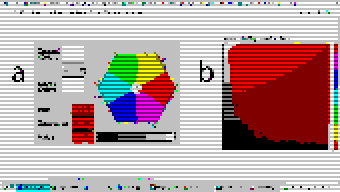 |
Extended color support basically comes down to the following:
uchar . ushort is used to represent attribute pairs. This is still the case when using Borland C++.TColorAttr has been added which replaces uchar . It specifies a foreground and background color and a style. Colors can be specified in different formats (BIOS color attributes, 24-bit RGB...). Styles are the typical ones (bold, italic, underline...). There's also TAttrPair , which replaces ushort .TDrawBuffer 's methods, which used to take uchar or ushort parameters to specify color attributes, now take TColorAttr or TAttrPair .TPalette , which used to contain an array of uchar , now contains an array of TColorAttr . The TView::mapColor method also returns TColorAttr instead of uchar .TView::mapColor has been made virtual so that the palette system can be bypassed without having to rewrite any draw methods.TColorAttr and TAttrPair can be initialized with and casted into uchar and ushort in a way such that legacy code still compiles out-of-the-box without any change in functionality.Below is a more detailed explanation aimed at developers.
In the first place we will explain the data types the programmer needs to know in order to take advantage of the extended color support. To get access to them, you may have to define the macro Uses_TColorAttr before including <tvision/tv.h> .
All the types described in this section are trivial . This means that they can be memset 'd and memcpy 'd. But variables of these types are uninitialized when declared without initializer, just like primitive types. So make sure you don't manipulate them before initializing them.
Several types are defined which represent different color formats. The reason why these types exist is to allow distinguishing color formats using the type system. Some of them also have public fields which make it easier to manipulate individual bits.
TColorBIOS represents a BIOS color. It allows accessing the r , g , b and bright bits individually, and can be casted implicitly into/from uint8_t .
The memory layout is:
b ).g ).r ).bright ). Examples of TColorBIOS usage:
TColorBIOS bios = 0x4 ;  // 0x4: red.
bios.bright = 1 ;        // 0xC: light red.
bios.b = bios.r;        // 0xD: light magenta.
bios = bios ^ 3 ;        // 0xE: yellow.
uint8_t c = bios;       // Implicit conversion to integer types.
In terminal emulators, BIOS colors are mapped to the basic 16 ANSI colors.
TColorRGB represents a color in 24-bit RGB. It allows accessing the r , g and b bit fields individually, and can be casted implicitly into/from uint32_t .
The memory layout is:
b ).g ).r ). Examples of TColorRGB usage:
TColorRGB rgb = 0x9370DB ;   // 0xRRGGBB.
rgb = { 0x93 , 0x70 , 0xDB };   // {R, G, B}.
rgb = rgb ^ 0xFFFFFF ;       // Negated.
rgb.g = rgb.r & 0x88 ;       // Access to individual components.
uint32_t c = rgb;           // Implicit conversion to integer types.
TColorXTerm represents an index into the xterm-256color color palette. It can be casted into and from uint8_t .
TColorDesired TColorDesired represents a color which the programmer intends to show on screen, encoded in any of the supported color types.
A TColorDesired can be initialized in the following ways:
As a BIOS color: with a char literal or a TColorBIOS object:
TColorDesired bios1 = ' xF ' ;
TColorDesired bios2 = TColorBIOS( 0xF );
As a RGB color: with an int literal or a TColorRGB object:
TColorDesired rgb1 = 0xFF7700 ; // 0xRRGGBB.
TColorDesired rgb2 = TColorRGB( 0xFF , 0x77 , 0x00 ); // {R, G, B}.
TColorDesired rgb3 = TColorRGB( 0xFF7700 ); // 0xRRGGBB.
As an XTerm palette index: with a TColorXTerm object.
As the terminal default color: through zero-initialization:
TColorDesired def1 {};
// Or with 'memset':
TColorDesired def2;
memset (&def2, 0 , sizeof (def2));
TColorDesired has methods to query the contained color, but you will usually not need to use them. See the struct definition in <tvision/colors.h> for more information.
Trivia: the name is inspired by Scintilla's ColourDesired .
TColorAttr TColorAttr describes the color attributes of a screen cell. This is the type you are most likely to interact with if you intend to change the colors in a view.
A TColorAttr is composed of:
A foreground color, of type TColorDesired .
A background color, of type TColorDesired .
A style bitmask containing a combination of the following flags:
slBold .slItalic .slUnderline .slBlink .slReverse .slStrike . These flags are based on the basic display attributes selectable through ANSI escape codes. The results may vary between terminal emulators. slReverse is probably the least reliable of them: prefer using the TColorAttr reverseAttribute(TColorAttr attr) free function over setting this flag.
The most straight-forward way to create a TColorAttr is by means of the TColorAttr(TColorDesired fg, TColorDesired bg, ushort style=0) and TColorAttr(int bios) constructors:
 // Foreground: RGB 0x892312
// Background: RGB 0x7F00BB
// Style: Normal.
TColorAttr a1 = { TColorRGB ( 0x89 , 0x23 , 0x12 ), TColorRGB ( 0x7F , 0x00 , 0xBB )};

// Foreground: BIOS 0x7.
// Background: RGB 0x7F00BB.
// Style: Bold, Italic.
TColorAttr a2 = { ' x7 ' , 0x7F00BB , slBold | slItalic};

// Foreground: Terminal default.
// Background: BIOS 0xF.
// Style: Normal.
TColorAttr a3 = {{}, TColorBIOS ( 0xF )};

// Foreground: Terminal default.
// Background: Terminal default.
// Style: Normal.
TColorAttr a4 = {};

// Foreground: BIOS 0x0
// Background: BIOS 0x7
// Style: Normal
TColorAttr a5 = 0x70 ;
The fields of a TColorAttr can be accessed with the following free functions:
TColorDesired getFore ( const TColorAttr &attr);
TColorDesired getBack ( const TColorAttr &attr);
ushort getStyle ( const TColorAttr &attr);
void setFore (TColorAttr &attr, TColorDesired fg);
void setBack (TColorAttr &attr, TColorDesired bg);
void setStyle (TColorAttr &attr, ushort style);
TAttrPair TAttrPair is a pair of TColorAttr , used by some API functions to pass two attributes at once.
You may initialize a TAttrPair with the TAttrPair(const TColorAttrs &lo, const TColorAttrs &hi) constructor:
TColorAttr cNormal = { 0x234983 , 0x267232 };
TColorAttr cHigh = { 0x309283 , 0x127844 };
TAttrPair attrs = {cNormal, cHigh};
TDrawBuffer b;
b.moveCStr( 0 , " Normal text, ~Highlighted text~ " , attrs);
The attributes can be accessed with the [0] and [1] subindices:
TColorAttr lo = { 0x892343 , 0x271274 };
TColorAttr hi = ' x93 ' ;
TAttrPair attrs = {lo, hi};
assert (lo == attrs[ 0 ]);
assert (hi == attrs[ 1 ]);TView Views are commonly drawn by means of a TDrawBuffer . Most TDrawBuffer member functions take color attributes by parameter. 예를 들어:
 ushort TDrawBuffer::moveStr ( ushort indent, TStringView str, TColorAttr attr);
ushort TDrawBuffer::moveCStr ( ushort indent, TStringView str, TAttrPair attrs);
void TDrawBuffer::putAttribute ( ushort indent, TColorAttr attr);
However, the views provided with Turbo Vision usually store their color information in palettes. A view's palette can be queried with the following member functions:
TColorAttr TView::mapColor (uchar index);
TAttrPair TView::getColor ( ushort indices);
mapColor looks up a single color attribute in the view's palette, given an index into the palette. Remember that the palette indices for each view class can be found in the Turbo Vision headers. For example, <tvision/views.h> says the following about TScrollBar :
 /* ---------------------------------------------------------------------- */
/*      class TScrollBar                                                  */
/*                                                                        */
/*      Palette layout                                                    */
/*        1 = Page areas                                                  */
/*        2 = Arrows                                                      */
/*        3 = Indicator                                                   */
/* ---------------------------------------------------------------------- */
getColor is a helper function that allows querying two cell attributes at once. Each byte in the indices parameter contains an index into the palette. The TAttrPair result contains the two cell attributes.
For example, the following can be found in the draw method of TMenuBar :
TAttrPair cNormal = getColor( 0x0301 );
TAttrPair cSelect = getColor( 0x0604 );
Which would be equivalent to this:
TAttrPair cNormal = { mapColor ( 1 ), mapColor ( 3 )};
TAttrPair cSelect = { mapColor ( 4 ), mapColor ( 6 )};
As an API extension, the mapColor method has been made virtual . This makes it possible to override Turbo Vision's hierarchical palette system with a custom solution without having to rewrite the draw() method.
So, in general, there are three ways to use extended colors in views:
mapColor method: // The 'TMyScrollBar' class inherits from 'TScrollBar' and overrides 'TView::mapColor'.
TColorAttr TMyScrollBar::mapColor (uchar index) noexcept
{
// In this example the values are hardcoded,
// but they could be stored elsewhere if desired.
switch ( index )
{
case 1 : return { 0x492983 , 0x826124 }; // Page areas.
case 2 : return { 0x438939 , 0x091297 }; // Arrows.
case 3 : return { 0x123783 , 0x329812 }; // Indicator.
default : return errorAttr;
}
} By providing extended color attributes directly to TDrawBuffer methods, if the palette system is not being used. 예를 들어:
 // The 'TMyView' class inherits from 'TView' and overrides 'TView::draw'.
void TMyView::draw ()
{
    TDrawBuffer b;
    TColorAttr color { 0x1F1C1B , 0xFAFAFA , slBold};
    b. moveStr ( 0 , " This is bold black text over a white background " , color);
    /* ... */
}
By modifying the palettes. There are two ways to do this:
TColorAttr . 예를 들어: void updateAppPalette ()
{
TPalette &pal = TProgram::application-> getPalete ();
pal[ 1 ] = { 0x762892 , 0x828712 }; // TBackground.
pal[ 2 ] = { 0x874832 , 0x249838 , slBold}; // TMenuView normal text.
pal[ 3 ] = {{}, {}, slItalic | slUnderline}; // TMenuView disabled text.
/* ... */
} static const TColorAttr cpMyApp[] =
{
{ 0x762892 , 0x828712 }, // TBackground.
{ 0x874832 , 0x249838 , slBold}, // TMenuView normal text.
{{}, {}, slItalic | slUnderline}, // TMenuView disabled text.
/* ... */
};
// The 'TMyApp' class inherits from 'TApplication' and overrides 'TView::getPalette'.
TPalette & TMyApp::getPalette () const
{
static TPalette palette (cpMyApp);
return palette;
} TScreen::screenMode exposes some information about the display's color support:
(TScreen::screenMode & 0xFF) == TDisplay::smMono , the display is monocolor (only relevant in DOS).(TScreen::screenMode & 0xFF) == TDisplay::smBW80 , the display is grayscale (only relevant in DOS).(TScreen::screenMode & 0xFF) == TDisplay::smCO80 , the display supports at least 16 colors.TScreen::screenMode & TDisplay::smColor256 , the display supports at least 256 colors.TScreen::screenMode & TDisplay::smColorHigh , the display supports even more colors (eg 24-bit color). TDisplay::smColor256 is also set in this case. The types defined previously represent concepts that are also important when developing for Borland C++:
| 개념 | Layout in Borland C++ | Layout in modern platforms |
|---|---|---|
| Color Attribute | uchar . A BIOS color attribute. | struct TColorAttr . |
| 색상 | A 4-bit number. | struct TColorDesired . |
| Attribute Pair | ushort . An attribute in each byte. | struct TAttrPair . |
One of this project's key principles is that the API should be used in the same way both in Borland C++ and modern platforms, that is to say, without the need for #ifdef s. Another principle is that legacy code should compile out-of-the-box, and adapting it to the new features should increase complexity as little as possible.
Backward-compatibility is accomplished in the following way:
In Borland C++, TColorAttr and TAttrPair are typedef 'd to uchar and ushort , respectively.
In modern platforms, TColorAttr and TAttrPair can be used in place of uchar and ushort , respectively, since they are able to hold any value that fits into them and can be casted implicitly into/from them.
A TColorAttr initialized with uchar represents a BIOS color attribute. When converting back to uchar , the following happens:
fg and bg are BIOS colors, and style is cleared, the resulting uchar represents the same BIOS color attribute contained in the TColorAttr (as in the code above).uchar / ushort with TColorAttr / TAttrPair if they intend to support the extended color attributes. The same goes for TAttrPair and ushort , considering that it is composed of two TColorAttr .
A use case of backward-compatibility within Turbo Vision itself is the TPalette class, core of the palette system. In its original design, it used a single data type ( uchar ) to represent different things: array length, palette indices or color attributes.
The new design simply replaces uchar with TColorAttr . This means there are no changes in the way TPalette is used, yet TPalette is now able to store extended color attributes.
TColorDialog hasn't been remodeled, and thus it can't be used to pick extended color attributes at runtime.
The following pattern of code is common across draw methods of views:
 void TMyView::draw ()
{
    ushort cFrame, cTitle;
    if (state & sfDragging)
    {
        cFrame = 0x0505 ;
        cTitle = 0x0005 ;
    }
    else
    {
        cFrame = 0x0503 ;
        cTitle = 0x0004 ;
    }
    cFrame = getColor (cFrame);
    cTitle = getColor (cTitle);
    /* ... */
}
In this case, ushort is used both as a pair of palette indices and as a pair of color attributes. getColor now returns a TAttrPair , so even though this compiles out-of-the-box, extended attributes will be lost in the implicit conversion to ushort .
The code above still works just like it did originally. It's only non-BIOS color attributes that don't produce the expected result. Because of the compatibility between TAttrPair and ushort , the following is enough to enable support for extended color attributes:
 -    ushort cFrame, cTitle;
+    TAttrPair cFrame, cTitle;
Nothing prevents you from using different variables for palette indices and color attributes, which is what should actually be done. The point of backward-compatibility is the ability to support new features without changing the program's logic, that is to say, minimizing the risk of increasing code complexity or introducing bugs.


