phoenix todo list tutorial
1.0.0
Tutorial langkah demi langkah pemula yang lengkap untuk membangun daftar TODO di Phoenix.
100% fungsional. 0% JavaScript. Just HTML , CSS dan Elixir . Cepat dan bisa dipertahankan.
Daftar TODO akrab bagi kebanyakan orang; Kami membuat daftar sepanjang waktu. Membangun daftar TODO dari awal adalah cara yang bagus untuk mempelajari Elixir / Phoenix karena UI / UX sederhana , sehingga kami dapat fokus pada implementasi.
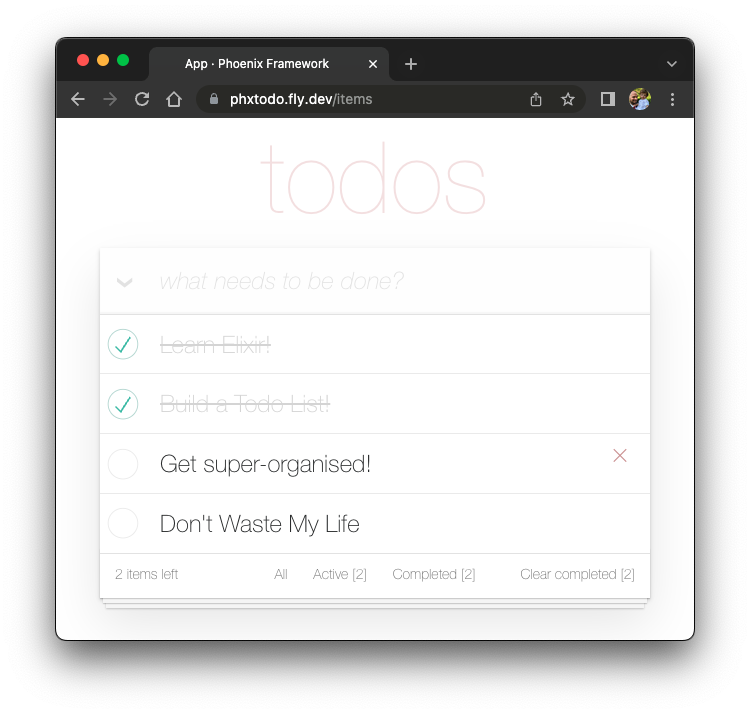
Untuk tim @dwyl aplikasi/tutorial ini adalah showcase tentang bagaimana rendering sisi server ( dengan peningkatan progresif sisi klien ) dapat memberikan keseimbangan yang sangat baik antara efektivitas pengembang ( fitur pengiriman cepat ), UX dan aksesibilitas . Halaman yang diberikan server membutuhkan waktu kurang dari 5ms untuk merespons sehingga UX cepat . On Fly.io: Phxtodo.fly.dev Waktu respons pulang pergi adalah sub 200ms untuk semua interaksi, jadi rasanya seperti aplikasi yang diberikan di sisi klien.
Tutorial daftar TODO yang menunjukkan pemula lengkap cara membangun aplikasi di Elixir/Phoenix dari awal.
Coba versi fly.io. Tambahkan beberapa item ke daftar dan uji fungsionalitasnya.
Bahkan dengan perjalanan pulang pergi HTTP penuh untuk setiap interaksi, waktu responsnya cepat . Perhatikan bagaimana Chrome | Firefox | Safari menunggu respons dari server sebelum menata ulang halaman. Refresh halaman penuh lama tadi hilang . Browser modern dengan cerdas hanya membuat perubahan! Jadi UX mendekati "asli"! Serius, coba aplikasi fly.io di ponsel Anda dan lihat!
Dalam tutorial ini kami menggunakan CSS TODOMVC untuk menyederhanakan UI kami. Ini memiliki beberapa keunggulan yang terbesar adalah meminimalkan berapa banyak CSS yang harus kita tulis! Ini juga berarti kami memiliki panduan untuk fitur mana yang perlu diimplementasikan untuk mencapai fungsionalitas penuh.
Catatan : Kami menyukai
CSSkarena kekuatan/fleksibilitasnya yang luar biasa, tetapi kami tahu bahwa tidak semua orang menyukainya. Lihat: Learn-tachyons#Mengapa hal terakhir yang kita inginkan adalah membuang banyak waktu denganCSSdalam tutorialPhoenix!
Tutorial ini adalah untuk siapa saja yang belajar Elixir/Phoenix. Tidak ada pengalaman sebelumnya dengan Phoenix diasumsikan/diharapkan. Kami telah memasukkan semua langkah yang diperlukan untuk membangun aplikasi.
Jika Anda terjebak pada langkah apa pun, silakan buka masalah di GitHub di mana kami dengan senang hati membantu Anda melepaskan diri! Jika Anda merasa bahwa setiap baris kode dapat menggunakan sedikit lebih banyak penjelasan/kejelasan, jangan ragu untuk memberi tahu kami! Kita tahu bagaimana rasanya menjadi pemula, bisa membuat frustrasi ketika sesuatu tidak masuk akal! Mengajukan pertanyaan di GitHub membantu semua orang untuk belajar!
Tolong beri kami umpan balik! Bintang repo jika Anda merasa terbantu.
Sebelum Anda mencoba membuat daftar TODO, pastikan Anda memiliki semua yang Anda butuhkan di depan komputer Anda. Lihat: Prasyarat
Setelah Anda mengonfirmasi bahwa Anda telah menginstal Phoenix & PostgreSQL, coba jalankan aplikasi yang sudah jadi .
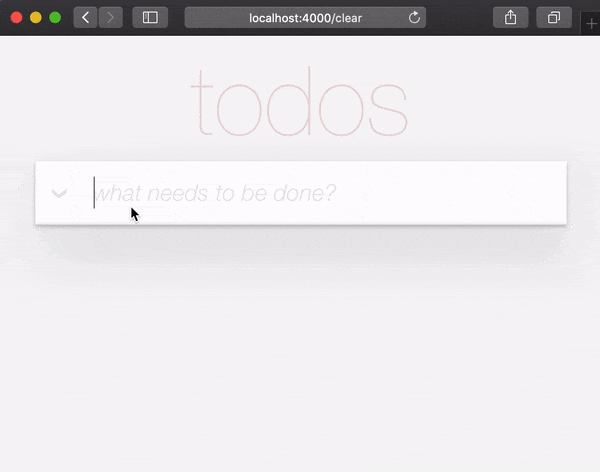
localhost Anda Sebelum Anda mulai membangun versi Anda sendiri dari aplikasi daftar TODO, jalankan versi jadi di localhost Anda untuk mengonfirmasi bahwa itu berfungsi.
Klon proyek dari GitHub:
git clone [email protected]:dwyl/phoenix-todo-list-tutorial.git && cd phoenix-todo-list-tutorialInstal dependensi dan atur database:
mix setupMulai server Phoenix:
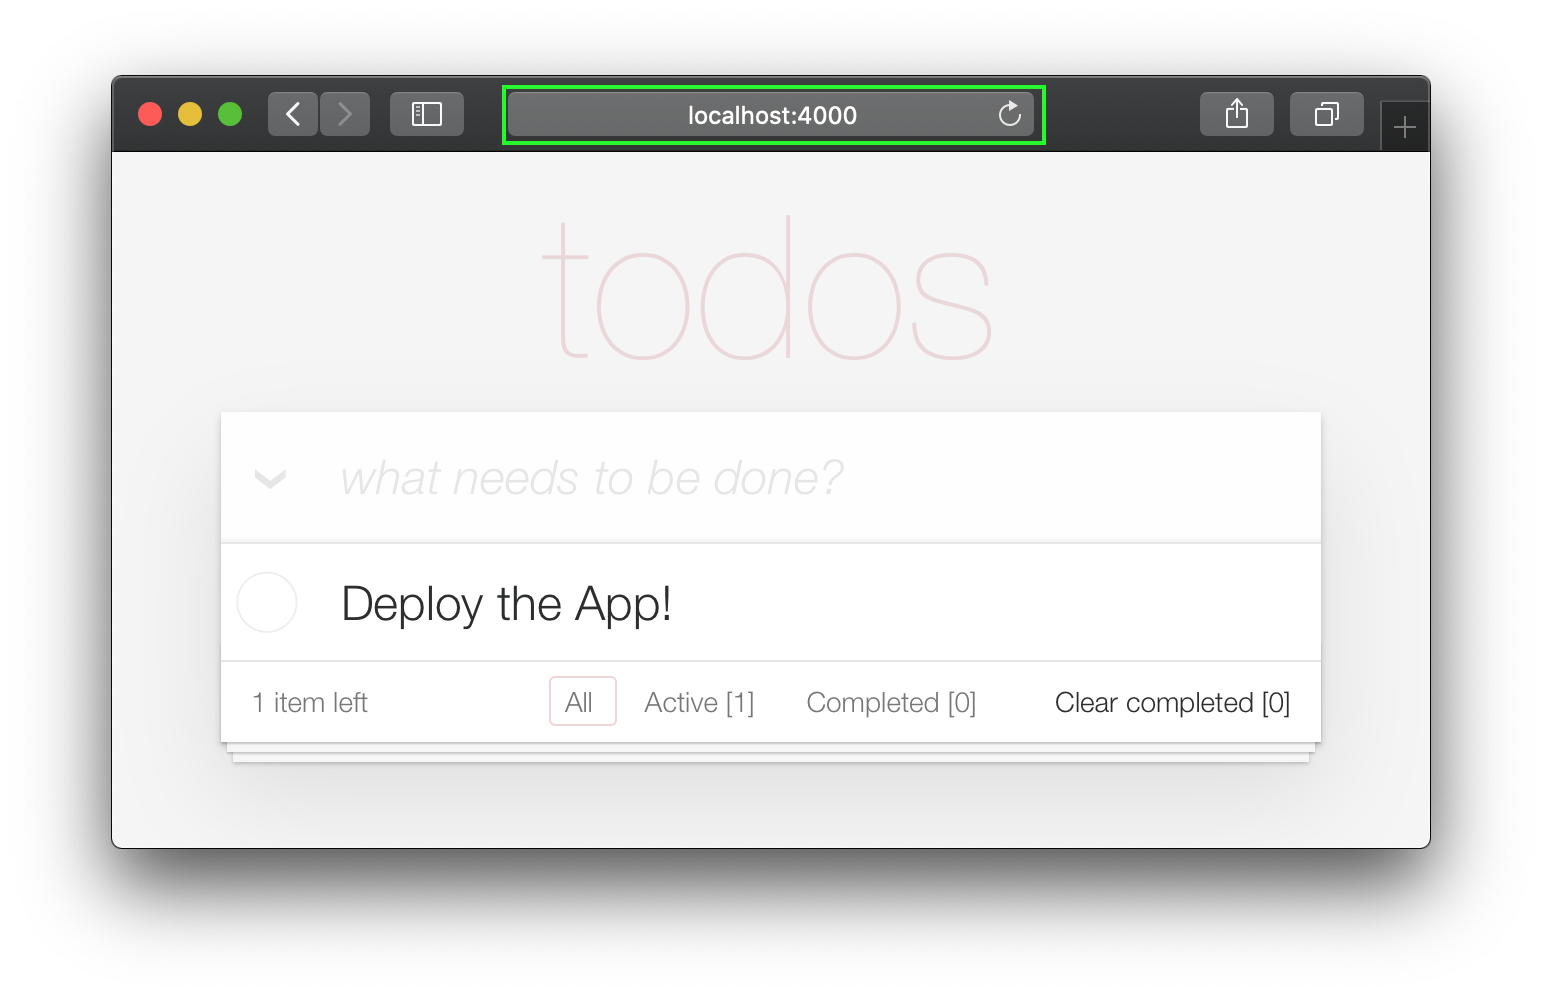
mix phx.server Kunjungi localhost:4000 di browser web Anda.
Anda harus melihat:
Sekarang Anda memiliki aplikasi contoh yang sudah selesai berjalan di localhost Anda,
Mari kita bangun dari awal dan pahami semua langkah.
Saat menjalankan aplikasi contoh yang sudah jadi di localhost , jika Anda ingin mencoba tombol login , Anda harus mendapatkan AUTH_API_KEY . [1 menit] Lihat: Dapatkan AUTH_API_KEY Anda
Jika Anda menjalankan aplikasi yang sudah jadi di localhost Anda ( dan Anda benar -benar harus! ),
Anda perlu mengubah direktori sebelum memulai tutorial:
cd ..
Sekarang Anda siap membangun !
Di terminal Anda, buat aplikasi Phoenix baru menggunakan perintah mix berikut:
mix phx.new app --no-dashboard --no-gettext --no-mailer Ketika diminta untuk menginstal dependensi, ketik Y diikuti oleh Enter .
Catatan : Bendera -bendera itu setelah nama
apphanya untuk menghindari membuat file yang tidak kita butuhkan untuk contoh sederhana ini. Lihat: hexdocs.pm/phoenix/mix.tasks.phx.new
Ubah ke dalam direktori app yang baru dibuat ( cd app ) dan pastikan Anda memiliki semua yang Anda butuhkan:
mix setupMulai server Phoenix:
mix phx.server Sekarang Anda dapat mengunjungi localhost:4000 di browser web Anda. Anda harus melihat sesuatu yang mirip dengan:
Matikan server Phoenix Ctrl + C.
Jalankan tes untuk memastikan semuanya berfungsi seperti yang diharapkan:
mix testAnda harus melihat:
Compiling 16 files (.ex)
Generated app app

17:49:40.111 [info]  Already up
...

Finished in 0.04 seconds
3 tests, 0 failures
Setelah menetapkan bahwa aplikasi Phoenix berfungsi seperti yang diharapkan, mari kita lanjutkan untuk membuat beberapa file!
items Dalam membuat daftar TODO dasar, kami hanya membutuhkan satu skema: items . Kemudian kita dapat menambahkan daftar dan tag terpisah untuk mengatur/mengkategorikan items kita tetapi untuk saat ini hanya ini yang kita butuhkan.
Jalankan perintah generator berikut untuk membuat tabel item:
mix phx.gen.html Todo Item items text:string person_id:integer status:integer Sebenarnya, kami hanya membutuhkan bidang text dan status , tetapi karena kami tahu kami ingin mengaitkan item dengan orang -orang (_later dalam tutorial), kami menambahkan bidang sekarang .
Anda akan melihat output berikut:
 * creating lib/app_web/controllers/item_controller.ex
* creating lib/app_web/controllers/item_html/edit.html.heex
* creating lib/app_web/controllers/item_html/index.html.heex
* creating lib/app_web/controllers/item_html/new.html.heex
* creating lib/app_web/controllers/item_html/show.html.heex
* creating lib/app_web/controllers/item_html.ex
* creating test/app_web/controllers/item_controller_test.exs
* creating lib/app/todo/item.ex
* creating priv/repo/migrations/20221205102303_create_items.exs
* creating lib/app/todo.ex
* injecting lib/app/todo.ex
* creating test/app/todo_test.exs
* injecting test/app/todo_test.exs
* creating test/support/fixtures/todo_fixtures.ex
* injecting test/support/fixtures/todo_fixtures.ex

Add the resource to your browser scope in lib/app_web/router.ex:

    resources "/items", ItemController


Remember to update your repository by running migrations:

    $ mix ecto.migrate
Itu membuat banyak file! Beberapa di antaranya tidak kita butuhkan secara ketat.
Kami hanya dapat membuat hanya file yang kami butuhkan , tetapi ini adalah cara "resmi" untuk membuat aplikasi CRUD di Phoenix, jadi kami menggunakannya untuk kecepatan.
Catatan : Konteks Phoenix yang dilambangkan dalam contoh ini sebagai
Todo, adalah " modul khusus yang mengekspos dan fungsionalitas terkait kelompok ." Kami merasa mereka tidak perlu mempersulit aplikasi Phoenix dasar dengan lapisan "antarmuka" dan kami benar -benar berharap kami dapat menghindarinya. Tetapi mengingat bahwa mereka dipanggang ke dalam generator, dan pencipta kerangka kerja menyukai mereka, kami memiliki pilihan: baik bergabung dengan konteks atau secara manual membuat semua file dalam proyek Phoenix kami. Generator adalah cara yang jauh lebih cepat untuk membangun! Rangkullah , bahkan jika Anda akhirnya harusdeletebeberapa file yang tidak digunakan di sepanjang jalan!
Kami tidak akan menjelaskan masing -masing file ini pada tahap ini dalam tutorial karena lebih mudah untuk memahami file saat Anda membangun aplikasi! Tujuan dari setiap file akan menjadi jelas saat Anda maju dengan mengeditnya.
/items ke router.ex Ikuti instruksi yang dicatat oleh generator untuk menambahkan resources "/items", ItemController ke router.ex .
Buka file lib/app_web/router.ex dan temukan baris: scope "/", AppWeb do . Tambahkan garis ke ujung blok. misalnya:
 scope "/" , AppWeb do
  pipe_through :browser

  get "/" , PageController , :index
  resources "/items" , ItemController # this is the new line
end
File router.ex Anda seharusnya terlihat seperti ini: router.ex#L20
Sekarang, seperti yang disarankan terminal, jalankan mix ecto.migrate . Ini akan selesai menyiapkan tabel basis data dan menjalankan migrasi yang diperlukan sehingga semuanya berfungsi dengan baik!
Pada titik ini kami sudah memiliki daftar TODO fungsional ( jika kami bersedia menggunakan Phoenix UI default ).
Coba jalankan aplikasi di localhost Anda: Jalankan migrasi yang dihasilkan dengan mix ecto.migrate kemudian server dengan:
mix phx.server
Kunjungi: http: // localhost: 4000/item/baru dan masukkan beberapa data.
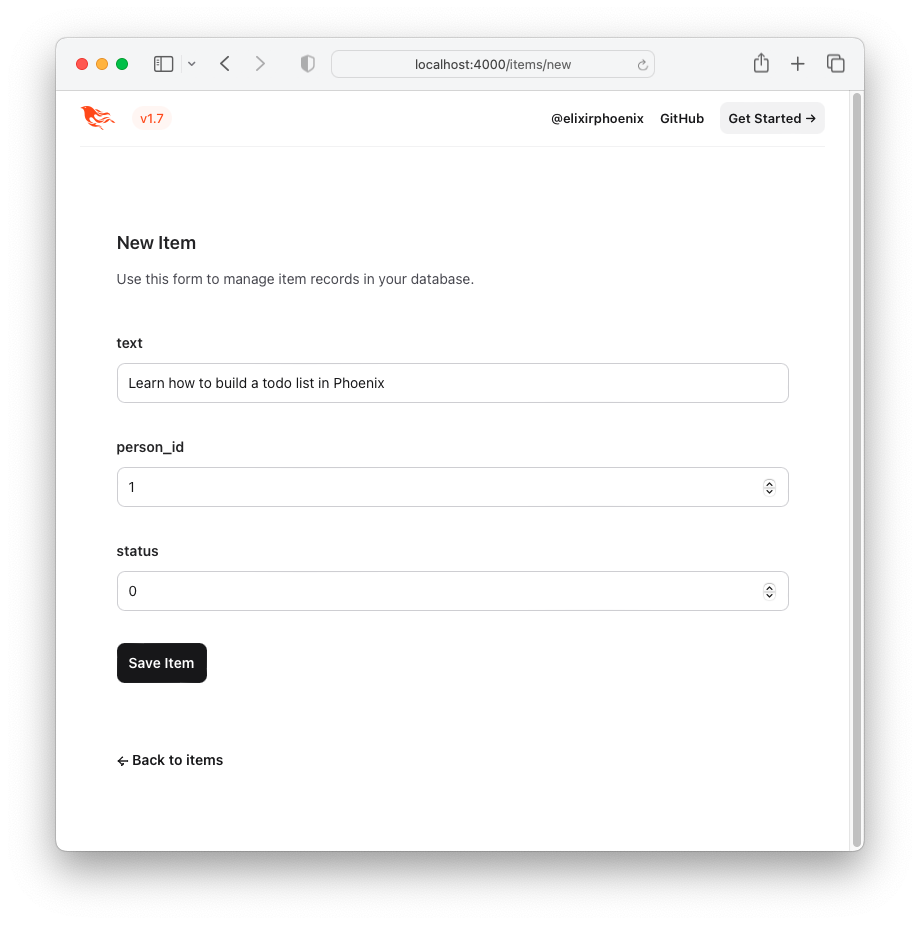
Klik tombol "Simpan Item" dan Anda akan diarahkan ke halaman "Tampilkan": http: // localhost: 4000/item/1
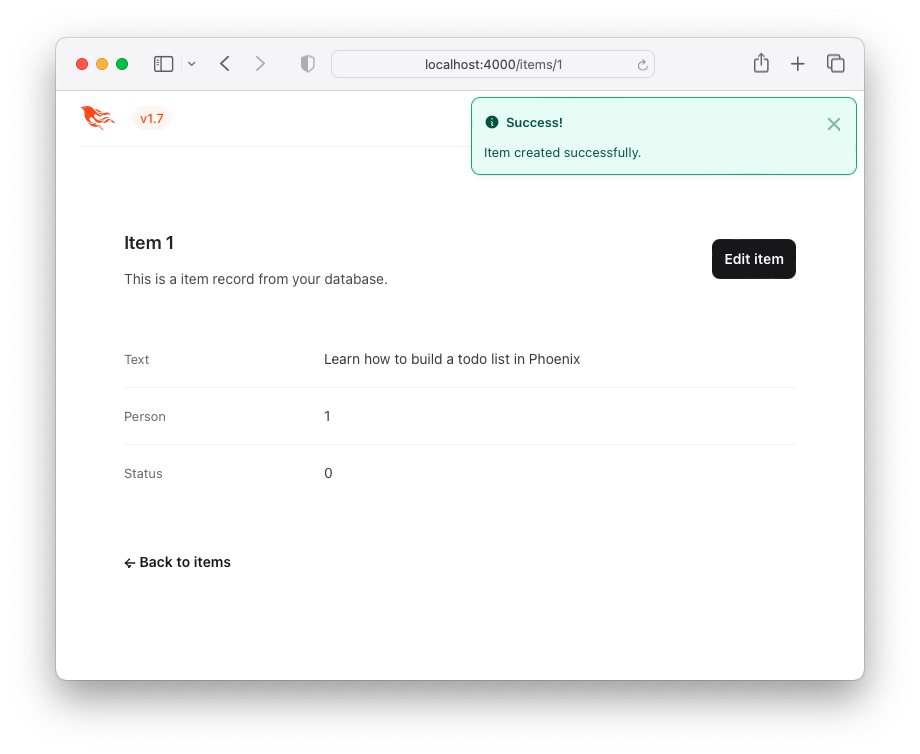
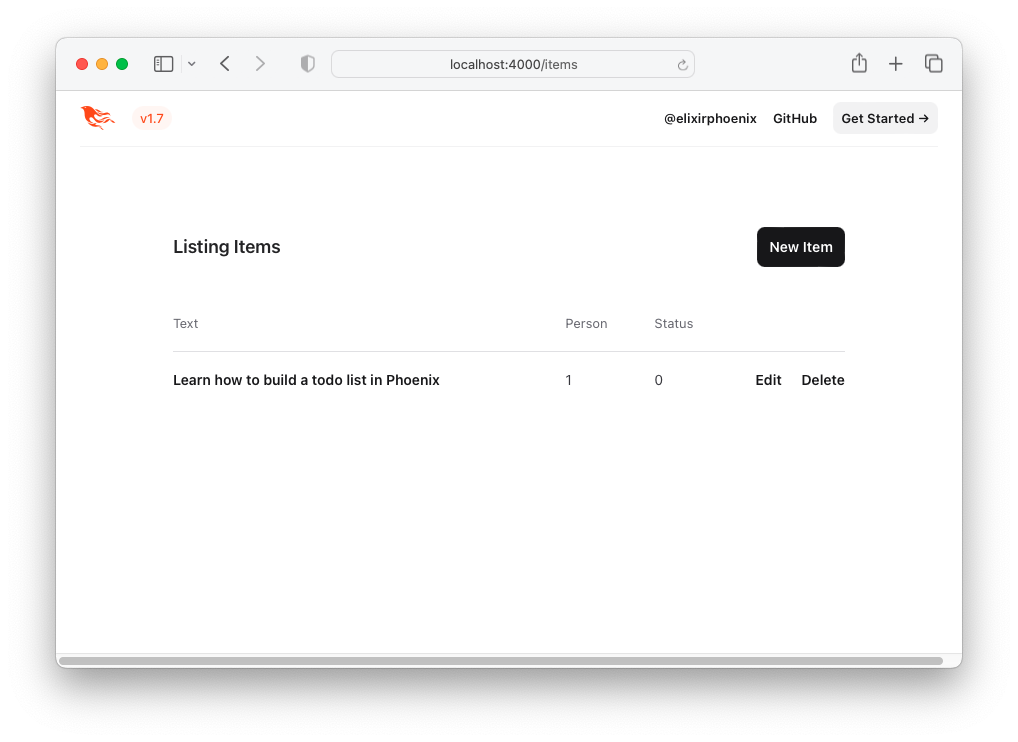
Ini bukan pengalaman pengguna yang menarik (UX), tetapi berhasil ! Berikut adalah daftar item - "Daftar ToDo". Anda dapat mengunjungi ini dengan mengklik tombol Back to items atau dengan mengakses URL berikut http: // localhost: 4000/item.
Mari kita tingkatkan UX dengan menggunakan HTML dan CSS TODOMVC!
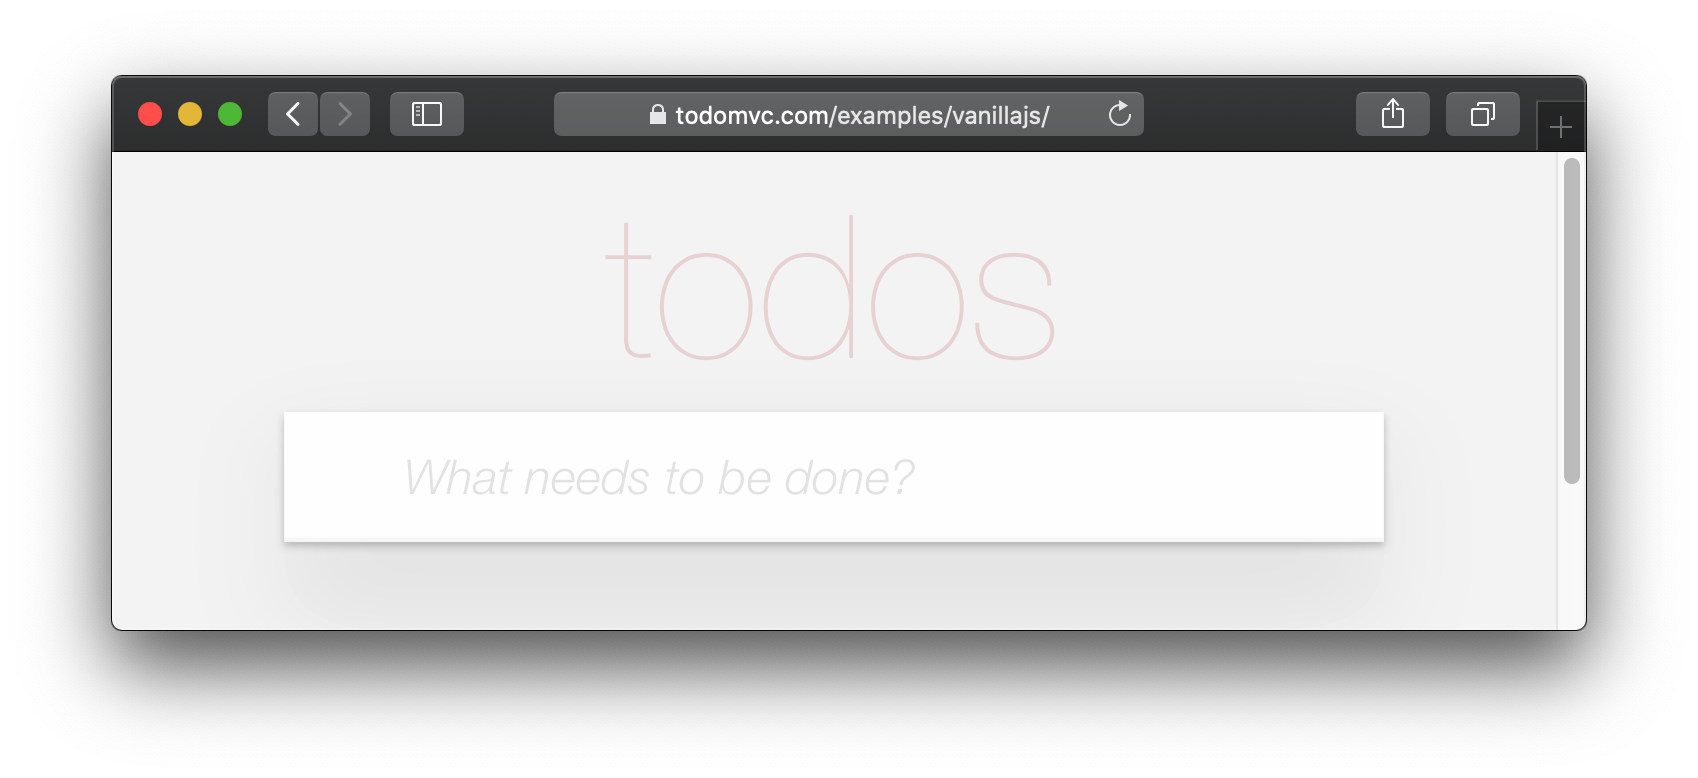
Untuk menciptakan kembali TODODOMVC UI/UX, mari kita pinjam kode HTML langsung dari contoh.
Kunjungi: http://todomvc.com/examples/vanillejs Tambahkan beberapa item ke daftar. Kemudian, periksa sumbernya menggunakan alat dev browser Anda. misalnya:
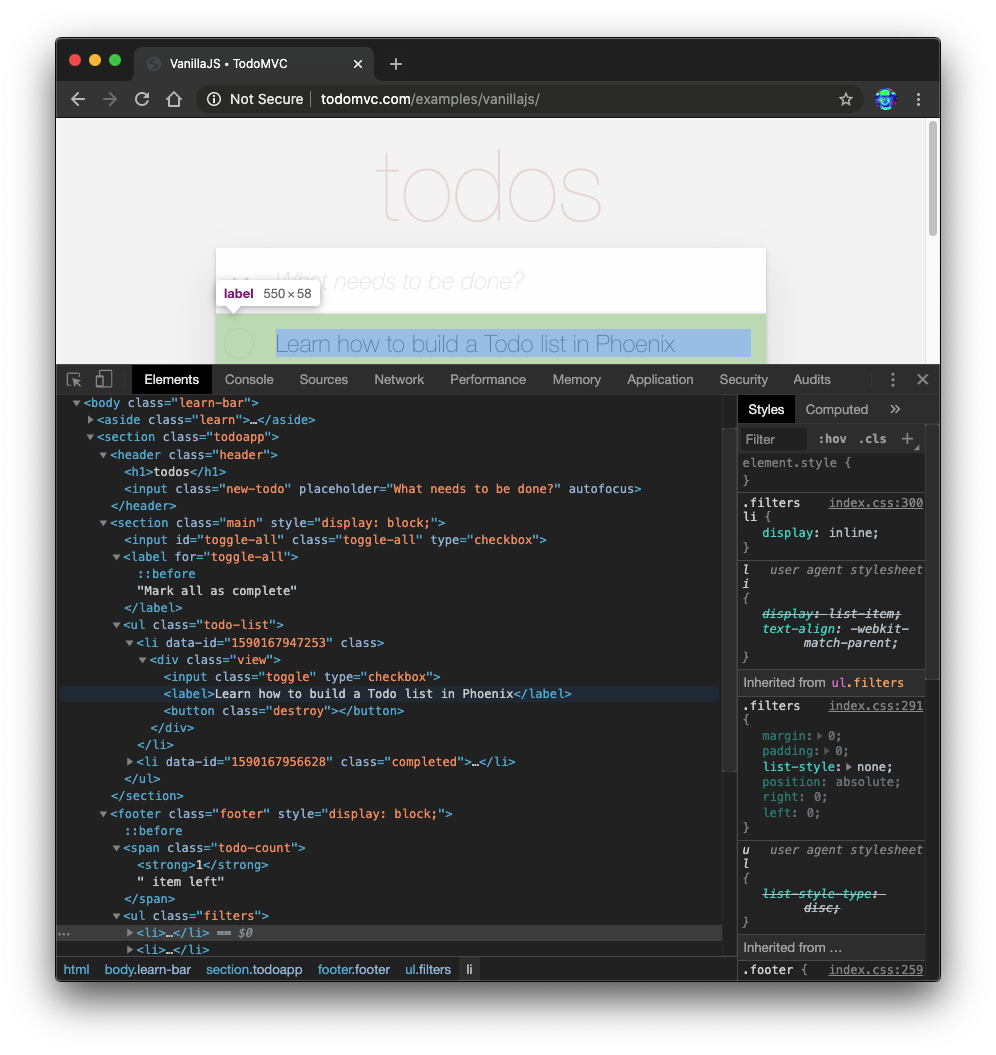
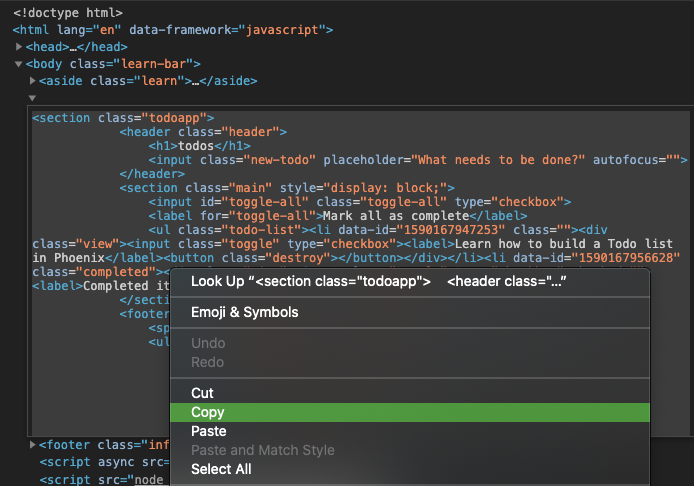
Klik kanan pada sumber yang Anda inginkan (misalnya: <section class="todoapp"> ) dan pilih "Edit sebagai html":

Setelah HTML untuk <section> dapat diedit, pilih dan salin.
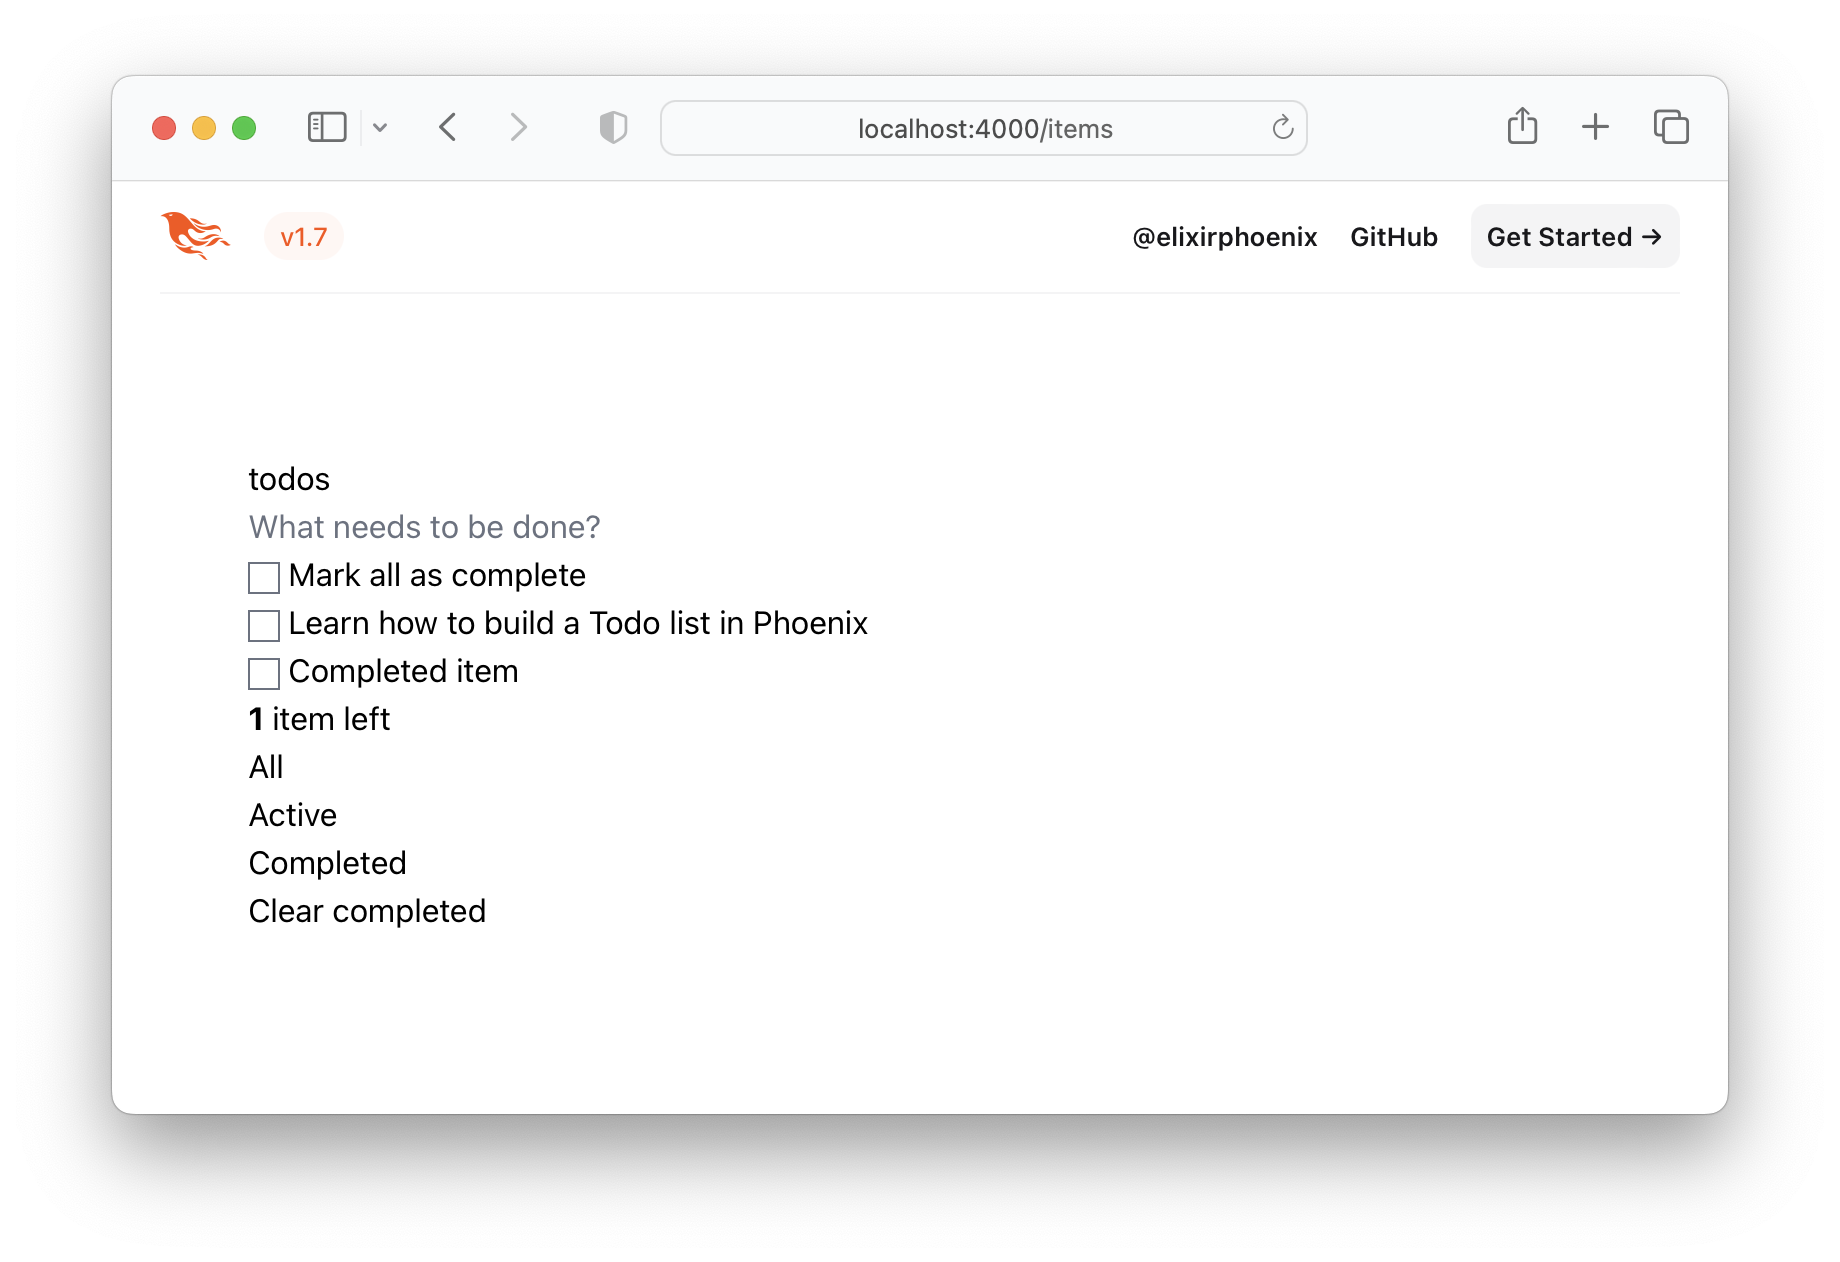
Kode HTML adalah:
 < section class =" todoapp " >
  < header class =" header " >
    < h1 > todos </ h1 >
    < input class =" new-todo " placeholder =" What needs to be done? " autofocus ="" />
  </ header >
  < section class =" main " style =" display: block; " >
    < input id =" toggle-all " class =" toggle-all " type =" checkbox " />
    < label for =" toggle-all " > Mark all as complete </ label >
    < ul class =" todo-list " >
      < li data-id =" 1590167947253 " class ="" >
        < div class =" view " >
          < input class =" toggle " type =" checkbox " />
          < label > Learn how to build a Todo list in Phoenix </ label >
          < button class =" destroy " > </ button >
        </ div >
      </ li >
      < li data-id =" 1590167956628 " class =" completed " >
        < div class =" view " >
          < input class =" toggle " type =" checkbox " />
          < label > Completed item </ label >
          < button class =" destroy " > </ button >
        </ div >
      </ li >
    </ ul >
  </ section >
  < footer class =" footer " style =" display: block; " >
    < span class =" todo-count " > < strong > 1 </ strong > item left </ span >
    < ul class =" filters " >
      < li >
        < a href =" #/ " class =" selected " > All </ a >
      </ li >
      < li >
        < a href =" #/active " > Active </ a >
      </ li >
      < li >
        < a href =" #/completed " > Completed </ a >
      </ li >
    </ ul >
    < button class =" clear-completed " style =" display: block; " >
      Clear completed
    </ button >
  </ footer >
</ section >
Mari kita konversi HTML ini ke templat Elixir ( EEx ) tertanam.
CATATAN : Alasan kami menyalin
HTMLini dari inspektur elemen browser alih-alih langsung dari sumber di github:examples/vanillajs/index.htmladalah bahwa ini adalah "aplikasi satu halaman", sehingga<ul class="todo-list"></ul>hanya dikembalikan di browser. Menyalinnya dari alat peramban dev adalah cara termudah untuk mendapatkanHTMLlengkap .
index.html.eex Buka file lib/app_web/controllers/item_html/index.html.eex dan gulir ke bawah.
Kemudian ( tanpa menghapus kode yang sudah ada di sana ) tempel kode HTML yang kami bersumber dari TODOMVC.
misalnya:
/lib/app_web/controllers/item_html/index.html.eex#L27-L73
Jika Anda mencoba menjalankan aplikasi sekarang dan mengunjungi http: // localhost: 4000/item/
Anda akan melihat ini ( tanpa CSS TODOMVC ):
Itu jelas bukan yang kita inginkan, jadi mari kita dapatkan TODODE CSS dan simpan di proyek kita!
/assets/css Kunjungi http://todomvc.com/examples/vanillejs/node_modules/todomvc-app-csss/index.css
dan simpan file ke /assets/css/todomvc-app.css .
misalnya: /assets/css/todomvc-app.css
todomvc-app.css DI app.scss Buka file assets/css/app.scss dan ganti dengan yang berikut:
 /* This file is for your main application css. */
/* @import "./phoenix.css"; */
@import "./todomvc-app.css" ;
misalnya: /assets/css/app.scss#L4
Buka file lib/app_web/components/layouts/app.html.heex Anda dan ganti konten dengan kode berikut:
 <!DOCTYPE html >
< html lang =" en " >
  < head >
    < meta charset =" utf-8 " />
    < meta http-equiv =" X-UA-Compatible " content =" IE=edge " />
    < meta name =" viewport " content =" width=device-width, initial-scale=1.0 " />
    < title > Phoenix Todo List </ title >
    < link rel =" stylesheet " href = {~p "/assets/app.css"} />
    < script defer type =" text/javascript " src = {~p "/assets/app.js"} > </ script >
  </ head >
  < body >
    < main role =" main " class =" container " >
      < %= @inner_content % >
    </ main >
  </ body >
</ html >
Sebelumnya:
lib/app_web/components/layouts/app.html.eex
Setelah:lib/app_web/components/layouts/app.html.heex
<%= @inner_content %> adalah tempat aplikasi TODO akan diterjemahkan.
Catatan : Tag
<script>disertakan di luar konvensi. Namun, kami tidak akan menulis javascript dalamJavaScriptini. Kami akan mencapai paritas fitur 100% dengan TODOMVC, tanpa menulis jajaranJS. Kami tidak "membenci"JS, sebenarnya kami memiliki tutorial "saudari" yang membangun aplikasi yang sama diJS: DWYL/JAVASCRIPT-TODO-LISTORIAL kami hanya ingin mengingatkan Anda bahwa Anda tidak memerlukanJSuntuk membangun aplikasi web yang berfungsi penuh dengan UX yang hebat!
Dengan template tata letak yang disimpan, file TODOMVC CSS disimpan ke /assets/css/todomvc-app.css dan todomvc-app.css yang diimpor di app.scss , halaman /items Anda sekarang harus terlihat seperti ini:
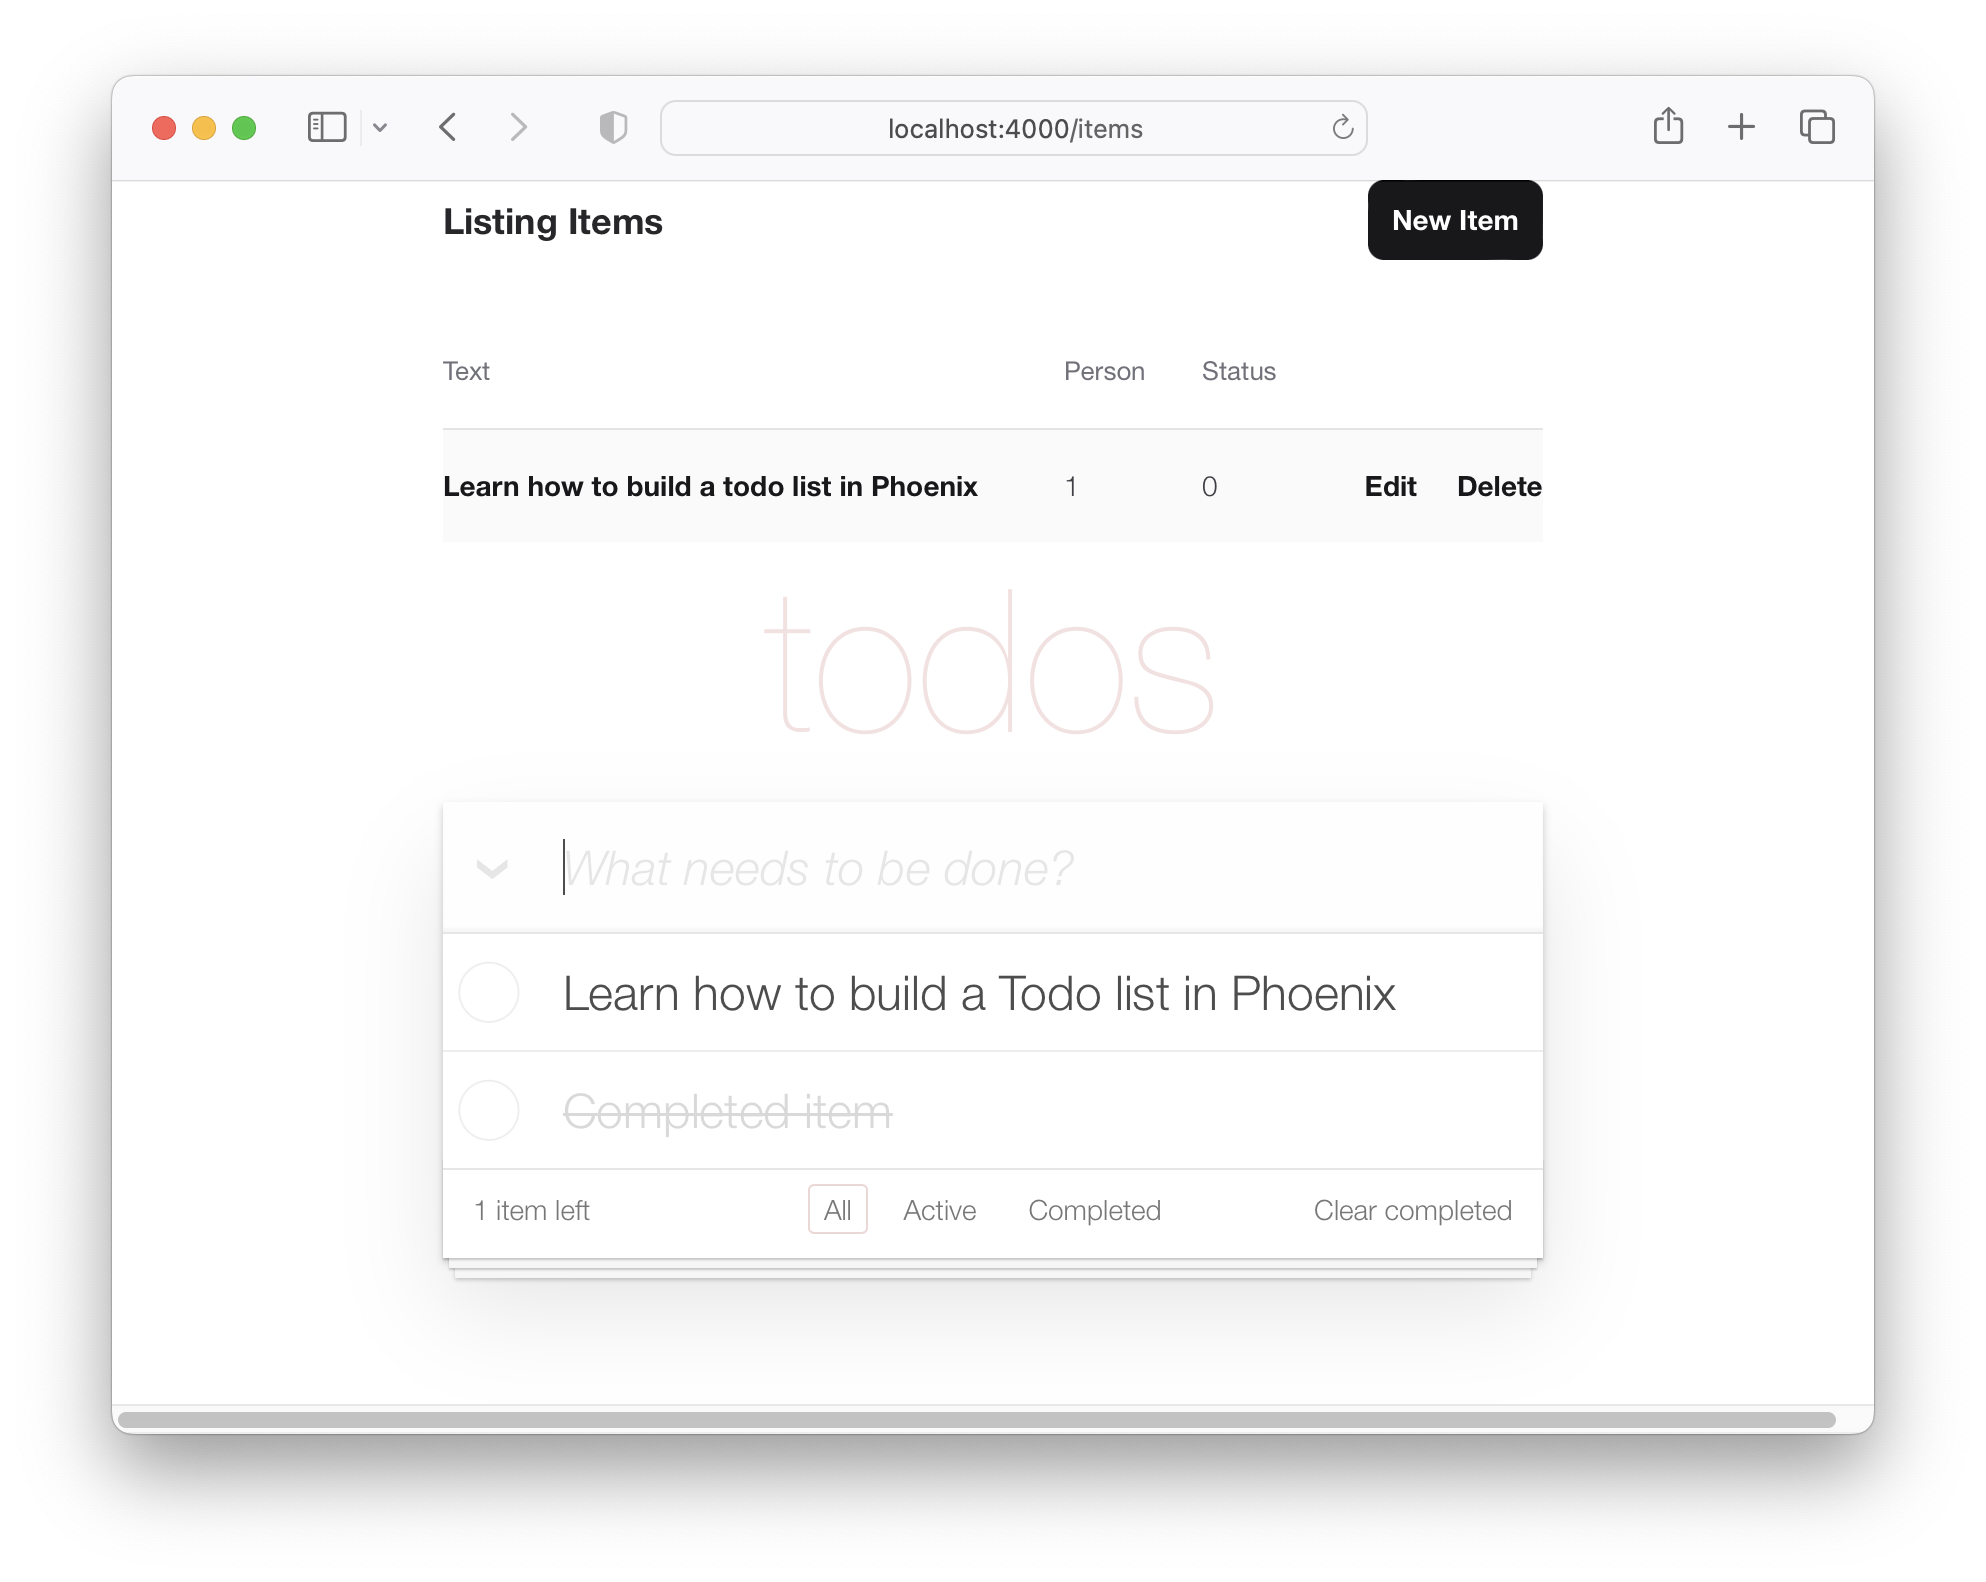
Jadi daftar TODO kami mulai terlihat seperti TODOMVC, tetapi masih hanya daftar dummy.
Untuk membuat data item di template TODOMVC, kita perlu menambahkan beberapa fungsi. Ketika kami membuat proyek dan menghasilkan model item , pengontrol dibuat (terletak di lib/app_web/controllers/item_controller.ex ) dan komponen/tampilan juga (terletak di lib/app_web/controllers/item_html.ex ). Komponen/tampilan ini adalah apa yang secara efektif mengontrol rendering konten di dalam direktori lib/app_web/controllers/item_html yang kami sesak dengan sebelumnya.
Kita tahu bahwa kita perlu membuat perubahan pada UI, jadi kita akan menambahkan beberapa fungsi dalam komponen ini (yang mirip dengan bagian tampilan dari paradigma MVC).
Ini adalah kesempatan pertama kami untuk melakukan sedikit pengembangan yang didorong oleh tes (TDD).
Buat file baru dengan Path test/app_web/controllers/item_html_test.exs .
Ketik kode berikut ke dalam file:
 defmodule AppWeb.ItemHTMLTest do
  use AppWeb.ConnCase , async: true
  alias AppWeb.ItemHTML

  test "complete/1 returns completed if item.status == 1" do
    assert ItemHTML . complete ( % { status: 1 } ) == "completed"
  end

  test "complete/1 returns empty string if item.status == 0" do
    assert ItemHTML . complete ( % { status: 0 } ) == ""
  end
end
misalnya: /test/app_web/controllers/item_html_test.exs
Jika Anda mencoba menjalankan file tes ini:
mix test test/app_web/controllers/item_html_test.exsAnda akan melihat kesalahan berikut (karena fungsinya belum ada!):
** (UndefinedFunctionError) function AppWeb.ItemHTML.checked/1 is undefined or private
Buka file lib/app_web/controllers/item_html.ex dan tulis fungsi untuk membuat tes lulus .
Beginilah cara kami mengimplementasikan fungsi. File item_html.ex Anda sekarang akan terlihat seperti berikut.
 defmodule AppWeb.ItemHTML do
  use AppWeb , :html

  embed_templates "item_html/*"

  # add class "completed" to a list item if item.status=1
  def complete ( item ) do
    case item . status do
      1 -> "completed"
      _ -> "" # empty string means empty class so no style applied
    end
  end
end
Menjalankan kembali tes dan mereka sekarang harus lulus:
mix test test/app_web/controllers/item_html_test.exsAnda harus melihat:
....

Finished in 0.1 seconds
4 tests, 0 failures
Sekarang kami telah membuat dua fungsi tampilan ini, dan tes kami lulus, mari kita gunakan di templat kami!
Buka file lib/app_web/controllers/item_html/index.html.eex dan temukan baris:
< ul class =" todo-list " > Ganti isi <ul> dengan yang berikut:
 < %= for item < - @items do % >
  < li data-id = {item.id} class = {complete(item)} >
    < div class =" view " >
      < %= if item.status == 1 do % >
        < input class =" toggle " type =" checkbox " checked />
      < % else % >
        < input class =" toggle " type =" checkbox " />
      < % end % >
      < label > < %= item.text % > </ label >
      < .link
        class="destroy"
        href={~p"/items/#{item}"}
        method="delete"
      >
      </ .link >
    </ div >
  </ li >
< % end % >
misalnya: lib/app_web/controllers/item_html/index.html.heex#L43-L53
Dengan dua file yang disimpan, jika Anda menjalankan aplikasi sekarang: mix phx.server dan kunjungi http: // localhost: 4000/item.
Anda akan melihat items nyata yang Anda buat di Langkah 2.2 di atas:

Sekarang setelah kami memiliki item yang diajukan dalam tata letak TODOMVC, mari kita bekerja untuk membuat item baru dengan gaya "aplikasi satu halaman".
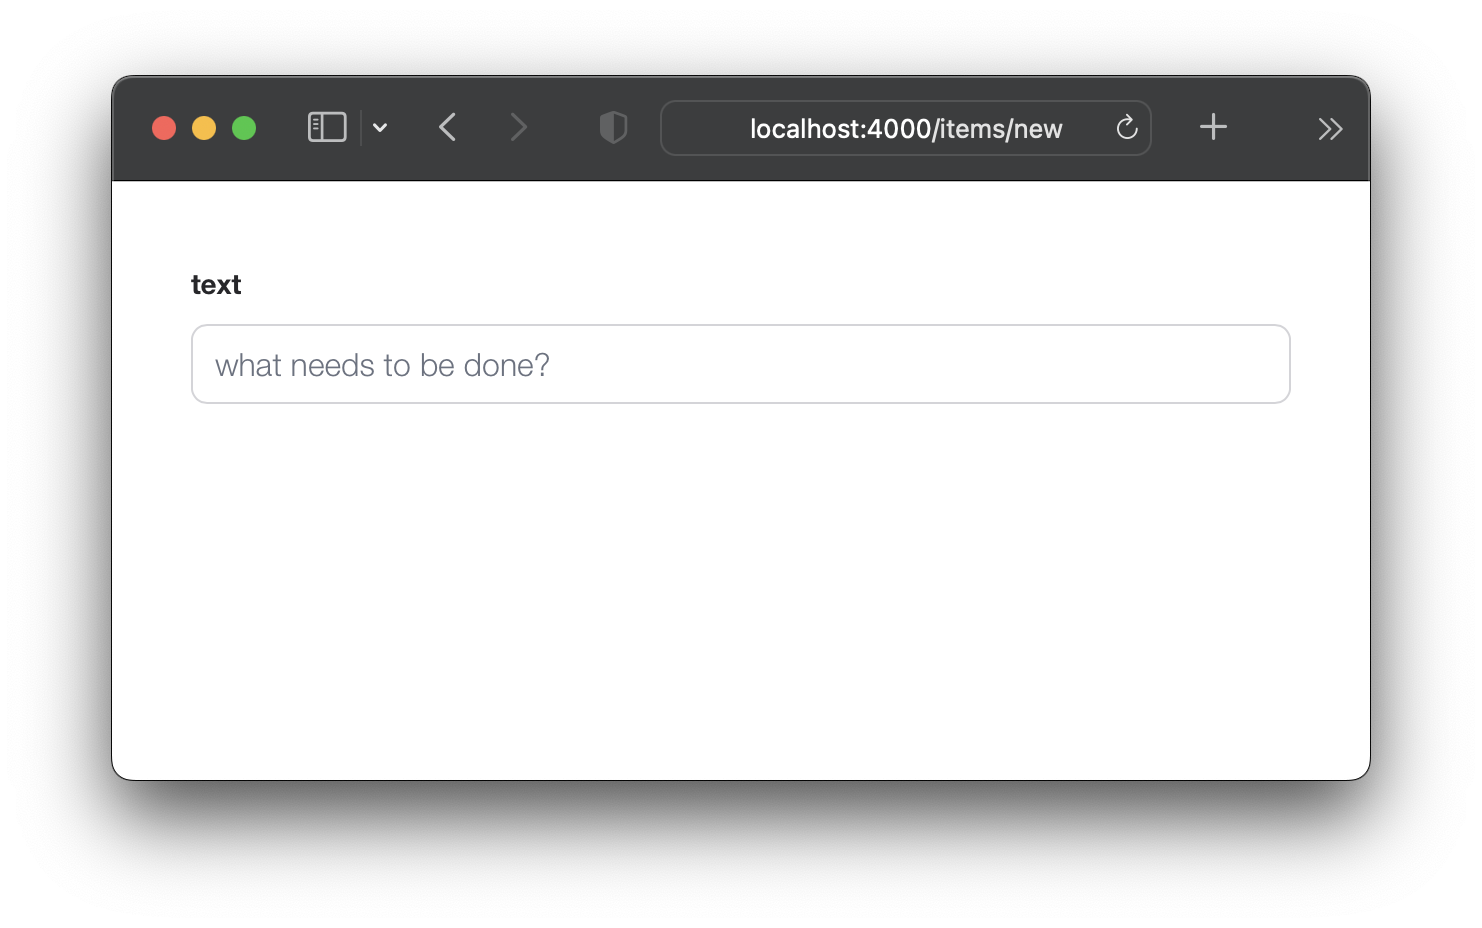
Saat ini Formulir "Item Baru" kami tersedia di: http: // localhost: 4000/item/baru ( sebagaimana disebutkan dalam langkah 2 di atas )
Kami ingin orang tersebut dapat membuat item baru tanpa harus menavigasi ke halaman yang berbeda. Untuk mencapai tujuan itu, kami akan menyertakan lib/app_web/controllers/item_html/new.html.heex template ( parsial ) di dalam templat lib/app_web/controllers/item_html/index.html.heex . misalnya:
Sebelum kita bisa melakukan itu, kita perlu merapikan template new.html.heex untuk menghapus bidang yang tidak kita butuhkan .
Mari buka lib/app_web/controllers/item_html/new.html.heex dan menyederhanakannya hanya untuk bidang penting :text :
 < . simple_form :let = { f } for = { @ changeset } action = { ~p " /items " } >
  < . input
    field = { { f , :text } }
    type = "text"
    placeholder = "what needs to be done?"
  / >
  < :actions >
    < . button style = "display:none" > Save Item< / . button >
  < / :actions >
< / . simple_form >
Sebelum:
/lib/app_web/controllers/item_html/new.html.heex
Setelah:/lib/app_web/controllers/item_html/new.html.heex
Kita juga perlu mengubah gaya tag <.input> . Dengan Phoenix, di dalam file lib/app_web/components/core_components.ex , gaya didefinisikan untuk komponen pra-dibangun (yang merupakan kasus dengan <.input> ).
Untuk mengubah ini sehingga menggunakan gaya yang sama dengan TODODE, cari baris berikut.
def input ( assigns ) do
Ubah atribut kelas dengan kelas new-todo . Fungsi ini seharusnya terlihat seperti berikut.
  def input ( assigns ) do
    ~H """
    <div phx-feedback-for={@name}>
      <.label for={@id}><%= @label %></.label>
      <input
        type={@type}
        name={@name}
        id={@id || @name}
        value={@value}
        class={[
          input_border(@errors),
          "new-todo"
        ]}
        {@rest}
      />
      <.error :for={msg <- @errors}><%= msg %></.error>
    </div>
    """
  end
Kita juga perlu mengubah gaya actions di dalam simple_form . Dalam file yang sama, cari def simple_form(assigns) do dan ubah sehingga sepertinya:
  def simple_form ( assigns ) do
    ~H """
    <.form :let={f} for={@for} as={@as} {@rest}>
      <div>
        <%= render_slot(@inner_block, f) %>
        <div :for={action <- @actions}>
          <%= render_slot(action, f) %>
        </div>
      </div>
    </.form>
    """
  end
Jika Anda menjalankan aplikasi Phoenix sekarang dan kunjungi http: // localhost: 4000/item/baru Anda akan melihat satu :text dan tidak ada tombol "simpan":
Jangan khawatir, Anda masih bisa mengirimkan formulir dengan kunci enter (return). Namun jika Anda mencoba mengirimkan formulir sekarang, itu tidak akan berhasil karena kami menghapus dua bidang yang disyaratkan oleh changeset ! Mari kita perbaiki itu.
items untuk Menetapkan Nilai default Mengingat bahwa kami telah menghapus dua bidang ( :person_id dan :status ) dari new.html.eex , kita perlu memastikan ada nilai default untuk ini dalam skema. Buka file lib/app/todo/item.ex dan ganti konten dengan yang berikut:
 defmodule App.Todo.Item do
  use Ecto.Schema
  import Ecto.Changeset

  schema "items" do
    field :person_id , :integer , default: 0
    field :status , :integer , default: 0
    field :text , :string

    timestamps ( )
  end

  @ doc false
  def changeset ( item , attrs ) do
    item
    |> cast ( attrs , [ :text , :person_id , :status ] )
    |> validate_required ( [ :text ] )
  end
end
Di sini kami memperbarui schema "item" untuk menetapkan nilai default 0 untuk person_id dan status . Dan di changeset/2 kami menghapus persyaratan untuk person_id dan status . Dengan begitu formulir item baru kami dapat dikirimkan hanya dengan bidang text .
misalnya: /lib/app/todo/item.ex#L6-L7
Sekarang kami memiliki nilai default untuk person_id dan status jika Anda mengirimkan /items/new , itu akan berhasil.
index/2 di ItemController Untuk mengatur formulir item baru ( new.html.eex ) di template index.html.eex , kita perlu memperbarui AppWeb.ItemController.index/2 untuk memasukkan perubahan.
Buka file lib/app_web/controllers/item_controller.ex dan perbarui fungsi index/2 ke yang berikut:
 def index ( conn , _params ) do
  items = Todo . list_items ( )
  changeset = Todo . change_item ( % Item { } )
  render ( conn , "index.html" , items: items , changeset: changeset )
end
Sebelum: /lib/app_web/controllers/item_controller.ex
Setelah: /lib/app_web/controllers/item_controller.ex#L9-L10
Anda tidak akan melihat perubahan dalam UI atau tes setelah langkah ini. Pindah saja ke 5.3 di mana momen "aha" terjadi.
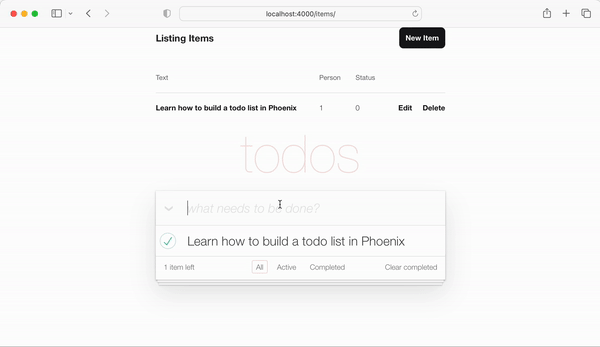
new.html.eex di dalam index.html.eex Sekarang kami telah melakukan semua pekerjaan persiapan, langkah selanjutnya adalah membuat new.html.eex ( parsial ) di dalam index.html.eex Template.
Buka file lib/app_web/controllers/item_html/index.html.heex dan temukan baris:
< input class =" new-todo " placeholder =" What needs to be done? " autofocus ="" >Gantilah dengan ini:
< % = new ( Map . put ( assigns , :action , ~p " /items/new " ) ) % > Mari kita hancurkan apa yang baru saja kita lakukan. Kami menanamkan parsial new.html.heex di dalam file index.html.heex . Kami melakukan ini dengan memanggil fungsi new/2 di dalam item_controller.ex . Fungsi ini berkaitan dengan halaman dalam items/new dan membuat file new.html.heex . Karenanya mengapa kita menyebut fungsi ini untuk berhasil disematkan?
Sebelum: /lib/app_web/controllers/item_html/index.html.heex#L36
Setelah: /lib/app_web/controllers/item_html/index.html.heex#L36
Jika Anda menjalankan aplikasi sekarang dan kunjungi: http: // localhost: 4000/item
Anda dapat membuat item dengan mengetik teks Anda dan mengirimkannya dengan kunci enter (return).
Mengarahkan ulang ke template "show" adalah "OK", tetapi kita dapat melakukan ux yang lebih baik dengan mengarahkan kembali ke kembali ke template index.html . Untungnya ini semudah memperbarui satu baris dalam kode.
redirect di create/2 Buka file lib/app_web/controllers/item_controller.ex dan cari fungsi create . Secara khusus baris:
|> redirect ( to: ~p " /items/ #{ item } " )Perbarui baris ke:
|> redirect ( to: ~p " /items/ " ) Sebelum: /lib/app_web/controllers/item_controller.ex#L22
Setelah: /lib/app_web/controllers/item_controller.ex#L23
Sekarang ketika kami membuat item baru, kami diarahkan ke template index.html :

item_controller_test.exs untuk mengarahkan ke index Perubahan yang kami buat pada file new.html.heex dan langkah -langkah di atas telah melanggar beberapa tes otomatis kami. Kita harus memperbaikinya.
Jalankan tes:
mix testAnda akan melihat output berikut:
 Finished in 0.08 seconds (0.03s async, 0.05s sync)
23 tests, 3 failures
Buka file test/app_web/controllers/item_controller_test.exs dan temukan describe "new item" dan describe "create item" . Ubah keduanya menjadi berikut ini.
Ganti tes:
 describe "new item" do
  test "renders form" , % { conn: conn } do
    conn = get ( conn , ~p " /items/new " )
    assert html_response ( conn , 200 ) =~ "what needs to be done?"
  end
end

describe "create item" do
  test "redirects to show when data is valid" , % { conn: conn } do
    conn = post ( conn , ~p " /items " , item: @ create_attrs )

    assert % { } = redirected_params ( conn )
    assert redirected_to ( conn ) == ~p " /items/ "
  end

  test "errors when invalid attributes are passed" , % { conn: conn } do
    conn = post ( conn , ~p " /items " , item: @ invalid_attrs )
    assert html_response ( conn , 200 ) =~ "can't be blank"
  end
end
Kode yang diperbarui:
/test/app_web/controllers/item_controller_test.exs#L34-L55
Jika Anda menjalankan kembali tes mix test akan sekarang semua lulus lagi.
......................
Finished in 0.2 seconds (0.09s async, 0.1s sync)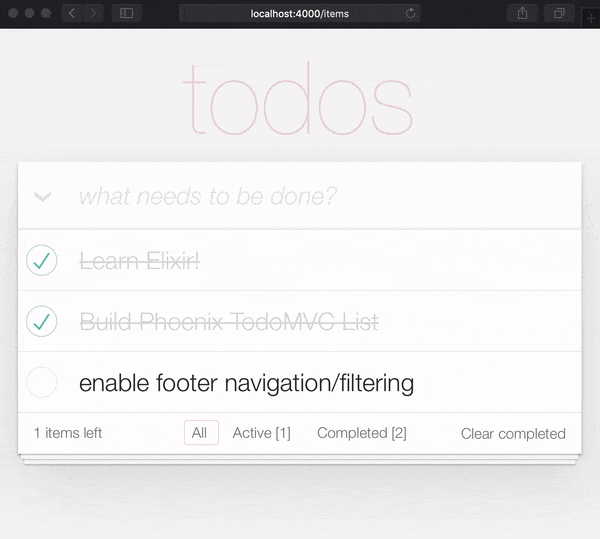
22 tests, 0 failuresSejauh ini fungsionalitas utama TODOMVC UI berfungsi, kami dapat membuat item baru dan mereka muncul dalam daftar kami. Pada langkah ini kita akan meningkatkan UI untuk memasukkan jumlah item yang tersisa di sudut kiri bawah.
Buka file test/app_web/controllers/item_html_test.exs dan buat dua tes berikut:
 test "remaining_items/1 returns count of items where item.status==0" do
  items = [
    % { text: "one" , status: 0 } ,
    % { text: "two" , status: 0 } ,
    % { text: "done" , status: 1 }
  ]
  assert ItemHTML . remaining_items ( items ) == 2
end

test "remaining_items/1 returns 0 (zero) when no items are status==0" do
  items = [ ]
  assert ItemHTML . remaining_items ( items ) == 0
end
EG: test/app_web/controllers/item_html_test.exs#L14-L26
Tes ini akan gagal karena fungsi ItemHTML.remaining_items/1 tidak ada.
Buat tes lulus dengan menambahkan kode berikut ke file lib/app_web/controllers/item_html.ex :
 # returns integer value of items where item.status == 0 (not "done")
def remaining_items ( items ) do
  Enum . filter ( items , fn i -> i . status == 0 end ) |> Enum . count
end
misalnya: /lib/app_web/controllers/item_html#L15-L17
Sekarang tes lulus, gunakan remaining_items/1 di templat index.html . Buka file lib/app_web/controllers/item_html/index.html.eex dan temukan baris kode:
< span class =" todo-count " > < strong > 1 </ strong > item left </ span >Ganti dengan baris ini:
< span class =" todo-count " > < %= remaining_items(@items) % > items left </ span > Ini hanya memanggil fungsi ItemHTML.remaining_items/1 dengan daftar @items yang akan mengembalikan jumlah integer dari item yang tersisa yang belum "selesai".
Misalnya: /lib/app_web/controllers/item_html/index.html.eex#L60
Pada titik ini barang -barang (yang tersisa) penghitung di kiri bawah TODOMVC UI berfungsi !
Tambahkan item new ke daftar Anda dan saksikan peningkatan hitungan:
Itu cukup mudah mari kita coba sesuatu yang sedikit lebih maju!
Beristirahatlah dan ambil segelas air segar, bagian selanjutnya akan menjadi intens !
status Item Todo ke 1 Salah satu fungsi inti dari daftar TODO adalah mengubah status item dari 0 hingga 1 ("Lengkap").
Dalam skema kami, item yang sudah selesai memiliki status 1 .
Kami akan membutuhkan dua fungsi di pengontrol kami:
toggle_status/1 mengubah status item misalnya: 0 hingga 1 dan 1 hingga 0.toggle/2 Fungsi penangan untuk permintaan HTTP untuk beralih status item. Buka file test/app_web/controllers/item_controller_test.exs . Kami akan membuat beberapa perubahan di sini sehingga kami dapat menambahkan tes ke fungsi yang kami sebutkan sebelumnya. Kami akan mengimpor App.Todo di dalam item_controller_test.exs dan memperbaiki konstanta membuat dan atribut untuk membuat item tiruan. Pastikan awal file terlihat seperti itu.
 defmodule AppWeb.ItemControllerTest do
  use AppWeb.ConnCase
  alias App.Todo

  import App.TodoFixtures

  @ create_attrs % { person_id: 42 , status: 0 , text: "some text" }
  @ public_create_attrs % { person_id: 0 , status: 0 , text: "some public text" }
  @ completed_attrs % { person_id: 42 , status: 1 , text: "some text completed" }
  @ public_completed_attrs % { person_id: 0 , status: 1 , text: "some public text completed" }
  @ update_attrs % { person_id: 43 , status: 1 , text: "some updated text" }
  @ invalid_attrs % { person_id: nil , status: nil , text: nil }
Kami menambahkan atribut Item tetap untuk kemudian digunakan dalam tes. Kami menentukan Item public karena nanti kami akan menambahkan otentikasi ke aplikasi ini.
Setelah ini, temukan fungsi defp create_item()/1 di dalam file yang sama. Ubahnya jadi sepertinya begitu.
  defp create_item ( _ ) do
    item = item_fixture ( @ create_attrs )
    % { item: item }
  end
Kami akan menggunakan fungsi ini untuk membuat objek Item untuk digunakan dalam tes yang akan kami tambahkan. Omong -omong, mari kita lakukan itu! Tambahkan cuplikan berikut ke file.
 describe "toggle updates the status of an item 0 > 1 | 1 > 0" do
  setup [ :create_item ]

  test "toggle_status/1 item.status 1 > 0" , % { item: item } do
    assert item . status == 0
    # first toggle
    toggled_item = % { item | status: AppWeb.ItemController . toggle_status ( item ) }
    assert toggled_item . status == 1
    # second toggle sets status back to 0
    assert AppWeb.ItemController . toggle_status ( toggled_item ) == 0
  end

  test "toggle/2 updates an item.status 0 > 1" , % { conn: conn , item: item } do
    assert item . status == 0
    get ( conn , ~p ' /items/toggle/ #{ item . id } ' )
    toggled_item = Todo . get_item! ( item . id )
    assert toggled_item . status == 1
  end
end
misalnya: /test/app_web/controllers/item_controller_test.exs#L64-L82
Buka file lib/app_web/controllers/item_controller.ex dan tambahkan fungsi berikut ke dalamnya:
  def toggle_status ( item ) do
    case item . status do
      1 -> 0
      0 -> 1
    end
  end

  def toggle ( conn , % { "id" => id } ) do
    item = Todo . get_item! ( id )
    Todo . update_item ( item , % { status: toggle_status ( item ) } )
    conn
    |> redirect ( to: ~p " /items " )
  end
misalnya: /lib/app_web/controllers/item_controller.ex#L64-L76
Tes masih akan gagal pada titik ini karena rute yang kami gunakan dalam tes kami belum ada. Ayo perbaiki itu!
get /items/toggle/:id yang Menuju toggle/2 Buka lib/app_web/router.ex dan temukan resources "/items", ItemController . Tambahkan baris baru:
get "/items/toggle/:id" , ItemController , :toggle misalnya: /lib/app_web/router.ex#L21
Sekarang tes kami akhirnya akan lulus:
mix testAnda harus melihat:
22:39:42.231 [info]  Already up
...........................

Finished in 0.5 seconds
27 tests, 0 failurestoggle/2 saat kotak centang diklik di index.html Sekarang tes kami lulus, sudah waktunya benar -benar menggunakan semua fungsionalitas yang telah kami bangun di UI. Buka file /lib/app_web/controllers/item_html/index.html.heex dan temukan baris:
 < %= if item.status == 1 do % >
...
< % else % >
...
< % end % >
Ganti dengan yang berikut:
  < %= if item.status == 1 do % >
    < .link href={~p"/items/toggle/#{item.id}"}
        class="toggle checked" >
        type="checkbox"
    </ .link >
  < % else % >
    < .link href={~p"/items/toggle/#{item.id}"}
        type="checkbox"
        class="toggle" >
    </ .link >
  < % end % >
Ketika tautan ini diklik get /items/toggle/:id Endpoint dipanggil,
Itu pada gilirannya memicu penangan toggle/2 yang kami definisikan di atas.
Sebelum:
/lib/app_web/controllers/item_html/index.html.heex#L40
Setelah:/lib/app_web/controllers/item_html/index.html.heex#L47-L57
app.scss .checked Sayangnya, tag <a> (yang dihasilkan dengan <.link> ) tidak dapat memiliki :checked , sehingga gaya TODODOMVC default yang bekerja pada tag <input> tidak akan berfungsi untuk tautan tersebut. Jadi kita perlu menambahkan beberapa baris CSS ke app.scss kami.
Buka file assets/css/app.scss dan tambahkan baris berikut ke dalamnya:
. todo-list li . checked + label {
	background-image : url ( 'data:image/svg+xml;utf8,%3Csvg%20xmlns%3D%22http%3A//www.w3.org/2000/svg%22%20width%3D%2240%22%20height%3D%2240%22%20viewBox%3D%22-10%20-18%20100%20135%22%3E%3Ccircle%20cx%3D%2250%22%20cy%3D%2250%22%20r%3D%2250%22%20fill%3D%22none%22%20stroke%3D%22%23bddad5%22%20stroke-width%3D%223%22/%3E%3Cpath%20fill%3D%22%235dc2af%22%20d%3D%22M72%2025L42%2071%2027%2056l-4%204%2020%2020%2034-52z%22/%3E%3C/svg%3E' );
	background-repeat : no-repeat;
}
Setelah menyimpan file yang harus Anda miliki: /assets/css/app.scss#L8
Dan ketika Anda melihat aplikasi, fungsionalitas sakelar berfungsi seperti yang diharapkan:

Catatan Implementasi : Kami sangat sengaja tidak menggunakan JavaScript dalam tutorial ini karena kami mendemonstrasikan bagaimana melakukan 100% aplikasi yang diberikan sisi server. Ini selalu berfungsi bahkan ketika JS dinonaktifkan di browser atau perangkatnya sangat tua dan tidak memiliki browser web modern. Kami dapat dengan mudah menambahkan atribut onclick ke tag <input> , misalnya:
 < input < %= checked(item) % > type="checkbox" class="toggle"
onclick="location.href='
  < %= Routes.item_path(@conn, :toggle, item.id) % > ';" >
Tapi onclick adalah JavaScript dan kami tidak perlu menggunakan JS .
<a> (tautan) adalah pendekatan non-JS semantik yang sempurna untuk beralih item.status .
todo yang Benar Jika Anda "menyelesaikan" atau mengembalikan operasi, urutan Todos mungkin berbeda antara operasi ini. Agar ini konsisten, mari kita ambil semua item todo dalam urutan yang sama.
Di dalam lib/app/todo.ex , ubah list_items/0 ke yang berikut.
  def list_items do
    query =
      from (
        i in Item ,
        select: i ,
        order_by: [ asc: i . id ]
      )

    Repo . all ( query )
  end
Dengan mengambil item todo dan memesannya, kami menjamin UX tetap konsisten!
Bagian terakhir dari fungsionalitas yang perlu kita tambahkan ke UI kita adalah kemampuan untuk mengedit teks item.
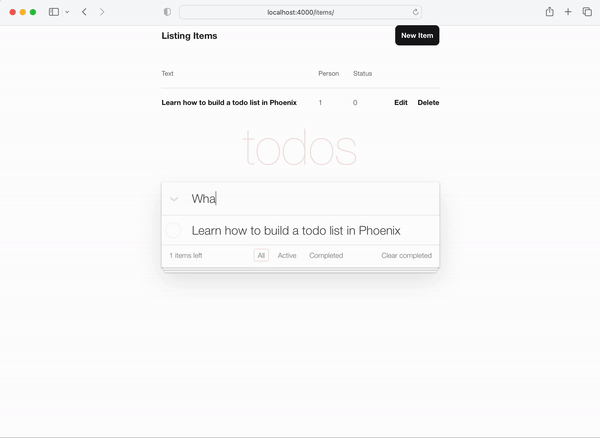
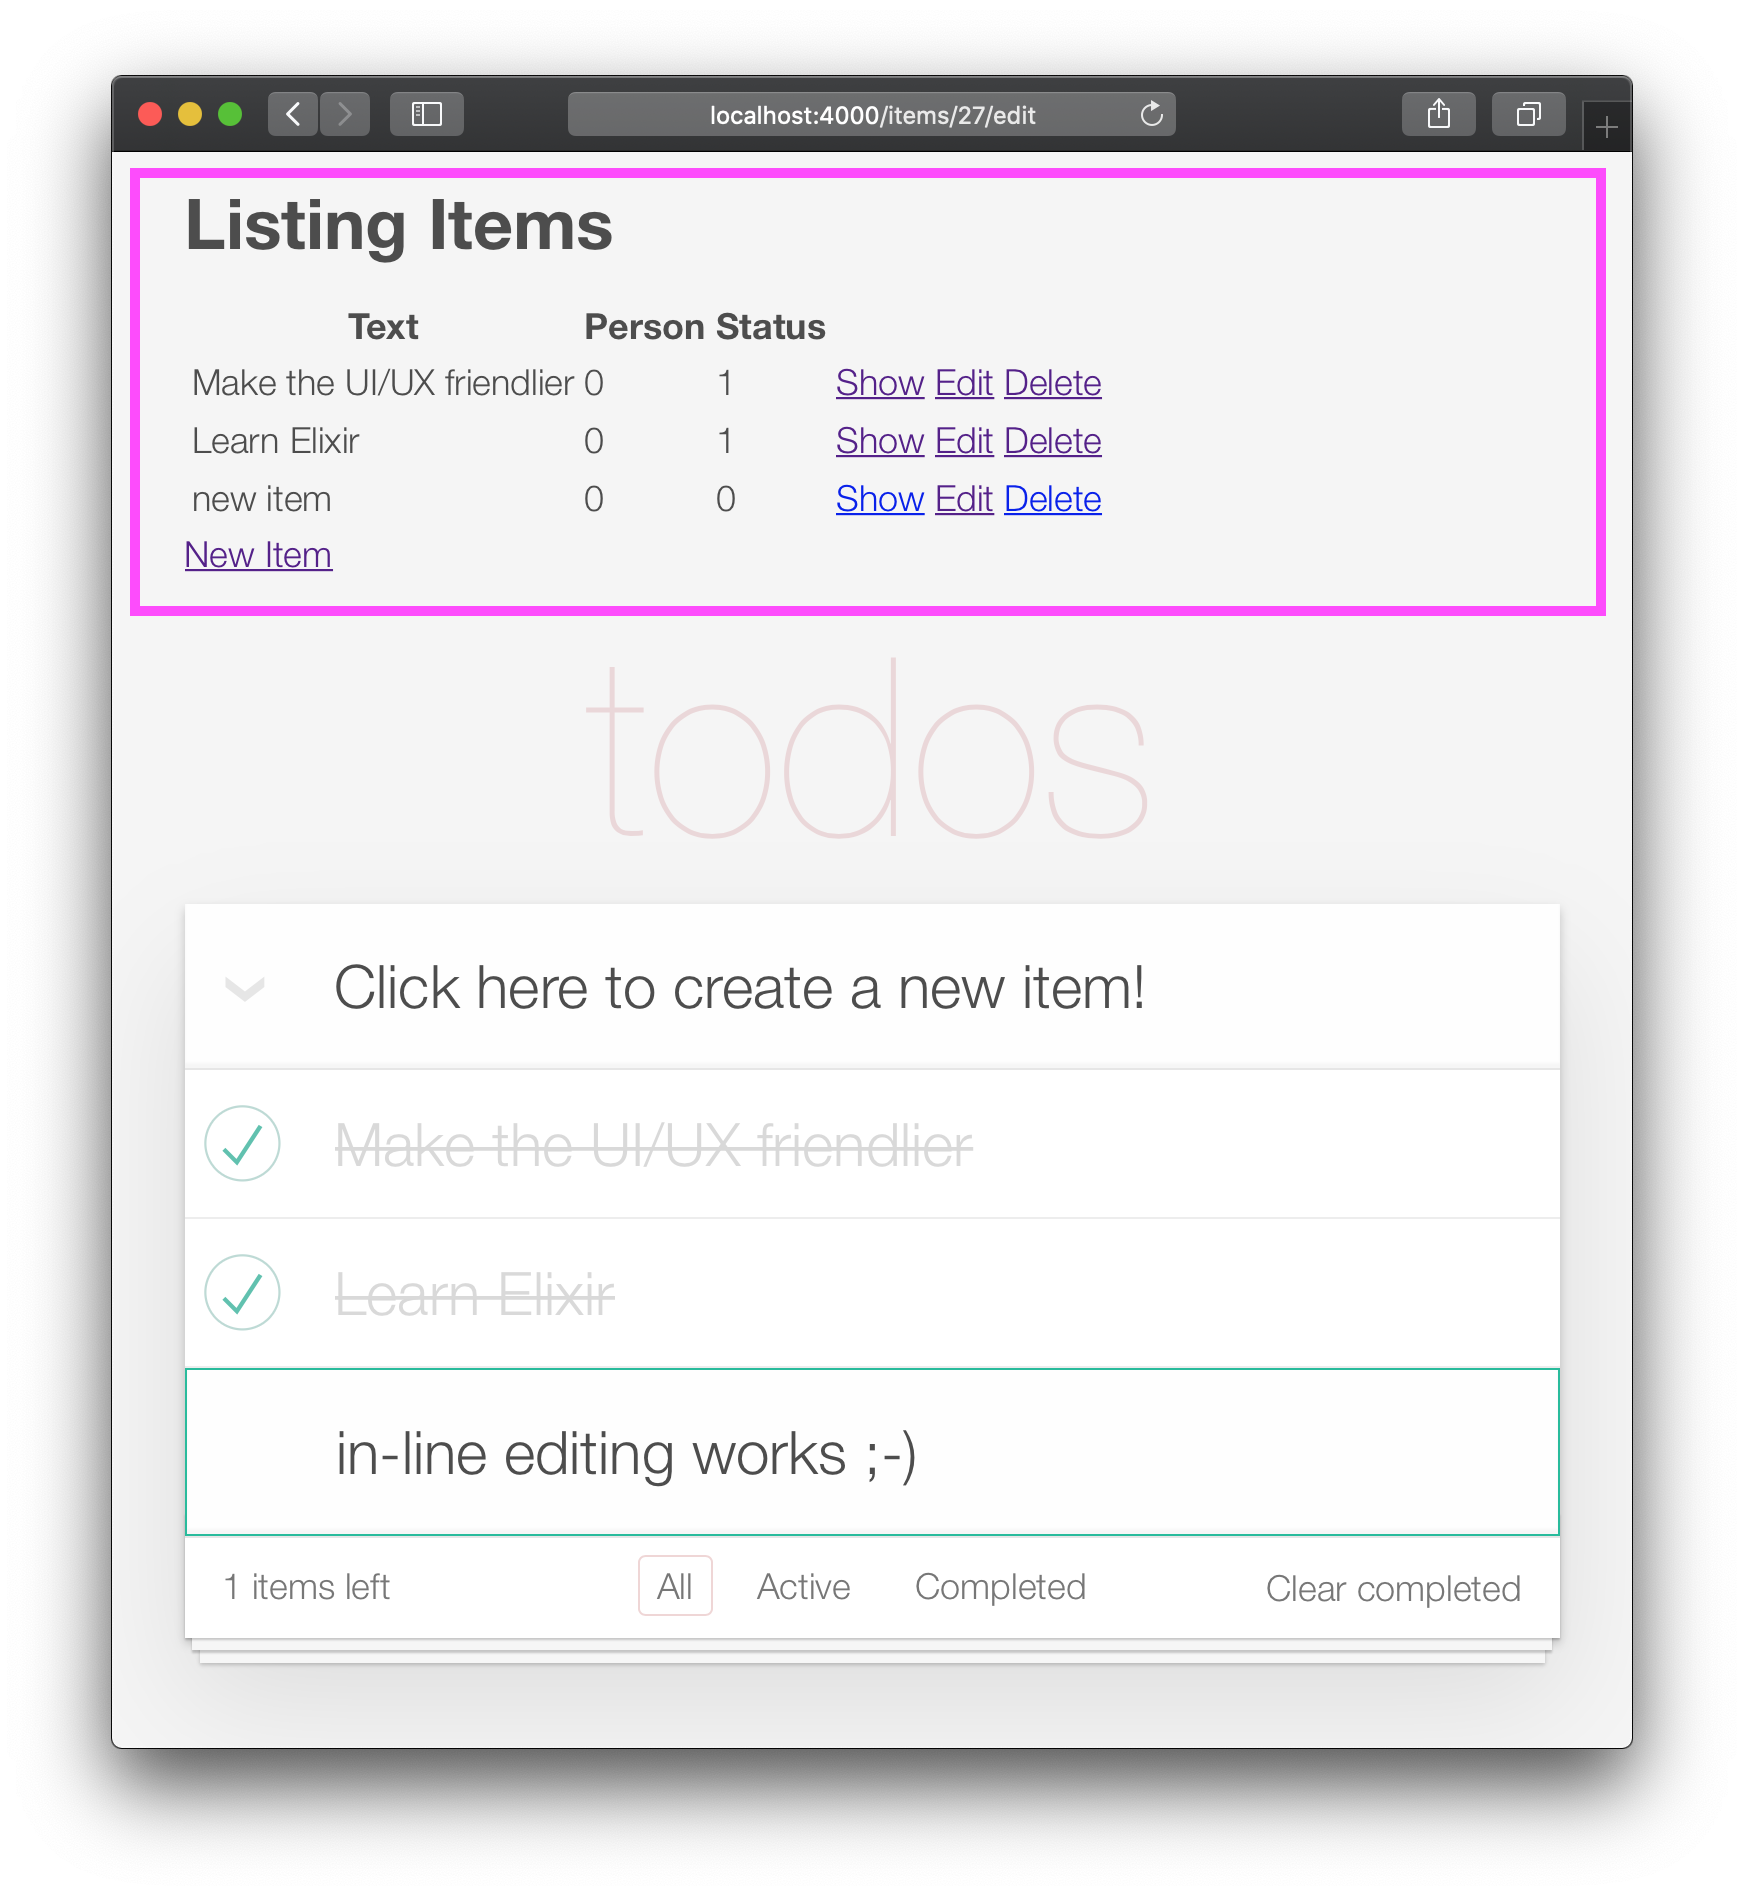
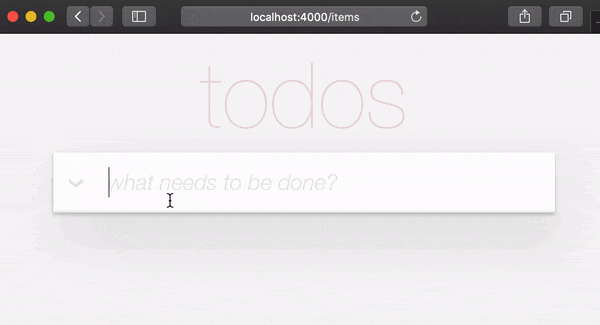
Di akhir langkah ini Anda akan memiliki pengeditan in-line Working:

Alasan membutuhkan dua klik untuk mengedit item, adalah agar orang tidak secara tidak sengaja mengedit item saat menggulir. Jadi mereka harus dengan sengaja mengklik/mengetuk dua kali untuk mengedit.
Dalam spesifikasi TooddomVC ini dicapai dengan membuat pendengar acara untuk acara klik ganda dan mengganti elemen <label> dengan <input> . Kami berusaha menghindari menggunakan JavaScript di aplikasi Phoenix yang diberikan di sisi server ( untuk saat ini ), jadi kami ingin menggunakan pendekatan alternatif. Untungnya kami dapat mensimulasikan acara klik dua kali menggunakan HTML dan CSS saja. Lihat: https://css-tricks.com/double-click-in-css ( kami sarankan membaca posting itu dan demo untuk sepenuhnya memahami cara kerja CSS ini !)
Catatan : Implementasi CSS bukan klik dua kali yang benar , deskripsi yang lebih akurat adalah "dua klik" karena kedua klik dapat terjadi dengan penundaan yang sewenang-wenang. IE First Click diikuti oleh 10 detik tunggu dan klik kedua akan memiliki efek yang sama dengan dua klik berturut -turut. Jika Anda ingin mengimplementasikan klik ganda yang sebenarnya, lihat: github.com/dwyl/javascript-todo-list-tutorial#52-double-click
Ayo lanjutkan! Buka file lib/app_web/controllers/item_html/index.html.heex dan temukan baris:
< % = new ( Map . put ( assigns , :action , ~p " /items/new " ) ) % >Ganti dengan:
 < % = if @ editing . id do % >
  <. link href = { ~p " /items " }
      method = "get"
      class= "new-todo" >
      Click here to create a new item!
  < / . link >
< % else % >
  < % = new ( Map . put ( assigns , :action , ~p " /items/new " ) ) % >
< % end % >
Di sini, kami sedang memeriksa apakah kami mengedit item, dan membuat tautan, bukan formulir. Kami melakukan ini untuk menghindari beberapa formulir di halaman. Jika kami tidak mengedit item, render new.html.heex seperti sebelumnya. Dengan ini, jika pengguna mengedit item, ia dapat "keluar dari mode pengeditan" dengan mengklik tautan yang diberikan.
misalnya: lib/app_web/controllers/item_html/index.html.heex#L30-L38
Selanjutnya, masih di file index.html.eex , temukan baris:
< %= for item < - @items do % > Ganti seluruh tag <li> dengan kode berikut.
 < li data - id = { item . id } class= { complete ( item ) } >
    < % = if item . status == 1 do % >
      <. link href = { ~p " /items/toggle/ #{ item . id } " }
          class= "toggle checked" >
          type = "checkbox"
      < / . link >
    < % else % >
      < . link href = { ~p " /items/toggle/ #{ item . id } " }
          type = "checkbox"
          class= "toggle" >
      < / . link >
    < % end % >

  < div class = "view" >
    < % = if item . id == @ editing . id do % >
      < % = edit (
        Map . put ( assigns , :action , ~p " /items/ #{ item . id } /edit " )
        |> Map . put ( :item , item )
      ) % >
    < % else % >
      < . link href = { ~p " /items/ #{ item } /edit " } class= "dblclick" >
        < label > < % = item . text % > < / label >
      < / . link >
      < span > < / span > < ! -- used for CSS Double Click -- >
    < % end % >

    < . link
      class = "destroy"
      href = { ~p " /items/ #{ item } " }
      method= "delete"
    >
    < / . link >
  < / div >
< /li>
misalnya: lib/app_web/controllers/item_html/index.html.heex#L46-L79
Kami telah melakukan beberapa hal di sini. Kami mengubah tombol sakelar di luar tag <div class="view> . Selain itu, kami telah mengubah teks dengan pernyataan blok if else .
Jika pengguna tidak mengedit, tautan ( <a> ) diterjemahkan yang, ketika diklik, memungkinkan pengguna untuk memasukkan mode "Edit". Di sisi lain, jika pengguna mengedit , ia membuat file edit.html.heex .
Omong -omong, mari kita edit edit.html.heex sehingga membuat apa yang kita inginkan: bidang teks yang, setelah Enter ditekan, mengedit item TODO yang merujuk.
 < .simple_form :let={f} for={@changeset} method="put" action={~p"/items/#{@item}"} >
  < .input
    field={{f, :text}}
    type="text"
    placeholder="what needs to be done?"
    class="new-todo"
  />
  < :actions >
    < .button
    style="display: none;"
    type="submit" >
      Save
    </ .button >
  </ :actions >
  <!-- submit the form using the Return/Enter key -->
</ .simple_form >CSS untuk pengeditan Untuk mengaktifkan efek klik ganda CSS untuk masuk ke mode edit , kita perlu menambahkan CSS berikut ke file assets/css/app.scss kami:
. dblclick {
  position : relative; /* So z-index works later, but no surprises now */
}

. dblclick + span {
  position : absolute;
  top : -1 px ; /* these negative numbers are to ensure */
  left : -1 px ; /* that the <span> covers the <a> */
  width : 103 % ; /* Gotta do this instead of right: 0; */
  bottom : -1 px ;
  z-index : 1 ;
}

. dblclick + span : active {
  left : -9999 px ;
}

. dblclick : hover {
  z-index : 2 ;
}
EG: assets/css/app.css#L13-L32
Selain itu, karena markup kami sedikit berbeda dengan markup TODOMVC, kami perlu menambahkan sedikit lebih banyak CSS untuk menjaga UI konsisten:
. todo-list li . toggle + div > a > label {
  background-image : url ( 'data:image/svg+xml;utf8,%3Csvg%20xmlns%3D%22http%3A//www.w3.org/2000/svg%22%20width%3D%2240%22%20height%3D%2240%22%20viewBox%3D%22-10%20-18%20100%20135%22%3E%3Ccircle%20cx%3D%2250%22%20cy%3D%2250%22%20r%3D%2250%22%20fill%3D%22none%22%20stroke%3D%22%23ededed%22%20stroke-width%3D%223%22/%3E%3C/svg%3E' );
  background-repeat : no-repeat;
  background-position : center left;
}

. todo-list li . checked + div > a > label
{
  background-image : url ( 'data:image/svg+xml;utf8,%3Csvg%20xmlns%3D%22http%3A//www.w3.org/2000/svg%22%20width%3D%2240%22%20height%3D%2240%22%20viewBox%3D%22-10%20-18%20100%20135%22%3E%3Ccircle%20cx%3D%2250%22%20cy%3D%2250%22%20r%3D%2250%22%20fill%3D%22none%22%20stroke%3D%22%23bddad5%22%20stroke-width%3D%223%22/%3E%3Cpath%20fill%3D%22%235dc2af%22%20d%3D%22M72%2025L42%2071%2027%2056l-4%204%2020%2020%2034-52z%22/%3E%3C/svg%3E' );
  background-repeat : no-repeat;
  background-position : center left;
}

. toggle {
  width : 10 % ;
  z-index : 3 ; /* keep the toggle checkmark above the rest */
}

a . new-todo {
  display : block;
  text-decoration : none;
}

. todo-list . new-todo {
  border : 1 px # 1abc9c solid;
}

. view a , . view a : visited {
  display : block;
  text-decoration : none;
  color : # 2b2d2f ;
}

. todo-list li . destroy {
  text-decoration : none;
  text-align : center;
  z-index : 3 ; /* keep the delete link above the text */
}
Inilah yang seharusnya terlihat oleh file app.scss Anda di akhir langkah ini: assets/css/app.css#L34-L71
ItemController.edit/2 Untuk mengaktifkan pengeditan in-line, kita perlu memodifikasi fungsi edit/2 . Buka file lib/app_web/controllers/item_controller.ex dan ganti fungsi edit/2 dengan yang berikut:
 def edit ( conn , params ) do
  index ( conn , params )
end
Selain itu, mengingat bahwa kami meminta fungsi index/2 kami untuk menangani pengeditan, kami perlu memperbarui index/2 :
 def index ( conn , params ) do
  item = if not is_nil ( params ) and Map . has_key? ( params , "id" ) do
    Todo . get_item! ( params [ "id" ] )
  else
    % Item { }
  end
  items = Todo . list_items ( )
  changeset = Todo . change_item ( item )
  render ( conn , "index.html" , items: items , changeset: changeset , editing: item )
end
Akhirnya, kita perlu menangani pengiriman formulir untuk memperbarui item (yang diberikan dalam edit.html.heex ). Ketika kami menekan Enter , pawang update/2 dipanggil di dalam lib/app_web/controllers/item_controller.ex . Kami ingin tetap di halaman yang sama setelah memperbarui item.
Jadi, ubah jadi sepertinya ini.
 def update ( conn , % { "id" => id , "item" => item_params } ) do
  item = Todo . get_item! ( id )

  case Todo . update_item ( item , item_params ) do
    { :ok , _item } ->
      conn
      |> redirect ( to: ~p " /items/ " )

    { :error , % Ecto.Changeset { } = changeset } ->
      render ( conn , :edit , item: item , changeset: changeset )
  end
end
File item_controller.ex Anda sekarang harus terlihat seperti ini: lib/app_web/controllers/item_controller.ex
ItemControllerTestDalam pencarian kami untuk membangun aplikasi satu halaman, kami melanggar beberapa tes! Tidak apa -apa. Mereka mudah diperbaiki.
Buka file test/app_web/controllers/item_controller_test.exs dan cari tes dengan teks berikut.
test "renders form for editing chosen item"
Dan ubah jadi sepertinya berikut ini.
  test "renders form for editing chosen item" , % { conn: conn , item: item } do
    conn = get ( conn , ~p " /items/ #{ item } /edit " )
    assert html_response ( conn , 200 ) =~ "Click here to create a new item"
  end
Saat kami memasukkan "Edit Timer Mode", kami membuat <a> tautan untuk kembali ke /items , seperti yang telah kami terapkan sebelumnya. Tag ini memiliki teks "Klik di sini untuk membuat item baru", yang kami tegaskan.
EG: test/app_web/controllers/item_controller_test.exs#L37-L39
Selanjutnya, cari tes dengan deskripsi berikut:
describe "update item"Perbarui blok ke bagian kode berikut.
 describe "update item" do
  setup [ :create_item ]

  test "redirects when data is valid" , % { conn: conn , item: item } do
    conn = put ( conn , ~p " /items/ #{ item } " , item: @ update_attrs )
    assert redirected_to ( conn ) == ~p " /items/ "

    conn = get ( conn , ~p " /items/ " )
    assert html_response ( conn , 200 ) =~ "some updated text"
  end

  test "errors when invalid attributes are passed" , % { conn: conn , item: item } do
    conn = put ( conn , ~p " /items/ #{ item } " , item: @ invalid_attrs )
    assert html_response ( conn , 200 ) =~ "can't be blank"
  end
end
EG: test/app_web/controllers/item_controller_test.exs#L67-L80
Kami telah memperbarui jalur yang dialihkan aplikasi setelah memperbarui item. Karena kami sedang membangun aplikasi satu halaman, jalur itu berkaitan dengan /items/ URL.
Jika Anda menjalankan tes sekarang, mereka harus lulus lagi:
 mix test

23:08:01.785 [info]  Already up
...........................

Finished in 0.5 seconds
27 tests, 0 failures

Randomized with seed 956565
index.html Sekarang kami memiliki fitur toggle dan edit berfungsi, kami akhirnya dapat menghapus tata letak phoenix (tabel) default dari lib/app_web/controllers/item_html/index.html.heex Template.
Buka file lib/app_web/controllers/item_html/index.html.eex dan hapus semua kode sebelum baris:
< section class =" todoapp " > misalnya: lib/app_web/controllers/item_html/index.html.heex
Aplikasi Anda sekarang harus terlihat seperti ini: 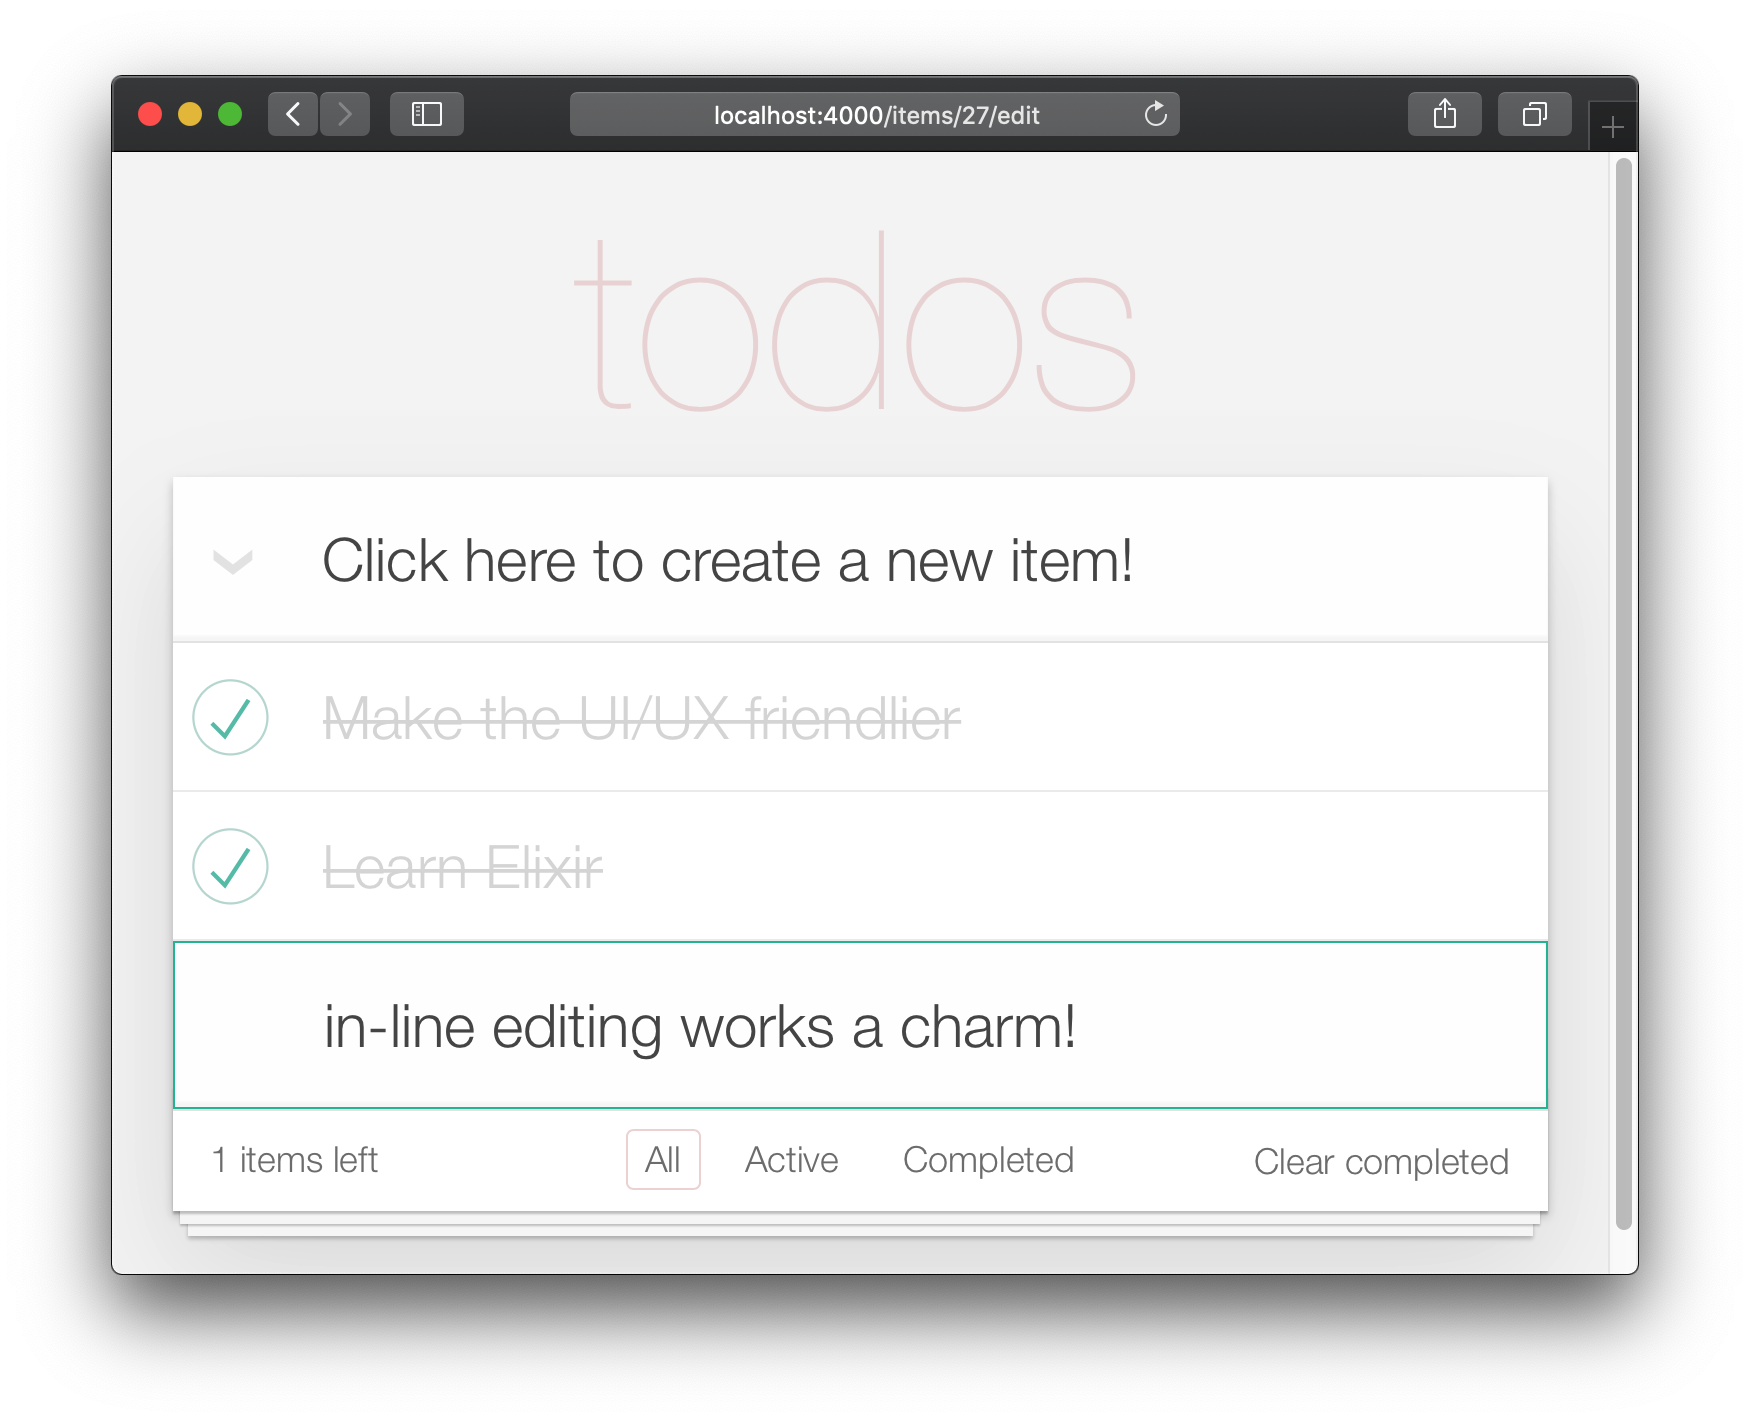
Sayangnya, dengan menghapus tata letak default, kami telah "memecahkan" tes.
Buka file test/app_web/controllers/item_controller_test.exs dan cari tes yang memiliki deskripsi berikut:
test "lists all items"Perbarui pernyataan dari:
assert html_response ( conn , 200 ) =~ "Listing Items"Ke:
assert html_response ( conn , 200 ) =~ "todos" EG: test/app_web/controllers/item_controller_test.exs#L14
Sekarang fungsionalitas inti (buat, edit/perbarui, hapus), kita dapat menambahkan peningkatan UI akhir. Pada langkah ini kita akan menambahkan navigasi/penyaringan footer.
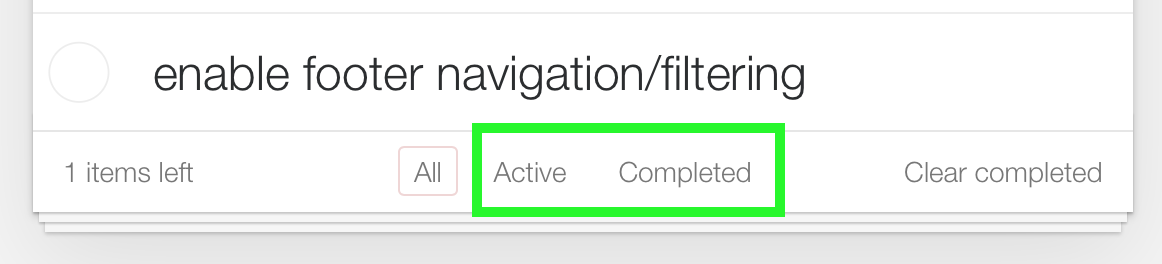
Tampilan "Semua" adalah default. "Aktif" adalah semua item dengan status==0 . "Selesai" adalah semua item dengan status==1 .
/:filterSebelum memulai, mari tambahkan tes unit. Kami ingin menampilkan item yang difilter sesuai dengan filter yang dipilih.
Buka test/app_web/controllers/item_controller_test.exs dan temukan describe "index" do . Di blok ini, tambahkan tes berikut. Ini memeriksa apakah item tersebut ditampilkan dengan benar saat filter diubah.
  test "lists items in filter" , % { conn: conn } do
    conn = post ( conn , ~p " /items " , item: @ public_create_attrs )

    # After creating item, navigate to 'active' filter page
    conn = get ( conn , ~p " /items/filter/active " )
    assert html_response ( conn , 200 ) =~ @ public_create_attrs . text

    # Navigate to 'completed page'
    conn = get ( conn , ~p " /items/filter/completed " )
    assert ! ( html_response ( conn , 200 ) =~ @ public_create_attrs . text )
  end
EG: test/app_web/controllers/item_controller_test.exs#L21-L32
Buka lib/app_web/router.ex dan tambahkan rute berikut:
get "/items/filter/:filter" , ItemController , :index misalnya: /lib/app_web/router.ex#L23
index/2 untuk mengirim filter ke melihat/template Buka file lib/app_web/controllers/item_controller.ex dan cari fungsi index/2 . Ganti doa render/3 di akhir index/2 dengan yang berikut:
 render ( conn , "index.html" ,
  items: items ,
  changeset: changeset ,
  editing: item ,
  filter: Map . get ( params , "filter" , "all" )
)
EG: lib/app_web/controllers/item_controller.ex#L17-L22
Map.get(params, "filter", "all") menetapkan nilai default filter kami ke "semua" jadi ketika index.html diberikan, tunjukkan item "semua".
filter/2 Lihat Untuk memfilter item berdasarkan status mereka, kita perlu membuat fungsi baru.
Buka file lib/app_web/controllers/item_html.ex dan buat fungsi filter/2 sebagai berikut:
 def filter ( items , str ) do
  case str do
    "items" -> items
    "active" -> Enum . filter ( items , fn i -> i . status == 0 end )
    "completed" -> Enum . filter ( items , fn i -> i . status == 1 end )
    _ -> items
  end
end
misalnya: lib/app_web/controllers/item_html.ex#L19-L26
Ini akan memungkinkan kami untuk memfilter item pada langkah berikutnya.
index.html Gunakan fungsi filter/2 untuk memfilter item yang ditampilkan. Buka file lib/app_web/controllers/item_html/index.html.heex dan cari baris loop for :
< % = for item <- @ items do % >Ganti dengan:
< % = for item <- filter ( @ items , @ filter ) do % > misalnya: lib/app_web/controllers/item_html/index.html.heex#L18
Ini memohon fungsi filter/2 yang kami tentukan pada langkah sebelumnya yang lewat dalam daftar @items dan @filter yang dipilih.
Selanjutnya, cari <footer> dan ganti isi <ul class="filters"> dengan kode berikut:
  < li >
    < % = if @ filter == "items" do % >
      <a href = "/items/filter/items" class= "selected" >
        All
      < / a >
    < % else % >
      <a href = "/items/filter/items" >
        All
      < / a >
    < % end % >
  < / li >
  < li >
    < % = if @ filter == "active" do % >
      <a href = "/items/filter/active" class= 'selected' >
        Active
        [ < % = Enum . count ( filter ( @ items , "active" ) ) % > ]
      < / a >
    < % else % >
      <a href = "/items/filter/active" >
        Active
        [ < % = Enum . count ( filter ( @ items , "active" ) ) % > ]
      < / a >
    < % end % >
  < / li >
  < li >
    < % = if @ filter == "completed" do % >
      <a href = "/items/filter/completed" class= 'selected' >
        Completed
        [ < % = Enum . count ( filter ( @ items , "completed" ) ) % > ]
      < / a >
    < % else % >
      <a href = "/items/filter/completed" >
        Completed
        [ < % = Enum . count ( filter ( @ items , "completed" ) ) % > ]
      < / a >
    < % end % >
  < / li >
Kami secara kondisional menambahkan kelas selected sesuai dengan nilai penugasan @filter .
misalnya: /lib/app_web/controllers/item_html/index.html.heex#L62-L98
Di akhir langkah ini Anda akan memiliki filter footer yang berfungsi penuh:
Kami dapat dengan cepat menutupi fungsi ini yang kami tambahkan dengan tes unit kecil. Buka test/app_web/controllers/item_html_test.exs dan tambahkan yang berikut.
  test "test filter function" do
    items = [
      % { text: "one" , status: 0 } ,
      % { text: "two" , status: 0 } ,
      % { text: "three" , status: 1 } ,
      % { text: "four" , status: 2 } ,
      % { text: "five" , status: 2 } ,
      % { text: "six" , status: 1 } ,
    ]

    assert length ( ItemHTML . filter ( items , "items" ) ) == 4
    assert length ( ItemHTML . filter ( items , "active" ) ) == 2
    assert length ( ItemHTML . filter ( items , "completed" ) ) == 2
    assert length ( ItemHTML . filter ( items , "any" ) ) == 4
  end
Dan Anda harus selesai dengan fitur ini? Pekerjaan yang luar biasa!
Kami hampir selesai dengan implementasi phoenix kami dari TODOMVC. Hal terakhir yang harus diimplementasikan adalah "jelas selesai".
Buka file lib/app_web/router.ex Anda dan tambahkan rute berikut:
get "/items/clear" , ItemController , :clear_completed scope "/" sekarang harus terlihat seperti berikut:
  scope "/" , AppWeb do
    pipe_through :browser

    get "/" , PageController , :home
    get "/items/toggle/:id" , ItemController , :toggle
    get "/items/clear" , ItemController , :clear_completed
    get "/items/filter/:filter" , ItemController , :index
    resources "/items" , ItemController
  end
Di file lib/app_web/controllers/item_controller.ex Tambahkan kode berikut:
import Ecto.Query
alias App.Repo
def clear_completed ( conn , _param ) do
person_id = 0
query = from ( i in Item , where: i . person_id == ^ person_id , where: i . status == 1 )
Repo . update_all ( query , set: [ status: 2 ] )
# render the main template:
index ( conn , % { filter: "all" } )
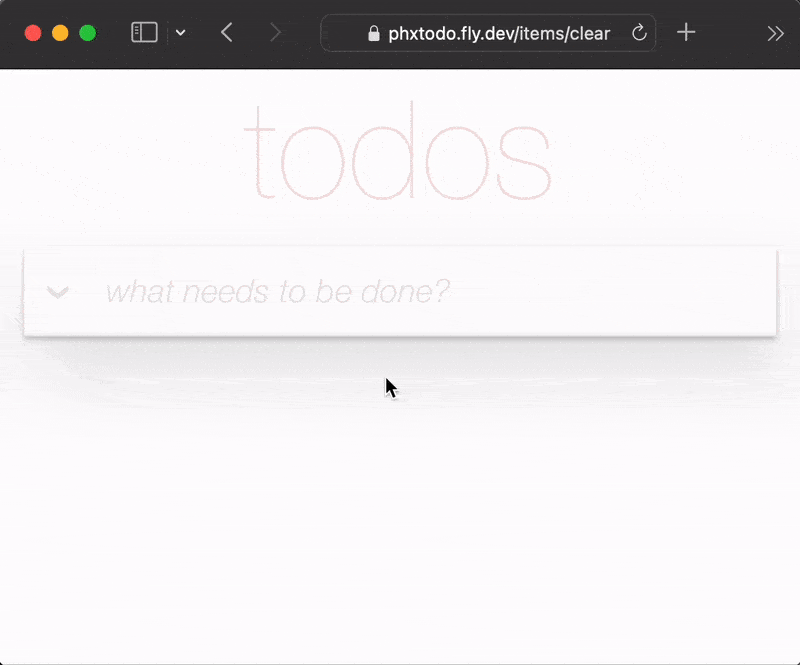
end EG: lib/app_web/controllers/item_controller.ex#L87-L93
Ini menggunakan fungsi Handy update_all/3 untuk memperbarui semua item yang sesuai dengan query . Dalam kasus kami, kami mencari semua items yang termasuk dalam person_id==0 dan memiliki status==1 .
Kami tidak menghapus item, melainkan kami memperbarui status mereka ke 2 yang untuk keperluan contoh kami berarti mereka "diarsipkan".
Catatan : Ini adalah panduan yang berguna untuk
update_all: https://adamdelong.com/bulk-update-ecto
Akhirnya, di lib/app_web/controllers/item_html/index.html.eex gulir ke bagian bawah file dan ganti baris:
 < button class = "clear-completed" style = "display: block;" >
  Clear completed
< / button >
Dengan:
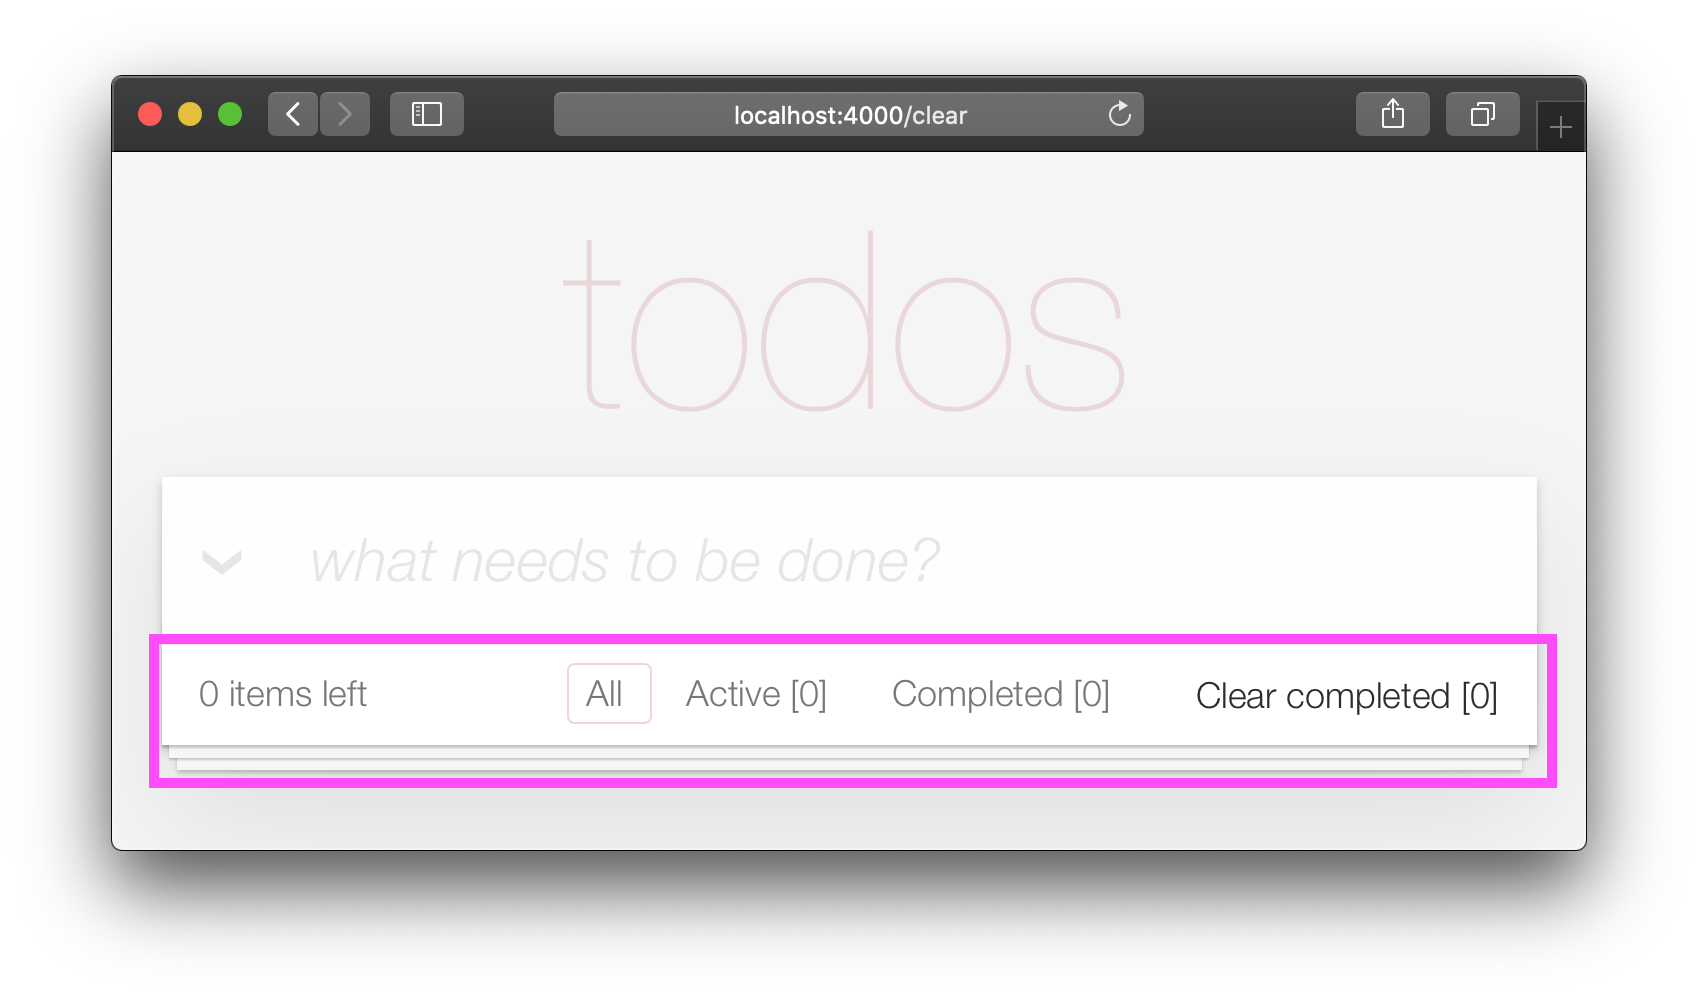
 < a class = "clear-completed" href = "/items/clear" >
  Clear completed
  [ < % = Enum . count ( filter ( @ items , "completed" ) ) % > ]
< / a >
misalnya: lib/app_web/controllers/item_html/index.html.heex#L104-L107
Hal terakhir yang perlu kita lakukan adalah memperbarui fungsi filter/2 di dalam lib/app_web/controllers/item_html.ex . Since status = 2 now pertains to an archived state, we want to return anything that is not archived.
Change the filter/2 function so it looks like so.
 def filter ( items , str ) do
  case str do
    "items" -> Enum . filter ( items , fn i -> i . status !== 2 end )
    "active" -> Enum . filter ( items , fn i -> i . status == 0 end )
    "completed" -> Enum . filter ( items , fn i -> i . status == 1 end )
    _ -> Enum . filter ( items , fn i -> i . status !== 2 end )
  end
end
At the end of this section your Todo List should have the "Clear completed" function working:
It's useful to have tests cover this feature. Open test/app_web/controllers/item_controller_test.exs . Alongside the constants, on top of the file, add the following line.
@completed_attrs %{person_id: 42, status: 1, text: "some text completed"}
We will use this to create an item that is already completed, so we can test the "clear completed" functionality.
Add the next lines to test the clear_completed/2 function.
  describe "clear completed" do
    setup [ :create_item ]

    test "clears the completed items" , % { conn: conn , item: item } do

      # Creating completed item
      conn = post ( conn , ~p " /items " , item: @ public_completed_attrs )
      # Clearing completed items
      conn = get ( conn , ~p " /items/clear " )

      items = conn . assigns . items
      [ completed_item | _tail ] = conn . assigns . items

      assert conn . assigns . filter == "all"
      assert completed_item . status == 2
    end

    test "clears the completed items in public (person_id=0)" , % { conn: conn , item: item } do

      # Creating completed item
      conn = post ( conn , ~p " /items " , item: @ public_completed_attrs )
      # Clearing completed items
      conn = get ( conn , ~p " /items/clear " )

      items = conn . assigns . items
      [ completed_item | _tail ] = conn . assigns . items

      assert conn . assigns . filter == "all"
      assert completed_item . status == 2
    end
endAt this point we already have a fully functioning Phoenix Todo List. There are a few things we can tidy up to make the App even better!
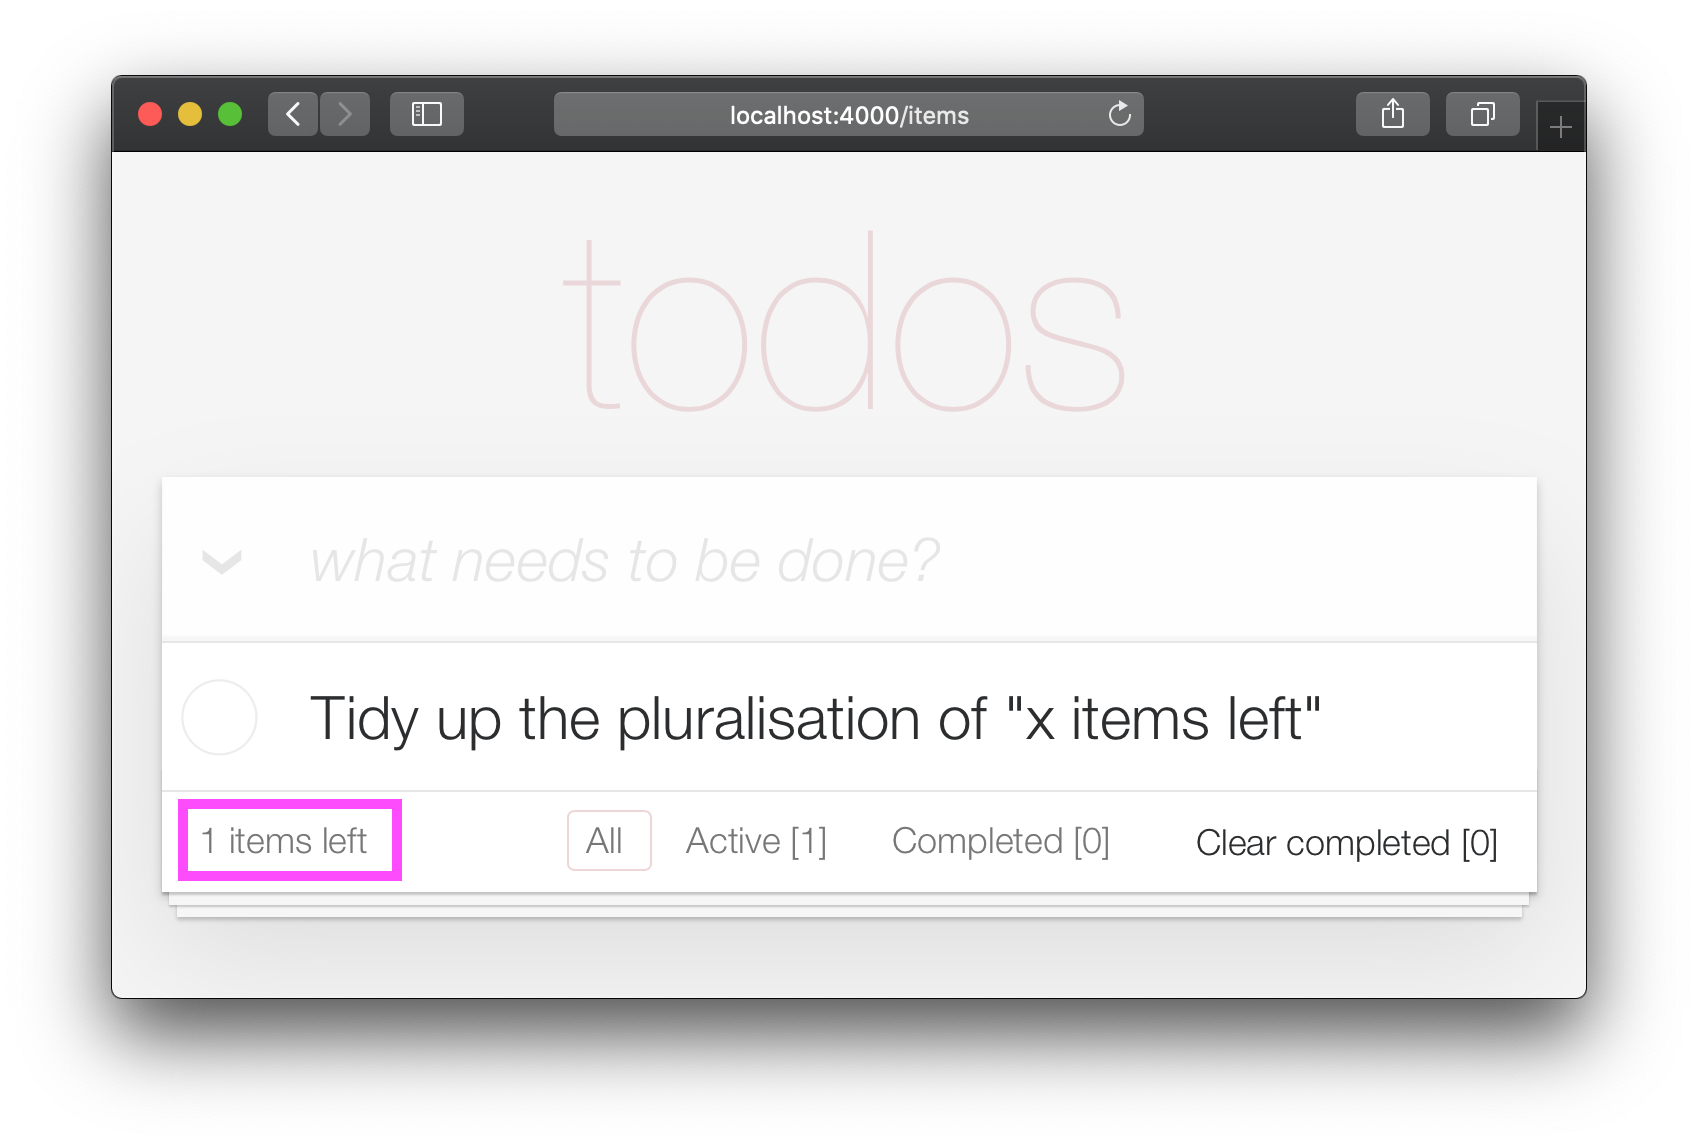
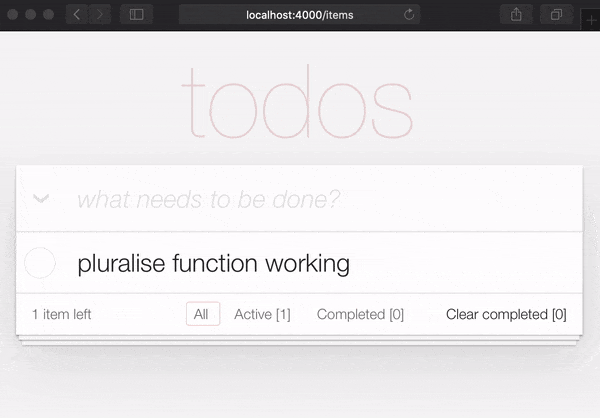
If you are the type of person to notice the tiny details, you would have been itching each time you saw the " 1 items left " in the bottom left corner:
Open your test/app_web/controllers/item_html_test.exs file and add the following test:
 test "pluralise/1 returns item for 1 item and items for < 1 <" do
  assert ItemHTML . pluralise ( [ % { text: "one" , status: 0 } ] ) == "item"
  assert ItemHTML . pluralise ( [
    % { text: "one" , status: 0 } ,
    % { text: "two" , status: 0 }
  ] ) == "items"
  assert ItemHTML . pluralise ( [ % { text: "one" , status: 1 } ] ) == "items"
end
eg: test/app_web/controllers/item_html_test.exs#L28-L35
This test will obviously fail because the AppWeb.ItemHTML.pluralise/1 is undefined. Let's make it pass!
Open your lib/app_web/controllers/item_html.ex file and add the following function definition for pluralise/1 :
 # pluralise the word item when the number of items is greater/less than 1
def pluralise ( items ) do
  # items where status < 1 is equal to Zero or Greater than One:
  case remaining_items ( items ) == 0 || remaining_items ( items ) > 1 do
    true -> "items"
    false -> "item"
  end
end
eg: lib/app_web/controllers/item_html.ex#L28-L35
Note : we are only pluralising one word in our basic Todo App so we are only handling this one case in our
pluralise/1function. In a more advanced app we would use a translation tool to do this kind of pluralising. See: https://hexdocs.pm/gettext/Gettext.Plural.html
Finally, use the pluralise/1 in our template. Open lib/app_web/controllers/item_html/index.html.heex
Locate the line:
< span class = "todo-count" > < % = remaining_items ( @ items ) % > items left < /span>And replace it with the following code:
 < span class = "todo-count" >
  < % = remaining_items ( @ items ) % > < % = pluralise ( @ items ) % > left
< /span>
eg: lib/app_web/controllers/item_html/index.html.heex#L61
At the end of this step you will have a working pluralisation for the word item/items in the bottom left of the UI:
If you visit one of the TodoMVC examples, you will see that no <footer> is displayed when there are no items in the list: http://todomvc.com/examples/vanillajs
At present our App shows the <footer> even if their are Zero items: ?
This is a visual distraction/clutter that creates unnecessary questions in the user's mind. Let's fix it!
Open your lib/app_web/controllers/item_html.ex file and add the following function definition unarchived_items/1 :
 def got_items? ( items ) do
  Enum . filter ( items , fn i -> i . status < 2 end ) |> Enum . count > 0
end
eg: lib/app_web/controllers/item_html.ex#L37-L39
Now use got_items?/1 in the template.
Wrap the <footer> element in the following if statement:
 < % = if got_items? ( @ items ) do % >

< % end % >
eg: lib/app_web/controllers/item_html/index.html.heex#L58
The convention in Phoenix/Elixir ( which came from Ruby/Rails ) is to have a ? (question mark) in the name of functions that return a Boolean ( true/false ) result.
At the end of this step our <footer> element is hidden when there are no items:
/ to ItemController.index/2 The final piece of tidying up we can do is to change the Controller that gets invoked for the "homepage" ( / ) of our app. Currently when the person viewing the Todo App
visits http://localhost:4000/ they see the lib/app_web/controllers/page_html/home.html.eex template:
This is the default Phoenix home page ( minus the CSS Styles and images that we removed in step 3.4 above ). It does not tell us anything about the actual app we have built, it doesn't even have a link to the Todo App! Let's fix it!
Open the lib/app_web/router.ex file and locate the line:
get "/" , PageController , :index Update the controller to ItemController .
get "/" , ItemController , :index eg: lib/app_web/router.ex#L20
Now when you run your App you will see the todo list on the home page:
Unfortunately, this update will "break" the page test. Run the tests and see:
1) test GET / (AppWeb.PageControllerTest)
     test/app_web/controllers/page_controller_test.exs:4
     Assertion with = ~ failed
     code:  assert html_response(conn, 200) = ~ " Welcome to Phoenix! "
     left:  " <!DOCTYPE html>n<html lang= " en " >n  <head>n ... "
Given that we are no longer using the Page Controller, View, Template or Tests, we might as well delete them from our project!
git rm lib/app_web/controllers/page_controller.ex
git rm lib/app_web/controllers/page_html.ex
git rm lib/app_web/page_html/home.html.heex
git rm test/app_web/controllers/page_controller_test.exs
Deleting files is good hygiene in any software project. Don't be afraid to do it, you can always recover files that are in your git history.
Re-run the tests:
mix test
You should see them pass now:
 ...........................

Finished in 0.5 seconds
27 tests, 0 failures
Given that our Phoenix Todo List App is 100% server rendered, older browsers will perform a full page refresh when an action (create/edit/toggle/delete) is performed. This will feel like a "blink" in the page and on really slow connections it will result in a temporary blank page ! Obviously, that's horrible UX and is a big part of why Single Page Apps (SPAs) became popular; to avoid page refresh, use Turbo !
Get the performance benefits of an SPA without the added complexity of a client-side JavaScript framework. When a link is clicked/tapped, Turbolinks automatically fetches the page, swaps in its <body> , and merges its <head> , all without incurring the cost of a full page load.
Luckily, adding Turbo will require just a simple copy and paste! Check the unpkg files to fetch the latest CDN package.
We now need to add the following line to lib/app_web/components/layouts/app.html.heex and lib/app_web/components/layouts/root.html.heex .
< script src =" https://unpkg.com/browse/@hotwired/[email protected]/dist/turbo.es2017-esm.js " > </ script > This will install the UMD builds from Turbo without us needing to install a package using npm . Neat, huh?
And that's it! Now when you deploy your server rendered Phoenix App, it will feel like an SPA! Try the Fly.io demo again: phxtodo.fly.dev Feel that buttery-smooth page transition.
Currently, our application occurs in the same page. However, there is a route that we don't use and is also aesthetically incompatible with the rest of our app.
If we check lib/app_web/controllers/item_controller.ex , you might notice the following function.
  def show ( conn , % { "id" => id } ) do
    item = Todo . get_item! ( id )
    render ( conn , :show , item: item )
  end
This serves the GET /items/:id route. We could do the same as we did with edit and render index . However, let's do something different so we learn a bit more about routes.
If we head on to router.ex , and locate the line:
resources "/items" , ItemControllerWe can change it to this.
resources "/items" , ItemController , except: [ :show ] We are saying that we want to keep all the routes in ItemController except the one related to the show action.
We can now safely delete it from item_controller.ex , as we don't need it any more.
Your files should look like the following.
eg: /lib/router.ex#L19-L29 lib/app_web/controllers/item_controller.ex
Currently, the application allows anyone to access it and manage todo items . Wouldn't it be great if we added authentication so each person could check their own list?
We created a dedicated authentication guide: /auth.md to help you set this up. You will soon find out this is extremely easy ?.
Deployment to Fly.io takes a few minutes, but has a few "steps", we suggest you follow the speed run guide: https://fly.io/docs/elixir/getting-started/
Once you have deployed you will will be able to view/use your app in any Web/Mobile Browser.
eg: https://phxtodo.fly.dev
xs
Our Phoenix server currently only returns HTML pages that are server-side rendered . This is already awesome but we can make use of Phoenix to extend its capabilities.
What if our server also responded with JSON ? You're in luck! We've created small guide for creating a REST API : api.md
If you found this example useful, please ️ the GitHub repository so we ( and others ) know you liked it!
If you want to learn more Phoenix and the magic of LiveView , consider reading our beginner's tutorial: github.com/dwyl/ phoenix-liveview-counter-tutorial
Thank you for learning with us! ☀️


