QMChatViewController ios
0.6.6
Ein eleganter Ready-to-Go-Chat-Ansicht Controller für iOS Chat-Anwendungen, die Quickblox communication backend verwenden.
#Merkmale
Quickblox .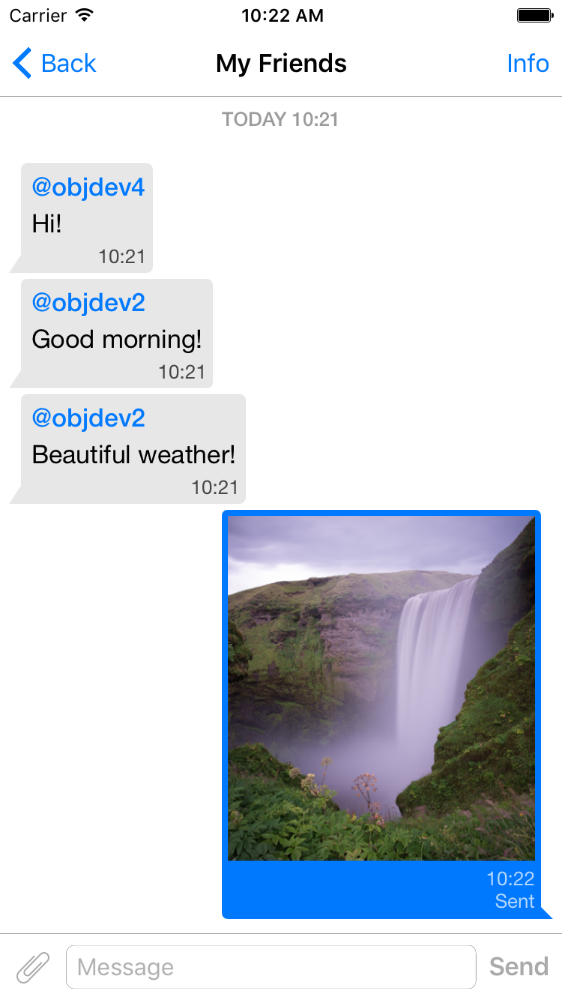
pod 'QMChatViewController'
Ziehen Sie den Ordner QMChatViewController in Ihren Projektordner und verlinken Sie mit dem entsprechenden Ziel.
Abhängigkeiten installieren.
Ein Beispiel ist im Repository enthalten. Probieren Sie es aus, um zu sehen, wie Chat View Controller funktioniert.
Schritte zum Hinzufügen von QMChatViewController zu Ihrer App:
Erstellen Sie eine Unterklasse von QMChatViewController . Sie können es sowohl aus Code- als auch aus Schnittstellenbuilder erstellen.
Öffnen Sie Ihre Unterklasse von QMChatViewController und machen Sie Folgendes in der ViewDidload -Methode:
self.senderID = 2000 ;
self.senderDisplayName = @" user1 " ;[ self .chatDataSource addMessages: <array of messages>];Meldung senden. Senden.
- ( void )didPressSendButton:(UIButton *)button
	       withMessageText:( NSString *)text
			      senderId:( NSUInteger )senderId
 		 senderDisplayName:( NSString *)senderDisplayName
              		  date:( NSDate *)date {
	// Add sending message - for example:
    QBChatMessage *message = [QBChatMessage message ];
	message. text = text;
	message. senderID = senderId;

	QBChatAttachment *attacment = [[QBChatAttachment alloc ] init ];
	message. attachments = @[attacment];

	[ self .chatDataSource addMessage: message];

	[ self finishSendingMessageAnimated: YES ];

 	// Save message to your cache/memory storage.
	// Send message using Quickblox SDK
}
Zellansichtsklassen zurückgeben, die für die Chat -Nachricht spezifisch sind:
- ( Class )viewClassForItem:(QBChatMessage *)item {
    // Cell class for message
    if (item. senderID != self. senderID ) {

        return [QMChatIncomingCell class ];
    }
    else {

        return [QMChatOutgoingCell class ];
    }

    return nil ;
}
Berechnen Sie die Größe der Zelle und die minimale Breite:
- ( CGFloat )collectionView:(QMChatCollectionView *)collectionView minWidthAtIndexPath:( NSIndexPath *)indexPath {

    QBChatMessage *item = [ self .chatDataSource messageForIndexPath: indexPath];

    NSAttributedString *attributedString = item. senderID == self. senderID ?
    [ self bottomLabelAttributedStringForItem: item] : [ self topLabelAttributedStringForItem: item];

    CGSize size = [TTTAttributedLabel sizeThatFitsAttributedString: attributedString
                                                   withConstraints: CGSizeMake ( 1000 , 10000 )
                                            limitedToNumberOfLines: 1 ];
    return size. width ;
}
Ober-, unten- und Textetiketten.
- ( NSAttributedString *)attributedStringForItem:(QBChatMessage *)messageItem {

    UIColor *textColor = [messageItem senderID ] == self. senderID ?
    [UIColor whiteColor ] : [UIColor colorWithWhite: 0.290 alpha: 1.000 ];

    UIFont *font = [UIFont fontWithName: @" Helvetica " size: 15 ];
    NSDictionary *attributes = @{ NSForegroundColorAttributeName :textColor,
                                 NSFontAttributeName :font};

    NSMutableAttributedString *attrStr =
    [[ NSMutableAttributedString alloc ] initWithString: messageItem.text
                                           attributes: attributes];
    return attrStr;
}

- ( NSAttributedString *)topLabelAttributedStringForItem:(QBChatMessage *)messageItem {

    if (messageItem. senderID == self. senderID ) {

        return nil ;
    }

    UIFont *font = [UIFont fontWithName: @" Helvetica " size: 14 ];

    UIColor *textColor = [UIColor colorWithRed: 0.184 green: 0.467 blue: 0.733 alpha: 1.000 ];

    NSDictionary *attributes = @{ NSForegroundColorAttributeName :textColor,
                                 NSFontAttributeName :font};

    NSMutableAttributedString *attrStr =
    [[ NSMutableAttributedString alloc ] initWithString: @" nickname "
                                           attributes: attributes];
    return attrStr;
}

- ( NSAttributedString *)bottomLabelAttributedStringForItem:(QBChatMessage *)messageItem {

    UIFont *font = [UIFont fontWithName: @" Helvetica " size: 12 ];
    UIColor *textColor = [messageItem senderID ] == self. senderID ?

    [UIColor colorWithWhite: 1.000 alpha: 0.510 ] : [UIColor colorWithWhite: 0.000 alpha: 0.490 ];

    NSDictionary *attributes = @{ NSForegroundColorAttributeName :textColor,
                                 NSFontAttributeName :font};

    NSString *dateStr = @" 10:20 " ;

    NSMutableAttributedString *attrStr =
    [[ NSMutableAttributedString alloc ] initWithString: dateStr
                                           attributes: attributes];
    return attrStr;
}
Ändern der Sammlung von Chat -Zellen -Attributen ohne Änderung der Einschränkungen:
 struct QMChatLayoutModel {

	CGSize avatarSize;
	CGSize containerSize;
	UIEdgeInsets containerInsets;
	CGFloat topLabelHeight;
	CGFloat bottomLabelHeight;
	CGSize staticContainerSize;
	CGFloat maxWidthMarginSpace;
};

typedef struct QMChatLayoutModel QMChatCellLayoutModel;Sie können diese Attribute in dieser Methode ändern:
- (QMChatCellLayoutModel)collectionView:(QMChatCollectionView *)collectionView layoutModelAtIndexPath:( NSIndexPath *)indexPath {

	QMChatCellLayoutModel layoutModel = [ super collectionView: collectionView layoutModelAtIndexPath: indexPath];
	// Update attributes here ...
	return layoutModel;
}
Wenn Sie also das obere Etikett oder das untere Etikett ausblenden möchten, müssen Sie nur die Höhe auf 0 einstellen.
QMChatViewController unterstützt die Meldungen von Bilde -Anhangszellen. QMChatAttachmentIncomingCell wird für QMChatAttachmentOutgoingCell Anhänge verwendet. Beide haben Fortschrittsbezeichnungen, um den Ladefortschritt anzuzeigen. XIBs sind auch enthalten.
QMChatViewController enthält seinen Datenquellmanager mit dem Namen QMChatDataSource . Es verfügt über die Implementierung aller Methoden, die Sie mit QMChatViewController arbeiten müssen. Diese Klasse sollte verwendet werden, um Nachrichten aus der Datenquelle hinzuzufügen, zu aktualisieren und zu löschen. QMChatDataSource hat einen Delegierten, der aufgerufen wurde, wenn die Datenquelle geändert wurde.
Weitere Informationen zu Methoden und der Verwendung finden Sie in unserem Inline -Dokument in QMChatDataSource.h .
Inline -Code -Dokumentation verfügbar.
Siehe Lizenz


