react native font demo
1.0.0
Ser capaz de usar modificadores de tipo de tipo de fontes, como fontWeight e fontStyle em combinação com uma família de fontes personalizada, tanto no iOS quanto no Android.
 < Text style = { {
  fontFamily : "Raleway" ,
  fontWeight : "100" ,
  style : "italic"
} } >
  Hello world!
</ Text >
< Text style = { {
  fontFamily : "Raleway" ,
  fontWeight : "bold" ,
  style : "normal"
} } >
  Hello world !
< / Text >
Para este exemplo, registraremos a família Raleway Font. Obviamente, esse método funcionará com qualquer fonte TTF.
Você precisa de toda a família de fontes Raleway, extraída em uma pasta temporária. Aquilo é:
Raleway-Thin.ttf (100)Raleway-ThinItalic.ttfRaleway-ExtraLight.ttf (200)Raleway-ExtraLightItalic.ttfRaleway-Light.ttf (300)Raleway-LightItalic.ttfRaleway-Regular.ttf (400)Raleway-Italic.ttfRaleway-Medium.ttf (500)Raleway-MediumItalic.ttfRaleway-SemiBold.ttf (600)Raleway-SemiBoldItalic.ttfRaleway-Bold.ttf (700)Raleway-BoldItalic.ttfRaleway-ExtraBold.ttf (800)Raleway-ExtraBoldItalic.ttfRaleway-Black.ttf (900)Raleway-BlackItalic.ttf Assumiremos que esses arquivos agora estão armazenados em /tmp/raleway/ .
Você precisará do OTFInfo instalado em seu sistema para executar esta etapa. Ele é enviado com muitas distribuições Linux. No MacOS, instale-o via pacote Brew LCDF-TypeTools .
otfinfo --family Raleway-Regular.ttf Deve imprimir "raleway". Este valor deve ser retido para a configuração do Android. Este nome será usado no estilo React fontFamily .
react-native init FontDemo
cd FontDemoPara o Android, usaremos fontes XML para definir variantes de uma família de fontes básicas.
Observação : Este procedimento está disponível no React Native, uma vez que Commite FD6386A07EB75A8EC16B1384A3E5827DEA520B64 (7 de maio de 2019), com a adição do método
ReactFontManager::addCustomFont.
mkdir android/app/src/main/res/font
cp /tmp/raleway/ * .ttf android/app/src/main/res/font
Devemos renomear os arquivos de fonte que seguem essas regras para cumprir as restrições de nomes de ativos do Android:
- por _ ;Você pode usar o script Bash abaixo (certifique -se de dar a pasta da fonte como primeiro argumento):
 #! /bin/bash
# fixfonts.sh

typeset folder= " $1 "
if [[ -d " $folder " && ! -z " $folder " ]] ; then
  pushd " $folder " ;
  for file in * .ttf ; do
    typeset normalized= " ${file // - / _} " ;
    normalized= " ${normalized,,} " ;
    mv " $file " " $normalized "
  done
  popd
fi
./fixfonts.sh /path/to/root/FontDemo/android/app/src/main/res/font Crie o arquivo android/app/src/main/res/font/raleway.xml com o conteúdo abaixo. Basicamente, devemos criar uma entrada por combinação de fontStyle / fontWeight que desejamos apoiar e registrar o nome de ativo correspondente.
<? xml version = " 1.0 " encoding = " utf-8 " ?>
< font-family xmlns : app = " http://schemas.android.com/apk/res-auto " >
    < font app : fontStyle = " normal " app : fontWeight = " 100 " app : font = " @font/raleway_thin " />
    < font app : fontStyle = " italic " app : fontWeight = " 100 " app : font = " @font/raleway_thinitalic " />
    < font app : fontStyle = " normal " app : fontWeight = " 200 " app : font = " @font/raleway_extralight " />
    < font app : fontStyle = " italic " app : fontWeight = " 200 " app : font = " @font/raleway_extralightitalic " />
    < font app : fontStyle = " normal " app : fontWeight = " 300 " app : font = " @font/raleway_light " />
    < font app : fontStyle = " italic " app : fontWeight = " 300 " app : font = " @font/raleway_lightitalic " />
    < font app : fontStyle = " normal " app : fontWeight = " 400 " app : font = " @font/raleway_regular " />
    < font app : fontStyle = " italic " app : fontWeight = " 400 " app : font = " @font/raleway_italic " />
    < font app : fontStyle = " normal " app : fontWeight = " 500 " app : font = " @font/raleway_medium " />
    < font app : fontStyle = " italic " app : fontWeight = " 500 " app : font = " @font/raleway_mediumitalic " />
    < font app : fontStyle = " normal " app : fontWeight = " 600 " app : font = " @font/raleway_semibold " />
    < font app : fontStyle = " italic " app : fontWeight = " 600 " app : font = " @font/raleway_semibolditalic " />
    < font app : fontStyle = " normal " app : fontWeight = " 700 " app : font = " @font/raleway_bold " />
    < font app : fontStyle = " italic " app : fontWeight = " 700 " app : font = " @font/raleway_bolditalic " />
    < font app : fontStyle = " normal " app : fontWeight = " 800 " app : font = " @font/raleway_extrabold " />
    < font app : fontStyle = " italic " app : fontWeight = " 800 " app : font = " @font/raleway_extrabolditalic " />
    < font app : fontStyle = " normal " app : fontWeight = " 900 " app : font = " @font/raleway_black " />
    < font app : fontStyle = " italic " app : fontWeight = " 900 " app : font = " @font/raleway_blackitalic " />
</ font-family > In android/app/src/main/java/com/fontdemo/MainApplication.java , vincule o nome da família da fonte ao ativo que acabamos de criar dentro do método onCreate .
️ Se você estiver registrando uma fonte diferente, substitua "Raleway" pelo nome encontrado na etapa anterior (encontre o nome da família da fonte).
 --- a/android/app/src/main/java/com/fontdemo/MainApplication.java
+++ b/android/app/src/main/java/com/fontdemo/MainApplication.java
@@ -7,6 +7,7 @@ import com.facebook.react.ReactApplication;
 import com.facebook.react.ReactInstanceManager;
 import com.facebook.react.ReactNativeHost;
 import com.facebook.react.ReactPackage;
+ import com.facebook.react.views.text.ReactFontManager;
 import com.facebook.soloader.SoLoader;
 import java.lang.reflect.InvocationTargetException;
 import java.util.List;
@@ -43,6 +44,7 @@ public class MainApplication extends Application implements ReactApplication {
   @Override
   public void onCreate() {
     super.onCreate();
+    ReactFontManager.getInstance().addCustomFont(this, "Raleway", R.font.raleway);
     SoLoader.init(this, /* native exopackage */ false);
     initializeFlipper(this, getReactNativeHost().getReactInstanceManager());
   }
No React Native 0.73+
 --- a/android/app/src/main/java/com/fontdemo/MainApplication.kt
+++ b/android/app/src/main/java/com/fontdemo/MainApplication.kt
import com.facebook.react.ReactApplication
import com.facebook.react.ReactHost
import com.facebook.react.ReactNativeHost
import com.facebook.react.ReactPackage
+ import com.facebook.react.common.assets.ReactFontManager
import com.facebook.react.defaults.DefaultNewArchitectureEntryPoint.load
import com.facebook.react.defaults.DefaultReactHost.getDefaultReactHost
import com.facebook.react.defaults.DefaultReactNativeHost


  override fun onCreate() {
    super.onCreate()
+    ReactFontManager.getInstance().addCustomFont(this, "Raleway", R.font.raleway);
    SoLoader.init(this, false)
    if (BuildConfig.IS_NEW_ARCHITECTURE_ENABLED) {
      // If you opted-in for the New Architecture, we load the native entry point for this app.
      load()
    }
    ReactNativeFlipper.initializeFlipper(this, reactNativeHost.reactInstanceManager)
  }
No iOS, as coisas ficarão muito mais fáceis. Basicamente, precisaremos usar a funcionalidade do link de ativo nativo do React. Este método requer que usemos o nome da família da fonte recuperado na primeira etapa como atributo de estilo fontFamily .
mkdir -p assets/fonts
cp /tmp/raleway/ * .ttf assets/fontsreact-native.config.js module . exports = {
project : {
ios : { } ,
android : { } ,
} ,
iosAssets : [ './assets/fonts' ] ,
} ; # react-native >= 0.69
npx react-native-asset
# otherwise
react-native link| iOS | Android |
|---|---|
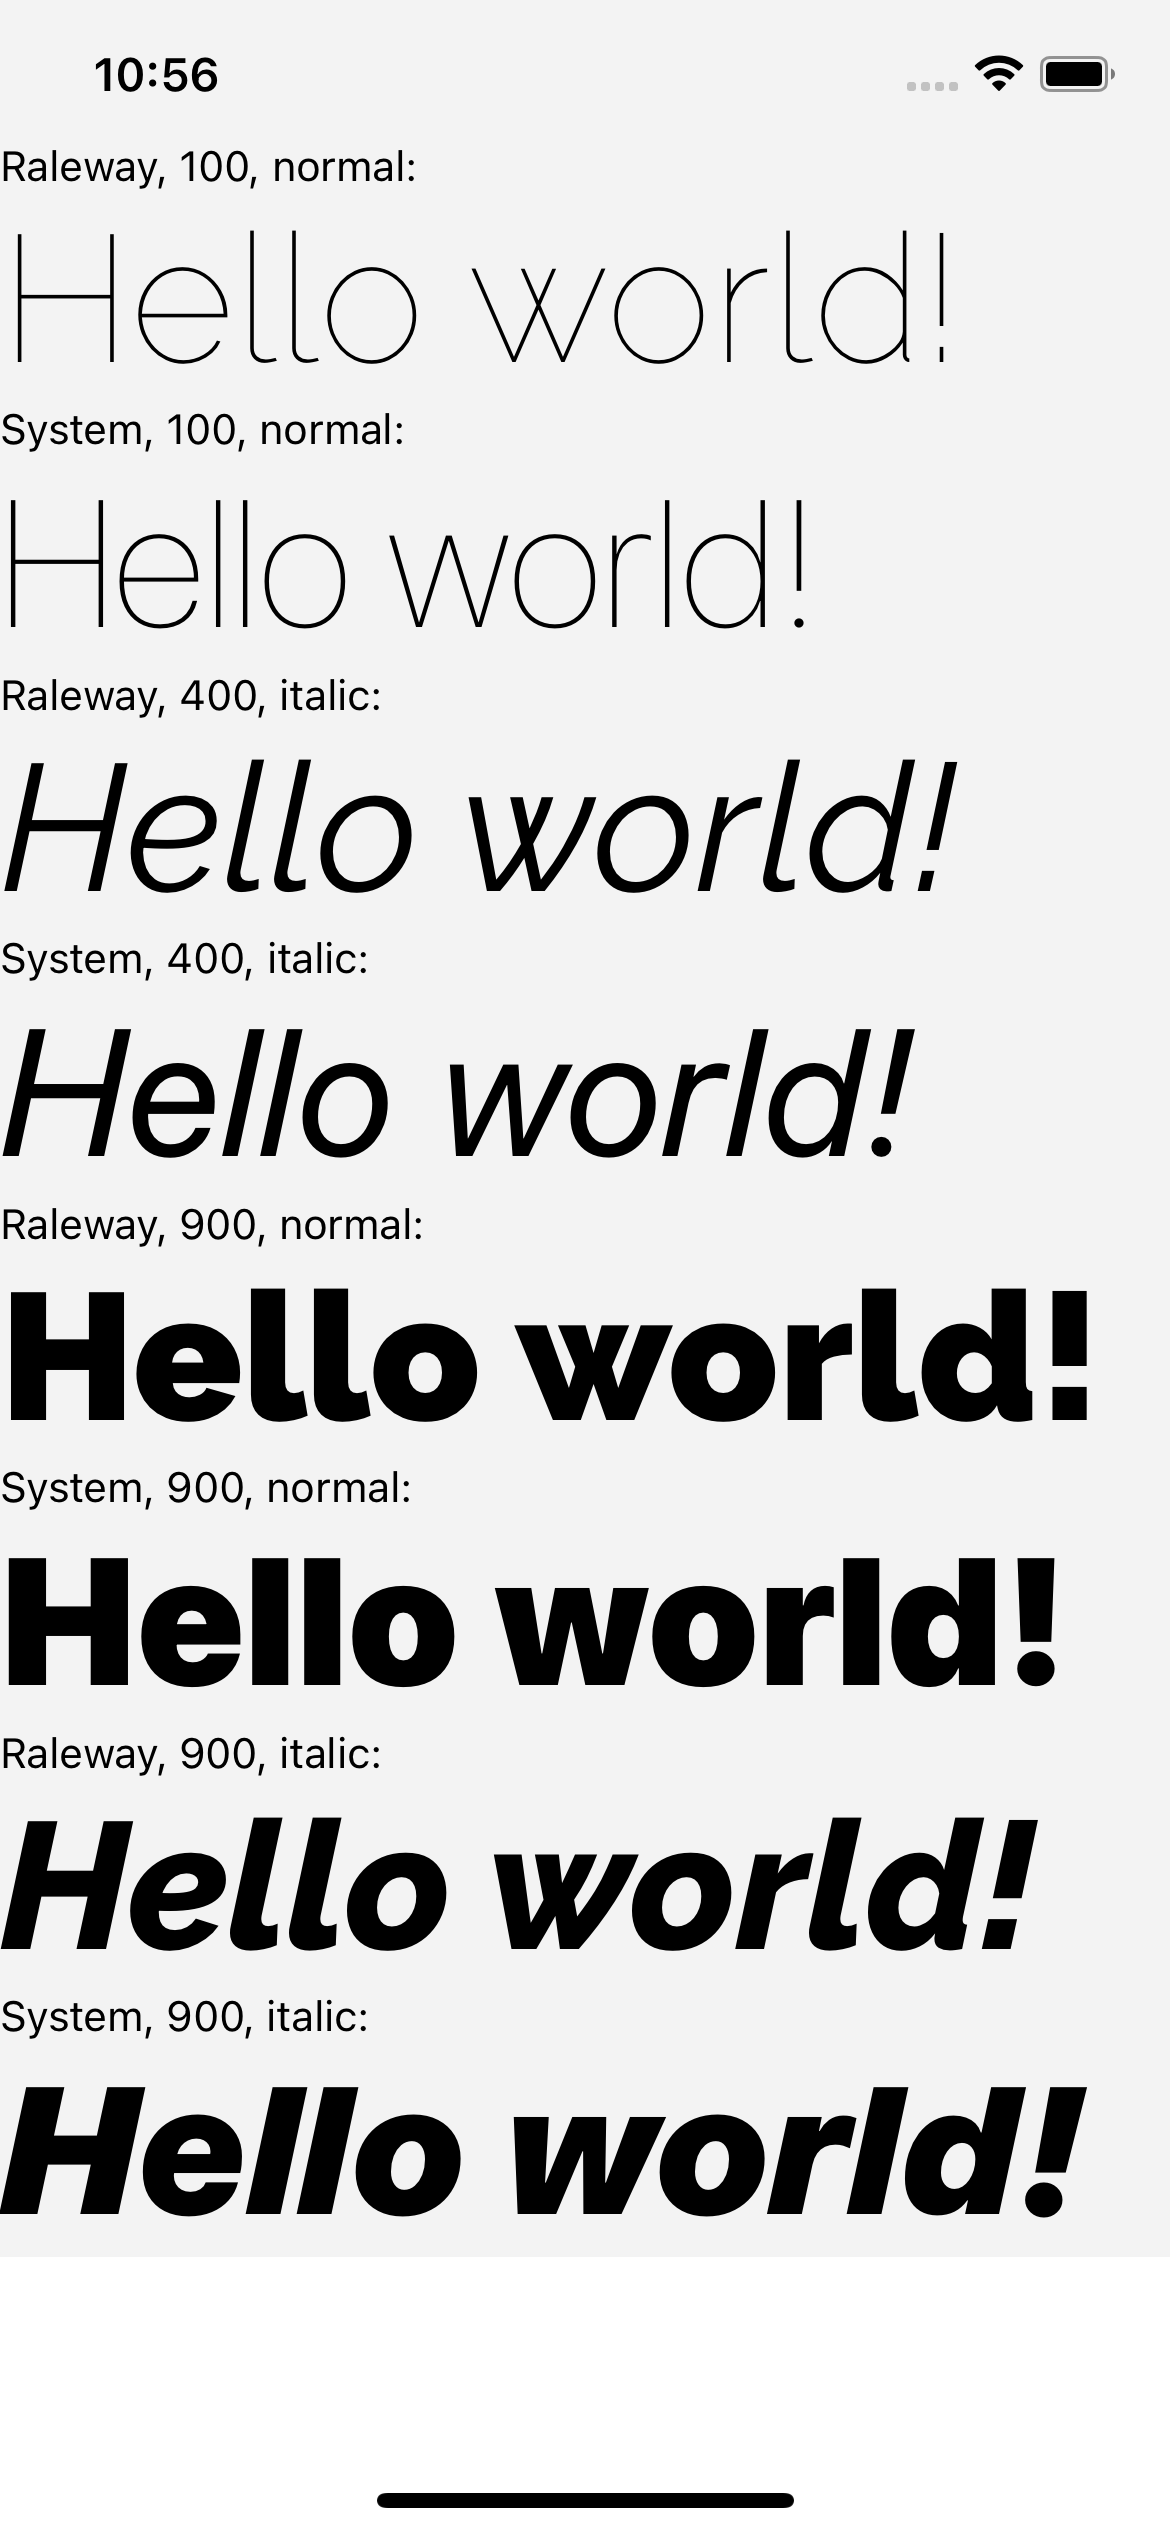 | 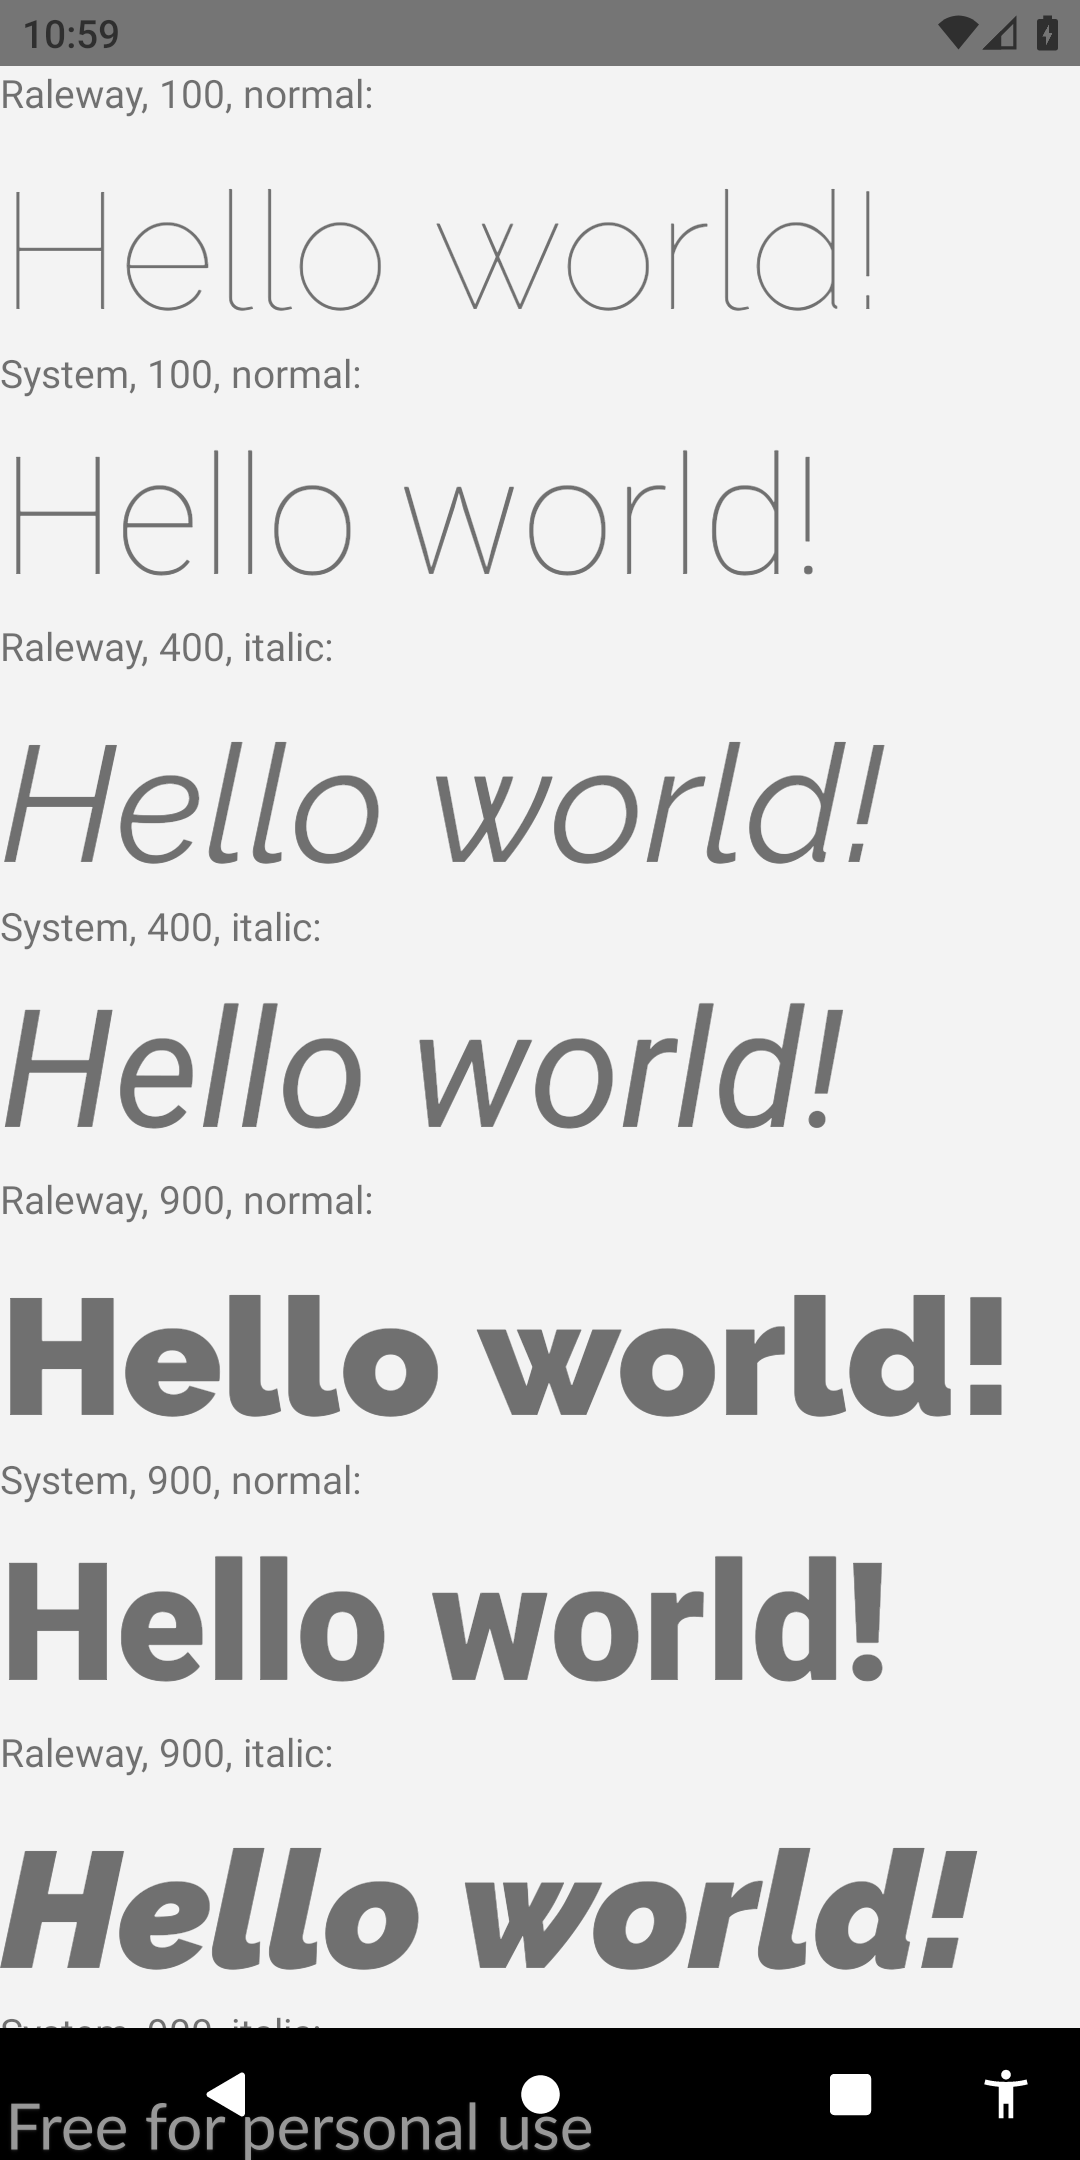 |
Se você achou este guia relevante, eu apreciaria muito que você vote esta resposta Stackoverflow. Também ajudaria a comunidade a descobrir essa solução. Saúde!


