react native font demo
1.0.0
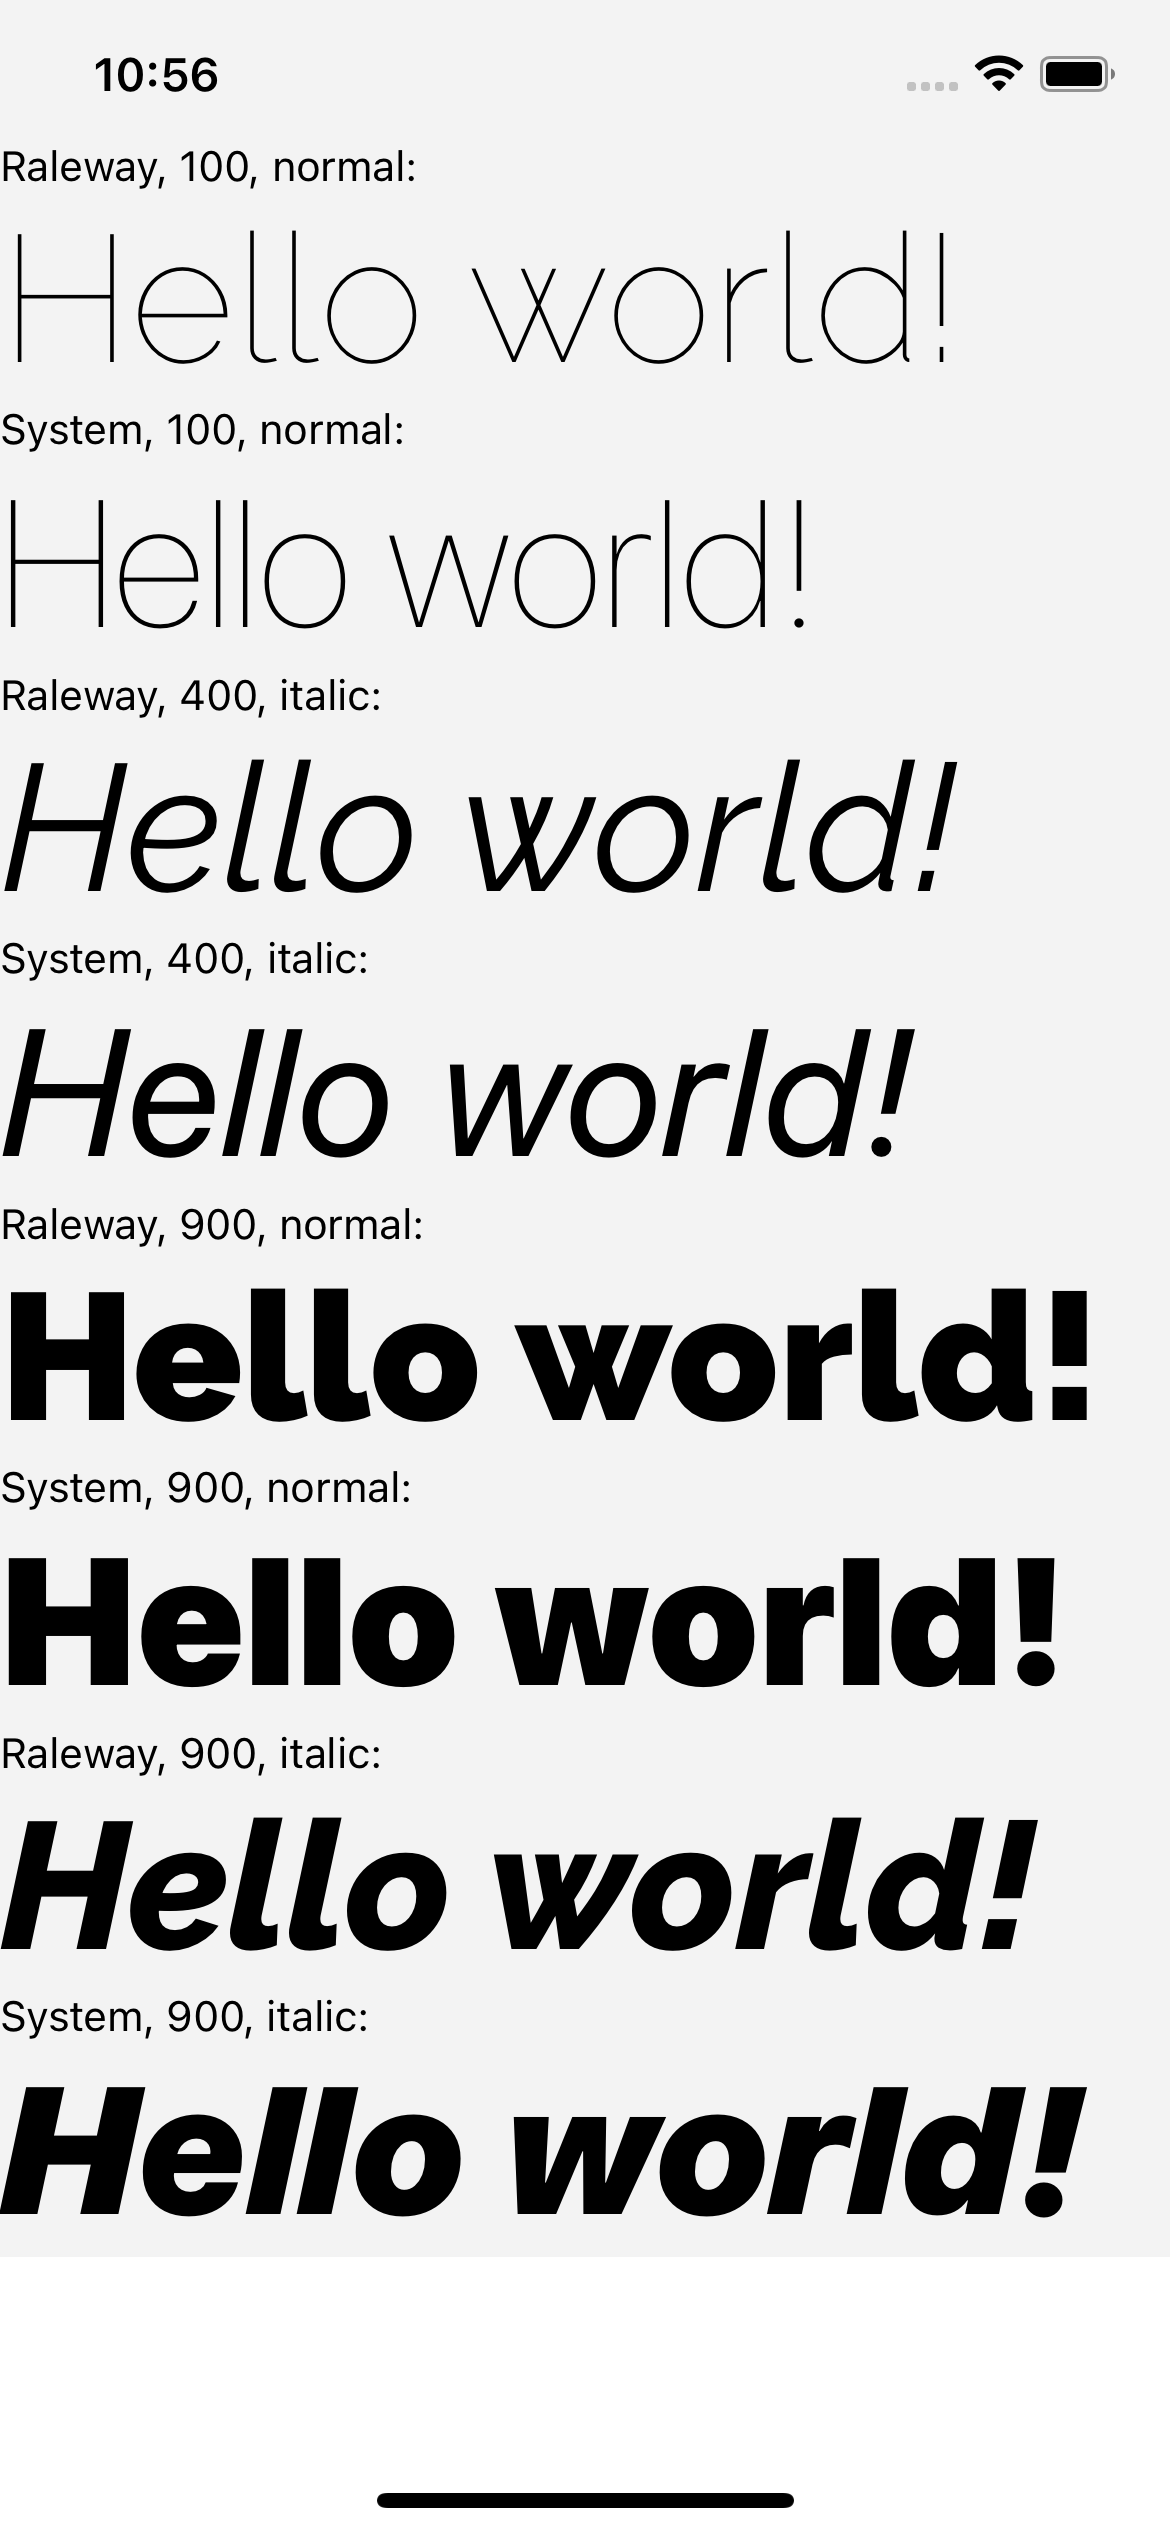
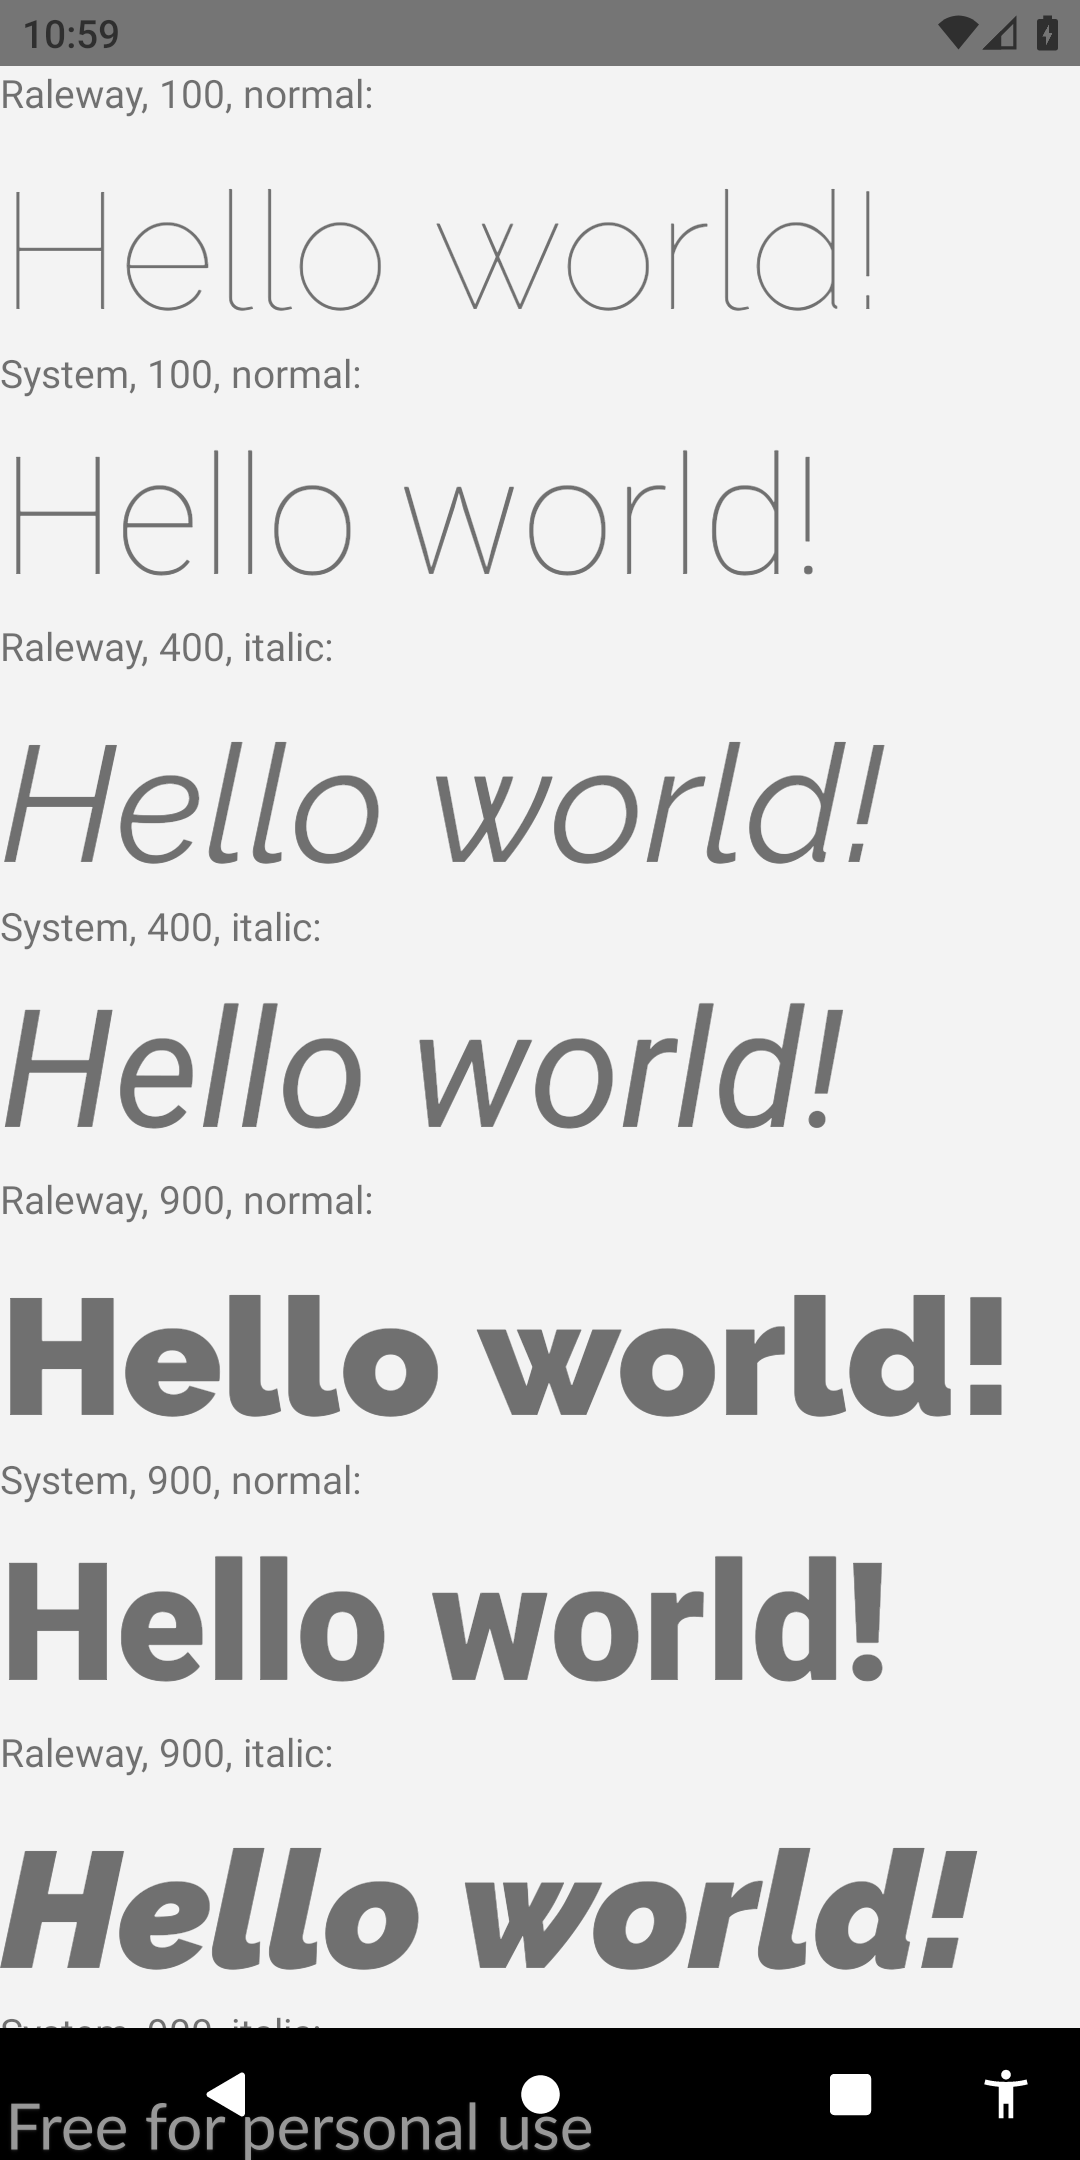
Ser capaz de usar modificadores tipográficos de fuentes, como fontWeight y fontStyle en combinación con una familia de fuentes personalizadas, tanto en iOS como en Android.
 < Text style = { {
  fontFamily : "Raleway" ,
  fontWeight : "100" ,
  style : "italic"
} } >
  Hello world!
</ Text >
< Text style = { {
  fontFamily : "Raleway" ,
  fontWeight : "bold" ,
  style : "normal"
} } >
  Hello world !
< / Text >
Para este ejemplo, vamos a registrar la familia Raleway Font. Por supuesto, este método funcionará con cualquier fuente TTF.
Necesita a toda la familia Raleway Font, extraída en una carpeta temporal. Eso es:
Raleway-Thin.ttf (100)Raleway-ThinItalic.ttfRaleway-ExtraLight.ttf (200)Raleway-ExtraLightItalic.ttfRaleway-Light.ttf (300)Raleway-LightItalic.ttfRaleway-Regular.ttf (400)Raleway-Italic.ttfRaleway-Medium.ttf (500)Raleway-MediumItalic.ttfRaleway-SemiBold.ttf (600)Raleway-SemiBoldItalic.ttfRaleway-Bold.ttf (700)Raleway-BoldItalic.ttfRaleway-ExtraBold.ttf (800)Raleway-ExtraBoldItalic.ttfRaleway-Black.ttf (900)Raleway-BlackItalic.ttf Asumiremos que esos archivos ahora se almacenan en /tmp/raleway/ .
Necesitará que OTFINFO esté instalado en su sistema para realizar este paso. Se envía con muchas distribuciones de Linux. En MacOS, instálelo a través del paquete LCDF-Typetools Brew.
otfinfo --family Raleway-Regular.ttf Debería imprimir "Raleway". Este valor debe conservarse para la configuración de Android. Este nombre se utilizará en el estilo React fontFamily .
react-native init FontDemo
cd FontDemoPara Android, vamos a usar fuentes XML para definir variantes de una familia de fuentes base.
Observación : Este procedimiento está disponible en React Native desde Commit FD6386A07EB75A8EC16B1384A3E5827DEA520B64 (7 de mayo de 2019), con la adición de
ReactFontManager::addCustomFontMethod.
mkdir android/app/src/main/res/font
cp /tmp/raleway/ * .ttf android/app/src/main/res/font
Debemos cambiar el nombre de los archivos de fuentes que siguen estas reglas para cumplir con las restricciones de nombres de activos de Android:
- con _ ;Puede usar el siguiente script bash (asegúrese de dar la carpeta de fuentes como primer argumento):
 #! /bin/bash
# fixfonts.sh

typeset folder= " $1 "
if [[ -d " $folder " && ! -z " $folder " ]] ; then
  pushd " $folder " ;
  for file in * .ttf ; do
    typeset normalized= " ${file // - / _} " ;
    normalized= " ${normalized,,} " ;
    mv " $file " " $normalized "
  done
  popd
fi
./fixfonts.sh /path/to/root/FontDemo/android/app/src/main/res/font Cree el archivo android/app/src/main/res/font/raleway.xml con el contenido siguiente. Básicamente, debemos crear una entrada por combinación de fontStyle / fontWeight que deseamos admitir, y registrar el nombre del activo correspondiente.
<? xml version = " 1.0 " encoding = " utf-8 " ?>
< font-family xmlns : app = " http://schemas.android.com/apk/res-auto " >
    < font app : fontStyle = " normal " app : fontWeight = " 100 " app : font = " @font/raleway_thin " />
    < font app : fontStyle = " italic " app : fontWeight = " 100 " app : font = " @font/raleway_thinitalic " />
    < font app : fontStyle = " normal " app : fontWeight = " 200 " app : font = " @font/raleway_extralight " />
    < font app : fontStyle = " italic " app : fontWeight = " 200 " app : font = " @font/raleway_extralightitalic " />
    < font app : fontStyle = " normal " app : fontWeight = " 300 " app : font = " @font/raleway_light " />
    < font app : fontStyle = " italic " app : fontWeight = " 300 " app : font = " @font/raleway_lightitalic " />
    < font app : fontStyle = " normal " app : fontWeight = " 400 " app : font = " @font/raleway_regular " />
    < font app : fontStyle = " italic " app : fontWeight = " 400 " app : font = " @font/raleway_italic " />
    < font app : fontStyle = " normal " app : fontWeight = " 500 " app : font = " @font/raleway_medium " />
    < font app : fontStyle = " italic " app : fontWeight = " 500 " app : font = " @font/raleway_mediumitalic " />
    < font app : fontStyle = " normal " app : fontWeight = " 600 " app : font = " @font/raleway_semibold " />
    < font app : fontStyle = " italic " app : fontWeight = " 600 " app : font = " @font/raleway_semibolditalic " />
    < font app : fontStyle = " normal " app : fontWeight = " 700 " app : font = " @font/raleway_bold " />
    < font app : fontStyle = " italic " app : fontWeight = " 700 " app : font = " @font/raleway_bolditalic " />
    < font app : fontStyle = " normal " app : fontWeight = " 800 " app : font = " @font/raleway_extrabold " />
    < font app : fontStyle = " italic " app : fontWeight = " 800 " app : font = " @font/raleway_extrabolditalic " />
    < font app : fontStyle = " normal " app : fontWeight = " 900 " app : font = " @font/raleway_black " />
    < font app : fontStyle = " italic " app : fontWeight = " 900 " app : font = " @font/raleway_blackitalic " />
</ font-family > En android/app/src/main/java/com/fontdemo/MainApplication.java , ata el nombre de la familia de fuentes con el activo que acabamos de crear dentro del método onCreate .
️ Si está registrando una fuente diferente, asegúrese de reemplazar "Raleway" con el nombre encontrado en el paso anterior (encuentre el nombre de la familia).
 --- a/android/app/src/main/java/com/fontdemo/MainApplication.java
+++ b/android/app/src/main/java/com/fontdemo/MainApplication.java
@@ -7,6 +7,7 @@ import com.facebook.react.ReactApplication;
 import com.facebook.react.ReactInstanceManager;
 import com.facebook.react.ReactNativeHost;
 import com.facebook.react.ReactPackage;
+ import com.facebook.react.views.text.ReactFontManager;
 import com.facebook.soloader.SoLoader;
 import java.lang.reflect.InvocationTargetException;
 import java.util.List;
@@ -43,6 +44,7 @@ public class MainApplication extends Application implements ReactApplication {
   @Override
   public void onCreate() {
     super.onCreate();
+    ReactFontManager.getInstance().addCustomFont(this, "Raleway", R.font.raleway);
     SoLoader.init(this, /* native exopackage */ false);
     initializeFlipper(this, getReactNativeHost().getReactInstanceManager());
   }
En react nativo 0.73+
 --- a/android/app/src/main/java/com/fontdemo/MainApplication.kt
+++ b/android/app/src/main/java/com/fontdemo/MainApplication.kt
import com.facebook.react.ReactApplication
import com.facebook.react.ReactHost
import com.facebook.react.ReactNativeHost
import com.facebook.react.ReactPackage
+ import com.facebook.react.common.assets.ReactFontManager
import com.facebook.react.defaults.DefaultNewArchitectureEntryPoint.load
import com.facebook.react.defaults.DefaultReactHost.getDefaultReactHost
import com.facebook.react.defaults.DefaultReactNativeHost


  override fun onCreate() {
    super.onCreate()
+    ReactFontManager.getInstance().addCustomFont(this, "Raleway", R.font.raleway);
    SoLoader.init(this, false)
    if (BuildConfig.IS_NEW_ARCHITECTURE_ENABLED) {
      // If you opted-in for the New Architecture, we load the native entry point for this app.
      load()
    }
    ReactNativeFlipper.initializeFlipper(this, reactNativeHost.reactInstanceManager)
  }
En iOS, las cosas se volverán mucho más fáciles. Básicamente, solo necesitaremos usar la funcionalidad de enlace de activos nativos React. Este método requiere que usemos el apellido de fuentes recuperado en el primer paso como atributo de estilo fontFamily .
mkdir -p assets/fonts
cp /tmp/raleway/ * .ttf assets/fontsreact-native.config.js module . exports = {
project : {
ios : { } ,
android : { } ,
} ,
iosAssets : [ './assets/fonts' ] ,
} ; # react-native >= 0.69
npx react-native-asset
# otherwise
react-native link| iOS | Androide |
|---|---|
 |  |
Si encontró esta guía relevante, agradecería mucho que vote esta respuesta de StackOverflow. También ayudaría a la comunidad a descubrir esta solución. ¡Salud!


