pyggester
v1.0: Optimize Your Python Data Structures - Dynamic & Static Analysis Unleashed

Pyggester - (Python + Sugestester) funciona como um analisador dinâmico e estático. Seu objetivo principal está em oferecer sugestões para melhorar a eficiência do código Python, abordando o uso abaixo do ideal de estruturas de dados.
O Pyggester oferece uma interface CLI bastante decente para suas funcionalidades. A CLI é construída em cima de Typer
Execution command :
pyggest output :
                                          _____
_____________  ________ _______ ______________  /_____________
___  __ _  / / /_  __ `/_  __ `/  _ _  ___/  __/  _ _  ___/
__  /_/ /  /_/ /_  /_/ /_  /_/ //  __/(__  )/ /_ /  __/  /
_  .___/___, / ___, / ___, / ___//____/ __/ ___//_/
/_/     /____/  /____/  /____/


Usage: pyggest [OPTIONS] COMMAND [ARGS]...

╭─ Options ────────────────────────────────────────────────────────────────────────────────────────────────────────────────────────────────────╮
│ --install-completion          Install completion for the current shell.                                                                      │
│ --show-completion             Show completion for the current shell, to copy it or customize the installation.                               │
│ --help                        Show this message and exit.                                                                                    │
╰──────────────────────────────────────────────────────────────────────────────────────────────────────────────────────────────────────────────╯
╭─ Commands ───────────────────────────────────────────────────────────────────────────────────────────────────────────────────────────────────╮
│ static                 Perform static analysis using PyggestStatic.                                                                          │
│ transform              Perform dynamic transformation using PyggesterDynamic.                                                                │
╰──────────────────────────────────────────────────────────────────────────────────────────────────────────────────────────────────────────────╯
O Pyggester CLI apresenta dois recursos distintos:
Análise estática: esse recurso examina de forma abrangente seu código sem executá -lo, fornecendo informações perspicazes sobre sua estrutura e potenciais melhorias.
Execution command
[! NOTA] O subcomando 'estático' existe, mas não tem funcionalidades implementadas, porque já temos bons analisadores estáticos (Pylint, Ruff, Flake8). Nas iterações futuras, devemos identificar sugestões que podem ser estabelecidas através da análise estática, nós as incorporaremos a esse recurso.
pyggest staticTransformação dinâmica/automática: esse recurso adiciona código extra aos seus arquivos Python para analisar suas estruturas de dados em tempo de execução. Seu código original permanece o mesmo; não será alterado. Um novo arquivo é criado como o original, mas com código adicional. Isso funciona para arquivos únicos e diretórios inteiros (estruturas completas do projeto).
Execution command
pyggest transform[! Info] Pyggester oferece documentação integrada para uso detalhado
pyggest transform --help
pyggest static --help # NOT IMPLEMENTEDVocê pode instalar facilmente a biblioteca Python usando o PIP. Abra seu terminal e execute o seguinte comando:
pip install pyggesterClone o repositório: abra seu terminal e execute o seguinte comando para clonar o repositório do GitHub para sua máquina local:
git clone [email protected]:ValdonVitija/pyggester.gitNavegue até o repositório: altere seu diretório de trabalho para o repositório clonado:
cd pyggesterInstale o Pyggester como um Pacakge localmente:
[! IMPORTANTE] Considere fazer isso dentro de um ambiente virtual (VENV), se possível.
pip install .Vamos supor que você tenha um único arquivo python que deseja analisar dinamicamente (análise de tempo de execução)
Antes da transformação do código com Pyggester:
(venv) root@user: ~ /my_app > ls
app.py
Conteúdo de app.py:
 def sum_of_integers ( integer_list ):
    total = sum ( integer_list )
    return total

my_list = [ 1 , 2 , 3 , 4 , 5 ]
print ( sum_of_integers ( my_list ))Importante
Certifique -se de que você esteja em um ambiente virtual com o Pyggester instalado antes de ir para a próxima etapa.
(venv) root@devs04: ~ /my_app > pyggest transform app.py
╭──────────────────────────────────────────────────────────────────────────────────────────────────────────────────────────────────────────────╮
│ File transformed successfully !                                                                                                               │
╰──────────────────────────────────────────────────────────────────────────────────────────────────────────────────────────────────────────────╯(venv) root@devs04: ~ /my_app > ls
app.py app_transformed.pyConteúdo de app_transformed.py:
 from pyggester . observable_collector import OBSERVABLE_COLLECTOR
from pyggester . observables import ObservableNumpyArray , ObservableNamedTuple , ObservableSet , ObservablePandasDataFrame , ObservableList , ObservableDict , ObservableTuple


def sum_of_integers ( integer_list ):
    total = sum ( integer_list )
    return total


my_list = ObservableList ([ 1 , 2 , 3 , 4 , 5 ])
OBSERVABLE_COLLECTOR . append ( my_list )
print ( sum_of_integers ( my_list ))

for observable in OBSERVABLE_COLLECTOR :
    observable . run ()
Importante
Agora temos um novo arquivo, criado automaticamente, que reflete o arquivo original. Este novo arquivo inclui todo o conteúdo do original, além de código extra para analisar seu código durante o tempo de execução. Em vez de executar o 'app.py' original, agora você deve executar 'app_transformed.py'. Tenha certeza, tudo, desde 'App.py', é retido em 'app_transformed.py'.
(venv) root@devs04: ~ /my_app > python3 app_transformed.py
15
╭────────────────────────────────────────────────────────────────────────────╮
│ 10 | Suggestions(/root/my_app/app_transformed.py):                         │
│     [ * ] Consider using an array.array instead of a list, for optimal       │
│ memory consumption                                                         │
│     [ * ] Consider using a set instead of a list, because of unique elements │
╰────────────────────────────────────────────────────────────────────────────╯Vamos supor que você tenha um projeto Python (diretório/repo) que deseja analisar dinamicamente (análise de tempo de execução)
Antes da transformação do código com Pyggester:
(venv) root@devs04: ~ /python_demo/app_dir > ls
__pycache__  app.py  temperature.py  weather.py
Conteúdo de app.py:
 import weather
import temperature


def main ():
    city = input ( 'Enter a city name: ' )
    weather_condition = weather . get_weather ( city )
    avg_temp = temperature . get_average_temperature ()
    print ( f'Weather in { city } : { weather_condition } ' )
    print ( f'Average temperature: { avg_temp } degrees Celsius' )


main ()
Conteúdo de temperatura.py:
 temperatures = list ([ 20 , 22 , 15 , 18 , 20 , 21 , 22 , 22 , 18 , 17 , 20 ])


def get_average_temperature ():
    return sum ( temperatures ) / len ( temperatures )
Conteúdo de Weather.py:
 weather_conditions = [ 'Sunny' , 'Rainy' , 'Cloudy' , 'Windy' , 'Sunny' , 'Cloudy' ]

def get_weather ( city ):
return weather_conditions . pop ()Importante
Certifique -se de que você esteja em um ambiente virtual com o Pyggester instalado antes de ir para a próxima etapa.
(venv) root@devs04: ~ /python_demo > pyggest transform app_dir/
Enter the name of the main file: app.py
╭──────────────────────────────────────────────────────────────────────────╮
│ Directory transformed successfully !                                      │
╰──────────────────────────────────────────────────────────────────────────╯
Importante
Quando um diretório ou projeto é especificado como um argumento, Pyggester nos leva a especificar o arquivo principal do nosso projeto. Este arquivo deve ser o ponto de entrada do seu projeto, indicado pelo nome do arquivo.
(venv) root@devs04: ~ /python_demo > ls
app_dir  app_dir_transformed
Conteúdo de app_dir_transformed/:
( venv ) root @ devs04 : ~ / python_demo / app_dir_transformed > ls
app . py  temperature . py  weather . py
Conteúdo de app.py:
 from pyggester . observable_collector import OBSERVABLE_COLLECTOR
from pyggester . observables import ObservableNumpyArray , ObservableList , ObservablePandasDataFrame , ObservableNamedTuple , ObservableSet , ObservableDict , ObservableTuple
import weather
import temperature


def main ():
    city = input ( 'Enter a city name: ' )
    weather_condition = weather . get_weather ( city )
    avg_temp = temperature . get_average_temperature ()
    print ( f'Weather in { city } : { weather_condition } ' )
    print ( f'Average temperature: { avg_temp } degrees Celsius' )


main ()
for observable in OBSERVABLE_COLLECTOR :
    observable . run ()
Conteúdo de temperatura.py:
 from pyggester . observable_collector import OBSERVABLE_COLLECTOR
from pyggester . observables import ObservableNumpyArray , ObservableList , ObservablePandasDataFrame , ObservableNamedTuple , ObservableSet , ObservableDict , ObservableTuple
temperatures = ObservableList ( list ([ 20 , 22 , 15 , 18 , 20 , 21 , 22 , 22 , 18 , 17 ,
    20 ]))
OBSERVABLE_COLLECTOR . append ( temperatures )


def get_average_temperature ():
    return sum ( temperatures ) / len ( temperatures )
Conteúdo de Weather.py:
 from pyggester . observable_collector import OBSERVABLE_COLLECTOR
from pyggester . observables import ObservableNumpyArray , ObservableList , ObservablePandasDataFrame , ObservableNamedTuple , ObservableSet , ObservableDict , ObservableTuple
weather_conditions = ObservableList ([ 'Sunny' , 'Rainy' , 'Cloudy' , 'Windy' ,
    'Sunny' , 'Cloudy' ])
OBSERVABLE_COLLECTOR . append ( weather_conditions )


def get_weather ( city ):
    return weather_conditions . pop ()
Importante
Agora temos um novo diretório, criado automaticamente, que reflete o diretório original. Este novo diretório inclui todo o conteúdo do original, além de código extra para analisar seu código durante o tempo de execução. Em vez de executar o 'app.py' original, agora você deve executar 'app.py' que reside dentro de 'app_dir_transformed/'. Tenha certeza, tudo, desde 'App_dir', é retido em 'app_dir_transformed/'.
(venv) root@devs04: ~ /python_demo/app_dir_transformed > python3 app.py
Enter a city name: Pristina
Weather in Pristina: Cloudy
Average temperature: 19.545454545454547 degrees Celsius
╭─────────────────────────────────────────────────────────────────────────────────────╮
│ 3 | Suggestions(/root/python_demo/app_dir_transformed/temperature.py):              │
│     [ * ] Consider using an array.array instead of a list, for optimal memory         │
│ consumption                                                                         │
╰─────────────────────────────────────────────────────────────────────────────────────╯ .
├── LICENSE
├── README.md # main readme file. The one you are currently reading.
├── VERSION # version of pyggester
├── contributing.md
├── pyggester # directory containing the full source code of pyggester
│ ├── __init__.py
│ ├── cli.py # defines the typer cli structure(command & options)
│ ├── command_handlers.py # Handles subcommands and every option variation per subcommand.
│ ├── data # data/config files related to pyggester.
│ │ └── help_files # build in help files for the pyggester cli
│ │ ├── __init__.py
│ │ ├── transform_helper.md # detailed built-in documentation for the transform subcommand of pyggest
│ │ └── static_helper.md # detailed built-in documentation for the static subcommand of pyggest
│ ├── helpers.py # helper functions to be used by other modules
│ ├── main.py # The entry point of pyggest execution. Initializes the typer cli app and prints the ascii logo of pyggester
│ ├── message_handler.py # Manages how the collected messages will be printed to the user.
│ ├── module_importer.py # Contains the mechanism to automatically import observables
│ ├── observable_collector.py # Contains the list that will be used to collect all observables.
│ ├── observable_transformations.py # Contains the mechanism that will automatically add code that collects observables and glues together all ast modules
│ ├── observables.py # Contains all the defined observables(enhanced version of python collections)
│ ├── pyggester.py # The 'engine' of pyggester. This module glues everything together
│ ├── text_formatters.py # Contains text formatters, to beautify text in stdout.
│ └── wrappers.py # Contains the mechanism that wrap each observable.
├── pyggester_abstract_execution_flow.png
├── pyggester_logo.png
├── pytest.ini # pytest config file
├── requirements.txt # Every pyggester dependecy resides here
├── setup.py # Creates the pyggester pacakge and defines pyggest as the entry point command to execute pyggester
└── tests
├── __init__.py
├── test_cli.py
├── test_command_handlers.py
├── test_file.py
├── test_file_transformed.py
├── test_helpers.py
├── test_main.py
├── test_message_handler.py
├── test_module_importer.py
├── test_observable_transformations.py
├── test_observables.py
├── test_pyggester.py
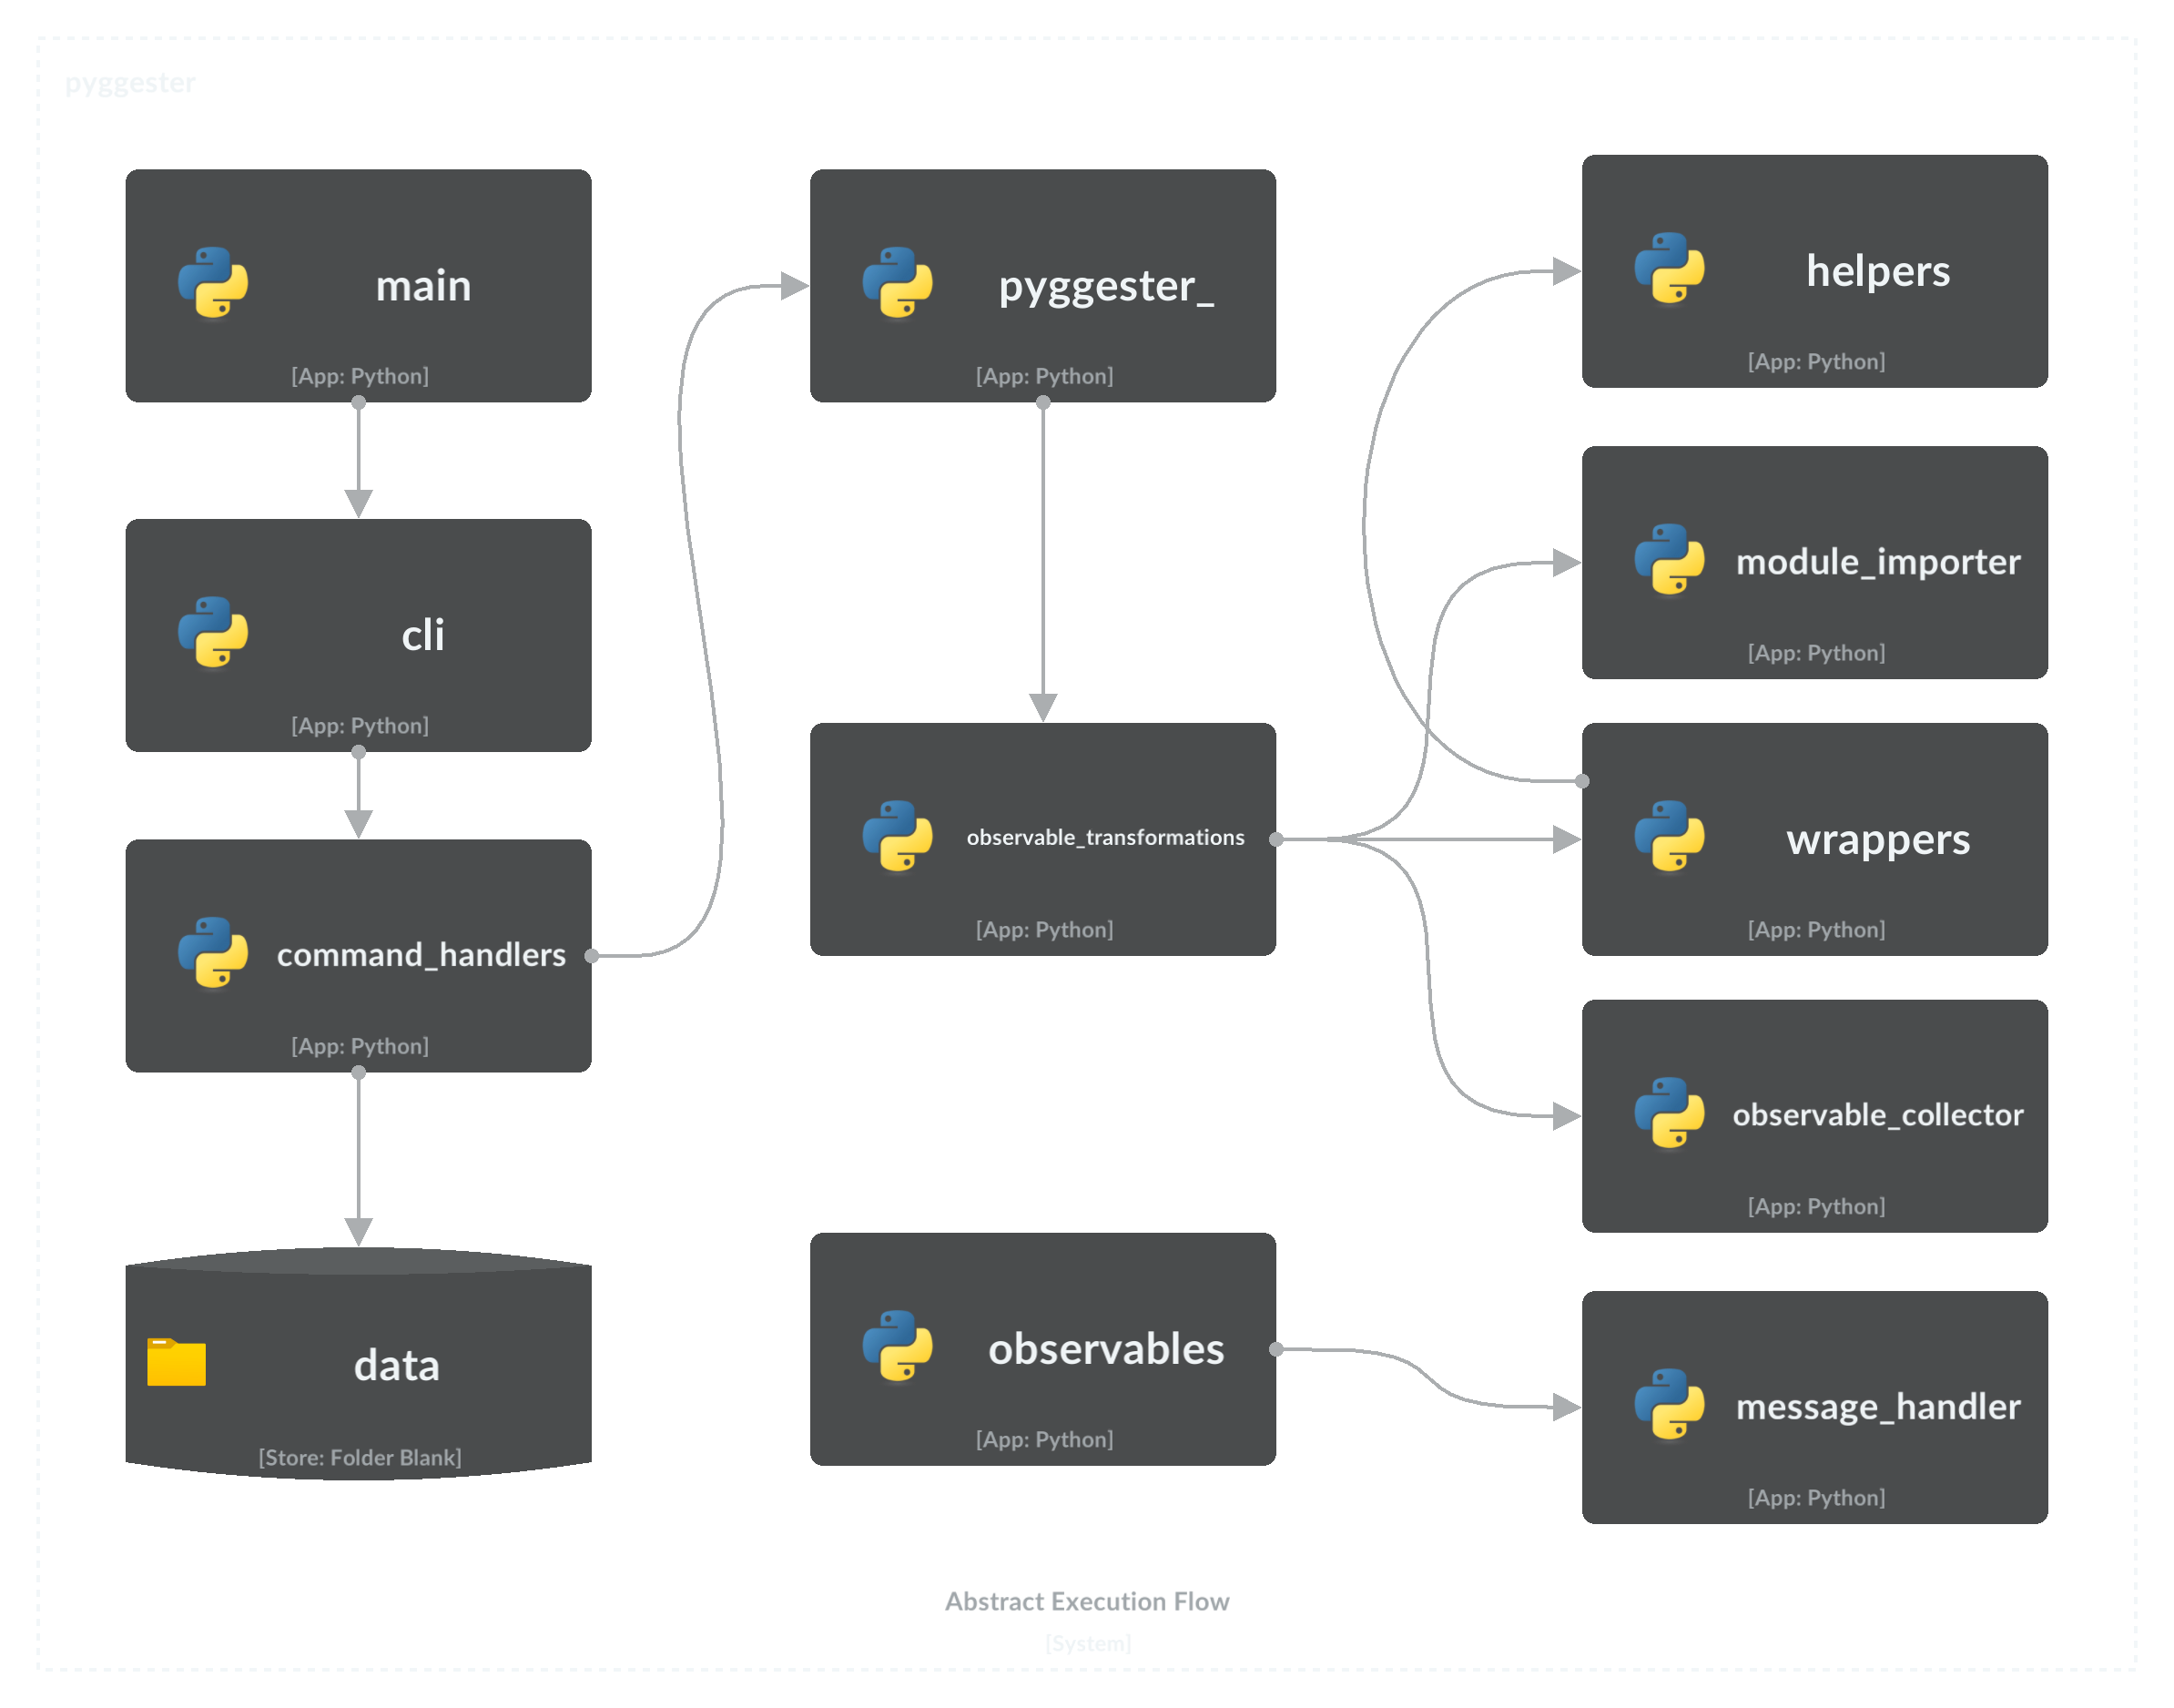
└── test_wrappers.pyO diagrama de fluxo a seguir ilustra os principais componentes do Pyggester e fornece uma visão geral abrangente da sequência de execução.
Para contribuir com este projeto, consulte o Guia de Contribuição Abrangente para obter instruções detalhadas e práticas recomendadas.
MIT Licença
Copyright (C) 2023 Valdonvitijaa
A permissão é concedida, gratuita, a qualquer pessoa que obtenha uma cópia deste software e arquivos de documentação associados (o "software"), para lidar com o software sem restrição, inclusive sem limitação os direitos de usar, copiar, modificar, mesclar, publicar, distribuir, mobilizar o software e/ou vender cópias do software e permitir que as pessoas a quem
O aviso de direitos autorais acima e este aviso de permissão devem ser incluídos em todas as cópias ou em partes substanciais do software.
O software é fornecido "como está", sem garantia de qualquer tipo, expresso ou implícito, incluindo, entre outros, as garantias de comercialização, aptidão para uma finalidade específica e não innoculação. Em nenhum caso os autores ou detentores de direitos autorais serão responsáveis por qualquer reclamação, danos ou outro passivo, seja em uma ação de contrato, delito ou não, decorrente de, fora ou em conexão com o software ou o uso ou outras negociações no software.


