kobweb
v0.20.0
Kobweb은 Compose HTML 위에 구축되어 Next.js 및 Chakra UI에서 영감을 얻은 웹 사이트 및 웹 앱을 만들기위한 의견이 많은 Kotlin 프레임 워크입니다.
@Page
@Composable
fun HomePage () {
  Column ( Modifier .fillMaxWidth(), horizontalAlignment = Alignment . CenterHorizontally ) {
    Row ( Modifier .align( Alignment . End )) {
      var colorMode by ColorMode .currentState
      Button (
        onClick = { colorMode = colorMode.opposite },
        Modifier .borderRadius( 50 .percent).padding( 0 .px)
      ) {
        // Includes support for Font Awesome icons
        if (colorMode.isLight) FaSun () else FaMoon ()
      }
    }
    H1 {
      Text ( " Welcome to Kobweb! " )
    }
    Row ( Modifier .flexWrap( FlexWrap . Wrap )) {
      SpanText ( " Create rich, dynamic web apps with ease, leveraging " )
      Link ( " https://kotlinlang.org/ " , " Kotlin " )
      SpanText ( " and " )
      Link ( " https://github.com/JetBrains/compose-multiplatform#compose-html/ " , " Compose HTML " )
    }
  }
}
Kobweb은 여전히 1.0 이전이지만, 한동안 사용할 수 있습니다. 하위 레벨 API에 대한 탈출 해치를 제공하므로 Kobweb이 아직 지원하지 않더라도 무엇이든 달성 할 수 있습니다. 관심을 나타 내기 위해 프로젝트를 주연으로 고려하십시오. 그래서 우리는 커뮤니티가 원하는 것을 창조하고 있음을 알고 있습니다. 얼마나 준비 되었습니까? ▼
우리의 목표는 다음과 같습니다.
다음은 10 초 안에 Markdown 지원 및 라이브 재 장전을 통해 Compose HTML 프로젝트를 처음부터 작성하는 데모입니다.
Kobweb의 높은 수준의 개요는 Droidcon SF 24에서 내 대화를 확인할 수 있습니다. 토크는 Kobweb가 할 수있는 일을 전시하고 Compose HTML (위에 구축)을 소개하며 광범위한 프론트 엔드 및 백엔드 기능을 다룹니다. 코드에는 빛이지만 프레임 워크의 구조와 기능을 이해하는 데 무겁습니다.
Kobweb의 사용자 중 하나 인 Stevdza-San은 Kobweb을 사용하여 프로젝트를 구축하는 방법을 보여주는 무료 시작 자습서를 만들었습니다.
팁
먼저 정적 레이아웃 사이트로 시작하고 나중에 전체 스택 사이트로 마이그레이션 할 수 있습니다. (정적 레이아웃 대 풀 스택 사이트에 대한 자세한 내용은 아래에 있습니다.)
Skyfish라는 YouTube 채널은 Kobweb로 FullStack 사이트를 구축하는 방법에 대한 튜토리얼 비디오를 만들었습니다.
첫 번째 단계는 Kobweb 이진을 얻는 것입니다. 설치, 다운로드 및/또는 빌드 할 수 있으므로 이러한 모든 접근 방식에 대한 지침을 포함시킬 수 있습니다.
Aalmiray와 Helpermethod 덕분에 이러한 설치 옵션이 작동하도록 도와주었습니다. 자신의 프로젝트 에서이 작업을 수행 해야하는 경우 jreleaser를 확인하십시오!
OS : Mac 및 Linux
$ brew install varabyte/tap/kobwebOS : Windows
 # Note: Adding buckets only has to be done once.

# Feel free to skip java if you already have it
> scoop bucket add java
> scoop install java/openjdk

# Install kobweb
> scoop bucket add varabyte https://github.com/varabyte/scoop-varabyte.git
> scoop install varabyte/kobwebOS : Windows, Mac 및 *Nix
$ sdk install kobweb이 목표에 대한 지원을 추가 한 AKSH1618에 감사합니다!
aur 도우미와 함께 : 예를 들어 :
$ yay -S kobweb
$ paru -S kobweb
$ trizen -S kobweb
# etc.
AUR 도우미없이 :
$ git clone https://aur.archlinux.org/kobweb.git
$ cd kobweb
$ makepkg -siVarabyte/Kobweb-Cli#11을 참조하십시오. 의견을 남기는 것을 고려하십시오!
이진 아티팩트는 Github에서 호스팅됩니다. 최신을 다운로드하려면 Github에서 Zip 또는 Tar 파일을 잡거나 터미널에서 가져올 수 있습니다.
$ cd /path/to/applications

# You can either pull down the zip file

$ wget https://github.com/varabyte/kobweb-cli/releases/download/v0.9.18/kobweb-0.9.18.zip
$ unzip kobweb-0.9.18.zip

# ... or the tar file

$ wget https://github.com/varabyte/kobweb-cli/releases/download/v0.9.18/kobweb-0.9.18.tar
$ tar -xvf kobweb-0.9.18.tar
그리고 직접 경로에 추가하는 것이 좋습니다.
$ PATH= $PATH :/path/to/applications/kobweb-0.9.18/bin
$ kobweb version # to check it's working
또는 상징적 링크를 통해 :
$ cd /path/to/bin # some folder you've created that's in your PATH
$ ln -s /path/to/applications/kobweb-0.9.18/bin/kobweb kobweb우리는 Github에서 Kobweb Artifacts를 주최하지만 직접 구축하기가 쉽습니다.
Kobweb을 구축하려면 JDK11 또는 최신이 필요합니다. 먼저 추가하는 방법에 대해 논의하겠습니다.
JDK 설치를 완전히 제어하려면 수동으로 다운로드하는 것이 좋습니다.
JAVA_HOME 변수를 업데이트하여 가리 킵니다. JAVA_HOME=/path/to/jdks/corretto-11.0.12
# ... or whatever version or path you chose보다 자동화 된 접근 방식을 위해서는 Intellij를 요청할 수 있습니다.
https://www.jetbrains.com/help/idea/sdk.html#set-up-jdk를 다음과 같이하십시오
Kobweb CLI는 실제로 별도의 GitHub 리포로 유지됩니다. JDK를 설정하면 복제하고 만들기 쉬워야합니다.
$ cd /path/to/src/root # some folder you've created for storing src code
$ git clone https://github.com/varabyte/kobweb-cli
$ cd kobweb-cli
$ ./gradlew :kobweb:installDist
마지막으로 경로를 업데이트하십시오.
$ PATH= $PATH :/path/to/src/root/kobweb-cli/kobweb/build/install/kobweb/bin
$ kobweb version # to check it's working 이전에 Kobweb을 설치하고 새 버전을 사용할 수 있음을 알고있는 경우 업데이트하는 방식은 설치 방법에 따라 다릅니다.
| 방법 | 지침 |
|---|---|
| 홈브류 | brew updatebrew upgrade kobweb |
| 국자 | scoop update kobweb |
| sdkman! | sdk upgrade kobweb |
| 아치 리눅스 | 다시 시작하는 설치 단계가 작동해야합니다. AUR 도우미를 사용하는 경우 설명서를 검토해야 할 수도 있습니다. |
| 다운로드 github | 최신 릴리스를 방문하십시오. zip 및 tar 파일을 모두 찾을 수 있습니다. |
$ cd /path/to/projects/
$ kobweb create app
프로젝트를 설정하는 데 필요한 몇 가지 질문이 있습니다.
프로젝트에 대한 루트 폴더를 미리 만들 필요가 없습니다. 설정 프로세스는 생성하라는 메시지가 표시됩니다. 이 섹션의 나머지 부분에 대해서는 요청할 때 "my-project"폴더를 선택한다고 가정 해 봅시다.
완료되면 홈페이지와 정보 페이지 (Markdown으로 작성된 정보 페이지 포함)와 일부 구성 요소 (재사용 가능한, 작품의 모음)가있는 기본 프로젝트가 있습니다. 자신의 디렉토리 구조는 다음과 같이 보일 것입니다.
 my-project
└── site/src/jsMain
    ├── kotlin.org.example.myproject
    │   ├── components
    │   │   ├── layouts
    │   │   │   ├── MarkdownLayout.kt
    │   │   │   └── PageLayout.kt
    │   │   ├── sections
    │   │   │   ├── Footer.kt
    │   │   │   └── NavHeader.kt
    │   │   └── widgets
    │   │       └── IconButton.kt
    │   ├── pages
    │   │   └── Index.kt
    │   └── AppEntry.kt
    └── resources/markdown
        └── About.md
INDEX.HTML 또는 라우팅 로직이 없음에 유의하십시오! Kobweb를 실행할 때 자동으로이를 생성합니다. 이것은 우리를 다음 섹션으로 데려옵니다 ...
$ cd your-project/site
$ kobweb run
이 명령은 http : // localhost : 8080에서 웹 서버를 돌립니다. 포트를 구성하려면 프로젝트의 .kobweb/conf.yaml 파일을 편집하여 그렇게 할 수 있습니다.
Intellij에서 프로젝트를 열고 편집을 시작할 수 있습니다. Kobweb가 실행되는 동안 변경 사항을 감지하고, 재 컴파일하며, 사이트에 대한 업데이트를 자동으로 배포합니다.
IDE 창 옆에 별도의 터미널 창을 열고 싶지 않다면 대체 솔루션을 선호 할 수 있습니다.
Intellij 터미널 도구 창을 사용하여 kobweb 실행할 수 있습니다. 컴파일 오류가 발생하면 스택 추적 라인이 링크로 장식되어 관련 소스로 쉽게 이동할 수 있습니다.
kobweb 자체는 Gradle을 대표하지만 명령을 직접 부르는 것을 막을 수는 없습니다. 각 Kobweb 명령에 대한 Gradle Run 구성을 만들 수 있습니다.
팁
Gradle을 대표하는 Kobweb CLI 명령을 실행하면 Gradle 명령을 콘솔에 기록합니다. 이것이이 섹션에서 논의 된 Gradle 명령을 발견 할 수있는 방법입니다.
kobwebStart -t 명령을 사용하십시오.-t 인수 (또는 --continuous )는 Gradle에게 파일 변경을 관찰하도록 지시하여 라이브 로딩 동작을 제공합니다.kobwebStop 명령을 사용하십시오.kobwebExport -PkobwebReuseServer=false -PkobwebEnv=DEV -PkobwebRunLayout=FULLSTACK -PkobwebBuildTarget=RELEASE -PkobwebExportLayout=FULLSTACK-PkobwebExportLayout=STATIC .kobwebStart -PkobwebEnv=PROD -PkobwebRunLayout=FULLSTACK-PkobwebRunLayout=STATIC .Intellij의 Gradle 통합에 대한 모든 것을 여기에서 읽을 수 있습니다. 또는 위에서 논의 된 명령에 대한 실행 구성을 만드는 방법으로 바로 이동하려면이 지침을 읽으십시오.
Kobweb은 배울 수있는 샘플 컬렉션을 제공 할 것입니다. 사용 가능한 것을 보려면 실행하십시오.
$ kobweb list

You can create the following Kobweb projects by typing ` kobweb create ... `

• app: A template for a minimal site that demonstrates the basic features of Kobweb
• examples/jb/counter: A very minimal site with just a counter (based on the Jetbrains tutorial)
• examples/todo: An example TODO app, showcasing client / server interactions
예를 들어, kobweb create examples/todo .
Kobweb에 의해 생성 된 프로젝트 템플릿은 모두 Gradle 버전 카탈로그를 수용합니다.
당신이 그것을 모른다면, 그것은 gradle/libs.versions.toml 에 존재하는 파일입니다. kobweb create 통해 원래 만든 프로젝트에 새 버전을 조정하거나 추가하려는 경우, 그곳에서 찾을 수 있습니다.
예를 들어, 다음은 Libs.versions.toml이 우리 자신의 상륙 사이트에 사용합니다.
이 기능에 대한 자세한 내용은 공식 문서를 확인하십시오.
Kobweb의 최신 버전은이 readme의 맨 위에 선언됩니다. 새 버전이 나오면 gradle/libs.version.toml 편집하고 kobweb 버전을 업데이트하여 자신의 프로젝트를 업데이트 할 수 있습니다.
중요한
kotlin 및 jetbrains-compose 버전도 업데이트 해야하는지 확인하려면 Compatibility.md를 두 번 확인해야합니다.
주의
혼란 스러울 수 있지만 Kobweb에는 라이브러리 자체의 버전 (이 상황에 적용 가능한 버전)과 명령 줄 도구에 대한 두 가지 버전이 있습니다.
Kobweb는 핵심으로 기본 CSS 스타일을 라우팅 및 구성하는 등 Compose HTML 앱을 구축하는 데 많은 보일러 플레이트를 트리밍하는 소수의 클래스입니다. Kobweb은 코드베이스를 분석하고 관련 보일러 플레이트 코드를 생성하는 Gradle 플러그인을 추가로 제공합니다.
Kobweb은 또한 동일한 이름의 CLI 바이너리로, Compose HTML 앱을 건축 및/또는 운영하는 지루한 부분을 처리하는 명령을 제공합니다. 우리는 그 물건을 방해하지 않기 때문에 더 흥미로운 작품에 집중할 수 있습니다!
(Compose HTML에 대한 자세한 내용은 공식 자습서를 방문하십시오).
페이지를 만드는 것이 쉽습니다! 정상적인 @Composable 메소드 일뿐입니다. 합성 가능 페이지로 업그레이드하려면 다음과 같은 일입니다.
jsMain 소스 디렉토리의 pages 패키지 어딘가에있는 파일에서 복합 가능을 정의하십시오.@Page 로 주석을 달 수 있습니다그로부터 Kobweb은 자동으로 사이트 항목을 만들 것입니다.
예를 들어, 다음 파일을 작성하면 다음과 같습니다.
 // jsMain/kotlin/com/mysite/pages/admin/Settings.kt

@Page
@Composable
fun SettingsPage () {
    /* ... */
}
이것은 mysite.com/admin/settings 로 이동하여 방문 할 수있는 페이지를 만듭니다.
중요한
URL의 마지막 부분 인 여기서 settings 슬러그 라고합니다.
기본적으로 슬러그는 파일 이름에서 나오며, 이는 AboutUs.kt about-us 로 변환됩니다. 그러나 이것은 원하는대로 상환 될 수 있습니다 (곧 더 자세히 설명하십시오).
파일 이름 Index.kt 는 특별합니다. 페이지가 해당 파일 내부에 정의되면 해당 URL의 기본 페이지로 처리됩니다. 예를 들어, 사용자가 mysite.com/admin/ 방문하면 .../pages/admin/Index.kt 에 정의 된 페이지가 방문됩니다.
페이지에서 생성 된 경로를 변경 해야하는 경우 Page 주석의 routeOverride 필드를 설정할 수 있습니다.
 // jsMain/kotlin/com/mysite/pages/admin/Settings.kt

@Page(routeOverride = " config " )
@Composable
fun SettingsPage () {
    /* ... */
}
위의 내용은 mysite.com/admin/config 로 이동하여 방문 할 수있는 페이지를 만듭니다.
routeOverride 추가로 슬래시가 포함될 수 있으며 값이 시작 및/또는 슬래시로 끝나면 특별한 의미가 있습니다.
재정의를 "index"로 설정하면 위에서 설명한대로 파일을 Index.kt 로 설정하는 것과 동일합니다.
몇 가지 예는 이러한 규칙을 명확히 할 수 있으며 (그리고 결합 될 때 어떻게 행동하는지). 파일 a/b/c/Slug.kt 내에서 사이트 example.com 의 페이지를 정의한다고 가정합니다.
| 주석 | 결과 URL |
|---|---|
@Page | example.com/a/b/c/slug |
@Page("other") | example.com/a/b/c/other |
@Page("index") | example.com/a/b/c/ |
@Page("d/e/f/") | example.com/a/b/c/d/e/f/slug |
@Page("d/e/f/other") | example.com/a/b/c/d/e/f/other |
@Page("d/e/f/index") | example.com/a/b/c/d/e/f/ |
@Page("/d/e/f/") | example.com/d/e/f/slug |
@Page("/d/e/f/other") | example.com/d/e/f/other |
@Page("/d/e/f/index") | example.com/d/e/f/ |
@Page("/") | example.com/slug |
@Page("/other") | example.com/other |
@Page("/index") | example.com/ |
주의
여기서 허용되는 유연성에도 불구 하고이 기능을 자주 사용해서는 안됩니다. Kobweb 프로젝트는 사용자가 사이트의 URL을 Codebase의 파일과 쉽게 연결할 수 있다는 사실을 통해 이점을 얻지만이 기능을 사용하면 해당 가정을 중단 할 수 있습니다. 주로 동적 라우팅 (동적 경로 ▼ 섹션 참조)을 활성화하거나 Kotlin Filename에서 허용되지 않는 문자를 사용하는 URL 이름을 활성화하기 위해 제공됩니다.
슬러그는 파일 이름에서 파생되지만 경로의 이전 부분은 파일 패키지에서 파생됩니다.
패키지는 선행 또는 후행 밑줄을 제거하여 경로 부품으로 변환됩니다 (이들은 패키지 이름 (예 : site.pages.blog._2022 및 site.events.fun_ )으로 허용되는 값과 키워드를 제한하는 데 종종 사용되기 때문에 카멜 케이스 패키지를 하이픈 단어로 변환합니다 ( site.pages.team.ourValues /team/our-values/ ).
패키지를 위해 생성 된 경로 부분을 무시하려면 PackageMapping 주석을 사용할 수 있습니다.
예를 들어, 팀이 미적 이유로 Camelcase 패키지를 사용하지 않는 것을 선호한다고 가정 해 봅시다. 또는 의도적으로 귀하는 사이트의 경로 부품에 선행 밑줄을 추가하여 경로 /team/_internal/contact-numbers 와 같이 경로/팀과 같은 경로와 같은 선행 밑줄이 자동으로 제거된다고 언급했습니다. 이를 위해 패키지 매핑을 사용할 수 있습니다.
패키지 매핑 주석을 현재 파일에 적용합니다. 그것을 사용하면 다음과 같이 보입니다.
 // site/pages/team/values/PackageMapping.kt
@file:PackageMapping( " our-values " )

package site.pages.blog.values

import com.varabyte.kobweb.core.PackageMapping
위의 패키지 매핑이 제자리에 있으면 site/pages/team/values/Mission.kt /team/our-values/mission 사는 파일을 방문 할 수 있습니다.
모든 페이지 방법은 rememberPageContext() 메소드를 통해 PageContext 에 대한 액세스를 제공합니다.
비판적으로, 페이지의 컨텍스트는 라우터에 대한 액세스를 제공하여 다른 페이지로 이동할 수 있습니다.
또한 현재 페이지의 URL에 대한 동적 정보를 제공합니다 (다음 섹션에서 논의).
@Page
@Composable
fun ExamplePage () {
    val ctx = rememberPageContext()
    Button (onClick = { ctx.router.navigateTo( " /other/page " ) }) {
        Text ( " Click me " )
    }
}페이지 컨텍스트를 사용하여 현재 페이지의 URL에 전달 된 쿼리 매개 변수의 값을 확인할 수 있습니다.
따라서 site.com/posts?id=12345&mode=edit 방문하면 다음과 같은 값을 쿼리 할 수 있습니다.
 enum class Mode {
    EDIT , VIEW ;

    companion object {
        fun from ( value : String ) {
           entries.find { it.name.equals(value, ignoreCase = true ) }
               ? : error( " Unknown mode: $value " )
        }
    }
}

@Page
@Composable
fun Posts () {
    val ctx = rememberPageContext()
    // Here, I'm assuming these params are always present, but you can use
    // `get` instead of `getValue` to handle the nullable case. Care should
    // also be taken to parse invalid values without throwing an exception.
    val postId = ctx.route.params.getValue( " id " ).toInt()
    val mode = Mode .from(ctx.route.params.getValue( " mode " ))
    /* ... */
} Kobweb은 쿼리 매개 변수 외에도 URL 자체에 직접 임베딩 인수를 지원합니다. 예를 들어, 사이트 방문자가 users/bitspittle/posts/20211231103156 과 같은 URL에 입력 한 경우 Path users/{user}/posts/{post} 등록 할 수 있습니다.
우리는 그것을 어떻게 설정합니까? 고맙게도, 그것은 매우 쉽습니다.
그러나 먼저, 동적 경로 users/{user}/posts/{post} 예제에는 실제로 중간에 하나와 테일 엔드에 두 개의 다른 동적 부분이 있습니다. 이들은 각각 PackageMapping 및 Page Annotations에 의해 처리 될 수 있습니다.
매핑 이름에서 곱슬 버팀대의 사용에주의하십시오! Kobweb은 이것이 역동적 인 패키지임을 알립니다.
 // pages/users/user/PackageMapping.kt
@file:PackageMapping( " {user} " ) // or @file:PackageMapping("{}")

package site.pages.users.user

import com.varabyte.kobweb.core.PackageMapping
빈 "{}" PackageMapping 주석에 전달하면 Kobweb가 패키지 자체의 이름을 사용하도록 지시합니다 (즉,이 특정 경우 user ).
PackageMapping 과 마찬가지로, Page 주석은 동적 값을 나타 내기 위해 곱슬 브레이스를 가져갈 수도 있습니다.
 // pages/users/user/posts/Post.kt

@Page( " {post} " ) // Or @Page("{}")
@Composable
fun PostPage () {
   /* ... */
}
빈 "{}" Kobweb에게 현재 파일의 이름을 사용하도록 지시합니다.
Page 주석을 사용하면 전체 경로를 다시 작성할 수 있습니다. 그 가치는 또한 동적 부품을 받아들이므로 다음과 같은 일을 할 수도 있습니다.
 // pages/users/user/posts/Post.kt

@Page( " /users/{user}/posts/{post} " ) // Or @Page("/users/{user}/posts/{}")
@Composable
fun PostPage () {
    /* ... */
}
그러나 큰 힘으로 큰 책임이 있습니다. 이와 같은 트릭은 특히 프로젝트가 커짐에 따라 나중에 찾거나 업데이트하기가 어려울 수 있습니다. 작동하는 동안 절대적으로 필요한 경우 (레거시 URL 경로를 지원 해야하는 코드 리팩터 후)이 형식을 사용해야합니다.
쿼리 매개 변수를 요청하는 것과 동일하게 동적 경로 값을 쿼리합니다. 즉, ctx.params 사용하십시오.
@Page( " {} " )
@Composable
fun PostPage () {
    val ctx = rememberPageContext()
    val postId = ctx.route.params.getValue( " post " )
    /* ... */
}
중요한
동적 경로와 쿼리 매개 변수가 mysite.com/posts/{post}?post=... 에서와 동일한 이름을 갖는 URL 경로를 작성하지 않아야합니다. 복잡한 프로젝트에서 디버깅하기가 정말 까다로울 수 있습니다. 충돌이 있으면 동적 경로 매개 변수가 우선합니다. (필요한 경우 ctx.route.queryParams 통해 쿼리 매개 변수 값에 여전히 액세스 할 수 있습니다.)
사이트에서 제공하려는 리소스가 있으면 사이트의 jsMain/resources/public Folder에 배치하여이를 처리합니다.
예를 들어, 로고가 있으면 mysite.com/assets/images/logo.png 에서 사용할 수있는 로고 jsMain/resources/public/assets/images/logo.png 의 Kobweb 프로젝트에 넣을 수 있습니다.
다시 말해, 프로젝트 리소스의 public/ 디렉토리의 모든 것이 최종 사이트 ( public/ 부품 제외)로 자동 복사됩니다.
Web Dev를 처음 접하는 사람들에게는 HTML 요소에 스타일을 설정하는 두 가지 방법이라는 것을 이해해야합니다 : 인라인 및 스타일 시트.
인라인 스타일은 요소 태그 자체에 정의됩니다. RAW HTML에서는 다음과 같습니다.
< div style =" background-color:black " >한편, 주어진 HTML 페이지는 각 스타일이 선택기에 연결된 스타일을 정의 할 수있는 스타일 시트 목록을 참조 할 수 있습니다 (해당 스타일에 적용되는 요소를 선택 하는 규칙).
매우 짧은 스타일 시트의 구체적인 예는 다음을 도울 수 있습니다.
 body {
  background-color : black;
  color : magenta
}
# title {
  color : yellow
}
그리고이 스타일 시트를 사용하여 다음 문서를 스타일로 만들 수 있습니다.
 < body >
  <!-- Title gets background-color from "body" and foreground color from "#title" -->
  < div id =" title " > Yellow on black </ div >
  Magenta on black
</ body >
메모
상충되는 스타일이 스타일 시트와 인라인 선언 모두에 존재하면 인라인 스타일이 우선합니다.
어렵고 빠른 규칙은 없지만 일반적으로 HTML / CSS를 손으로 작성할 때 스타일 시트는 종종 우려의 분리를 더 잘 유지하기 때문에 인라인 스타일보다 선호됩니다. 즉, HTML은 사이트의 내용을 나타내며 CSS는 모양과 느낌을 제어해야합니다.
하지만! 우리는 HTML / CSS를 손으로 쓰지 않습니다. 우리는 Compose HTML을 사용하고 있습니다! 코틀 린에서 이것에 관심이 있어야합니까?
결과적으로 스타일 시트를 사용해야 할 때가 있습니다. 이는 없으면 고급 동작 (특히 의사 클래스, 의사 요소 및 미디어 쿼리)에 대한 스타일을 정의 할 수 없기 때문입니다. 예를 들어 스타일 시트 접근 방식을 사용하지 않고는 방문한 링크의 색상을 무시할 수 없습니다. 따라서 근본적인 차이가 있다는 것을 깨달을 가치가 있습니다.
마지막으로, 요소가 간단 할 때 DOM 트리를 쉽게 읽을 수 있도록 (예 : <div class="title"> <div style="color:yellow; background-color:black; font-size: 24px; ..."> ).
우리는 수정 자 및 CSS 스타일 블록을 곧 소개하고 논의 할 것입니다. 그러나 일반적으로 수정자를 실크로 직접 전달하면 인라인 스타일이 발생하는 반면 CSS 스타일 블록을 사용하여 스타일을 정의하면 사이트의 스타일에 포함됩니다.
 // Uses inline styles
Box ( Modifier .color( Colors . Red )) { /* ... */ }

// Uses a stylesheet
val BoxStyle = CssStyle {
    base { Modifier . Color ( Colors . Red ) }
}
Box ( BoxStyle .toModifier()) { /* ... */ }
프로토 타이핑시 초보자 또는 고급 사용자로서 최대한 인라인 수정자를 자유롭게 사용하여 의사 클래스, 유사 요소 또는 미디어 쿼리를 사용해야한다면 CSS 스타일 블록에 피벗하십시오. 인라인 스타일을 Kobweb의 스타일 시트로 마이그레이션하는 것은 상당히 쉽습니다.
내 프로젝트에서는 정말 간단한 레이아웃 요소 (예 : Row(Modifier.fillMaxWidth()) ) 및 CSS 스타일 블록을 복잡하거나 재사용 할 수있는 위젯에 인라인 스타일을 사용하는 경향이 있습니다. 실제로 모든 스타일을 위젯 자체 위의 한 곳에 함께 그룹화하는 것은 좋은 조직 컨벤션이됩니다.
Kobweb은 Jetpack Compose에서 찾은 것과 유사한 경험을 제공하기 위해 Modifier 클래스를 소개합니다. (개념에 익숙하지 않은 경우 여기에서 더 많이 읽을 수 있습니다).
Compose HTML의 세계에서는 CSS 스타일과 속성 위에 Modifier 래퍼로 생각할 수 있습니다.
중요한
HTML 속성 및/또는 스타일에 익숙하지 않은 경우 공식 문서를 참조하십시오.
그래서 이것은 :
Modifier .backgroundColor( Colors . Red ).color( Colors . Green ).padding( 200 .px) Box 와 같이 Kobweb에서 제공 한 위젯에 전달되면 :
 Box ( Modifier .backgroundColor( Colors . Red ).color( Colors . Green ).padding( 200 .px)) {
    /* ... */
}
<div style="background:red;color:green;padding:200px"> 와 같은 스타일 속성으로 HTML 태그를 생성합니다.
위의 background , color 및 padding 과 같은 Kobweb가 제공하는 수정 자 확장자 (및 성장)가 많이 있습니다. 그러나 attrsModifier 및 styleModifier 누락 된 수정자를 수정하는 데있어 두 개의 탈출 해치가 있습니다.
이 시점에서 Kobweb 아래의 하나의 층인 Compose HTML과 상호 작용하고 있습니다.
그것들을 사용하면 다음과 같습니다.
 // Modify attributes of an element tag
// e.g. the "a", "b", and "c" in <tag a="..." b="..." c="..." />
Modifier .attrsModifier {
    id( " example " )
}

// Modify styles of an element tag
// e.g. the "x", "y", and "z" in `<tag a="..." b="..." c="..." style="x:...;y:...;z:..." />
Modifier .styleModifier {
    width( 100 .percent)
    height( 50 .percent)
}

// Note: Because "style" itself is an attribute, you can define styles in an attrsModifier:
Modifier .attrsModifier {
    id( " example " )
    style {
        width( 100 .percent)
        height( 50 .percent)
    }
}
// ... but in the above case, you should use a styleModifier for simplicity
Kobweb가 수정자를 제공하지 않고 Compose HTML이 필요한 속성 또는 스타일 지원을 제공하지 않는 경우가있는 경우 (그리고 희망적으로 희귀 한!) 사례에서는 attrsModifier 와 attr Method 또는 styleModifier + property 방법을 사용할 수 있습니다. 탈출 해치 내 에서이 탈출 해치를 사용하면 필요한 사용자 정의 값을 제공 할 수 있습니다.
위의 사례는 다음과 같이 다시 작성할 수 있습니다.
 Modifier .attrsModifier {
    attr( " id " , " example " )
}

Modifier .styleModifier {
    property( " width " , 100 .percent)
    // Or even raw CSS:
    // property("width", "100%")
    property( " height " , 50 .percent)
}
마지막으로, 스타일은 CSS의 설계에 의해 모든 요소에 적용 가능하지만 속성은 종종 특정 요소와 관련이 있습니다. 예를 들어, id 속성은 모든 요소에 적용될 수 있지만 href a 태그에만 적용될 수 있습니다. 수정자는 어떤 요소가 전달되는지에 대한 컨텍스트가 없기 때문에 Kobweb은 글로벌 속성 (예 : Modifier.id("example") )에 속성 수정자를 제공하는 것을 목표로합니다.
따라서 자체 코드뿐만 아니라 자체 코드에서 attrsModifier (또는 그 속기 Modifier.attr )를 사용하여 Modifier.toAttrs ( Modifier Compose HTML 위젯으로 전달할 수있는 attrs 블록으로 변환)를 사용하여 속성 값을 설정하는 경우가 종종 허용됩니다.
그러나 자신의 코드베이스에서 styleModifier { property(key, value) } 사용해야하는 경우, 누락 된 수정자를 라이브러리에 추가 할 수 있도록 문제를 제출하는 것을 고려하십시오. 최소한 자신만의 확장 방법을 정의하여 자신만의 유형-안전 스타일 수정자를 만들도록 권장됩니다.
실크는 Kobweb에 포함 된 UI 층이며 Compose HTML에 제작되었습니다.
Compose HTML은 기본 HTML / CSS 개념을 이해해야하지만 실크는 그 중 일부를 추상화하려고 시도하여 API가 Android 또는 데스크탑에서 Compose 앱을 개발 한 경험과 더 유사하게 제공합니다. "div, span, flexbox, attrs, styles, classes"및 더 많은 "행, 열, 상자 및 수정 자"가 적습니다.
우리는 실크를 Kobweb 경험의 매우 중요한 부분이라고 생각하지만 선택적 구성 요소로 설계되었다고 지적 할 가치가 있습니다. 실크없이 Kobweb을 절대적으로 사용할 수 있습니다. (Kobweb없이 실크를 사용할 수도 있습니다!).
실크를 인터 리브하고 HTML 구성 요소를 쉽게 구성 할 수도 있습니다 (실크가 자체적으로 구성되므로).
@InitSilk 방법 더 나아 가기 전에, 우리는 당신이 당신의 사이트가 시작될 때 호출되는 @InitSilk 와 메소드를 주석을 달 수 있다고 신속하게 언급하고 싶습니다.
이 메소드는 단일 InitSilkContext 매개 변수를 가져와야합니다. 컨텍스트에는 실크 기본값을 조정할 수있는 다양한 속성이 포함되어 있으며 아래 섹션에서 더 자세히 설명됩니다.
@InitSilk
fun initSilk ( ctx : InitSilkContext ) {
  // `ctx` has a handful of properties which allow you to adjust Silk's default behavior.
}
팁
@InitSilk 메소드의 이름은 공개되는 한 단일 InitSilkContext 매개 변수를 사용하고 같은 이름의 다른 메소드와 충돌하지 않는 한 중요하지 않습니다. 가독성 목적으로 이름을 선택하는 것이 좋습니다.
원하는만큼 많은 @InitSilk 메소드를 정의 할 수 있으므로 모든 것을 수행하는 단일의 모 놀리 식, fun initSilk(ctx) 메소드를 선언하는 대신 관련성 있고 명확하게 명확한 조각으로 분해하십시오.
실크를 사용하면 CssStyle 기능 및 base 블록을 사용하여 SO와 같은 스타일을 정의 할 수 있습니다.
 val CustomStyle = CssStyle {
    base {
        Modifier .background( Colors . Red )
    }
}
CustomStyle.toModifier() 사용하여 수정 자로 변환하십시오. 이 시점에서 Modifier 매개 변수를 취하는 복합 가능에 전달할 수 있습니다.
 // Approach #1 (uses inline styles)
Box ( Modifier .backgroundColor( Colors . Red )) { /* ... */ }

// Approach #2 (uses stylesheets)
Box ( CustomStyle .toModifier()) { /* ... */ }
중요한
CssStyle 선언 할 때는 공개되어야합니다. 코드는 Kobweb Gradle 플러그인에 의해 main.kt 파일 내부에서 생성되기 때문에 해당 코드를 등록하려면 스타일에 액세스 할 수 있어야합니다.
일반적으로 스타일을 전 세계적으로 생각하는 것이 좋습니다. 기술적으로는 모두 전 세계적으로 적용된 스타일 시트에 살고 있기 때문에 스타일 이름이 전체 애플리케이션에서 고유한지 확인해야합니다.
등록을 직접 처리하기 위해 약간의 보일러 플레이트를 추가하면 기술적으로 스타일을 비공개로 만들 수 있습니다.
@Suppress( " PRIVATE_COMPONENT_STYLE " )
private val ExampleCustomStyle = CssStyle { /* ... */ }
// Or use a leading underscore to automatically suppress the warning
private val _ExampleOtherCustomStyle = CssStyle { /* ... */ }

@InitSilk
fun registerPrivateStyle ( ctx : InitSilkContext ) {
  // Kobweb will not be able to detect the property name, so a name must be provided manually
  ctx.theme.registerStyle( " example-custom " , ExampleCustomStyle )
  ctx.theme.registerStyle( " example-other-custom " , _ExampleOtherCustomStyle )
}
그러나 스타일을 공개하고 Kobweb Gradle 플러그인이 모든 것을 처리하도록하는 것이 좋습니다.
CssStyle.base CssStyle.base 선언으로 기본 스타일 블록의 구문을 조금 더 단순화 할 수 있습니다.
 val CustomStyle = CssStyle .base {
    Modifier .background( Colors . Red )
}
추가 선택기를 지원할 필요가 있다면 다시 분류해야 할 수도 있습니다. ▼.
Kobweb Gradle 플러그인은 CssStyle 속성을 자동으로 감지하고 속성 이름 자체에서 파생되었지만 케밥 케이스를 사용하여 이름을 생성합니다.
예를 들어, val TitleTextStyle = CssStyle { ... } 작성하면 이름이 "Title-Text"입니다.
일반적 으로이 이름을 신경 쓰지 않아도되지만, 그것이 진행되고있는 일이라는 것을 이해하는 데 유용 할 수있는 틈새 사례가 있습니다.
이름을 수동으로 설정 해야하는 경우 CssName 주석을 사용하여 기본 이름을 무시할 수 있습니다.
@CssName( " my-custom-name " )
val CustomStyle = CssStyle {
    base {
        Modifier .background( Colors . Red )
    }
} 그렇다면 base 블록은 무엇입니까?
사실, 그것은 그 자체로는 약간 장황 해 보입니다. 그러나 조건부로 효과적인 추가 선택기 블록을 정의 할 수 있습니다. 기본 스타일은 항상 먼저 적용되지만 특정 선택기의 규칙에 따라 추가 스타일이 적용됩니다.
주의
추가 선택기를 정의 할 때, 특히 중 하나 이상이 동일한 CSS 속성을 동시에 수정하는 경우 주문.
여기서 우리는 기본적으로 빨간색이지만 마우스가 그 위에 맴돌 때 녹색의 스타일을 만듭니다.
 val CustomStyle = CssStyle {
    base {
        Modifier .color( Colors . Red )
    }

    hover {
        Modifier .color( Colors . Green )
    }
}
Kobweb은 편의를 위해 귀하를위한 많은 표준 선택기를 제공하지만 CSS에 정통한 사람들의 경우 항상 CSS 규칙을 직접 정의하여 Kobweb가 아직 추가하지 않은보다 복잡한 조합 또는 선택기를 활성화 할 수 있습니다.
예를 들어, 이것은 위의 스타일 정의와 동일합니다.
 val CustomStyle = CssStyle {
    base {
        Modifier .color( Colors . Red )
    }

    cssRule( " :hover " ) {
        Modifier .color( Colors . Green )
    }
}브레이크 포인트라고 불리는 반응 형 HTML / CSS 디자인의 세계에는 디버깅 브레이크 포인트와 혼란스럽게 아무 관련이없는 기능이 있습니다. 오히려 스타일이 변경 될 때 사이트의 크기 경계를 지정합니다. 이것이 사이트가 모바일 대 태블릿 대 데스크탑에서 컨텐츠를 다르게 제시하는 방법입니다.
Kobweb은 프로젝트에 사용할 수있는 4 가지 중단 점 크기를 제공합니다.이 중단 점 크기를 전혀 사용하지 않으면 사이트를 설계 할 때 작업 할 수있는 5 개의 버킷이 제공됩니다.
코드에 @InitSilk 메소드를 추가하고 ctx.theme.breakpoints 설정하여 사이트의 기본값 값을 변경할 수 있습니다.
@InitSilk
fun initializeBreakpoints ( ctx : InitSilkContext ) {
    ctx.theme.breakpoints = BreakpointSizes (
        sm = 30 .cssRem,
        md = 48 .cssRem,
        lg = 62 .cssRem,
        xl = 80 .cssRem,
    )
}
CssStyle 의 중단 점을 참조하려면 다음과 같이 호출하십시오.
 val CustomStyle = CssStyle {
    base {
        Modifier .fontSize( 24 .px)
    }

    Breakpoint . MD {
        Modifier .fontSize( 32 .px)
    }
}
팁
브레이크 포인트 조건 스타일을 테스트 할 때 브라우저 개발 도구를 사용하면 창 크기를 시뮬레이션하여 사이트가 다른 크기를 어떻게 보는지 확인할 수 있습니다. 예를 들어 Chrome에서는 다음과 같은 지침을 따를 수 있습니다 : https://developer.chrome.com/docs/devtools/device-mode
또한 스타일이 Kotlin Range 연산자를 사용하여 특정 범위의 중단 점에만 적용되어야한다고 지정할 수도 있습니다.
 val CustomStyle = CssStyle {
    // The following three declarations are the same, and ensure their style is only active in mobile / tablet modes

    // Option 1: exclusive upper bound
    ( Breakpoint . ZERO .. < Breakpoint . MD ) { Modifier .fontSize( 24 .px) }

    // Option 2: using `until` for `..<`
    ( Breakpoint . ZERO until Breakpoint . MD ) { Modifier .fontSize( 24 .px)  }

    // Option 3: inclusive upper bound
    ( Breakpoint . ZERO .. Breakpoint . SM ) { Modifier .fontSize( 24 .px) }

    Breakpoint . MD { Modifier .fontSize( 32 .px) }
}
괄호로 표현식을 감싸는 팬이 아니라면 between 방법도 제공되며, 그렇지 않으면 ..< 범위 연산자 :
 val CustomStyle = CssStyle {
    // Style active in mobile / tablet modes
    between( Breakpoint . ZERO , Breakpoint . MD ) { /* ... */ }
}
마지막으로, 범위의 첫 번째 브레이크 포인트가 Breakpoint.ZERO 인 경우 대신 The until Method를 사용하여 표현식을 단축 할 수 있습니다.
 val CustomStyle = CssStyle {
    // Style active in mobile / tablet modes
    until( Breakpoint . MD ) { /* ... */ }
}
실제로, 당신은 정상적인 중단 점을 선언하는 것 until 생각할 수 있습니다. 다시 말해, until(Breakpoint.MD) { ... } 중간 크기 까지 모든 중단 점 크기를 의미하는 반면 Breakpoint.MD { ... } 중간 크기 이상을 의미합니다.
CssStyle 정의 할 때 colorMode 라는 필드를 사용할 수 있습니다.
 val CustomStyle = CssStyle .base {
    Modifier .color( if (colorMode.isLight) Colors . Red else Colors . Pink )
}
실크는 모든 위젯에 대해 다양한 밝고 어두운 색상을 정의하며 자신의 위젯에서 그 중 하나를 재사용하려면 colorMode.toPalette() 사용하여 쿼리 할 수 있습니다.
 val CustomStyle = CssStyle .base {
    Modifier .color(colorMode.toPalette().link.default)
}
SilkTheme 매우 간단한 (예 : 흑백) 기본값을 포함하지만 @InitSilk 메소드에서 더 브랜드를 인식하는 것보다 우선 할 수 있습니다.
 // Assume a bunch of color constants (e.g. BRAND_LIGHT_COLOR) are defined somewhere

@InitSilk
fun overrideSilkTheme ( ctx : InitSilkContext ) {
  ctx.theme.palettes.light.background = BRAND_LIGHT_BACKGROUND
  ctx.theme.palettes.light.color = BRAND_LIGHT_COLOR
  ctx.theme.palettes.dark.background = BRAND_DARK_BACKGROUND
  ctx.theme.palettes.dark.color = BRAND_DARK_COLOR
} 기본적으로 Kobweb은 사이트의 색상 모드를 ColorMode.LIGHT 로 초기화합니다.
그러나 @InitSilk 메소드에서 initialColorMode 속성을 설정하여이를 제어 할 수 있습니다.
@InitSilk
fun setInitialColorMode ( ctx : InitSilkContext ) {
    ctx.theme.initialColorMode = ColorMode . DARK
}
사용자의 시스템 환경 설정을 존중하려면 initialColorMode ColorMode.systemPreference 로 설정할 수 있습니다.
@InitSilk
fun setInitialColorMode ( ctx : InitSilkContext ) {
    ctx.theme.initialColorMode = ColorMode .systemPreference
}사이트의 컬러 모드 토글을 지원하는 경우 사용자의 마지막으로 선택한 설정을 로컬 스토리지에 저장 한 다음 사용자가 나중에 사이트를 다시 방문하면 복원하는 것이 좋습니다.
복원은 @InitSilk 블록에서 발생하는 반면 root @App composable에서 색상 모드를 저장하는 코드가 발생해야합니다.
@InitSilk
fun setInitialColorMode ( ctx : InitSilkContext ) {
    ctx.theme.initialColorMode =
      ColorMode .loadFromLocalStorage() ? : ColorMode .systemPreference
}

@App
@Composable
fun AppEntry ( content : @Composable () -> Unit ) {
  SilkApp {
    val colorMode = ColorMode .current
    LaunchedEffect (colorMode) {
        colorMode.saveToLocalStorage()
    }

    /* ... */
  }
}때때로 다른 스타일과 함께 / 후에 만 적용 해야하는 스타일을 정의하고 싶을 수도 있습니다.
이를 달성하는 가장 쉬운 방법은 extendedBy 방법을 사용하여 기본 CSS 스타일 블록을 확장하는 것입니다.
 val GeneralTextStyle = CssStyle {
    base { Modifier .fontSize( 16 .px).fontFamily( " ... " ) }
}
val EmphasizedTextStyle = GeneralTextStyle .extendedBy {
    base { Modifier .fontWeight( FontWeight . Bold ) }
}

// Or, using the `base` methods:
// val GeneralTextStyle = CssStyle.base {
//   Modifier.fontSize(16.px).fontFamily("...")
// }
// val EmphasizedTextStyle = GeneralTextStyle.extendedByBase {
//   Modifier.fontWeight(FontWeight.Bold)
// }
연장되면 두 스타일을 자동으로 포함시키기 위해 확장 스타일로 toModifier 호출하면됩니다.
 SpanText ( " WARNING " , EmphasizedTextStyle .toModifier())
// You do NOT need to reference the base style, i.e.
// GeneralTextStyle.toModifier().then(EmphasizedTextStyle.toModifier()) 지금까지 우리는 CSS 스타일 블록을 일반적인 CSS 스타일 속성을 정의하는 것으로 논의했습니다. 그러나 타이핑 된 CSS 스타일 블록을 정의하는 방법이있어 특정 기본 스타일과 관련된 유형 변형을 생성 할 수 있습니다.
이 경우 기본 스타일을 위젯 구성 요소를 정의 할 때 패턴이 효과적이기 때문에 구성 요소 스타일 이라고합니다. 실제로, 그것은 실크가 위젯의 모든 단일 하나에 사용하는 표준 패턴입니다.
나중에 구성 요소 스타일을 사용하여 위젯을 구축하는이 전체 패턴에 대해 논의하지만, 시작하려면 선언하는 방법을 보여줍니다. ComponentKind 구현 한 다음 CssStyle 선언 블록으로 전달하는 마커 인터페이스를 만듭니다.
예를 들어, 나만의 Button 위젯을 만들고있는 경우 :
 sealed interface ButtonKind : ComponentKind
val ButtonStyle = CssStyle < ButtonKind > { /* ... */ }
인터페이스 선언에 대한 두 가지 점에 주목하십시오.
sealed 표시되어 있습니다. 이것은 기술적으로 할 필요는 없지만 다른 사람이 더 서브 클래스를하지 않을 의도를 표현하는 방법으로 권장합니다. 일반적인 CssStyle 선언과 마찬가지로 관련 이름은 속성 이름에서 파생됩니다. @CssName 주석을 사용 하여이 동작을 무시할 수 있습니다.
구성 요소 스타일의 성능은 addVariant 방법을 사용하여 구성 요소 변형을 생성 할 수 있다는 것입니다.
val OutlinedButtonVariant : CssStyleVariant < ButtonKind > = ButtonStyle .addVariant { /* ... */ }메모
변형에 대한 권장 명명 규칙은 관련 스타일을 취하고 이름을 접미사와 "variant"라는 단어로 사용하는 것입니다.
중요한
CssStyle 과 마찬가지로 CssStyleVariant 는 공개되어야합니다. 동일한 이유는 다음과 같습니다. 코드가 Kobweb Gradle 플러그인에 의해 main.kt 파일 내부에서 생성되기 때문에 해당 코드를 등록하려면 변형에 액세스 할 수 있어야합니다.
등록을 직접 처리하기 위해 약간의 보일러 플레이트를 추가하면 기술적으로 개인을 비공개로 만들 수 있습니다.
@Suppress( " PRIVATE_COMPONENT_VARIANT " )
private val ExampleCustomVariant = ButtonStyle .addVariant {
  /* ... */
}
// Or, `private val _ExampleCustomVariant`

@InitSilk
fun registerPrivateVariant ( ctx : InitSilkContext ) {
  // When registering variants, using a leading dash will automatically prepend the bast style name.
  // This example here will generate the final name "button-example".
  ctx.theme.registerVariant( " -example " , ExampleCustomVariant )
}
그러나 변종을 공개하고 Kobweb Gradle 플러그인이 모든 것을 처리하도록하는 것이 좋습니다.
구성 요소 변형의 아이디어는 위젯 작성자가 사용자가 그 위에 적용 할 수있는 하나 이상의 일반적인 조정과 함께 기본 스타일을 정의 할 수있는 전원을 제공한다는 것입니다. (위젯 작성자가 스타일에 대한 변형을 제공하지 않더라도 모든 사용자는 항상 자신의 코드베이스에서 자신을 정의 할 수 있습니다.)
버튼 스타일 예제를 다시 방문하여 모든 것을 하나로 모으십시오.
 sealed interface ButtonKind : ComponentKind

val ButtonStyle = CssStyle < ButtonKind > { /* ... */ }

// Note: Creates a CSS style called "button-outlined"
val OutlinedButtonVariant = ButtonStyle .addVariant { /* ... */ }

// Note: Creates a CSS style called "button-inverted"
val InvertedButtonVariant = ButtonStyle .addVariant { /* ... */ }
구성 요소 스타일로 사용하면 toModifier() 메소드는 선택적으로 변형 매개 변수를 취합니다. 변형이 전달되면 두 스타일이 모두 적용됩니다. 기본 스타일과 변형 스타일이 이어집니다.
예를 들어, ButtonStyle.toModifier(OutlinedButtonVariant) 추가 개요 스타일이있는 메인 버튼 스타일을 먼저 적용합니다.
CssStyle 과 마찬가지로 @CssName 주석으로 스타일 변형을 주석에 올릴 수 있습니다. 선행 대시를 사용하면 기본 스타일 이름이 자동으로 전제됩니다. 예를 들어:
@CssName( " custom-name " )
val OutlinedButtonVariant = ButtonStyle .addVariant { /* ... */ } // Creates a CSS style called "custom-name"

@CssName( " -custom-name " )
val InvertedButtonVariant = ButtonStyle .addVariant { /* ... */ } // Creates a CSS style called "button-custom-name"
addVariantBase Like CssStyle.base , variants that don't need to support additional selectors can use addVariantBase instead to slightly simplify their declaration:
 val HighlightedCustomVariant by CustomStyle .addVariantBase {
    Modifier .backgroundColor( Colors . Green )
}

// Short for
// val HighlightedCustomVariant by CustomStyle.addVariant {
//   base { Modifier.backgroundColor(Colors.Green) }
// } Silk uses component styles when defining its widgets, and you can too! The full pattern looks like this:
 sealed interface CustomWidgetKind : ComponentKind

val CustomWidgetStyle = CssStyle < CustomWidgetKind > { /* ... */ }

@Composable
fun CustomWidget (
    modifier : Modifier = Modifier ,
    variant : CssStyleVariant < CustomWidgetKind > ? = null,
    @Composable content : () -> Unit
) {
    val finalModifier = CustomWidgetStyle .toModifier(variant).then(modifier)
    /* ... */
}
다시 말해서:
modifier as its first optional parameter.CssStyleVariant parameter (typed to your unique ComponentKind implementation)@Composable context lambda parameter (unless this widget doesn't support custom content)A caller might call your widget one of several ways:
 // Approach #1: Use default styling
CustomWidget { /* ... */ }

// Approach #2: Tweak default styling with a variant
CustomWidget (variant = TransparentWidgetVariant ) { /* ... */ }

// Approach #3: Tweak default styling with inline overrides
CustomWidget ( Modifier .backgroundColor( Colors . Blue )) { /* ... */ }

// Approach #4: Tweak default styling with both a variant and inline overrides
CustomWidget ( Modifier .backgroundColor( Colors . Blue ), variant = TransparentWidgetVariant ) { /* ... */ }In CSS, animations work by letting you define keyframes in a stylesheet which you then reference, by name, in an animation style. You can read more about them on Mozilla's documentation site.
For example, here's the CSS for an animation of a sliding rectangle (from this tutorial):
 div {
  width : 100 px ;
  height : 100 px ;
  background : red;
  position : relative;
  animation : shift-right 5 s infinite;
}

@keyframes shift-right {
  from { left : 0 px ;}
  to { left : 200 px ;}
}
Kobweb lets you define your keyframes in code by using a Keyframes block:
 val ShiftRightKeyframes = Keyframes {
    from { Modifier .left( 0 .px) }
    to { Modifier .left( 200 .px) }
}

// Later
Div (
    Modifier
        .size( 100 .px).backgroundColor( Colors . Red ).position( Position . Relative )
        .animation( ShiftRightKeyframes .toAnimation(
            duration = 5 .s,
            iterationCount = AnimationIterationCount . Infinite
        ))
        .toAttrs()
)
The name of the keyframes block is automatically derived from the property name (here, ShiftRightKeyframes is converted into "shift-right" ). You can then use the toAnimation method to convert your collection of keyframes into an animation that uses them, which you can pass into the Modifier.animation modifier.
중요한
When you declare a Keyframes animation, it must be public. This is because code gets generated inside a main.kt file by the Kobweb Gradle plugin, and that code needs to be able to access your variant in order to register it.
In general, it's a good idea to think of animations as global anyway, since technically they all live in a globally applied stylesheet, and you have to make sure that the animation name is unique across your whole application.
You can technically make an animation private if you add a bit of boilerplate to handle the registration yourself:
@Suppress( " PRIVATE_KEYFRAMES " )
private val ExampleKeyframes = Keyframes { /* ... */ }
// Or, `private val _ExampleKeyframes`

@InitSilk
fun registerPrivateAnim ( ctx : InitSilkContext ) {
    ctx.stylesheet.registerKeyframes( " example " , ExampleKeyframes )
}
However, you are encouraged to keep your keyframes public and let the Kobweb Gradle plugin handle everything for you.
Occasionally, you may need access to the raw element backing the Silk widget you've just created. All Silk widgets provide an optional ref parameter which takes a listener that provides this information.
 Box (
    ref = /* ... */
) {
    /* ... */
}
All ref callbacks (discussed more below) will receive an org.w3c.dom.Element subclass. You can check out the Element class (and its often more relevant HTMLElement inheritor) to see the methods and properties that are available on it.
Raw HTML elements expose a lot of functionality not available through the higher-level Compose HTML APIs.
refFor a trivial but common example, we can use the raw element to capture focus:
 Box (
    ref = ref { element ->
        // Triggered when this Box is first added into the DOM
        element.focus()
    }
)
The ref { ... } method can actually take one or more optional keys of any value. If any of these keys change on a subsequent recomposition, the callback will be rerun:
 val colorMode by ColorMode .currentState
Box (
    // Callback will get triggered each time the color mode changes
    ref = ref(colorMode) { element -> /* ... */ }
)
disposableRef If you need to know both when the element enters AND exits the DOM, you can use disposableRef instead. With disposableRef , the very last line in your block must be a call to onDispose :
 val activeElements : MutableSet < HTMLElement > = /* ... */

/* ... later ... */

Box (
    ref = disposableRef { element ->
        activeElements.put(element)
        onDispose { activeElements.remove(element) }
    }
)
The disposableRef method can also take keys that rerun the listener if any of them change. The onDispose callback will also be triggered in that case, as the old effect gets discarded.
refScope And, finally, you may want to have multiple listeners that are recreated independently of one another based on different keys. You can use refScope as a way to combine two or more ref and/or disposableRef calls in any combination:
 val isFeature1Enabled : Boolean = /* ... */
val isFeature2Enabled : Boolean = /* ... */

Box (
    ref = refScope {
        ref(isFeature1Enabled) { element -> /* ... */ }
        disposableRef(isFeature2Enabled) { element -> /* ... */ ; onDispose { /* ... */ } }
    }
) You may occasionally want the backing element of a normal Compose HTML widget, such as a Div or Span . However, these widgets don't have a ref callback, as that's a convenience feature provided by Silk.
You still have a few options in this case.
The official way to retrieve a reference is by using a ref block inside an attrs block. This version of ref is actually more similar to Silk's disposableRef concept than its ref one, as it requires an onDispose block:
 Div (attrs = {
    ref { element -> /* ... */ ; onDispose { /* ... */ } }
})
The above snippet was adapted from the official tutorials.
You could put that exact same logic inside the Modifier.toAttrs block if you're terminating some modifier chain:
 Div (attrs = Modifier .toAttrs {
  ref { element -> /* ... */ ; onDispose { /* ... */ } }
})
Unlike Silk's version of ref , Compose HTML's version does not accept keys. If you need this behavior and if the Compose HTML widget accepts a content block (many of them do), you can call Silk's registerRefScope method directly within it:
 Div {
  registerRefScope(
    disposableRef { element -> /* ... */ ; onDispose { /* ... */ } }
    // or ref { element -> /* ... */ }
  )
} Kobweb supports CSS variables (also called CSS custom properties), which is a feature where you can store and retrieve property values from variables declared within your CSS styles. It does this through a class called StyleVariable .
메모
You can find official documentation for CSS custom properties here.
Using style variables is fairly simple. You first declare one without a value (but lock it down to a type) and later you can initialize it within a style using Modifier.setVariable(...) :
 val dialogWidth by StyleVariable < CSSLengthNumericValue >()

// This style will be applied to a div that lives at the root, so that
// this variable value will be made available to all children.
val RootStyle = CssStyle .base {
  Modifier .setVariable(dialogWidth, 600 .px)
}
팁
Compose HTML provides a CSSLengthValue , which represents concrete values like 10.px or 5.cssRem . However, Kobweb provides a CSSLengthNumericValue type which represents the concept more generally, eg as the result of intermediate calculations. There are CSS*NumericValue types provided for all relevant units, and it is recommended to use them when declaring style variables as they more naturally support being used in calculations.
We discuss CSSNumericValue types▼ in more detail later in this document.
You can later query variables using the value() method to extract their current value:
 val DialogStyle = CssStyle .base {
  Modifier .width(dialogWidth.value())
}
You can also provide a fallback value, which, if present, would be used in the case that a variable hadn't already been set previously:
 val DialogStyle = CssStyle .base {
  // Will be the value of the dialogWidth variable if it was set, otherwise 500px
  Modifier .width(dialogWidth.value( 500 .px))
}
Additionally, you can also provide a default fallback value when declaring the variable:
 // Note the default fallback: 100px
val dialogWidth by StyleVariable < CSSLengthNumericValue >( 100 .px)

val DialogStyle100 = CssStyle .base {
  // Uses default fallback. width = 100px
  Modifier .width(dialogWidth.value())
}
val DialogStyle200 = CssStyle .base {
  // Uses specific fallback. width = 200px
  Modifier .width(dialogWidth.value( 200 .px))
}
val DialogStyle300 = CssStyle .base {
  // Fallback (400px) ignored because variable is set explicitly. width = 300px
  Modifier .setVariable(dialogWidth, 300 .px).width(dialogWidth.value( 400 .px))
}
주의
In the above example in the DialogStyle300 style, we set a variable and query it in the same line, which we did purely for demonstration purposes. In practice, you would probably never do this -- the variable would have been set separately elsewhere, eg in an inline style or on a parent container.
To demonstrate these concepts all together, below we declare a background color variable, create a root container scope which sets it, a child style that uses it, and, finally, a child style variant that overrides it:
 // Default to a debug color, so if we see it, it indicates we forgot to set it later
val bgColor by StyleVariable < CSSColorValue >( Colors . Magenta )

val ContainerStyle = CssStyle .base {
    Modifier .setVariable(bgColor, Colors . Blue )
}
val SquareStyle = CssStyle .base {
    Modifier .size( 100 .px).backgroundColor(bgColor.value())
}
val RedSquareStyle = SquareStyle .extendedByBase {
    Modifier .setVariable(bgColor, Colors . Red )
}
The following code brings the above styles together (and in some cases uses inline styles to override the background color further):
@Composable
fun ColoredSquares () {
    Box ( ContainerStyle .toModifier()) {
        Column {
            Row {
                // 1: Read color from ContainerStyle
                Box ( SquareStyle .toModifier())
                // 2: Override color via RedSquareStyle
                Box ( RedSquareStyle .toModifier())
            }
            Row {
                // 3: Override color via inline styles
                Box ( SquareStyle .toModifier().setVariable(bgColor, Colors . Green ))
                Span ( Modifier .setVariable(bgColor, Colors . Yellow ).toAttrs()) {
                    // 4: Read color from parent's inline style
                    Box ( SquareStyle .toModifier())
                }
            }
        }
    }
}
The above renders the following output:

You can also set CSS variables directly from code if you have access to the backing HTML element. Below, we use the ref callback to get the backing element for a fullscreen Box and then use a Button to set it to a random color from the colors of the rainbow:
 // We specify the initial color of the rainbow here, since the variable
// won't otherwise be set until the user clicks a button.
val bgColor by StyleVariable < CSSColorValue >( Colors . Red )

val ScreenStyle = CssStyle .base {
    Modifier .fillMaxSize().backgroundColor(bgColor.value())
}

@Page
@Composable
fun RainbowBackground () {
    val roygbiv = listOf ( Colors . Red , /* ... */ Colors . Violet )

    var screenElement : HTMLElement ? by remember { mutableStateOf( null ) }
    Box ( ScreenStyle .toModifier(), ref = ref { screenElement = it }) {
        Button (onClick = {
            // You can call `setVariable` on the backing HTML element to set the variable value directly
            screenElement !! .setVariable(bgColor, roygbiv.random())
        }) {
            Text ( " Click me " )
        }
    }
}
The above results in the following UI:

Most of the time, you can actually get away with not using CSS Variables! Your Kotlin code is often a more natural place to describe dynamic behavior than HTML / CSS is.
Let's revisit the "colored squares" example from above. Note it's much easier to read if we don't try to use variables at all.
 val SquareStyle = CssStyle .base {
    Modifier .size( 100 .px)
}

@Composable
fun ColoredSquares () {
    Column {
        Row {
            Box ( SquareStyle .toModifier().backgroundColor( Colors . Blue ))
            Box ( SquareStyle .toModifier().backgroundColor( Colors . Red ))
        }
        Row {
            Box ( SquareStyle .toModifier().backgroundColor( Colors . Green ))
            Box ( SquareStyle .toModifier().backgroundColor( Colors . Yellow ))
        }
    }
}
And the "rainbow background" example is similarly easier to read by using Kotlin variables (ie var someValue by remember { mutableStateOf(...) } ) instead of CSS variables:
 val ScreenStyle = CssStyle .base {
    Modifier .fillMaxSize()
}

@Page
@Composable
fun RainbowBackground () {
    val roygbiv = listOf ( Colors . Red , /* ... */ Colors . Violet )

    var currColor by remember { mutableStateOf( Colors . Red ) }
    Box ( ScreenStyle .toModifier().backgroundColor(currColor)) {
        Button (onClick = { currColor = roygbiv.random() }) {
            Text ( " Click me " )
        }
    }
}
Even though you should rarely need CSS variables, there may be occasions where they can be a useful tool in your toolbox. The above examples were artificial scenarios used as a way to show off CSS variables in relatively isolated environments. But here are some situations that might benefit from CSS variables:
themePrimary and themeSecondary (applied at the site's root) which you can then reference throughout your styles.When in doubt, lean on Kotlin for handling dynamic behavior, and occasionally consider using style variables if you feel doing so would clean up the code.
Kobweb provides the silk-icons-fa artifact which you can use in your project if you want access to all the free Font Awesome (v6) icons.
Using it is easy! Search the Font Awesome gallery, choose an icon, and then call it using the associated Font Awesome icon composable.
For example, if I wanted to add the Kobweb-themed spider icon, I could call this in my Kobweb code:
FaSpider ()그게 다야!
Some icons have a choice between solid and outline versions, such as "Square" (outline and filled). In that case, the default choice will be an outline mode, but you can pass in a style enum to control this:
FaSquare (style = IconStyle . FILLED )All Font Awesome composables accept a modifier parameter, so you can tweak it further:
FaSpider ( Modifier .color( Colors . Red ))메모
When you create a project using our app template, Font Awesome icons are included.
Kobweb provides the silk-icons-mdi artifact which you can use in your project if you want access to all the free Material Design icons.
Using it is easy! Search the Material Icons gallery, choose an icon, and then call it using the associated Material Design Icon composable.
For example, let's say after a search I found and wanted to use their bug report icon, I could call this in my Kobweb code by converting the name to camel case:
MdiBugReport ()그게 다야!
Most material design icons support multiple styles: outlined, filled, rounded, sharp, and two-tone. Check the gallery search link above to verify what styles are supported by your icon. You can identify the one you want to use by passing it into the method's style parameter:
MdiLightMode (style = IconStyle . TWO_TONED )All Material Design Icon composables accept a modifier parameter, so you can tweak it further:
MdiError ( Modifier .color( Colors . Red ))Outside of pages, it is common to create reusable, composable parts. While Kobweb doesn't enforce any particular rule here, we recommend a convention that, if followed, may make it easier to allow new readers of your codebase to get around.
First, as a sibling to pages, create a folder called components . Within it, add:
@Page pages will start by calling a page layout function first. It's possible that you will only need a single layout for your entire site. If you create a markdown file under the jsMain/resources/markdown folder, a corresponding page will be created for you at build time, using the filename as its path.
For example, if I create the following file:
// jsMain/resources/markdown/docs/tutorial/Kobweb.md

# Kobweb Tutorial

...
this will create a page that I can then visit by going to mysite.com/docs/tutorial/kobweb
Front Matter is metadata that you can specify at the beginning of your document, like so:
 ---
title : Tutorial
author : bitspittle
---

...
In a following section, we'll discuss how to embed code in your markdown, but for now, know that these key / value pairs can be queried in code using the page's context:
@Composable
fun AuthorWidget () {
  val ctx = rememberPageContext()
  // Note: You can use `markdown!!` only if you're sure that
  // this composable is called while inside a page generated
  // from Markdown.
  val author = ctx.markdown !! .frontMatter.getValue( " author " ).single()
  Text ( " Article by $author " )
}
중요한
If you're not seeing ctx.markdown autocomplete, you need to make sure you depend on the com.varabyte.kobwebx:kobwebx-markdown artifact in your project's build.gradle .
Within your front matter, there's a special value which, if set, will be used to render a root @Composable that adds the rest of your markdown code as its content. This is useful for specifying a layout for example:
 ---
root : .components.layout.DocsLayout
---

# Kobweb Tutorial
The above will generate code like the following:
 import com.mysite.components.layout.DocsLayout

@Composable
@Page
fun KobwebPage () {
  DocsLayout {
    H1 {
      Text ( " Kobweb Tutorial " )
    }
  }
}
If you have a default root that you'd like to use in most / all of your markdown files, you can specify it in the markdown block in your build script:
 // site/build.gradle.kts

kobweb {
  markdown {
    defaultRoot.set( " .components.layout.MarkdownLayout " )
  }
} Kobweb Markdown front matter supports a routeOverride key. If present, its value will be passed into the generated @Page annotation (see the Route Override section▲ for valid values here).
This allows you to give your URL a name that normal Kotlin filename rules don't allow for, such as a hyphen:
# AStarDemo.md
 ---
routeOverride : a*-demo
---
The above will generate code like the following:
@Composable
@Page( " a*-demo " )
fun AStarDemoPage () { /* ... */
}The power of Kotlin + Compose HTML is interactive components, not static text! Therefore, Kobweb Markdown support enables special syntax that can be used to insert Kotlin code.
Usually, you will define widgets that belong in their own section. Just use three triple-curly braces to insert a function that lives in its own block:
 # Kobweb Tutorial

...

{{{ .components.widgets.VisitorCounter }}}
which will generate code for you like the following:
@Composable
@Page
fun KobwebPage () {
  /* ... */
  com.mysite.components.widgets. VisitorCounter ()
}
You may have noticed that the code path in the markdown file is prefixed with a . . When you do that, the final path will automatically be prepended with your site's full package.
Occasionally, you may want to insert a smaller widget into the flow of a single sentence. For this case, use the ${...} inline syntax:
Press ${.components.widgets.ColorButton} to toggle the site's current color.주의
Spaces are not allowed within the curly braces! If you have them there, Markdown skips over the whole thing and leaves it as text.
You may wish to add imports to the code generated from your markdown. Kobweb Markdown supports registering both global imports (imports that will be added to every generated file) and local imports (those that will only apply to a single target file).
To register a global import, you configure the markdown block in your build script:
 // site/build.gradle.kts

kobweb {
  markdown {
    imports.add( " .components.widgets.* " )
  }
}
Notice that you can begin your path with a "." to tell the Kobweb Markdown plugin to prepend your site's package to it. The above would ensure that every markdown file generated would have the following import:
import com.mysite.components.widgets.*Imports can help you simplify your Kobweb calls. Revisiting an example from just above:
 # Without imports

Press ${.components.widgets.ColorButton} to toggle the site's current color.

# With imports

Press ${ColorButton} to toggle the site's current color.
Local imports are specified in your markdown's front matter (and can even affect its root declaration!):
 ---
root : DocsLayout
imports :
  - .components.sections.DocsLayout
  - .components.widgets.VisitorCounter
---

...

{{{ VisitorCounter }}}Kobweb Markdown supports callouts, which are a way to highlight pieces of information in your document. For example, you can use them to highlight notes, tips, warnings, or important messages.
To use a callout, set the first line of some blockquoted text to [!TYPE] , where TYPE is one of the following:
 > [ !NOTE ]
> Lorem ipsum...

> [ !QUOTE ]
> Lorem ipsum... 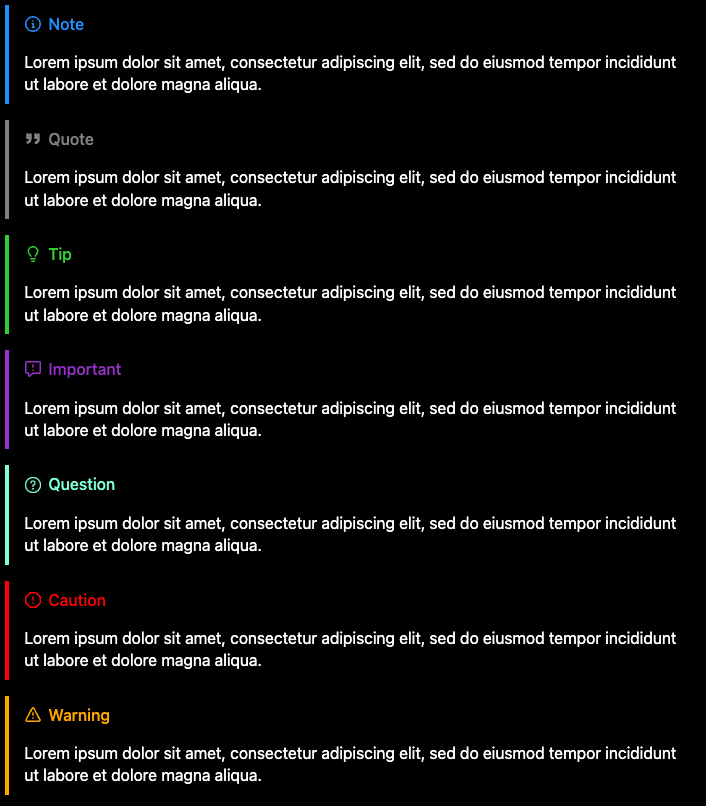
If you'd like to change the value of the default title that shows up, you can specify it in quotes:
> [ !QUESTION "Something to ponder..." ]As another example, when using quotes, you can set this to the empty string, which looks clean:
 > [ !QUOTE "" ]
> ... 
If you want to specify a label that should apply globally, you can do so by overriding the blockquote handler in your project's build script, using the convenience method SilkCalloutBlockquoteHandler for it:
kobweb {
  markdown {
    handlers.blockquote.set( SilkCalloutBlockquoteHandler (labels = mapOf ( " QUOTE " to " " )))
  }
}
주의
Callouts are provided by Silk. If your project does not use Silk and you override the blockquote handler like this, it will generate code that will cause a compile error.
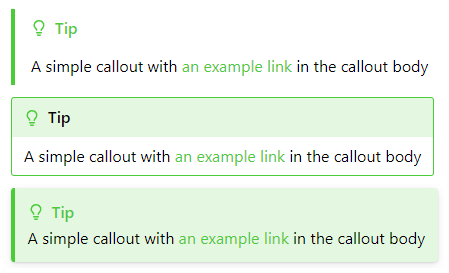
Silk provides a handful of variants for callouts.
For example, an outlined variant:

and a filled variant:

You can also combine any of the standard variants with an additional matching link variant (eg LeftBorderedCalloutVariant.then(MatchingLinkCalloutVariant)) ) to make it so that any hyperlinks inside the callout will match the color of the callout itself:
If you prefer any of these styles over the default, you can set the variant parameter in the SilkCalloutBlockquoteHandler , for example here we set it to the outlined variant:
kobweb {
  markdown {
    handlers.blockquote.set( SilkCalloutBlockquoteHandler (
      variant = " com.varabyte.kobweb.silk.components.display.OutlinedCalloutVariant " )
    )
  }
}
Of course, you can also define your own variant in your own codebase and pass that in here as well.
If you'd like to register a custom callout, this is done in two parts.
First, declare your custom callout setup in your code somewhere:
 package com.mysite.components.widgets.callouts

val CustomCallout = CalloutType (
    /* ... specify icon, label, and colors here ... */
)
and then register it in your build script, extending the default list of handlers (ie SilkCalloutTypes ) with your custom one:
kobweb {
  markdown {
    handlers.blockquote.set(
      SilkCalloutBlockquoteHandler (types =
        SilkCalloutTypes +
          mapOf ( " CUSTOM " to " .components.widgets.callouts.CustomCallout " )
      )
    )
  }
}
메모
As seen above, by using a leading . , you can omit your project's group (eg com.mysite ). Kobweb will automatically prepend it for you.
그게 다야! At this point, you can use it in your markdown:
 > [ !CUSTOM ]
> Neat.It can be really useful to process all markdown files during your site's build. A common example is to collect all markdown articles and generate a listing page from them.
You can actually do this using pure Gradle code, but it's common enough that Kobweb provides a convenience API, via the markdown block's process callback.
You can register a callback that will be triggered at build time with a list of all markdown files in your project.
kobweb {
  markdown {
    process.set { markdownEntries ->
      // `markdownEntries` is type `List<MarkdownEntry>`, where an entry includes the file's path, the route it will
      // be served at, and any parsed front matter.

      println ( " Processing markdown files: " )
      markdownEntries.forEach { entry ->
        println ( " t * ${entry.filePath} -> ${entry.route} " )
      }
    }
  }
}
Inside the callback, you can also call generateKotlin and generateMarkdown utility methods. Here is a very rough example of creating a listing page for all blog posts in a site (found under the resources/markdown/blog folder):
kobweb {
  markdown {
    process.set { markdownEntries ->
      generateMarkdown( " blog/index.md " , buildString {
        appendLine( " # Blog Index " )
        markdownEntries.forEach { entry ->
          if (entry.filePath.startsWith( " blog/ " )) {
            val title = entry.frontMatter[ " title " ] ? : " Untitled "
            appendLine( " * [ $title ]( ${entry.route} ) " )
          }
        }
      })
    }
  }
}
Refer to the build script of my open source blog site and search for "process.set" to see this feature in action in a production environment.
Many developers new to web development have heard horror stories about CSS, and they might hope that Kobweb, by leveraging Kotlin and a Jetpack Compose-inspired API, means they won't have to learn it.
It's worth dispelling that illusion! CSS is inevitable.
That said, CSS's reputation is probably worse than it deserves to be. Many of its features are actually fairly straightforward and some are quite powerful. For example, you can efficiently declare that your element should be wrapped with a thin border, with round corners, casting a drop shadow beneath it to give it a feeling of depth, painted with a gradient effect for its background, and animated with an oscillating, tilting effect.
It's hoped that, once you've learned a bit of CSS through Kobweb, you'll find yourself actually enjoying it (sometimes)!
Kobweb offers enough of a layer of abstraction that you can learn CSS in a more incremental way.
First and most importantly, Kobweb gives you a Kotlin-idiomatic type-safe API to CSS properties. This is a major improvement over writing CSS in text files which fail silently at runtime.
Next, layout widgets like Box , Column , and Row can get you up and running quickly with rich, complex layouts before ever having to understand what a "flex layout" is.
Meanwhile, using CssStyle can help you break your CSS up into smaller, more manageable pieces that live close to the code that actually uses them, allowing your project to avoid a giant, monolithic CSS file. (Such giant CSS files are one of the reasons CSS has an intimidating reputation).
For example, a CSS file that could easily look like this:
 /* Dozens of rules... */

. important {
  background-color : red;
  font-weight : bold;
}

. important : hover {
  background-color : pink;
}

/* Dozens of other rules... */

. post-title {
    font-size : 24 px ;
}

/* A dozen more more rules... */
can migrate to this in Kobweb:
 // ------------------ CriticalInformation.kt

val ImportantStyle = CssStyle {
  base {
    Modifier .backgroundColor( Colors . Red ).fontWeight( FontWeight . Bold )
  }

  hover {
    Modifier .backgroundColor( Colors . Pink )
  }
}

// ------------------ Post.kt

val PostTitleStyle = CssStyle .base { Modifier .fontSize( 24 .px) }
Next, Silk provides a Deferred composable which lets you declare code that won't get rendered until the rest of the DOM finishes first, meaning it will appear on top of everything else. This is a clean way to avoid setting CSS z-index values (another aspect of CSS that has a bad reputation).
And finally, Silk aims to provide widgets with default styles that look good for many sites. This means you should be able to rapidly develop common UIs without running into some of the more complex aspects of CSS.
Let's walk through an example of layering CSS effects on top of a basic element.
팁
Two of the best learning resources for CSS properties are https://developer.mozilla.org and https://www.w3schools.com . Keep an eye out for these when you do a web search.
We'll create the bordered, floating, oscillating element we discussed earlier. Rereading it now, here are the concepts we need to figure out how to do:
Let's say we want to create an attention grabbing "welcome" widget on our site. You can always start with an empty box, which we'll put some text in:
 Box ( Modifier .padding(topBottom = 5 .px, leftRight = 30 .px)) {
  Text ( " WELCOME!! " )
}
Create a border
Next, search the internet for "CSS border". One of the top links should be: https://developer.mozilla.org/en-US/docs/Web/CSS/border
Skim the docs and play around with the interactive examples. With an understanding of the border property now, let's use code completion to discover the Kobweb version of the API:
 Box (
  Modifier
    .padding(topBottom = 5 .px, leftRight = 30 .px)
    .border( 1 .px, LineStyle . Solid , Colors . Black )
) {
  Text ( " WELCOME!! " )
}
Round out the corners
Search for "CSS rounded corners". It turns out the CSS property in this case is called a "border radius": https://developer.mozilla.org/en-US/docs/Web/CSS/border-radius
 Box (
  Modifier
    .padding(topBottom = 5 .px, leftRight = 30 .px)
    .border( 1 .px, LineStyle . Solid , Colors . Black )
    .borderRadius( 5 .px)
) {
  Text ( " WELCOME!! " )
}
Add a drop shadow
Search for "CSS shadow". There are a few types of CSS shadow features, but after some quick reading, we realize we want to use box shadows: https://developer.mozilla.org/en-US/docs/Web/CSS/box-shadow
After playing around with blur and spread values, we get something that looks decent:
 Box (
  Modifier
    .padding(topBottom = 5 .px, leftRight = 30 .px)
    .border( 1 .px, LineStyle . Solid , Colors . Black )
    .borderRadius( 5 .px)
    .boxShadow(blurRadius = 5 .px, spreadRadius = 3 .px, color = Colors . DarkGray )
) {
  Text ( " WELCOME!! " )
}
Add a gradient background
Search for "CSS gradient background". This isn't a straightforward CSS property like the previous cases, so we instead get a more general documentation page explaining the feature: https://developer.mozilla.org/en-US/docs/Web/CSS/CSS_images/Using_CSS_gradients
This case turns out to be a little trickier to ultimately find the Kotlin, type-safe equivalent, but if you dig a bit more into the CSS docs, you'll learn that a linear gradient is a type of background image.
 Box (
  Modifier
    .padding(topBottom = 5 .px, leftRight = 30 .px)
    .border( 1 .px, LineStyle . Solid , Colors . Black )
    .borderRadius( 5 .px)
    .boxShadow(blurRadius = 5 .px, spreadRadius = 3 .px, color = Colors . DarkGray )
    .backgroundImage(linearGradient( LinearGradient . Direction . ToRight , Colors . LightBlue , Colors . LightGreen ))
) {
  Text ( " WELCOME!! " )
}
Add a wobble animation
And finally, search for "CSS animations": https://developer.mozilla.org/en-US/docs/Web/CSS/CSS_animations/Using_CSS_animations
You can review the Animations▲ section above for a refresher on how Kobweb supports this feature, which requires declaring a top-level Keyframes block which then gets referenced inside an animation modifier:
 // Top level property
val WobbleKeyframes = Keyframes {
  from { Modifier .rotate(( - 5 ).deg) }
  to { Modifier .rotate( 5 .deg) }
}

// Inside your @Page composable
Box (
  Modifier
    .padding(topBottom = 5 .px, leftRight = 30 .px)
    .border( 1 .px, LineStyle . Solid , Colors . Black )
    .borderRadius( 5 .px)
    .boxShadow(blurRadius = 5 .px, spreadRadius = 3 .px, color = Colors . DarkGray )
    .backgroundImage(linearGradient( LinearGradient . Direction . ToRight , Colors . LightBlue , Colors . LightGreen ))
    .animation(
      WobbleKeyframes .toAnimation(
        duration = 1 .s,
        iterationCount = AnimationIterationCount . Infinite ,
        timingFunction = AnimationTimingFunction . EaseInOut ,
        direction = AnimationDirection . Alternate ,
      )
    )
) {
  Text ( " WELCOME!! " )
}
그리고 우리는 끝났습니다!
The above element isn't going to win any style awards, but I hope this demonstrates how much power CSS can give you in just a few declarative lines of code. And thanks to the nature of CSS, combined with Kobweb's live reloading experience, we were able to experiment with our idea incrementally.
One of our main project contributors created a site called CSS 2 Kobweb which aims to simplify the process of converting CSS examples to equivalent Kobweb CssStyle and/or Modifier declarations.
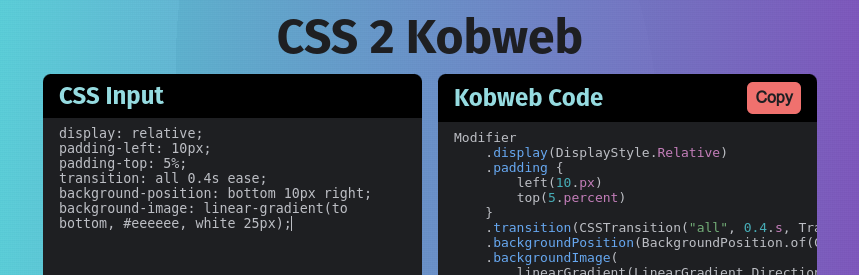
팁
CSS 2 Kobweb also supports specifying class name selectors and keyframes. For example, see what happens when you paste in the following CSS code:
. site-banner {
  position : relative;
  padding-left : 10 px ;
  padding-top : 5 % ;
  animation : slide-in 3 s linear 1 s infinite;
  background-position : bottom 10 px right;
  background-image : linear-gradient (to bottom , # eeeeee , white 25 px );
}
. site-banner : hover {
  color : rgb ( 40 , 40 , 40 );
}
@keyframes slide-in {
  from {
    transform : translateX ( -2 rem ) scale ( 0.5 );
  }
  to {
    transform : translateX ( 0 );
    opacity : 1 ;
  }
}
The web is full of examples of interesting CSS effects. Almost any CSS-related search will result in tons of StackOverflow answers, interactive playgrounds featuring WYSIWYG editors, and blog posts. Many of these introduce some really novel CSS examples. This is a great way to learn more about web development!
However, as the previous section demonstrated, it can sometimes be a pain to go from a CSS example to the equivalent Kobweb code. We hope that CSS 2 Kobweb can help with that.
This project is already very useful, but it's still early days. If you find cases of CSS 2 Kobweb that are incorrect, please consider filing an issue in their repository.
Hopefully this section gave you insight into how you can explore CSS APIs on your own, but if you're stuck on getting an effect working, remember you can reach out to one of the options in the connecting with us▼ section, and someone in the community can probably help!
One of Kobweb's major additions on top of Compose HTML is the export process.
This feature elevates the framework from one that produces a single-page application to one that produces a whole, navigable site. The export process takes snapshots of every page, resulting in better SEO support and a quicker initial render.
A normal development workflow will have you using kobweb run to build up your site, and then when you're ready to publish it, you'll kobweb export a production version.
Let's take a moment to walk through this process in more detail, in order to demystify it.
The index.html file of a normal Compose HTML site looks like this:
 <!DOCTYPE html >
< html lang =" en " >
< head >
  < meta charset =" UTF-8 " >
  < title > My Site Title </ title >
</ head >
< body >
< div id =" root " > </ div >
< script src =" mysite.js " > </ script >
</ body >
</ html >
메모
For example, you can find this exact structure recommended in the official Getting Started instructions.
What this does is declare a root element whose contents will get filled out dynamically at runtime. You can think of the mysite.js script at the end of the file as the seed that grows into your website.
This is very powerful, but when you build a website with this approach, you run into two major issues:
mysite.js gets bigger and bigger, meaning a larger download is required before the site gets rendered. OK, so let's add Kobweb into the mix. Here, we build a very minimal page and export our site (using kobweb export ) to see what happens.
@Page
@Composable
fun ExampleKobwebPage () {
    Text ( " This is a minimal example to demonstrate exporting. " )
}
Exporting generates the following HTML under your kobweb/.site folder, which I've reproduced here with a bunch of styles elided:
 <!doctype html >
< html lang =" en " >
 < head >
  < meta http-equiv =" Content-Type " content =" text/html; charset=UTF-8 " >
  < title > My Site Title </ title >
  < meta content =" Powered by Kobweb " name =" description " >
  < link href =" /favicon.ico " rel =" icon " >
  < meta content =" width=device-width, initial-scale=1 " name =" viewport " >
 </ head >
 < body >
  < div id =" root " style =" ... " >
   < style > ... </ style >
   < div class =" ... " style =" min-height: 100vh; " >
    This is a minimal example to demonstrate exporting.
   </ div >
  </ div >
  < script src =" /mysite.js " > </ script >
 </ body >
</ html >
As you can see, Kobweb has filled out a bunch of extra information, although the site script it still linked to at the bottom of the file. This is important since, as mentioned earlier in this section, it contains all information necessary not just to render this page but the whole site.
In other words, you can download just this page and then continue to navigate around the site without needing to download any more files.
In short, the export process will discover all @Page -annotated methods in your codebase and generate a snapshot of each one. You can think of each snapshot as an SEO-friendly starting point from which you can access the rest of your site.
In order for Kobweb exporting to be able to take a snapshot of your site, it needs to spin up a browser in headless mode. This browser is responsible for loading the simple Compose HTML version of an index.html page and running its JavaScript to fill out the page. The browser will then get queried for the final html which Kobweb saves to disk.
Kobweb delegates much of this task to Microsoft's excellent Playwright framework. Hopefully this will be invisible to almost all users, but for advanced cases, it can be useful to know the technology that's running under the hood.
For custom CI/CD setups, you will at the very least need to be aware that the Kobweb export process requires a browser. For users who would like more information about this, we discuss one example in more detail later, in the GitHub Workflow for exports▼ section.
There are two flavors of Kobweb sites: static and full stack .
A static site (or, more completely, a static layout site) is one where you export a bunch of frontend files (eg html , js , and public resources) into a single, organized folder that gets served directly by a static website hosting provider.
In other words, you don't write a single line of server code. The server is provided for you in this case and uses a fairly straightforward algorithm - it hosts all the content you upload to it as raw, static assets.
The name static does not refer to the behavior of your site but rather that of your hosting provider solution. If someone makes a request for a page, the same response bytes get served every time (even if that page is full of custom code that allows it to behave in very interactive ways).
A full stack site is one where you write both the logic that runs on the frontend (ie on the user's machine) and the logic that runs on the backend (ie on a server somewhere). This custom server must at least serve requested files (exactly the same job that a static web hosting service does) plus it likely also defines endpoints providing custom functionality tailored to your site's needs.
For example, maybe you define an endpoint which, given a user ID and an authentication token, returns that user's profile information.
When Kobweb was first written, it only provided the full stack solution, as being able to write your own server logic enabled a maximum amount of power and flexibility. The mental model for using Kobweb during this early time was simple and clear.
However, in practice, most projects don't need the power afforded by a full stack setup. A website can give users a very clean, dynamic experience simply by writing responsive frontend logic to make it look good, eg with animations and delightful user interactions.
Additionally, many " Feature as a Service" solutions have popped up over the years, which can provide a ton of convenient functionality that used to require a custom server. These days, you can easily integrate auth, database, and analytics solutions all without writing a single line of backend code.
The process for exporting a bunch of files in a way that can be consumed by a static web hosting provider tends to be much faster and cheaper than using a full stack solution. Therefore, you should prefer a static site layout unless you have a specific need for a full stack approach.
Some possible reasons to use a custom server (and, therefore, a full stack approach) are:
If you aren't sure which category you fall into, then you should probably be creating a static layout site. It's much easier to migrate from a static layout site to a full stack site later than the other way around.
Both site flavors require an export.
To export your site with a static layout, use the kobweb export --layout static command, while for full stack the command is kobweb export --layout fullstack (or just kobweb export since fullstack is the default layout as it originally was the only way).
Once exported, you can test your site by running it locally before uploading. You run a static site with kobweb run --env prod --layout static and a full stack site with kobweb run --env prod --layout fullstack (or just kobweb run --env prod ).
Sometimes, you have behavior that should run when an actual user is navigating your site, but you don't want it to run at export time. For example, maybe you offer logged-in users an authenticated experience, but you'll never have a logged-in user at export time.
You can determine if your page is being rendered as part of an export by checking the PageContext.isExporting property. This gives you the opportunity to manipulate the exported HTML or avoid side effects associated with page loading.
@Composable
fun AuthenticatedLayout ( content : @Composable () -> Unit ) {
    var loggedInUser by remember { mutableStateOf< User ?>( null ) }

    val ctx = rememberPageContext()
    if ( ! ctx.isExporting) {
        LaunchedEffect ( Unit ) {
            loggedInUser = checkForLoggedInUser() // <- A slow, expensive method
        }
    }

    if (loggedInUser == null ) {
        LoggedOutScaffold { content() }
    } else {
        LoggedInScaffold (user) { content() }
    }
}
Dynamic routes are skipped over by the export process. After all, it's not possible to know all the possible values that could be passed into a dynamic route.
However, if you have a specific instance of a dynamic route that you'd like to export, you can configure your site's build script as follows:
kobweb {
  app {
    export {
      // "/users/{user}/posts/{post}" has special handling for the "default" / "0" case
      addExtraRoute( " /users/default/posts/0 " , " users/index.html " )
    }
  }
} A static site gets exported into .kobweb/site by default (you can configure this location in your .kobweb/conf.yaml file if you'd like). You can then upload the contents of that folder to the static web hosting provider of your choice.
Deploying a full stack site is a bit more complex, as different providers have wildly varying setups, and some users may even decide to run their own web server themselves. However, when you export your Kobweb site, scripts are generated for running your server, both for *nix platforms ( .kobweb/server/start.sh ) and the Windows platform ( .kobweb/server/start.bat ). If the provider you are using speaks Dockerfile, you can set ENTRYPOINT to either of these scripts (depending on the server's platform).
Going in more detail than this is outside the scope of this README. However, you can read my blog posts for a lot more information and some clear, concrete examples:
By default, Kobweb will automatically root every page to the KobwebApp composable (or, if using Silk, to a SilkApp composable). These perform some minimal common work (eg applying CSS styles) that should be present across your whole site.
This means if you register a page:
 // jsMain/kotlin/com/mysite/pages/Index.kt

@Page
@Composable
fun HomePage () {
    /* ... */
}
then the final result that actually runs on your site will be:
 // In a generated main.kt somewhere...

KobwebApp {
  HomePage ()
}
It is likely you'll want to configure this further for your own application. Perhaps you have some initialization logic that you'd like to run before any page gets run (like logic for updating saved settings into local storage). And for many apps it's a great place to specify a full screen Silk Surface as that makes all children beneath it transition between light and dark colors smoothly.
In this case, you can create your own root composable and annotate it with @App . If present, Kobweb will use that instead of its own default. You should, of course, delegate to KobwebApp (or SilkApp if using Silk), as the initialization logic from those methods should still be run.
Here's an example application composable override that I use in many of my own projects:
@App
@Composable
fun MyApp ( content : @Composable () -> Unit ) {
  SilkApp {
    val colorMode = ColorMode .current
    LaunchedEffect (colorMode) { // Relaunched every time the color mode changes
      localStorage.setItem( " color-mode " , colorMode.name)
    }

    // A full screen Silk surface. Sets the background based on Silk's palette and animates color changes.
    Surface ( SmoothColorStyle .toModifier().minHeight( 100 .vh)) {
      content()
    }
  }
}
You can define at most a single @App on your site, or else the Kobweb Application plugin will complain at build time.
The default styles picked by browsers for many HTML elements rarely fit most site designs, and it's likely you'll want to tweak at least some of them. A very common example of this is the default web font, which if left as is will make your site look a bit archaic.
Most traditional sites overwrite styles by creating a CSS stylesheet and then linking to it in their HTML. However, if you are using Silk in your Kobweb application, you can use an approach very similar to CssStyle discussed above but for general HTML elements.
To do this, create an @InitSilk method. The context parameter includes a stylesheet property that represents the CSS stylesheet for your site, providing a Silk-idiomatic API for adding CSS rules to it.
Below is a simple example that sets the whole site to more aesthetically pleasing fonts than the browser defaults, one for regular text and one for code:
@InitSilk
fun initSilk ( ctx : InitSilkContext ) {
  ctx.stylesheet.registerStyleBase( " body " ) {
    Modifier .fontFamily( " Ubuntu " , " Roboto " , " Arial " , " Helvetica " , " sans-serif " )
      .fontSize( 18 .px)
      .lineHeight( 1.5 )
  }

  ctx.stylesheet.registerStyleBase( " code " ) {
    Modifier .fontFamily( " Ubuntu Mono " , " Roboto Mono " , " Lucida Console " , " Courier New " , " monospace " )
  }
}
팁
The registerStyleBase method is commonly used for registering styles with minimal code, but you can also use registerStyle , especially if you want to add some support for one or more pseudo-classes ( eg hover , focus , active ):
ctx.stylesheet.registerStyle( " code " ) {
  base {
    Modifier
      .fontFamily( " Ubuntu Mono " , " Roboto Mono " , " Lucida Console " , " Courier New " , " monospace " )
      .userSelect( UserSelect . None ) // No copying code allowed!
  }
  hover {
    Modifier .cursor( Cursor . NotAllowed )
  }
}Occasionally you might find yourself with a value at build time that you want your site to know at runtime.
For example, maybe you want to specify a version based on the current UTC timestamp. Or maybe you want to read a system environment variable's value and pass that into your Kobweb site as a way to configure its behavior.
This is supported via Kobweb's AppGlobals singleton, which is like a Map<String, String> whose values you can set from your project's build script using the kobweb.app.globals property.
Let's demonstrate this with the UTC version example.
In your application's build.gradle.kts , add the following code:
 import java.time.LocalDateTime
import java.time.ZoneId
import java.time.format.DateTimeFormatter

plugins {
  /* ... */
  alias(libs.plugins.kobweb.application)
}

kobweb {
  app {
    globals.put(
      " version " ,
      LocalDateTime
          .now( ZoneId .of( " UTC " ))
          .format( DateTimeFormatter .ofPattern( " yyyyMMdd.kkmm " ))
    )
  }
}
You can then access them via the AppGlobals.get or AppGlobals.getValue methods:
val version = AppGlobals .getValue( " version " )In your Kotlin project somewhere, it is recommended that you either add some type-safe extension methods, or you can create your own wrapper object (based on your preference):
 // SiteGlobals.kt

import com.varabyte.kobweb.core.AppGlobals

// Extension method approach ---------------------

val AppGlobals .version : String
  get() = getValue( " version " )

// Wrapper object approach -----------------------

object SiteGlobals {
  val version : String = AppGlobals .getValue( " version " )
}
At this point, you can access this value in your site's code, say for a tiny label that would look good in a footer perhaps:
 // components/widgets/SiteVersion.kt

val VersionTextStyle = CssStyle .base {
  Modifier .fontSize( 0.6 .cssRem)
}

@Composable
fun SiteVersion ( modifier : Modifier = Modifier ) {
  // Extension method approach
  val versionLabel = " v " + AppGlobals .version
  // Wrapper object approach
  val versionLabel = " v " + SiteGlobals .version

  SpanText (versionLabel, VersionTextStyle .toModifier().then(modifier))
}As mentioned earlier, Silk widgets all use component styles▲ to power their look and feel.
Normally, if you want to tweak a style in select locations within your site, you just create a variant from that style:
 val TweakedButtonVariant = ButtonStyle .addVariantBase { /* ... */ }

// Later...
Button (variant = TweakedButtonVariant ) { /* ... */ }
But what if you want to globally change the look and feel of a widget across your entire site?
You could of course create your own composable which wraps some underlying composable with its own new style, eg MyButton which defines its own MyButtonStyle that internally delegates to Button . However, you'd have to be careful to make sure all new developers who add code to your site know to use MyButton instead of Button directly.
Silk provides another way, allowing you to modify any of its declared styles and/or variants in place.
You can do this via an @InitSilk method, which takes an InitSilkContext parameter. This context provides the theme property, which provides the following family of methods for rewriting styles and variants:
@InitSilk
fun replaceStylesAndOrVariants ( ctx : InitSilkContext ) {
  ctx.theme.replaceStyle( SomeStyle ) { /* ... */ }
  ctx.theme.replaceVariant( SomeVariant ) { /* ... */ }
  ctx.theme.modifyStyle( SomeStyle ) { /* ... */ }
  ctx.theme.modifyVariant( SomeVariant ) { /* ... */ }
}
메모
Technically, you can use these methods with your own site's declared styles and variants as well, but there should be no reason to do so since you can just go to the source and change those values directly. However, this can still be useful if you're using a third-party Kobweb library that provides its own styles and/or variants.
Use the replace versions if you want to define a whole new set of CSS rules from scratch, or use the modify versions to layer additional changes on top of what's already there.
주의
Using replace on some of the more complex Silk styles can be tricky, and you may want to familiarize yourself with the details of how those widgets are implemented before attempting to do so. Additionally, once you replace a style in your site, you will be opting-out of any future improvements to that style that may be made in future versions of Silk.
Here's an example of replacing ImageStyle on a site that wants to force all images to have rounded corners and automatically scale down to fit their container:
@InitSilk
fun replaceSilkImageStyle ( ctx : InitSilkContext ) {
  ctx.theme.replaceStyleBase( ImageStyle ) {
    Modifier
      .clip( Rect (cornerRadius = 8 .px))
      .fillMaxWidth()
      .objectFit( ObjectFit . ScaleDown )
  }
}
and here's an example for a site that always wants its horizontal dividers to fill max width:
@InitSilk
fun makeHorizontalDividersFillWidth ( ctx : InitSilkContext ) {
  ctx.theme.modifyStyleBase( HorizontalDividerStyle ) {
    Modifier .fillMaxWidth()
  }
}Let's say you've decided on creating a full stack website using Kobweb. This section walks you through setting it up as well as introducing the various APIs for communicating to the backend from the frontend.
A Kobweb project will always at least have a JavaScript component, but if you declare a JVM target, that will be used to define custom server logic that can then be used by your Kobweb site.
It's easiest to let Kobweb do it for you. In your site's build script, make sure you've declared configAsKobwebApplication(includeServer = true) :
 // site/build.gradle.kts
import com.varabyte.kobweb.gradle.application.util.configAsKobwebApplication

plugins {
    alias(libs.plugins.kotlin.multiplatform)
    alias(libs.plugins.jetbrains.compose)
    alias(libs.plugins.kobweb.application)
}

/* ... */

kotlin {
    configAsKobwebApplication(includeServer = true )
    /* ... */
}
중요한
configAsKobwebApplication(includeServer = true) declares and sets up both js() and jvm() Kotlin Multiplatform targets for you. If you don't set includeServer = true explicitly, only the JS target will be declared.
The easy way to check if everything is set up correctly is to open your project inside IntelliJ IDEA, wait for it to finish indexing, and check that the jvmMain folder is detected as a module (if so, it will be given a special icon and look the same as the jsMain folder):
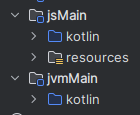
You can define and annotate methods which will generate server endpoints you can interact with. To add one:
suspend able) in a file somewhere under the api package in your jvmMain source directory.ApiContext .@ApiFor example, here's a simple method that echoes back an argument passed into it:
 // jvmMain/kotlin/com/mysite/api/Echo.kt

@Api
suspend fun echo ( ctx : ApiContext ) {
    // ctx.req is for the incoming request, ctx.res for responding back to the client

    // Params are parsed from the URL, e.g. here "/api/echo?message=..."
    val msg = ctx.req.params[ " message " ] ? : " "
    ctx.res.setBodyText(msg)
}
After running your project, you can test the endpoint by visiting mysite.com/api/echo?message=hello
You can also trigger the endpoint in your frontend code by using the extension api property added to the kotlinx.browser.window class:
@Page
@Composable
fun ApiDemoPage () {
  val coroutineScope = rememberCoroutineScope()

  Button (onClick = {
    coroutineScope.launch {
      println ( " Echoed: " + window.api.get( " echo?message=hello " ).decodeToString())
    }
  }) { Text ( " Click me " ) }
}
All the HTTP methods are supported ( post , put , etc.).
These methods will throw an exception if the request fails for any reason. Note that for every HTTP method, there's a corresponding "try" version that will return null instead ( tryPost , tryPut , etc.).
If you know what you're doing, you can of course always use window.fetch(...) directly.
When you define an API route, you are expected to set a status code for the response, or otherwise it will default to status code 404 .
In other words, the following API route stub will return a 404:
@Api
suspend fun error404 ( ctx : ApiContext ) {
}
In contrast, this minimal API route returns an OK status code:
@Api
suspend fun noActionButOk ( ctx : ApiContext ) {
    ctx.res.status = 200
}
중요한
The ctx.res.setBodyText method sets the status code to 200 automatically for you, which is why code in the previous section worked without setting the status directly. Of course, if you wanted to return a different status code value after setting the body text, you could explicitly set it right after making the setBodyText call. 예를 들어:
ctx.res.setBodyText( " ... " )
ctx.res.status = 201
The design for defaulting to 404 was chosen to allow you to conditionally handle API routes based on input conditions, where early aborts automatically result in the client getting an error.
A very common case is creating an API route that only handles POST requests:
@Api
suspend fun updateUser ( ctx : ApiContext ) {
    if (ctx.req.method != HttpMethod . POST ) return
    // ...
    ctx.res.status = 200
}
Finally, note that you can add headers to your response. A common endpoint that some servers provide is a redirect (302) with an updated URL location. This would look like:
@Api
suspend fun redirect ( ctx : ApiContext ) {
    if (ctx.req.method != HttpMethod . GET ) return
    ctx.res.headers[ " Location " ] = " ... "
    ctx.res.status = 302
}
단순한!
Similar to dynamic @Page routes, you can define API routes using curly braces in the same way to indicate a dynamic value that should be captured with some binding name.
For example, the following endpoint will capture the value "123" into a key name called "article" when querying articles/123 :
 // jvmMain/kotlin/com/mysite/api/articles/Article.kt

@Api( " {} " )
suspend fun fetchArticle ( ctx : ApiContext ) {
    val articleId = ctx.req.params[ " article " ] ? : return
    // ...
}
Recall from the @Page docs that specifying a name inside the curly braces defines the variable name used to capture the value. When empty, as above, Kobweb uses the filename to generate it. In other words, you could explicitly specify @Api("{article}") for the same effect.
Once this API endpoint is defined, you just query it as you would any normal API endpoint:
coroutineScope.launch {
  val articleText = window.api.get( " articles/123 " ).decodeToString()
  // ...
}
Finally, astute readers might notice that (like dynamic @Page routes) we use the same property to query dynamic route values as well as query parameters.
Captured dynamic values will always take precedence over query parameters in the params map. In practice, this should never be a problem, because it would be very confusing design to write an API endpoint that got called like articles/123?article=456 . That said, you can also use ctx.req.queryParams["article"] to disambiguate this case if necessary.
@InitApi methods and initializing services Kobweb also supports declaring methods that should be run when your server starts up, which is particularly useful for initializing services that your @Api methods can then use. These methods must be annotated with @InitApi and must take a single InitApiContext parameter.
중요한
If you are running a development server and change any of your backend code, causing a live reloading event, the init methods will be run again.
The InitApiContext class exposes a mutable set property (called data ) which you can put anything into. Meanwhile, @Api methods expose an immutable version of data . This allows you to initialize a service in an @InitApi method and then access it in your @Api methods.
Let's demonstrate a concrete example, imagining we had an interface called Database with a mutable subclass MutableDatabase that implements it and provides additional APIs for mutating the database.
The skeleton for registering and later querying such a database instance might look like this:
@InitApi
fun initDatabase ( ctx : InitApiContext ) {
  val db = MutableDatabase ()
  db.createTable( " users " , listOf ( " id " , " name " )). apply {
    addRow( listOf ( " 1 " , " Alice " ))
    addRow( listOf ( " 2 " , " Bob " ))
  }
  db.loadResource( " products.csv " )

  ctx.data.add< Database >(db)
}

@Api
fun getUsers ( ctx : ApiContext ) {
  if (ctx.req.method != HttpMethod . GET ) return
  val db = ctx.data.get< Database >()
  ctx.res.setBodyText(db.query( " SELECT * FROM users " ).toString())
}Kobweb servers also support persistent connections via streams. Streams are essentially named channels that maintain continuous contact between the client and the server, allowing either to send messages to the other at any time. This is especially useful if you want your server to be able to communicate updates to your client without needing to poll.
Additionally, multiple clients can connect to the same stream. In this case, the server can choose to not only send a message back to your client, but also to broadcast messages to all users (or a filtered subset of users) on the same stream. You could use this, for example, to implement a chat server with rooms.
Like API routes, API streams must be defined under the api package in your jvmMain source directory. By default, the name of the stream will be derived from the file name and path that it's declared in (eg "api/lobby/Chat.kt" will create a channel named "lobby/chat").
Unlike API routes, API streams are defined as properties, not methods. This is because API streams need to be a bit more flexible than routes, since streams consist of multiple distinct events: client connection, client messages, and client disconnection.
Also unlike API routes, streams do not have to be annotated. The Kobweb Application plugin can automatically detect them.
For example, here's a simple stream, declared on the backend, that echoes back any argument it receives:
 // jvmMain/kotlin/com/mysite/api/Echo.kt

val echo = object : ApiStream {
  override suspend fun onClientConnected ( ctx : ClientConnectedContext ) {
    // Optional: ctx.stream.broadcast a message to all other clients that ctx.clientId connected
    // Optional: Update ctx.data here, initializing data associated with ctx.clientId
  }
  override suspend fun onTextReceived ( ctx : TextReceivedContext ) {
    ctx.stream.send(ctx.text)
  }
  override suspend fun onClientDisconnected ( ctx : ClientDisconnectedContext ) {
    // Optional: ctx.stream.broadcast a message to all other clients that ctx.clientId disconnected
    // Optional: Update ctx.data here, removing data associated with ctx.clientId
  }
}
To communicate with an API stream from your site, you need to create a stream connection on the client:
@Page
@Composable
fun ApiStreamDemoPage () {
  val echoStream = rememberApiStream( " echo " , object : ApiStreamListener {
    override fun onConnected ( ctx : ConnectedContext ) {}
    override fun onTextReceived ( ctx : TextReceivedContext ) {
      console.log( " Echoed: ${ctx.text} " )
    }
    override fun onDisconnected ( ctx : DisconnectedContext ) {}
  })

  Button (onClick = {
    echoStream.send( " hello! " )
  }) { Text ( " Click me " ) }
}
After running your project, you can click on the button and check the console logs. If everything is working properly, you should see "Echoed: hello!" for each time you press the button.
팁
The examples/chat template project uses API streams to implement a very simple chat application, so you can reference that project for a more realistic example.
The above example was intentionally verbose, to showcase the broader functionality around API streams. However, depending on your use-case, you can elide a fair bit of boilerplate.
First of all, the connect and disconnect handlers are optional, so you can omit them if you don't need them. Let's simplify the echo example:
 // Backend
val echo = object : ApiStream {
  override suspend fun onTextReceived ( ctx : TextReceivedContext ) {
    ctx.stream.send(ctx.text)
  }
}

// Frontend
val echoStream = rememberApiStream( " echo " , object : ApiStreamListener {
  override fun onTextReceived ( ctx : TextReceivedContext ) {
    console.log( " Echoed: ${ctx.text} " )
  }
})
Additionally, if you only care about the text event, there are convenience methods for that:
 // Backend
val echo = ApiStream { ctx -> ctx.stream.send(ctx.text) }

// Frontend
val echoStream = rememberApiStream( " echo " ) {
  ctx -> console.log( " Echoed: ${ctx.text} " )
}
In practice, your API streams will probably be a bit more involved than the echo example above, but it's nice to know that you can handle some cases only needing a one-liner on the server and another on the client to create a persistent client-server connection!
메모
If you need to create an API stream with stricter control around when it actually connects to the server, you can create the ApiStream object directly instead of using rememberApiStream :
 val echoStream = remember { ApiStream ( " echo " ) }
val scope = rememberCoroutineScope()

// Later, perhaps after a button is clicked...
scope.launch {
  echoStream.connect( object : ApiStreamListener { /* ... */ })
}When faced with a choice, use API routes as often as you can. They are conceptually simpler, and you can query API endpoints with a CLI program like curl and sometimes even visit the URL directly in your browser. They are great for handling queries of or updates to server resources in response to user-driven actions (like visiting a page or clicking on a button). Every operation you perform returns a clear response code in addition to some payload information.
Meanwhile, API streams are very flexible and can be a natural choice to handle high-frequency communication. But they are also more complex. Unlike a simple request / response pattern, you are instead opting in to manage a potentially long lifetime during which you can receive any number of events. You may have to concern yourself about interactions between all the clients on the stream as well. API streams are fundamentally stateful.
You often need to make a lot of decisions when using API streams. What should you do if a client or server disconnects earlier than expected? How do you want to communicate to the client that their last action succeeded or failed (and you need to be clear about exactly which action because they might have sent another one in the meantime)? What structure do you want to enforce, if any, between a client and server connection where both sides can send messages to each other at any time?
Most importantly, API streams may not horizontally scale as well as API routes. At some point, you may find yourself in a situation where a new web server is spun up to handle some intense load.
If you're using API routes, you're already probably delegating to a database service as your data backend, so this may just work seamlessly.
But for API streams, you many naturally find yourself writing a bunch of broadcasting code. However, this only works to communicate between all clients that are connected to the same server. Two clients connected to the same stream on different servers are effectively in different, disconnected worlds.
The above situation is often handled by using a pubsub service (like Redis). This feels somewhat equivalent to using a database as a service in the API route situation, but this code might not be as straightforward to migrate.
API routes and API streams are not a you-must-use-one-or-the-other situation. Your project can use both! In general, try to imagine the case where a new server might get spun up, and design your code to handle that situation gracefully. API routes are generally safe to use, so use them often. However, if you have a situation where you need to communicate events in real-time, especially situations where you want your client to be continuously directed what to do by the server via events, API streams are a great choice.
메모
You can also search online about REST vs WebSockets, as these are the technologies that API routes and API streams are implemented with. Any discussions about them should apply here as well.
It is very common to want to set a value on one page that should be made available on other pages. Or maybe you want a value to be restored when a user returns to the page again in the future, even if they've since closed and reopened the browser.
In the world of web development, this is accomplished with web storage, of which there are two flavors: local storage and session storage .
Local storage and web storage have identical APIs, with the key difference being their lifetimes. Local storage values will last until the user clears their browser's cache, while session storage will last until the user closes the current tab.
As you might expect, local storage is useful for values that should stick around indefinitely. User preferences are a common use case here. Many Kobweb sites save the user's last selected color mode in local storage, for example.
Meanwhile, session storage is useful when you want to persist data just as long as the user is interacting with your site but no longer. For example, you might keep track of values typed into text fields that haven't been submitted to the server yet, just in case the user reloads the page by accident (page reloads do not end sessions).
Using the storage APIs in Kotlin is trivial -- just reference the kotlinx.browser.localStorage and kotlinx.browser.sessionStorage objects, which are both of type Storage :
 // Note: Several fields elided for simplicity...
interface Storage {
    fun getItem ( key : String ): String?
    fun setItem ( key : String , value : String )
}
import kotlinx.browser.localStorage
localStorage.setItem( " example-key " , " example-value " )
assert (localStorage.getItem( " example-key " ) == " example-value " )With these APIs, the developer can check if an expected value is present in storage or not when visiting a page and act accordingly, for example by re-routing users to a login page if they detect the user is not logged in.
Kobweb provides the StorageKey utility class to enable the creation and querying of type-safe storage values.
For example, if you want to store an integer value, you can do so like this:
 val BRIGHTNESS_KEY = IntStorageKey ( " brightness " )

localStorage.setItem( BRIGHTNESS_KEY , 100 )
val brightness = localStorage.getItem( BRIGHTNESS_KEY ) ? : 100
The StorageKey class (and all implementors) can take an optional defaultValue parameter, which can help reduce some of the boilerplate in the above code:
 val BRIGHTNESS_KEY = IntStorageKey ( " brightness " , defaultValue = 100 )

val brightness = localStorage.getItem( BRIGHTNESS_KEY ) !!
While typed key support is provided for all primitive types (strings, booleans, ints, floats, etc.) and also enums, you can create your own custom implementations by providing your own to-string and from-string conversion functions:
 class User ( val name : String , val id : String )

class UserStorageKey ( name : String ) : StorageKey<User>(name) {
    override fun convertToString ( value : User ) = " $name : $id "
    override fun convertFromString ( value : String ): User ? = value.split( " : " )
        . takeIf { it.size == 2 }
        ?. let { User (it[ 0 ], it[ 1 ]) }
}

val LOGGED_IN_USER_KEY = UserStorageKey ( " logged-in-user " )

val loggedInUser = localStorage.getItem( LOGGED_IN_USER_KEY )
If you are using Kotlinx serialization in your project, you can use it to simplify the above code:
@Serializable
class User ( val name : String , val id : String )

class UserStorageKey ( name : String ) : StorageKey<User>(name) {
    override fun convertToString ( value : User ): String = Json .encodeToString(value)
    override fun convertFromString ( value : String ): User ? =
        try { Json .decodeFromString(value) } catch (ex : Exception ) { null }
} For simplicity, new projects can choose to put all their pages and widgets inside a single application module, eg site/ .
However, you can define components and/or pages in separate modules and apply the com.varabyte.kobweb.library plugin on them (in contrast to your main module which applies the com.varabyte.kobweb.application plugin.)
In other words, you can split up and organize your project like this:
 my-project
├── sitelib
│   ├── build.gradle.kts # apply "com.varabyte.kobweb.library"
│   └── src/jsMain
│       └── kotlin.org.example.myproject.sitelib
│           ├── components
│           └── pages
└── site
    ├── build.gradle.kts # apply "com.varabyte.kobweb.application"
    ├── .kobweb/conf.yaml
    └── src/jsMain
        └── kotlin.org.example.myproject.site
            ├── components
            └── pages
If you'd like to explore a multimodule project example, you can do so by running:
$ kobweb create examples/chatwhich demonstrates a chat application with its auth and chat functionality each managed in their own separate modules.
Web workers are a standard web technology that allow you to run JavaScript code in a separate thread from your main application. Although JavaScript is famously single-threaded, web workers offer a way for you to run potentially expensive code in parallel to your main site without slowing it down.
A web worker script is entirely isolated from your main site and has no access to the DOM. The only way to communicate between them is via message passing.
메모
Astute readers may recognize the actor model here, which is an effective way to allow concurrency without worrying about common synchronization issues that plague common lock-based approaches.
A somewhat forced but easy-to-understand example of a web worker is one that computes the first N prime numbers.
While the worker is crunching away on intensive calculations, your site still works as normal, fully responsive. When the worker is finished, it posts a message to the application, which handles it by updating relevant UI elements.
Kobweb aims to make using web workers as easy as possible.
Here's everything you have to do (we'll show examples of these steps shortly):
kotlin { ... } block in your build script with a configAsKobwebWorker() call."com.varabyte.kobweb:kobweb-worker" .WorkerFactory interface, providing a WorkerStrategy that represents the core logic of your worker. import com.varabyte.kobweb.gradle.worker.util.configAsKobwebWorker
plugins {
alias(libs.plugins.kotlin.multiplatform)
alias(libs.plugins.kobweb.worker) // or id("com.varabyte.kobweb.worker")
}
group = " example.worker "
version = " 1.0-SNAPSHOT "
kotlin {
configAsKobwebWorker( " example-worker " )
sourceSets {
jsMain.dependencies {
implementation(libs.kobweb.worker) // or "com.varabyte.kobweb:kobweb-worker"
}
}
} The WorkerFactory interface is minimal:
 interface WorkerFactory < I , O > {
  fun createStrategy ( postOutput : OutputDispatcher < O >): WorkerStrategy < I >
  fun createIOSerializer (): IOSerializer < I , O >
}
This concise interface still captures a lot of information. It declares:
postOutput object that can be used to send output messages back to the application. The WorkerStrategy class represents the core logic your worker does after receiving input from the application, as well as exposes a self parameter that provides useful worker functionality.
 abstract class WorkerStrategy < I > {
  protected val self : DedicatedWorkerGlobalScope
  abstract fun onInput ( inputMessage : InputMessage < I >)
}
The OutputDispatcher is a simple class which allows you to send output messages back to the application.
 class OutputDispatcher < O > {
  operator fun invoke ( output : O , transferables : Transferables = Transferables . Empty )
}

// `postOutput: OutputDispatcher<String>` can be called like a normal method, e.g. `postOutput("hello!")`
메모
Do not worry about the Transferables parameter for now. Transferable objects are a somewhat niche, performance-related feature, and they will be discussed later. It is not expected that a majority of workers will require them.
Finally, IOSerializer is responsible for marshalling objects between the worker and the application.
 interface IOSerializer < I , O > {
  fun serializeInput ( input : I ): String
  fun deserializeInput ( input : String ): I
  fun serializeOutput ( output : O ): String
  fun deserializeOutput ( output : String ): O
}
This class allows you to use the serialization library of your choice. However, as you'll see later, this can be a one-liner for developers using Kotlinx Serialization.
Once the Kobweb Worker Gradle plugin finds your worker factory implementation, it will generate a simple Worker class that wraps it.
 // Generated code!
class Worker ( val onOutput : WorkerContext .( O ) -> Unit ) {
  fun postInput ( input : I , transferables : Transferables = Transferables . Empty )
  fun terminate ()
}
Applications will interact with this Worker and not the WorkerStrategy directly. In fact, you should make your worker factory implementation internal to prevent applications from seeing anything but the worker.
You should think of the WorkerStrategy as representing implementation details while the Worker class represents a public API. In other words, the WorkerStrategy receives inputs, processes data, and posts outputs, while the Worker allows users to post inputs and get notified when outputs are ready.
An application module (ie one that applies the Kobweb Application Gradle plugin) will automatically discover any Kobweb worker dependencies, extracting its worker script and putting it under the public/ folder of your final site.
The following sections introduce concrete worker factories, which should help solidify the abstract concepts introduced above.
The simplest worker strategy possible is one that blindly repeats back whatever input it receives.
This is never a worker strategy that you'd actually create -- there wouldn't be a need for it -- but it's a good starting point for seeing a worker factory in action.
When you have a worker strategy that works with raw strings like this one does, you can use a one-line helper method to implement the createIOSerializer method, called createPassThroughSerializer (since it just passes the raw strings unmodified).
 // Worker module
internal class EchoWorkerFactory : WorkerFactory < String , String > {
  override fun createStrategy ( postOutput : OutputDispatcher < String >) = WorkerStrategy < String > { input ->
    postOutput(input)
  }
  override fun createIOSerializer () = createPassThroughSerializer()
}
Based on that implementation, a worker called EchoWorker will be auto-generated at compile time. Using it in your application looks like this:
 // Application module
val worker = rememberWorker {
  EchoWorker { message -> println ( " Echoed: $message " ) }
}

// Later
worker.postInput( " hello! " ) // After a round trip: "Echoed: hello!"
그게 다야!
중요한
Note the use of the rememberWorker method. This internally calls a remember but also sets up disposal logic that terminates the worker when the composable is exited. If you just use a normal remember block, the worker may keep running longer than you expect, even if you navigate to another part of your site.
You can also stop a worker yourself by calling worker.terminate() directly.
This next worker strategy will take in an Int value from the user. This number represents how many seconds to count down, firing a message for each second that passes.
This is another strategy that you'd never need in practice -- you'd just use the window.setInterval method yourself in your site script -- but we'll show this anyway to demonstrate two additional concepts on top of the echo worker:
postOutput as often as you want. // Worker module
internal class CountDownWorkerFactory : WorkerFactory < Int , Int > {
override fun createStrategy ( postOutput : OutputDispatcher < Int >) = WorkerStrategy < Int > { input ->
var nextCount = input
var intervalId : Int = 0
intervalId = self.setInterval({ // A
postOutput(nextCount) // B
if (nextCount > 0 ) { -- nextCount } else { self.clearInterval(intervalId) }
}, 1000 )
}
override fun createIOSerializer () = object : IOSerializer < Int , Int > { // C
override fun serializeInput ( input : Int ) = input.toString()
override fun deserializeInput ( input : String ) = input.toInt()
override fun serializeOutput ( output : Int ) = output.toString()
override fun deserializeOutput ( output : String ) = output.toInt()
}
}Notice the three comment tags above.
self.setInterval (and self.clearInterval later) instead of the window object to do this. This is because the window object is only available in the main script and using it here will throw an exception.postOutput any time following an input message, not just in direct response to one.deserialize calls, because you control them! In other words, the only way you'd get a bad string is if you generated it yourself in either of the serialize methods. If a message serializer ever does throw an exception, then the Kobweb worker will simply ignore it as a bad message.Using the worker in your application looks like this:
 // Application module
val worker = rememberWorker {
  CountDownWorker {
    if (it > 0 ) {
      console.log(it + " ... " )
    } else {
      console.log( " HAPPY NEW YEAR!!! " )
    }
  }
}

// Later
worker.postInput( 10 ) // 10... 9... 8... etc.
팁
If you need really accurate, consistent interval timers, creating a worker like this may actually be beneficial. According to this article, web worker timers are slightly more accurate than timers run in the main thread, as they don't have to compete with the rest of the site's responsibilities. Also, it seems that web workers timers stay consistent even if the site tab loses focus.
Finally, we get to the worker idea we introduced in the very first section -- finding the first N primes.
This kind of worker likely looks like one that would actually get used in a real codebase, that being a worker which performs a potentially expensive, UI-agnostic calculation.
We'll also use this example to demonstrate how to use Kotlinx Serialization to easily declare rich input and output message types.
First, add kotlinx-serialization and kobwebx-serialization-kotlinx to your dependencies:
 // build.gradle.kts
kotlin {
  configAsKobwebWorker()
  jsMain.dependencies {
    implementation(libs.kotlinx.serialization.json) // or "org.jetbrains.kotlinx:kotlinx-serialization-json"
    implementation(libs.kobwebx.worker.kotlinx.serialization) // or "com.varabyte.kobwebx:kobwebx-serialization-kotlinx"
  }
}
Then, define the worker factory:
@Serializable
data class FindPrimesInput ( val max : Int )

@Serializable
data class FindPrimesOutput ( val max : Int , val primes : List < Int >)

private fun findPrimes ( max : Int ): List < Int > {
  // Loop through all numbers, taking out multiples of each prime
  // e.g. 2 will take out 4, 6, 8, 10, etc.
  // then 3 will take out 9, 15, 21, etc. (6, 12, and 18 were already removed)
  val primes = ( 1 .. max).toMutableList()
  var primeIndex = 1 // Skip index 0, which is 1.
  while (primeIndex < primes.lastIndex) {
    val prime = primes[primeIndex]
    var maybePrimeIndex = primeIndex + 1
    while (maybePrimeIndex <= primes.lastIndex) {
      if (primes[maybePrimeIndex] % prime == 0 ) {
        primes.removeAt(maybePrimeIndex)
      } else {
        ++ maybePrimeIndex
      }
    }
    primeIndex ++
  }
  return primes
}

internal class FindPrimesWorkerFactory : WorkerFactory < FindPrimesInput , FindPrimesOutput > {
  override fun createStrategy ( postOutput : OutputDispatcher < FindPrimesOutput >) =
    object : WorkerStrategy < FindPrimesInput >() {
      override fun onInput ( inputMessage : InputMessage < FindPrimesInput >) {
        val input = inputMessage.input
        postOutput( FindPrimesOutput (input.max, findPrimes(input.max)))
      }
    }

  override fun createIOSerializer () = Json .createIOSerializer< FindPrimesInput , FindPrimesOutput >()
}
Most of the complexity above is the findPrimes algorithm itself!
The onInput handler is about as easy as it gets. Notice that we pass the input max value back into the output, so that the receiving application can easily correlate the output with the input.
And finally, note the use of the Json.createIOSerializer method call. This utility method comes from the kobwebx-serialization-kotlinx dependency, allowing you to use a one-liner to implement all the serialization methods for you.
팁
It's fairly trivial to write the message serializer yourself if you don't want to pull in the extra dependency (or if you are using a different serialization library):
 object : IOSerializer < FindPrimesInput , FindPrimesOutput > {
  override fun serializeInput ( input : FindPrimesInput ): String = Json .encodeToString(input)
  override fun deserializeInput ( input : String ): FindPrimesInput = Json .decodeFromString(input)
  override fun serializeOutput ( output : FindPrimesOutput ): String = Json .encodeToString(output)
  override fun deserializeOutput ( output : String ): FindPrimesOutput = Json .decodeFromString(output)
}
Using the worker in your application looks like this:
 // Application module
val worker = rememberWorker {
  FindPrimesWorker {
    println ( " Primes for ${it.max} : ${it.primes} " )
  }
}

// Later
worker.postInput( FindPrimesInput ( 1000 )) // Primes for 1000: [1, 2, 3, 5, 7, 11, ..., 977, 983, 991, 997]
The richly-typed input and output messages allow for a very explicit API here, and in the future, more parameters could be added (with default values) to either input or output classes, extending the functionality of your workers without breaking existing code.
We don't show it here, but you could also create sealed classes for your input and output messages, allowing you to define multiple types of messages that your worker can receive and respond to.
Occasionally, you may find yourself with a very large blob of data in your main application that you want to pass to a worker (or vice versa!). For example, maybe your worker will be responsible for processing a potentially large, multi-megabyte image.
Serializing a large amount of data can be expensive! In fact, you may find that even though your worker can run efficiently on a background thread, sending a large amount of data to it can cause your site to experience a significant pause during the copy. This can easily be seconds if the data is large enough!
This isn't just an issue with Kobweb. This was originally a problem with standard web APIs. To support this use-case, web workers introduced the concept of transferable objects.
Instead of an object being copied over, its ownership is transferred over from one thread to another. Attempts to use the object in the original thread after that point will throw an exception.
Kobweb workers support transferable objects in a type-safe, Kotlin-idiomatic way, via the Transferables class. Using it, you can register named objects in one thread and then retrieve them by that name in another.
Here's an example where we send a very large array over to a worker.
 // In your site:
val largeArray = Uint8Array ( 1024 * 1024 * 8 ). apply { /* initialize it */ }

worker.postInput( WorkerInput (), Transferables {
  add( " largeArray " , largeArray)
})

// In the worker:
val largeArray = transferables.getUint8Array( " largeArray " ) !!
And, of course, workers can send transferable objects back to the main application as well.
 // In the worker:
val largeArray = Uint8Array ( 1024 * 1024 * 8 ). apply { /* initialize it */ }
postOutput( WorkerOutput (), Transferables {
  add( " largeArray " , largeArray)
})

// In your site:
val worker = rememberWorker {
  ExampleWorker {
    val largeArray = transferables.getUint8Array( " largeArray " ) !!
    // ...
  }
}
Finally, it's worth noting that not every object can be transferred. In fact, very few can! You can refer to the official docs for a full list of supported transferable objects. When building a Transferables object, the add method is type-safe, meaning you cannot add an object that cannot then be transferred over.
주의
Kotlin/JS does not support a majority of the classes listed here, so neither does Kobweb as a result. If you find yourself needing one of these missing classes, consider filing an issue and we might wrap the JavaScript class into Kobweb directly and update the Transferables API.
Despite official limitations, Kobweb actually offers support for a few additional types, as a convenience. If it is possible to extract transferable content from an object, transfer that , and then build the original object back up on the other end, we are happy to do that for you.
Typed arrays, such as Int8Array , are a great example. They are actually not transferable! Only their internal ArrayBuffer is.
However, when you ask Kobweb to transfer a typed array, it will instead transfer its contents for you and regenerate the outer array seamlessly on the other end. This is just boilerplate code that you would have had to write yourself anyway.
팁
The examples/imageprocessor template demonstrates workers leveraging Transferables to pass image data from the main thread to a worker and back, so you can reference that project for a complete, working example.
Due to the fundamental design of web workers, you can only define a single worker per module. If you need multiple workers, you must create multiple modules, each providing their own separate worker strategy.
The Kobweb Worker Gradle plugin will complain if it finds more than one worker factory implemented in a module.
By default, the Kobweb Worker Gradle plugin requires your worker factory class to be suffixed with WorkerFactory so it has guidance on how to name the final worker (for example, MyExampleWorkerFactory would generate a worker called MyExampleWorker , placing it in the same package as the factory class).
 //  The Kobweb Worker Gradle plugin will complain about this name!
internal class MyWorkerInfoProvider : WorkerFactory < I , O > { /* ... */ }
If you don't like this constraint, you can override the kobweb.worker.fqcn property in your build script to provide a worker name explicitly:
 // build.gradle.kts
kobweb {
  worker {
    fqcn.set( " com.mysite.MyWorker " )
  }
}
at which point, you are free to name your worker factory whatever you like.
If you want to just change the name of your worker, you can omit the package:
 // build.gradle.kts
kobweb {
  worker {
    fqcn.set( " .MyWorker " ) // Uses the same package as the worker factory
  }
}In practice, almost every site can get away without ever using a worker, especially in Kotlin/JS where you can leverage coroutines as a way to mimic concurrency in your single-threaded site.
That said, if you know your site is going to run some logic that is not concerned with the web DOM at all, and which might additionally take a long time to run, separating that out into its own worker can be a sensible approach.
By isolating your logic into a separate worker, you not only keep it from potentially freezing your UI, but you also guarantee that it will be strongly decoupled from the rest of your site, preventing future developers from introducing potential spaghetti code issues in the future.
Another interesting use-case for a worker is isolating some sort of complex state management, where encapsulating that complexity keeps the rest of your site easier to reason about.
For example, maybe you're making a web game, and you decide to create a worker to manage all the game logic. You could of course create a Kobweb library for the same effect, but using a worker has a stronger guarantee that the logic will never interact directly with your site's UI.
주의
You should be aware that, since a web worker is a whole separate standalone script, it needs to include its own copy of the Kotlin/JS runtime, even though your main site already has its own copy.
Even after running a dead-code elimination pass, I found that the trivial echo worker's final output was about 200K (which compressed down to 60K before being sent over the wire).
For most practical use-cases, a 60K download is not a deal-breaker, especially as most images are many multiples larger than that. But developers should be aware of this, and if this is indeed a concern, you may need to avoid using Kobweb workers on your site.
Typically, sites live at the top level. This means if you have a root file index.html and your site is hosted at the domain https://mysite.com then that HTML file can be accessed by visiting https://mysite.com/index.html .
However, in some cases, your site may be hosted under a subfolder, such as https://example.com/products/myproduct/ , in which case your site's root index.html file would live at https://example.com/products/myproduct/index.html .
Kobweb needs to know about this subfolder structure so that it can take it into account in its routing logic. This can be specified in your project's .kobweb/conf.yaml file with the basePath value under the site section:
 site :
  title : " ... "
  basePath : " ... "
where the value of basePath is the part between the origin part of the URL and your site's root. For example, if your site is rooted at https://example.com/products/myproduct/ , then the value of basePath would be products/myproduct .
팁
GitHub Pages is a common web hosting solution that developers use for their sites. By default, this approach hosts your site under a subfolder (set to the project's name).
In other words, if you are planning to host your Kobweb site on GitHub Pages, you will need to set an appropriate basePath value. For a concrete example of setting basePath for GitHub Pages specifically, check out this relevant section from my blog site that goes over it.
Once you've set your basePath in the conf.yaml file, you can generally design your site without explicitly mentioning it, as Kobweb provides base-path-aware widgets that handle it for you. For example, Link("/docs/manuals/v123.pdf") (or Anchor("/docs/manuals/v123.pdf") if you're not using Silk) will automatically resolve to https://example.com/products/myproduct/docs/manuals/v123.pdf .
Of course, you may find yourself working with code external to Kobweb that is not base-path aware. If you find you need to access the base path value explicitly in your own code, you can do so by using the BasePath.value property or by calling the BasePath.prepend companion method.
 // The Video element comes from Compose HTML and is NOT base-path aware.
// Therefore, we need to manually prepend the base path to the video source.
Video (attrs = {
    attr( " width " , 320 .px.toString())
    attr( " height " , 240 .px.toString())
}) {
    Source (attrs = {
        attr( " type " , " video/mp4 " )
        attr( " src " , BasePath .prepend( " /videos/demo.mp4 " ))
    })
}Over the lifetime of a site, you may find yourself needing to change its structure. Perhaps you need to move a handful of pages under a new folder, or you need to rename a page, etc.
However, if your site has been live for a while, you may have a ton of internal links to those pages. Worse, the rest of the web (say, Google search results, or blogs and articles) may be full of links to those old locations, so even if you can find and fix up everything on your end, you can't control what others have done.
The web has long supported the concept of redirects to handle this. By advertising what links you've changed publicly, search indices can be updated and even if someone visits your page at the old location, your server can automatically tell your browser where they should have gone instead.
In Kobweb, you can define redirects in your project's .kobweb/conf.yaml file. You simplify define a series of from and to values in the server.redirects block.
 server :
  redirects :
    - from : " /old-page "
      to : " /new-page "
Kobweb servers will pick up these redirect values from the conf.yaml file and will intercept any matching incoming route requests, sending back a 301 status code to the client.
So, in the above example, if a user tries to visit https://example.com/old-page , they will be redirected to https://example.com/new-page automatically. Any internal links on your site that reference the old page will also be handled -- trying to navigate to the old location will automatically end up at the new one.
The Kobweb redirect feature also supports using regexes in the from value, which can then be referenced in the to section using $1 , $2 , etc. variables which will be substituted with text matches in parentheses.
Group matching can be really useful if you want to redirect a whole section of your site to a new location. For example, the following redirect rule can help if you've moved all pages from an old parent folder into a new one:
 server :
  redirects :
    - from : " /socials/facebook/([^/]+) "
      to : " /socials/meta/$1 "
The last thing to note is that if you have multiple redirects, they will be processed in order and all applied. This should rarely matter in most cases, but you can use it if you need to combine both changing a folder name AND a page name:
 server :
  redirects :
    - from : " /socials/facebook/([^/]+) "
      to : " /socials/meta/$1 "
    - from : " (/socials/meta)/about-facebook "
      to : " $1/about-meta "
중요한
If you are using a third-party static hosting provider to host your site, they will be unaware of the Kobweb conf.yaml file, so you will need to read their documentation to learn how to configure your redirects with them.
In this case, you may be able to skip defining redirects in your own Kobweb configuration file, since it may be redundant at that point. However, it may still be useful to do for documentation purposes and to ensure you won't 404 due to an old, internal link that you forgot to update.
CSS Layers are a very powerful but also relatively new CSS feature, which allow wrapping CSS style rules inside named layers as a way to control their priorities. In short, CSS layers are arbitrary names that you specify the order of. This can be an especially useful tool when dealing with CSS style rules that are fighting with each other.
Compose HTML does not support CSS layers, but Silk does! Even if you never use layers directly in your own project, Silk uses them, so users can still benefit from the feature.
By default, Silk defines six layers (from lowest to highest ordering priority):
The reset layer is useful for defining CSS rules that exist to compensate for browser defaults that are inconsistent with each other or to override values that exist for legacy reasons that modern web design has moved away from.
The base layer is actually not used by Silk (this may change someday), but it is provided so users can home general CSS styles in there if they want to. It is a useful place to define global styles that should get easily overridden by any other CSS rule defined elsewhere in your project, such as inside a CssStyle .
The next four styles are associated with the various flavors of CssStyle definitions:
 interface SomeKind : ComponentKind
val SomeStyle = CssStyle < SomeKind > { /* ... */ } // "component-styles"
val SomeVariant = SomeStyle .addVariant { /* ... */ } // "component-variants"
class ButtonSize ( /* ... */ ) : CssStyle.Base( /* ... */ ) // "restricted-styles"
val GeneralStyle = CssSTyle { /* ... */ } // "general-styles"
We chose this order to ensure that CSS styles are layered in ways that match intuition; for example, a style's variant will always layer on top of the base style itself; meanwhile, a user's declared style will always layer over a component style defined by Silk.
You can register your own custom layers inside an @InitSilk method, using the cssLayers property:
@InitSilk
fun initSilk ( ctx : InitSilkContext ) {
    ctx.stylesheet.cssLayers.add( " theme " , " layout " , " utilities " )
}
When declaring new layers, you can anchor them relative to existing layers. This is useful, for example, if you want to insert layers between Silk's base layer and its CssStyle layers:
@InitSilk
fun initSilk ( ctx : InitSilkContext ) {
    ctx.stylesheet.cssLayers.add( " third-party " , after = SilkLayer . BASE )
}
@CssLayer annotation If you need to affect the layer for a CssStyle block, you can tag it with the @CssLayer annotation:
@CssLayer( " important " )
val ImportantStyle = CssStyle { /* ... */ }
메모
You should always explicitly register your layers. So, for the code above, you should also declare:
@InitSilk
fun initSilk ( ctx : InitSilkContext ) {
  ctx.stylesheet.cssLayers.add( " important " )
}
If you don't do this, the browser will append add any unknown layer to the end of the CSS layer list (ie the highest priority spot). In many cases this will be fine, but being explicit both expresses your intention clearly and reduces the chance of your site breaking in subtle ways when a future developer adds a new layer in the future.
Silk will print out a warning to the console if it detects any unregistered layers.
layer blocks @InitSilk blocks let you register general CSS styles. You can wrap them insides layers using layer blocks:
@InitSilk
fun initSilk ( ctx : InitSilkContext ) {
    ctx.stylesheet. apply {
        cssLayers.add( " headers " )
        layer( " headers " ) {
            registerStyle( " h1 " ) { /* ... */ }
            registerStyle( " h2 " ) { /* ... */ }
        }
    }
}
Of course, you can associate styles with existing layers, such as the base layer we mentioned a few sections above:
@InitSilk
fun initSilk ( ctx : InitSilkContext ) {
    ctx.stylesheet. apply {
        layer( SilkLayer . BASE ) {
            registerStyle( " div " ) { /* ... */ }
            registerStyle( " span " ) { /* ... */ }
        }
    }
}Finally, if you are working with third party CSS stylesheets, it can be a very useful trick to wrap them in their own layer.
For example, let's say you are fighting with a third party library whose styles are a bit too aggressive and are interfering with your own styles.
First, inside your build script, import the stylesheet using an @import directive:
 // BEFORE
kobweb.app.index.head.add {
  link {
    rel = " stylesheet "
    href = " /highlight.js/styles/dracula.css "
  }
}

// AFTER
kobweb.app.index.head.add {
  style {
    unsafe {
      raw( " @import url( " /highlight.js/styles/dracula.css " ) layer(highlightjs); " )
    }
  }
}
Then, register your new layer in an @InitSilk block.
@InitSilk
fun initSilk ( ctx : InitSilkContext ) {
    // Layer(s) referenced in build.gradle.kts
    ctx.stylesheet.cssLayers.add( " highlightjs " , after = SilkLayer . BASE )
}
You've just tamed some wild CSS styles, congratulations!
Kobweb used to support a feature called legacy routes (you can read more about the feature here using an earlier version of the Kobweb README). This was an emergency feature added to give users time to respond to us fixing a long-standing mistake with our initial route naming algorithm without breaking their existing sites.
As of v0.18.3, we believe enough time has passed, and legacy route support has finally been removed. As a result, users who never migrated away from the feature might be seeing an error pointing them to this section.
If that is you, please follow these steps:
../gradlew kobwebListRoutes and look for any routes that have hyphens in them.redirects section of the conf.yaml file to explicitly redirect from the old route to the new one. See the Redirects▲ section for more information.legacyRouteRedirectStrategy = ... line from the kobweb.app block in your build script. 팁
This target commit demonstrates how I upgraded my blog site (which uses Firebase) to move away from Kobweb legacy route redirecting.
Occasionally, you might find yourself wanting code for your site that is better generated programmatically than written by hand.
The recommended best practice is to create a Gradle task that is associated with its own unique output directory, use the task to write some code to disk under that directory, and then add that task as a source directory for your project.
메모
The reason to encourage tasks with their own unique output directory is because this approach is very friendly with Gradle caching. You may read more here to learn about this in more detail.
Adding your task as a source directory ensures it will get triggered automatically before the Kobweb tasks responsible for processing your project are themselves run.
You want to do this even if you only plan to generate a single file. This is because associating your task with an output directory is what enables it to be used in place of a source directory.
The structure for this approach generally looks like this:
 // e.g. site/build.gradle.kts

val generateCodeTask = tasks.register( " generateCode " ) {
  group = " myproject "
  // You may not need an input file or dir for your task, and if so, you can exclude the next line. If you do need one,
  // I'm assuming it is a data file or files in your resources somewhere.
  val resInputDir = layout.projectDirectory.dir( " src/jsMain/resources " )
  // $name here to create a unique output directory just for this task
  val genOutputDir = layout.buildDirectory.dir( " generated/ $group / $name /src/jsMain/kotlin " )

  inputs.dir(resInputDir).withPathSensitivity( PathSensitivity . RELATIVE )
  outputs.dir(genOutputDir)

  doLast {
    genOutputDir.get().file( " org/example/pages/SomeCode.kt " ).asFile. apply {
      parentFile.mkdirs()
      // find and parse file out of resInputDir and write generated code here:
      writeText( /* ... */ )

      println ( " Generated $absolutePath " )
    }
  }
}

kotlin {
  configAsKobwebApplication()
  commonMain.dependencies { /* ... */ }
  jsMain {
    kotlin.srcDir(generateCodeTask) // <----- Set your task here
    dependencies { /* ... */ }
  }
} In case you want to generate resources that end up in your final site as files (eg mysite.com/rss.xml ) and not code, the main change you need to make is migrating the line kotlin.srcDir to resources.srcDir :
 // e.g. site/build.gradle.kts

val generateResourceTask = tasks.register( " generateResource " ) {
  group = " myproject "
  // $name here to create a unique output directory just for this task
  val genOutputDir = layout.buildDirectory.dir( " generated/ $group / $name /src/jsMain/resources " )

  outputs.dir(genOutputDir)

  doLast {
    // NOTE: Use "public/" here so the export pass will find it and put it into the final site
    genOutputDir.get().file( " public/rss.xml " ).asFile. apply {
      parentFile.mkdirs()
      writeText( /* ... */ )

      println ( " Generated $absolutePath " )
    }
  }
}

kotlin {
  configAsKobwebApplication()
  commonMain.dependencies { /* ... */ }
  jsMain {
    resources.srcDir(generateResourceTask) // <----- Set your task here
    dependencies { /* ... */ }
  }
}Currently, Kobweb is still under active development, and due to our limited resources, we are focusing on improving the path to creating a new project from scratch. However, some users have shown interest in Kobweb but already have an existing project and aren't sure how to add Kobweb into it.
As long as you understand that this path isn't officially supported yet, we'll provide steps below to take which may help people accomplish this manually for now. Honestly, the hardest part is creating a correct .kobweb/conf.yaml , which the following steps help you work around:
 # In some tmp directory somewhere
kobweb create app
# or `kobweb create app/empty`, if you are already
# experienced with Kobweb and know what you're doingsite subfolder out into your own project. (Once done, you can delete the dummy project, as it has served its usefulness.) cp -r app/site /path/to/your/project
# delete appsettings.gradle.kts file, include the new module and add our custom artifact repository link so your project can find the Kobweb Gradle plugins. // settings.gradle.kts
pluginManagement {
repositories {
// ... other repositories you already declared ...
maven( " https://us-central1-maven.pkg.dev/varabyte-repos/public " )
}
}
// ... other includes you already declared
include( " :site " )build.gradle.kts file, add our custom artifact repository there as well (so your project can find Kobweb libraries) // build.gradle.kts
subprojects {
repositories {
// ... other repositories you already declared ...
maven( " https://us-central1-maven.pkg.dev/varabyte-repos/public " )
}
}
// If you prefer, you can just declare this directly inside the
// repositories block in site's `build.gradle.kts` file, but I
// like declaring my maven repositories globally.gradle/libs.versions.toml [ versions ]
jetbrains-compose = " ... " # replace with actual version, see COMPATIBILITY.md!
kobweb = " ... " # replace with actual version
kotlin = " ... " # replace with actual version
[ libraries ]
kobweb-api = { module = " com.varabyte.kobweb:kobweb-api " , version.ref = " kobweb " }
kobweb-core = { module = " com.varabyte.kobweb:kobweb-core " , version.ref = " kobweb " }
kobweb-silk = { module = " com.varabyte.kobweb:kobweb-silk " , version.ref = " kobweb " }
kobwebx-markdown = { module = " com.varabyte.kobwebx:kobwebx-markdown " , version.ref = " kobweb " }
silk-icons-fa = { module = " com.varabyte.kobwebx:silk-icons-fa " , version.ref = " kobweb " }
[ plugins ]
jetbrains-compose = { id = " org.jetbrains.compose " , version.ref = " jetbrains-compose " }
kobweb-application = { id = " com.varabyte.kobweb.application " , version.ref = " kobweb " }
kobwebx-markdown = { id = " com.varabyte.kobwebx.markdown " , version.ref = " kobweb " }
kotlin-multiplatform = { id = " org.jetbrains.kotlin.multiplatform " , version.ref = " kotlin " }If everything is working as expected, you should be able to run Kobweb within your project now:
 # In /path/to/your/project
cd site
kobweb run
If you're still having issues, you may want to connect with us▼ for support (but understand that getting Kobweb added to complex existing projects may not be something we can currently prioritize).
While you can always export your site manually on your machine, you may want to automate this process. A common solution for this is a GitHub workflow.
For your convenience, we include a sample workflow below that exports your site and then uploads the results (which can be downloaded from a link shown in the workflow summary page):
 # .github/workflows/export-site.yml

name : Export Kobweb site

on :
  workflow_dispatch :

jobs :
  export_and_upload :
    runs-on : ubuntu-latest
    defaults :
      run :
        shell : bash

    env :
      KOBWEB_CLI_VERSION : 0.9.18

    steps :
      - uses : actions/checkout@v4
      - uses : actions/setup-java@v4
        with :
          distribution : temurin
          java-version : 11

      # When projects are created on Windows, the executable bit is sometimes lost. So set it back just in case.
      - name : Ensure Gradle is executable
        run : chmod +x gradlew

      - name : Setup Gradle
        uses : gradle/actions/setup-gradle@v3

      - name : Query Browser Cache ID
        id : browser-cache-id
        run : echo "value=$(./gradlew -q :site:kobwebBrowserCacheId)" >> $GITHUB_OUTPUT

      - name : Cache Browser Dependencies
        uses : actions/cache@v4
        id : playwright-cache
        with :
          path : ~/.cache/ms-playwright
          key : ${{ runner.os }}-playwright-${{ steps.browser-cache-id.outputs.value }}

      - name : Fetch kobweb
        uses : robinraju/[email protected]
        with :
          repository : " varabyte/kobweb-cli "
          tag : " v${{ env.KOBWEB_CLI_VERSION }} "
          fileName : " kobweb-${{ env.KOBWEB_CLI_VERSION }}.zip "
          tarBall : false
          zipBall : false

      - name : Unzip kobweb
        run : unzip kobweb-${{ env.KOBWEB_CLI_VERSION }}.zip

      - name : Run export
        run : |
          cd site
          ../kobweb-${{ env.KOBWEB_CLI_VERSION }}/bin/kobweb export --notty --layout static

      - name : Upload site
        uses : actions/upload-artifact@v4
        with :
          name : site
          path : site/.kobweb/site/
          if-no-files-found : error
          retention-days : 1
You can copy this workflow (or parts of it) into your own GitHub project and then modify it to your needs.
Some notes...
kobweb export needs to download a browser the first time it is run. This workflow sets up a cache that saves it across runs. The cache is tagged with a unique ID so that future Kobweb releases, which may change the version of the browser downloaded, will use a new cache bucket (allowing GitHub to eventually clean up the old one).gh_pages repository. I've included this here (and set the retention days very low) just so you can verify that the workflow is working for your project.For a simple site, the above workflow should take about 2 minutes to run.
StyleVariable s using calc StyleVariable s work in a subtle way that is usually fine until it isn't -- which is often when you try to interact with their values instead of just passing them around.
Specifically, this would compile but be a problem at runtime:
 val MyOpacityVar by StyleVariable < Number >()

// later...

// Border opacity should be more opaque than the rest of the widget
val borderOpacity = max( 1.0 , MyOpacityVar .value().toDouble() * 2 )
To see what the problem is, let's first take a step back. The following code:
 val MyOpacityVar by StyleVariable < Number >()

// later...
Modifier .opacity( MyOpacityVar .value())
generates the following CSS:
opacity : var ( --my-opacity ); However, MyOpacityVar acts like a Number in our code! How does something that effectively has a type of Number generate text output like var(--my-opacity) ?
This is accomplished through the use of Kotlin/JS's unsafeCast , where you can tell the compiler to treat a value as a different type than it actually is. In this case, MyOpacityVar.value() returns some object which the Kotlin compiler treats like a Number for compilation purposes, but it is really some class instance whose toString() evaluates to var(--my-opacity) .
Therefore, Modifier.opacity(MyOpacityVar.value()) works seemingly like magic! However, if you try to do some arithmetic, like MyOpacityVar.value().toDouble() * 0.5 , the compiler might be happy, but things will break silently at runtime, when the JS engine is asked to do math on something that's not really a number.
In CSS, doing math with variables is accomplished by using calc blocks, so Kobweb offers its own calc method to mirror this. When dealing with raw numerical values, you must wrap them in num so we can escape the raw type system which was causing runtime confusion above:
calc { num( MyOpacityVar .value()) * num( 0.5 ) }
// Output: "calc(var(--my-opacity, 1) * 0.5)"
At this point, you can write code like this:
Modifier .opacity(calc { num( MyOpacityVar .value()) * num( 0.5 ) }) It's a little hard to remember to wrap raw values in num , but you will get compile errors if you do it wrong.
Working with variables representing length values don't require calc blocks because Compose HTML supports mathematical operations on such numeric unit types:
 val MyFontSizeVar by StyleVariable < CSSLengthNumericValue >()

MyFontSizeVar .value() + 1 .cssRem
// Output: "calc(var(--my-font-size) + 1rem)"
However, a calc block could still be useful if you were starting with a raw number that you wanted to convert to a size:
 val MyFontSizeScaleFactorVar by StyleVariable < Number >()

calc { MyFontSizeScaleFactorVar .value() * 16 .px }
// Output: calc(var(--my-font-size-scale-factor) * 16px) Many users who create a full stack application generally expect to completely own both the client- and server-side code.
However, being an opinionated framework, Kobweb provides a custom Ktor server in order to deliver some of its features. For example, it implements the logic for handling server API routes▲ as well as some live reloading functionality.
It would not be trivial to refactor this behavior into some library that users could import into their own backend server. As a compromise, some server configuration is exposed by the .kobweb/conf.yaml file, and this has been the main way users could affect the server's behavior.
That said, there will always be some use cases that Kobweb won't anticipate. So as an escape hatch, Kobweb allows users who know what they're doing to write their own plugins to extend the server.
메모
The Kobweb Server plugin feature is still fairly new. If you use it, please consider filing issues for any missing features and connecting with us▼ to share any feedback you have about your experience.
Creating a Kobweb server plugin is relatively straightforward. You'll need to:
KobwebServerPlugin interface.kobwebServerPlugin dependency in your site's build script..kobweb/server/plugins directory.The following steps will walk you through creating your first Kobweb Server Plugin.
팁
You can download this project to see the completed result from applying the instructions in this section to the kobweb create app site.
settings.gradle.kts file to include the new project.kobweb-server-project library and kotlin JVM plugin in .gradle/libs.versions.toml : [ libraries ]
kobweb-server-plugin = { module = " com.varabyte.kobweb:kobweb-server-plugin " , version.ref = " kobweb " }
[ plugins ]
kotlin-jvm = { id = " org.jetbrains.kotlin.jvm " , version.ref = " kotlin " }demo-server-plugin/ ).build.gradle.kts : plugins {
alias(libs.plugins.kotlin.jvm)
}
group = " org.example.app " // update to your own project's group
version = " 1.0-SNAPSHOT "
dependencies {
compileOnly(libs.kobweb.server.plugin)
}src/main/kotlin/DemoKobwebServerPlugin.kt : import com.varabyte.kobweb.server.plugin.KobwebServerPlugin
import io.ktor.server.application.Application
import io.ktor.server.application.log
class DemoKobwebServerPlugin : KobwebServerPlugin {
override fun configure ( application : Application ) {
application.log.info( " REPLACE ME WITH REAL CONFIGURATION " )
}
}팁
As the Kobweb server is written in Ktor, you should familiarize yourself with Ktor's documentation.
src/main/resources/META-INF/services/com.varabyte.kobweb.server.plugin.KobwebServerPlugin , setting its content to the fully-qualified class name of your plugin. 예를 들어: org.example.app.DemoKobwebServerPlugin
메모
If you aren't familiar with META-INF/services , you can read this helpful article to learn more about service implementations, a very useful Java feature.
The Kobweb Gradle Application plugin provides a way to notify it about your JAR project. Set it up, and Gradle will build and copy your plugin jar over for you automatically.
In your Kobweb project's build script, include the following kobwebServerPlugin line in a top-level dependencies block:
 // site/build.gradle.kts

dependencies {
  kobwebServerPlugin(project( " :demo-server-plugin " ))
}

kotlin { /* ... */ }
중요한
You need to put the kobwebServerPlugin declaration inside a top-level dependencies block, not in one of the ones nested under the kotlin block (such as kotlin.jvmMain.dependencies ).
Once this is set up, upon the next Kobweb server run (eg via kobweb run ), if you check the logs, you should see something like this:
 [main] INFO  ktor.application - Autoreload is disabled because the development mode is off.
[main] INFO  ktor.application - REPLACE ME WITH REAL CONFIGURATION
[main] INFO  ktor.application - Application started in 0.112 seconds.
[main] INFO  ktor.application - Responding at http://0.0.0.0:8080
Despite the simplicity of the KobwebServerPlugin interface, the application parameter passed into KobwebServerPlugin.configure is quite powerful.
While I know it may sound kind of meta, you can create and install a Ktor Application Plugin inside a Kobweb Server Plugin. Once you've done that, you have access to all stages of a network call, as well as some other hooks like ones for receiving Application lifecycle events.
팁
Please read the Extending Ktor documentation to learn more.
Doing so looks like this:
import com.varabyte.kobweb.server.plugin.KobwebServerPlugin
import io.ktor.server.application.Application
import io.ktor.server.application.createApplicationPlugin
import io.ktor.server.application.install
class DemoKobwebServerPlugin : KobwebServerPlugin {
override fun configure ( application : Application ) {
val demo = createApplicationPlugin( " DemoKobwebServerPlugin " ) {
onCall { call -> /* ... */ } // Request comes in
onCallRespond { call -> /* ... */ } // Response goes out
}
application.install(demo)
}
}It's important to note that, unlike other parts of Kobweb, Kobweb Server Plugins do NOT support live reloading. We only start up and configure a Kobweb server once in its lifetime.
If you make a change to a Kobweb Server Plugin, you must quit and restart the server for it to take effect.
You may already have an existing and complex backend, perhaps written with Ktor or Spring Boot, and, if so, are wondering if you can integrate Kobweb with it.
The recommended solution for now is to export your site using a static layout (read more about static layout sites here▲) and then add code to your backend to serve the files yourself, as it is fairly trivial.
When you export a site statically, it will generate all files into your .kobweb/site folder. Then, if using Ktor, for example, serving these files is a one-liner:
routing {
staticFiles( " / " , File ( " .kobweb/site " ))
} If using Ktor, you should also install the IgnoreTrailingSlash plugin so that your web server will serve index.html when a user visits a directory (eg /docs/ ) instead of returning a 404:
embeddedServer( .. .) { // `this` is `Application` in this scope
this .install( IgnoreTrailingSlash )
// Remaining configuration
} If you need to access HTTP endpoints exposed by your backend, you can use window.fetch(...) directly, or you can use the convenience http property that Kobweb adds to the window object which exposes all the HTTP methods ( get , post , put , etc.):
@Page
@Composable
fun CustomBackendDemoPage () {
LaunchedEffect ( Unit ) {
val endpointResponse = window.http.get( " /my/endpoint?id=123 " ).decodeToString()
/* ... */
}
}Unfortunately, using your own backend does mean you're opting out of using Kobweb's full stack solution, which means you won't have access to Kobweb's API routes, API streams, or live reloading support. This is a situation we'd like to improve someday (link to tracking issue), but we don't have enough resources to be able to prioritize resolving this for a 1.0 release.
CSSNumericValue type-aliases Kobweb introduces a handful of type-aliases for CSS unit values, basing them off of the CSSNumericValue class and extending the set defined by Compose HTML:
typealias CSSAngleNumericValue = CSSNumericValue < out CSSUnitAngle >
typealias CSSLengthOrPercentageNumericValue = CSSNumericValue < out CSSUnitLengthOrPercentage >
typealias CSSLengthNumericValue = CSSNumericValue < out CSSUnitLength >
typealias CSSPercentageNumericValue = CSSNumericValue < out CSSUnitPercentage >
typealias CSSFlexNumericValue = CSSNumericValue < out CSSUnitFlex >
typealias CSSTimeNumericValue = CSSNumericValue < out CSSUnitTime >This section explains why they were added and why you should almost always prefer using them.
When you write CSS values like 10.px , 5.cssRem , 45.deg , or even 30.s into your code, you normally don't have to think too much about their types. You just create them and pass them into the appropriate Kobweb / Compose HTML APIs.
Let's discuss what is actually happening when you do this. Compose HTML provides a CSSSizeValue class which represents a number value and its unit.
val lengthValue = 10 .px // CSSSizeValue<CSSUnit.px> (value = 10 and unit = px)
val angleValue = 45 .deg // CSSSizeValue<CSSUnit.deg> (value = 45 and unit = deg)This is a pretty elegant approach, but the types are verbose. This can be troublesome when writing code that needs to work with them:
val lengths : List < CSSSizeValue < CSSUnit .px>>
fun drawArc ( arc : CSSSizeValue < CSSUnit .deg>) Note also that the above cases are overly restrictive, only supporting a single length and angle type, respectively. We usually want to support all relevant types (eg px , em , cssRem , etc. for lengths; deg , rad , grad , and turn for angles). We can do this with the following out syntax:
val lengths : List < CSSSizeValue < out CSSUnitLength >>
fun drawArc ( arc : CSSSizeValue < out CSSUnitAngle >)What a mouthful!
As a result, the Compose HTML team added type-aliases for all these unit types, such as CSSLengthValue and CSSAngleValue . Now, you can write the above code like:
val lengths : List < CSSLengthValue >
fun drawArc ( arc : CSSAngleValue )Much better! Seems great. No problems, right? 오른쪽?!
You can probably tell by my tone: Yes problems.
To explain, we first need to talk about CSSNumericValue .
It is common to transform values in CSS using many of its various mathematical functions. Perhaps you want to take the sum of two different units ( 10.px + 5.cssRem ) or call some other math function ( clamp(1.cssRem, 3.vw) ). These operations return intermediate values that cannot be directly queried like a CSSSizeValue can.
This is handled by the CSSNumericValue class, also defined by Compose HTML (and which is actually a base class of CSSSizeValue ).
val lengthSum = 10 .px + 2 .cssRem // CSSNumericValue<CSSUnitLength>
val angleSum = 45 .deg + 1 .turn // CSSNumericValue<CSSAngleLength>These numeric operations are of course useful to the browser, which can resolve them into absolute screen values, but for us in user space, they are opaque calculations.
In practice, however, that's fine! The limited view of these values does not matter because we rarely need to query them in our code. In almost all cases, we just take some numeric value, optionally tweak it by doing some more math on it, and then pass it onto the browser.
Because it is opaque, CSSNumericValue is far more flexible and widely applicable than CSSSizeValue is. If you are writing a function that takes a parameter, or declaring a StyleVariable tied to some length or time, you almost always want to use CSSNumericValue and not CSSSizeValue .
CSSNumericValue type-aliases As mentioned above, the Compose HTML team created their unit-related type-aliases against the CSSSizeValue class.
This decision makes it really easy to write code that works well when you test it with concrete size values but is actually more restrictive than you expected.
Kobweb ensures its APIs all reference its CSSNumericValue type-aliases:
// Legacy Kobweb
fun Modifier. lineHeight ( value : CSSLengthOrPercentageValue ): Modifier = styleModifier {
lineHeight(value)
}
// Modern Kobweb
fun Modifier. lineHeight ( value : CSSLengthOrPercentageNumericValue ): Modifier = styleModifier {
lineHeight(value)
}If you are using style variables in your code, or writing your own functions that take CSS units as arguments, you might be referencing the Compose HTML types. Your code will still work fine, but you are strongly encouraged to migrate them to Kobweb's newer set, in order to make your code more flexible about what it can accept:
// Not recommended
val MyFontSize by StyleVariable < CSSLengthValue >
fun drawArc ( arc : CSSAngleValue )
// Recommended
val MyFontSize by StyleVariable < CSSLengthNumericValue >
fun drawArc ( arc : CSSAngleNumericValue )메모
Perhaps in the future, the Compose HTML team might consider updating their type-aliases to use the CSSNumericValue type and not the CSSSizeValue type. If that happens, we can revert our changes and delete this section. But until then, it's worth understanding why Kobweb introduces its own type-aliases and why you are encouraged to use them instead of the Compose HTML versions.
A Kobweb project always has a frontend and, if configured as a full stack site, a backend as well. Both require different steps to debug them.
At the moment, attaching a debugger to Kotlin/JS code requires IntelliJ Ultimate. If you have it, you can follow these steps in the official docs.
중요한
Be sure the port in your URL matches the port you specified in your .kobweb/conf.yaml file. By default, this is 8080.
If you do not have access to IntelliJ Ultimate, then you'll have to rely on println debugging. While this is far from great, live reloading plus Kotlin's type system generally help you incrementally build your site up without too many issues.
팁
If you're a student, you can apply for a free IntelliJ Ultimate license here. If you maintain an open source project, you can apply here.
Debugging the backend first requires configuring the Kobweb server to support remote debugging. This is easy to do by modifying the kobweb block in your build script to enable remote debugging:
kobweb {
app {
server {
remoteDebugging {
enabled.set( true )
port.set( 5005 )
}
}
}
}메모
Specifying the port is optional. Otherwise, it is 5005, a common remote debugging default. If you ever need to debug multiple Kobweb servers at the same time, however, it can be useful to change it.
Once you've enabled remote debugging support, you can then follow the official documentation to add a remote JVM debug configuration to your IDE.
중요한
For remote debugging to work:
jvmMain classpath associated with your Kobweb application, eg app.site.jvmMain . If you've refactored your backend code out to another module, you should be able to use that instead. At this point, start up your Kobweb server using kobweb run .
주의
Remote debugging is only supported in dev mode. It will not be enabled for a server started with kobweb run --env prod .
With your Kobweb server running and your "remote debug" run configuration selected, press the debug button. If everything is set up correctly, you should see a message in the IDE debugger console like: Connected to the target VM, address: 'localhost:5005', transport: 'socket'
If instead, you see a red popup with a message like Unable to open debugger port (localhost:5005): java.net.ConnectException "Connection refused" , please double-check the values in your conf.yaml file, restart the server, and try again.
The easiest way to use a custom font is if it is already hosted for you. For example, Google Fonts provides a CDN that you can use to load fonts directly.
주의
While this is the easiest approach, be sure you won't run into compliance issues! If you use Google Fonts on your site, you may technically be in violation of the GDPR in Europe, because an EU citizen's IP address is communicated to Google and logged. You may wish to find a Europe-safe host instead, or self-host, which you can read about in the next section▼.
The font service should give you HTML to add to your site's <head> tag. For example, Google Fonts suggests the following when I select Roboto Regular 400:
< link rel =" preconnect " href =" https://fonts.googleapis.com " >
< link rel =" preconnect " href =" https://fonts.gstatic.com " crossorigin >
< link href =" https://fonts.googleapis.com/css2?family=Roboto&display=swap " rel =" stylesheet " > This code should be converted into Kotlin and added to the kobweb block of your site's build.gradle.kts script:
kobweb {
app {
index {
head.add {
link(rel = " preconnect " , href = " https://fonts.googleapis.com " )
link(rel = " preconnect " , href = " https://fonts.gstatic.com " ) { attributes[ " crossorigin " ] = " " }
link(
href = " https://fonts.googleapis.com/css2?family=Roboto&display=swap " ,
rel = " stylesheet "
)
}
}
}
}Once done, you can now reference this new font:
Column ( Modifier .fontFamily( " Roboto " )) {
Text ( " Hello world! " )
} Users can flexibly declare a custom font by using CSS's @font-face rule.
In Kobweb, you can normally declare CSS properties in Kotlin (within an @InitSilk block), but unfortunately, Firefox doesn't allow you to define or modify @font-face entries in code (relevant Bugzilla issue). Therefore, for guaranteed cross-platform compatibility, you should create a CSS file and reference it from your build script.
To keep the example concrete, let's say you've downloaded the open source font Lobster from Google Fonts (and its license as well, of course).
You need to put the font file inside your public resources directory, so it can be found by the user visiting your site. I recommend the following file organization:
jsMain
└── resources
└── public
└── fonts
├── faces.css
└── lobster
├── OFL.txt
└── Lobster-Regular.ttf
where faces.css contains all your @font-face rule definitions (we just have a single one for now):
@font-face {
font-family : 'Lobster' ;
src : url ( '/fonts/lobster/Lobster-Regular.ttf' );
}메모
The above layout may be slightly overkill if you are sure you'll only ever have a single font, but it's flexible enough to support additional fonts if you decide to add more in the future, which is why we recommend it as a general advice here.
Now, you need to reference this CSS file from your build.gradle.kts script:
kobweb {
app {
index {
head.add {
link(rel = " stylesheet " , href = " /fonts/faces.css " )
}
}
}
}Finally, you can reference the font in your code:
Column ( Modifier .fontFamily( " Lobster " )) {
Text ( " Hello world! " )
} When you run kobweb run , the spun-up web server will, by default, log to the .kobweb/server/logs directory.
메모
You can generate logs using the ctx.logger property inside @Api calls▲.
You can configure logging behavior by editing the .kobweb/conf.yaml file. Below we show setting all parameters to their default values:
server :
logging :
level : DEBUG # ALL, TRACE, DEBUG, INFO, WARN, ERROR, OFF
logRoot : " .kobweb/server/logs "
clearLogsOnStart : true # Warning - if true, wipes ALL files in logRoot, so don't put other files in there!
logFileBaseName : " kobweb-server " # e.g. "kobweb-server.log", "kobweb-server.2023-04-13.log"
maxFileCount : null # null = unbound. One log file is created per day, so 30 = 1 month of logs
totalSizeCap : 10MiB # null = unbound. Accepted units: B, K, M, G, KB, MB, GB, KiB, MiB, GiB
compressHistory : true # If true, old log files are compressed with gzip The above defaults were chosen to be reasonable for most users running their projects on their local machines in developer mode. However, for production servers, you may want to set clearLogsOnStart to false, bump up the totalSizeCap after reviewing the disk limitations of your web server host, and maybe set maxFileCount to a reasonable limit.
Note that most config files assume "10MB" is 10 * 1024 * 1024 bytes, but here it will actually result in 10 * 1000 * 1000 bytes. You probably want to use "KiB", "MiB", or "GiB" when you configure this value.
CORS, or Cross-Origin Resource Sharing , is a security feature built on the idea that a web page should not be able to make requests for resources from a server that is not the same as the one that served the page unless it was served from a trusted domain.
To configure CORS for a Kobweb backend, Kobweb's .kobweb/conf.yaml file allows you to declare such trusted domains using a cors block:
server :
cors :
hosts :
- name : " example.com "
schemes :
- " https " 메모
Specifying the schemes is optional. If you don't specify them, Kobweb defaults to "http" and "https".
메모
You can also specify subdomains, eg
- name : " example.com "
subdomains :
- " en "
- " de "
- " es " which would add CORS support for en.example.com , de.example.com , and es.example.com , as well as example.com itself.
Once configured, your Kobweb server will be able to respond to data requests from any of the specified hosts.
팁
If you find that your full-stack site, which was working locally during development, rejects requests in the production version, check your browser's console logs. If you see errors in there about a violated CORS policy, that means you didn't configure CORS correctly.
The Kobweb export feature is built on top of Microsoft Playwright, a solution for making it easy to download and run browsers programmatically.
One of the features provided by Playwright is the ability to generate traces, which are essentially detailed reports you can use to understand what is happening as your site loads. Kobweb exposes this feature through the export block in your Kobweb application's build script.
Enabling traces is easy:
// build.gradle.kts
plugins {
// ... other plugins ...
alias(libs.plugins.kobweb.application)
}
kobweb {
app {
export {
enableTraces()
}
}
} You can pass in parameters to configure the enableTraces method, but by default, it will generate trace files into your .kobweb/export-traces/ directory.
Once enabled, you can run kobweb export , then once exported, open any of the generated *.trace.zip files by navigating to them using your OS's file explorer and drag-and-dropping them into the Playwright Trace Viewer.
팁
You can learn more about how to use the Trace Viewer using the official documentation.
It's not expected many users will need to debug their site exports, but it's a great tool to have (especially combined with the server logs feature) to diagnose if one of your pages is taking longer to export than expected.
In the beginning, Kobweb was only intended to be a thin layer on top of Compose HTML, but the more we worked on it, the more we ran into features that were simply not yet implemented in Compose HTML. In other cases, we found ourselves reaching for utilities that we wished existed in Kotlin/JS browser APIs. As we began adding these features, we realized it would have been a shame to bury them deep inside our framework.
As a result, we created two modules:
compose-html-ext , where we put code that we would be more than happy for the Compose HTML team to fork and migrate over to Compose HTML someday.browser-ext , a collection of general purpose utilities that we think could be useful to any Kotlin/JS project targeting the browser.The features across these modules include (not comprehensive):
calc (especially useful when working with CSS variables), etc.window.fetch (for example, making it easier to use the most common HTTP verbs like GET, POST, etc., as well as providing suspend fun versions of fetch)GenericTag , which is an easy-to-use API wrapping Compose HTML's TagElement composable, with additional namespacing support if needed (for example, required when implementing SVG elements)StyleVariable , allows specifying a default value, provides first-class number/string variable support, and fixes a bug in Compose HTML's CSSStyleVariable class where it can accept invalid values.setTimeout and setInterval methods that are more Kotlin-idiomatic (eg the lambdas are the last parameter) 메모
Some users have mentioned we should have opened PRs for the Compose HTML team instead of maintaining a separate codebase. However, after observing that JetBrains was focusing more and more of its energy on Compose Multiplatform for Web, we decided to implement the features we needed in our own project. This way, we could maintain our velocity while allowing their team to pick and choose what they agreed with at some point in the future at their leisure. There's so much code here, especially around CSS APIs, that getting mired down in PR discussions would have ground our progress to a halt.
If you want to use Compose HTML but not Kobweb, or Kotlin/JS but not Compose HTML, you can still use and benefit from compose-html-ext or browser-ext in your own project. An example build script could look like this (here, for a non-Kobweb Compose HTML project):
// build.gradle.kts
plugins {
kotlin( " multiplatform " ) version " ... "
}
repositories {
mavenCentral()
google()
maven( " https://us-central1-maven.pkg.dev/varabyte-repos/public " ) // IMPORTANT!!!
}
kotlin {
js().browser()
sourceSets {
jsMain.dependencies {
implementation(compose.html.core)
implementation(compose.runtime)
implementation( " com.varabyte.kobweb:compose-html-ext:... " ) // IMPORTANT!!!
}
}
}메모
The compose-html-ext dependency automatically exposes the browser-ext dependency.
Jetbrains is working on the "Compose Multiplatform UI Framework", which allows developers to use the same codebase across Android, iOS, Desktop, and the Web. And it may seem like the Kobweb + Silk approach is obsoleted by it.
It's first worth understanding the core difference between the two approaches. With Compose Multiplatform, the framework owns its own rendering pipeline, drawing to a buffer. In contrast, Compose HTML modifies an HTML / CSS DOM tree and leaves it up to the browser to do the final rendering.
This has major implications on how similar the two APIs can get. For example, in Compose Multiplatform, the order you apply modifiers matters. However, in Compose HTML, this action simply sets html style properties under the hood, where order does not matter.
Due to its reputation, ditching HTML / CSS entirely at first can seem like a total win, but this approach has several limitations:
It would also prevent a developer from making use of the rich ecosystem of Javascript libraries out there.
Finally, Kobweb is more than just Kotlin-ifying HTML / CSS. It also provides rich integration with powerful web technologies like web workers▲ and websockets▲.
For now, I am making a bet that there will always be value in embracing the web, providing a framework that sticks to HTML / CSS but offers a growing suite of UI widgets, layouts, and other features that make it a more comfortable experience for the Kotlin developer.
For example, the flexbox layout is a very powerful concept, but it can be very tricky to use. In most cases, you'll find it's much easier to compose Row s and Column s together than trying to remember if you should be justifying your items or aligning your content, even if Row s and Column s are just configuring the correct HTML / CSS for you behind the scenes.
Ultimately, I believe there is room for both Compose Multiplatform and Kobweb. If you want to make an app experience that feels the same on Android, iOS, Desktop, and Web, then Compose Multiplatform could be the right choice for you. However, if you just want to make a traditional website but want to use Kotlin instead of TypeScript, Kobweb can provide an excellent development experience for that case.
Current state: Foundations are in place! You may encounter API gaps.
You may wish to refer to our Kobweb 1.0 roadmap document.
Kobweb is becoming quite functional. We are already using it to build https://kobweb.varabyte.com and https://bitspittle.dev. Several users have created working portfolio sites already, and I'm aware of at least two cases where Kobweb was used in a project for a client.
이 시점에서 :
Modifier builder for a significant number of CSS properties.However, there's always more to do.
I think there's enough there now to let you do almost anything you'd want to do, as either Kobweb supports it or you can escape hatch to underlying Compose HTML / Kotlin/JS approaches, but there might be some areas where it's still a bit DIY. It would be great to get real-world experience to hear what issues users are actually running into.
So, should you use Kobweb at this point? If you are...
On the fence but not sure? Connect with us, and I'd be happy to help you assess your situation.
I'm pleased to mention that Kobweb has received feedback from some satisfied users. 다음은 다음과 같습니다.
Kobweb uses BrowserStack when we need to test its APIs on older browsers.
We appreciate their support for the open source community.
If you're comfortable with it, using Discord is recommended, because there's a growing community of users in there who can offer help even when I'm not around.
It is still early days, and while we believe we've proven the feasibility of this approach at this point, there's still plenty of work to do to get to a 1.0 launch! We are hungry for the community's feedback, so please don't hesitate to:
Thank you for your support and interest in Kobweb!


