kobweb
v0.20.0
Kobweb هو إطار Kotlin المأخوَّر لإنشاء مواقع الويب وتطبيقات الويب ، مبنية على تأليف HTML ومستوحاة من Next.js و Chakra UI.
@Page
@Composable
fun HomePage () {
  Column ( Modifier .fillMaxWidth(), horizontalAlignment = Alignment . CenterHorizontally ) {
    Row ( Modifier .align( Alignment . End )) {
      var colorMode by ColorMode .currentState
      Button (
        onClick = { colorMode = colorMode.opposite },
        Modifier .borderRadius( 50 .percent).padding( 0 .px)
      ) {
        // Includes support for Font Awesome icons
        if (colorMode.isLight) FaSun () else FaMoon ()
      }
    }
    H1 {
      Text ( " Welcome to Kobweb! " )
    }
    Row ( Modifier .flexWrap( FlexWrap . Wrap )) {
      SpanText ( " Create rich, dynamic web apps with ease, leveraging " )
      Link ( " https://kotlinlang.org/ " , " Kotlin " )
      SpanText ( " and " )
      Link ( " https://github.com/JetBrains/compose-multiplatform#compose-html/ " , " Compose HTML " )
    }
  }
}
على الرغم من أن KobWeb لا يزال قبل 1.0 ، إلا أنه كان قابلاً للاستخدام لفترة من الوقت الآن. إنه يوفر فتحات الهروب إلى واجهات برمجة التطبيقات ذات المستوى الأدنى ، بحيث يمكنك إنجاز أي شيء حتى لو لم يدعمها Kobweb بعد. يرجى التفكير في بطولة المشروع للإشارة إلى الاهتمام ، حتى نعلم أننا نخلق شيئًا يريده المجتمع. ما مدى استعداده؟ ▼
هدفنا هو توفير:
إليك عرضًا توضيحيًا حيث نقوم بإنشاء مشروع HTML من الصفر بدعم من التخفيضات وإعادة التحميل المباشر ، في أقل من 10 ثوان:
يمكنك التحقق من حديثي في Droidcon SF 24 للحصول على نظرة عامة عالية على KobWeb. يعرض الحواري ما يمكن أن يفعله KobWeb ، ويقوم بإنشاء HTML (الذي يبنيه فوق) ، ويغطي مجموعة واسعة من وظائف الواجهة الأمامية والخلفية. إنه خفيف على التعليمات البرمجية ولكنه ثقيل على فهم هيكل وقدرات الإطار.
قام Stevdza-san ، أحد مستخدمي Kobweb ، Stevdza-San ، بإنشاء برامج تعليمية مجانية تُظهر كيفية بناء المشاريع باستخدام KobWeb.
نصيحة
من السهل البدء بموقع تخطيط ثابت أولاً والترحيل إلى موقع مكدس كامل لاحقًا. (يمكنك قراءة المزيد حول التصميم الثابت مقابل مواقع المكدس الكاملة ▼ أدناه.)
قامت قناة YouTube التي تسمى Skyfish بإنشاء فيديو تعليمي حول كيفية إنشاء موقع Fullstack مع KobWeb.
الخطوة الأولى هي الحصول على kobweb ثنائي. يمكنك تثبيته وتنزيله و/أو بناءه ، لذلك سنقوم بتضمين تعليمات لجميع هذه الأساليب.
شكر كبير لـ Aolmiray و Helpermethod لمساعدتي في عمل خيارات التثبيت هذه. تحقق من Jreleaser إذا كنت بحاجة إلى القيام بذلك في مشروعك!
OS: Mac و Linux
$ brew install varabyte/tap/kobwebOS: Windows
 # Note: Adding buckets only has to be done once.

# Feel free to skip java if you already have it
> scoop bucket add java
> scoop install java/openjdk

# Install kobweb
> scoop bucket add varabyte https://github.com/varabyte/scoop-varabyte.git
> scoop install varabyte/kobwebOS: Windows و Mac و *nix
$ sdk install kobwebشكرا طن إلى AKSH1618 لإضافة الدعم لهذا الهدف!
مع مساعد Aur ، على سبيل المثال:
$ yay -S kobweb
$ paru -S kobweb
$ trizen -S kobweb
# etc.
بدون مساعد Aur:
$ git clone https://aur.archlinux.org/kobweb.git
$ cd kobweb
$ makepkg -siيرجى الاطلاع على: Varabyte/Kobweb-Cli#11 والنظر في ترك تعليق!
يتم استضافة قطعة أثرية ثنائية لدينا على جيثب. لتنزيل الأحدث ، يمكنك إما الحصول على ملف Zip أو Tar من Github أو يمكنك جلبه من المحطة الخاصة بك:
$ cd /path/to/applications

# You can either pull down the zip file

$ wget https://github.com/varabyte/kobweb-cli/releases/download/v0.9.18/kobweb-0.9.18.zip
$ unzip kobweb-0.9.18.zip

# ... or the tar file

$ wget https://github.com/varabyte/kobweb-cli/releases/download/v0.9.18/kobweb-0.9.18.tar
$ tar -xvf kobweb-0.9.18.tar
وأوصي بإضافته إلى طريقك ، إما مباشرة:
$ PATH= $PATH :/path/to/applications/kobweb-0.9.18/bin
$ kobweb version # to check it's working
أو عبر الرابط الرمزي:
$ cd /path/to/bin # some folder you've created that's in your PATH
$ ln -s /path/to/applications/kobweb-0.9.18/bin/kobweb kobwebعلى الرغم من أننا نستضيف kobweb من القطع الأثرية على Github ، إلا أنه من السهل بناء خاص بك.
يتطلب بناء kobweb JDK11 أو الأحدث. سنناقش أولاً كيفية إضافته.
إذا كنت تريد التحكم الكامل في تثبيت JDK الخاص بك ، فإن التنزيل يدويًا هو خيار جيد.
JAVA_HOME الخاص بك لتشير إليه. JAVA_HOME=/path/to/jdks/corretto-11.0.12
# ... or whatever version or path you choseللحصول على نهج أكثر تلقائيًا ، يمكنك طلب تثبيت intellij لـ JDK لك.
اتبع تعليماتهم هنا:
يتم الحفاظ على Kobweb CLI فعليًا في ريبو GitHub منفصل. بمجرد إعداد JDK ، يجب أن يكون من السهل استنساخه وبناءه:
$ cd /path/to/src/root # some folder you've created for storing src code
$ git clone https://github.com/varabyte/kobweb-cli
$ cd kobweb-cli
$ ./gradlew :kobweb:installDist
أخيرًا ، قم بتحديث طريقك:
$ PATH= $PATH :/path/to/src/root/kobweb-cli/kobweb/build/install/kobweb/bin
$ kobweb version # to check it's working إذا قمت بتثبيت KobWeb مسبقًا وكنت على دراية بأن إصدارًا جديدًا متاحًا ، فإن الطريقة التي تقوم بتحديثها تعتمد على كيفية تثبيته.
| طريقة | تعليمات |
|---|---|
| البيرة | brew updatebrew upgrade kobweb |
| مغرفة | scoop update kobweb |
| سدكمان! | sdk upgrade kobweb |
| قوس لينكس | يجب إعادة تشغيل خطوات التثبيت. إذا كنت تستخدم Aur Helper ، فقد تحتاج إلى مراجعة دليله. |
| تم تنزيله من جيثب | قم بزيارة أحدث إصدار. يمكنك العثور على ملف zip و tar هناك. |
$ cd /path/to/projects/
$ kobweb create app
سيتم طرح بعض الأسئلة اللازمة لإعداد مشروعك.
لا تحتاج إلى إنشاء مجلد جذر لمشروعك في وقت مبكر - ستطالبك عملية الإعداد بإنشاء واحد. بالنسبة للأجزاء المتبقية من هذا القسم ، دعنا نقول أنك تختار المجلد "My-Project" عند سؤاله.
عند الانتهاء ، سيكون لديك مشروع أساسي مع صفحتين - صفحة رئيسية وصفحة حول (مع الصفحة المكتوبة في Markdown) - وبعض المكونات (وهي مجموعات من القطع القابلة لإعادة الاستخدام والقابلة للتأليف). يجب أن يبدو هيكل الدليل الخاص بك مثل هذا:
 my-project
└── site/src/jsMain
    ├── kotlin.org.example.myproject
    │   ├── components
    │   │   ├── layouts
    │   │   │   ├── MarkdownLayout.kt
    │   │   │   └── PageLayout.kt
    │   │   ├── sections
    │   │   │   ├── Footer.kt
    │   │   │   └── NavHeader.kt
    │   │   └── widgets
    │   │       └── IconButton.kt
    │   ├── pages
    │   │   └── Index.kt
    │   └── AppEntry.kt
    └── resources/markdown
        └── About.md
لاحظ أنه لا يوجد index.html أو منطق التوجيه في أي مكان! نقوم بإنشاء ذلك لك تلقائيًا عند تشغيل KobWeb. هذا يقودنا إلى القسم التالي ...
$ cd your-project/site
$ kobweb run
يدور هذا الأمر على خادم الويب على http: // localhost: 8080. إذا كنت ترغب في تكوين المنفذ ، فيمكنك القيام بذلك عن طريق تحرير ملف .kobweb/conf.yaml لمشروعك.
يمكنك فتح مشروعك في Intellij والبدء في تحريره. أثناء تشغيل KobWeb ، ستكتشف التغييرات ، وإعادة الترجمة ، ونشر التحديثات على موقعك تلقائيًا.
إذا كنت لا ترغب في الحفاظ على نافذة طرفية منفصلة مفتوحة بجانب نافذة IDE الخاصة بك ، فقد تفضل حلولًا بديلة.
يمكنك استخدام نافذة أداة Intellij Terminal لتشغيل kobweb داخلها. إذا واجهت خطأ في الترجمة ، فسيتم تزيين خطوط تتبع المكدس بالروابط ، مما يجعل من السهل التنقل إلى المصدر ذي الصلة.
kobweb نفسها المندوبين إلى Gradle ، ولكن لا شيء يمنعك من الاتصال بالأوامر بنفسك. يمكنك إنشاء تكوينات تشغيل Gradle لكل من أوامر KobWeb.
نصيحة
عندما تقوم بتشغيل أمر kobweb cli الذي ينفي إلى Gradle ، فإنه سيقوم بتسجيل أمر Gradle إلى وحدة التحكم. هذه هي الطريقة التي يمكنك بها اكتشاف أوامر Gradle التي تمت مناقشتها في هذا القسم.
kobwebStart -t .-t (أو ، --continuous ) Gradle أن تراقب تغييرات الملفات ، مما يمنحك سلوك التحميل المباشر.kobwebStop .kobwebExport -PkobwebReuseServer=false -PkobwebEnv=DEV -PkobwebRunLayout=FULLSTACK -PkobwebBuildTarget=RELEASE -PkobwebExportLayout=FULLSTACK-PkobwebExportLayout=STATIC .kobwebStart -PkobwebEnv=PROD -PkobwebRunLayout=FULLSTACK-PkobwebRunLayout=STATIC .يمكنك قراءة كل شيء عن تكامل Gradle من Intellij هنا. أو مجرد القفز مباشرة إلى كيفية إنشاء تكوينات تشغيل لأي من الأوامر التي تمت مناقشتها أعلاه ، اقرأ هذه التعليمات.
ستوفر KobWeb مجموعة متزايدة من العينات لتتعلمها منها. لمعرفة ما هو متاح ، قم بتشغيل:
$ kobweb list

You can create the following Kobweb projects by typing ` kobweb create ... `

• app: A template for a minimal site that demonstrates the basic features of Kobweb
• examples/jb/counter: A very minimal site with just a counter (based on the Jetbrains tutorial)
• examples/todo: An example TODO app, showcasing client / server interactions
على سبيل المثال ، kobweb create examples/todo بتأسيس تطبيق TODO محليًا.
قوالب المشروع التي أنشأتها kobweb جميع كتالوجات إصدار Gradle.
إذا لم تكن على علم بذلك ، فهو ملف موجود في gradle/libs.versions.toml . إذا وجدت نفسك ترغب في تعديل أو إضافة إصدارات جديدة إلى المشاريع التي قمت بإنشائها في الأصل عبر kobweb create ، فهذا هو المكان الذي ستجده.
على سبيل المثال ، إليك libs.versions.toml نستخدمها لموقع الهبوط الخاص بنا.
لقراءة المزيد حول الميزة ، يرجى مراجعة المستندات الرسمية.
تم الإعلان عن أحدث إصدار متاح من KobWeb في الجزء العلوي من هذا ReadMe. إذا ظهر إصدار جديد ، يمكنك تحديث مشروعك الخاص عن طريق تحرير gradle/libs.version.toml وتحديث إصدار kobweb هناك.
مهم
يجب عليك التحقق kotlin jetbrains-compose .
حذر
يمكن أن يكون الأمر مربكًا ، لكن لدى KobWeb نسختين - الإصدار للمكتبة نفسها (تلك التي تنطبق في هذا الموقف) ، والآخر الخاص بأداة سطر الأوامر.
Kobweb ، في جوهرها ، هي حفنة من الفصول المسؤولة عن تقليص الكثير من الغلاية حول بناء تطبيق HTML ، مثل توجيه وتكوين أنماط CSS الأساسية. يوفر KobWeb أيضًا مكونًا إضافيًا للفرد يحلل قاعدة الشفرة الخاصة بك وينشئ رمز BoilerPlate ذي الصلة.
KobWeb هو أيضًا ثنائي CLI يحمل نفس الاسم الذي يوفر أوامر للتعامل مع الأجزاء الشاقة من البناء و/أو تشغيل تطبيق HTML. نريد إخراج هذه الأشياء من الطريق ، حتى تتمكن من الاستمتاع بالتركيز على العمل الأكثر إثارة للاهتمام!
(لمعرفة المزيد حول تكوين HTML ، يرجى زيارة البرامج التعليمية الرسمية).
إنشاء صفحة أمر سهل! إنها مجرد طريقة عادية @Composable . لترقية Composable إلى صفحة ، كل ما عليك فعله هو:
pages في دليل مصدر jsMain الخاص بك.@Pageفقط من ذلك ، سيقوم KobWeb بإنشاء إدخال موقع لك تلقائيًا.
على سبيل المثال ، إذا قمت بإنشاء الملف التالي:
 // jsMain/kotlin/com/mysite/pages/admin/Settings.kt

@Page
@Composable
fun SettingsPage () {
    /* ... */
}
سيؤدي ذلك إلى إنشاء صفحة يمكنني زيارتها بعد ذلك بالذهاب إلى mysite.com/admin/settings .
مهم
الجزء الأخير من عنوان URL ، هنا settings ، يسمى Slug .
بشكل افتراضي ، يأتي Slug من اسم الملف ، الذي يتم تحويله إلى kebab-case ، على سبيل المثال ، سوف يتحول AboutUs.kt إلى about-us . ومع ذلك ، يمكن التغلب على هذا كل ما تريد (المزيد عن ذلك قريبًا).
اسم الملف Index.kt خاص. إذا تم تعريف صفحة داخل هذا الملف ، فسيتم التعامل معها على أنها الصفحة الافتراضية ضمن عنوان URL هذا. على سبيل المثال ، سيتم زيارة صفحة محددة في .../pages/admin/Index.kt إذا قام المستخدم بزيارة mysite.com/admin/ .
إذا كنت بحاجة إلى تغيير المسار الذي تم إنشاؤه للصفحة ، فيمكنك تعيين حقل routeOverride الخاص بشروح Page :
 // jsMain/kotlin/com/mysite/pages/admin/Settings.kt

@Page(routeOverride = " config " )
@Composable
fun SettingsPage () {
    /* ... */
}
ستنشئ ما ورد أعلاه صفحة يمكنك زيارتها عن طريق الذهاب إلى mysite.com/admin/config .
يمكن أن يحتوي routeOverride بالإضافة إلى القطع المائلة ، وإذا بدأت القيمة و/أو تنتهي بقطع مائل ، فإن هذا له معنى خاص.
وإذا قمت بتعيين التجاوز على "الفهرس" ، فإن ذلك يتصرف مثل تعيين الملف على Index.kt كما هو موضح أعلاه.
يمكن أن توضح بعض الأمثلة هذه القواعد (وكيف تتصرف عند الجمع). على افتراض أننا نحدد صفحة لموقعنا example.com داخل الملف a/b/c/Slug.kt :
| التعليقات التوضيحية | عنوان URL الناتج |
|---|---|
@Page | example.com/a/b/c/slug |
@Page("other") | example.com/a/b/c/other |
@Page("index") | example.com/a/b/c/ |
@Page("d/e/f/") | example.com/a/b/c/d/e/f/slug |
@Page("d/e/f/other") | example.com/a/b/c/d/e/f/other |
@Page("d/e/f/index") | example.com/a/b/c/d/e/f/ |
@Page("/d/e/f/") | example.com/d/e/f/slug |
@Page("/d/e/f/other") | example.com/d/e/f/other |
@Page("/d/e/f/index") | example.com/d/e/f/ |
@Page("/") | example.com/slug |
@Page("/other") | example.com/other |
@Page("/index") | example.com/ |
حذر
على الرغم من المرونة المسموح بها هنا ، يجب ألا تستخدم هذه الميزة بشكل متكرر ، على الإطلاق. يستفيد مشروع KOBWEB من حقيقة أنه يمكن للمستخدم ربط عنوان URL بسهولة على موقعك بملف في قاعدة الشفرة الخاصة بك ، ولكن هذه الميزة تتيح لك كسر هذه الافتراضات. يتم توفيره بشكل أساسي لتمكين التوجيه الديناميكي (انظر القسم الديناميكي ▼) أو تمكين اسم عنوان URL الذي يستخدم أحرفًا غير مسموح بها في أسماء ملفات Kotlin.
بينما يتم اشتقاق Slug من اسم الملف ، يتم اشتقاق الأجزاء السابقة من المسار من حزمة الملف.
سيتم تحويل الحزمة إلى جزء مسار عن طريق إزالة أي قيادة أو زائدة من السطحية (حيث يتم استخدامها غالبًا للاتصال بالقيود في القيم والكلمات الرئيسية المسموح بها في اسم الحزمة /team/our-values/ على سبيل site.pages.team.ourValues . site.pages.blog._2022 و site.events.fun_ .
إذا كنت ترغب في تجاوز جزء المسار الذي تم إنشاؤه لحزمة ، فيمكنك استخدام تعليق التعليقات التوضيحية PackageMapping .
على سبيل المثال ، لنفترض أن فريقك يفضل عدم استخدام حزم Camelcase لأسباب جمالية. أو ربما تريد عن قصد إضافة السطح السفلي الرائد إلى جزء مسار موقعك لبعض التركيز (منذ أن ذكرنا سابقًا أن الإزالة السفلية الرائدة تلقائيًا) ، كما هو الحال في أطراف المسار /team/_internal/contact-numbers . يمكنك استخدام تعيينات الحزمة لهذا الغرض.
يمكنك تطبيق شرح تعيين الحزمة على الملف الحالي. استخدامه يبدو مثل هذا:
 // site/pages/team/values/PackageMapping.kt
@file:PackageMapping( " our-values " )

package site.pages.blog.values

import com.varabyte.kobweb.core.PackageMapping
مع وجود حزمة أعلاه في مكانها ، سيتم زيارة ملف يعيش في site/pages/team/values/Mission.kt في /team/our-values/mission .
توفر كل طريقة صفحة الوصول إلى PageContext الخاص بها عبر طريقة rememberPageContext() .
من الأهمية بمكان أن يوفر سياق الصفحة إمكانية الوصول إلى جهاز التوجيه ، مما يتيح لك الانتقال إلى صفحات أخرى.
كما يوفر معلومات ديناميكية حول عنوان URL للصفحة الحالية (تمت مناقشته في القسم التالي).
@Page
@Composable
fun ExamplePage () {
    val ctx = rememberPageContext()
    Button (onClick = { ctx.router.navigateTo( " /other/page " ) }) {
        Text ( " Click me " )
    }
}يمكنك استخدام سياق الصفحة للتحقق من قيم أي معلمات استعلام يتم تمريرها في عنوان URL للصفحة الحالية.
لذا ، إذا قمت بزيارة site.com/posts?id=12345&mode=edit ، فيمكنك الاستعلام عن هذه القيم مثل ذلك:
 enum class Mode {
    EDIT , VIEW ;

    companion object {
        fun from ( value : String ) {
           entries.find { it.name.equals(value, ignoreCase = true ) }
               ? : error( " Unknown mode: $value " )
        }
    }
}

@Page
@Composable
fun Posts () {
    val ctx = rememberPageContext()
    // Here, I'm assuming these params are always present, but you can use
    // `get` instead of `getValue` to handle the nullable case. Care should
    // also be taken to parse invalid values without throwing an exception.
    val postId = ctx.route.params.getValue( " id " ).toInt()
    val mode = Mode .from(ctx.route.params.getValue( " mode " ))
    /* ... */
} بالإضافة إلى معلمات الاستعلام ، يدعم Kobweb لتضمين الحجج مباشرة في عنوان URL نفسه. على سبيل المثال ، قد ترغب في تسجيل users/{user}/posts/{post} الذي سيتم زيارته إذا كتب زائر الموقع في عنوان URL مثل users/bitspittle/posts/20211231103156 .
كيف يمكننا إعداده؟ لحسن الحظ ، الأمر سهل إلى حد ما.
ولكن أولاً ، لاحظ أنه في المثال ، في مثال Dynamic Route users/{user}/posts/{post} يوجد بالفعل جزءان ديناميكيين مختلفين ، أحدهما في الوسط وواحد في نهاية الذيل. يمكن التعامل معها بواسطة التعليقات PackageMapping Page ، على التوالي.
انتبه لاستخدام الأقواس المجعد في اسم التعيين! هذا يتيح KobWeb معرفة أن هذه حزمة ديناميكية.
 // pages/users/user/PackageMapping.kt
@file:PackageMapping( " {user} " ) // or @file:PackageMapping("{}")

package site.pages.users.user

import com.varabyte.kobweb.core.PackageMapping
إذا قمت بتمرير "{}" فارغة في تعليق توضيحي PackageMapping ، فإنه يوجه KobWeb إلى استخدام اسم الحزمة نفسها (أي user في هذه الحالة المحددة).
مثل PackageMapping ، يمكن أن تأخذ شرح Page أيضًا أقواس مجعد للإشارة إلى قيمة ديناميكية.
 // pages/users/user/posts/Post.kt

@Page( " {post} " ) // Or @Page("{}")
@Composable
fun PostPage () {
   /* ... */
}
يخبر "{}" فارغ KobWeb باستخدام اسم الملف الحالي.
تذكر أن شرح Page يسمح لك بإعادة كتابة المسار بأكمله. تقبل هذه القيمة أيضًا الأجزاء الديناميكية ، حتى تتمكن من القيام بشيء مثل:
 // pages/users/user/posts/Post.kt

@Page( " /users/{user}/posts/{post} " ) // Or @Page("/users/{user}/posts/{}")
@Composable
fun PostPage () {
    /* ... */
}
ولكن مع القوة العظيمة تأتي مسؤولية كبيرة. قد يكون من الصعب العثور على الحيل مثل هذه و/أو التحديث لاحقًا ، خاصة وأن مشروعك أكبر. أثناء عمله ، يجب عليك فقط استخدام هذا التنسيق في الحالات التي تحتاج فيها تمامًا (ربما بعد إعادة تشفير الكود حيث يتعين عليك دعم مسارات URL القديمة).
يمكنك الاستعلام عن قيم المسار الديناميكي تمامًا كما لو كنت تطلب معلمات الاستعلام. وهذا هو ، استخدم ctx.params :
@Page( " {} " )
@Composable
fun PostPage () {
    val ctx = rememberPageContext()
    val postId = ctx.route.params.getValue( " post " )
    /* ... */
}
مهم
يجب عليك تجنب إنشاء مسارات URL حيث يكون للمسار الديناميكي ومعلمات الاستعلام نفس الاسم ، كما في mysite.com/posts/{post}?post=... ، لأن هذا قد يكون من الصعب حقًا تصحيحه في مشروع معقد. إذا كان هناك تعارض ، فإن معلمات المسار الديناميكي ستتخذ الأسبقية. (لا يزال بإمكانك الوصول إلى قيمة معلمة الاستعلام عبر ctx.route.queryParams في هذه الحالة إذا لزم الأمر.)
إذا كان لديك مورد ترغب في الخدمة من موقعك ، فأنت تتعامل مع هذا عن طريق وضعه في موقع jsMain/resources/public لموقعك.
على سبيل المثال ، إذا كان لديك شعار ترغب في أن تكون متاحًا على mysite.com/assets/images/logo.png ، فستضعه في مشروع KobWeb الخاص بك على jsMain/resources/public/assets/images/logo.png .
وبعبارة أخرى ، سيتم نسخ أي شيء تحت العام/ الدليل public/ الدليل تلقائيًا إلى موقعك النهائي (لا يشمل public/ الجزء).
بالنسبة لأولئك الجدد إلى Web Dev ، تجدر الإشارة إلى أن هناك طريقتان لتعيين الأنماط على عناصر HTML الخاصة بك: مضمّنة وتسميلية.
يتم تعريف الأنماط المضمنة على علامة العنصر نفسها. في HTML الخام ، قد يبدو هذا:
< div style =" background-color:black " >وفي الوقت نفسه ، يمكن لأي صفحة HTML معينة الرجوع إلى قائمة بأوراق الأنماط التي يمكن أن تحدد مجموعة من الأنماط ، حيث يرتبط كل نمط بمحدد (قاعدة تختار العناصر التي تنطبق عليها تلك الأنماط).
يمكن أن يساعد هنا مثال ملموس على ورقة الأنماط القصيرة جدًا هنا:
 body {
  background-color : black;
  color : magenta
}
# title {
  color : yellow
}
ويمكنك استخدام ورقة الأنماط هذه لتصميم المستند التالي:
 < body >
  <!-- Title gets background-color from "body" and foreground color from "#title" -->
  < div id =" title " > Yellow on black </ div >
  Magenta on black
</ body >
ملحوظة
عندما تكون الأساليب المتضاربة موجودة في ورقة الأنماط وكإعلان مضمّن ، فإن الأساليب المضمنة لها الأسبقية.
لا توجد قاعدة صعبة وسريعة ، ولكن بشكل عام ، عند كتابة HTML / CSS باليد ، غالبًا ما تفضل أوراق الأنماط على أنماط مضمنة لأنها تحافظ بشكل أفضل على فصل المخاوف. أي أن HTML يجب أن تمثل محتوى موقعك ، بينما يتحكم CSS في الشكل والمظهر.
لكن! نحن لا نكتب HTML / CSS باليد. نحن نستخدم تكوين HTML! هل يجب أن نهتم بهذا في كوتلين؟
كما اتضح ، هناك أوقات يتعين عليك فيها استخدام أوراق الأنماط ، لأنه بدونها ، لا يمكنك تحديد أنماط للسلوكيات المتقدمة (وخاصة الفئات الزائفة ، العناصر الزائفة ، والاستعلامات الإعلامية). على سبيل المثال ، لا يمكنك تجاوز لون الروابط التي تمت زيارتها دون استخدام نهج ورقة الأنماط. لذلك يجدر إدراك أن هناك اختلافات أساسية.
أخيرًا ، قد يكون من الأسهل أيضًا تصحيح صفحتك باستخدام أدوات المتصفح عندما تتكئ على أنماط الأنماط على أنماط مضمنة ، حيث إنها تجعل شجرة DOM أسهل في القراءة عندما تكون عناصرك بسيطة (على سبيل المثال <div class="title"> <div style="color:yellow; background-color:black; font-size: 24px; ...">
سنقدم ومناقشة المعدلات وكتل نمط CSS بمزيد من التفصيل قريبًا. ولكن بشكل عام ، عندما تقوم بتمرير المعدلات مباشرة إلى عنصر واجهة مستخدم قابلة للتكوين في الحرير ، فإن هذه ستؤدي إلى أنماط مضمنة ، بينما إذا كنت تستخدم كتلة نمط CSS لتحديد أنماطك ، فسيتم تضمينها في ورقة أنماط الموقع:
 // Uses inline styles
Box ( Modifier .color( Colors . Red )) { /* ... */ }

// Uses a stylesheet
val BoxStyle = CssStyle {
    base { Modifier . Color ( Colors . Red ) }
}
Box ( BoxStyle .toModifier()) { /* ... */ }
بصفتك مبتدئًا ، أو حتى كمستخدم متقدم عند النماذج الأولية ، لا تتردد في استخدام المعدلات المضمنة قدر الإمكان ، والتحويل إلى كتل نمط CSS إذا وجدت نفسك بحاجة إلى استخدام الفئات الزائفة أو عناصر زائفة أو استعلامات الوسائط. من السهل إلى حد ما الترحيل أنماطًا مضمّنة إلى أوراق الأنماط في KobWeb.
في مشاريعي الخاصة ، أميل إلى استخدام أنماط مضمّنة لعناصر تخطيط بسيطة حقًا (مثل Row(Modifier.fillMaxWidth()) ) وكتل نمط CSS للعناصر المعقدة و/أو القابلة لإعادة الاستخدام. في الواقع يصبح اتفاقية تنظيمية لطيفة لجميع أنماطك تجميعها معًا في مكان واحد فوق عنصر واجهة المستخدم نفسها.
يقدم KobWeb فئة Modifier ، من أجل توفير تجربة مماثلة لما تجده في Jetpack. (يمكنك قراءة المزيد عنها هنا إذا لم تكن على دراية بالمفهوم).
في عالم Compose HTML ، يمكنك التفكير في Modifier كركبة فوق أنماط وسمات CSS.
مهم
يرجى الرجوع إلى الوثائق الرسمية إذا لم تكن على دراية بسمات HTML و/أو الأنماط.
لذلك هذا:
Modifier .backgroundColor( Colors . Red ).color( Colors . Green ).padding( 200 .px) عندما تنتقل إلى عنصر واجهة مستخدم مقدمة من KobWeb ، مثل Box :
 Box ( Modifier .backgroundColor( Colors . Red ).color( Colors . Green ).padding( 200 .px)) {
    /* ... */
}
من شأنه أن يولد علامة HTML مع خاصية نمط مثل: <div style="background:red;color:green;padding:200px">
هناك مجموعة من ملحقات المعدل (وهي تنمو) التي توفرها KobWeb ، مثل background color padding أعلاه. ولكن هناك أيضًا اثنين من الفوقين للهروب في أي وقت تصادفه إلى مُعدِّل مفقود: attrsModifier و styleModifier .
في هذه المرحلة ، أنت تتفاعل مع Compose HTML ، طبقة واحدة تحت KobWeb.
يبدو أن استخدامها هكذا:
 // Modify attributes of an element tag
// e.g. the "a", "b", and "c" in <tag a="..." b="..." c="..." />
Modifier .attrsModifier {
    id( " example " )
}

// Modify styles of an element tag
// e.g. the "x", "y", and "z" in `<tag a="..." b="..." c="..." style="x:...;y:...;z:..." />
Modifier .styleModifier {
    width( 100 .percent)
    height( 50 .percent)
}

// Note: Because "style" itself is an attribute, you can define styles in an attrsModifier:
Modifier .attrsModifier {
    id( " example " )
    style {
        width( 100 .percent)
        height( 50 .percent)
    }
}
// ... but in the above case, you should use a styleModifier for simplicity
في الحالة العرضية (ونأمل نادرًا!) حيث لا يوفر KobWEB معدلًا ولا يوفر تكوين HTML السمة أو الدعم الذي تحتاجه ، يمكنك استخدام attrsModifier بالإضافة إلى طريقة attr أو styleModifier بالإضافة إلى طريقة property . يتيح لك فتحة الهروب داخل فتحة الهروب تقديم أي قيمة مخصصة تحتاجها.
يمكن إعادة كتابة الحالات المذكورة أعلاه على النحو التالي:
 Modifier .attrsModifier {
    attr( " id " , " example " )
}

Modifier .styleModifier {
    property( " width " , 100 .percent)
    // Or even raw CSS:
    // property("width", "100%")
    property( " height " , 50 .percent)
}
أخيرًا ، لاحظ أن الأنماط ، من خلال تصميم CSS ، تنطبق على أي عنصر ، في حين أن السمات غالباً ما ترتبط بسمات محددة. على سبيل المثال ، يمكن تطبيق سمة id على أي عنصر ، ولكن لا يمكن تطبيق href إلا على علامة a نظرًا لأن المعدلات ليس لديها سياق للعنصر الذي يتم نقله فيه ، فإن KobWeb يهدف فقط إلى توفير معدلات السمات للسمات العالمية (على سبيل المثال Modifier.id("example") ) ولا توجد معدلات أخرى.
لذا ، فإن استخدام attrsModifier (أو المعدل المتخثر Modifier.attr ) في الكود الخاص بك وكذلك Modifier.toAttrs (الذي يحول Modifier إلى كتلة attrs التي يمكن تمريرها إلى مصغرة HTML) لتعيين قيم السمة غالبًا ما يكون مقبولًا.
ومع ذلك ، إذا انتهى بك الأمر إلى استخدام styleModifier { property(key, value) } في قاعدة الشفرة الخاصة بك ، فكر في تقديم مشكلة معنا حتى نتمكن من إضافة المعدل المفقود إلى المكتبة. على الأقل ، يتم تشجيعك على تحديد طريقة التمديد الخاصة بك لإنشاء معدّل نمط آمن من النوع.
الحرير عبارة عن طبقة واجهة المستخدم متضمنة مع kobweb وبنيت على تأليف HTML.
على الرغم من أن تكوين HTML يتطلب منك فهم مفاهيم HTML / CSS الأساسية ، فإن الحرير يحاول تجريد بعض ذلك بعيدًا ، مما يوفر واجهة برمجة تطبيقات أقرب إلى ما قد تواجهه في تطوير تطبيق على Android أو سطح المكتب. أقل "div ، span ، flexbox ، attrs ، الأنماط ، الفصول" والمزيد "الصفوف والأعمدة والمربعات والمعدلات".
نحن نعتبر حريرًا جزءًا مهمًا جدًا من تجربة Kobweb ، ولكن من المفيد الإشارة إلى أنه مصمم كمكون اختياري. يمكنك بالتأكيد استخدام kobweb بدون حرير. (يمكنك أيضًا استخدام الحرير بدون kobweb!).
يمكنك أيضًا تشابك الحرير وتكوين مكونات HTML بسهولة (لأن الحرير هو مجرد تأليفها بنفسها).
@InitSilk أساليب قبل المضي قدمًا ، نريد أن نذكر بسرعة أنه يمكنك التعليق على طريقة مع @InitSilk ، والتي سيتم استدعاؤها عند بدء تشغيل موقعك.
يجب أن تأخذ هذه الطريقة معلمة InitSilkContext واحدة. يحتوي السياق على خصائص مختلفة تسمح بضبط الإعدادات الافتراضية للحرير ، والتي سيتم عرضها بمزيد من التفاصيل في الأقسام أدناه.
@InitSilk
fun initSilk ( ctx : InitSilkContext ) {
  // `ctx` has a handful of properties which allow you to adjust Silk's default behavior.
}
نصيحة
لا تهم أسماء أساليب @InitSilk الخاصة بك ، طالما أنها عامة ، تأخذ معلمة InitSilkContext واحدة ، ولا تصطدم بطريقة أخرى تحمل نفس الاسم. نشجعك على اختيار اسم لأغراض قابلية القراءة.
يمكنك تحديد العديد من أساليب @InitSilk كما تريد ، لذلك لا تتردد في تقسيمها إلى قطع ذات صلة ومسامة بوضوح ، بدلاً من إعلان طريقة واحدة متجانسة ، تم تسميتها بشكل عام ، والتي تقوم بـ fun initSilk(ctx) التي تفعل كل شيء.
مع الحرير ، يمكنك تحديد نمط مثل ذلك ، باستخدام وظيفة CssStyle و base Block:
 val CustomStyle = CssStyle {
    base {
        Modifier .background( Colors . Red )
    }
}
وتحويله إلى تعديل باستخدام CustomStyle.toModifier() . في هذه المرحلة ، يمكنك تمريره إلى أي مؤلف يأخذ معلمة Modifier :
 // Approach #1 (uses inline styles)
Box ( Modifier .backgroundColor( Colors . Red )) { /* ... */ }

// Approach #2 (uses stylesheets)
Box ( CustomStyle .toModifier()) { /* ... */ }
مهم
عندما تعلن عن CssStyle ، يجب أن تكون عامة. وذلك لأن الكود يتم إنشاؤه داخل ملف main.kt بواسطة البرنامج المساعد Kobweb Gradle ، ويجب أن يكون هذا الرمز قادرًا على الوصول إلى أسلوبك من أجل تسجيله.
بشكل عام ، من الجيد التفكير في الأنماط على أنها عالمية على أي حال ، لأنهم من الناحية الفنية يعيشون جميعًا في ورقة الأنماط المطبقة عالميًا ، وعليك التأكد من أن اسم النمط فريد عبر تطبيقك بالكامل.
يمكنك من الناحية الفنية جعل نمط خاص إذا قمت بإضافة القليل من اللوحات الغلاية للتعامل مع التسجيل بنفسك:
@Suppress( " PRIVATE_COMPONENT_STYLE " )
private val ExampleCustomStyle = CssStyle { /* ... */ }
// Or use a leading underscore to automatically suppress the warning
private val _ExampleOtherCustomStyle = CssStyle { /* ... */ }

@InitSilk
fun registerPrivateStyle ( ctx : InitSilkContext ) {
  // Kobweb will not be able to detect the property name, so a name must be provided manually
  ctx.theme.registerStyle( " example-custom " , ExampleCustomStyle )
  ctx.theme.registerStyle( " example-other-custom " , _ExampleOtherCustomStyle )
}
ومع ذلك ، يتم تشجيعك على الحفاظ على أنماطك العامة والسماح لمكوّن الإضافات Kobweb Gradle يتعامل مع كل شيء لك.
CssStyle.base يمكنك تبسيط بناء جملة كتل النمط الأساسي قليلاً مع إعلان CssStyle.base :
 val CustomStyle = CssStyle .base {
    Modifier .background( Colors . Red )
}
فقط كن على دراية بأنك قد تضطر إلى كسر هذا مرة أخرى إذا وجدت نفسك بحاجة إلى دعم محددات إضافية ▼.
يكتشف المكون الإضافي Kobweb Gradle خصائص CssStyle ويقوم بإنشاء اسم لك ، مشتقًا من اسم الخاصية نفسه ولكن باستخدام حالة Kebab.
على سبيل المثال ، إذا قمت بكتابة val TitleTextStyle = CssStyle { ... } ، فسيكون اسمه "TITLE-TEXT".
عادةً ما لا تحتاج إلى الاهتمام بهذا الاسم ، ولكن هناك حالات متخصصة حيث يمكن أن يكون من المفيد أن نفهم أن هذا ما يحدث.
إذا كنت بحاجة إلى تعيين اسم يدويًا ، فيمكنك استخدام شرح CssName لتجاوز الاسم الافتراضي:
@CssName( " my-custom-name " )
val CustomStyle = CssStyle {
    base {
        Modifier .background( Colors . Red )
    }
} إذن ، ما الأمر مع الكتلة base ؟
صحيح ، يبدو مطوّلة بعض الشيء من تلقاء نفسها. ومع ذلك ، يمكنك تحديد كتل محدد إضافية تصدر حيز التنفيذ بشكل مشروط. سيتم تطبيق النمط الأساسي دائمًا أولاً ، ولكن سيتم تطبيق أي أنماط إضافية بناءً على قواعد المحدد المحددة.
حذر
أمر مهم عند تحديد محددات إضافية ، خاصة إذا كان أكثر من واحد منهم يعدل خاصية CSS نفسها في نفس الوقت.
هنا ، نقوم بإنشاء نمط أحمر بشكل افتراضي ولكنه أخضر عندما يحوم الماوس فوقه:
 val CustomStyle = CssStyle {
    base {
        Modifier .color( Colors . Red )
    }

    hover {
        Modifier .color( Colors . Green )
    }
}
يوفر KobWeb مجموعة من المحددات القياسية لك للراحة ، ولكن بالنسبة لأولئك الذين يتمتعون بذكاء CSS ، يمكنك دائمًا تحديد قاعدة CSS مباشرة لتمكين مجموعات أو محددات أكثر تعقيدًا لم يضيفها KobWeb بعد.
على سبيل المثال ، هذا مطابق لتعريف النمط أعلاه:
 val CustomStyle = CssStyle {
    base {
        Modifier .color( Colors . Red )
    }

    cssRule( " :hover " ) {
        Modifier .color( Colors . Green )
    }
}هناك ميزة في عالم تصميم HTML / CSS المستجيب يسمى Breakpoints ، والتي لا علاقة لها بشكل مربك مع نقاط التوقف عن تصحيح الأخطاء. بدلاً من ذلك ، يحددون حدود الحجم لموقعك عندما تتغير الأنماط. هذه هي الطريقة التي تقدم بها المواقع المحتوى بشكل مختلف على الأجهزة المحمولة مقابل الكمبيوتر اللوحي مقابل سطح المكتب.
يوفر KobWeb أربعة أحجام في نقاط الإيقاف التي يمكنك استخدامها لمشروعك ، والتي ، بما في ذلك استخدام أي حجم نقطة على الإطلاق ، يمنحك خمسة دلاء يمكنك العمل معها عند تصميم موقعك:
يمكنك تغيير القيم الافتراضية لنقاط التوقف لموقعك عن طريق إضافة طريقة @InitSilk إلى الكود الخاص بك وإعداد ctx.theme.breakpoints :
@InitSilk
fun initializeBreakpoints ( ctx : InitSilkContext ) {
    ctx.theme.breakpoints = BreakpointSizes (
        sm = 30 .cssRem,
        md = 48 .cssRem,
        lg = 62 .cssRem,
        xl = 80 .cssRem,
    )
}
للإشارة إلى نقطة توقف في CssStyle ، فقط استدعاء:
 val CustomStyle = CssStyle {
    base {
        Modifier .fontSize( 24 .px)
    }

    Breakpoint . MD {
        Modifier .fontSize( 32 .px)
    }
}
نصيحة
عند اختبار أنماط الإيقاف الشرطية ، يجب أن تدرك أن أدوات Dev Browser تتيح لك محاكاة أبعاد النوافذ لمعرفة كيف ينظر موقعك إلى أحجام مختلفة. على سبيل المثال ، على Chrome ، يمكنك متابعة هذه التعليمات: https://developer.chrome.com/docs/devtools/device-mode
يمكنك أيضًا تحديد أن النمط يجب أن ينطبق فقط على مجموعة محددة من نقاط التوقف باستخدام مشغلي نطاق Kotlin:
 val CustomStyle = CssStyle {
    // The following three declarations are the same, and ensure their style is only active in mobile / tablet modes

    // Option 1: exclusive upper bound
    ( Breakpoint . ZERO .. < Breakpoint . MD ) { Modifier .fontSize( 24 .px) }

    // Option 2: using `until` for `..<`
    ( Breakpoint . ZERO until Breakpoint . MD ) { Modifier .fontSize( 24 .px)  }

    // Option 3: inclusive upper bound
    ( Breakpoint . ZERO .. Breakpoint . SM ) { Modifier .fontSize( 24 .px) }

    Breakpoint . MD { Modifier .fontSize( 32 .px) }
}
إذا لم تكن من المعجبين بالحاجة إلى لف التعبير مع الأقواس ، فسيتم توفيرها between الطريقة أيضًا ، والتي تتطابق مع ..< عامل المدى:
 val CustomStyle = CssStyle {
    // Style active in mobile / tablet modes
    between( Breakpoint . ZERO , Breakpoint . MD ) { /* ... */ }
}
أخيرًا ، إذا كانت نقطة الإيقاف الأولى في نطاقك هي Breakpoint.ZERO ، يمكنك تقصير تعبيرك باستخدام الطريقة until الأسلوب بدلاً من ذلك:
 val CustomStyle = CssStyle {
    // Style active in mobile / tablet modes
    until( Breakpoint . MD ) { /* ... */ }
}
في الواقع ، يمكنك التفكير until العكس لإعلان نقطة توقف طبيعية. بمعنى آخر ، until(Breakpoint.MD) { ... } جميع أحجام نقطة الإيقاف حتى الحجم المتوسط ، في حين أن Breakpoint.MD { ... } تعني متوسط الحجم وما فوق.
عندما تحدد CssStyle ، يتوفر حقل يسمى colorMode لك لاستخدامه:
 val CustomStyle = CssStyle .base {
    Modifier .color( if (colorMode.isLight) Colors . Red else Colors . Pink )
}
يحدد Silk مجموعة من الألوان الخفيفة والظلام لجميع عناصر واجهة المستخدم ، وإذا كنت ترغب في إعادة استخدام أي منها في عنصر واجهة المستخدم الخاصة بك ، يمكنك الاستعلام عنها باستخدام colorMode.toPalette() :
 val CustomStyle = CssStyle .base {
    Modifier .color(colorMode.toPalette().link.default)
}
يحتوي SilkTheme على افتراضيات بسيطة للغاية (على سبيل المثال بالأبيض والأسود) ، ولكن يمكنك تجاوزها بطريقة @InitSilk ، ربما إلى شيء أكثر وعيا:
 // Assume a bunch of color constants (e.g. BRAND_LIGHT_COLOR) are defined somewhere

@InitSilk
fun overrideSilkTheme ( ctx : InitSilkContext ) {
  ctx.theme.palettes.light.background = BRAND_LIGHT_BACKGROUND
  ctx.theme.palettes.light.color = BRAND_LIGHT_COLOR
  ctx.theme.palettes.dark.background = BRAND_DARK_BACKGROUND
  ctx.theme.palettes.dark.color = BRAND_DARK_COLOR
} بشكل افتراضي ، سيقوم KobWeb بتهيئة وضع لون موقعك إلى ColorMode.LIGHT .
ومع ذلك ، يمكنك التحكم في هذا عن طريق تعيين خاصية initialColorMode في طريقة @InitSilk :
@InitSilk
fun setInitialColorMode ( ctx : InitSilkContext ) {
    ctx.theme.initialColorMode = ColorMode . DARK
}
إذا كنت ترغب في احترام تفضيلات نظام المستخدم ، فيمكنك تعيين initialColorMode إلى ColorMode.systemPreference :
@InitSilk
fun setInitialColorMode ( ctx : InitSilkContext ) {
    ctx.theme.initialColorMode = ColorMode .systemPreference
}إذا كنت تدعم تبديل وضع لون الموقع ، فيتم تشجيعك على حفظ آخر إعداد تم اختياره للمستخدم في التخزين المحلي ثم استعادته إذا قام المستخدم بإعادة النظر في موقعك لاحقًا.
ستحدث عملية الاستعادة في كتلة @InitSilk الخاصة بك ، في حين يجب أن يحدث الكود لحفظ وضع اللون في @App Composable:
@InitSilk
fun setInitialColorMode ( ctx : InitSilkContext ) {
    ctx.theme.initialColorMode =
      ColorMode .loadFromLocalStorage() ? : ColorMode .systemPreference
}

@App
@Composable
fun AppEntry ( content : @Composable () -> Unit ) {
  SilkApp {
    val colorMode = ColorMode .current
    LaunchedEffect (colorMode) {
        colorMode.saveToLocalStorage()
    }

    /* ... */
  }
}قد تجد نفسك في بعض الأحيان ترغب في تحديد نمط يجب تطبيقه فقط مع / بعد نمط آخر.
أسهل طريقة لإنجاز هذا هو من خلال تمديد كتلة نمط CSS الأساسية ، باستخدام طريقة extendedBy :
 val GeneralTextStyle = CssStyle {
    base { Modifier .fontSize( 16 .px).fontFamily( " ... " ) }
}
val EmphasizedTextStyle = GeneralTextStyle .extendedBy {
    base { Modifier .fontWeight( FontWeight . Bold ) }
}

// Or, using the `base` methods:
// val GeneralTextStyle = CssStyle.base {
//   Modifier.fontSize(16.px).fontFamily("...")
// }
// val EmphasizedTextStyle = GeneralTextStyle.extendedByBase {
//   Modifier.fontWeight(FontWeight.Bold)
// }
بمجرد تمديدها ، تحتاج فقط إلى الاتصال toModifier على النمط الموسع لتضمين كلا النمطين تلقائيًا:
 SpanText ( " WARNING " , EmphasizedTextStyle .toModifier())
// You do NOT need to reference the base style, i.e.
// GeneralTextStyle.toModifier().then(EmphasizedTextStyle.toModifier()) حتى الآن ، ناقشنا كتل نمط CSS على أنها تحديد مجموعة متنوعة من خصائص نمط CSS. ومع ذلك ، هناك طريقة لتحديد كتل نمط CSS المكتوبة ، والتي تتيح لك إنشاء المتغيرات المكتوبة المرتبطة ، وتوافق فقط مع نمط قاعدة محدد.
يسمى النمط الأساسي في هذه الحالة نمط المكون لأن النمط فعال عند تحديد مكونات القطعة. في الواقع ، هذا هو النمط القياسي الذي يستخدمه الحرير لكل واحد من عناصر واجهة المستخدم.
سنناقش هذا النمط الكامل حول بناء الحاجيات باستخدام أنماط المكون لاحقًا ، ولكن للبدء ، سنظهر كيفية إعلان واحدة. يمكنك إنشاء واجهة علامة تنفذ ComponentKind ثم تمرير ذلك إلى كتلة إعلان CssStyle .
على سبيل المثال ، إذا كنت تقوم بإنشاء عنصر Button الخاصة بك:
 sealed interface ButtonKind : ComponentKind
val ButtonStyle = CssStyle < ButtonKind > { /* ... */ }
لاحظ نقطتين حول إعلان الواجهة لدينا:
sealed . هذا ليس ضروريًا من الناحية الفنية ، لكننا نوصي به كوسيلة للتعبير عن نيتك لعدم وجود أي شخص آخر في الطبقة الفرعية. مثل إعلانات CssStyle العادية ، يتم اشتقاق الاسم المرتبط من اسم خاصته. يمكنك استخدام تعليق توضيحي @CssName لتجاوز هذا السلوك.
قوة أنماط المكونات هي أنها يمكن أن تنشئ متغيرات مكون ، باستخدام طريقة addVariant :
val OutlinedButtonVariant : CssStyleVariant < ButtonKind > = ButtonStyle .addVariant { /* ... */ }ملحوظة
تتمثل اتفاقية التسمية الموصى بها للمتغيرات في أخذ نمطها المرتبط بها واستخدام اسمها كلاحقة بالإضافة إلى كلمة "variant" ، على سبيل المثال "ButtonStyle" -> "OrdInedButtonVariant" و "TextStyle" -> "التأكيد على textvariant".
مهم
مثل CssStyle ، يجب أن يكون CssStyleVariant الخاص بك عاما. هذا هو السبب نفسه: نظرًا لأن الكود يتم إنشاؤه داخل ملف main.kt بواسطة البرنامج المساعد Kobweb Gradle ، ويجب أن يكون هذا الرمز قادرًا على الوصول إلى المتغير الخاص بك من أجل تسجيله.
يمكنك من الناحية الفنية جعل اختلافًا خاصًا إذا قمت بإضافة القليل من Boilerplate للتعامل مع التسجيل بنفسك:
@Suppress( " PRIVATE_COMPONENT_VARIANT " )
private val ExampleCustomVariant = ButtonStyle .addVariant {
  /* ... */
}
// Or, `private val _ExampleCustomVariant`

@InitSilk
fun registerPrivateVariant ( ctx : InitSilkContext ) {
  // When registering variants, using a leading dash will automatically prepend the bast style name.
  // This example here will generate the final name "button-example".
  ctx.theme.registerVariant( " -example " , ExampleCustomVariant )
}
ومع ذلك ، يتم تشجيعك على الحفاظ على المتغيرات العامة الخاصة بك والسماح لمكوّن الإضافات Kobweb Gradel بالتعامل مع كل شيء لك.
تتمثل الفكرة وراء المتغيرات المكونة في أنها تمنح قوة مؤلف القطعة لتحديد نمط الأساس إلى جانب واحد أو أكثر من التعديلات الشائعة التي قد يرغب المستخدمون في تطبيقها فوقه. (وحتى إذا لم يوفر مؤلف عنصر واجهة المستخدم أي متغيرات لهذا النمط ، يمكن لأي مستخدم دائمًا تحديد خاص به في قاعدة الشفرة الخاصة به.)
دعنا نعيد النظر في مثال نمط الزر ، وجمع كل شيء معًا.
 sealed interface ButtonKind : ComponentKind

val ButtonStyle = CssStyle < ButtonKind > { /* ... */ }

// Note: Creates a CSS style called "button-outlined"
val OutlinedButtonVariant = ButtonStyle .addVariant { /* ... */ }

// Note: Creates a CSS style called "button-inverted"
val InvertedButtonVariant = ButtonStyle .addVariant { /* ... */ }
عند استخدامه باستخدام نمط المكون ، تأخذ طريقة toModifier() اختياريًا معلمة متغيرة. عندما يتم تمرير البديل ، سيتم تطبيق كلا النمطين - النمط الأساسي متبوعًا بالنمط البديل.
على سبيل المثال ، يطبق ButtonStyle.toModifier(OutlinedButtonVariant) نمط الزر الرئيسي لأول مرة في الأعلى مع بعض التصميم الإضافي.
يمكنك التعليق على المتغيرات النمطية مع شرح @CssName ، تمامًا كما يمكنك مع CssStyle . سيؤدي استخدام اندفاعة رائدة تلقائيًا إلى إعداد اسم النمط الأساسي. على سبيل المثال:
@CssName( " custom-name " )
val OutlinedButtonVariant = ButtonStyle .addVariant { /* ... */ } // Creates a CSS style called "custom-name"

@CssName( " -custom-name " )
val InvertedButtonVariant = ButtonStyle .addVariant { /* ... */ } // Creates a CSS style called "button-custom-name"
addVariantBase Like CssStyle.base , variants that don't need to support additional selectors can use addVariantBase instead to slightly simplify their declaration:
 val HighlightedCustomVariant by CustomStyle .addVariantBase {
    Modifier .backgroundColor( Colors . Green )
}

// Short for
// val HighlightedCustomVariant by CustomStyle.addVariant {
//   base { Modifier.backgroundColor(Colors.Green) }
// } Silk uses component styles when defining its widgets, and you can too! The full pattern looks like this:
 sealed interface CustomWidgetKind : ComponentKind

val CustomWidgetStyle = CssStyle < CustomWidgetKind > { /* ... */ }

@Composable
fun CustomWidget (
    modifier : Modifier = Modifier ,
    variant : CssStyleVariant < CustomWidgetKind > ? = null,
    @Composable content : () -> Unit
) {
    val finalModifier = CustomWidgetStyle .toModifier(variant).then(modifier)
    /* ... */
}
بعبارة أخرى:
modifier as its first optional parameter.CssStyleVariant parameter (typed to your unique ComponentKind implementation)@Composable context lambda parameter (unless this widget doesn't support custom content)A caller might call your widget one of several ways:
 // Approach #1: Use default styling
CustomWidget { /* ... */ }

// Approach #2: Tweak default styling with a variant
CustomWidget (variant = TransparentWidgetVariant ) { /* ... */ }

// Approach #3: Tweak default styling with inline overrides
CustomWidget ( Modifier .backgroundColor( Colors . Blue )) { /* ... */ }

// Approach #4: Tweak default styling with both a variant and inline overrides
CustomWidget ( Modifier .backgroundColor( Colors . Blue ), variant = TransparentWidgetVariant ) { /* ... */ }In CSS, animations work by letting you define keyframes in a stylesheet which you then reference, by name, in an animation style. You can read more about them on Mozilla's documentation site.
For example, here's the CSS for an animation of a sliding rectangle (from this tutorial):
 div {
  width : 100 px ;
  height : 100 px ;
  background : red;
  position : relative;
  animation : shift-right 5 s infinite;
}

@keyframes shift-right {
  from { left : 0 px ;}
  to { left : 200 px ;}
}
Kobweb lets you define your keyframes in code by using a Keyframes block:
 val ShiftRightKeyframes = Keyframes {
    from { Modifier .left( 0 .px) }
    to { Modifier .left( 200 .px) }
}

// Later
Div (
    Modifier
        .size( 100 .px).backgroundColor( Colors . Red ).position( Position . Relative )
        .animation( ShiftRightKeyframes .toAnimation(
            duration = 5 .s,
            iterationCount = AnimationIterationCount . Infinite
        ))
        .toAttrs()
)
The name of the keyframes block is automatically derived from the property name (here, ShiftRightKeyframes is converted into "shift-right" ). You can then use the toAnimation method to convert your collection of keyframes into an animation that uses them, which you can pass into the Modifier.animation modifier.
مهم
When you declare a Keyframes animation, it must be public. This is because code gets generated inside a main.kt file by the Kobweb Gradle plugin, and that code needs to be able to access your variant in order to register it.
In general, it's a good idea to think of animations as global anyway, since technically they all live in a globally applied stylesheet, and you have to make sure that the animation name is unique across your whole application.
You can technically make an animation private if you add a bit of boilerplate to handle the registration yourself:
@Suppress( " PRIVATE_KEYFRAMES " )
private val ExampleKeyframes = Keyframes { /* ... */ }
// Or, `private val _ExampleKeyframes`

@InitSilk
fun registerPrivateAnim ( ctx : InitSilkContext ) {
    ctx.stylesheet.registerKeyframes( " example " , ExampleKeyframes )
}
However, you are encouraged to keep your keyframes public and let the Kobweb Gradle plugin handle everything for you.
Occasionally, you may need access to the raw element backing the Silk widget you've just created. All Silk widgets provide an optional ref parameter which takes a listener that provides this information.
 Box (
    ref = /* ... */
) {
    /* ... */
}
All ref callbacks (discussed more below) will receive an org.w3c.dom.Element subclass. You can check out the Element class (and its often more relevant HTMLElement inheritor) to see the methods and properties that are available on it.
Raw HTML elements expose a lot of functionality not available through the higher-level Compose HTML APIs.
refFor a trivial but common example, we can use the raw element to capture focus:
 Box (
    ref = ref { element ->
        // Triggered when this Box is first added into the DOM
        element.focus()
    }
)
The ref { ... } method can actually take one or more optional keys of any value. If any of these keys change on a subsequent recomposition, the callback will be rerun:
 val colorMode by ColorMode .currentState
Box (
    // Callback will get triggered each time the color mode changes
    ref = ref(colorMode) { element -> /* ... */ }
)
disposableRef If you need to know both when the element enters AND exits the DOM, you can use disposableRef instead. With disposableRef , the very last line in your block must be a call to onDispose :
 val activeElements : MutableSet < HTMLElement > = /* ... */

/* ... later ... */

Box (
    ref = disposableRef { element ->
        activeElements.put(element)
        onDispose { activeElements.remove(element) }
    }
)
The disposableRef method can also take keys that rerun the listener if any of them change. The onDispose callback will also be triggered in that case, as the old effect gets discarded.
refScope And, finally, you may want to have multiple listeners that are recreated independently of one another based on different keys. You can use refScope as a way to combine two or more ref and/or disposableRef calls in any combination:
 val isFeature1Enabled : Boolean = /* ... */
val isFeature2Enabled : Boolean = /* ... */

Box (
    ref = refScope {
        ref(isFeature1Enabled) { element -> /* ... */ }
        disposableRef(isFeature2Enabled) { element -> /* ... */ ; onDispose { /* ... */ } }
    }
) You may occasionally want the backing element of a normal Compose HTML widget, such as a Div or Span . However, these widgets don't have a ref callback, as that's a convenience feature provided by Silk.
You still have a few options in this case.
The official way to retrieve a reference is by using a ref block inside an attrs block. This version of ref is actually more similar to Silk's disposableRef concept than its ref one, as it requires an onDispose block:
 Div (attrs = {
    ref { element -> /* ... */ ; onDispose { /* ... */ } }
})
The above snippet was adapted from the official tutorials.
You could put that exact same logic inside the Modifier.toAttrs block if you're terminating some modifier chain:
 Div (attrs = Modifier .toAttrs {
  ref { element -> /* ... */ ; onDispose { /* ... */ } }
})
Unlike Silk's version of ref , Compose HTML's version does not accept keys. If you need this behavior and if the Compose HTML widget accepts a content block (many of them do), you can call Silk's registerRefScope method directly within it:
 Div {
  registerRefScope(
    disposableRef { element -> /* ... */ ; onDispose { /* ... */ } }
    // or ref { element -> /* ... */ }
  )
} Kobweb supports CSS variables (also called CSS custom properties), which is a feature where you can store and retrieve property values from variables declared within your CSS styles. It does this through a class called StyleVariable .
ملحوظة
You can find official documentation for CSS custom properties here.
Using style variables is fairly simple. You first declare one without a value (but lock it down to a type) and later you can initialize it within a style using Modifier.setVariable(...) :
 val dialogWidth by StyleVariable < CSSLengthNumericValue >()

// This style will be applied to a div that lives at the root, so that
// this variable value will be made available to all children.
val RootStyle = CssStyle .base {
  Modifier .setVariable(dialogWidth, 600 .px)
}
نصيحة
Compose HTML provides a CSSLengthValue , which represents concrete values like 10.px or 5.cssRem . However, Kobweb provides a CSSLengthNumericValue type which represents the concept more generally, eg as the result of intermediate calculations. There are CSS*NumericValue types provided for all relevant units, and it is recommended to use them when declaring style variables as they more naturally support being used in calculations.
We discuss CSSNumericValue types▼ in more detail later in this document.
You can later query variables using the value() method to extract their current value:
 val DialogStyle = CssStyle .base {
  Modifier .width(dialogWidth.value())
}
You can also provide a fallback value, which, if present, would be used in the case that a variable hadn't already been set previously:
 val DialogStyle = CssStyle .base {
  // Will be the value of the dialogWidth variable if it was set, otherwise 500px
  Modifier .width(dialogWidth.value( 500 .px))
}
Additionally, you can also provide a default fallback value when declaring the variable:
 // Note the default fallback: 100px
val dialogWidth by StyleVariable < CSSLengthNumericValue >( 100 .px)

val DialogStyle100 = CssStyle .base {
  // Uses default fallback. width = 100px
  Modifier .width(dialogWidth.value())
}
val DialogStyle200 = CssStyle .base {
  // Uses specific fallback. width = 200px
  Modifier .width(dialogWidth.value( 200 .px))
}
val DialogStyle300 = CssStyle .base {
  // Fallback (400px) ignored because variable is set explicitly. width = 300px
  Modifier .setVariable(dialogWidth, 300 .px).width(dialogWidth.value( 400 .px))
}
حذر
In the above example in the DialogStyle300 style, we set a variable and query it in the same line, which we did purely for demonstration purposes. In practice, you would probably never do this -- the variable would have been set separately elsewhere, eg in an inline style or on a parent container.
To demonstrate these concepts all together, below we declare a background color variable, create a root container scope which sets it, a child style that uses it, and, finally, a child style variant that overrides it:
 // Default to a debug color, so if we see it, it indicates we forgot to set it later
val bgColor by StyleVariable < CSSColorValue >( Colors . Magenta )

val ContainerStyle = CssStyle .base {
    Modifier .setVariable(bgColor, Colors . Blue )
}
val SquareStyle = CssStyle .base {
    Modifier .size( 100 .px).backgroundColor(bgColor.value())
}
val RedSquareStyle = SquareStyle .extendedByBase {
    Modifier .setVariable(bgColor, Colors . Red )
}
The following code brings the above styles together (and in some cases uses inline styles to override the background color further):
@Composable
fun ColoredSquares () {
    Box ( ContainerStyle .toModifier()) {
        Column {
            Row {
                // 1: Read color from ContainerStyle
                Box ( SquareStyle .toModifier())
                // 2: Override color via RedSquareStyle
                Box ( RedSquareStyle .toModifier())
            }
            Row {
                // 3: Override color via inline styles
                Box ( SquareStyle .toModifier().setVariable(bgColor, Colors . Green ))
                Span ( Modifier .setVariable(bgColor, Colors . Yellow ).toAttrs()) {
                    // 4: Read color from parent's inline style
                    Box ( SquareStyle .toModifier())
                }
            }
        }
    }
}
The above renders the following output:

You can also set CSS variables directly from code if you have access to the backing HTML element. Below, we use the ref callback to get the backing element for a fullscreen Box and then use a Button to set it to a random color from the colors of the rainbow:
 // We specify the initial color of the rainbow here, since the variable
// won't otherwise be set until the user clicks a button.
val bgColor by StyleVariable < CSSColorValue >( Colors . Red )

val ScreenStyle = CssStyle .base {
    Modifier .fillMaxSize().backgroundColor(bgColor.value())
}

@Page
@Composable
fun RainbowBackground () {
    val roygbiv = listOf ( Colors . Red , /* ... */ Colors . Violet )

    var screenElement : HTMLElement ? by remember { mutableStateOf( null ) }
    Box ( ScreenStyle .toModifier(), ref = ref { screenElement = it }) {
        Button (onClick = {
            // You can call `setVariable` on the backing HTML element to set the variable value directly
            screenElement !! .setVariable(bgColor, roygbiv.random())
        }) {
            Text ( " Click me " )
        }
    }
}
The above results in the following UI:

Most of the time, you can actually get away with not using CSS Variables! Your Kotlin code is often a more natural place to describe dynamic behavior than HTML / CSS is.
Let's revisit the "colored squares" example from above. Note it's much easier to read if we don't try to use variables at all.
 val SquareStyle = CssStyle .base {
    Modifier .size( 100 .px)
}

@Composable
fun ColoredSquares () {
    Column {
        Row {
            Box ( SquareStyle .toModifier().backgroundColor( Colors . Blue ))
            Box ( SquareStyle .toModifier().backgroundColor( Colors . Red ))
        }
        Row {
            Box ( SquareStyle .toModifier().backgroundColor( Colors . Green ))
            Box ( SquareStyle .toModifier().backgroundColor( Colors . Yellow ))
        }
    }
}
And the "rainbow background" example is similarly easier to read by using Kotlin variables (ie var someValue by remember { mutableStateOf(...) } ) instead of CSS variables:
 val ScreenStyle = CssStyle .base {
    Modifier .fillMaxSize()
}

@Page
@Composable
fun RainbowBackground () {
    val roygbiv = listOf ( Colors . Red , /* ... */ Colors . Violet )

    var currColor by remember { mutableStateOf( Colors . Red ) }
    Box ( ScreenStyle .toModifier().backgroundColor(currColor)) {
        Button (onClick = { currColor = roygbiv.random() }) {
            Text ( " Click me " )
        }
    }
}
Even though you should rarely need CSS variables, there may be occasions where they can be a useful tool in your toolbox. The above examples were artificial scenarios used as a way to show off CSS variables in relatively isolated environments. But here are some situations that might benefit from CSS variables:
themePrimary and themeSecondary (applied at the site's root) which you can then reference throughout your styles.When in doubt, lean on Kotlin for handling dynamic behavior, and occasionally consider using style variables if you feel doing so would clean up the code.
Kobweb provides the silk-icons-fa artifact which you can use in your project if you want access to all the free Font Awesome (v6) icons.
Using it is easy! Search the Font Awesome gallery, choose an icon, and then call it using the associated Font Awesome icon composable.
For example, if I wanted to add the Kobweb-themed spider icon, I could call this in my Kobweb code:
FaSpider ()هذا كل شيء!
Some icons have a choice between solid and outline versions, such as "Square" (outline and filled). In that case, the default choice will be an outline mode, but you can pass in a style enum to control this:
FaSquare (style = IconStyle . FILLED )All Font Awesome composables accept a modifier parameter, so you can tweak it further:
FaSpider ( Modifier .color( Colors . Red ))ملحوظة
When you create a project using our app template, Font Awesome icons are included.
Kobweb provides the silk-icons-mdi artifact which you can use in your project if you want access to all the free Material Design icons.
Using it is easy! Search the Material Icons gallery, choose an icon, and then call it using the associated Material Design Icon composable.
For example, let's say after a search I found and wanted to use their bug report icon, I could call this in my Kobweb code by converting the name to camel case:
MdiBugReport ()هذا كل شيء!
Most material design icons support multiple styles: outlined, filled, rounded, sharp, and two-tone. Check the gallery search link above to verify what styles are supported by your icon. You can identify the one you want to use by passing it into the method's style parameter:
MdiLightMode (style = IconStyle . TWO_TONED )All Material Design Icon composables accept a modifier parameter, so you can tweak it further:
MdiError ( Modifier .color( Colors . Red ))Outside of pages, it is common to create reusable, composable parts. While Kobweb doesn't enforce any particular rule here, we recommend a convention that, if followed, may make it easier to allow new readers of your codebase to get around.
First, as a sibling to pages, create a folder called components . Within it, add:
@Page pages will start by calling a page layout function first. It's possible that you will only need a single layout for your entire site. If you create a markdown file under the jsMain/resources/markdown folder, a corresponding page will be created for you at build time, using the filename as its path.
For example, if I create the following file:
// jsMain/resources/markdown/docs/tutorial/Kobweb.md

# Kobweb Tutorial

...
this will create a page that I can then visit by going to mysite.com/docs/tutorial/kobweb
Front Matter is metadata that you can specify at the beginning of your document, like so:
 ---
title : Tutorial
author : bitspittle
---

...
In a following section, we'll discuss how to embed code in your markdown, but for now, know that these key / value pairs can be queried in code using the page's context:
@Composable
fun AuthorWidget () {
  val ctx = rememberPageContext()
  // Note: You can use `markdown!!` only if you're sure that
  // this composable is called while inside a page generated
  // from Markdown.
  val author = ctx.markdown !! .frontMatter.getValue( " author " ).single()
  Text ( " Article by $author " )
}
مهم
If you're not seeing ctx.markdown autocomplete, you need to make sure you depend on the com.varabyte.kobwebx:kobwebx-markdown artifact in your project's build.gradle .
Within your front matter, there's a special value which, if set, will be used to render a root @Composable that adds the rest of your markdown code as its content. This is useful for specifying a layout for example:
 ---
root : .components.layout.DocsLayout
---

# Kobweb Tutorial
The above will generate code like the following:
 import com.mysite.components.layout.DocsLayout

@Composable
@Page
fun KobwebPage () {
  DocsLayout {
    H1 {
      Text ( " Kobweb Tutorial " )
    }
  }
}
If you have a default root that you'd like to use in most / all of your markdown files, you can specify it in the markdown block in your build script:
 // site/build.gradle.kts

kobweb {
  markdown {
    defaultRoot.set( " .components.layout.MarkdownLayout " )
  }
} Kobweb Markdown front matter supports a routeOverride key. If present, its value will be passed into the generated @Page annotation (see the Route Override section▲ for valid values here).
This allows you to give your URL a name that normal Kotlin filename rules don't allow for, such as a hyphen:
# AStarDemo.md
 ---
routeOverride : a*-demo
---
The above will generate code like the following:
@Composable
@Page( " a*-demo " )
fun AStarDemoPage () { /* ... */
}The power of Kotlin + Compose HTML is interactive components, not static text! Therefore, Kobweb Markdown support enables special syntax that can be used to insert Kotlin code.
Usually, you will define widgets that belong in their own section. Just use three triple-curly braces to insert a function that lives in its own block:
 # Kobweb Tutorial

...

{{{ .components.widgets.VisitorCounter }}}
which will generate code for you like the following:
@Composable
@Page
fun KobwebPage () {
  /* ... */
  com.mysite.components.widgets. VisitorCounter ()
}
You may have noticed that the code path in the markdown file is prefixed with a . . When you do that, the final path will automatically be prepended with your site's full package.
Occasionally, you may want to insert a smaller widget into the flow of a single sentence. For this case, use the ${...} inline syntax:
Press ${.components.widgets.ColorButton} to toggle the site's current color.حذر
Spaces are not allowed within the curly braces! If you have them there, Markdown skips over the whole thing and leaves it as text.
You may wish to add imports to the code generated from your markdown. Kobweb Markdown supports registering both global imports (imports that will be added to every generated file) and local imports (those that will only apply to a single target file).
To register a global import, you configure the markdown block in your build script:
 // site/build.gradle.kts

kobweb {
  markdown {
    imports.add( " .components.widgets.* " )
  }
}
Notice that you can begin your path with a "." to tell the Kobweb Markdown plugin to prepend your site's package to it. The above would ensure that every markdown file generated would have the following import:
import com.mysite.components.widgets.*Imports can help you simplify your Kobweb calls. Revisiting an example from just above:
 # Without imports

Press ${.components.widgets.ColorButton} to toggle the site's current color.

# With imports

Press ${ColorButton} to toggle the site's current color.
Local imports are specified in your markdown's front matter (and can even affect its root declaration!):
 ---
root : DocsLayout
imports :
  - .components.sections.DocsLayout
  - .components.widgets.VisitorCounter
---

...

{{{ VisitorCounter }}}Kobweb Markdown supports callouts, which are a way to highlight pieces of information in your document. For example, you can use them to highlight notes, tips, warnings, or important messages.
To use a callout, set the first line of some blockquoted text to [!TYPE] , where TYPE is one of the following:
 > [ !NOTE ]
> Lorem ipsum...

> [ !QUOTE ]
> Lorem ipsum... 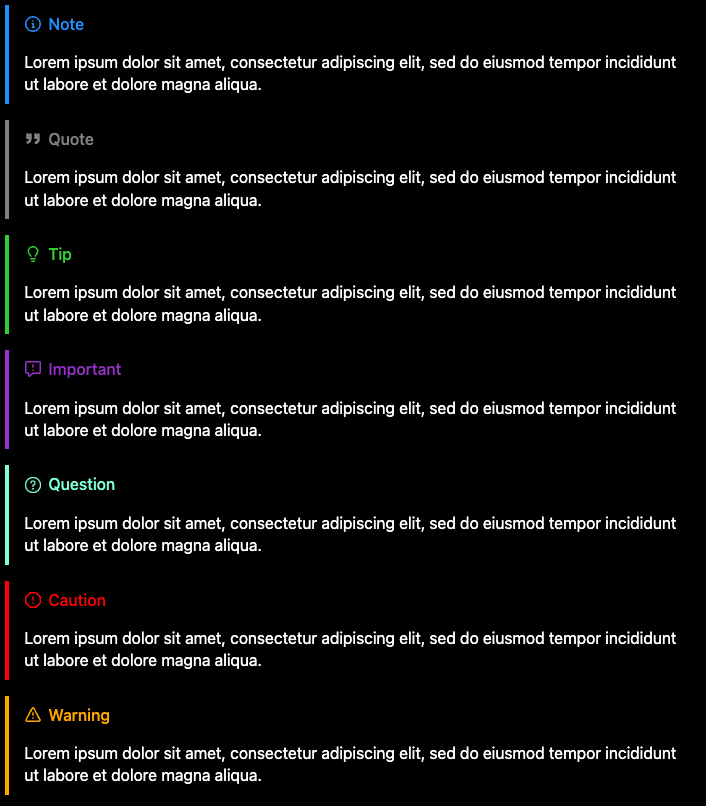
If you'd like to change the value of the default title that shows up, you can specify it in quotes:
> [ !QUESTION "Something to ponder..." ]As another example, when using quotes, you can set this to the empty string, which looks clean:
 > [ !QUOTE "" ]
> ... 
If you want to specify a label that should apply globally, you can do so by overriding the blockquote handler in your project's build script, using the convenience method SilkCalloutBlockquoteHandler for it:
kobweb {
  markdown {
    handlers.blockquote.set( SilkCalloutBlockquoteHandler (labels = mapOf ( " QUOTE " to " " )))
  }
}
حذر
Callouts are provided by Silk. If your project does not use Silk and you override the blockquote handler like this, it will generate code that will cause a compile error.
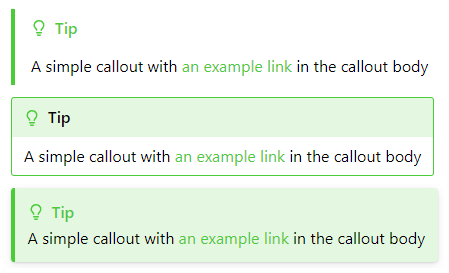
Silk provides a handful of variants for callouts.
For example, an outlined variant:

and a filled variant:

You can also combine any of the standard variants with an additional matching link variant (eg LeftBorderedCalloutVariant.then(MatchingLinkCalloutVariant)) ) to make it so that any hyperlinks inside the callout will match the color of the callout itself:
If you prefer any of these styles over the default, you can set the variant parameter in the SilkCalloutBlockquoteHandler , for example here we set it to the outlined variant:
kobweb {
  markdown {
    handlers.blockquote.set( SilkCalloutBlockquoteHandler (
      variant = " com.varabyte.kobweb.silk.components.display.OutlinedCalloutVariant " )
    )
  }
}
Of course, you can also define your own variant in your own codebase and pass that in here as well.
If you'd like to register a custom callout, this is done in two parts.
First, declare your custom callout setup in your code somewhere:
 package com.mysite.components.widgets.callouts

val CustomCallout = CalloutType (
    /* ... specify icon, label, and colors here ... */
)
and then register it in your build script, extending the default list of handlers (ie SilkCalloutTypes ) with your custom one:
kobweb {
  markdown {
    handlers.blockquote.set(
      SilkCalloutBlockquoteHandler (types =
        SilkCalloutTypes +
          mapOf ( " CUSTOM " to " .components.widgets.callouts.CustomCallout " )
      )
    )
  }
}
ملحوظة
As seen above, by using a leading . , you can omit your project's group (eg com.mysite ). Kobweb will automatically prepend it for you.
هذا كل شيء! At this point, you can use it in your markdown:
 > [ !CUSTOM ]
> Neat.It can be really useful to process all markdown files during your site's build. A common example is to collect all markdown articles and generate a listing page from them.
You can actually do this using pure Gradle code, but it's common enough that Kobweb provides a convenience API, via the markdown block's process callback.
You can register a callback that will be triggered at build time with a list of all markdown files in your project.
kobweb {
  markdown {
    process.set { markdownEntries ->
      // `markdownEntries` is type `List<MarkdownEntry>`, where an entry includes the file's path, the route it will
      // be served at, and any parsed front matter.

      println ( " Processing markdown files: " )
      markdownEntries.forEach { entry ->
        println ( " t * ${entry.filePath} -> ${entry.route} " )
      }
    }
  }
}
Inside the callback, you can also call generateKotlin and generateMarkdown utility methods. Here is a very rough example of creating a listing page for all blog posts in a site (found under the resources/markdown/blog folder):
kobweb {
  markdown {
    process.set { markdownEntries ->
      generateMarkdown( " blog/index.md " , buildString {
        appendLine( " # Blog Index " )
        markdownEntries.forEach { entry ->
          if (entry.filePath.startsWith( " blog/ " )) {
            val title = entry.frontMatter[ " title " ] ? : " Untitled "
            appendLine( " * [ $title ]( ${entry.route} ) " )
          }
        }
      })
    }
  }
}
Refer to the build script of my open source blog site and search for "process.set" to see this feature in action in a production environment.
Many developers new to web development have heard horror stories about CSS, and they might hope that Kobweb, by leveraging Kotlin and a Jetpack Compose-inspired API, means they won't have to learn it.
It's worth dispelling that illusion! CSS is inevitable.
That said, CSS's reputation is probably worse than it deserves to be. Many of its features are actually fairly straightforward and some are quite powerful. For example, you can efficiently declare that your element should be wrapped with a thin border, with round corners, casting a drop shadow beneath it to give it a feeling of depth, painted with a gradient effect for its background, and animated with an oscillating, tilting effect.
It's hoped that, once you've learned a bit of CSS through Kobweb, you'll find yourself actually enjoying it (sometimes)!
Kobweb offers enough of a layer of abstraction that you can learn CSS in a more incremental way.
First and most importantly, Kobweb gives you a Kotlin-idiomatic type-safe API to CSS properties. This is a major improvement over writing CSS in text files which fail silently at runtime.
Next, layout widgets like Box , Column , and Row can get you up and running quickly with rich, complex layouts before ever having to understand what a "flex layout" is.
Meanwhile, using CssStyle can help you break your CSS up into smaller, more manageable pieces that live close to the code that actually uses them, allowing your project to avoid a giant, monolithic CSS file. (Such giant CSS files are one of the reasons CSS has an intimidating reputation).
For example, a CSS file that could easily look like this:
 /* Dozens of rules... */

. important {
  background-color : red;
  font-weight : bold;
}

. important : hover {
  background-color : pink;
}

/* Dozens of other rules... */

. post-title {
    font-size : 24 px ;
}

/* A dozen more more rules... */
can migrate to this in Kobweb:
 // ------------------ CriticalInformation.kt

val ImportantStyle = CssStyle {
  base {
    Modifier .backgroundColor( Colors . Red ).fontWeight( FontWeight . Bold )
  }

  hover {
    Modifier .backgroundColor( Colors . Pink )
  }
}

// ------------------ Post.kt

val PostTitleStyle = CssStyle .base { Modifier .fontSize( 24 .px) }
Next, Silk provides a Deferred composable which lets you declare code that won't get rendered until the rest of the DOM finishes first, meaning it will appear on top of everything else. This is a clean way to avoid setting CSS z-index values (another aspect of CSS that has a bad reputation).
And finally, Silk aims to provide widgets with default styles that look good for many sites. This means you should be able to rapidly develop common UIs without running into some of the more complex aspects of CSS.
Let's walk through an example of layering CSS effects on top of a basic element.
نصيحة
Two of the best learning resources for CSS properties are https://developer.mozilla.org and https://www.w3schools.com . Keep an eye out for these when you do a web search.
We'll create the bordered, floating, oscillating element we discussed earlier. Rereading it now, here are the concepts we need to figure out how to do:
Let's say we want to create an attention grabbing "welcome" widget on our site. You can always start with an empty box, which we'll put some text in:
 Box ( Modifier .padding(topBottom = 5 .px, leftRight = 30 .px)) {
  Text ( " WELCOME!! " )
}
Create a border
Next, search the internet for "CSS border". One of the top links should be: https://developer.mozilla.org/en-US/docs/Web/CSS/border
Skim the docs and play around with the interactive examples. With an understanding of the border property now, let's use code completion to discover the Kobweb version of the API:
 Box (
  Modifier
    .padding(topBottom = 5 .px, leftRight = 30 .px)
    .border( 1 .px, LineStyle . Solid , Colors . Black )
) {
  Text ( " WELCOME!! " )
}
Round out the corners
Search for "CSS rounded corners". It turns out the CSS property in this case is called a "border radius": https://developer.mozilla.org/en-US/docs/Web/CSS/border-radius
 Box (
  Modifier
    .padding(topBottom = 5 .px, leftRight = 30 .px)
    .border( 1 .px, LineStyle . Solid , Colors . Black )
    .borderRadius( 5 .px)
) {
  Text ( " WELCOME!! " )
}
Add a drop shadow
Search for "CSS shadow". There are a few types of CSS shadow features, but after some quick reading, we realize we want to use box shadows: https://developer.mozilla.org/en-US/docs/Web/CSS/box-shadow
After playing around with blur and spread values, we get something that looks decent:
 Box (
  Modifier
    .padding(topBottom = 5 .px, leftRight = 30 .px)
    .border( 1 .px, LineStyle . Solid , Colors . Black )
    .borderRadius( 5 .px)
    .boxShadow(blurRadius = 5 .px, spreadRadius = 3 .px, color = Colors . DarkGray )
) {
  Text ( " WELCOME!! " )
}
Add a gradient background
Search for "CSS gradient background". This isn't a straightforward CSS property like the previous cases, so we instead get a more general documentation page explaining the feature: https://developer.mozilla.org/en-US/docs/Web/CSS/CSS_images/Using_CSS_gradients
This case turns out to be a little trickier to ultimately find the Kotlin, type-safe equivalent, but if you dig a bit more into the CSS docs, you'll learn that a linear gradient is a type of background image.
 Box (
  Modifier
    .padding(topBottom = 5 .px, leftRight = 30 .px)
    .border( 1 .px, LineStyle . Solid , Colors . Black )
    .borderRadius( 5 .px)
    .boxShadow(blurRadius = 5 .px, spreadRadius = 3 .px, color = Colors . DarkGray )
    .backgroundImage(linearGradient( LinearGradient . Direction . ToRight , Colors . LightBlue , Colors . LightGreen ))
) {
  Text ( " WELCOME!! " )
}
Add a wobble animation
And finally, search for "CSS animations": https://developer.mozilla.org/en-US/docs/Web/CSS/CSS_animations/Using_CSS_animations
You can review the Animations▲ section above for a refresher on how Kobweb supports this feature, which requires declaring a top-level Keyframes block which then gets referenced inside an animation modifier:
 // Top level property
val WobbleKeyframes = Keyframes {
  from { Modifier .rotate(( - 5 ).deg) }
  to { Modifier .rotate( 5 .deg) }
}

// Inside your @Page composable
Box (
  Modifier
    .padding(topBottom = 5 .px, leftRight = 30 .px)
    .border( 1 .px, LineStyle . Solid , Colors . Black )
    .borderRadius( 5 .px)
    .boxShadow(blurRadius = 5 .px, spreadRadius = 3 .px, color = Colors . DarkGray )
    .backgroundImage(linearGradient( LinearGradient . Direction . ToRight , Colors . LightBlue , Colors . LightGreen ))
    .animation(
      WobbleKeyframes .toAnimation(
        duration = 1 .s,
        iterationCount = AnimationIterationCount . Infinite ,
        timingFunction = AnimationTimingFunction . EaseInOut ,
        direction = AnimationDirection . Alternate ,
      )
    )
) {
  Text ( " WELCOME!! " )
}
And we're done!
The above element isn't going to win any style awards, but I hope this demonstrates how much power CSS can give you in just a few declarative lines of code. And thanks to the nature of CSS, combined with Kobweb's live reloading experience, we were able to experiment with our idea incrementally.
One of our main project contributors created a site called CSS 2 Kobweb which aims to simplify the process of converting CSS examples to equivalent Kobweb CssStyle and/or Modifier declarations.
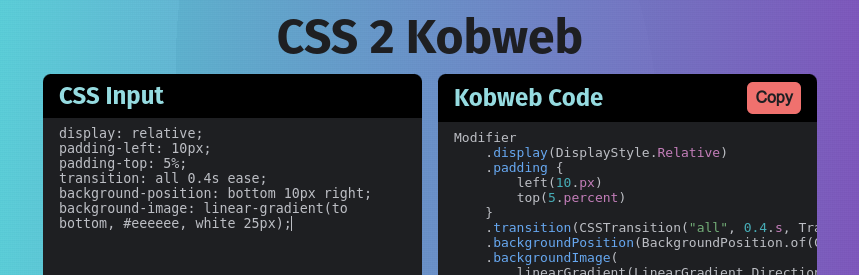
نصيحة
CSS 2 Kobweb also supports specifying class name selectors and keyframes. For example, see what happens when you paste in the following CSS code:
. site-banner {
  position : relative;
  padding-left : 10 px ;
  padding-top : 5 % ;
  animation : slide-in 3 s linear 1 s infinite;
  background-position : bottom 10 px right;
  background-image : linear-gradient (to bottom , # eeeeee , white 25 px );
}
. site-banner : hover {
  color : rgb ( 40 , 40 , 40 );
}
@keyframes slide-in {
  from {
    transform : translateX ( -2 rem ) scale ( 0.5 );
  }
  to {
    transform : translateX ( 0 );
    opacity : 1 ;
  }
}
The web is full of examples of interesting CSS effects. Almost any CSS-related search will result in tons of StackOverflow answers, interactive playgrounds featuring WYSIWYG editors, and blog posts. Many of these introduce some really novel CSS examples. This is a great way to learn more about web development!
However, as the previous section demonstrated, it can sometimes be a pain to go from a CSS example to the equivalent Kobweb code. We hope that CSS 2 Kobweb can help with that.
This project is already very useful, but it's still early days. If you find cases of CSS 2 Kobweb that are incorrect, please consider filing an issue in their repository.
Hopefully this section gave you insight into how you can explore CSS APIs on your own, but if you're stuck on getting an effect working, remember you can reach out to one of the options in the connecting with us▼ section, and someone in the community can probably help!
One of Kobweb's major additions on top of Compose HTML is the export process.
This feature elevates the framework from one that produces a single-page application to one that produces a whole, navigable site. The export process takes snapshots of every page, resulting in better SEO support and a quicker initial render.
A normal development workflow will have you using kobweb run to build up your site, and then when you're ready to publish it, you'll kobweb export a production version.
Let's take a moment to walk through this process in more detail, in order to demystify it.
The index.html file of a normal Compose HTML site looks like this:
 <!DOCTYPE html >
< html lang =" en " >
< head >
  < meta charset =" UTF-8 " >
  < title > My Site Title </ title >
</ head >
< body >
< div id =" root " > </ div >
< script src =" mysite.js " > </ script >
</ body >
</ html >
ملحوظة
For example, you can find this exact structure recommended in the official Getting Started instructions.
What this does is declare a root element whose contents will get filled out dynamically at runtime. You can think of the mysite.js script at the end of the file as the seed that grows into your website.
This is very powerful, but when you build a website with this approach, you run into two major issues:
mysite.js gets bigger and bigger, meaning a larger download is required before the site gets rendered. OK, so let's add Kobweb into the mix. Here, we build a very minimal page and export our site (using kobweb export ) to see what happens.
@Page
@Composable
fun ExampleKobwebPage () {
    Text ( " This is a minimal example to demonstrate exporting. " )
}
Exporting generates the following HTML under your kobweb/.site folder, which I've reproduced here with a bunch of styles elided:
 <!doctype html >
< html lang =" en " >
 < head >
  < meta http-equiv =" Content-Type " content =" text/html; charset=UTF-8 " >
  < title > My Site Title </ title >
  < meta content =" Powered by Kobweb " name =" description " >
  < link href =" /favicon.ico " rel =" icon " >
  < meta content =" width=device-width, initial-scale=1 " name =" viewport " >
 </ head >
 < body >
  < div id =" root " style =" ... " >
   < style > ... </ style >
   < div class =" ... " style =" min-height: 100vh; " >
    This is a minimal example to demonstrate exporting.
   </ div >
  </ div >
  < script src =" /mysite.js " > </ script >
 </ body >
</ html >
As you can see, Kobweb has filled out a bunch of extra information, although the site script it still linked to at the bottom of the file. This is important since, as mentioned earlier in this section, it contains all information necessary not just to render this page but the whole site.
In other words, you can download just this page and then continue to navigate around the site without needing to download any more files.
In short, the export process will discover all @Page -annotated methods in your codebase and generate a snapshot of each one. You can think of each snapshot as an SEO-friendly starting point from which you can access the rest of your site.
In order for Kobweb exporting to be able to take a snapshot of your site, it needs to spin up a browser in headless mode. This browser is responsible for loading the simple Compose HTML version of an index.html page and running its JavaScript to fill out the page. The browser will then get queried for the final html which Kobweb saves to disk.
Kobweb delegates much of this task to Microsoft's excellent Playwright framework. Hopefully this will be invisible to almost all users, but for advanced cases, it can be useful to know the technology that's running under the hood.
For custom CI/CD setups, you will at the very least need to be aware that the Kobweb export process requires a browser. For users who would like more information about this, we discuss one example in more detail later, in the GitHub Workflow for exports▼ section.
There are two flavors of Kobweb sites: static and full stack .
A static site (or, more completely, a static layout site) is one where you export a bunch of frontend files (eg html , js , and public resources) into a single, organized folder that gets served directly by a static website hosting provider.
In other words, you don't write a single line of server code. The server is provided for you in this case and uses a fairly straightforward algorithm - it hosts all the content you upload to it as raw, static assets.
The name static does not refer to the behavior of your site but rather that of your hosting provider solution. If someone makes a request for a page, the same response bytes get served every time (even if that page is full of custom code that allows it to behave in very interactive ways).
A full stack site is one where you write both the logic that runs on the frontend (ie on the user's machine) and the logic that runs on the backend (ie on a server somewhere). This custom server must at least serve requested files (exactly the same job that a static web hosting service does) plus it likely also defines endpoints providing custom functionality tailored to your site's needs.
For example, maybe you define an endpoint which, given a user ID and an authentication token, returns that user's profile information.
When Kobweb was first written, it only provided the full stack solution, as being able to write your own server logic enabled a maximum amount of power and flexibility. The mental model for using Kobweb during this early time was simple and clear.
However, in practice, most projects don't need the power afforded by a full stack setup. A website can give users a very clean, dynamic experience simply by writing responsive frontend logic to make it look good, eg with animations and delightful user interactions.
Additionally, many " Feature as a Service" solutions have popped up over the years, which can provide a ton of convenient functionality that used to require a custom server. These days, you can easily integrate auth, database, and analytics solutions all without writing a single line of backend code.
The process for exporting a bunch of files in a way that can be consumed by a static web hosting provider tends to be much faster and cheaper than using a full stack solution. Therefore, you should prefer a static site layout unless you have a specific need for a full stack approach.
Some possible reasons to use a custom server (and, therefore, a full stack approach) are:
If you aren't sure which category you fall into, then you should probably be creating a static layout site. It's much easier to migrate from a static layout site to a full stack site later than the other way around.
Both site flavors require an export.
To export your site with a static layout, use the kobweb export --layout static command, while for full stack the command is kobweb export --layout fullstack (or just kobweb export since fullstack is the default layout as it originally was the only way).
Once exported, you can test your site by running it locally before uploading. You run a static site with kobweb run --env prod --layout static and a full stack site with kobweb run --env prod --layout fullstack (or just kobweb run --env prod ).
Sometimes, you have behavior that should run when an actual user is navigating your site, but you don't want it to run at export time. For example, maybe you offer logged-in users an authenticated experience, but you'll never have a logged-in user at export time.
You can determine if your page is being rendered as part of an export by checking the PageContext.isExporting property. This gives you the opportunity to manipulate the exported HTML or avoid side effects associated with page loading.
@Composable
fun AuthenticatedLayout ( content : @Composable () -> Unit ) {
    var loggedInUser by remember { mutableStateOf< User ?>( null ) }

    val ctx = rememberPageContext()
    if ( ! ctx.isExporting) {
        LaunchedEffect ( Unit ) {
            loggedInUser = checkForLoggedInUser() // <- A slow, expensive method
        }
    }

    if (loggedInUser == null ) {
        LoggedOutScaffold { content() }
    } else {
        LoggedInScaffold (user) { content() }
    }
}
Dynamic routes are skipped over by the export process. After all, it's not possible to know all the possible values that could be passed into a dynamic route.
However, if you have a specific instance of a dynamic route that you'd like to export, you can configure your site's build script as follows:
kobweb {
  app {
    export {
      // "/users/{user}/posts/{post}" has special handling for the "default" / "0" case
      addExtraRoute( " /users/default/posts/0 " , " users/index.html " )
    }
  }
} A static site gets exported into .kobweb/site by default (you can configure this location in your .kobweb/conf.yaml file if you'd like). You can then upload the contents of that folder to the static web hosting provider of your choice.
Deploying a full stack site is a bit more complex, as different providers have wildly varying setups, and some users may even decide to run their own web server themselves. However, when you export your Kobweb site, scripts are generated for running your server, both for *nix platforms ( .kobweb/server/start.sh ) and the Windows platform ( .kobweb/server/start.bat ). If the provider you are using speaks Dockerfile, you can set ENTRYPOINT to either of these scripts (depending on the server's platform).
Going in more detail than this is outside the scope of this README. However, you can read my blog posts for a lot more information and some clear, concrete examples:
By default, Kobweb will automatically root every page to the KobwebApp composable (or, if using Silk, to a SilkApp composable). These perform some minimal common work (eg applying CSS styles) that should be present across your whole site.
This means if you register a page:
 // jsMain/kotlin/com/mysite/pages/Index.kt

@Page
@Composable
fun HomePage () {
    /* ... */
}
then the final result that actually runs on your site will be:
 // In a generated main.kt somewhere...

KobwebApp {
  HomePage ()
}
It is likely you'll want to configure this further for your own application. Perhaps you have some initialization logic that you'd like to run before any page gets run (like logic for updating saved settings into local storage). And for many apps it's a great place to specify a full screen Silk Surface as that makes all children beneath it transition between light and dark colors smoothly.
In this case, you can create your own root composable and annotate it with @App . If present, Kobweb will use that instead of its own default. You should, of course, delegate to KobwebApp (or SilkApp if using Silk), as the initialization logic from those methods should still be run.
Here's an example application composable override that I use in many of my own projects:
@App
@Composable
fun MyApp ( content : @Composable () -> Unit ) {
  SilkApp {
    val colorMode = ColorMode .current
    LaunchedEffect (colorMode) { // Relaunched every time the color mode changes
      localStorage.setItem( " color-mode " , colorMode.name)
    }

    // A full screen Silk surface. Sets the background based on Silk's palette and animates color changes.
    Surface ( SmoothColorStyle .toModifier().minHeight( 100 .vh)) {
      content()
    }
  }
}
You can define at most a single @App on your site, or else the Kobweb Application plugin will complain at build time.
The default styles picked by browsers for many HTML elements rarely fit most site designs, and it's likely you'll want to tweak at least some of them. A very common example of this is the default web font, which if left as is will make your site look a bit archaic.
Most traditional sites overwrite styles by creating a CSS stylesheet and then linking to it in their HTML. However, if you are using Silk in your Kobweb application, you can use an approach very similar to CssStyle discussed above but for general HTML elements.
To do this, create an @InitSilk method. The context parameter includes a stylesheet property that represents the CSS stylesheet for your site, providing a Silk-idiomatic API for adding CSS rules to it.
Below is a simple example that sets the whole site to more aesthetically pleasing fonts than the browser defaults, one for regular text and one for code:
@InitSilk
fun initSilk ( ctx : InitSilkContext ) {
  ctx.stylesheet.registerStyleBase( " body " ) {
    Modifier .fontFamily( " Ubuntu " , " Roboto " , " Arial " , " Helvetica " , " sans-serif " )
      .fontSize( 18 .px)
      .lineHeight( 1.5 )
  }

  ctx.stylesheet.registerStyleBase( " code " ) {
    Modifier .fontFamily( " Ubuntu Mono " , " Roboto Mono " , " Lucida Console " , " Courier New " , " monospace " )
  }
}
نصيحة
The registerStyleBase method is commonly used for registering styles with minimal code, but you can also use registerStyle , especially if you want to add some support for one or more pseudo-classes ( eg hover , focus , active ):
ctx.stylesheet.registerStyle( " code " ) {
  base {
    Modifier
      .fontFamily( " Ubuntu Mono " , " Roboto Mono " , " Lucida Console " , " Courier New " , " monospace " )
      .userSelect( UserSelect . None ) // No copying code allowed!
  }
  hover {
    Modifier .cursor( Cursor . NotAllowed )
  }
}Occasionally you might find yourself with a value at build time that you want your site to know at runtime.
For example, maybe you want to specify a version based on the current UTC timestamp. Or maybe you want to read a system environment variable's value and pass that into your Kobweb site as a way to configure its behavior.
This is supported via Kobweb's AppGlobals singleton, which is like a Map<String, String> whose values you can set from your project's build script using the kobweb.app.globals property.
Let's demonstrate this with the UTC version example.
In your application's build.gradle.kts , add the following code:
 import java.time.LocalDateTime
import java.time.ZoneId
import java.time.format.DateTimeFormatter

plugins {
  /* ... */
  alias(libs.plugins.kobweb.application)
}

kobweb {
  app {
    globals.put(
      " version " ,
      LocalDateTime
          .now( ZoneId .of( " UTC " ))
          .format( DateTimeFormatter .ofPattern( " yyyyMMdd.kkmm " ))
    )
  }
}
You can then access them via the AppGlobals.get or AppGlobals.getValue methods:
val version = AppGlobals .getValue( " version " )In your Kotlin project somewhere, it is recommended that you either add some type-safe extension methods, or you can create your own wrapper object (based on your preference):
 // SiteGlobals.kt

import com.varabyte.kobweb.core.AppGlobals

// Extension method approach ---------------------

val AppGlobals .version : String
  get() = getValue( " version " )

// Wrapper object approach -----------------------

object SiteGlobals {
  val version : String = AppGlobals .getValue( " version " )
}
At this point, you can access this value in your site's code, say for a tiny label that would look good in a footer perhaps:
 // components/widgets/SiteVersion.kt

val VersionTextStyle = CssStyle .base {
  Modifier .fontSize( 0.6 .cssRem)
}

@Composable
fun SiteVersion ( modifier : Modifier = Modifier ) {
  // Extension method approach
  val versionLabel = " v " + AppGlobals .version
  // Wrapper object approach
  val versionLabel = " v " + SiteGlobals .version

  SpanText (versionLabel, VersionTextStyle .toModifier().then(modifier))
}As mentioned earlier, Silk widgets all use component styles▲ to power their look and feel.
Normally, if you want to tweak a style in select locations within your site, you just create a variant from that style:
 val TweakedButtonVariant = ButtonStyle .addVariantBase { /* ... */ }

// Later...
Button (variant = TweakedButtonVariant ) { /* ... */ }
But what if you want to globally change the look and feel of a widget across your entire site?
You could of course create your own composable which wraps some underlying composable with its own new style, eg MyButton which defines its own MyButtonStyle that internally delegates to Button . However, you'd have to be careful to make sure all new developers who add code to your site know to use MyButton instead of Button directly.
Silk provides another way, allowing you to modify any of its declared styles and/or variants in place.
You can do this via an @InitSilk method, which takes an InitSilkContext parameter. This context provides the theme property, which provides the following family of methods for rewriting styles and variants:
@InitSilk
fun replaceStylesAndOrVariants ( ctx : InitSilkContext ) {
  ctx.theme.replaceStyle( SomeStyle ) { /* ... */ }
  ctx.theme.replaceVariant( SomeVariant ) { /* ... */ }
  ctx.theme.modifyStyle( SomeStyle ) { /* ... */ }
  ctx.theme.modifyVariant( SomeVariant ) { /* ... */ }
}
ملحوظة
Technically, you can use these methods with your own site's declared styles and variants as well, but there should be no reason to do so since you can just go to the source and change those values directly. However, this can still be useful if you're using a third-party Kobweb library that provides its own styles and/or variants.
Use the replace versions if you want to define a whole new set of CSS rules from scratch, or use the modify versions to layer additional changes on top of what's already there.
حذر
Using replace on some of the more complex Silk styles can be tricky, and you may want to familiarize yourself with the details of how those widgets are implemented before attempting to do so. Additionally, once you replace a style in your site, you will be opting-out of any future improvements to that style that may be made in future versions of Silk.
Here's an example of replacing ImageStyle on a site that wants to force all images to have rounded corners and automatically scale down to fit their container:
@InitSilk
fun replaceSilkImageStyle ( ctx : InitSilkContext ) {
  ctx.theme.replaceStyleBase( ImageStyle ) {
    Modifier
      .clip( Rect (cornerRadius = 8 .px))
      .fillMaxWidth()
      .objectFit( ObjectFit . ScaleDown )
  }
}
and here's an example for a site that always wants its horizontal dividers to fill max width:
@InitSilk
fun makeHorizontalDividersFillWidth ( ctx : InitSilkContext ) {
  ctx.theme.modifyStyleBase( HorizontalDividerStyle ) {
    Modifier .fillMaxWidth()
  }
}Let's say you've decided on creating a full stack website using Kobweb. This section walks you through setting it up as well as introducing the various APIs for communicating to the backend from the frontend.
A Kobweb project will always at least have a JavaScript component, but if you declare a JVM target, that will be used to define custom server logic that can then be used by your Kobweb site.
It's easiest to let Kobweb do it for you. In your site's build script, make sure you've declared configAsKobwebApplication(includeServer = true) :
 // site/build.gradle.kts
import com.varabyte.kobweb.gradle.application.util.configAsKobwebApplication

plugins {
    alias(libs.plugins.kotlin.multiplatform)
    alias(libs.plugins.jetbrains.compose)
    alias(libs.plugins.kobweb.application)
}

/* ... */

kotlin {
    configAsKobwebApplication(includeServer = true )
    /* ... */
}
مهم
configAsKobwebApplication(includeServer = true) declares and sets up both js() and jvm() Kotlin Multiplatform targets for you. If you don't set includeServer = true explicitly, only the JS target will be declared.
The easy way to check if everything is set up correctly is to open your project inside IntelliJ IDEA, wait for it to finish indexing, and check that the jvmMain folder is detected as a module (if so, it will be given a special icon and look the same as the jsMain folder):
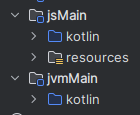
You can define and annotate methods which will generate server endpoints you can interact with. To add one:
suspend able) in a file somewhere under the api package in your jvmMain source directory.ApiContext .@ApiFor example, here's a simple method that echoes back an argument passed into it:
 // jvmMain/kotlin/com/mysite/api/Echo.kt

@Api
suspend fun echo ( ctx : ApiContext ) {
    // ctx.req is for the incoming request, ctx.res for responding back to the client

    // Params are parsed from the URL, e.g. here "/api/echo?message=..."
    val msg = ctx.req.params[ " message " ] ? : " "
    ctx.res.setBodyText(msg)
}
After running your project, you can test the endpoint by visiting mysite.com/api/echo?message=hello
You can also trigger the endpoint in your frontend code by using the extension api property added to the kotlinx.browser.window class:
@Page
@Composable
fun ApiDemoPage () {
  val coroutineScope = rememberCoroutineScope()

  Button (onClick = {
    coroutineScope.launch {
      println ( " Echoed: " + window.api.get( " echo?message=hello " ).decodeToString())
    }
  }) { Text ( " Click me " ) }
}
All the HTTP methods are supported ( post , put , etc.).
These methods will throw an exception if the request fails for any reason. Note that for every HTTP method, there's a corresponding "try" version that will return null instead ( tryPost , tryPut , etc.).
If you know what you're doing, you can of course always use window.fetch(...) directly.
When you define an API route, you are expected to set a status code for the response, or otherwise it will default to status code 404 .
In other words, the following API route stub will return a 404:
@Api
suspend fun error404 ( ctx : ApiContext ) {
}
In contrast, this minimal API route returns an OK status code:
@Api
suspend fun noActionButOk ( ctx : ApiContext ) {
    ctx.res.status = 200
}
مهم
The ctx.res.setBodyText method sets the status code to 200 automatically for you, which is why code in the previous section worked without setting the status directly. Of course, if you wanted to return a different status code value after setting the body text, you could explicitly set it right after making the setBodyText call. على سبيل المثال:
ctx.res.setBodyText( " ... " )
ctx.res.status = 201
The design for defaulting to 404 was chosen to allow you to conditionally handle API routes based on input conditions, where early aborts automatically result in the client getting an error.
A very common case is creating an API route that only handles POST requests:
@Api
suspend fun updateUser ( ctx : ApiContext ) {
    if (ctx.req.method != HttpMethod . POST ) return
    // ...
    ctx.res.status = 200
}
Finally, note that you can add headers to your response. A common endpoint that some servers provide is a redirect (302) with an updated URL location. This would look like:
@Api
suspend fun redirect ( ctx : ApiContext ) {
    if (ctx.req.method != HttpMethod . GET ) return
    ctx.res.headers[ " Location " ] = " ... "
    ctx.res.status = 302
}
بسيط!
Similar to dynamic @Page routes, you can define API routes using curly braces in the same way to indicate a dynamic value that should be captured with some binding name.
For example, the following endpoint will capture the value "123" into a key name called "article" when querying articles/123 :
 // jvmMain/kotlin/com/mysite/api/articles/Article.kt

@Api( " {} " )
suspend fun fetchArticle ( ctx : ApiContext ) {
    val articleId = ctx.req.params[ " article " ] ? : return
    // ...
}
Recall from the @Page docs that specifying a name inside the curly braces defines the variable name used to capture the value. When empty, as above, Kobweb uses the filename to generate it. In other words, you could explicitly specify @Api("{article}") for the same effect.
Once this API endpoint is defined, you just query it as you would any normal API endpoint:
coroutineScope.launch {
  val articleText = window.api.get( " articles/123 " ).decodeToString()
  // ...
}
Finally, astute readers might notice that (like dynamic @Page routes) we use the same property to query dynamic route values as well as query parameters.
Captured dynamic values will always take precedence over query parameters in the params map. In practice, this should never be a problem, because it would be very confusing design to write an API endpoint that got called like articles/123?article=456 . That said, you can also use ctx.req.queryParams["article"] to disambiguate this case if necessary.
@InitApi methods and initializing services Kobweb also supports declaring methods that should be run when your server starts up, which is particularly useful for initializing services that your @Api methods can then use. These methods must be annotated with @InitApi and must take a single InitApiContext parameter.
مهم
If you are running a development server and change any of your backend code, causing a live reloading event, the init methods will be run again.
The InitApiContext class exposes a mutable set property (called data ) which you can put anything into. Meanwhile, @Api methods expose an immutable version of data . This allows you to initialize a service in an @InitApi method and then access it in your @Api methods.
Let's demonstrate a concrete example, imagining we had an interface called Database with a mutable subclass MutableDatabase that implements it and provides additional APIs for mutating the database.
The skeleton for registering and later querying such a database instance might look like this:
@InitApi
fun initDatabase ( ctx : InitApiContext ) {
  val db = MutableDatabase ()
  db.createTable( " users " , listOf ( " id " , " name " )). apply {
    addRow( listOf ( " 1 " , " Alice " ))
    addRow( listOf ( " 2 " , " Bob " ))
  }
  db.loadResource( " products.csv " )

  ctx.data.add< Database >(db)
}

@Api
fun getUsers ( ctx : ApiContext ) {
  if (ctx.req.method != HttpMethod . GET ) return
  val db = ctx.data.get< Database >()
  ctx.res.setBodyText(db.query( " SELECT * FROM users " ).toString())
}Kobweb servers also support persistent connections via streams. Streams are essentially named channels that maintain continuous contact between the client and the server, allowing either to send messages to the other at any time. This is especially useful if you want your server to be able to communicate updates to your client without needing to poll.
Additionally, multiple clients can connect to the same stream. In this case, the server can choose to not only send a message back to your client, but also to broadcast messages to all users (or a filtered subset of users) on the same stream. You could use this, for example, to implement a chat server with rooms.
Like API routes, API streams must be defined under the api package in your jvmMain source directory. By default, the name of the stream will be derived from the file name and path that it's declared in (eg "api/lobby/Chat.kt" will create a channel named "lobby/chat").
Unlike API routes, API streams are defined as properties, not methods. This is because API streams need to be a bit more flexible than routes, since streams consist of multiple distinct events: client connection, client messages, and client disconnection.
Also unlike API routes, streams do not have to be annotated. The Kobweb Application plugin can automatically detect them.
For example, here's a simple stream, declared on the backend, that echoes back any argument it receives:
 // jvmMain/kotlin/com/mysite/api/Echo.kt

val echo = object : ApiStream {
  override suspend fun onClientConnected ( ctx : ClientConnectedContext ) {
    // Optional: ctx.stream.broadcast a message to all other clients that ctx.clientId connected
    // Optional: Update ctx.data here, initializing data associated with ctx.clientId
  }
  override suspend fun onTextReceived ( ctx : TextReceivedContext ) {
    ctx.stream.send(ctx.text)
  }
  override suspend fun onClientDisconnected ( ctx : ClientDisconnectedContext ) {
    // Optional: ctx.stream.broadcast a message to all other clients that ctx.clientId disconnected
    // Optional: Update ctx.data here, removing data associated with ctx.clientId
  }
}
To communicate with an API stream from your site, you need to create a stream connection on the client:
@Page
@Composable
fun ApiStreamDemoPage () {
  val echoStream = rememberApiStream( " echo " , object : ApiStreamListener {
    override fun onConnected ( ctx : ConnectedContext ) {}
    override fun onTextReceived ( ctx : TextReceivedContext ) {
      console.log( " Echoed: ${ctx.text} " )
    }
    override fun onDisconnected ( ctx : DisconnectedContext ) {}
  })

  Button (onClick = {
    echoStream.send( " hello! " )
  }) { Text ( " Click me " ) }
}
After running your project, you can click on the button and check the console logs. If everything is working properly, you should see "Echoed: hello!" for each time you press the button.
نصيحة
The examples/chat template project uses API streams to implement a very simple chat application, so you can reference that project for a more realistic example.
The above example was intentionally verbose, to showcase the broader functionality around API streams. However, depending on your use-case, you can elide a fair bit of boilerplate.
First of all, the connect and disconnect handlers are optional, so you can omit them if you don't need them. Let's simplify the echo example:
 // Backend
val echo = object : ApiStream {
  override suspend fun onTextReceived ( ctx : TextReceivedContext ) {
    ctx.stream.send(ctx.text)
  }
}

// Frontend
val echoStream = rememberApiStream( " echo " , object : ApiStreamListener {
  override fun onTextReceived ( ctx : TextReceivedContext ) {
    console.log( " Echoed: ${ctx.text} " )
  }
})
Additionally, if you only care about the text event, there are convenience methods for that:
 // Backend
val echo = ApiStream { ctx -> ctx.stream.send(ctx.text) }

// Frontend
val echoStream = rememberApiStream( " echo " ) {
  ctx -> console.log( " Echoed: ${ctx.text} " )
}
In practice, your API streams will probably be a bit more involved than the echo example above, but it's nice to know that you can handle some cases only needing a one-liner on the server and another on the client to create a persistent client-server connection!
ملحوظة
If you need to create an API stream with stricter control around when it actually connects to the server, you can create the ApiStream object directly instead of using rememberApiStream :
 val echoStream = remember { ApiStream ( " echo " ) }
val scope = rememberCoroutineScope()

// Later, perhaps after a button is clicked...
scope.launch {
  echoStream.connect( object : ApiStreamListener { /* ... */ })
}When faced with a choice, use API routes as often as you can. They are conceptually simpler, and you can query API endpoints with a CLI program like curl and sometimes even visit the URL directly in your browser. They are great for handling queries of or updates to server resources in response to user-driven actions (like visiting a page or clicking on a button). Every operation you perform returns a clear response code in addition to some payload information.
Meanwhile, API streams are very flexible and can be a natural choice to handle high-frequency communication. But they are also more complex. Unlike a simple request / response pattern, you are instead opting in to manage a potentially long lifetime during which you can receive any number of events. You may have to concern yourself about interactions between all the clients on the stream as well. API streams are fundamentally stateful.
You often need to make a lot of decisions when using API streams. What should you do if a client or server disconnects earlier than expected? How do you want to communicate to the client that their last action succeeded or failed (and you need to be clear about exactly which action because they might have sent another one in the meantime)? What structure do you want to enforce, if any, between a client and server connection where both sides can send messages to each other at any time?
Most importantly, API streams may not horizontally scale as well as API routes. At some point, you may find yourself in a situation where a new web server is spun up to handle some intense load.
If you're using API routes, you're already probably delegating to a database service as your data backend, so this may just work seamlessly.
But for API streams, you many naturally find yourself writing a bunch of broadcasting code. However, this only works to communicate between all clients that are connected to the same server. Two clients connected to the same stream on different servers are effectively in different, disconnected worlds.
The above situation is often handled by using a pubsub service (like Redis). This feels somewhat equivalent to using a database as a service in the API route situation, but this code might not be as straightforward to migrate.
API routes and API streams are not a you-must-use-one-or-the-other situation. Your project can use both! In general, try to imagine the case where a new server might get spun up, and design your code to handle that situation gracefully. API routes are generally safe to use, so use them often. However, if you have a situation where you need to communicate events in real-time, especially situations where you want your client to be continuously directed what to do by the server via events, API streams are a great choice.
ملحوظة
You can also search online about REST vs WebSockets, as these are the technologies that API routes and API streams are implemented with. Any discussions about them should apply here as well.
It is very common to want to set a value on one page that should be made available on other pages. Or maybe you want a value to be restored when a user returns to the page again in the future, even if they've since closed and reopened the browser.
In the world of web development, this is accomplished with web storage, of which there are two flavors: local storage and session storage .
Local storage and web storage have identical APIs, with the key difference being their lifetimes. Local storage values will last until the user clears their browser's cache, while session storage will last until the user closes the current tab.
As you might expect, local storage is useful for values that should stick around indefinitely. User preferences are a common use case here. Many Kobweb sites save the user's last selected color mode in local storage, for example.
Meanwhile, session storage is useful when you want to persist data just as long as the user is interacting with your site but no longer. For example, you might keep track of values typed into text fields that haven't been submitted to the server yet, just in case the user reloads the page by accident (page reloads do not end sessions).
Using the storage APIs in Kotlin is trivial -- just reference the kotlinx.browser.localStorage and kotlinx.browser.sessionStorage objects, which are both of type Storage :
 // Note: Several fields elided for simplicity...
interface Storage {
    fun getItem ( key : String ): String?
    fun setItem ( key : String , value : String )
}
import kotlinx.browser.localStorage
localStorage.setItem( " example-key " , " example-value " )
assert (localStorage.getItem( " example-key " ) == " example-value " )With these APIs, the developer can check if an expected value is present in storage or not when visiting a page and act accordingly, for example by re-routing users to a login page if they detect the user is not logged in.
Kobweb provides the StorageKey utility class to enable the creation and querying of type-safe storage values.
For example, if you want to store an integer value, you can do so like this:
 val BRIGHTNESS_KEY = IntStorageKey ( " brightness " )

localStorage.setItem( BRIGHTNESS_KEY , 100 )
val brightness = localStorage.getItem( BRIGHTNESS_KEY ) ? : 100
The StorageKey class (and all implementors) can take an optional defaultValue parameter, which can help reduce some of the boilerplate in the above code:
 val BRIGHTNESS_KEY = IntStorageKey ( " brightness " , defaultValue = 100 )

val brightness = localStorage.getItem( BRIGHTNESS_KEY ) !!
While typed key support is provided for all primitive types (strings, booleans, ints, floats, etc.) and also enums, you can create your own custom implementations by providing your own to-string and from-string conversion functions:
 class User ( val name : String , val id : String )

class UserStorageKey ( name : String ) : StorageKey<User>(name) {
    override fun convertToString ( value : User ) = " $name : $id "
    override fun convertFromString ( value : String ): User ? = value.split( " : " )
        . takeIf { it.size == 2 }
        ?. let { User (it[ 0 ], it[ 1 ]) }
}

val LOGGED_IN_USER_KEY = UserStorageKey ( " logged-in-user " )

val loggedInUser = localStorage.getItem( LOGGED_IN_USER_KEY )
If you are using Kotlinx serialization in your project, you can use it to simplify the above code:
@Serializable
class User ( val name : String , val id : String )

class UserStorageKey ( name : String ) : StorageKey<User>(name) {
    override fun convertToString ( value : User ): String = Json .encodeToString(value)
    override fun convertFromString ( value : String ): User ? =
        try { Json .decodeFromString(value) } catch (ex : Exception ) { null }
} For simplicity, new projects can choose to put all their pages and widgets inside a single application module, eg site/ .
However, you can define components and/or pages in separate modules and apply the com.varabyte.kobweb.library plugin on them (in contrast to your main module which applies the com.varabyte.kobweb.application plugin.)
In other words, you can split up and organize your project like this:
 my-project
├── sitelib
│   ├── build.gradle.kts # apply "com.varabyte.kobweb.library"
│   └── src/jsMain
│       └── kotlin.org.example.myproject.sitelib
│           ├── components
│           └── pages
└── site
    ├── build.gradle.kts # apply "com.varabyte.kobweb.application"
    ├── .kobweb/conf.yaml
    └── src/jsMain
        └── kotlin.org.example.myproject.site
            ├── components
            └── pages
If you'd like to explore a multimodule project example, you can do so by running:
$ kobweb create examples/chatwhich demonstrates a chat application with its auth and chat functionality each managed in their own separate modules.
Web workers are a standard web technology that allow you to run JavaScript code in a separate thread from your main application. Although JavaScript is famously single-threaded, web workers offer a way for you to run potentially expensive code in parallel to your main site without slowing it down.
A web worker script is entirely isolated from your main site and has no access to the DOM. The only way to communicate between them is via message passing.
ملحوظة
Astute readers may recognize the actor model here, which is an effective way to allow concurrency without worrying about common synchronization issues that plague common lock-based approaches.
A somewhat forced but easy-to-understand example of a web worker is one that computes the first N prime numbers.
While the worker is crunching away on intensive calculations, your site still works as normal, fully responsive. When the worker is finished, it posts a message to the application, which handles it by updating relevant UI elements.
Kobweb aims to make using web workers as easy as possible.
Here's everything you have to do (we'll show examples of these steps shortly):
kotlin { ... } block in your build script with a configAsKobwebWorker() call."com.varabyte.kobweb:kobweb-worker" .WorkerFactory interface, providing a WorkerStrategy that represents the core logic of your worker. import com.varabyte.kobweb.gradle.worker.util.configAsKobwebWorker
plugins {
alias(libs.plugins.kotlin.multiplatform)
alias(libs.plugins.kobweb.worker) // or id("com.varabyte.kobweb.worker")
}
group = " example.worker "
version = " 1.0-SNAPSHOT "
kotlin {
configAsKobwebWorker( " example-worker " )
sourceSets {
jsMain.dependencies {
implementation(libs.kobweb.worker) // or "com.varabyte.kobweb:kobweb-worker"
}
}
} The WorkerFactory interface is minimal:
 interface WorkerFactory < I , O > {
  fun createStrategy ( postOutput : OutputDispatcher < O >): WorkerStrategy < I >
  fun createIOSerializer (): IOSerializer < I , O >
}
This concise interface still captures a lot of information. It declares:
postOutput object that can be used to send output messages back to the application. The WorkerStrategy class represents the core logic your worker does after receiving input from the application, as well as exposes a self parameter that provides useful worker functionality.
 abstract class WorkerStrategy < I > {
  protected val self : DedicatedWorkerGlobalScope
  abstract fun onInput ( inputMessage : InputMessage < I >)
}
The OutputDispatcher is a simple class which allows you to send output messages back to the application.
 class OutputDispatcher < O > {
  operator fun invoke ( output : O , transferables : Transferables = Transferables . Empty )
}

// `postOutput: OutputDispatcher<String>` can be called like a normal method, e.g. `postOutput("hello!")`
ملحوظة
Do not worry about the Transferables parameter for now. Transferable objects are a somewhat niche, performance-related feature, and they will be discussed later. It is not expected that a majority of workers will require them.
Finally, IOSerializer is responsible for marshalling objects between the worker and the application.
 interface IOSerializer < I , O > {
  fun serializeInput ( input : I ): String
  fun deserializeInput ( input : String ): I
  fun serializeOutput ( output : O ): String
  fun deserializeOutput ( output : String ): O
}
This class allows you to use the serialization library of your choice. However, as you'll see later, this can be a one-liner for developers using Kotlinx Serialization.
Once the Kobweb Worker Gradle plugin finds your worker factory implementation, it will generate a simple Worker class that wraps it.
 // Generated code!
class Worker ( val onOutput : WorkerContext .( O ) -> Unit ) {
  fun postInput ( input : I , transferables : Transferables = Transferables . Empty )
  fun terminate ()
}
Applications will interact with this Worker and not the WorkerStrategy directly. In fact, you should make your worker factory implementation internal to prevent applications from seeing anything but the worker.
You should think of the WorkerStrategy as representing implementation details while the Worker class represents a public API. In other words, the WorkerStrategy receives inputs, processes data, and posts outputs, while the Worker allows users to post inputs and get notified when outputs are ready.
An application module (ie one that applies the Kobweb Application Gradle plugin) will automatically discover any Kobweb worker dependencies, extracting its worker script and putting it under the public/ folder of your final site.
The following sections introduce concrete worker factories, which should help solidify the abstract concepts introduced above.
The simplest worker strategy possible is one that blindly repeats back whatever input it receives.
This is never a worker strategy that you'd actually create -- there wouldn't be a need for it -- but it's a good starting point for seeing a worker factory in action.
When you have a worker strategy that works with raw strings like this one does, you can use a one-line helper method to implement the createIOSerializer method, called createPassThroughSerializer (since it just passes the raw strings unmodified).
 // Worker module
internal class EchoWorkerFactory : WorkerFactory < String , String > {
  override fun createStrategy ( postOutput : OutputDispatcher < String >) = WorkerStrategy < String > { input ->
    postOutput(input)
  }
  override fun createIOSerializer () = createPassThroughSerializer()
}
Based on that implementation, a worker called EchoWorker will be auto-generated at compile time. Using it in your application looks like this:
 // Application module
val worker = rememberWorker {
  EchoWorker { message -> println ( " Echoed: $message " ) }
}

// Later
worker.postInput( " hello! " ) // After a round trip: "Echoed: hello!"
هذا كل شيء!
مهم
Note the use of the rememberWorker method. This internally calls a remember but also sets up disposal logic that terminates the worker when the composable is exited. If you just use a normal remember block, the worker may keep running longer than you expect, even if you navigate to another part of your site.
You can also stop a worker yourself by calling worker.terminate() directly.
This next worker strategy will take in an Int value from the user. This number represents how many seconds to count down, firing a message for each second that passes.
This is another strategy that you'd never need in practice -- you'd just use the window.setInterval method yourself in your site script -- but we'll show this anyway to demonstrate two additional concepts on top of the echo worker:
postOutput as often as you want. // Worker module
internal class CountDownWorkerFactory : WorkerFactory < Int , Int > {
override fun createStrategy ( postOutput : OutputDispatcher < Int >) = WorkerStrategy < Int > { input ->
var nextCount = input
var intervalId : Int = 0
intervalId = self.setInterval({ // A
postOutput(nextCount) // B
if (nextCount > 0 ) { -- nextCount } else { self.clearInterval(intervalId) }
}, 1000 )
}
override fun createIOSerializer () = object : IOSerializer < Int , Int > { // C
override fun serializeInput ( input : Int ) = input.toString()
override fun deserializeInput ( input : String ) = input.toInt()
override fun serializeOutput ( output : Int ) = output.toString()
override fun deserializeOutput ( output : String ) = output.toInt()
}
}Notice the three comment tags above.
self.setInterval (and self.clearInterval later) instead of the window object to do this. This is because the window object is only available in the main script and using it here will throw an exception.postOutput any time following an input message, not just in direct response to one.deserialize calls, because you control them! In other words, the only way you'd get a bad string is if you generated it yourself in either of the serialize methods. If a message serializer ever does throw an exception, then the Kobweb worker will simply ignore it as a bad message.Using the worker in your application looks like this:
 // Application module
val worker = rememberWorker {
  CountDownWorker {
    if (it > 0 ) {
      console.log(it + " ... " )
    } else {
      console.log( " HAPPY NEW YEAR!!! " )
    }
  }
}

// Later
worker.postInput( 10 ) // 10... 9... 8... etc.
نصيحة
If you need really accurate, consistent interval timers, creating a worker like this may actually be beneficial. According to this article, web worker timers are slightly more accurate than timers run in the main thread, as they don't have to compete with the rest of the site's responsibilities. Also, it seems that web workers timers stay consistent even if the site tab loses focus.
Finally, we get to the worker idea we introduced in the very first section -- finding the first N primes.
This kind of worker likely looks like one that would actually get used in a real codebase, that being a worker which performs a potentially expensive, UI-agnostic calculation.
We'll also use this example to demonstrate how to use Kotlinx Serialization to easily declare rich input and output message types.
First, add kotlinx-serialization and kobwebx-serialization-kotlinx to your dependencies:
 // build.gradle.kts
kotlin {
  configAsKobwebWorker()
  jsMain.dependencies {
    implementation(libs.kotlinx.serialization.json) // or "org.jetbrains.kotlinx:kotlinx-serialization-json"
    implementation(libs.kobwebx.worker.kotlinx.serialization) // or "com.varabyte.kobwebx:kobwebx-serialization-kotlinx"
  }
}
Then, define the worker factory:
@Serializable
data class FindPrimesInput ( val max : Int )

@Serializable
data class FindPrimesOutput ( val max : Int , val primes : List < Int >)

private fun findPrimes ( max : Int ): List < Int > {
  // Loop through all numbers, taking out multiples of each prime
  // e.g. 2 will take out 4, 6, 8, 10, etc.
  // then 3 will take out 9, 15, 21, etc. (6, 12, and 18 were already removed)
  val primes = ( 1 .. max).toMutableList()
  var primeIndex = 1 // Skip index 0, which is 1.
  while (primeIndex < primes.lastIndex) {
    val prime = primes[primeIndex]
    var maybePrimeIndex = primeIndex + 1
    while (maybePrimeIndex <= primes.lastIndex) {
      if (primes[maybePrimeIndex] % prime == 0 ) {
        primes.removeAt(maybePrimeIndex)
      } else {
        ++ maybePrimeIndex
      }
    }
    primeIndex ++
  }
  return primes
}

internal class FindPrimesWorkerFactory : WorkerFactory < FindPrimesInput , FindPrimesOutput > {
  override fun createStrategy ( postOutput : OutputDispatcher < FindPrimesOutput >) =
    object : WorkerStrategy < FindPrimesInput >() {
      override fun onInput ( inputMessage : InputMessage < FindPrimesInput >) {
        val input = inputMessage.input
        postOutput( FindPrimesOutput (input.max, findPrimes(input.max)))
      }
    }

  override fun createIOSerializer () = Json .createIOSerializer< FindPrimesInput , FindPrimesOutput >()
}
Most of the complexity above is the findPrimes algorithm itself!
The onInput handler is about as easy as it gets. Notice that we pass the input max value back into the output, so that the receiving application can easily correlate the output with the input.
And finally, note the use of the Json.createIOSerializer method call. This utility method comes from the kobwebx-serialization-kotlinx dependency, allowing you to use a one-liner to implement all the serialization methods for you.
نصيحة
It's fairly trivial to write the message serializer yourself if you don't want to pull in the extra dependency (or if you are using a different serialization library):
 object : IOSerializer < FindPrimesInput , FindPrimesOutput > {
  override fun serializeInput ( input : FindPrimesInput ): String = Json .encodeToString(input)
  override fun deserializeInput ( input : String ): FindPrimesInput = Json .decodeFromString(input)
  override fun serializeOutput ( output : FindPrimesOutput ): String = Json .encodeToString(output)
  override fun deserializeOutput ( output : String ): FindPrimesOutput = Json .decodeFromString(output)
}
Using the worker in your application looks like this:
 // Application module
val worker = rememberWorker {
  FindPrimesWorker {
    println ( " Primes for ${it.max} : ${it.primes} " )
  }
}

// Later
worker.postInput( FindPrimesInput ( 1000 )) // Primes for 1000: [1, 2, 3, 5, 7, 11, ..., 977, 983, 991, 997]
The richly-typed input and output messages allow for a very explicit API here, and in the future, more parameters could be added (with default values) to either input or output classes, extending the functionality of your workers without breaking existing code.
We don't show it here, but you could also create sealed classes for your input and output messages, allowing you to define multiple types of messages that your worker can receive and respond to.
Occasionally, you may find yourself with a very large blob of data in your main application that you want to pass to a worker (or vice versa!). For example, maybe your worker will be responsible for processing a potentially large, multi-megabyte image.
Serializing a large amount of data can be expensive! In fact, you may find that even though your worker can run efficiently on a background thread, sending a large amount of data to it can cause your site to experience a significant pause during the copy. This can easily be seconds if the data is large enough!
This isn't just an issue with Kobweb. This was originally a problem with standard web APIs. To support this use-case, web workers introduced the concept of transferable objects.
Instead of an object being copied over, its ownership is transferred over from one thread to another. Attempts to use the object in the original thread after that point will throw an exception.
Kobweb workers support transferable objects in a type-safe, Kotlin-idiomatic way, via the Transferables class. Using it, you can register named objects in one thread and then retrieve them by that name in another.
Here's an example where we send a very large array over to a worker.
 // In your site:
val largeArray = Uint8Array ( 1024 * 1024 * 8 ). apply { /* initialize it */ }

worker.postInput( WorkerInput (), Transferables {
  add( " largeArray " , largeArray)
})

// In the worker:
val largeArray = transferables.getUint8Array( " largeArray " ) !!
And, of course, workers can send transferable objects back to the main application as well.
 // In the worker:
val largeArray = Uint8Array ( 1024 * 1024 * 8 ). apply { /* initialize it */ }
postOutput( WorkerOutput (), Transferables {
  add( " largeArray " , largeArray)
})

// In your site:
val worker = rememberWorker {
  ExampleWorker {
    val largeArray = transferables.getUint8Array( " largeArray " ) !!
    // ...
  }
}
Finally, it's worth noting that not every object can be transferred. In fact, very few can! You can refer to the official docs for a full list of supported transferable objects. When building a Transferables object, the add method is type-safe, meaning you cannot add an object that cannot then be transferred over.
حذر
Kotlin/JS does not support a majority of the classes listed here, so neither does Kobweb as a result. If you find yourself needing one of these missing classes, consider filing an issue and we might wrap the JavaScript class into Kobweb directly and update the Transferables API.
Despite official limitations, Kobweb actually offers support for a few additional types, as a convenience. If it is possible to extract transferable content from an object, transfer that , and then build the original object back up on the other end, we are happy to do that for you.
Typed arrays, such as Int8Array , are a great example. They are actually not transferable! Only their internal ArrayBuffer is.
However, when you ask Kobweb to transfer a typed array, it will instead transfer its contents for you and regenerate the outer array seamlessly on the other end. This is just boilerplate code that you would have had to write yourself anyway.
نصيحة
The examples/imageprocessor template demonstrates workers leveraging Transferables to pass image data from the main thread to a worker and back, so you can reference that project for a complete, working example.
Due to the fundamental design of web workers, you can only define a single worker per module. If you need multiple workers, you must create multiple modules, each providing their own separate worker strategy.
The Kobweb Worker Gradle plugin will complain if it finds more than one worker factory implemented in a module.
By default, the Kobweb Worker Gradle plugin requires your worker factory class to be suffixed with WorkerFactory so it has guidance on how to name the final worker (for example, MyExampleWorkerFactory would generate a worker called MyExampleWorker , placing it in the same package as the factory class).
 //  The Kobweb Worker Gradle plugin will complain about this name!
internal class MyWorkerInfoProvider : WorkerFactory < I , O > { /* ... */ }
If you don't like this constraint, you can override the kobweb.worker.fqcn property in your build script to provide a worker name explicitly:
 // build.gradle.kts
kobweb {
  worker {
    fqcn.set( " com.mysite.MyWorker " )
  }
}
at which point, you are free to name your worker factory whatever you like.
If you want to just change the name of your worker, you can omit the package:
 // build.gradle.kts
kobweb {
  worker {
    fqcn.set( " .MyWorker " ) // Uses the same package as the worker factory
  }
}In practice, almost every site can get away without ever using a worker, especially in Kotlin/JS where you can leverage coroutines as a way to mimic concurrency in your single-threaded site.
That said, if you know your site is going to run some logic that is not concerned with the web DOM at all, and which might additionally take a long time to run, separating that out into its own worker can be a sensible approach.
By isolating your logic into a separate worker, you not only keep it from potentially freezing your UI, but you also guarantee that it will be strongly decoupled from the rest of your site, preventing future developers from introducing potential spaghetti code issues in the future.
Another interesting use-case for a worker is isolating some sort of complex state management, where encapsulating that complexity keeps the rest of your site easier to reason about.
For example, maybe you're making a web game, and you decide to create a worker to manage all the game logic. You could of course create a Kobweb library for the same effect, but using a worker has a stronger guarantee that the logic will never interact directly with your site's UI.
حذر
You should be aware that, since a web worker is a whole separate standalone script, it needs to include its own copy of the Kotlin/JS runtime, even though your main site already has its own copy.
Even after running a dead-code elimination pass, I found that the trivial echo worker's final output was about 200K (which compressed down to 60K before being sent over the wire).
For most practical use-cases, a 60K download is not a deal-breaker, especially as most images are many multiples larger than that. But developers should be aware of this, and if this is indeed a concern, you may need to avoid using Kobweb workers on your site.
Typically, sites live at the top level. This means if you have a root file index.html and your site is hosted at the domain https://mysite.com then that HTML file can be accessed by visiting https://mysite.com/index.html .
However, in some cases, your site may be hosted under a subfolder, such as https://example.com/products/myproduct/ , in which case your site's root index.html file would live at https://example.com/products/myproduct/index.html .
Kobweb needs to know about this subfolder structure so that it can take it into account in its routing logic. This can be specified in your project's .kobweb/conf.yaml file with the basePath value under the site section:
 site :
  title : " ... "
  basePath : " ... "
where the value of basePath is the part between the origin part of the URL and your site's root. For example, if your site is rooted at https://example.com/products/myproduct/ , then the value of basePath would be products/myproduct .
نصيحة
GitHub Pages is a common web hosting solution that developers use for their sites. By default, this approach hosts your site under a subfolder (set to the project's name).
In other words, if you are planning to host your Kobweb site on GitHub Pages, you will need to set an appropriate basePath value. For a concrete example of setting basePath for GitHub Pages specifically, check out this relevant section from my blog site that goes over it.
Once you've set your basePath in the conf.yaml file, you can generally design your site without explicitly mentioning it, as Kobweb provides base-path-aware widgets that handle it for you. For example, Link("/docs/manuals/v123.pdf") (or Anchor("/docs/manuals/v123.pdf") if you're not using Silk) will automatically resolve to https://example.com/products/myproduct/docs/manuals/v123.pdf .
Of course, you may find yourself working with code external to Kobweb that is not base-path aware. If you find you need to access the base path value explicitly in your own code, you can do so by using the BasePath.value property or by calling the BasePath.prepend companion method.
 // The Video element comes from Compose HTML and is NOT base-path aware.
// Therefore, we need to manually prepend the base path to the video source.
Video (attrs = {
    attr( " width " , 320 .px.toString())
    attr( " height " , 240 .px.toString())
}) {
    Source (attrs = {
        attr( " type " , " video/mp4 " )
        attr( " src " , BasePath .prepend( " /videos/demo.mp4 " ))
    })
}Over the lifetime of a site, you may find yourself needing to change its structure. Perhaps you need to move a handful of pages under a new folder, or you need to rename a page, etc.
However, if your site has been live for a while, you may have a ton of internal links to those pages. Worse, the rest of the web (say, Google search results, or blogs and articles) may be full of links to those old locations, so even if you can find and fix up everything on your end, you can't control what others have done.
The web has long supported the concept of redirects to handle this. By advertising what links you've changed publicly, search indices can be updated and even if someone visits your page at the old location, your server can automatically tell your browser where they should have gone instead.
In Kobweb, you can define redirects in your project's .kobweb/conf.yaml file. You simplify define a series of from and to values in the server.redirects block.
 server :
  redirects :
    - from : " /old-page "
      to : " /new-page "
Kobweb servers will pick up these redirect values from the conf.yaml file and will intercept any matching incoming route requests, sending back a 301 status code to the client.
So, in the above example, if a user tries to visit https://example.com/old-page , they will be redirected to https://example.com/new-page automatically. Any internal links on your site that reference the old page will also be handled -- trying to navigate to the old location will automatically end up at the new one.
The Kobweb redirect feature also supports using regexes in the from value, which can then be referenced in the to section using $1 , $2 , etc. variables which will be substituted with text matches in parentheses.
Group matching can be really useful if you want to redirect a whole section of your site to a new location. For example, the following redirect rule can help if you've moved all pages from an old parent folder into a new one:
 server :
  redirects :
    - from : " /socials/facebook/([^/]+) "
      to : " /socials/meta/$1 "
The last thing to note is that if you have multiple redirects, they will be processed in order and all applied. This should rarely matter in most cases, but you can use it if you need to combine both changing a folder name AND a page name:
 server :
  redirects :
    - from : " /socials/facebook/([^/]+) "
      to : " /socials/meta/$1 "
    - from : " (/socials/meta)/about-facebook "
      to : " $1/about-meta "
مهم
If you are using a third-party static hosting provider to host your site, they will be unaware of the Kobweb conf.yaml file, so you will need to read their documentation to learn how to configure your redirects with them.
In this case, you may be able to skip defining redirects in your own Kobweb configuration file, since it may be redundant at that point. However, it may still be useful to do for documentation purposes and to ensure you won't 404 due to an old, internal link that you forgot to update.
CSS Layers are a very powerful but also relatively new CSS feature, which allow wrapping CSS style rules inside named layers as a way to control their priorities. In short, CSS layers are arbitrary names that you specify the order of. This can be an especially useful tool when dealing with CSS style rules that are fighting with each other.
Compose HTML does not support CSS layers, but Silk does! Even if you never use layers directly in your own project, Silk uses them, so users can still benefit from the feature.
By default, Silk defines six layers (from lowest to highest ordering priority):
The reset layer is useful for defining CSS rules that exist to compensate for browser defaults that are inconsistent with each other or to override values that exist for legacy reasons that modern web design has moved away from.
The base layer is actually not used by Silk (this may change someday), but it is provided so users can home general CSS styles in there if they want to. It is a useful place to define global styles that should get easily overridden by any other CSS rule defined elsewhere in your project, such as inside a CssStyle .
The next four styles are associated with the various flavors of CssStyle definitions:
 interface SomeKind : ComponentKind
val SomeStyle = CssStyle < SomeKind > { /* ... */ } // "component-styles"
val SomeVariant = SomeStyle .addVariant { /* ... */ } // "component-variants"
class ButtonSize ( /* ... */ ) : CssStyle.Base( /* ... */ ) // "restricted-styles"
val GeneralStyle = CssSTyle { /* ... */ } // "general-styles"
We chose this order to ensure that CSS styles are layered in ways that match intuition; for example, a style's variant will always layer on top of the base style itself; meanwhile, a user's declared style will always layer over a component style defined by Silk.
You can register your own custom layers inside an @InitSilk method, using the cssLayers property:
@InitSilk
fun initSilk ( ctx : InitSilkContext ) {
    ctx.stylesheet.cssLayers.add( " theme " , " layout " , " utilities " )
}
When declaring new layers, you can anchor them relative to existing layers. This is useful, for example, if you want to insert layers between Silk's base layer and its CssStyle layers:
@InitSilk
fun initSilk ( ctx : InitSilkContext ) {
    ctx.stylesheet.cssLayers.add( " third-party " , after = SilkLayer . BASE )
}
@CssLayer annotation If you need to affect the layer for a CssStyle block, you can tag it with the @CssLayer annotation:
@CssLayer( " important " )
val ImportantStyle = CssStyle { /* ... */ }
ملحوظة
You should always explicitly register your layers. So, for the code above, you should also declare:
@InitSilk
fun initSilk ( ctx : InitSilkContext ) {
  ctx.stylesheet.cssLayers.add( " important " )
}
If you don't do this, the browser will append add any unknown layer to the end of the CSS layer list (ie the highest priority spot). In many cases this will be fine, but being explicit both expresses your intention clearly and reduces the chance of your site breaking in subtle ways when a future developer adds a new layer in the future.
Silk will print out a warning to the console if it detects any unregistered layers.
layer blocks @InitSilk blocks let you register general CSS styles. You can wrap them insides layers using layer blocks:
@InitSilk
fun initSilk ( ctx : InitSilkContext ) {
    ctx.stylesheet. apply {
        cssLayers.add( " headers " )
        layer( " headers " ) {
            registerStyle( " h1 " ) { /* ... */ }
            registerStyle( " h2 " ) { /* ... */ }
        }
    }
}
Of course, you can associate styles with existing layers, such as the base layer we mentioned a few sections above:
@InitSilk
fun initSilk ( ctx : InitSilkContext ) {
    ctx.stylesheet. apply {
        layer( SilkLayer . BASE ) {
            registerStyle( " div " ) { /* ... */ }
            registerStyle( " span " ) { /* ... */ }
        }
    }
}Finally, if you are working with third party CSS stylesheets, it can be a very useful trick to wrap them in their own layer.
For example, let's say you are fighting with a third party library whose styles are a bit too aggressive and are interfering with your own styles.
First, inside your build script, import the stylesheet using an @import directive:
 // BEFORE
kobweb.app.index.head.add {
  link {
    rel = " stylesheet "
    href = " /highlight.js/styles/dracula.css "
  }
}

// AFTER
kobweb.app.index.head.add {
  style {
    unsafe {
      raw( " @import url( " /highlight.js/styles/dracula.css " ) layer(highlightjs); " )
    }
  }
}
Then, register your new layer in an @InitSilk block.
@InitSilk
fun initSilk ( ctx : InitSilkContext ) {
    // Layer(s) referenced in build.gradle.kts
    ctx.stylesheet.cssLayers.add( " highlightjs " , after = SilkLayer . BASE )
}
You've just tamed some wild CSS styles, congratulations!
Kobweb used to support a feature called legacy routes (you can read more about the feature here using an earlier version of the Kobweb README). This was an emergency feature added to give users time to respond to us fixing a long-standing mistake with our initial route naming algorithm without breaking their existing sites.
As of v0.18.3, we believe enough time has passed, and legacy route support has finally been removed. As a result, users who never migrated away from the feature might be seeing an error pointing them to this section.
If that is you, please follow these steps:
../gradlew kobwebListRoutes and look for any routes that have hyphens in them.redirects section of the conf.yaml file to explicitly redirect from the old route to the new one. See the Redirects▲ section for more information.legacyRouteRedirectStrategy = ... line from the kobweb.app block in your build script. نصيحة
This target commit demonstrates how I upgraded my blog site (which uses Firebase) to move away from Kobweb legacy route redirecting.
Occasionally, you might find yourself wanting code for your site that is better generated programmatically than written by hand.
The recommended best practice is to create a Gradle task that is associated with its own unique output directory, use the task to write some code to disk under that directory, and then add that task as a source directory for your project.
ملحوظة
The reason to encourage tasks with their own unique output directory is because this approach is very friendly with Gradle caching. You may read more here to learn about this in more detail.
Adding your task as a source directory ensures it will get triggered automatically before the Kobweb tasks responsible for processing your project are themselves run.
You want to do this even if you only plan to generate a single file. This is because associating your task with an output directory is what enables it to be used in place of a source directory.
The structure for this approach generally looks like this:
 // e.g. site/build.gradle.kts

val generateCodeTask = tasks.register( " generateCode " ) {
  group = " myproject "
  // You may not need an input file or dir for your task, and if so, you can exclude the next line. If you do need one,
  // I'm assuming it is a data file or files in your resources somewhere.
  val resInputDir = layout.projectDirectory.dir( " src/jsMain/resources " )
  // $name here to create a unique output directory just for this task
  val genOutputDir = layout.buildDirectory.dir( " generated/ $group / $name /src/jsMain/kotlin " )

  inputs.dir(resInputDir).withPathSensitivity( PathSensitivity . RELATIVE )
  outputs.dir(genOutputDir)

  doLast {
    genOutputDir.get().file( " org/example/pages/SomeCode.kt " ).asFile. apply {
      parentFile.mkdirs()
      // find and parse file out of resInputDir and write generated code here:
      writeText( /* ... */ )

      println ( " Generated $absolutePath " )
    }
  }
}

kotlin {
  configAsKobwebApplication()
  commonMain.dependencies { /* ... */ }
  jsMain {
    kotlin.srcDir(generateCodeTask) // <----- Set your task here
    dependencies { /* ... */ }
  }
} In case you want to generate resources that end up in your final site as files (eg mysite.com/rss.xml ) and not code, the main change you need to make is migrating the line kotlin.srcDir to resources.srcDir :
 // e.g. site/build.gradle.kts

val generateResourceTask = tasks.register( " generateResource " ) {
  group = " myproject "
  // $name here to create a unique output directory just for this task
  val genOutputDir = layout.buildDirectory.dir( " generated/ $group / $name /src/jsMain/resources " )

  outputs.dir(genOutputDir)

  doLast {
    // NOTE: Use "public/" here so the export pass will find it and put it into the final site
    genOutputDir.get().file( " public/rss.xml " ).asFile. apply {
      parentFile.mkdirs()
      writeText( /* ... */ )

      println ( " Generated $absolutePath " )
    }
  }
}

kotlin {
  configAsKobwebApplication()
  commonMain.dependencies { /* ... */ }
  jsMain {
    resources.srcDir(generateResourceTask) // <----- Set your task here
    dependencies { /* ... */ }
  }
}Currently, Kobweb is still under active development, and due to our limited resources, we are focusing on improving the path to creating a new project from scratch. However, some users have shown interest in Kobweb but already have an existing project and aren't sure how to add Kobweb into it.
As long as you understand that this path isn't officially supported yet, we'll provide steps below to take which may help people accomplish this manually for now. Honestly, the hardest part is creating a correct .kobweb/conf.yaml , which the following steps help you work around:
 # In some tmp directory somewhere
kobweb create app
# or `kobweb create app/empty`, if you are already
# experienced with Kobweb and know what you're doingsite subfolder out into your own project. (Once done, you can delete the dummy project, as it has served its usefulness.) cp -r app/site /path/to/your/project
# delete appsettings.gradle.kts file, include the new module and add our custom artifact repository link so your project can find the Kobweb Gradle plugins. // settings.gradle.kts
pluginManagement {
repositories {
// ... other repositories you already declared ...
maven( " https://us-central1-maven.pkg.dev/varabyte-repos/public " )
}
}
// ... other includes you already declared
include( " :site " )build.gradle.kts file, add our custom artifact repository there as well (so your project can find Kobweb libraries) // build.gradle.kts
subprojects {
repositories {
// ... other repositories you already declared ...
maven( " https://us-central1-maven.pkg.dev/varabyte-repos/public " )
}
}
// If you prefer, you can just declare this directly inside the
// repositories block in site's `build.gradle.kts` file, but I
// like declaring my maven repositories globally.gradle/libs.versions.toml [ versions ]
jetbrains-compose = " ... " # replace with actual version, see COMPATIBILITY.md!
kobweb = " ... " # replace with actual version
kotlin = " ... " # replace with actual version
[ libraries ]
kobweb-api = { module = " com.varabyte.kobweb:kobweb-api " , version.ref = " kobweb " }
kobweb-core = { module = " com.varabyte.kobweb:kobweb-core " , version.ref = " kobweb " }
kobweb-silk = { module = " com.varabyte.kobweb:kobweb-silk " , version.ref = " kobweb " }
kobwebx-markdown = { module = " com.varabyte.kobwebx:kobwebx-markdown " , version.ref = " kobweb " }
silk-icons-fa = { module = " com.varabyte.kobwebx:silk-icons-fa " , version.ref = " kobweb " }
[ plugins ]
jetbrains-compose = { id = " org.jetbrains.compose " , version.ref = " jetbrains-compose " }
kobweb-application = { id = " com.varabyte.kobweb.application " , version.ref = " kobweb " }
kobwebx-markdown = { id = " com.varabyte.kobwebx.markdown " , version.ref = " kobweb " }
kotlin-multiplatform = { id = " org.jetbrains.kotlin.multiplatform " , version.ref = " kotlin " }If everything is working as expected, you should be able to run Kobweb within your project now:
 # In /path/to/your/project
cd site
kobweb run
If you're still having issues, you may want to connect with us▼ for support (but understand that getting Kobweb added to complex existing projects may not be something we can currently prioritize).
While you can always export your site manually on your machine, you may want to automate this process. A common solution for this is a GitHub workflow.
For your convenience, we include a sample workflow below that exports your site and then uploads the results (which can be downloaded from a link shown in the workflow summary page):
 # .github/workflows/export-site.yml

name : Export Kobweb site

on :
  workflow_dispatch :

jobs :
  export_and_upload :
    runs-on : ubuntu-latest
    defaults :
      run :
        shell : bash

    env :
      KOBWEB_CLI_VERSION : 0.9.18

    steps :
      - uses : actions/checkout@v4
      - uses : actions/setup-java@v4
        with :
          distribution : temurin
          java-version : 11

      # When projects are created on Windows, the executable bit is sometimes lost. So set it back just in case.
      - name : Ensure Gradle is executable
        run : chmod +x gradlew

      - name : Setup Gradle
        uses : gradle/actions/setup-gradle@v3

      - name : Query Browser Cache ID
        id : browser-cache-id
        run : echo "value=$(./gradlew -q :site:kobwebBrowserCacheId)" >> $GITHUB_OUTPUT

      - name : Cache Browser Dependencies
        uses : actions/cache@v4
        id : playwright-cache
        with :
          path : ~/.cache/ms-playwright
          key : ${{ runner.os }}-playwright-${{ steps.browser-cache-id.outputs.value }}

      - name : Fetch kobweb
        uses : robinraju/[email protected]
        with :
          repository : " varabyte/kobweb-cli "
          tag : " v${{ env.KOBWEB_CLI_VERSION }} "
          fileName : " kobweb-${{ env.KOBWEB_CLI_VERSION }}.zip "
          tarBall : false
          zipBall : false

      - name : Unzip kobweb
        run : unzip kobweb-${{ env.KOBWEB_CLI_VERSION }}.zip

      - name : Run export
        run : |
          cd site
          ../kobweb-${{ env.KOBWEB_CLI_VERSION }}/bin/kobweb export --notty --layout static

      - name : Upload site
        uses : actions/upload-artifact@v4
        with :
          name : site
          path : site/.kobweb/site/
          if-no-files-found : error
          retention-days : 1
You can copy this workflow (or parts of it) into your own GitHub project and then modify it to your needs.
Some notes...
kobweb export needs to download a browser the first time it is run. This workflow sets up a cache that saves it across runs. The cache is tagged with a unique ID so that future Kobweb releases, which may change the version of the browser downloaded, will use a new cache bucket (allowing GitHub to eventually clean up the old one).gh_pages repository. I've included this here (and set the retention days very low) just so you can verify that the workflow is working for your project.For a simple site, the above workflow should take about 2 minutes to run.
StyleVariable s using calc StyleVariable s work in a subtle way that is usually fine until it isn't -- which is often when you try to interact with their values instead of just passing them around.
Specifically, this would compile but be a problem at runtime:
 val MyOpacityVar by StyleVariable < Number >()

// later...

// Border opacity should be more opaque than the rest of the widget
val borderOpacity = max( 1.0 , MyOpacityVar .value().toDouble() * 2 )
To see what the problem is, let's first take a step back. The following code:
 val MyOpacityVar by StyleVariable < Number >()

// later...
Modifier .opacity( MyOpacityVar .value())
generates the following CSS:
opacity : var ( --my-opacity ); However, MyOpacityVar acts like a Number in our code! How does something that effectively has a type of Number generate text output like var(--my-opacity) ?
This is accomplished through the use of Kotlin/JS's unsafeCast , where you can tell the compiler to treat a value as a different type than it actually is. In this case, MyOpacityVar.value() returns some object which the Kotlin compiler treats like a Number for compilation purposes, but it is really some class instance whose toString() evaluates to var(--my-opacity) .
Therefore, Modifier.opacity(MyOpacityVar.value()) works seemingly like magic! However, if you try to do some arithmetic, like MyOpacityVar.value().toDouble() * 0.5 , the compiler might be happy, but things will break silently at runtime, when the JS engine is asked to do math on something that's not really a number.
In CSS, doing math with variables is accomplished by using calc blocks, so Kobweb offers its own calc method to mirror this. When dealing with raw numerical values, you must wrap them in num so we can escape the raw type system which was causing runtime confusion above:
calc { num( MyOpacityVar .value()) * num( 0.5 ) }
// Output: "calc(var(--my-opacity, 1) * 0.5)"
At this point, you can write code like this:
Modifier .opacity(calc { num( MyOpacityVar .value()) * num( 0.5 ) }) It's a little hard to remember to wrap raw values in num , but you will get compile errors if you do it wrong.
Working with variables representing length values don't require calc blocks because Compose HTML supports mathematical operations on such numeric unit types:
 val MyFontSizeVar by StyleVariable < CSSLengthNumericValue >()

MyFontSizeVar .value() + 1 .cssRem
// Output: "calc(var(--my-font-size) + 1rem)"
However, a calc block could still be useful if you were starting with a raw number that you wanted to convert to a size:
 val MyFontSizeScaleFactorVar by StyleVariable < Number >()

calc { MyFontSizeScaleFactorVar .value() * 16 .px }
// Output: calc(var(--my-font-size-scale-factor) * 16px) Many users who create a full stack application generally expect to completely own both the client- and server-side code.
However, being an opinionated framework, Kobweb provides a custom Ktor server in order to deliver some of its features. For example, it implements the logic for handling server API routes▲ as well as some live reloading functionality.
It would not be trivial to refactor this behavior into some library that users could import into their own backend server. As a compromise, some server configuration is exposed by the .kobweb/conf.yaml file, and this has been the main way users could affect the server's behavior.
That said, there will always be some use cases that Kobweb won't anticipate. So as an escape hatch, Kobweb allows users who know what they're doing to write their own plugins to extend the server.
ملحوظة
The Kobweb Server plugin feature is still fairly new. If you use it, please consider filing issues for any missing features and connecting with us▼ to share any feedback you have about your experience.
Creating a Kobweb server plugin is relatively straightforward. You'll need to:
KobwebServerPlugin interface.kobwebServerPlugin dependency in your site's build script..kobweb/server/plugins directory.The following steps will walk you through creating your first Kobweb Server Plugin.
نصيحة
You can download this project to see the completed result from applying the instructions in this section to the kobweb create app site.
settings.gradle.kts file to include the new project.kobweb-server-project library and kotlin JVM plugin in .gradle/libs.versions.toml : [ libraries ]
kobweb-server-plugin = { module = " com.varabyte.kobweb:kobweb-server-plugin " , version.ref = " kobweb " }
[ plugins ]
kotlin-jvm = { id = " org.jetbrains.kotlin.jvm " , version.ref = " kotlin " }demo-server-plugin/ ).build.gradle.kts : plugins {
alias(libs.plugins.kotlin.jvm)
}
group = " org.example.app " // update to your own project's group
version = " 1.0-SNAPSHOT "
dependencies {
compileOnly(libs.kobweb.server.plugin)
}src/main/kotlin/DemoKobwebServerPlugin.kt : import com.varabyte.kobweb.server.plugin.KobwebServerPlugin
import io.ktor.server.application.Application
import io.ktor.server.application.log
class DemoKobwebServerPlugin : KobwebServerPlugin {
override fun configure ( application : Application ) {
application.log.info( " REPLACE ME WITH REAL CONFIGURATION " )
}
}نصيحة
As the Kobweb server is written in Ktor, you should familiarize yourself with Ktor's documentation.
src/main/resources/META-INF/services/com.varabyte.kobweb.server.plugin.KobwebServerPlugin , setting its content to the fully-qualified class name of your plugin. على سبيل المثال: org.example.app.DemoKobwebServerPlugin
ملحوظة
If you aren't familiar with META-INF/services , you can read this helpful article to learn more about service implementations, a very useful Java feature.
The Kobweb Gradle Application plugin provides a way to notify it about your JAR project. Set it up, and Gradle will build and copy your plugin jar over for you automatically.
In your Kobweb project's build script, include the following kobwebServerPlugin line in a top-level dependencies block:
 // site/build.gradle.kts

dependencies {
  kobwebServerPlugin(project( " :demo-server-plugin " ))
}

kotlin { /* ... */ }
مهم
You need to put the kobwebServerPlugin declaration inside a top-level dependencies block, not in one of the ones nested under the kotlin block (such as kotlin.jvmMain.dependencies ).
Once this is set up, upon the next Kobweb server run (eg via kobweb run ), if you check the logs, you should see something like this:
 [main] INFO  ktor.application - Autoreload is disabled because the development mode is off.
[main] INFO  ktor.application - REPLACE ME WITH REAL CONFIGURATION
[main] INFO  ktor.application - Application started in 0.112 seconds.
[main] INFO  ktor.application - Responding at http://0.0.0.0:8080
Despite the simplicity of the KobwebServerPlugin interface, the application parameter passed into KobwebServerPlugin.configure is quite powerful.
While I know it may sound kind of meta, you can create and install a Ktor Application Plugin inside a Kobweb Server Plugin. Once you've done that, you have access to all stages of a network call, as well as some other hooks like ones for receiving Application lifecycle events.
نصيحة
Please read the Extending Ktor documentation to learn more.
Doing so looks like this:
import com.varabyte.kobweb.server.plugin.KobwebServerPlugin
import io.ktor.server.application.Application
import io.ktor.server.application.createApplicationPlugin
import io.ktor.server.application.install
class DemoKobwebServerPlugin : KobwebServerPlugin {
override fun configure ( application : Application ) {
val demo = createApplicationPlugin( " DemoKobwebServerPlugin " ) {
onCall { call -> /* ... */ } // Request comes in
onCallRespond { call -> /* ... */ } // Response goes out
}
application.install(demo)
}
}It's important to note that, unlike other parts of Kobweb, Kobweb Server Plugins do NOT support live reloading. We only start up and configure a Kobweb server once in its lifetime.
If you make a change to a Kobweb Server Plugin, you must quit and restart the server for it to take effect.
You may already have an existing and complex backend, perhaps written with Ktor or Spring Boot, and, if so, are wondering if you can integrate Kobweb with it.
The recommended solution for now is to export your site using a static layout (read more about static layout sites here▲) and then add code to your backend to serve the files yourself, as it is fairly trivial.
When you export a site statically, it will generate all files into your .kobweb/site folder. Then, if using Ktor, for example, serving these files is a one-liner:
routing {
staticFiles( " / " , File ( " .kobweb/site " ))
} If using Ktor, you should also install the IgnoreTrailingSlash plugin so that your web server will serve index.html when a user visits a directory (eg /docs/ ) instead of returning a 404:
embeddedServer( .. .) { // `this` is `Application` in this scope
this .install( IgnoreTrailingSlash )
// Remaining configuration
} If you need to access HTTP endpoints exposed by your backend, you can use window.fetch(...) directly, or you can use the convenience http property that Kobweb adds to the window object which exposes all the HTTP methods ( get , post , put , etc.):
@Page
@Composable
fun CustomBackendDemoPage () {
LaunchedEffect ( Unit ) {
val endpointResponse = window.http.get( " /my/endpoint?id=123 " ).decodeToString()
/* ... */
}
}Unfortunately, using your own backend does mean you're opting out of using Kobweb's full stack solution, which means you won't have access to Kobweb's API routes, API streams, or live reloading support. This is a situation we'd like to improve someday (link to tracking issue), but we don't have enough resources to be able to prioritize resolving this for a 1.0 release.
CSSNumericValue type-aliases Kobweb introduces a handful of type-aliases for CSS unit values, basing them off of the CSSNumericValue class and extending the set defined by Compose HTML:
typealias CSSAngleNumericValue = CSSNumericValue < out CSSUnitAngle >
typealias CSSLengthOrPercentageNumericValue = CSSNumericValue < out CSSUnitLengthOrPercentage >
typealias CSSLengthNumericValue = CSSNumericValue < out CSSUnitLength >
typealias CSSPercentageNumericValue = CSSNumericValue < out CSSUnitPercentage >
typealias CSSFlexNumericValue = CSSNumericValue < out CSSUnitFlex >
typealias CSSTimeNumericValue = CSSNumericValue < out CSSUnitTime >This section explains why they were added and why you should almost always prefer using them.
When you write CSS values like 10.px , 5.cssRem , 45.deg , or even 30.s into your code, you normally don't have to think too much about their types. You just create them and pass them into the appropriate Kobweb / Compose HTML APIs.
Let's discuss what is actually happening when you do this. Compose HTML provides a CSSSizeValue class which represents a number value and its unit.
val lengthValue = 10 .px // CSSSizeValue<CSSUnit.px> (value = 10 and unit = px)
val angleValue = 45 .deg // CSSSizeValue<CSSUnit.deg> (value = 45 and unit = deg)This is a pretty elegant approach, but the types are verbose. This can be troublesome when writing code that needs to work with them:
val lengths : List < CSSSizeValue < CSSUnit .px>>
fun drawArc ( arc : CSSSizeValue < CSSUnit .deg>) Note also that the above cases are overly restrictive, only supporting a single length and angle type, respectively. We usually want to support all relevant types (eg px , em , cssRem , etc. for lengths; deg , rad , grad , and turn for angles). We can do this with the following out syntax:
val lengths : List < CSSSizeValue < out CSSUnitLength >>
fun drawArc ( arc : CSSSizeValue < out CSSUnitAngle >)What a mouthful!
As a result, the Compose HTML team added type-aliases for all these unit types, such as CSSLengthValue and CSSAngleValue . Now, you can write the above code like:
val lengths : List < CSSLengthValue >
fun drawArc ( arc : CSSAngleValue )Much better! Seems great. No problems, right? يمين؟!
You can probably tell by my tone: Yes problems.
To explain, we first need to talk about CSSNumericValue .
It is common to transform values in CSS using many of its various mathematical functions. Perhaps you want to take the sum of two different units ( 10.px + 5.cssRem ) or call some other math function ( clamp(1.cssRem, 3.vw) ). These operations return intermediate values that cannot be directly queried like a CSSSizeValue can.
This is handled by the CSSNumericValue class, also defined by Compose HTML (and which is actually a base class of CSSSizeValue ).
val lengthSum = 10 .px + 2 .cssRem // CSSNumericValue<CSSUnitLength>
val angleSum = 45 .deg + 1 .turn // CSSNumericValue<CSSAngleLength>These numeric operations are of course useful to the browser, which can resolve them into absolute screen values, but for us in user space, they are opaque calculations.
In practice, however, that's fine! The limited view of these values does not matter because we rarely need to query them in our code. In almost all cases, we just take some numeric value, optionally tweak it by doing some more math on it, and then pass it onto the browser.
Because it is opaque, CSSNumericValue is far more flexible and widely applicable than CSSSizeValue is. If you are writing a function that takes a parameter, or declaring a StyleVariable tied to some length or time, you almost always want to use CSSNumericValue and not CSSSizeValue .
CSSNumericValue type-aliases As mentioned above, the Compose HTML team created their unit-related type-aliases against the CSSSizeValue class.
This decision makes it really easy to write code that works well when you test it with concrete size values but is actually more restrictive than you expected.
Kobweb ensures its APIs all reference its CSSNumericValue type-aliases:
// Legacy Kobweb
fun Modifier. lineHeight ( value : CSSLengthOrPercentageValue ): Modifier = styleModifier {
lineHeight(value)
}
// Modern Kobweb
fun Modifier. lineHeight ( value : CSSLengthOrPercentageNumericValue ): Modifier = styleModifier {
lineHeight(value)
}If you are using style variables in your code, or writing your own functions that take CSS units as arguments, you might be referencing the Compose HTML types. Your code will still work fine, but you are strongly encouraged to migrate them to Kobweb's newer set, in order to make your code more flexible about what it can accept:
// Not recommended
val MyFontSize by StyleVariable < CSSLengthValue >
fun drawArc ( arc : CSSAngleValue )
// Recommended
val MyFontSize by StyleVariable < CSSLengthNumericValue >
fun drawArc ( arc : CSSAngleNumericValue )ملحوظة
Perhaps in the future, the Compose HTML team might consider updating their type-aliases to use the CSSNumericValue type and not the CSSSizeValue type. If that happens, we can revert our changes and delete this section. But until then, it's worth understanding why Kobweb introduces its own type-aliases and why you are encouraged to use them instead of the Compose HTML versions.
A Kobweb project always has a frontend and, if configured as a full stack site, a backend as well. Both require different steps to debug them.
At the moment, attaching a debugger to Kotlin/JS code requires IntelliJ Ultimate. If you have it, you can follow these steps in the official docs.
مهم
Be sure the port in your URL matches the port you specified in your .kobweb/conf.yaml file. By default, this is 8080.
If you do not have access to IntelliJ Ultimate, then you'll have to rely on println debugging. While this is far from great, live reloading plus Kotlin's type system generally help you incrementally build your site up without too many issues.
نصيحة
If you're a student, you can apply for a free IntelliJ Ultimate license here. If you maintain an open source project, you can apply here.
Debugging the backend first requires configuring the Kobweb server to support remote debugging. This is easy to do by modifying the kobweb block in your build script to enable remote debugging:
kobweb {
app {
server {
remoteDebugging {
enabled.set( true )
port.set( 5005 )
}
}
}
}ملحوظة
Specifying the port is optional. Otherwise, it is 5005, a common remote debugging default. If you ever need to debug multiple Kobweb servers at the same time, however, it can be useful to change it.
Once you've enabled remote debugging support, you can then follow the official documentation to add a remote JVM debug configuration to your IDE.
مهم
For remote debugging to work:
jvmMain classpath associated with your Kobweb application, eg app.site.jvmMain . If you've refactored your backend code out to another module, you should be able to use that instead. At this point, start up your Kobweb server using kobweb run .
حذر
Remote debugging is only supported in dev mode. It will not be enabled for a server started with kobweb run --env prod .
With your Kobweb server running and your "remote debug" run configuration selected, press the debug button. If everything is set up correctly, you should see a message in the IDE debugger console like: Connected to the target VM, address: 'localhost:5005', transport: 'socket'
If instead, you see a red popup with a message like Unable to open debugger port (localhost:5005): java.net.ConnectException "Connection refused" , please double-check the values in your conf.yaml file, restart the server, and try again.
The easiest way to use a custom font is if it is already hosted for you. For example, Google Fonts provides a CDN that you can use to load fonts directly.
حذر
While this is the easiest approach, be sure you won't run into compliance issues! If you use Google Fonts on your site, you may technically be in violation of the GDPR in Europe, because an EU citizen's IP address is communicated to Google and logged. You may wish to find a Europe-safe host instead, or self-host, which you can read about in the next section▼.
The font service should give you HTML to add to your site's <head> tag. For example, Google Fonts suggests the following when I select Roboto Regular 400:
< link rel =" preconnect " href =" https://fonts.googleapis.com " >
< link rel =" preconnect " href =" https://fonts.gstatic.com " crossorigin >
< link href =" https://fonts.googleapis.com/css2?family=Roboto&display=swap " rel =" stylesheet " > This code should be converted into Kotlin and added to the kobweb block of your site's build.gradle.kts script:
kobweb {
app {
index {
head.add {
link(rel = " preconnect " , href = " https://fonts.googleapis.com " )
link(rel = " preconnect " , href = " https://fonts.gstatic.com " ) { attributes[ " crossorigin " ] = " " }
link(
href = " https://fonts.googleapis.com/css2?family=Roboto&display=swap " ,
rel = " stylesheet "
)
}
}
}
}Once done, you can now reference this new font:
Column ( Modifier .fontFamily( " Roboto " )) {
Text ( " Hello world! " )
} Users can flexibly declare a custom font by using CSS's @font-face rule.
In Kobweb, you can normally declare CSS properties in Kotlin (within an @InitSilk block), but unfortunately, Firefox doesn't allow you to define or modify @font-face entries in code (relevant Bugzilla issue). Therefore, for guaranteed cross-platform compatibility, you should create a CSS file and reference it from your build script.
To keep the example concrete, let's say you've downloaded the open source font Lobster from Google Fonts (and its license as well, of course).
You need to put the font file inside your public resources directory, so it can be found by the user visiting your site. I recommend the following file organization:
jsMain
└── resources
└── public
└── fonts
├── faces.css
└── lobster
├── OFL.txt
└── Lobster-Regular.ttf
where faces.css contains all your @font-face rule definitions (we just have a single one for now):
@font-face {
font-family : 'Lobster' ;
src : url ( '/fonts/lobster/Lobster-Regular.ttf' );
}ملحوظة
The above layout may be slightly overkill if you are sure you'll only ever have a single font, but it's flexible enough to support additional fonts if you decide to add more in the future, which is why we recommend it as a general advice here.
Now, you need to reference this CSS file from your build.gradle.kts script:
kobweb {
app {
index {
head.add {
link(rel = " stylesheet " , href = " /fonts/faces.css " )
}
}
}
}Finally, you can reference the font in your code:
Column ( Modifier .fontFamily( " Lobster " )) {
Text ( " Hello world! " )
} When you run kobweb run , the spun-up web server will, by default, log to the .kobweb/server/logs directory.
ملحوظة
You can generate logs using the ctx.logger property inside @Api calls▲.
You can configure logging behavior by editing the .kobweb/conf.yaml file. Below we show setting all parameters to their default values:
server :
logging :
level : DEBUG # ALL, TRACE, DEBUG, INFO, WARN, ERROR, OFF
logRoot : " .kobweb/server/logs "
clearLogsOnStart : true # Warning - if true, wipes ALL files in logRoot, so don't put other files in there!
logFileBaseName : " kobweb-server " # e.g. "kobweb-server.log", "kobweb-server.2023-04-13.log"
maxFileCount : null # null = unbound. One log file is created per day, so 30 = 1 month of logs
totalSizeCap : 10MiB # null = unbound. Accepted units: B, K, M, G, KB, MB, GB, KiB, MiB, GiB
compressHistory : true # If true, old log files are compressed with gzip The above defaults were chosen to be reasonable for most users running their projects on their local machines in developer mode. However, for production servers, you may want to set clearLogsOnStart to false, bump up the totalSizeCap after reviewing the disk limitations of your web server host, and maybe set maxFileCount to a reasonable limit.
Note that most config files assume "10MB" is 10 * 1024 * 1024 bytes, but here it will actually result in 10 * 1000 * 1000 bytes. You probably want to use "KiB", "MiB", or "GiB" when you configure this value.
CORS, or Cross-Origin Resource Sharing , is a security feature built on the idea that a web page should not be able to make requests for resources from a server that is not the same as the one that served the page unless it was served from a trusted domain.
To configure CORS for a Kobweb backend, Kobweb's .kobweb/conf.yaml file allows you to declare such trusted domains using a cors block:
server :
cors :
hosts :
- name : " example.com "
schemes :
- " https " ملحوظة
Specifying the schemes is optional. If you don't specify them, Kobweb defaults to "http" and "https".
ملحوظة
You can also specify subdomains, eg
- name : " example.com "
subdomains :
- " en "
- " de "
- " es " which would add CORS support for en.example.com , de.example.com , and es.example.com , as well as example.com itself.
Once configured, your Kobweb server will be able to respond to data requests from any of the specified hosts.
نصيحة
If you find that your full-stack site, which was working locally during development, rejects requests in the production version, check your browser's console logs. If you see errors in there about a violated CORS policy, that means you didn't configure CORS correctly.
The Kobweb export feature is built on top of Microsoft Playwright, a solution for making it easy to download and run browsers programmatically.
One of the features provided by Playwright is the ability to generate traces, which are essentially detailed reports you can use to understand what is happening as your site loads. Kobweb exposes this feature through the export block in your Kobweb application's build script.
Enabling traces is easy:
// build.gradle.kts
plugins {
// ... other plugins ...
alias(libs.plugins.kobweb.application)
}
kobweb {
app {
export {
enableTraces()
}
}
} You can pass in parameters to configure the enableTraces method, but by default, it will generate trace files into your .kobweb/export-traces/ directory.
Once enabled, you can run kobweb export , then once exported, open any of the generated *.trace.zip files by navigating to them using your OS's file explorer and drag-and-dropping them into the Playwright Trace Viewer.
نصيحة
You can learn more about how to use the Trace Viewer using the official documentation.
It's not expected many users will need to debug their site exports, but it's a great tool to have (especially combined with the server logs feature) to diagnose if one of your pages is taking longer to export than expected.
In the beginning, Kobweb was only intended to be a thin layer on top of Compose HTML, but the more we worked on it, the more we ran into features that were simply not yet implemented in Compose HTML. In other cases, we found ourselves reaching for utilities that we wished existed in Kotlin/JS browser APIs. As we began adding these features, we realized it would have been a shame to bury them deep inside our framework.
As a result, we created two modules:
compose-html-ext , where we put code that we would be more than happy for the Compose HTML team to fork and migrate over to Compose HTML someday.browser-ext , a collection of general purpose utilities that we think could be useful to any Kotlin/JS project targeting the browser.The features across these modules include (not comprehensive):
calc (especially useful when working with CSS variables), etc.window.fetch (for example, making it easier to use the most common HTTP verbs like GET, POST, etc., as well as providing suspend fun versions of fetch)GenericTag , which is an easy-to-use API wrapping Compose HTML's TagElement composable, with additional namespacing support if needed (for example, required when implementing SVG elements)StyleVariable , allows specifying a default value, provides first-class number/string variable support, and fixes a bug in Compose HTML's CSSStyleVariable class where it can accept invalid values.setTimeout and setInterval methods that are more Kotlin-idiomatic (eg the lambdas are the last parameter) ملحوظة
Some users have mentioned we should have opened PRs for the Compose HTML team instead of maintaining a separate codebase. However, after observing that JetBrains was focusing more and more of its energy on Compose Multiplatform for Web, we decided to implement the features we needed in our own project. This way, we could maintain our velocity while allowing their team to pick and choose what they agreed with at some point in the future at their leisure. There's so much code here, especially around CSS APIs, that getting mired down in PR discussions would have ground our progress to a halt.
If you want to use Compose HTML but not Kobweb, or Kotlin/JS but not Compose HTML, you can still use and benefit from compose-html-ext or browser-ext in your own project. An example build script could look like this (here, for a non-Kobweb Compose HTML project):
// build.gradle.kts
plugins {
kotlin( " multiplatform " ) version " ... "
}
repositories {
mavenCentral()
google()
maven( " https://us-central1-maven.pkg.dev/varabyte-repos/public " ) // IMPORTANT!!!
}
kotlin {
js().browser()
sourceSets {
jsMain.dependencies {
implementation(compose.html.core)
implementation(compose.runtime)
implementation( " com.varabyte.kobweb:compose-html-ext:... " ) // IMPORTANT!!!
}
}
}ملحوظة
The compose-html-ext dependency automatically exposes the browser-ext dependency.
Jetbrains is working on the "Compose Multiplatform UI Framework", which allows developers to use the same codebase across Android, iOS, Desktop, and the Web. And it may seem like the Kobweb + Silk approach is obsoleted by it.
It's first worth understanding the core difference between the two approaches. With Compose Multiplatform, the framework owns its own rendering pipeline, drawing to a buffer. In contrast, Compose HTML modifies an HTML / CSS DOM tree and leaves it up to the browser to do the final rendering.
This has major implications on how similar the two APIs can get. For example, in Compose Multiplatform, the order you apply modifiers matters. However, in Compose HTML, this action simply sets html style properties under the hood, where order does not matter.
Due to its reputation, ditching HTML / CSS entirely at first can seem like a total win, but this approach has several limitations:
It would also prevent a developer from making use of the rich ecosystem of Javascript libraries out there.
Finally, Kobweb is more than just Kotlin-ifying HTML / CSS. It also provides rich integration with powerful web technologies like web workers▲ and websockets▲.
For now, I am making a bet that there will always be value in embracing the web, providing a framework that sticks to HTML / CSS but offers a growing suite of UI widgets, layouts, and other features that make it a more comfortable experience for the Kotlin developer.
For example, the flexbox layout is a very powerful concept, but it can be very tricky to use. In most cases, you'll find it's much easier to compose Row s and Column s together than trying to remember if you should be justifying your items or aligning your content, even if Row s and Column s are just configuring the correct HTML / CSS for you behind the scenes.
Ultimately, I believe there is room for both Compose Multiplatform and Kobweb. If you want to make an app experience that feels the same on Android, iOS, Desktop, and Web, then Compose Multiplatform could be the right choice for you. However, if you just want to make a traditional website but want to use Kotlin instead of TypeScript, Kobweb can provide an excellent development experience for that case.
Current state: Foundations are in place! You may encounter API gaps.
You may wish to refer to our Kobweb 1.0 roadmap document.
Kobweb is becoming quite functional. We are already using it to build https://kobweb.varabyte.com and https://bitspittle.dev. Several users have created working portfolio sites already, and I'm aware of at least two cases where Kobweb was used in a project for a client.
عند هذه النقطة:
Modifier builder for a significant number of CSS properties.However, there's always more to do.
I think there's enough there now to let you do almost anything you'd want to do, as either Kobweb supports it or you can escape hatch to underlying Compose HTML / Kotlin/JS approaches, but there might be some areas where it's still a bit DIY. It would be great to get real-world experience to hear what issues users are actually running into.
So, should you use Kobweb at this point? If you are...
On the fence but not sure? Connect with us, and I'd be happy to help you assess your situation.
I'm pleased to mention that Kobweb has received feedback from some satisfied users. Here are a few:
Kobweb uses BrowserStack when we need to test its APIs on older browsers.
We appreciate their support for the open source community.
If you're comfortable with it, using Discord is recommended, because there's a growing community of users in there who can offer help even when I'm not around.
It is still early days, and while we believe we've proven the feasibility of this approach at this point, there's still plenty of work to do to get to a 1.0 launch! We are hungry for the community's feedback, so please don't hesitate to:
Thank you for your support and interest in Kobweb!


