Stylesheet.NET
v1.2.0
Stylesheet.net은 C#, vb.net 및 F# 개발자를 위해 설계된 크로스 플랫폼 .NET 라이브러리입니다. 이를 통해 개발자는 코드에 직접 CSS 스타일을 작성하여 외부 스타일 시트 파일을 제거 할 수 있습니다. Stylesheet.net은 모든 CSS 속성, AT- 룰, 키워드 및 기타 요소에 대한 사전 작성된 구현을 제공하여 추가 종속성이 필요하지 않습니다.
이를 통해 최소화 된 CS 및 미확인 CSS를 모두 내보낼 수 있습니다.
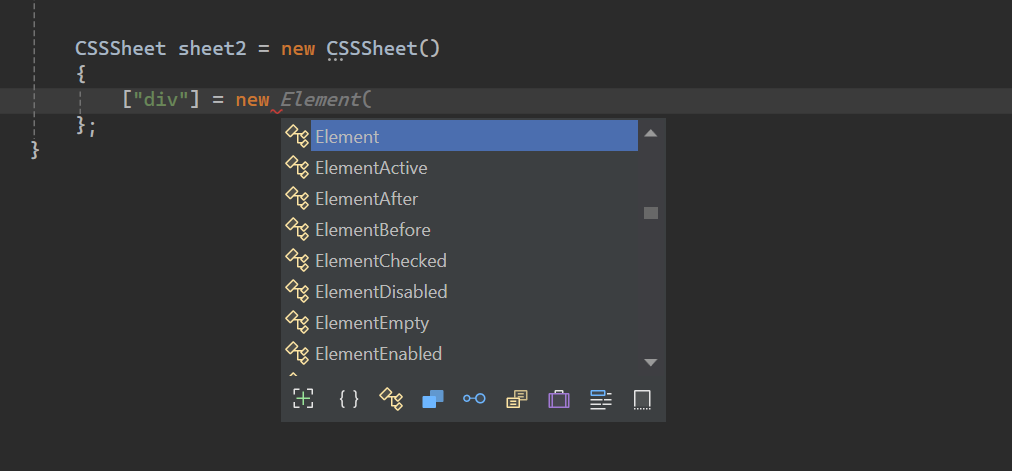
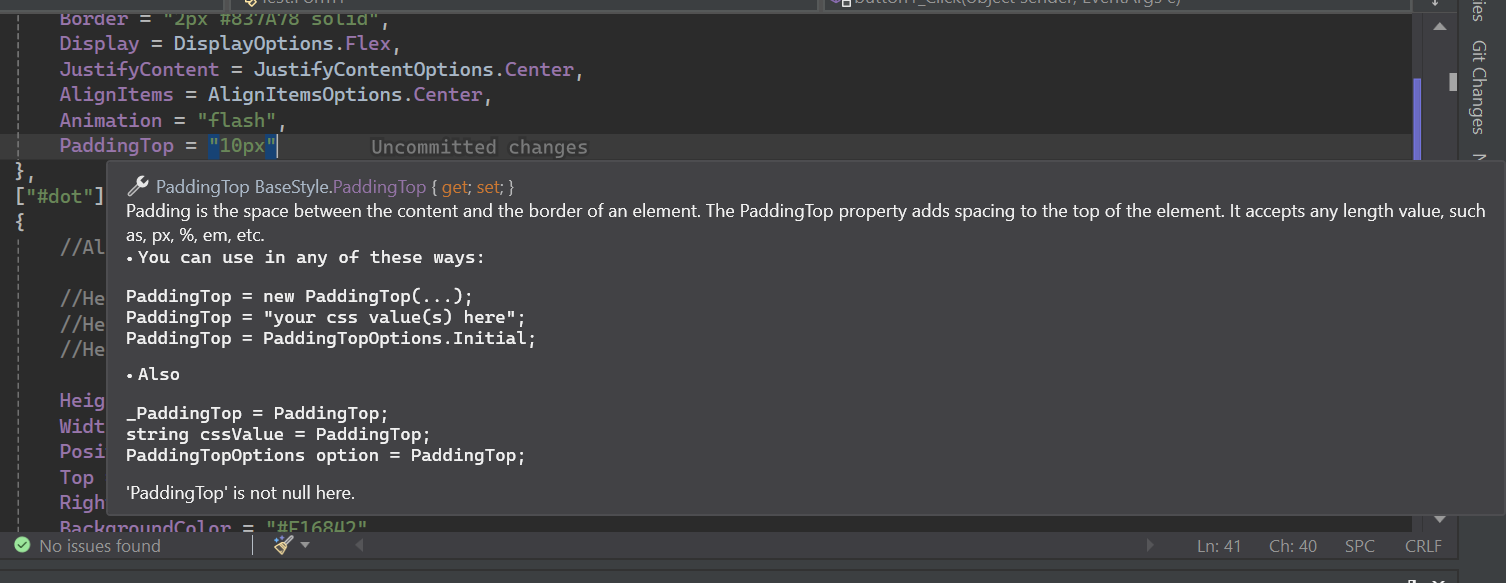
Stylesheet.net 에는 광범위한 Intellisense 문서가 있습니다.
Install-Package Stylesheet.NET -Version 1.2.0
Stylesheet.net을 사용하여 C# 코드 내에서 다음 CSS 스타일링 로직을 구현할 수 있습니다.
 @charset "UTF-8" ;
@font-face {
    font-family : 'lilitaone-regular' ;
    src : url ( 'font/lilitaone-regular.ttf' );
}
: root {
        all : unset;
        --color : blue;
}
. head . account {
        height : 40 px !important ;
        width : 40 px !important ;
        position : absolute;
        top : 12 px ;
        left : 15 px ;
        border-radius : 20 px ;
        border : 2 px # 837A78 solid;
        display : flex;
        justify-content : center;
        align-items : center;
        -webkit-animation : flash;
        -moz-animation : flash;
        animation : flash;
}
# dot : hover {
        height : 10 px ;
        width : 10 px ;
        position : absolute;
        top : 16 px ;
        right : 13 px ;
        background-color : # F16842 ;
        border-radius : 5 px ;
        display : block;
}
@Keyframes flash{
0% , 50% , to   {
        opacity : 1 ;

}
55%   {
        opacity : 0.5;

}
25% , 75%   {
        opacity : 0;

}
}
@media ( min-width : 0 px ) and ( max-width : 319 px ){
a [ target = "_blank" ]{
        position : absolute;
        top : 20 px ;
        left : 0 ;
        z-index : 99 ;
}
} using StylesheetNET ;
CSSSheet sheet1 = new CSSSheet ( )
{
Charset = "UTF-8" ,
Root = new Root ( )
{
All = AllOptions . Unset ,
[ "--color" ] = "blue"
} ,
[ ".head .account" ] = new Element ( )
{
//Also u can write them this way too
//Height = new Height("10px"),
//Height = new Height(HeightOptions.Auto)
//Height = HeightOptions.Auto;
Height = "40px !important" ,
Width = "40px !important" ,
Position = PositionOptions . Absolute ,
Top = "12px" ,
Left = "15px" ,
BorderRadius = "20px" ,
Border = "2px #837A78 solid" ,
Display = DisplayOptions . Flex ,
JustifyContent = JustifyContentOptions . Center ,
AlignItems = AlignItemsOptions . Center ,
Animation = "flash"
} ,
[ "#dot" ] = new ElementHover ( )
{
Height = "10px" ,
Width = "10px" ,
Position = PositionOptions . Absolute ,
Top = "16px" ,
Right = "13px" ,
BackgroundColor = "#F16842" ,
BorderRadius = "5px" ,
Display = DisplayOptions . Block
} ,
[ AtRuleType . MediaQuery ] = new MediaQuery ( new AtRule ( ) . MinWidth ( "0px" ) . And . MaxWidth ( "319px" ) )
{
[ "a[target= " _blank " ]" ] = new Element ( )
{
Position = PositionOptions . Absolute ,
Top = "20px" ,
Left = "0" ,
ZIndex = "99"
}
} ,
[ AtRuleType . Keyframes ] = new Keyframes ( "flash" )
{
[ "0%, 50%, to" ] = new Keyframe ( )
{
Opacity = "1"
} ,
[ "55%" ] = new Keyframe ( )
{
Opacity = "0.5"
} ,
[ "25%, 75%" ] = new Keyframe ( )
{
Opacity = "0"
}
}
} ;
sheet . AddFontFace ( "lilitaone-regular" , "font/lilitaone-regular.ttf" ) ; Stylesheet.net 에서 CSS를 내보내는 방법에는 여러 가지가 있습니다.
  string unminified_css = sheet1 ;
  //or
  string unminified_css = sheet1 . ToString ( ) ;
  string minified_css = sheet1 . ToString ( true ) ;
  //or
  string unminified_css = sheet1 . GenerateCss ( ) ;
string minified_css = sheet1 . GenerateCss ( true ) ; Stylesheet.net 은 여러 핵심 구성 요소로 구성되어 있으며 각각 요구 사항의 스타일링 요소에 대한 특정 기능을 제공합니다.
div , span , h1 , id , class , Attribute 등과 같은 스타일의 HTML 요소 스타일 선택기를 나타냅니다.:hover , :focus 및 유사 요소 ::before 및 ::after . 모든 요소 및 클래스 의사가 포함되어 있습니다 .@keyframes , 응답 형 레이아웃 용 @media 및 외부 스타일을 포함한 @import 및 @layer 와 같은 지침을 사용하여 사용자 정의 스타일 또는 동작을 정의 할 수 있습니다. div , span , h1 , id , class , Attribute 등과 같이 스타일을 유지하려는 HTML 요소 스타일 선택기를 나타냅니다 . 모든 요소 선택기 속성이 있습니다.
 div {
    height : 10 px ;
    width : 10 px ;
    position : absolute;
    top : 16 px ;
    right : 13 px ;
    background-color : # F16842 ;
    border-radius : 5 px ;
    display : block;
} CSSSheet sheet = new CSSSheet ( )
{
[ "div" ] = new Element ( )
{
Height = "10px" ,
Width = "10px" ,
Position = PositionOptions . Absolute ,
Top = "16px" ,
Right = "13px" ,
BackgroundColor = "#F16842" ,
BorderRadius = "5px" ,
Display = DisplayOptions . Block
}
}styleysheet.net을 사용하면 사용자 정의 속성을 추가 할 수 있습니다.
 CSSSheet sheet = new CSSSheet ( )
  {
   [ "div" ] = new Element ( )
   {
      Height = "10px" ,
      //Width = "10px",

      [ "width" ] = "10px" ,
      [ "my_custom_property" ] = "some css values"
   }
  }
거의 모든 속성은 실제로 문자열과 당신의 특정 열거 옵션을 암시 적으로 받아들이는 클래스 객체입니다.
각 속성은 네 가지 방법으로 작성할 수 있습니다.
예:
 Height = new Height ( "10px" )
 Height = "10px"
 Height = new Height ( HeightOptions . Auto )
 Height = HeightOptions . Auto ;
모든 속성 열거 옵션은 자산의 이름으로 시작한 다음
Options에 따릅니다. 예를 들어Height + Options = HeightOptions.모든 속성에는 사전 정의 된 CSS 키워드를 나타내는 열거 옵션이 있습니다.
Stylesheet.net은 CSS 의사 클래스 및 의사 요소에 대한 광범위한 지원을 제공하여 상태 또는 상호 작용에 따라 요소의 스타일을 정의 할 수 있습니다.
모든 의사는 요소 로 시작한 다음 의사 유형 으로 폴로 로트합니다.
예 :
ElementHover,ElementAfter,ElementNthChild등
예
 div : hover {
        color : red;
}
p :: after {
        content : "Some contents" ;
        width : 50 px ;
        height : 75 px ;
}
. list : nth-child ( 3 ){
        background-color : blue;
}
. text : not (. sup , p ){
        text-align
: right;
} CSSSheet sheet1 = new CSSSheet ( )
{
[ "div" ] = new ElementHover ( )
{
Color = "red"
} ,
[ "p" ] = new ElementAfter ( )
{
Content = " " Some contents " " ,
Width = "50px" ,
Height = "75px"
} ,
[ ".list" ] = new ElementNthChild ( 3 )
{
BackgroundColor = "blue"
} ,
[ ".text" ] = new ElementNot ( ".sup, p" )
{
TextAlign = TextAlignOptions . Right
}
} ; AT-Rules를 사용하면 애니메이션 용 @keyframes , 반응 형 레이아웃 용 @media 및 외부 스타일을 포함한 @import 및 @layer 와 같은 지시어를 사용하여 사용자 정의 스타일 또는 동작을 정의 할 수 있습니다.
미디어 쿼리는 반응 형 웹 디자인의 필수 구성 요소입니다. 그들은 다양한 뷰포트 크기에 적응하는 동적 레이아웃을 만들어 다양한 장치에서 최적의 사용자 경험을 보장 할 수 있습니다.
Stylesheet.net 에서는 두 가지 방법으로 미디어 쿼리를 정의 할 수 있습니다.
AT-RULE BUILDER
AT-RULE BUILDER는 코드 체인 패턴을 사용하여 사용자 정의 규칙을 정의하는 데 도움이됩니다.
AT-RULE BUILDER 암시성은 문자열로 변환되므로 문자열로 캐스트하거나 변환 할 필요가 없습니다.
 string condition = new AtRule ( ) . Screen . And . MinWidth ( "0px" ) . And . MaxWidth ( "319px" ) ;

//Will give you:
// screen and (min-width: 0px) and (max-width: 319px)
AT-RULE BUILDER 로 미디어 쿼리를 작성하겠습니다.
 @media only screen and ( max-width : 600 px ){
 div {
 width : 100 % ;
 height : 100 % ;
 display : grid;
 }
}
CSSSheet sheet1 = new CSSSheet ( )
{
[ AtRuleType . MediaQuery ] = new MediaQuery ( new AtRule ( ) . Only . Screen . And . MaxWidth ( "600px" ) )
{
[ "div" ] = new Element ( )
{
Width = "100%" ,
Height = "100%" ,
Display = DisplayOptions . Grid
}
}
} ;AT-RULE BUILDER 에는 모든 CSS 규칙이 구현되었습니다. 길이가없는 상태에서 원하는대로 쇄도 할 수 있습니다.
AT-RULE BUILDER를 사용하지 않으려면 자신의 CSS 규칙/조건을 문자열로 간단히 넣을 수 있습니다.
 @media only screen and ( max-width : 600 px ){
  div {
        width : 100 % ;
        height : 100 % ;
        display : grid;
    }
} CSSSheet sheet1 = new CSSSheet ( )
{
[ AtRuleType . MediaQuery ] = new MediaQuery ( "only screen and (max-width: 600px)" )
{
[ "div" ] = new Element ( )
{
Width = "100%" ,
Height = "100%" ,
Display = DisplayOptions . Grid
}
}
} ;라이브러리가 추가하므로
@media추가하지 마십시오.
@keyframes CSS AT-RULE은 개발자가 애니메이션 시퀀스 내의 특정 포인트에 대한 스타일을 정의하여 복잡한 애니메이션을 만들 수 있습니다.
Stylesheet.net은 이것을 두 개의 Keyframes 과 Keyframe 으로 나눕니다.
Keyframes 개체는 웨이 포인트를 보유하는 class 입니다. 웨이 포인트는 단일 Keyframe 객체입니다.
반면에 keyframe 은 단일 웨이 포인트입니다. 웨이 포인트는 이들의 percent 또는 from to 또는 조합의 모든 값 일 수 있습니다.
 @Keyframes flash{
0% , 50% , to   {
        opacity : 1 ;

}
55%   {
        opacity : 0.5;

}
25% , 75%   {
        opacity : 0;

}
} CSSSheet sheet1 = new CSSSheet ( )
{
[ AtRuleType . Keyframes ] = new Keyframes ( "flash" )
{
[ "0%, 50%, to" ] = new Keyframe ( )
{
Opacity = "1"
} ,
[ "55%" ] = new Keyframe ( )
{
Opacity = "0.5"
} ,
[ "25%, 75%" ] = new Keyframe ( )
{
Opacity = "0"
}
}
} ; CSS의 @import at-rule을 사용하면 외부 스타일 시트에서 현재 스타일 시트에 스타일을 포함시킬 수 있습니다.
스타일은 로컬 또는 URL에서 가져올 수 있습니다.
 @import 'path/file.css' ;
@import url ( 'someurl/file.css' ) ;

. head {
        height : 40 px !important ;
        width : 40 px !important ;
} CSSSheet sheet1 = new CSSSheet ( ) ;
sheet1 [ ".head" ] = new Element ( )
{
Height = "40px !important" ,
Width = "40px !important" ,
} ;
Import from_Path = new Import ( "path/file.css" ) ;
sheet1 . Import ( from_Path ) ;
Import from_url = new Import ( new Url ( "someurl/file.css" ) ) ;
sheet1 . Import ( from_url ) ;수입을 제거하거나 모든 수입을 지울 수 있습니다.
 sheet . RemoveImport ( import_to_remove ) ; //remove an import
sheet . ClearImport ( ) ; //remove all imports CSS의 @layer AT-Rule은 캐스케이드 레이어의 개념을 소개하여 개발자가 여러 CSS 규칙이 동일한 요소에 적용될 수있는 경우 스타일의 우선 순서를 정의 할 수 있도록합니다.
Stylesheet.net은 다음과 같은 고급 기능을 제공합니다.
 @layer layer1 {
    @layer layer2 {

        . head {
            display : flex;
        }
    }

    . head {
        height : 100 % ;
        width : 100 % ;
    }
}

@layer layer3 {

    . head {
        display : block;
    }
}

. head {
    height : 40 px !important ;
    width : 40 px !important ;
} CSSSheet sheet1 = new CSSSheet ( ) ;
sheet1 [ ".head" ] = new Element ( )
{
Height = "40px !important" ,
Width = "40px !important" ,
} ;
Layer layer1 = new Layer ( )
{
[ ".head" ] = new Element ( )
{
Height = "100%" ,
Width = "100%" ,
}
} ;
Layer layer2 = new Layer ( )
{
[ ".head" ] = new Element ( )
{
Display = DisplayOptions . Flex
}
} ;
Layer layer3 = new Layer ( )
{
[ ".head" ] = new Element ( )
{
Display = DisplayOptions . Block
}
} ;
layer1 . AddLayer ( "layer2" , layer2 ) ; //nest layer2 in layer1
sheet1 . AddLayer ( "layer1" , layer1 ) ; //add layer1 to sheet1
sheet1 . AddLayer ( "layer3" , layer3 ) ; //add layer3 to sheet1시트 나 레이어에서 레이어를 제거하거나 모든 레이어를 제거 할 수 있습니다. 기본 레이어 또는 레이어 이름으로 레이어를 제거 할 수 있습니다.
 layer1 . RemoveLayer ( "layer2" ) ;

sheet . RemoveLayer ( "layer1" ) ;
sheet . RemoveLayer ( "layer3" ) ; @font-face css at-rule을 사용하면 개발자가 웹 페이지에 사용자 정의 글꼴을 추가 할 수 있습니다. 이 글꼴은 원격 서버 또는 사용자 장치의 로컬로 설치된 글꼴에서로드 할 수 있습니다.
Stylesheet.net을 사용하면 두 가지 방식으로 사용자 정의 글꼴을 추가 할 수 있습니다.
 @font-face {
    font-family : "lilitaone-regular" ;
    src : url ( 'font/lilitaone-regular.ttf' );
}
@font-face {
    font-family : "NoyhR-Black" ;
    src : url ( "font/Noyh R Bold/NoyhR-Black.ttf" ) format ( "truetype" );
}

. head {
    height : 40 px !important ;
    width : 40 px !important ;
} CSSSheet sheet1 = new CSSSheet ( ) ;
sheet1 [ ".head" ] = new Element ( )
{
Height = "40px !important" ,
Width = "40px !important" ,
} ;
sheet1 . AddFontFace ( "lilitaone-regular" , "font/lilitaone-regular.ttf" ) ;
Dictionary < string , string > _font = new Dictionary < string , string > ( )
{
{ "font-family" , " " NoyhR-Black " " } ,
{ "src" , "url( " font/Noyh R Bold/NoyhR-Black.ttf " ) format( " truetype " )" }
} ;
sheet1 . AddFontFace ( _font ) ;FontFamily로 Fontface를 제거하거나 모든 것을 지울 수 있습니다.
 sheet1 . RemoveFontFace ( "lilitaone-regular" ) ;

sheet1 . ClearFontFace ( ) ; 이 안내서는 Stylesheet.net 의 기본 사항을 다룹니다. 자세한 내용을 배우고 전체 기능을 발견하려면 자유롭게 실험하고 다른 기능을 탐색하십시오.