octokit.js
v4.0.2
ブラウザ、node.js、およびdeno用のすべてのバッテリーが含むgithub sdk。
octokitパッケージは、3つの主要なOctokitライブラリを統合します
Octokit APIクライアントoctokit.restエンドポイントメソッドoctokit.request()| ブラウザ | ESM.Shから直接octokitをロードします < script type =" module " >
import { Octokit , App } from "https://esm.sh/octokit" ;
</ script > |
|---|---|
| デノ | ESM.Shから直接octokitをロードします import { Octokit , App } from "https://esm.sh/octokit?dts" ; |
| ノード |
import { Octokit , App } from "octokit" ; |
重要
条件付きエクスポートを使用する際に、 "moduleResolution": "node16", "module": "node16"を設定して、 tsconfig.json適応させる必要があります。
package.json "Exports"のTypeScriptドキュメントを参照してください。
@sindresorhusからESMへの移行に関するこの役立つガイドを参照してください
Octokit APIクライアントスタンドアロンミニマルオクタキット: @octokit/core 。
Octokitクライアントを使用して、GitHubのREST APIにリクエストを送信し、GitHubのGraphQL APIにクエリを送信できます。
例:認証されたユーザーのユーザー名を取得します。
 // Create a personal access token at https://github.com/settings/tokens/new?scopes=repo
const octokit = new Octokit ( { auth : `personal-access-token123` } ) ;

// Compare: https://docs.github.com/en/rest/reference/users#get-the-authenticated-user
const {
  data : { login } ,
} = await octokit . rest . users . getAuthenticated ( ) ;
console . log ( "Hello, %s" , login ) ;最も一般的に使用されるオプションは次のとおりです
| 名前 | タイプ | 説明 |
|---|---|---|
userAgent | String | GitHubのプラットフォームAPIに送信されるすべてのリクエストには、ユーザーエージェントの設定が必要です。ユーザーエージェントは、このようなものをデフォルトします: const octokit = new Octokit ( {
userAgent : "my-app/v1.2.3" ,
} ) ; |
authStrategy | Function | デフォルトは 以下の認証を参照してください。 |
auth | StringまたはObject | 以下の認証を参照してください。 |
baseUrl | String | GitHub Enterprise Serverで使用する場合は、APIのルートURLに const octokit = new Octokit ( {
baseUrl : "https://github.acme-inc.com/api/v3" ,
} ) ; |
高度なオプション
| 名前 | タイプ | 説明 |
|---|---|---|
request | Object |
ノードのみ
|
timeZone | String | Olsonデータベースの名前のリストに従ってタイムゾーンを定義する const octokit = new Octokit ( {
timeZone : "America/Los_Angeles" ,
} ) ;タイムゾーンヘッダーは、コミットを作成するときにタイムスタンプを生成するために使用されるタイムゾーンを決定します。 GithubのTimezonesドキュメントを参照してください。 |
throttle | Object | デフォルトでは、リクエストが一度再試行され、レートまたは二次レートの制限を押した場合に警告が記録されます。 {
onRateLimit : ( retryAfter , options , octokit ) => {
octokit . log . warn (
`Request quota exhausted for request ${ options . method } ${ options . url } `
) ;
if ( options . request . retryCount === 0 ) {
// only retries once
octokit . log . info ( `Retrying after ${ retryAfter } seconds!` ) ;
return true ;
}
} ,
onSecondaryRateLimit : ( retryAfter , options , octokit ) => {
octokit . log . warn (
`SecondaryRateLimit detected for request ${ options . method } ${ options . url } `
) ;
if ( options . request . retryCount === 0 ) {
// only retries once
octokit . log . info ( `Retrying after ${ retryAfter } seconds!` ) ;
return true ;
}
} ,
} ;この機能をオプトアウトするには: new Octokit ( { throttle : { enabled : false } } ) ;クラスター内のスロットリングは、Redisバックエンドを使用してサポートされています。 |
retry | Object | この機能をオプトアウトするには: new Octokit ( { retry : { enabled : false } } ) ; |
デフォルトでは、 Octokit APIクライアントは、静的トークンを使用して認証をサポートしています。
GitHubでサポートされている認証手段は、Octokit/Authentication-Strategies.jsで詳細に説明されています。それらのそれぞれをauthStrategy Constructorオプションとして設定し、 auth Constructorオプションとして戦略オプションを渡すことができます。
たとえば、GitHubアプリのインストールとして認証するために:
 import { createAppAuth } from "@octokit/auth-app" ;
const octokit = new Octokit ( {
  authStrategy : createAppAuth ,
  auth : {
    appId : 1 ,
    privateKey : "-----BEGIN PRIVATE KEY-----n..." ,
    installationId : 123 ,
  } ,
} ) ;

// authenticates as app based on request URLs
const {
  data : { slug } ,
} = await octokit . rest . apps . getAuthenticated ( ) ;

// creates an installation access token as needed
// assumes that installationId 123 belongs to @octocat, otherwise the request will fail
await octokit . rest . issues . create ( {
  owner : "octocat" ,
  repo : "hello-world" ,
  title : "Hello world from " + slug ,
} ) ; APIと内部配線を提供するAppまたはOAuthApp SDKを使用して、ほとんどのユースケースをカバーできます。
たとえば、 Appを使用して上記を実装します
 const app = new App ( { appId , privateKey } ) ;
const { data : slug } = await app . octokit . rest . apps . getAuthenticated ( ) ;
const octokit = await app . getInstallationOctokit ( 123 ) ;
await octokit . rest . issues . create ( {
  owner : "octocat" ,
  repo : "hello-world" ,
  title : "Hello world from " + slug ,
} ) ;
認証戦略がどのように機能するか、または独自の作成方法の詳細をご覧ください。
デフォルトでは、 Octokit APIクライアントは標準のプロキシサーバー環境変数を使用していません。プロキシサーバーのサポートを追加するには、 undici.ProxyAgent()などのサポートをサポートするHTTPSクライアントを提供する必要があります。
たとえば、これはProxyAgentを使用して、プロキシサーバーを介してリクエストを行います。
 import { fetch as undiciFetch , ProxyAgent } from 'undici' ;

const myFetch = ( url , options ) => {
  return undiciFetch ( url , {
    ... options ,
    dispatcher : new ProxyAgent ( < your_proxy_url > )
  } )
}

const octokit = new Octokit ( {
  request : {
     fetch : myFetch
  } ,
} ) ; Octokitを使用し、他の人が使用するように設計されているモジュールを書いている場合は、消費者がOctokitに代替エージェントを提供したり、次のような特定の呼び出しにパラメーターとして提供できるようにする必要があります。
 import { fetch as undiciFetch , ProxyAgent } from 'undici' ;

const myFetch = ( url , options ) => {
  return undiciFetch ( url , {
    ... options ,
    dispatcher : new ProxyAgent ( < your_proxy_url > )
  } )
}

octokit . rest . repos . get ( {
  owner ,
  repo ,
  request : {
    fetch : myFetch
  } ,
} ) ; 次のエラーが発生した場合:
フェッチは設定されていません。新しいOctokit({request:{fetch}})としてフェッチ実装を渡してください。
おそらく、nodejsのサポートされていないバージョンでOctokitを実行しようとしていることを意味します。 Octokitには、ネイティブフェッチAPIを含むノード18以降が必要です。
この問題をバイパスするには、このような独自のfetch実装(またはnode-fetchのような内蔵バージョン)を提供できます。
 import fetch from "node-fetch" ;

const octokit = new Octokit ( {
  request : {
    fetch : fetch ,
  } ,
} ) ; GitHub Rest API、 octokit.rest.* Endpointメソッドとoctokit.requestを使用する方法は2つあります。どちらも同じように行動し、 octokit.rest.*メソッドは便利なために追加され、 octokit.request内部で使用します。
例えば
 await octokit . rest . issues . create ( {
  owner : "octocat" ,
  repo : "hello-world" ,
  title : "Hello, world!" ,
  body : "I created this issue using Octokit!" ,
} ) ;
と同じです
 await octokit . request ( "POST /repos/{owner}/{repo}/issues" , {
  owner : "octocat" ,
  repo : "hello-world" ,
  title : "Hello, world!" ,
  body : "I created this issue using Octokit!" ,
} ) ;どちらの場合も、特定のリクエストは、必要に応じてacceptおよびuser-agentヘッダーを管理するoctokitインスタンスによって認証、再試行、および透過的に透過的にスロットルされます。
octokit.request使用して、完全なURLを渡すことにより、他のドメインにリクエストを送信し、GitHubのREST APIドキュメントでは(まだ)文書化されていないエンドポイントにリクエストを送信できます。
octokit.restエンドポイントメソッドすべてのGitHub REST APIエンドポイントには、コードの読みやすさと開発者の利便性を向上させるための関連するoctokit.restエンドポイントメソッドがあります。詳細については@octokit/plugin-rest-endpoint-methods参照してください。
例:問題を作成します
 await octokit . rest . issues . create ( {
  owner : "octocat" ,
  repo : "hello-world" ,
  title : "Hello, world!" ,
  body : "I created this issue using Octokit!" ,
} ) ; octokit.restエンドポイントメソッドは、GithubのOpenapi仕様から自動的に生成されます。非推奨警告を実装し、変化の頻度を減らすために、操作IDとパラメーター名の変更を追跡します。
カバーの下では、すべてのエンドポイントメソッドがデフォルト設定されたJust octokit.requestであるため、 .endpoint() APIと同じパラメーターと同じパラメーターをサポートします。
octokit.request() octokit.requestを使用して、GitHub REST APIを直接呼び出すことができます。 request APIは、GitHubのREST APIドキュメント1:1と一致するため、そこに表示されるものは何でも、 requestを使用して呼び出すことができます。すべての詳細については、 @octokit/requestを参照してください。
例:問題を作成します
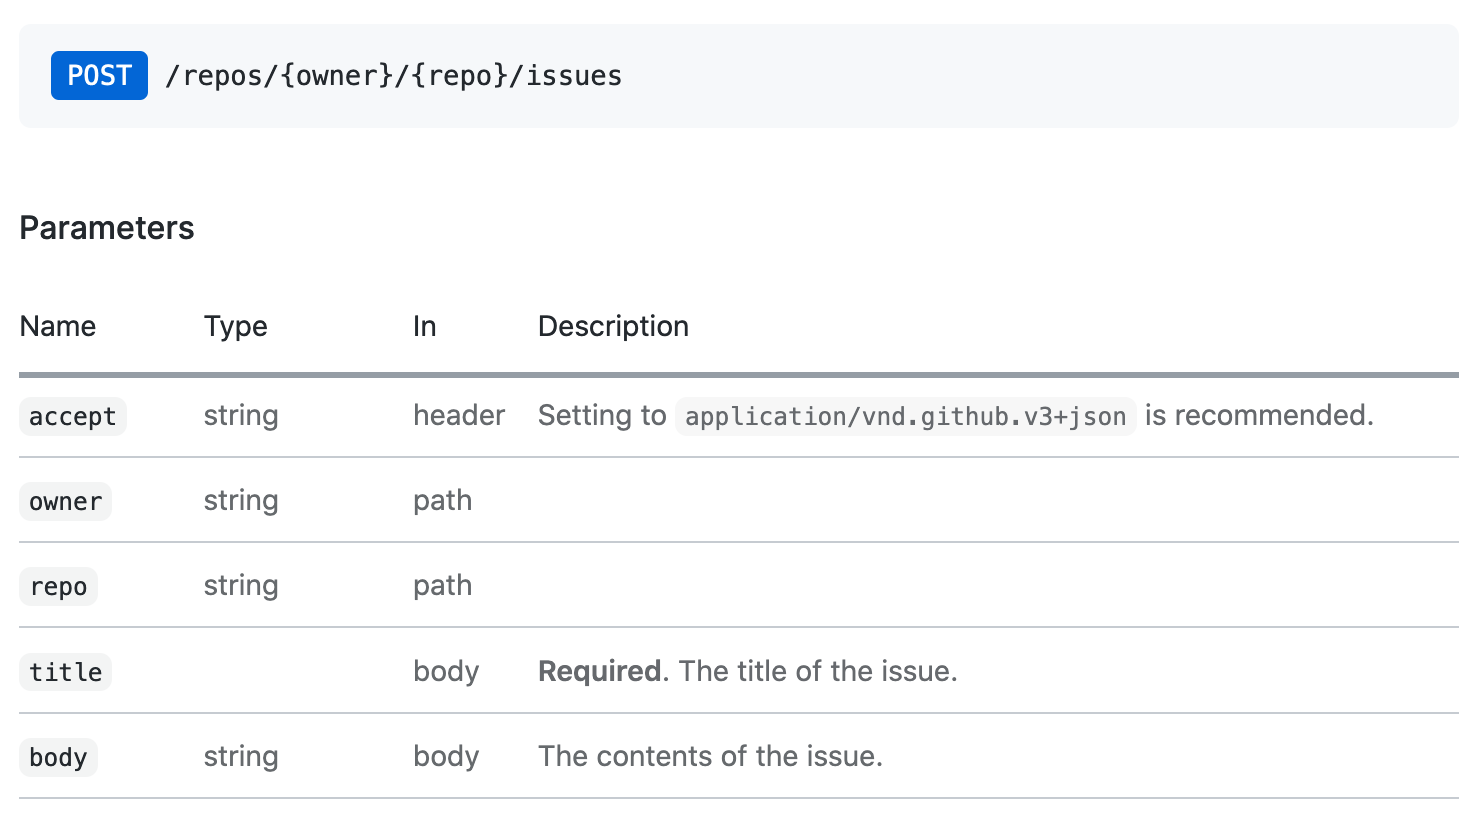
その問題に対応するoctokit.request API呼び出しは、次のようになります。
 // https://docs.github.com/en/rest/reference/issues#create-an-issue
await octokit . request ( "POST /repos/{owner}/{repo}/issues" , {
  owner : "octocat" ,
  repo : "hello-world" ,
  title : "Hello, world!" ,
  body : "I created this issue using Octokit!" ,
} ) ;
最初の引数は、GitHubのAPIドキュメントにリストされているREST APIルートです。 2番目の引数は、パス、クエリ、または本体で使用されているかどうかに関係なく、すべてのパラメーターを持つオブジェクトです。
Paginateが最初の30項目をデフォルトで返すすべてのREST APIエンドポイント。すべてのアイテムを取得する場合は、ページネーションAPIを使用できます。 Pagination APIは、REST APIルートを最初の引数として期待していますがoctokit.rest.*.list*
例:リポジトリ内のすべての問題を反復します
 const iterator = octokit . paginate . iterator ( octokit . rest . issues . listForRepo , {
  owner : "octocat" ,
  repo : "hello-world" ,
  per_page : 100 ,
} ) ;

// iterate through each response
for await ( const { data : issues } of iterator ) {
  for ( const issue of issues ) {
    console . log ( "Issue #%d: %s" , issue . number , issue . title ) ;
  }
}
Async Iteratorを使用することは、すべてのアイテムを繰り返す最もメモリ効率的な方法です。ただし、1回の呼び出しですべてのアイテムを取得することもできます
 const issues = await octokit . paginate ( octokit . rest . issues . listForRepo , {
  owner : "octocat" ,
  repo : "hello-world" ,
  per_page : 100 ,
} ) ; メディアタイプ形式は、すべてのリクエストでmediaType: { format }を使用して設定できます。
例: package.jsonファイルの生のコンテンツを取得します
 const { data } = await octokit . rest . repos . getContent ( {
  mediaType : {
    format : "raw" ,
  } ,
  owner : "octocat" ,
  repo : "hello-world" ,
  path : "package.json" ,
} ) ;
console . log ( "package name: %s" , JSON . parse ( data ) . name ) ;
メディアタイプ形式の詳細をご覧ください。
スタンドアロンモジュール: @octokit/request-error
リクエストエラー処理の場合、 RequestErrorをインポートして使用してくださいtry...catch 。
import { RequestError } from "octokit" ; try {
// your code here that sends at least one Octokit request
await octokit . request ( "GET /" ) ;
} catch ( error ) {
// Octokit errors are instances of RequestError, so they always have an `error.status` property containing the HTTP response code.
if ( error instanceof RequestError ) {
// handle Octokit error
// error.message; // Oops
// error.status; // 500
// error.request; // { method, url, headers, body }
// error.response; // { url, status, headers, data }
} else {
// handle all other errors
throw error ;
}
}OctokitはGithubのGraphQL APIを直接サポートしています。ドキュメントに表示され、GraphQLエクスプローラーでoctokit.graphqlでの呼び出しで使用可能な同じクエリを使用できます。
例:認証されたユーザーのログインを取得します
 const {
  viewer : { login } ,
} = await octokit . graphql ( `{
  viewer {
    login
  }
}` ) ;
変数は2番目の引数として渡すことができます
 const { lastIssues } = await octokit . graphql (
  `
    query lastIssues($owner: String!, $repo: String!, $num: Int = 3) {
      repository(owner: $owner, name: $repo) {
        issues(last: $num) {
          edges {
            node {
              title
            }
          }
        }
      }
    }
  ` ,
  {
    owner : "octokit" ,
    repo : "graphql.js" ,
  } ,
) ; GithubのGraphQL APIは、最大100個のアイテムを返します。すべてのアイテムを取得する場合は、ページネーションAPIを使用できます。
例:すべての問題を取得します
 const { allIssues } = await octokit . graphql . paginate (
  `
    query allIssues($owner: String!, $repo: String!, $num: Int = 10, $cursor: String) {
      repository(owner: $owner, name: $repo) {
        issues(first: $num, after: $cursor) {
          edges {
            node {
              title
            }
          }
          pageInfo {
            hasNextPage
            endCursor
          }
        }
      }
    }
  ` ,
  {
    owner : "octokit" ,
    repo : "graphql.js" ,
  } ,
) ;
GithubのGraphQLページネーションの使用の詳細をご覧ください。
{mediaType: previews: [] }オプションを使用してプレビューを有効にすることができます。
例:ラベルを作成します
 await octokit . graphql (
  `mutation createLabel($repositoryId:ID!,name:String!,color:String!) {
  createLabel(input:{repositoryId:$repositoryId,name:$name}) {
    label: {
      id
    }
  }
}` ,
  {
    repositoryId : 1 ,
    name : "important" ,
    color : "cc0000" ,
    mediaType : {
      previews : [ "bane" ] ,
    } ,
  } ,
) ;
GithubのGraphQLスキーマプレビューの詳細をご覧ください
Appクライアントは、GitHubアプリ、Webhooks、およびOAuthの機能を組み合わせています
スタンドアロンモジュール: @octokit/app
インテグレーターの場合、GitHubアプリは認証と承認の手段です。 GitHubアプリは、GitHubユーザーまたは組織アカウントに登録できます。 GitHubアプリの登録は、受信したい一連の権限とWebhooksイベントを定義し、見返りに一連の資格情報を提供します。ユーザーは、リポジトリをインストールしてリポジトリへのアクセスを付与できます。
一部のAPIエンドポイントでは、githubアプリがJSON Webトークン(JWT)を使用してそれ自体を認証する必要があります。インストールに影響を与えるリクエストの場合、アプリの資格情報とインストールIDを使用してインストールアクセストークンを作成する必要があります。
Appクライアントはあなたのためにすべての世話をします。
例:すべてのリポジトリにリポジトリイベントをディスパッチします。アプリはにインストールされています
 import { App } from "octokit" ;

const app = new App ( { appId , privateKey } ) ;

for await ( const { octokit , repository } of app . eachRepository . iterator ( ) ) {
  // https://docs.github.com/en/rest/reference/repos#create-a-repository-dispatch-event
  await octokit . rest . repos . createDispatchEvent ( {
    owner : repository . owner . login ,
    repo : repository . name ,
    event_type : "my_event" ,
    client_payload : {
      foo : "bar" ,
    } ,
  } ) ;
  console . log ( "Event dispatched for %s" , repository . full_name ) ;
}例:インストールとして認証されたoctokitインスタンスを取得します
const octokit = await app . getInstallationOctokit ( 123 ) ;アプリの詳細をご覧ください。
スタンドアロンモジュール: @octokit/webhooks
アプリをインストールするとき、アプリ登録要求がリクエストとして送信されるイベントは、アプリの登録に設定されたWebhook URLにリクエストとして送信されます。
WebHookイベントリクエストは、アプリの登録の一部でもあるWebHook Secretを使用して署名されます。リクエストペイロードを処理する前に、その秘密を確認する必要があります。
app.webhooks.* APIは、Webhookイベントの受信、検証、および処理のメソッドを提供します。
例:新しい問題に関するコメントを作成します
 import { createServer } from "node:http" ;
import { App , createNodeMiddleware } from "octokit" ;

const app = new App ( {
  appId ,
  privateKey ,
  webhooks : { secret } ,
} ) ;

app . webhooks . on ( "issues.opened" , ( { octokit , payload } ) => {
  return octokit . rest . issues . createComment ( {
    owner : payload . repository . owner . login ,
    repo : payload . repository . name ,
    issue_number : payload . issue . number ,
    body : "Hello, World!" ,
  } ) ;
} ) ;

// Your app can now receive webhook events at `/api/github/webhooks`
createServer ( createNodeMiddleware ( app ) ) . listen ( 3000 ) ;
サーバーレス環境の場合、イベントを明示的に検証して受信できます
 await app . webhooks . verifyAndReceive ( {
  id : request . headers [ "x-github-delivery" ] ,
  name : request . headers [ "x-github-event" ] ,
  signature : request . headers [ "x-hub-signature-256" ] ,
  payload : request . body ,
} ) ;
Github Webhooksの詳細をご覧ください。
スタンドアロンモジュール: @octokit/oauth-app
OAuthアプリとGitHubアプリの両方は、OAuthを使用してGitHubユーザーの認証をサポートしています。OAUTHアプリの承認とGitHubアプリのユーザーの識別と承認を参照してください。
いくつかの違いがあります:
AppはGitHubアプリ用です。 OAUTHアプリ固有の機能が必要な場合は、代わりにOAuthApp使用してください。
例:ユーザーがOAuth Webフローを使用してログインしたときにリポジトリを見る
 import { createServer } from "node:http" ;
import { App , createNodeMiddleware } from "octokit" ;

const app = new App ( {
  oauth : { clientId , clientSecret } ,
} ) ;

app . oauth . on ( "token.created" , async ( { token , octokit } ) => {
  await octokit . rest . activity . setRepoSubscription ( {
    owner : "octocat" ,
    repo : "hello-world" ,
    subscribed : true ,
  } ) ;
} ) ;

// Your app can receive the OAuth redirect at /api/github/oauth/callback
// Users can initiate the OAuth web flow by opening /api/github/oauth/login
createServer ( createNodeMiddleware ( app ) ) . listen ( 3000 ) ;
サーバーレス環境の場合、OAUTH Web Flow Redirectからcodeアクセストークンと明示的に交換できます。 app.oauth.createToken()認証オブジェクトを返し、「token.created」イベントを発します。
 const { token } = await app . oauth . createToken ( {
  code : request . query . code ,
} ) ;
例:デバイスフローを使用してトークンを作成します。
 const { token } = await app . oauth . createToken ( {
  async onVerification ( verification ) {
    await sendMessageToUser (
      request . body . phoneNumber ,
      `Your code is ${ verification . user_code } . Enter it at ${ verification . verification_uri } ` ,
    ) ;
  } ,
} ) ;
例:デフォルトのスコープを使用してOAUTHアプリサーバーを作成します
 import { createServer } from "node:http" ;
import { OAuthApp , createNodeMiddleware } from "octokit" ;

const app = new OAuthApp ( {
  clientId ,
  clientSecret ,
  defaultScopes : [ "repo" , "gist" ] ,
} ) ;

app . oauth . on ( "token" , async ( { token , octokit } ) => {
  await octokit . rest . gists . create ( {
    description : "I created this gist using Octokit!" ,
    public : true ,
    files : {
      "example.js" : `/* some code here */` ,
    } ,
  } ) ;
} ) ;

// Your app can receive the OAuth redirect at /api/github/oauth/callback
// Users can initiate the OAuth web flow by opening /api/oauth/login
createServer ( createNodeMiddleware ( app ) ) . listen ( 3000 ) ;GitHubアプリを登録した後、GitHubからWebhookイベントリクエストを取得したり、OAuthユーザーWebフローからリダイレクトを受け入れることができるサーバーを作成および展開する必要があります。
このようなサーバーを作成する最も簡単な方法は、 createNodeMiddleware()を使用することです。これは、Nodeのhttp.createServer()メソッドとエクスプレスミドルウェアの両方で動作します。
ミドルウェアが公開するデフォルトのルートはです
| ルート | ルートの説明 |
|---|---|
POST /api/github/webhooks | github webhookイベントリクエストを受信するエンドポイント |
GET /api/github/oauth/login | Githubの承認エンドポイントにリダイレクトします。オプションの?stateと?scopesクエリパラメーターを受け入れます。 ?scopes 、サポートされているOAuthスコープ名のコンマ分離されたリストです |
GET /api/github/oauth/callback | クライアントのリダイレクトエンドポイント。これは、 tokenイベントがトリガーされる場所です |
POST /api/github/oauth/token | OAUTHアクセストークンの認可コードを交換します。成功した場合、 tokenイベントがトリガーされます。 |
GET /api/github/oauth/token | トークンが有効かどうかを確認してください。 Authorizationヘッダーでトークンを使用して認証する必要があります。 GithubのPOST /applications/{client_id}/tokenエンドポイントを使用します |
PATCH /api/github/oauth/token | トークンをリセットします(現在のものを無効にし、新しいトークンを返します)。 Authorizationヘッダーでトークンを使用して認証する必要があります。 githubのPATCH /applications/{client_id}/tokenエンドポイントを使用します。 |
PATCH /api/github/oauth/refresh-token | 期限切れのトークンをリフレッシュします(現在のトークンを無効にし、新しいアクセストークンを返し、トークンを更新します)。 Authorizationヘッダーでトークンを使用して認証する必要があります。 GithubのPOST https://github.com/login/oauth/access_token oauthエンドポイントを使用します。 |
POST /api/github/oauth/token/scoped | スコープトークンを作成します(現在のトークンを無効にしません)。 Authorizationヘッダーでトークンを使用して認証する必要があります。 GithubのPOST /applications/{client_id}/token/scoped endpointを使用します。 |
DELETE /api/github/oauth/token | 基本的にログアウトに相当する現在のトークンを無効にします。 Authorizationヘッダーでトークンを使用して認証する必要があります。 |
DELETE /api/github/oauth/grant | 基本的にアンインストールに相当するユーザーの助成金を取り消します。 Authorizationヘッダーでトークンを使用して認証する必要があります。 |
例:Expressを備えたGitHubサーバーを作成します
 import express from "express" ;
import { App , createNodeMiddleware } from "octokit" ;

const expressApp = express ( ) ;
const octokitApp = new App ( {
  appId ,
  privateKey ,
  webhooks : { secret } ,
  oauth : { clientId , clientSecret } ,
} ) ;

expressApp . use ( createNodeMiddleware ( app ) ) ;

expressApp . listen ( 3000 , ( ) => {
  console . log ( `Example app listening at http://localhost:3000` ) ;
} ) ;アプリのクライアントの秘密をユーザーに公開してはならないので、 Appコンストラクターを使用できません。代わりに、 /api/github/oauth/*ルートを公開するAppコンストラクターを使用してサーバーを作成する必要があります。これにより、Webブラウザで実行されているアプリのOAuthログインを安全に実装できます。
(User) Authorization callback URL独自のアプリに設定した場合、 ?code=...&state=...クエリパラメーターを読み取る必要がある場合は、 app.oauthLoginUrl()によって返された値とstateパラメーターを、偽造攻撃から保護するために、oauth Authorizationトークンとcodeを交換します。
上記のようにアプリサーバーを実行する場合、それを行うためのデフォルトのルートはPOST /api/github/oauth/tokenです。
トークンを正常に取得したら、ブラウザのURLから?code=...&state=...クエリパラメーターを削除することもお勧めします
 const code = new URL ( location . href ) . searchParams . get ( "code" ) ;
if ( code ) {
  // remove ?code=... from URL
  const path =
    location . pathname +
    location . search . replace ( / b(code|state)=w+ / g , "" ) . replace ( / [?&]+$ / , "" ) ;
  history . replaceState ( { } , "" , path ) ;

  // exchange the code for a token with your backend.
  // If you use https://github.com/octokit/oauth-app.js
  // the exchange would look something like this
  const response = await fetch ( "/api/github/oauth/token" , {
    method : "POST" ,
    headers : {
      "content-type" : "application/json" ,
    } ,
    body : JSON . stringify ( { code } ) ,
  } ) ;
  const { token } = await response . json ( ) ;
  // `token` is the OAuth Access Token that can be use

  const { Octokit } = await import ( "https://esm.sh/@octokit/core" ) ;
  const octokit = new Octokit ( { auth : token } ) ;

  const {
    data : { login } ,
  } = await octokit . request ( "GET /user" ) ;
  alert ( "Hi there, " + login ) ;
}
? OAUTHユーザートークンに関連するすべてのメソッドに簡単なAPIを提供するために@octokit/auth-oauth-user-clientに取り組んでいます。
計画は、HTMLファイルにインポートできるJavaScriptファイルを返すNodeミドルウェアへの新しいGET /api/github/oauth/octokit.jsルートを追加することです。これにより、事前に認識されたoctokitインスタンスが利用可能になります。
スタンドアロンモジュール: @octokit/action
?本格的なActionクライアントは保留中です。 @actions/githubを使用することができます
mit


