octokit.js
v4.0.2
브라우저, node.js 및 deno 용 모든 배터리가 포함 된 Github SDK.
octokit 패키지는 3 개의 주요 Octokit 라이브러리를 통합합니다
Octokit API 클라이언트octokit.rest 종말점 방법octokit.request()| 브라우저 | Esm.sh에서 직접 octokit 로드하십시오 < script type =" module " >
import { Octokit , App } from "https://esm.sh/octokit" ;
</ script > |
|---|---|
| 데노 | Esm.sh에서 직접 octokit 로드하십시오 import { Octokit , App } from "https://esm.sh/octokit?dts" ; |
| 마디 | import { Octokit , App } from "octokit" ; |
중요한
조건부 내보내기를 사용하면 "moduleResolution": "node16", "module": "node16" 설정하여 tsconfig.json 조정해야합니다.
Package.json "Exports"의 TypeScript Docs를 참조하십시오.
@sindresorhus에서 ESM으로의 전환에 대한이 유용한 안내서를 참조하십시오.
Octokit API 클라이언트 독립형 최소 Octokit : @octokit/core .
Octokit 클라이언트는 Github의 REST API에 요청을 보내고 GitHub의 GraphQL API에 쿼리를 보내는 데 사용될 수 있습니다.
예 : 인증 된 사용자의 사용자 이름을 얻습니다.
 // Create a personal access token at https://github.com/settings/tokens/new?scopes=repo
const octokit = new Octokit ( { auth : `personal-access-token123` } ) ;

// Compare: https://docs.github.com/en/rest/reference/users#get-the-authenticated-user
const {
  data : { login } ,
} = await octokit . rest . users . getAuthenticated ( ) ;
console . log ( "Hello, %s" , login ) ;가장 일반적으로 사용되는 옵션은입니다
| 이름 | 유형 | 설명 |
|---|---|---|
userAgent | String | GitHub의 플랫폼 API에 전송 된 모든 요청에 사용자 에이전트 설정이 필요합니다. 사용자 에이전트는 다음과 같은 내용으로 기본적으로 다음과 같은 것으로 나타납니다 : const octokit = new Octokit ( {
userAgent : "my-app/v1.2.3" ,
} ) ; |
authStrategy | Function | 아래 인증을 참조하십시오. |
auth | String 또는 Object | 아래 인증을 참조하십시오. |
baseUrl | String | GitHub Enterprise Server와 함께 사용하는 경우 API의 루트 URL로 const octokit = new Octokit ( {
baseUrl : "https://github.acme-inc.com/api/v3" ,
} ) ; |
고급 옵션
| 이름 | 유형 | 설명 |
|---|---|---|
request | Object |
노드 만
|
timeZone | String | Olson 데이터베이스의 이름 목록에 따라 시간대를 정의하는 const octokit = new Octokit ( {
timeZone : "America/Los_Angeles" ,
} ) ;시간대 헤더는 커밋을 만들 때 타임 스탬프를 생성하는 데 사용되는 시간대를 결정합니다. Github 's Timezones 문서를 참조하십시오. |
throttle | Object | 기본적으로 요청이 한 번 재조정되고 금리 또는 보조 요율 제한에 따라 경고가 기록됩니다. {
onRateLimit : ( retryAfter , options , octokit ) => {
octokit . log . warn (
`Request quota exhausted for request ${ options . method } ${ options . url } `
) ;
if ( options . request . retryCount === 0 ) {
// only retries once
octokit . log . info ( `Retrying after ${ retryAfter } seconds!` ) ;
return true ;
}
} ,
onSecondaryRateLimit : ( retryAfter , options , octokit ) => {
octokit . log . warn (
`SecondaryRateLimit detected for request ${ options . method } ${ options . url } `
) ;
if ( options . request . retryCount === 0 ) {
// only retries once
octokit . log . info ( `Retrying after ${ retryAfter } seconds!` ) ;
return true ;
}
} ,
} ;이 기능을 옵트 아웃하려면 : new Octokit ( { throttle : { enabled : false } } ) ; 클러스터에서의 스로틀은 Redis 백엔드를 사용하여 지원됩니다. |
retry | Object | 이 기능을 옵트 아웃하려면 : new Octokit ( { retry : { enabled : false } } ) ; |
기본적으로 Octokit API 클라이언트는 정적 토큰을 사용하여 인증을 지원합니다.
GitHub에 의해 뒷받침되는 다양한 인증 수단이 있으며, 이는 Octokit/Authentication-strateing.js에 자세히 설명되어 있습니다. 각각을 authStrategy 생성자 옵션으로 설정하고 전략 옵션을 auth 생성자 옵션으로 전달할 수 있습니다.
예를 들어 GitHub 앱 설치로 인증하려면 다음과 같습니다.
 import { createAppAuth } from "@octokit/auth-app" ;
const octokit = new Octokit ( {
  authStrategy : createAppAuth ,
  auth : {
    appId : 1 ,
    privateKey : "-----BEGIN PRIVATE KEY-----n..." ,
    installationId : 123 ,
  } ,
} ) ;

// authenticates as app based on request URLs
const {
  data : { slug } ,
} = await octokit . rest . apps . getAuthenticated ( ) ;

// creates an installation access token as needed
// assumes that installationId 123 belongs to @octocat, otherwise the request will fail
await octokit . rest . issues . create ( {
  owner : "octocat" ,
  repo : "hello-world" ,
  title : "Hello world from " + slug ,
} ) ;
API 및 내부 배선을 제공하여 대부분의 사용 사례를 커버하는 App 또는 OAuthApp SDK를 사용할 수 있습니다.
예를 들어, 위의 App 구현합니다
 const app = new App ( { appId , privateKey } ) ;
const { data : slug } = await app . octokit . rest . apps . getAuthenticated ( ) ;
const octokit = await app . getInstallationOctokit ( 123 ) ;
await octokit . rest . issues . create ( {
  owner : "octocat" ,
  repo : "hello-world" ,
  title : "Hello world from " + slug ,
} ) ;
인증 전략이 어떻게 작동하는지 또는 직접 만드는 방법에 대해 자세히 알아보십시오.
기본적으로 Octokit API 클라이언트는 표준 프록시 서버 환경 변수를 사용하지 않습니다. 프록시 서버에 대한 지원을 추가하려면 undici.ProxyAgent() 와 같은 HTTPS 클라이언트를 제공해야합니다.
예를 들어, 이는 프록시 서버를 통해 요청을하기 위해 ProxyAgent 사용합니다.
 import { fetch as undiciFetch , ProxyAgent } from 'undici' ;

const myFetch = ( url , options ) => {
  return undiciFetch ( url , {
    ... options ,
    dispatcher : new ProxyAgent ( < your_proxy_url > )
  } )
}

const octokit = new Octokit ( {
  request : {
     fetch : myFetch
  } ,
} ) ;
Octokit 사용하고 다른 사람이 사용하도록 설계된 모듈을 작성하는 경우 소비자가 Octokit 에 대한 대체 에이전트를 제공하거나 다음과 같은 특정 통화의 매개 변수로 제공 할 수 있는지 확인해야합니다.
 import { fetch as undiciFetch , ProxyAgent } from 'undici' ;

const myFetch = ( url , options ) => {
  return undiciFetch ( url , {
    ... options ,
    dispatcher : new ProxyAgent ( < your_proxy_url > )
  } )
}

octokit . rest . repos . get ( {
  owner ,
  repo ,
  request : {
    fetch : myFetch
  } ,
} ) ; 다음 오류가 발생하면 :
페치가 설정되지 않았습니다. Fetch 구현을 New Octokit ({request : {fetch}})로 전달하십시오.
아마도 당신이 지원되지 않는 버전의 nodejs로 Octokit을 실행하려고한다는 것을 의미합니다. Octokit은 Node 18 이상이 필요하며 여기에는 기본 Fetch API가 포함됩니다.
이 문제를 우회하려면 다음과 같은 자체 fetch 구현 (또는 node-fetch 와 같은 내장 버전)을 제공 할 수 있습니다.
 import fetch from "node-fetch" ;

const octokit = new Octokit ( {
  request : {
    fetch : fetch ,
  } ,
} ) ; Github REST API를 사용하는 두 가지 방법 인 octokit.rest.* Endpoint Methods 및 octokit.request 가 있습니다. 둘 다 같은 방식으로, octokit.rest.* 방법은 편의를 위해 추가되며 octokit.request 내부적으로 사용합니다.
예를 들어
 await octokit . rest . issues . create ( {
  owner : "octocat" ,
  repo : "hello-world" ,
  title : "Hello, world!" ,
  body : "I created this issue using Octokit!" ,
} ) ;
동일합니다
 await octokit . request ( "POST /repos/{owner}/{repo}/issues" , {
  owner : "octocat" ,
  repo : "hello-world" ,
  title : "Hello, world!" ,
  body : "I created this issue using Octokit!" ,
} ) ;
두 경우 모두 octokit 인스턴스에 의해 주어진 요청이 인증, 재조정 및 스로트 링되어 필요에 따라 accept 및 user-agent 헤더를 관리합니다.
octokit.request 전체 URL을 전달하여 다른 도메인에 요청을 보내고 GitHub의 REST API 문서에 문서화되지 않은 엔드 포인트에 요청을 보내는 데 사용될 수 있습니다.
octokit.rest 종말점 방법 모든 GitHub REST API Endpoint에는 관련 octokit.rest 엔드 포인트 메소드가 더 나은 코드 가독성 및 개발자 편의성을 제공합니다. 자세한 내용은 @octokit/plugin-rest-endpoint-methods 참조하십시오.
예 : 문제를 만듭니다
 await octokit . rest . issues . create ( {
  owner : "octocat" ,
  repo : "hello-world" ,
  title : "Hello, world!" ,
  body : "I created this issue using Octokit!" ,
} ) ;
octokit.rest 엔드 포인트 방법은 GitHub의 OpenAPI 사양에서 자동으로 생성됩니다. 우리는 감가 상각 경고를 구현하고 변화를 중단하는 빈도를 줄이기 위해 작동 ID 및 매개 변수 이름 변경을 추적합니다.
표지 아래에서 모든 엔드 포인트 방법 .endpoint() 기본값이 설정된 octokit.request 입니다.
octokit.request() octokit.request 사용하여 Github REST API를 직접 호출 할 수 있습니다. request API는 GitHub의 REST API 문서 1 : 1과 일치하므로 여기에 표시되는 모든 것이 request 사용하여 호출 할 수 있습니다. 모든 세부 정보는 @octokit/request 참조하십시오.
예 : 문제를 만듭니다
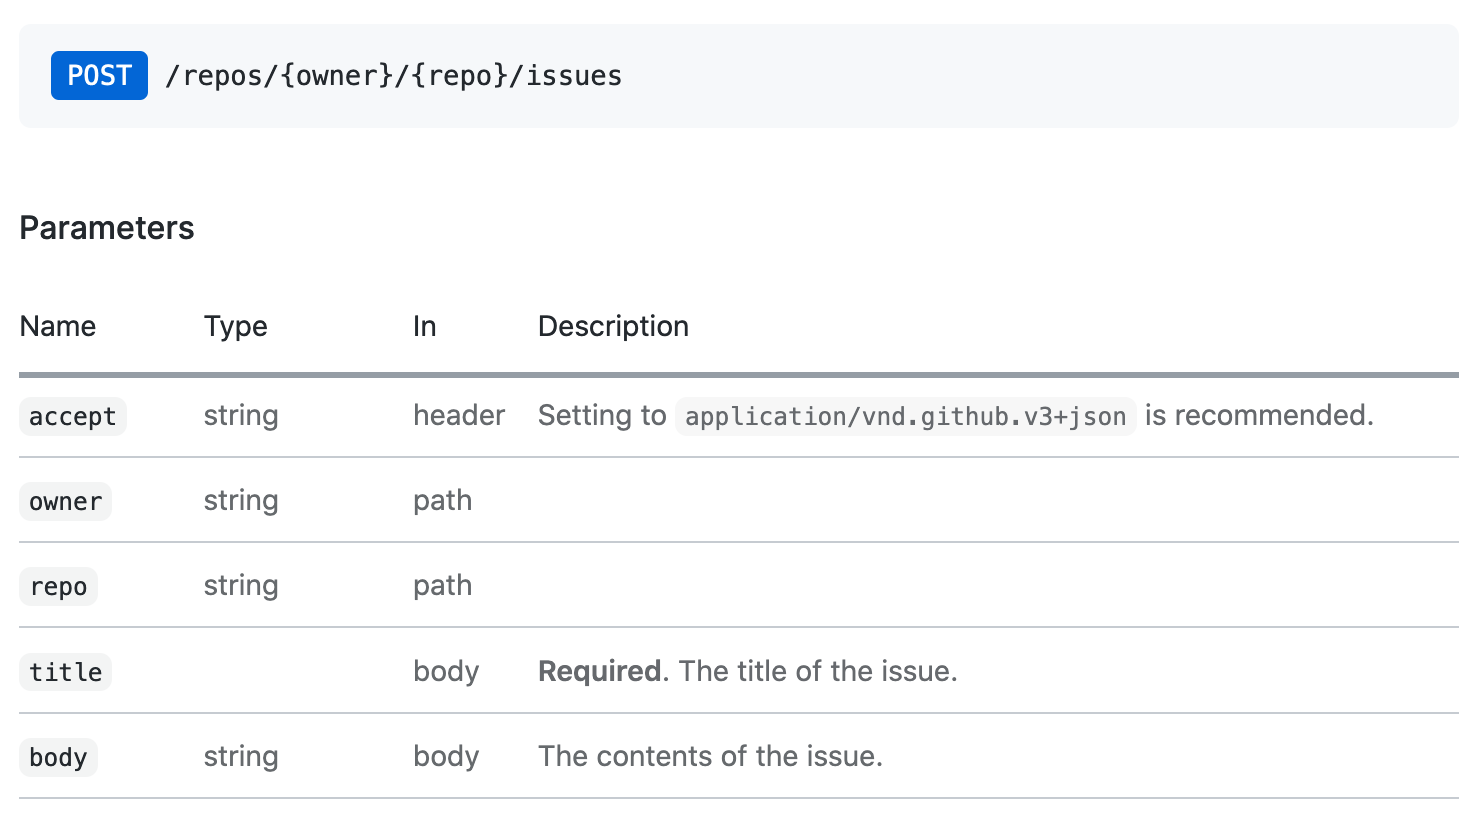
octokit.request API 호출 해당 이슈 생성 문서에 해당하는 API 호출은 다음과 같습니다.
 // https://docs.github.com/en/rest/reference/issues#create-an-issue
await octokit . request ( "POST /repos/{owner}/{repo}/issues" , {
  owner : "octocat" ,
  repo : "hello-world" ,
  title : "Hello, world!" ,
  body : "I created this issue using Octokit!" ,
} ) ;
첫 번째 인수는 GitHub의 API 문서에 나열된 REST API 경로입니다. 두 번째 인수는 경로, 쿼리 또는 본문에서 사용되는지 여부와 무관하게 모든 매개 변수를 가진 객체입니다.
Pagination의 모든 REST API 엔드 포인트는 기본적으로 처음 30 개 항목을 반환합니다. 모든 항목을 검색하려면 Pagination API를 사용할 수 있습니다. Pagination API는 REST API 경로를 첫 번째 인수로 기대하지만 octokit.rest.*.list* 편의성과 더 나은 코드 가독성을위한 방법을 전달할 수도 있습니다.
예 : 저장소의 모든 문제를 반복합니다
 const iterator = octokit . paginate . iterator ( octokit . rest . issues . listForRepo , {
  owner : "octocat" ,
  repo : "hello-world" ,
  per_page : 100 ,
} ) ;

// iterate through each response
for await ( const { data : issues } of iterator ) {
  for ( const issue of issues ) {
    console . log ( "Issue #%d: %s" , issue . number , issue . title ) ;
  }
}
비동기 반복기를 사용하는 것은 모든 항목을 반복하는 가장 메모리 효율적인 방법입니다. 그러나 단일 통화로 모든 항목을 검색 할 수도 있습니다.
 const issues = await octokit . paginate ( octokit . rest . issues . listForRepo , {
  owner : "octocat" ,
  repo : "hello-world" ,
  per_page : 100 ,
} ) ;
미디어 유형 형식은 모든 요청에서 mediaType: { format } 사용하여 설정할 수 있습니다.
예 : package.json 파일의 원시 내용을 검색합니다
 const { data } = await octokit . rest . repos . getContent ( {
  mediaType : {
    format : "raw" ,
  } ,
  owner : "octocat" ,
  repo : "hello-world" ,
  path : "package.json" ,
} ) ;
console . log ( "package name: %s" , JSON . parse ( data ) . name ) ;
미디어 유형 형식에 대해 자세히 알아보십시오.
독립형 모듈 : @octokit/request-error
요청 오류 처리의 경우 RequestError 가져 오기 및 사용 try...catch 문.
import { RequestError } from "octokit" ; try {
// your code here that sends at least one Octokit request
await octokit . request ( "GET /" ) ;
} catch ( error ) {
// Octokit errors are instances of RequestError, so they always have an `error.status` property containing the HTTP response code.
if ( error instanceof RequestError ) {
// handle Octokit error
// error.message; // Oops
// error.status; // 500
// error.request; // { method, url, headers, body }
// error.response; // { url, status, headers, data }
} else {
// handle all other errors
throw error ;
}
} Octokit은 또한 GitHub의 GraphQL API를 직접 지원합니다. 문서에 표시된 동일한 쿼리를 사용하고 octokit.graphql 로 호출에서 GraphQL Explorer에서 사용할 수 있습니다.
예 : 인증 된 사용자의 로그인을 받으십시오
 const {
  viewer : { login } ,
} = await octokit . graphql ( `{
  viewer {
    login
  }
}` ) ;
변수는 두 번째 인수로 전달 될 수 있습니다
 const { lastIssues } = await octokit . graphql (
  `
    query lastIssues($owner: String!, $repo: String!, $num: Int = 3) {
      repository(owner: $owner, name: $repo) {
        issues(last: $num) {
          edges {
            node {
              title
            }
          }
        }
      }
    }
  ` ,
  {
    owner : "octokit" ,
    repo : "graphql.js" ,
  } ,
) ; GitHub의 GraphQL API는 최대 100 개 항목을 반환합니다. 모든 항목을 검색하려면 Pagination API를 사용할 수 있습니다.
예 : 모든 문제를 가져옵니다
 const { allIssues } = await octokit . graphql . paginate (
  `
    query allIssues($owner: String!, $repo: String!, $num: Int = 10, $cursor: String) {
      repository(owner: $owner, name: $repo) {
        issues(first: $num, after: $cursor) {
          edges {
            node {
              title
            }
          }
          pageInfo {
            hasNextPage
            endCursor
          }
        }
      }
    }
  ` ,
  {
    owner : "octokit" ,
    repo : "graphql.js" ,
  } ,
) ;
GitHub의 GraphQL Pagination 사용법에 대해 자세히 알아보십시오.
{mediaType: previews: [] } 옵션을 사용하여 미리보기를 활성화 할 수 있습니다.
예 : 레이블을 만듭니다
 await octokit . graphql (
  `mutation createLabel($repositoryId:ID!,name:String!,color:String!) {
  createLabel(input:{repositoryId:$repositoryId,name:$name}) {
    label: {
      id
    }
  }
}` ,
  {
    repositoryId : 1 ,
    name : "important" ,
    color : "cc0000" ,
    mediaType : {
      previews : [ "bane" ] ,
    } ,
  } ,
) ;
GitHub의 GraphQL 스키마 미리보기에 대해 자세히 알아보십시오
App 클라이언트는 Github 앱, Webhooks 및 Oauth의 기능을 결합합니다.
독립형 모듈 : @octokit/app
통합기의 경우 GitHub 앱은 인증 및 승인 수단입니다. GitHub 앱은 GitHub 사용자 또는 조직 계정에 등록 할 수 있습니다. GitHub 앱 등록은 받고 자하는 일련의 권한 및 WebHooks 이벤트를 정의하고 대가로 일련의 자격 증명을 제공합니다. 사용자는 저장소를 설치하여 리포지토리에 대한 액세스 권한을 부여 할 수 있습니다.
일부 API 엔드 포인트에는 JWT (JSON Web Token)를 사용하여 GitHub 앱이 자체로 인증해야합니다. 설치에 영향을 미치는 요청의 경우 앱의 자격 증명 및 설치 ID를 사용하여 설치 액세스 토큰을 작성해야합니다.
App 클라이언트는 귀하를 위해 모든 것을 처리합니다.
예 : 모든 저장소에서 리포지토리 이벤트를 발송합니다. 앱이 설치됩니다.
 import { App } from "octokit" ;

const app = new App ( { appId , privateKey } ) ;

for await ( const { octokit , repository } of app . eachRepository . iterator ( ) ) {
  // https://docs.github.com/en/rest/reference/repos#create-a-repository-dispatch-event
  await octokit . rest . repos . createDispatchEvent ( {
    owner : repository . owner . login ,
    repo : repository . name ,
    event_type : "my_event" ,
    client_payload : {
      foo : "bar" ,
    } ,
  } ) ;
  console . log ( "Event dispatched for %s" , repository . full_name ) ;
}
예 : 설치로 인증 된 octokit 인스턴스를 얻습니다
const octokit = await app . getInstallationOctokit ( 123 ) ;앱에 대해 자세히 알아보십시오.
독립형 모듈 : @octokit/webhooks
앱을 설치할 때 앱 등록 요청이 앱 등록에서 설정된 WebHook URL에 대한 요청으로 전송됩니다.
Webhook 이벤트 요청은 앱 등록의 일부인 Webhook Secret을 사용하여 서명합니다. 요청 페이로드를 처리하기 전에 해당 비밀을 확인해야합니다.
app.webhooks.* API는 WebHook 이벤트를 수신, 확인 및 처리하는 방법을 제공합니다.
예 : 새로운 문제에 대한 의견을 작성하십시오
 import { createServer } from "node:http" ;
import { App , createNodeMiddleware } from "octokit" ;

const app = new App ( {
  appId ,
  privateKey ,
  webhooks : { secret } ,
} ) ;

app . webhooks . on ( "issues.opened" , ( { octokit , payload } ) => {
  return octokit . rest . issues . createComment ( {
    owner : payload . repository . owner . login ,
    repo : payload . repository . name ,
    issue_number : payload . issue . number ,
    body : "Hello, World!" ,
  } ) ;
} ) ;

// Your app can now receive webhook events at `/api/github/webhooks`
createServer ( createNodeMiddleware ( app ) ) . listen ( 3000 ) ;
서버리스 환경의 경우 이벤트를 명시 적으로 확인하고받을 수 있습니다.
 await app . webhooks . verifyAndReceive ( {
  id : request . headers [ "x-github-delivery" ] ,
  name : request . headers [ "x-github-event" ] ,
  signature : request . headers [ "x-hub-signature-256" ] ,
  payload : request . body ,
} ) ;
Github Webhooks에 대해 자세히 알아보십시오.
독립형 모듈 : @octokit/oauth-app
OAUTH 앱과 GitHub 앱은 OAUTH를 사용하여 GitHub 사용자 인증을 지원하며 OAUTH 앱 승인 및 GitHub 앱의 사용자 식별 및 승인을 참조하십시오.
몇 가지 차이점이 있습니다.
App 은 github 앱입니다. OAUTH APP 특이 적 기능이 필요한 경우 대신 OAuthApp 사용하십시오.
예 : 사용자가 Oauth 웹 흐름을 사용하여 로그인 할 때 저장소를 시청하십시오.
 import { createServer } from "node:http" ;
import { App , createNodeMiddleware } from "octokit" ;

const app = new App ( {
  oauth : { clientId , clientSecret } ,
} ) ;

app . oauth . on ( "token.created" , async ( { token , octokit } ) => {
  await octokit . rest . activity . setRepoSubscription ( {
    owner : "octocat" ,
    repo : "hello-world" ,
    subscribed : true ,
  } ) ;
} ) ;

// Your app can receive the OAuth redirect at /api/github/oauth/callback
// Users can initiate the OAuth web flow by opening /api/github/oauth/login
createServer ( createNodeMiddleware ( app ) ) . listen ( 3000 ) ;
서버리스 환경의 경우 액세스 토큰을 위해 OAUTH 웹 흐름 리디렉션에서 code 명시 적으로 교환 할 수 있습니다. app.oauth.createToken() 인증 객체를 반환하고 "Token.created"이벤트를 방출합니다.
 const { token } = await app . oauth . createToken ( {
  code : request . query . code ,
} ) ;
예 : 장치 흐름을 사용하여 토큰을 만듭니다.
 const { token } = await app . oauth . createToken ( {
  async onVerification ( verification ) {
    await sendMessageToUser (
      request . body . phoneNumber ,
      `Your code is ${ verification . user_code } . Enter it at ${ verification . verification_uri } ` ,
    ) ;
  } ,
} ) ;
예 : 기본 스코프가있는 OAUTH 앱 서버를 만듭니다
 import { createServer } from "node:http" ;
import { OAuthApp , createNodeMiddleware } from "octokit" ;

const app = new OAuthApp ( {
  clientId ,
  clientSecret ,
  defaultScopes : [ "repo" , "gist" ] ,
} ) ;

app . oauth . on ( "token" , async ( { token , octokit } ) => {
  await octokit . rest . gists . create ( {
    description : "I created this gist using Octokit!" ,
    public : true ,
    files : {
      "example.js" : `/* some code here */` ,
    } ,
  } ) ;
} ) ;

// Your app can receive the OAuth redirect at /api/github/oauth/callback
// Users can initiate the OAuth web flow by opening /api/oauth/login
createServer ( createNodeMiddleware ( app ) ) . listen ( 3000 ) ;GitHub 앱을 등록한 후에는 Github에서 Webhook 이벤트 요청을 검색 할 수있는 서버를 작성하고 배포하고 OAUTH 사용자 웹 흐름에서 리디렉션을 수락해야합니다.
이러한 서버를 생성하는 가장 간단한 방법은 createNodeMiddleware() 사용하는 것입니다. Node의 http.createServer() 메소드 및 Express Middleware와 함께 작동합니다.
미들웨어가 노출하는 기본 경로는입니다
| 노선 | 경로 설명 |
|---|---|
POST /api/github/webhooks | GitHub Webhook 이벤트 요청을받는 엔드 포인트 |
GET /api/github/oauth/login | GitHub의 권한 부여 엔드 포인트로 리디렉션됩니다. 선택 사항을 허용하는 ?state 및 ?scopes 쿼리 매개 변수를 허용합니다. ?scopes 지원되는 Oauth 범위 이름의 쉼표로 구분 된 목록입니다. |
GET /api/github/oauth/callback | 클라이언트의 리디렉션 엔드 포인트. 이것은 token 이벤트가 트리거되는 곳입니다 |
POST /api/github/oauth/token | OAUTH 액세스 토큰에 대한 권한 부여 코드를 교환하십시오. 성공하면 token 이벤트가 트리거됩니다. |
GET /api/github/oauth/token | 토큰이 유효한지 확인하십시오. Authorization 헤더에서 토큰을 사용하여 인증해야합니다. github의 POST /applications/{client_id}/token endpoint를 사용합니다 |
PATCH /api/github/oauth/token | 토큰을 재설정합니다 (현재의 토큰을 무효화하고 새 토큰을 반환). Authorization 헤더에서 토큰을 사용하여 인증해야합니다. github의 PATCH /applications/{client_id}/token endpoint를 사용합니다. |
PATCH /api/github/oauth/refresh-token | 만료되는 토큰을 새로 고칩니다 (현재의 토큰을 무효화하고 새로운 액세스 토큰을 반환하고 새로 고침 토큰을 반환). Authorization 헤더에서 토큰을 사용하여 인증해야합니다. github의 POST https://github.com/login/oauth/access_token oauth endpoint를 사용합니다. |
POST /api/github/oauth/token/scoped | 스코핑 된 토큰을 만듭니다 (현재 토큰을 무효화하지 마십시오). Authorization 헤더에서 토큰을 사용하여 인증해야합니다. GitHub의 POST /applications/{client_id}/token/scoped Endpoint를 사용합니다. |
DELETE /api/github/oauth/token | 기본적으로 로그 아웃과 동등한 현재 토큰을 무효화합니다. Authorization 헤더에서 토큰을 사용하여 인증해야합니다. |
DELETE /api/github/oauth/grant | 기본적으로 제거되지 않은 것과 동등한 사용자의 보조금을 취소합니다. Authorization 헤더에서 토큰을 사용하여 인증해야합니다. |
예 : Express로 GitHub 서버를 만듭니다
 import express from "express" ;
import { App , createNodeMiddleware } from "octokit" ;

const expressApp = express ( ) ;
const octokitApp = new App ( {
  appId ,
  privateKey ,
  webhooks : { secret } ,
  oauth : { clientId , clientSecret } ,
} ) ;

expressApp . use ( createNodeMiddleware ( app ) ) ;

expressApp . listen ( 3000 , ( ) => {
  console . log ( `Example app listening at http://localhost:3000` ) ;
} ) ; 앱의 클라이언트를 사용자에게 노출시키지 않아야하므로 App 생성자를 사용할 수 없습니다. 대신 /api/github/oauth/* 경로를 노출시키는 App 생성자를 사용하여 서버를 만들어야하며 웹 브라우저에서 실행되는 앱에 대해 OAUTH 로그인을 안전하게 구현할 수 있습니다.
자신의 앱으로 (User) Authorization callback URL 설정 한 경우 ?code=...&state=... 쿼리 매개 변수를 읽어야하는 것보다, state 매개 변수를 app.oauthLoginUrl() 에 의해 반환 된 값과 비교하여 위조 공격으로부터 보호하고, OAuth Authorization Token의 code 교환하십시오.
위에서 설명한대로 앱 서버를 실행하면이를 수행 할 기본 경로는 POST /api/github/oauth/token 입니다.
토큰을 성공적으로 검색하면 브라우저의 URL에서 ?code=...&state=... 쿼리 매개 변수를 제거하는 것이 좋습니다.
 const code = new URL ( location . href ) . searchParams . get ( "code" ) ;
if ( code ) {
  // remove ?code=... from URL
  const path =
    location . pathname +
    location . search . replace ( / b(code|state)=w+ / g , "" ) . replace ( / [?&]+$ / , "" ) ;
  history . replaceState ( { } , "" , path ) ;

  // exchange the code for a token with your backend.
  // If you use https://github.com/octokit/oauth-app.js
  // the exchange would look something like this
  const response = await fetch ( "/api/github/oauth/token" , {
    method : "POST" ,
    headers : {
      "content-type" : "application/json" ,
    } ,
    body : JSON . stringify ( { code } ) ,
  } ) ;
  const { token } = await response . json ( ) ;
  // `token` is the OAuth Access Token that can be use

  const { Octokit } = await import ( "https://esm.sh/@octokit/core" ) ;
  const octokit = new Octokit ( { auth : token } ) ;

  const {
    data : { login } ,
  } = await octokit . request ( "GET /user" ) ;
  alert ( "Hi there, " + login ) ;
}
? 우리는 OAUTH 사용자 토큰과 관련된 모든 방법에 대한 간단한 API를 제공하기 위해 @octokit/auth-oauth-user-client 에서 작업하고 있습니다.
이 계획은 Node Middleware에 새로운 GET /api/github/oauth/octokit.js 경로를 추가하여 HTML 파일로 가져올 수있는 JavaScript 파일을 반환하는 것입니다. 사전 승인 된 octokit 인스턴스를 사용할 수 있습니다.
독립형 모듈 : @octokit/action
? 완전 신부 Action 클라이언트가 보류 중입니다. 당분간 @actions/github 사용할 수 있습니다
MIT


