octokit.js
v4.0.2
包括浏览器,node.js和deno的全蝙蝠SDK。
octokit软件包集成了三个主要的Octokit库
Octokit API客户端octokit.rest端点方法octokit.request()| 浏览器 | 直接从ESM.SH加载octokit < script type =" module " >
import { Octokit , App } from "https://esm.sh/octokit" ;
</ script > |
|---|---|
| 丹诺 | 直接从ESM.SH加载octokit import { Octokit , App } from "https://esm.sh/octokit?dts" ; |
| 节点 | 使用 import { Octokit , App } from "octokit" ; |
重要的
当我们使用条件导出时,您需要通过设置"moduleResolution": "node16", "module": "node16"来调整tsconfig.json 。
请参阅package.json上的打字稿文档。
请参阅此有关从@SindResorhus过渡到ESM的有用指南
Octokit API客户端独立的最小Octokit : @octokit/core 。
Octokit客户端可用于将请求发送到GitHub的REST API,并查询GitHub的GraphQl API。
示例:获取身份验证用户的用户名。
 // Create a personal access token at https://github.com/settings/tokens/new?scopes=repo
const octokit = new Octokit ( { auth : `personal-access-token123` } ) ;

// Compare: https://docs.github.com/en/rest/reference/users#get-the-authenticated-user
const {
  data : { login } ,
} = await octokit . rest . users . getAuthenticated ( ) ;
console . log ( "Hello, %s" , login ) ;最常用的选项是
| 姓名 | 类型 | 描述 |
|---|---|---|
userAgent | String | 为GitHub平台API发送的所有请求都需要设置用户代理。用户代理默认为类似的内容: const octokit = new Octokit ( {
userAgent : "my-app/v1.2.3" ,
} ) ; |
authStrategy | Function | 默认为 请参阅下面的身份验证。 |
auth | String或Object | 设置为个人访问令牌,除非您更改了 请参阅下面的身份验证。 |
baseUrl | String | 与GitHub Enterprise Server一起使用时,将 const octokit = new Octokit ( {
baseUrl : "https://github.acme-inc.com/api/v3" ,
} ) ; |
高级选项
| 姓名 | 类型 | 描述 |
|---|---|---|
request | Object |
仅节点
|
timeZone | String | 设置根据Olson数据库的名称列表来定义 const octokit = new Octokit ( {
timeZone : "America/Los_Angeles" ,
} ) ;时区标题将确定用于创建提交时用于生成时间戳的时区。请参阅GitHub的时区文档。 |
throttle | Object | 默认情况下,请求一次,并在达到税率或次要利率限制的情况下记录警告。 {
onRateLimit : ( retryAfter , options , octokit ) => {
octokit . log . warn (
`Request quota exhausted for request ${ options . method } ${ options . url } `
) ;
if ( options . request . retryCount === 0 ) {
// only retries once
octokit . log . info ( `Retrying after ${ retryAfter } seconds!` ) ;
return true ;
}
} ,
onSecondaryRateLimit : ( retryAfter , options , octokit ) => {
octokit . log . warn (
`SecondaryRateLimit detected for request ${ options . method } ${ options . url } `
) ;
if ( options . request . retryCount === 0 ) {
// only retries once
octokit . log . info ( `Retrying after ${ retryAfter } seconds!` ) ;
return true ;
}
} ,
} ;选择退出此功能: new Octokit ( { throttle : { enabled : false } } ) ;使用REDIS后端支持群集中的节流。请参阅 |
retry | Object | 选择退出此功能: new Octokit ( { retry : { enabled : false } } ) ; |
默认情况下, Octokit API客户端使用静态令牌支持身份验证。
GitHub支持的身份验证手段有不同的方法,这些方法在Octokit/authentication-trategies.js上进行了详细描述。您可以将它们设置为authStrategy构造函数选项,并将策略选项作为auth构造器选项传递。
例如,为了将其作为github应用程序安装进行身份验证:
 import { createAppAuth } from "@octokit/auth-app" ;
const octokit = new Octokit ( {
  authStrategy : createAppAuth ,
  auth : {
    appId : 1 ,
    privateKey : "-----BEGIN PRIVATE KEY-----n..." ,
    installationId : 123 ,
  } ,
} ) ;

// authenticates as app based on request URLs
const {
  data : { slug } ,
} = await octokit . rest . apps . getAuthenticated ( ) ;

// creates an installation access token as needed
// assumes that installationId 123 belongs to @octocat, otherwise the request will fail
await octokit . rest . issues . create ( {
  owner : "octocat" ,
  repo : "hello-world" ,
  title : "Hello world from " + slug ,
} ) ;您可以使用提供API和内部接线的App或OAuthApp SDK来涵盖大多数用例。
例如,使用App实现上述
 const app = new App ( { appId , privateKey } ) ;
const { data : slug } = await app . octokit . rest . apps . getAuthenticated ( ) ;
const octokit = await app . getInstallationOctokit ( 123 ) ;
await octokit . rest . issues . create ( {
  owner : "octocat" ,
  repo : "hello-world" ,
  title : "Hello world from " + slug ,
} ) ;
了解有关身份验证策略如何工作或如何创建自己的更多信息的更多信息。
默认情况下, Octokit API客户端不利用标准代理服务器环境变量。为了增加对代理服务器的支持,您将需要提供一个支持它们的HTTPS客户端,例如undici.ProxyAgent() 。
例如,这将使用ProxyAgent来通过代理服务器提出请求:
 import { fetch as undiciFetch , ProxyAgent } from 'undici' ;

const myFetch = ( url , options ) => {
  return undiciFetch ( url , {
    ... options ,
    dispatcher : new ProxyAgent ( < your_proxy_url > )
  } )
}

const octokit = new Octokit ( {
  request : {
     fetch : myFetch
  } ,
} ) ;如果您正在编写使用Octokit的模块,并被设计为其他人使用,则应确保消费者可以为您的Octokit提供替代代理,或作为特定调用的参数,例如:
 import { fetch as undiciFetch , ProxyAgent } from 'undici' ;

const myFetch = ( url , options ) => {
  return undiciFetch ( url , {
    ... options ,
    dispatcher : new ProxyAgent ( < your_proxy_url > )
  } )
}

octokit . rest . repos . get ( {
  owner ,
  repo ,
  request : {
    fetch : myFetch
  } ,
} ) ; 如果收到以下错误:
未设置获取。请以新的Octokit({请求:{fetch}})作为获取实现。
这可能意味着您正在尝试使用不支持的Nodejs运行Octokit。 OCTOKIT需要节点18或更高,其中包括本机提取API。
要绕过此问题,您可以提供自己的fetch实现(或类似node-fetch的内置版本):
 import fetch from "node-fetch" ;

const octokit = new Octokit ( {
  request : {
    fetch : fetch ,
  } ,
} ) ;使用GitHub Rest API, octokit.rest.*端点方法和octokit.request有两种方法。两者都以相同的方式行动,即octokit.rest.*为了方便起见,它们在内部使用octokit.request 。
例如
 await octokit . rest . issues . create ( {
  owner : "octocat" ,
  repo : "hello-world" ,
  title : "Hello, world!" ,
  body : "I created this issue using Octokit!" ,
} ) ;
与
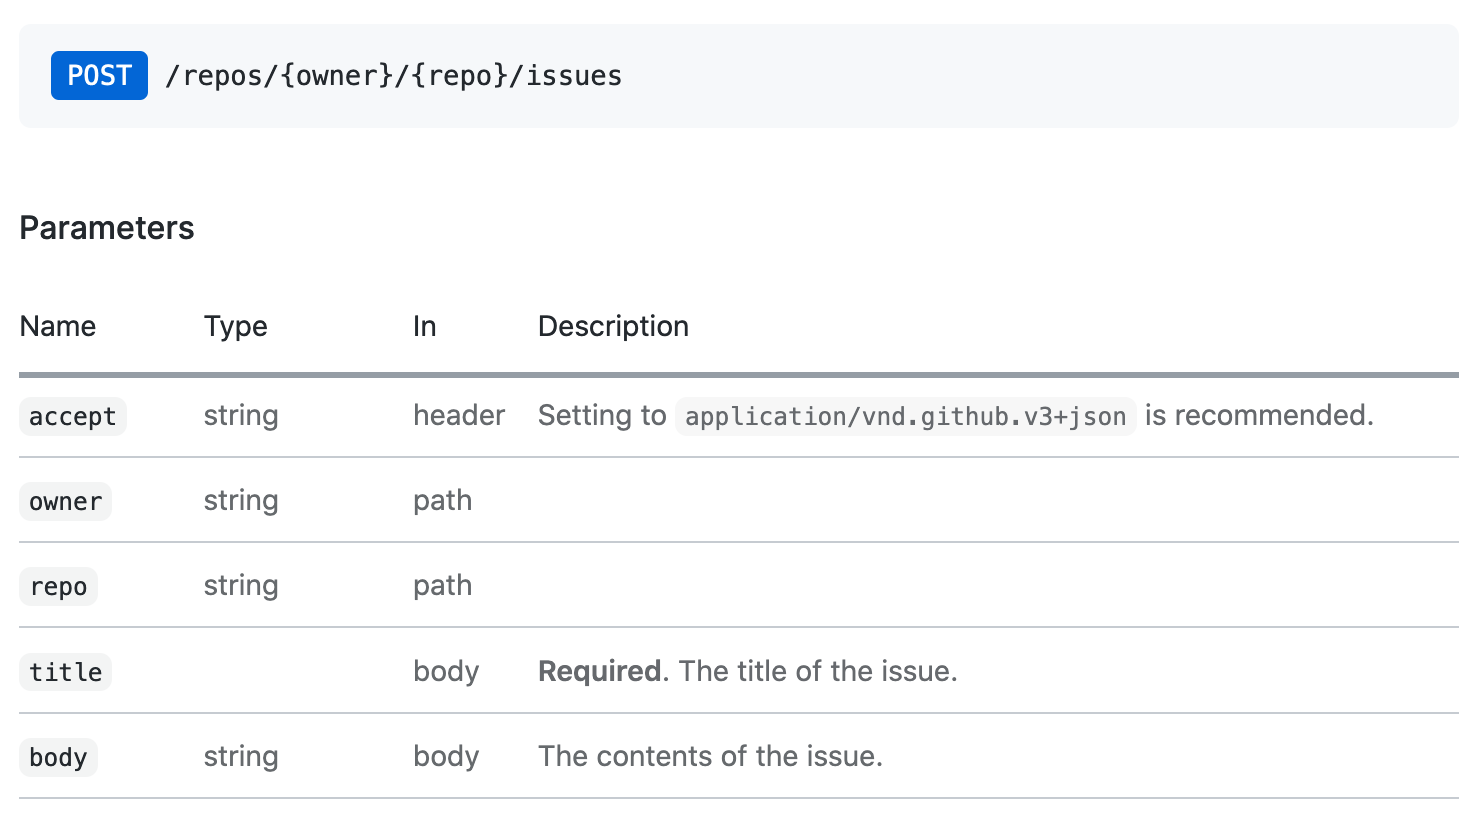
 await octokit . request ( "POST /repos/{owner}/{repo}/issues" , {
  owner : "octocat" ,
  repo : "hello-world" ,
  title : "Hello, world!" ,
  body : "I created this issue using Octokit!" ,
} ) ;在这两种情况下,给定的请求均由octokit实例透明地进行身份验证,重试和节流,该实例还根据需要管理accept和user-agent标头。
octokit.request可用于通过传递完整的URL并将请求发送到GitHub的REST API文档中未记录的端点来将请求发送到其他域。
octokit.rest端点方法每个GitHub REST API端点都有一个关联的octokit.rest端点方法,以提供更好的代码可读性和开发人员的便利性。有关完整的详细信息,请参见@octokit/plugin-rest-endpoint-methods 。
示例:创建一个问题
 await octokit . rest . issues . create ( {
  owner : "octocat" ,
  repo : "hello-world" ,
  title : "Hello, world!" ,
  body : "I created this issue using Octokit!" ,
} ) ; octokit.rest端点方法是从GitHub的OpenAPI规范中自动生成的。我们跟踪操作ID和参数名称更改,以实现折旧警告并降低破坏变化的频率。
在封面下,每个端点方法都只是octokit.request带有默认设置,因此它支持相同的参数以及.endpoint() API。
octokit.request()您可以使用octokit.request直接调用github rest API。 request API匹配GitHub的REST API文档1:1,因此您在那里看到的任何内容,都可以使用request调用。请参阅@octokit/request以获取所有详细信息。
示例:创建一个问题
octokit.request api调用与该问题创建文档相对应如下:
 // https://docs.github.com/en/rest/reference/issues#create-an-issue
await octokit . request ( "POST /repos/{owner}/{repo}/issues" , {
  owner : "octocat" ,
  repo : "hello-world" ,
  title : "Hello, world!" ,
  body : "I created this issue using Octokit!" ,
} ) ;
第一个参数是GitHub的API文档中列出的REST API路由。第二个参数是具有所有参数的对象,与路径,查询或身体中的使用无关。
默认情况下,所有REST API端点返回前30个项目。如果要检索所有项目,则可以使用分页API。分页API期望REST API路由作为第一个参数,但是您也可以通过任何octokit.rest.*.list*方法*为方便起见和更好的代码可读性。
示例:遍历存储库中的所有问题
 const iterator = octokit . paginate . iterator ( octokit . rest . issues . listForRepo , {
  owner : "octocat" ,
  repo : "hello-world" ,
  per_page : 100 ,
} ) ;

// iterate through each response
for await ( const { data : issues } of iterator ) {
  for ( const issue of issues ) {
    console . log ( "Issue #%d: %s" , issue . number , issue . title ) ;
  }
}
使用异步迭代器是遍历所有项目的最有效的内存有效方法。但是您也可以在一个通话中检索所有项目
 const issues = await octokit . paginate ( octokit . rest . issues . listForRepo , {
  owner : "octocat" ,
  repo : "hello-world" ,
  per_page : 100 ,
} ) ; 可以使用mediaType: { format }在每个请求上。
示例:检索package.json的原始内容。
 const { data } = await octokit . rest . repos . getContent ( {
  mediaType : {
    format : "raw" ,
  } ,
  owner : "octocat" ,
  repo : "hello-world" ,
  path : "package.json" ,
} ) ;
console . log ( "package name: %s" , JSON . parse ( data ) . name ) ;
了解有关媒体类型格式的更多信息。
独立模块: @octokit/request-error
为了解决请求错误处理,导入RequestError并使用try...catch语句。
import { RequestError } from "octokit" ; try {
// your code here that sends at least one Octokit request
await octokit . request ( "GET /" ) ;
} catch ( error ) {
// Octokit errors are instances of RequestError, so they always have an `error.status` property containing the HTTP response code.
if ( error instanceof RequestError ) {
// handle Octokit error
// error.message; // Oops
// error.status; // 500
// error.request; // { method, url, headers, body }
// error.response; // { url, status, headers, data }
} else {
// handle all other errors
throw error ;
}
}OCTOKIT还直接支持GITHUB的GraphQl API-您可以使用文档中显示的相同查询,并在使用octokit.graphql呼叫中使用GraphQl Explorer中可用。
示例:获取身份验证的用户的登录
 const {
  viewer : { login } ,
} = await octokit . graphql ( `{
  viewer {
    login
  }
}` ) ;
变量可以作为第二参数传递
 const { lastIssues } = await octokit . graphql (
  `
    query lastIssues($owner: String!, $repo: String!, $num: Int = 3) {
      repository(owner: $owner, name: $repo) {
        issues(last: $num) {
          edges {
            node {
              title
            }
          }
        }
      }
    }
  ` ,
  {
    owner : "octokit" ,
    repo : "graphql.js" ,
  } ,
) ; GitHub的GraphQl API最多返回100个项目。如果要检索所有项目,则可以使用分页API。
示例:获取所有问题
 const { allIssues } = await octokit . graphql . paginate (
  `
    query allIssues($owner: String!, $repo: String!, $num: Int = 10, $cursor: String) {
      repository(owner: $owner, name: $repo) {
        issues(first: $num, after: $cursor) {
          edges {
            node {
              title
            }
          }
          pageInfo {
            hasNextPage
            endCursor
          }
        }
      }
    }
  ` ,
  {
    owner : "octokit" ,
    repo : "graphql.js" ,
  } ,
) ;
了解有关GitHub的GraphQl分页使用情况的更多信息。
可以使用{mediaType: previews: [] }选项启用预览。
示例:创建标签
 await octokit . graphql (
  `mutation createLabel($repositoryId:ID!,name:String!,color:String!) {
  createLabel(input:{repositoryId:$repositoryId,name:$name}) {
    label: {
      id
    }
  }
}` ,
  {
    repositoryId : 1 ,
    name : "important" ,
    color : "cc0000" ,
    mediaType : {
      previews : [ "bane" ] ,
    } ,
  } ,
) ;
了解有关GitHub的GraphQl模式预览的更多信息
App客户端结合了GitHub应用程序,Webhooks和Oauth的功能
独立模块: @octokit/app
对于集成商,GitHub应用程序是认证和授权的一种手段。 GitHub应用程序可以在GitHub用户或组织帐户上注册。 GitHub应用程序注册定义了一组它要接收的权限和Webhooks事件,并提供了一组凭据回报。用户可以通过安装存储库授予访问权限。
一些API端点要求GitHub应用使用JSON Web令牌(JWT)对其进行身份验证。对于影响安装的请求,必须使用应用程序的凭据和安装ID创建安装访问令牌。
App客户端为您照顾一切。
示例:派遣每个存储库中的存储库事件已安装在应用程序上
 import { App } from "octokit" ;

const app = new App ( { appId , privateKey } ) ;

for await ( const { octokit , repository } of app . eachRepository . iterator ( ) ) {
  // https://docs.github.com/en/rest/reference/repos#create-a-repository-dispatch-event
  await octokit . rest . repos . createDispatchEvent ( {
    owner : repository . owner . login ,
    repo : repository . name ,
    event_type : "my_event" ,
    client_payload : {
      foo : "bar" ,
    } ,
  } ) ;
  console . log ( "Event dispatched for %s" , repository . full_name ) ;
}示例:获取一个已验证作为安装的octokit实例
const octokit = await app . getInstallationOctokit ( 123 ) ;了解有关应用程序的更多信息。
独立模块: @octokit/webhooks
安装应用程序时,将以请求发送应用程序注册请求的事件,以发送到应用程序注册中设置的Webhook URL。
Webhook事件请求是使用Webhook Secret签名的,Webhook Secret也是该应用程序注册的一部分。您必须在处理请求有效载荷之前验证该秘密。
app.webhooks.* API提供了接收,验证和处理Webhook事件的方法。
示例:关于新问题的评论
 import { createServer } from "node:http" ;
import { App , createNodeMiddleware } from "octokit" ;

const app = new App ( {
  appId ,
  privateKey ,
  webhooks : { secret } ,
} ) ;

app . webhooks . on ( "issues.opened" , ( { octokit , payload } ) => {
  return octokit . rest . issues . createComment ( {
    owner : payload . repository . owner . login ,
    repo : payload . repository . name ,
    issue_number : payload . issue . number ,
    body : "Hello, World!" ,
  } ) ;
} ) ;

// Your app can now receive webhook events at `/api/github/webhooks`
createServer ( createNodeMiddleware ( app ) ) . listen ( 3000 ) ;
对于无服务器环境,您可以明确验证并接收事件
 await app . webhooks . verifyAndReceive ( {
  id : request . headers [ "x-github-delivery" ] ,
  name : request . headers [ "x-github-event" ] ,
  signature : request . headers [ "x-hub-signature-256" ] ,
  payload : request . body ,
} ) ;
了解有关GitHub Webhooks的更多信息。
独立模块: @octokit/oauth-app
OAuth应用程序和GitHub应用都支持使用OAuth来验证GitHub用户,请参阅授权OAUTH应用程序并识别和授权用户为GitHub应用程序。
有一些差异:
App适用于GitHub应用。如果您需要OAuth App特定功能,请改用OAuthApp 。
示例:当用户登录使用OAuth Web流程时,请观看存储库
 import { createServer } from "node:http" ;
import { App , createNodeMiddleware } from "octokit" ;

const app = new App ( {
  oauth : { clientId , clientSecret } ,
} ) ;

app . oauth . on ( "token.created" , async ( { token , octokit } ) => {
  await octokit . rest . activity . setRepoSubscription ( {
    owner : "octocat" ,
    repo : "hello-world" ,
    subscribed : true ,
  } ) ;
} ) ;

// Your app can receive the OAuth redirect at /api/github/oauth/callback
// Users can initiate the OAuth web flow by opening /api/github/oauth/login
createServer ( createNodeMiddleware ( app ) ) . listen ( 3000 ) ;
对于无服务器环境,您可以从OAuth Web Flow重定向上明确交换code以获取访问令牌。 app.oauth.createToken()返回身份验证对象,并发出“ token.ended”事件。
 const { token } = await app . oauth . createToken ( {
  code : request . query . code ,
} ) ;
示例:使用设备流创建令牌。
 const { token } = await app . oauth . createToken ( {
  async onVerification ( verification ) {
    await sendMessageToUser (
      request . body . phoneNumber ,
      `Your code is ${ verification . user_code } . Enter it at ${ verification . verification_uri } ` ,
    ) ;
  } ,
} ) ;
示例:使用默认范围创建OAuth应用程序服务器
 import { createServer } from "node:http" ;
import { OAuthApp , createNodeMiddleware } from "octokit" ;

const app = new OAuthApp ( {
  clientId ,
  clientSecret ,
  defaultScopes : [ "repo" , "gist" ] ,
} ) ;

app . oauth . on ( "token" , async ( { token , octokit } ) => {
  await octokit . rest . gists . create ( {
    description : "I created this gist using Octokit!" ,
    public : true ,
    files : {
      "example.js" : `/* some code here */` ,
    } ,
  } ) ;
} ) ;

// Your app can receive the OAuth redirect at /api/github/oauth/callback
// Users can initiate the OAuth web flow by opening /api/oauth/login
createServer ( createNodeMiddleware ( app ) ) . listen ( 3000 ) ;注册GitHub应用程序后,您需要创建和部署可以从GitHub检索Webhook事件请求的服务器,并接受OAuth用户Web流的重定向。
创建此类服务器的最简单方法是使用createNodeMiddleware() ,它都可以与Node的http.createServer()方法以及Express Mifdreware一起使用。
中间件公开的默认路线是
| 路线 | 路线说明 |
|---|---|
POST /api/github/webhooks | 接收github webhook事件请求的端点 |
GET /api/github/oauth/login | 重定向到GitHub的授权端点。接受可选的?state和?scopes查询参数。 ?scopes是由逗号分隔的支持的OAuth范围名称的列表 |
GET /api/github/oauth/callback | 客户的重定向端点。这是触发token事件的地方 |
POST /api/github/oauth/token | 交换OAuth访问令牌的授权代码。如果成功,则触发token事件。 |
GET /api/github/oauth/token | 检查令牌是否有效。必须在Authorization标头中使用令牌进行身份验证。使用GitHub的POST /applications/{client_id}/token端点 |
PATCH /api/github/oauth/token | 重置一个令牌(当前一个,返回新令牌)。必须在Authorization标头中使用令牌进行身份验证。使用GitHub的PATCH /applications/{client_id}/token端点。 |
PATCH /api/github/oauth/refresh-token | 刷新一个到期的令牌(当前的代币无效,返回新的访问令牌和刷新令牌)。必须在Authorization标头中使用令牌进行身份验证。使用GitHub的POST https://github.com/login/oauth/access_token oauth endpoint。 |
POST /api/github/oauth/token/scoped | 创建一个示波器令牌(不会使当前的代币无效)。必须在Authorization标头中使用令牌进行身份验证。使用GitHub的POST /applications/{client_id}/token/scoped端点。 |
DELETE /api/github/oauth/token | 使当前令牌无效,基本上是注销的等效物。必须在Authorization标头中使用令牌进行身份验证。 |
DELETE /api/github/oauth/grant | 撤销用户的赠款,基本上相当于卸载。必须在Authorization标头中使用令牌进行身份验证。 |
示例:使用Express创建GitHub服务器
 import express from "express" ;
import { App , createNodeMiddleware } from "octokit" ;

const expressApp = express ( ) ;
const octokitApp = new App ( {
  appId ,
  privateKey ,
  webhooks : { secret } ,
  oauth : { clientId , clientSecret } ,
} ) ;

expressApp . use ( createNodeMiddleware ( app ) ) ;

expressApp . listen ( 3000 , ( ) => {
  console . log ( `Example app listening at http://localhost:3000` ) ;
} ) ;您不得将应用程序客户端的秘密曝光给用户,因此您不能使用App构造函数。取而代之的是,您必须使用App构造函数来创建服务器,该应用程序构造器揭示/api/github/oauth/*路由,您可以通过它安全地实现在Web浏览器中运行的应用程序的OAuth登录。
如果将(User) Authorization callback URL设置为您自己的应用程序,则需要读取?code=...&state=...查询参数,请将state参数与app.oauthLoginUrl()返回的值进行比较,以防止伪造攻击,然后交换OAuth授权的code 。
如果您按照上述运行应用程序服务器,则默认路由是POST /api/github/oauth/token 。
成功检索令牌后,也建议删除浏览器URL查询参数的?code=...&state=...
 const code = new URL ( location . href ) . searchParams . get ( "code" ) ;
if ( code ) {
  // remove ?code=... from URL
  const path =
    location . pathname +
    location . search . replace ( / b(code|state)=w+ / g , "" ) . replace ( / [?&]+$ / , "" ) ;
  history . replaceState ( { } , "" , path ) ;

  // exchange the code for a token with your backend.
  // If you use https://github.com/octokit/oauth-app.js
  // the exchange would look something like this
  const response = await fetch ( "/api/github/oauth/token" , {
    method : "POST" ,
    headers : {
      "content-type" : "application/json" ,
    } ,
    body : JSON . stringify ( { code } ) ,
  } ) ;
  const { token } = await response . json ( ) ;
  // `token` is the OAuth Access Token that can be use

  const { Octokit } = await import ( "https://esm.sh/@octokit/core" ) ;
  const octokit = new Octokit ( { auth : token } ) ;

  const {
    data : { login } ,
  } = await octokit . request ( "GET /user" ) ;
  alert ( "Hi there, " + login ) ;
} ?我们正在使用@octokit/auth-oauth-user-client为与OAuth用户令牌有关的所有方法提供简单的API。
该计划是将新的GET /api/github/oauth/octokit.js路由添加到节点中间件,该路由将返回可以导入到HTML文件中的JavaScript文件。它将提供一个预先验证的octokit实例。
独立模块: @octokit/action
?一个完全起步的Action客户正在等待。您可以暂时使用@actions/github
麻省理工学院


