octokit.js
v4.0.2
包括瀏覽器,node.js和deno的全蝙蝠SDK。
octokit軟件包集成了三個主要的Octokit庫
Octokit API客戶端octokit.rest端點方法octokit.request()| 瀏覽器 | 直接從ESM.SH加載octokit < script type =" module " >
import { Octokit , App } from "https://esm.sh/octokit" ;
</ script > |
|---|---|
| 丹諾 | 直接從ESM.SH加載octokit import { Octokit , App } from "https://esm.sh/octokit?dts" ; |
| 節點 | 使用 import { Octokit , App } from "octokit" ; |
重要的
當我們使用條件導出時,您需要通過設置"moduleResolution": "node16", "module": "node16"來調整tsconfig.json 。
請參閱package.json上的打字稿文檔。
請參閱此有關從@SindResorhus過渡到ESM的有用指南
Octokit API客戶端獨立的最小Octokit : @octokit/core 。
Octokit客戶端可用於將請求發送到GitHub的REST API,並查詢GitHub的GraphQl API。
示例:獲取身份驗證用戶的用戶名。
 // Create a personal access token at https://github.com/settings/tokens/new?scopes=repo
const octokit = new Octokit ( { auth : `personal-access-token123` } ) ;

// Compare: https://docs.github.com/en/rest/reference/users#get-the-authenticated-user
const {
  data : { login } ,
} = await octokit . rest . users . getAuthenticated ( ) ;
console . log ( "Hello, %s" , login ) ;最常用的選項是
| 姓名 | 類型 | 描述 |
|---|---|---|
userAgent | String | 為GitHub平台API發送的所有請求都需要設置用戶代理。用戶代理默認為類似的內容: const octokit = new Octokit ( {
userAgent : "my-app/v1.2.3" ,
} ) ; |
authStrategy | Function | 默認為 請參閱下面的身份驗證。 |
auth | String或Object | 設置為個人訪問令牌,除非您更改了 請參閱下面的身份驗證。 |
baseUrl | String | 與GitHub Enterprise Server一起使用時,將 const octokit = new Octokit ( {
baseUrl : "https://github.acme-inc.com/api/v3" ,
} ) ; |
高級選項
| 姓名 | 類型 | 描述 |
|---|---|---|
request | Object |
僅節點
|
timeZone | String | 設置根據Olson數據庫的名稱列表來定義 const octokit = new Octokit ( {
timeZone : "America/Los_Angeles" ,
} ) ;時區標題將確定用於創建提交時用於生成時間戳的時區。請參閱GitHub的時區文檔。 |
throttle | Object | 默認情況下,請求一次,並在達到稅率或次要利率限制的情況下記錄警告。 {
onRateLimit : ( retryAfter , options , octokit ) => {
octokit . log . warn (
`Request quota exhausted for request ${ options . method } ${ options . url } `
) ;
if ( options . request . retryCount === 0 ) {
// only retries once
octokit . log . info ( `Retrying after ${ retryAfter } seconds!` ) ;
return true ;
}
} ,
onSecondaryRateLimit : ( retryAfter , options , octokit ) => {
octokit . log . warn (
`SecondaryRateLimit detected for request ${ options . method } ${ options . url } `
) ;
if ( options . request . retryCount === 0 ) {
// only retries once
octokit . log . info ( `Retrying after ${ retryAfter } seconds!` ) ;
return true ;
}
} ,
} ;選擇退出此功能: new Octokit ( { throttle : { enabled : false } } ) ;使用REDIS後端支持群集中的節流。請參閱 |
retry | Object | 選擇退出此功能: new Octokit ( { retry : { enabled : false } } ) ; |
默認情況下, Octokit API客戶端使用靜態令牌支持身份驗證。
GitHub支持的身份驗證手段有不同的方法,這些方法在Octokit/authentication-trategies.js上進行了詳細描述。您可以將它們設置為authStrategy構造函數選項,並將策略選項作為auth構造器選項傳遞。
例如,為了將其作為github應用程序安裝進行身份驗證:
 import { createAppAuth } from "@octokit/auth-app" ;
const octokit = new Octokit ( {
  authStrategy : createAppAuth ,
  auth : {
    appId : 1 ,
    privateKey : "-----BEGIN PRIVATE KEY-----n..." ,
    installationId : 123 ,
  } ,
} ) ;

// authenticates as app based on request URLs
const {
  data : { slug } ,
} = await octokit . rest . apps . getAuthenticated ( ) ;

// creates an installation access token as needed
// assumes that installationId 123 belongs to @octocat, otherwise the request will fail
await octokit . rest . issues . create ( {
  owner : "octocat" ,
  repo : "hello-world" ,
  title : "Hello world from " + slug ,
} ) ;您可以使用提供API和內部接線的App或OAuthApp SDK來涵蓋大多數用例。
例如,使用App實現上述
 const app = new App ( { appId , privateKey } ) ;
const { data : slug } = await app . octokit . rest . apps . getAuthenticated ( ) ;
const octokit = await app . getInstallationOctokit ( 123 ) ;
await octokit . rest . issues . create ( {
  owner : "octocat" ,
  repo : "hello-world" ,
  title : "Hello world from " + slug ,
} ) ;
了解有關身份驗證策略如何工作或如何創建自己的更多信息的更多信息。
默認情況下, Octokit API客戶端不利用標準代理服務器環境變量。為了增加對代理服務器的支持,您將需要提供一個支持它們的HTTPS客戶端,例如undici.ProxyAgent() 。
例如,這將使用ProxyAgent來通過代理服務器提出請求:
 import { fetch as undiciFetch , ProxyAgent } from 'undici' ;

const myFetch = ( url , options ) => {
  return undiciFetch ( url , {
    ... options ,
    dispatcher : new ProxyAgent ( < your_proxy_url > )
  } )
}

const octokit = new Octokit ( {
  request : {
     fetch : myFetch
  } ,
} ) ;如果您正在編寫使用Octokit的模塊,並被設計為其他人使用,則應確保消費者可以為您的Octokit提供替代代理,或作為特定調用的參數,例如:
 import { fetch as undiciFetch , ProxyAgent } from 'undici' ;

const myFetch = ( url , options ) => {
  return undiciFetch ( url , {
    ... options ,
    dispatcher : new ProxyAgent ( < your_proxy_url > )
  } )
}

octokit . rest . repos . get ( {
  owner ,
  repo ,
  request : {
    fetch : myFetch
  } ,
} ) ; 如果收到以下錯誤:
未設置獲取。請以新的Octokit({請求:{fetch}})作為獲取實現。
這可能意味著您正在嘗試使用不支持的Nodejs運行Octokit。 OCTOKIT需要節點18或更高,其中包括本機提取API。
要繞過此問題,您可以提供自己的fetch實現(或類似node-fetch的內置版本):
 import fetch from "node-fetch" ;

const octokit = new Octokit ( {
  request : {
    fetch : fetch ,
  } ,
} ) ;使用GitHub Rest API, octokit.rest.*端點方法和octokit.request有兩種方法。兩者都以相同的方式行動,即octokit.rest.*為了方便起見,它們在內部使用octokit.request 。
例如
 await octokit . rest . issues . create ( {
  owner : "octocat" ,
  repo : "hello-world" ,
  title : "Hello, world!" ,
  body : "I created this issue using Octokit!" ,
} ) ;
與
 await octokit . request ( "POST /repos/{owner}/{repo}/issues" , {
  owner : "octocat" ,
  repo : "hello-world" ,
  title : "Hello, world!" ,
  body : "I created this issue using Octokit!" ,
} ) ;在這兩種情況下,給定的請求均由octokit實例透明地進行身份驗證,重試和節流,該實例還根據需要管理accept和user-agent標頭。
octokit.request可用於通過傳遞完整的URL並將請求發送到GitHub的REST API文檔中未記錄的端點來將請求發送到其他域。
octokit.rest端點方法每個GitHub REST API端點都有一個關聯的octokit.rest端點方法,以提供更好的代碼可讀性和開發人員的便利性。有關完整的詳細信息,請參見@octokit/plugin-rest-endpoint-methods 。
示例:創建一個問題
 await octokit . rest . issues . create ( {
  owner : "octocat" ,
  repo : "hello-world" ,
  title : "Hello, world!" ,
  body : "I created this issue using Octokit!" ,
} ) ; octokit.rest端點方法是從GitHub的OpenAPI規範中自動生成的。我們跟踪操作ID和參數名稱更改,以實現折舊警告並降低破壞變化的頻率。
在封面下,每個端點方法都只是octokit.request帶有默認設置,因此它支持相同的參數以及.endpoint() API。
octokit.request()您可以使用octokit.request直接調用github rest API。 request API匹配GitHub的REST API文檔1:1,因此您在那裡看到的任何內容,都可以使用request調用。請參閱@octokit/request以獲取所有詳細信息。
示例:創建一個問題
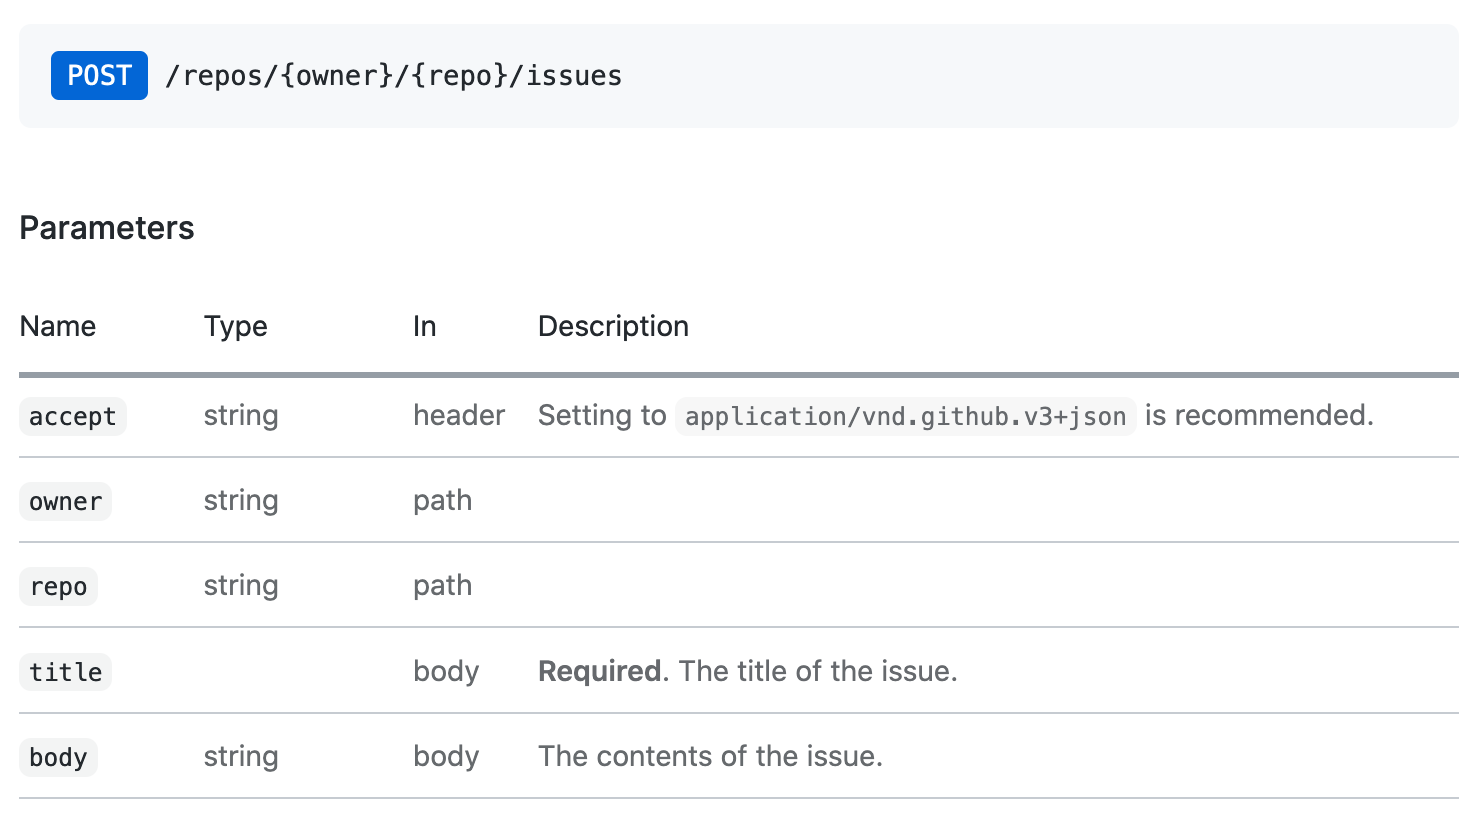
octokit.request api調用與該問題創建文檔相對應如下:
 // https://docs.github.com/en/rest/reference/issues#create-an-issue
await octokit . request ( "POST /repos/{owner}/{repo}/issues" , {
  owner : "octocat" ,
  repo : "hello-world" ,
  title : "Hello, world!" ,
  body : "I created this issue using Octokit!" ,
} ) ;
第一個參數是GitHub的API文檔中列出的REST API路由。第二個參數是具有所有參數的對象,與路徑,查詢或身體中的使用無關。
默認情況下,所有REST API端點返回前30個項目。如果要檢索所有項目,則可以使用分頁API。分頁API期望REST API路由作為第一個參數,但是您也可以通過任何octokit.rest.*.list*方法*為方便起見和更好的代碼可讀性。
示例:遍歷存儲庫中的所有問題
 const iterator = octokit . paginate . iterator ( octokit . rest . issues . listForRepo , {
  owner : "octocat" ,
  repo : "hello-world" ,
  per_page : 100 ,
} ) ;

// iterate through each response
for await ( const { data : issues } of iterator ) {
  for ( const issue of issues ) {
    console . log ( "Issue #%d: %s" , issue . number , issue . title ) ;
  }
}
使用異步迭代器是遍歷所有項目的最有效的內存有效方法。但是您也可以在一個通話中檢索所有項目
 const issues = await octokit . paginate ( octokit . rest . issues . listForRepo , {
  owner : "octocat" ,
  repo : "hello-world" ,
  per_page : 100 ,
} ) ; 可以使用mediaType: { format }在每個請求上。
示例:檢索package.json的原始內容。
 const { data } = await octokit . rest . repos . getContent ( {
  mediaType : {
    format : "raw" ,
  } ,
  owner : "octocat" ,
  repo : "hello-world" ,
  path : "package.json" ,
} ) ;
console . log ( "package name: %s" , JSON . parse ( data ) . name ) ;
了解有關媒體類型格式的更多信息。
獨立模塊: @octokit/request-error
為了解決請求錯誤處理,導入RequestError並使用try...catch語句。
import { RequestError } from "octokit" ; try {
// your code here that sends at least one Octokit request
await octokit . request ( "GET /" ) ;
} catch ( error ) {
// Octokit errors are instances of RequestError, so they always have an `error.status` property containing the HTTP response code.
if ( error instanceof RequestError ) {
// handle Octokit error
// error.message; // Oops
// error.status; // 500
// error.request; // { method, url, headers, body }
// error.response; // { url, status, headers, data }
} else {
// handle all other errors
throw error ;
}
}OCTOKIT還直接支持GITHUB的GraphQl API-您可以使用文檔中顯示的相同查詢,並在使用octokit.graphql呼叫中使用GraphQl Explorer中可用。
示例:獲取身份驗證的用戶的登錄
 const {
  viewer : { login } ,
} = await octokit . graphql ( `{
  viewer {
    login
  }
}` ) ;
變量可以作為第二參數傳遞
 const { lastIssues } = await octokit . graphql (
  `
    query lastIssues($owner: String!, $repo: String!, $num: Int = 3) {
      repository(owner: $owner, name: $repo) {
        issues(last: $num) {
          edges {
            node {
              title
            }
          }
        }
      }
    }
  ` ,
  {
    owner : "octokit" ,
    repo : "graphql.js" ,
  } ,
) ; GitHub的GraphQl API最多返回100個項目。如果要檢索所有項目,則可以使用分頁API。
示例:獲取所有問題
 const { allIssues } = await octokit . graphql . paginate (
  `
    query allIssues($owner: String!, $repo: String!, $num: Int = 10, $cursor: String) {
      repository(owner: $owner, name: $repo) {
        issues(first: $num, after: $cursor) {
          edges {
            node {
              title
            }
          }
          pageInfo {
            hasNextPage
            endCursor
          }
        }
      }
    }
  ` ,
  {
    owner : "octokit" ,
    repo : "graphql.js" ,
  } ,
) ;
了解有關GitHub的GraphQl分頁使用情況的更多信息。
可以使用{mediaType: previews: [] }選項啟用預覽。
示例:創建標籤
 await octokit . graphql (
  `mutation createLabel($repositoryId:ID!,name:String!,color:String!) {
  createLabel(input:{repositoryId:$repositoryId,name:$name}) {
    label: {
      id
    }
  }
}` ,
  {
    repositoryId : 1 ,
    name : "important" ,
    color : "cc0000" ,
    mediaType : {
      previews : [ "bane" ] ,
    } ,
  } ,
) ;
了解有關GitHub的GraphQl模式預覽的更多信息
App客戶端結合了GitHub應用程序,Webhooks和Oauth的功能
獨立模塊: @octokit/app
對於集成商,GitHub應用程序是認證和授權的一種手段。 GitHub應用程序可以在GitHub用戶或組織帳戶上註冊。 GitHub應用程序註冊定義了一組它要接收的權限和Webhooks事件,並提供了一組憑據回報。用戶可以通過安裝存儲庫授予訪問權限。
一些API端點要求GitHub應用使用JSON Web令牌(JWT)對其進行身份驗證。對於影響安裝的請求,必須使用應用程序的憑據和安裝ID創建安裝訪問令牌。
App客戶端為您照顧一切。
示例:派遣每個存儲庫中的存儲庫事件已安裝在應用程序上
 import { App } from "octokit" ;

const app = new App ( { appId , privateKey } ) ;

for await ( const { octokit , repository } of app . eachRepository . iterator ( ) ) {
  // https://docs.github.com/en/rest/reference/repos#create-a-repository-dispatch-event
  await octokit . rest . repos . createDispatchEvent ( {
    owner : repository . owner . login ,
    repo : repository . name ,
    event_type : "my_event" ,
    client_payload : {
      foo : "bar" ,
    } ,
  } ) ;
  console . log ( "Event dispatched for %s" , repository . full_name ) ;
}示例:獲取一個已驗證作為安裝的octokit實例
const octokit = await app . getInstallationOctokit ( 123 ) ;了解有關應用程序的更多信息。
獨立模塊: @octokit/webhooks
安裝應用程序時,將以請求發送應用程序註冊請求的事件,以發送到應用程序註冊中設置的Webhook URL。
Webhook事件請求是使用Webhook Secret簽名的,Webhook Secret也是該應用程序註冊的一部分。您必須在處理請求有效載荷之前驗證該秘密。
app.webhooks.* API提供了接收,驗證和處理Webhook事件的方法。
示例:關於新問題的評論
 import { createServer } from "node:http" ;
import { App , createNodeMiddleware } from "octokit" ;

const app = new App ( {
  appId ,
  privateKey ,
  webhooks : { secret } ,
} ) ;

app . webhooks . on ( "issues.opened" , ( { octokit , payload } ) => {
  return octokit . rest . issues . createComment ( {
    owner : payload . repository . owner . login ,
    repo : payload . repository . name ,
    issue_number : payload . issue . number ,
    body : "Hello, World!" ,
  } ) ;
} ) ;

// Your app can now receive webhook events at `/api/github/webhooks`
createServer ( createNodeMiddleware ( app ) ) . listen ( 3000 ) ;
對於無服務器環境,您可以明確驗證並接收事件
 await app . webhooks . verifyAndReceive ( {
  id : request . headers [ "x-github-delivery" ] ,
  name : request . headers [ "x-github-event" ] ,
  signature : request . headers [ "x-hub-signature-256" ] ,
  payload : request . body ,
} ) ;
了解有關GitHub Webhooks的更多信息。
獨立模塊: @octokit/oauth-app
OAuth應用程序和GitHub應用都支持使用OAuth來驗證GitHub用戶,請參閱授權OAUTH應用程序並識別和授權用戶為GitHub應用程序。
有一些差異:
App適用於GitHub應用。如果您需要OAuth App特定功能,請改用OAuthApp 。
示例:當用戶登錄使用OAuth Web流程時,請觀看存儲庫
 import { createServer } from "node:http" ;
import { App , createNodeMiddleware } from "octokit" ;

const app = new App ( {
  oauth : { clientId , clientSecret } ,
} ) ;

app . oauth . on ( "token.created" , async ( { token , octokit } ) => {
  await octokit . rest . activity . setRepoSubscription ( {
    owner : "octocat" ,
    repo : "hello-world" ,
    subscribed : true ,
  } ) ;
} ) ;

// Your app can receive the OAuth redirect at /api/github/oauth/callback
// Users can initiate the OAuth web flow by opening /api/github/oauth/login
createServer ( createNodeMiddleware ( app ) ) . listen ( 3000 ) ;
對於無服務器環境,您可以從OAuth Web Flow重定向上明確交換code以獲取訪問令牌。 app.oauth.createToken()返回身份驗證對象,並發出“ token.ended”事件。
 const { token } = await app . oauth . createToken ( {
  code : request . query . code ,
} ) ;
示例:使用設備流創建令牌。
 const { token } = await app . oauth . createToken ( {
  async onVerification ( verification ) {
    await sendMessageToUser (
      request . body . phoneNumber ,
      `Your code is ${ verification . user_code } . Enter it at ${ verification . verification_uri } ` ,
    ) ;
  } ,
} ) ;
示例:使用默認範圍創建OAuth應用程序服務器
 import { createServer } from "node:http" ;
import { OAuthApp , createNodeMiddleware } from "octokit" ;

const app = new OAuthApp ( {
  clientId ,
  clientSecret ,
  defaultScopes : [ "repo" , "gist" ] ,
} ) ;

app . oauth . on ( "token" , async ( { token , octokit } ) => {
  await octokit . rest . gists . create ( {
    description : "I created this gist using Octokit!" ,
    public : true ,
    files : {
      "example.js" : `/* some code here */` ,
    } ,
  } ) ;
} ) ;

// Your app can receive the OAuth redirect at /api/github/oauth/callback
// Users can initiate the OAuth web flow by opening /api/oauth/login
createServer ( createNodeMiddleware ( app ) ) . listen ( 3000 ) ;註冊GitHub應用程序後,您需要創建和部署可以從GitHub檢索Webhook事件請求的服務器,並接受OAuth用戶Web流的重定向。
創建此類服務器的最簡單方法是使用createNodeMiddleware() ,它都可以與Node的http.createServer()方法以及Express Mifdreware一起使用。
中間件公開的默認路線是
| 路線 | 路線說明 |
|---|---|
POST /api/github/webhooks | 接收github webhook事件請求的端點 |
GET /api/github/oauth/login | 重定向到GitHub的授權端點。接受可選的?state和?scopes查詢參數。 ?scopes是由逗號分隔的支持的OAuth範圍名稱的列表 |
GET /api/github/oauth/callback | 客戶的重定向端點。這是觸發token事件的地方 |
POST /api/github/oauth/token | 交換OAuth訪問令牌的授權代碼。如果成功,則觸發token事件。 |
GET /api/github/oauth/token | 檢查令牌是否有效。必須在Authorization標頭中使用令牌進行身份驗證。使用GitHub的POST /applications/{client_id}/token端點 |
PATCH /api/github/oauth/token | 重置一個令牌(當前一個,返回新令牌)。必須在Authorization標頭中使用令牌進行身份驗證。使用GitHub的PATCH /applications/{client_id}/token端點。 |
PATCH /api/github/oauth/refresh-token | 刷新一個到期的令牌(當前的代幣無效,返回新的訪問令牌和刷新令牌)。必須在Authorization標頭中使用令牌進行身份驗證。使用GitHub的POST https://github.com/login/oauth/access_token oauth endpoint。 |
POST /api/github/oauth/token/scoped | 創建一個示波器令牌(不會使當前的代幣無效)。必須在Authorization標頭中使用令牌進行身份驗證。使用GitHub的POST /applications/{client_id}/token/scoped端點。 |
DELETE /api/github/oauth/token | 使當前令牌無效,基本上是註銷的等效物。必須在Authorization標頭中使用令牌進行身份驗證。 |
DELETE /api/github/oauth/grant | 撤銷用戶的贈款,基本上相當於卸載。必須在Authorization標頭中使用令牌進行身份驗證。 |
示例:使用Express創建GitHub服務器
 import express from "express" ;
import { App , createNodeMiddleware } from "octokit" ;

const expressApp = express ( ) ;
const octokitApp = new App ( {
  appId ,
  privateKey ,
  webhooks : { secret } ,
  oauth : { clientId , clientSecret } ,
} ) ;

expressApp . use ( createNodeMiddleware ( app ) ) ;

expressApp . listen ( 3000 , ( ) => {
  console . log ( `Example app listening at http://localhost:3000` ) ;
} ) ;您不得將應用程序客戶端的秘密曝光給用戶,因此您不能使用App構造函數。取而代之的是,您必須使用App構造函數來創建服務器,該應用程序構造器揭示/api/github/oauth/*路由,您可以通過它安全地實現在Web瀏覽器中運行的應用程序的OAuth登錄。
如果將(User) Authorization callback URL設置為您自己的應用程序,則需要讀取?code=...&state=...查詢參數,請將state參數與app.oauthLoginUrl()返回的值進行比較,以防止偽造攻擊,然後交換OAuth授權的code 。
如果您按照上述運行應用程序服務器,則默認路由是POST /api/github/oauth/token 。
成功檢索令牌後,也建議刪除瀏覽器URL查詢參數的?code=...&state=...
 const code = new URL ( location . href ) . searchParams . get ( "code" ) ;
if ( code ) {
  // remove ?code=... from URL
  const path =
    location . pathname +
    location . search . replace ( / b(code|state)=w+ / g , "" ) . replace ( / [?&]+$ / , "" ) ;
  history . replaceState ( { } , "" , path ) ;

  // exchange the code for a token with your backend.
  // If you use https://github.com/octokit/oauth-app.js
  // the exchange would look something like this
  const response = await fetch ( "/api/github/oauth/token" , {
    method : "POST" ,
    headers : {
      "content-type" : "application/json" ,
    } ,
    body : JSON . stringify ( { code } ) ,
  } ) ;
  const { token } = await response . json ( ) ;
  // `token` is the OAuth Access Token that can be use

  const { Octokit } = await import ( "https://esm.sh/@octokit/core" ) ;
  const octokit = new Octokit ( { auth : token } ) ;

  const {
    data : { login } ,
  } = await octokit . request ( "GET /user" ) ;
  alert ( "Hi there, " + login ) ;
} ?我們正在使用@octokit/auth-oauth-user-client為與OAuth用戶令牌有關的所有方法提供簡單的API。
該計劃是將新的GET /api/github/oauth/octokit.js路由添加到節點中間件,該路由將返回可以導入到HTML文件中的JavaScript文件。它將提供一個預先驗證的octokit實例。
獨立模塊: @octokit/action
?一個完全起步的Action客戶正在等待。您可以暫時使用@actions/github
麻省理工學院


