windows rapl driver
v0.0.4
For now, the driver is unsigned, so you need to put windows in test mode (allowing custom drivers to run).
To do this, open a command prompt as an administrator and run :
bcdedit.exe -set TESTSIGNING ON
bcdedit.exe -set nointegritychecks on
Then restart the computer or server.
Once restarted, if on a desktop, you should have some text written on the bottom right corner of the desktop view with "Test Mode" displayed.
To disable test mode just open another command prompt with adminstrator access and run :
bcdedit.exe -set TESTSIGNING OFF
First download or compile :
You need those files in the same folder.
Then run, in an adminstrator command prompt :
DriverLoader.exe install
Start the service :
DriverLoader.exe start
At any time you could check for the state of the service giving access to the driver on your system, with this command :
driverquery /v | grep -i scaph
If running properly it should show a line like :
Scaphandre Dr Scaphandre Driver Serv Scaphandre Driver Serv File System System Running OK TRUE FALSE 0 4□096 0 14/01/2022 16:01:37 C:WINDOWSsystem32DRIVERSScaphandreDrv.sys 4□096
Install Visual Studio 2019
Install Visual Studio 2022
According to this documentation:
Optionnal : install the EWDK
Right clik on ScaphandreDrv in the right panel, in General Properties, look for the "Platform Toolset" field. It should say "WindowsKernelModeDriver10.0".
If the WDK doesn't appear in ScaphandreDrv Properties as a Platform Toolset choice, look for the vsix runner that should have a path like :
C:Program Files (x86)Windows Kits10VsixVS202210.0.22621.382WDK.vsix.
Close Visual Studio 2022, run the vsix runner.
On the top of the VS Window, select "Release" as a target and "x64" as a target platform.
Then "Build" > "Build Solution".
To build DriverLoader :
Right Click on the Solution > Add > New Projet > Empty Project
On the new Project "DriverLoader" inside the solution, right click > add > existing item, look for DriverLoader.cpp.
Right click on DriverLoader in the right panel > Properties > Advanced, then ensure "Character Set" is set as "Use Multi-Byte Character Set".
Build > Build Solution ( same target and platform as ScaphandreDrv ).
Compile DriverLoader.exe in userland/Service:
cd userland/Service

sudo apt install g++-mingw-w64 g++-mingw-w64-x86-64-win32 g++-mingw-w64-x86-64

x86_64-w64-mingw32-g++ DriverLoader.cpp -I/usr/x86_64-w64-mingw32/include/ddk/ -I/usr/x86_64-w64-mingw32/include/ --sysroot=. -o DriverLoader.exe -Wall -pedantic
In Visual Studio 2022 or 2019, open Extensions > Manage Extensions, then search for "Microsoft Visual Studio Installer Projects 2019|2022", then Download, close Visual Studtio.
Then a VSIX installer should start. Restart Visual Studio.
If the ScaphandreDrvInstaller project is displayed as incompatible, right click, then "Reload Project". Then Build.
In C:Program Files (x86)Windows Kits10bin10.0.22621.0x64
.MakeCert.exe -r -pe -ss PrivateCertStore -n CN=hubblo.org -eku 1.3.6.1.5.5.7.3.3 ScaphandreDrvTest.cer
In C:Program Files (x86)Windows Kits10bin10.0.22621.0x86, when you already have an Inf file
.stampinf.exe -f C:UsersMYUSERsourcereposwindows-rapl-driverScaphandreDrvScaphandreDrv.inf -d 03/11/2023 -v 0.0.1
Then (need to change inf file to succeed with x64, TODO document this part)
.Inf2Cat.exe /driver:C:UsersMYUSERsourcereposwindows-rapl-driverScaphandreDrv /os:10_X64
Then
.signtool.exe sign /v /fd sha256 /s PrivateCertStore /n hubblo.org "C:UsersMYUSERsourcereposwindows-rapl-driverScaphandreDrvscaphandredrv.cat"
Then (as Administrator)
.certmgr.exe /add "C:UsersMYUSERsourcereposwindows-rapl-driverScaphandreDrvScaphandreDrvTest.cer" /s /r localMachine root
Once the signing is proper, you should be able to install the driver with :
& "C:Program Files (x86)Windows Kits10Tools10.0.22621.0x64devcon.exe" install .ScaphandreDrv.inf rootSCAPHANDREDRV
If the signature is okay (even if untrusted), you should get this pop up window :
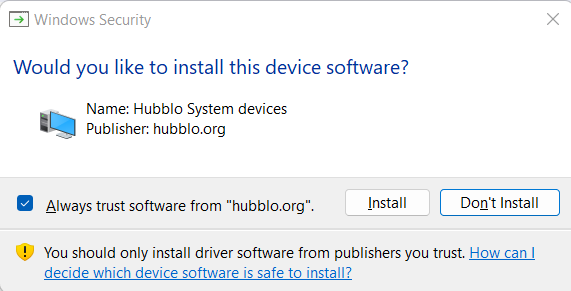
This driver has been developped for a specific use case : enabling Scaphandre on Windows.
Please have a look at those slides for a better understanding of how and why this driver has been developped.
For Windows 11 and + compatible versions, the admin account is HLKAdminUser with the password set at startup. For previous versions, it is HLKAdminUser / Testpassword,1.
We download a vhdx, which can only be used in Hyper-V. If you don't have Hyper-V compatible Windows, you have to convert it to vhd or vdi for use in virtual box
.VBoxManage.exe clonemedium disk "C:UsersMYUSERDownloads2019DC-22621.1.ni_release.220506-1250-HLK.vhdx" "C:UsersMYUSERDownloads2019DC-22621.1.ni_release.220506-1250-HLK.vhd" --format vhd
Change the network interface in Virtual Box from NAT to Bridged Interface, then accept the discovery on the network from the windows guest.
Remember to enable network discovery mode:
Control Panel > Network and Internet > Network and Sharing center > Advanced Sharing Settings
Then click on Turn on network discovery, then Save changes
If it does not work (if when reopening this panel the button is still on “Turn off”, follow this procedure: https://learn.microsoft.com/en-us/troubleshoot/windows-client/networking/cannot-turn-on-network-discovery
More precisely, open Run and launch services.msc if one of the services mentioned in the doc is not started: right click, mode: manual, apply, start
Make sure that the following dependency services are started:
- DNS Client
- Function Discovery Resource Publication
- SSDP Discovery
- UPnP Device Host
Configure the Windows firewall to allow Network Discovery by following these steps:
- Open Control Panel, select System and Security, and then select Windows Firewall.
- In the left pane, select Allow an app or feature
- Open Control Panel, select System and Security, and then select Windows Firewall.
- In the left pane, select Allow an app or feature through Windows Firewall.
- Select Change settings. If you're prompted for an administrator password or confirmation, enter the password or provide confirmation.
- Select Network discovery, and then select OK.
- Configure other firewalls in the network to allow Network Discovery.
- Turn on Network Discovery in Network and Sharing Center.
Sources
TODO Automating the process :
Dependencies:
Compilation: x86_64-w64-mingw32-g++ DriverLoader.cpp -o DriverLoader.exe
Code getting CPU manufacturer's informations (through CPUID) uses inlined assembly.
To compile on Linux, we need to tell GCC to use the Intel syntax and not the At&T one. We also need to specify we don't want an axecutable with independant position.
Example : gcc -masm=intel -no-pie cpuid.c -o cpuid
To compile on Windows, we can inline 32 bit assembly but not 64 bit (MSVC compiler doesn't support it).
To fix this, the cpuid function is written in pure assembly matching the Windows ABI (x86 and x86_64). To compile, use those commands :
To compile the agent, including the cpuid function, do it according to the architecture :
Fichiers intéressants dans le noyau linux :
build in release mode then retry !
"F:Windows Kits10binx86Inf2Cat.exe" /driver:c:UsersnulseDocumentsGitHubtest /os:10_19H1_X64,10_RS5_X64,ServerRS5_X64,10_RS4_X64
see https://docs.microsoft.com/en-us/windows-hardware/drivers/devtest/inf2cat
driverquery doesn't show any trace of a previous version of the driver but you gert an error 1078 when trying to install a new one with DriverLoader.exe Enusre you don't see Scaphandre service in services.msc, ensure you have uninstalled the full package in Add or Remove Programs If nothing does the trick, then remove the remaining Registry entry that has the name of the service, in HKEY_LOCAL_MACHINESYSTEMCurrentControlSetservices (see https://social.msdn.microsoft.com/Forums/windowsdesktop/en-US/ed214b30-b094-43c0-85e8-4702da85b5dd/add-service-failed-to-create-service?forum=wdk)


