ComfyUI to Python Extension
v1.3.0 Save as Script UI Button
The ComfyUI-to-Python-Extension is a powerful tool that translates ComfyUI workflows into executable Python code. Designed to bridge the gap between ComfyUI's visual interface and Python's programming environment, this script facilitates the seamless transition from design to code execution. Whether you're a data scientist, a software developer, or an AI enthusiast, this tool streamlines the process of implementing ComfyUI workflows in Python.
Convert this:
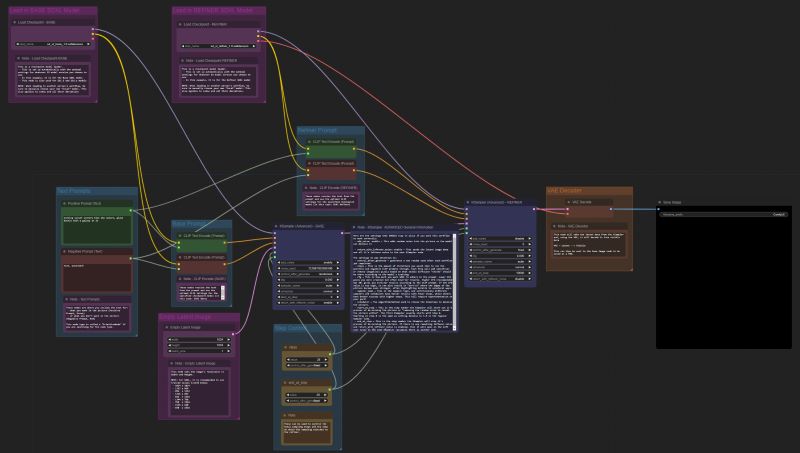
To this:
import random
import torch
import sys

sys.path.append("../")
from nodes import (
    VAEDecode,
    KSamplerAdvanced,
    EmptyLatentImage,
    SaveImage,
    CheckpointLoaderSimple,
    CLIPTextEncode,
)


def main():
    with torch.inference_mode():
        checkpointloadersimple = CheckpointLoaderSimple()
        checkpointloadersimple_4 = checkpointloadersimple.load_checkpoint(
            ckpt_name="sd_xl_base_1.0.safetensors"
        )

        emptylatentimage = EmptyLatentImage()
        emptylatentimage_5 = emptylatentimage.generate(
            width=1024, height=1024, batch_size=1
        )

        cliptextencode = CLIPTextEncode()
        cliptextencode_6 = cliptextencode.encode(
            text="evening sunset scenery blue sky nature, glass bottle with a galaxy in it",
            clip=checkpointloadersimple_4[1],
        )

        cliptextencode_7 = cliptextencode.encode(
            text="text, watermark", clip=checkpointloadersimple_4[1]
        )

        checkpointloadersimple_12 = checkpointloadersimple.load_checkpoint(
            ckpt_name="sd_xl_refiner_1.0.safetensors"
        )

        cliptextencode_15 = cliptextencode.encode(
            text="evening sunset scenery blue sky nature, glass bottle with a galaxy in it",
            clip=checkpointloadersimple_12[1],
        )

        cliptextencode_16 = cliptextencode.encode(
            text="text, watermark", clip=checkpointloadersimple_12[1]
        )

        ksampleradvanced = KSamplerAdvanced()
        vaedecode = VAEDecode()
        saveimage = SaveImage()

        for q in range(10):
            ksampleradvanced_10 = ksampleradvanced.sample(
                add_noise="enable",
                noise_seed=random.randint(1, 2**64),
                steps=25,
                cfg=8,
                sampler_name="euler",
                scheduler="normal",
                start_at_step=0,
                end_at_step=20,
                return_with_leftover_noise="enable",
                model=checkpointloadersimple_4[0],
                positive=cliptextencode_6[0],
                negative=cliptextencode_7[0],
                latent_image=emptylatentimage_5[0],
            )

            ksampleradvanced_11 = ksampleradvanced.sample(
                add_noise="disable",
                noise_seed=random.randint(1, 2**64),
                steps=25,
                cfg=8,
                sampler_name="euler",
                scheduler="normal",
                start_at_step=20,
                end_at_step=10000,
                return_with_leftover_noise="disable",
                model=checkpointloadersimple_12[0],
                positive=cliptextencode_15[0],
                negative=cliptextencode_16[0],
                latent_image=ksampleradvanced_10[0],
            )

            vaedecode_17 = vaedecode.decode(
                samples=ksampleradvanced_11[0], vae=checkpointloadersimple_12[2]
            )

            saveimage_19 = saveimage.save_images(
                filename_prefix="ComfyUI", images=vaedecode_17[0]
            )


if __name__ == "__main__":
    main()
comfyui_to_python.py parameters with CLI argumentsComfyUINavigate to your ComfyUI/custom_nodes directory
Clone this repo
git clone https://github.com/pydn/ComfyUI-to-Python-Extension.gitAfter cloning the repo, your ComfyUI directory should look like this:
/comfy
/comfy_extras
/custom_nodes
--/ComfyUI-to-Python-Extension
/input
/models
/output
/script_examples
/web
.gitignore
LICENSE
README.md
comfyui_screenshot.png
cuda_mollac.py
execution.py
extra_model_paths.yaml.example
folder_paths.py
latent_preview.py
main.py
nodes.py
requirements.txt
server.py
Launch ComfyUI
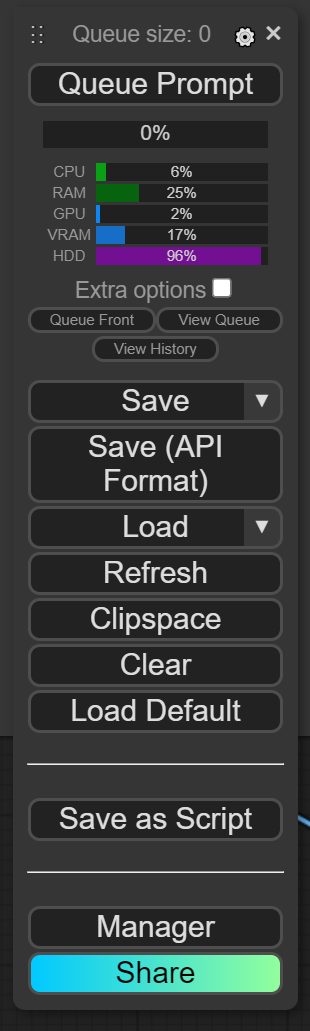
Load your favorite workflow and click Save As Script
Type your desired file name into the pop up screen.
Move .py file from your downloads folder to your ComfyUI directory.
Now you can execute the newly created .py file to generate images without launching a server.
Navigate to the ComfyUI-to-Python-Extension folder and install requirements
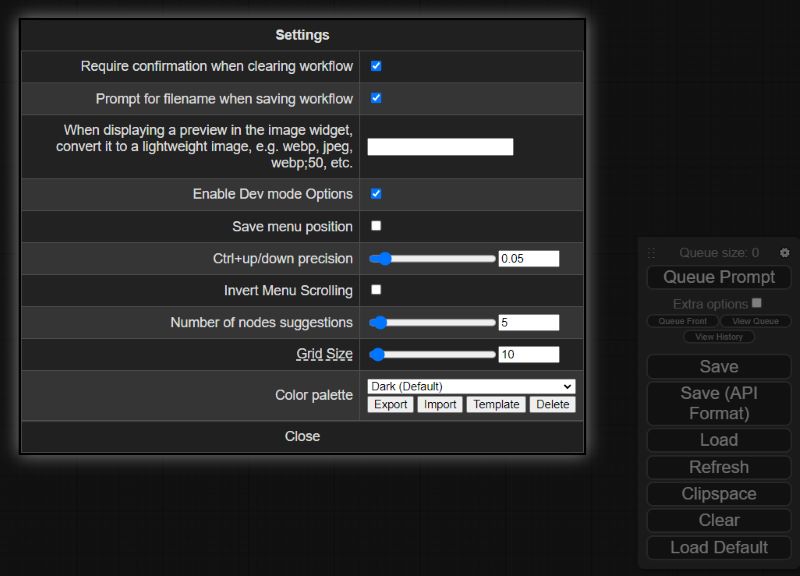
pip install -r requirements.txtLaunch ComfyUI, click the gear icon over Queue Prompt, then check Enable Dev mode Options. THE SCRIPT WILL NOT WORK IF YOU DO NOT ENABLE THIS OPTION!
Load up your favorite workflows, then click the newly enabled Save (API Format) button under Queue Prompt
Move the downloaded .json workflow file to your ComfyUI/ComfyUI-to-Python-Extension folder
If needed, add arguments when executing comfyui_to_python.py to update the default input_file and output_file to match your .json workflow file and desired .py file name. By default, the script will look for a file called workflow_api.json. You can also update the queue_size variable to your desired number of images that you want to generate in a single script execution. By default, the scripts will generate 10 images. Run python comfyui_to_python.py --help for more details.
6a. Run the script with default arguments:
python comfyui_to_python.py6b. Run the script with optional arguments:
python comfyui_to_python.py --input_file "workflow_api (2).json" --output_file my_workflow.py --queue_size 100After running comfyui_to_python.py, a new .py file will be created in the current working directory. If you made no changes, look for workflow_api.py.
Now you can execute the newly created .py file to generate images without launching a server.


