build a slack clone with react and pusher chatkit
1.0.0
在本教程中,您將學習如何使用React和Chatkit構建聊天應用程序。
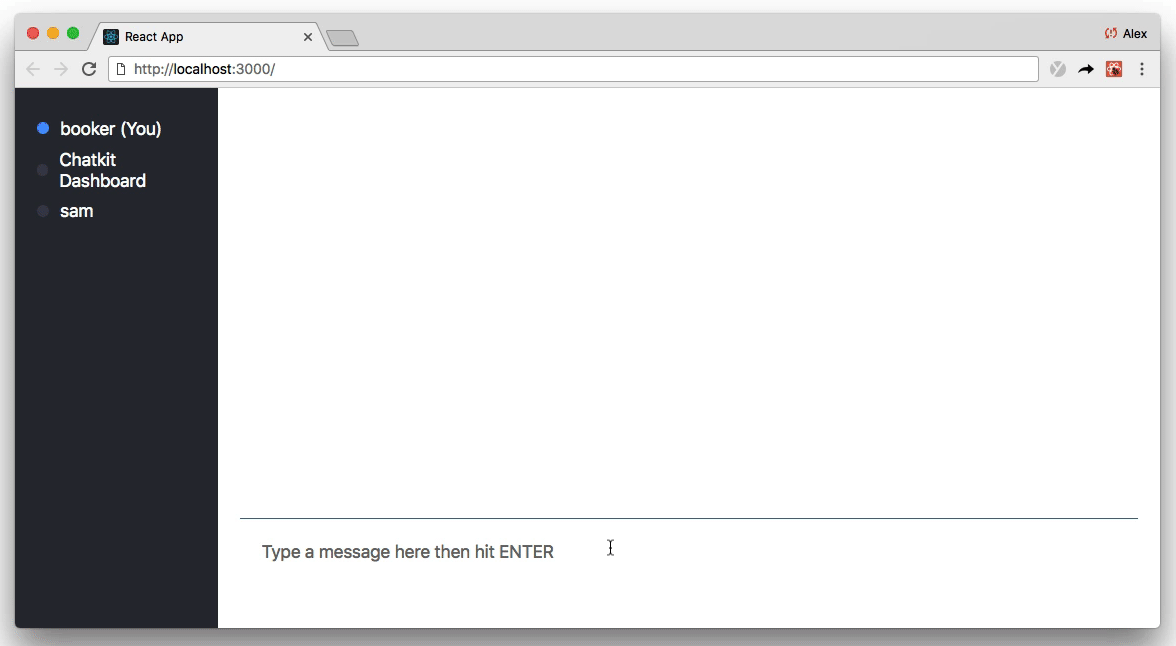
完成後,我們將擁有一個聊天應用程序,其中包含打字指標, “誰在線”列表和消息歷史記錄:
如果您認為這聽起來像是在一個教程中可以解決的很多,那麼您通常是對的!
但是,因為我們將使用Chatkit,所以我們或多或少地專注於前端反應代碼,而Chatkit進行了繁重的工作。
Chatkit是託管的API,可幫助您使用更少的代碼構建令人印象深刻的聊天功能。諸如
使用我們的跨平台SDK,所有聊天數據均發送到我們的託管API,我們管理聊天狀態並將其廣播給您的客戶:

您永遠不必擔心規模或基礎設施,我們為您服務。
學習Chatkit的最好方法是開始建造,因此我強烈建議您跟隨。一路上,將Chatkit與React一起使用時,您將學習最佳實踐。
本教程已經編寫,以便您可以逐步跟隨。總共有12個步驟。
這是一個快速的分解,所以您知道會發生什麼:
好吧,讓我們代碼!
這項演練不是從絕對划痕開始的,而是基於最小的啟動模板:

如您所見,入門模板不包含任何有趣的邏輯 - 我們需要運行React應用程序和簡單的節點服務器的樣板。
“服務器?沒有人提到服務器!”
如果您對節點不太熟悉,請不要擔心?下一節之後,我們不需要觸摸服務器。
要開始,請下載啟動模板,然後運行npm install :
 git clone https://github.com/pusher/build-a-slack-clone-with-react-and-pusher-chatkit chatkit-tutorial
cd chatkit-tutorial
npm install
(注意:要查看完整的代碼,您可以查看completed分支或在本地git checkout complete 。)
(還要注意:本教程假設使用npm ,但等效yarn命令也將起作用。)
現在,您已經下載了入門模板,讓我們創建一個chatkit實例。
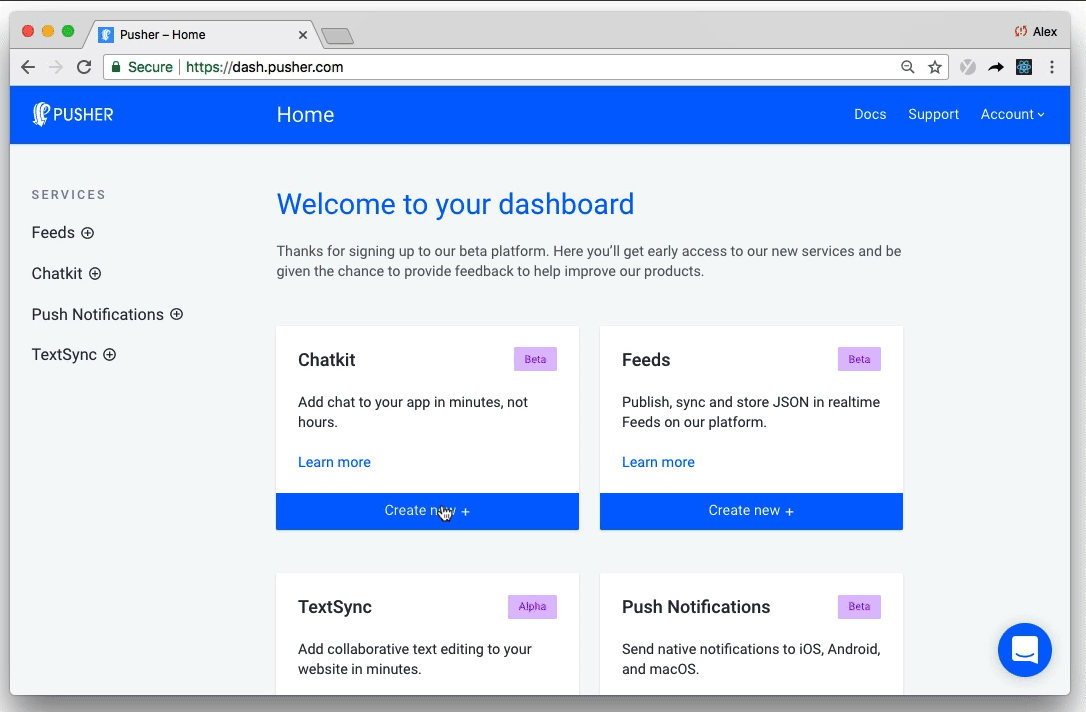
要創建自己的chatkit實例,請前往儀表板並擊中創建新的:
給您的實例任何名稱(我稱我的“ React Chat教程”),然後記下您的實例定位器和“鍵”選項卡中的秘密鍵。我們將在下一部分中都需要它們。
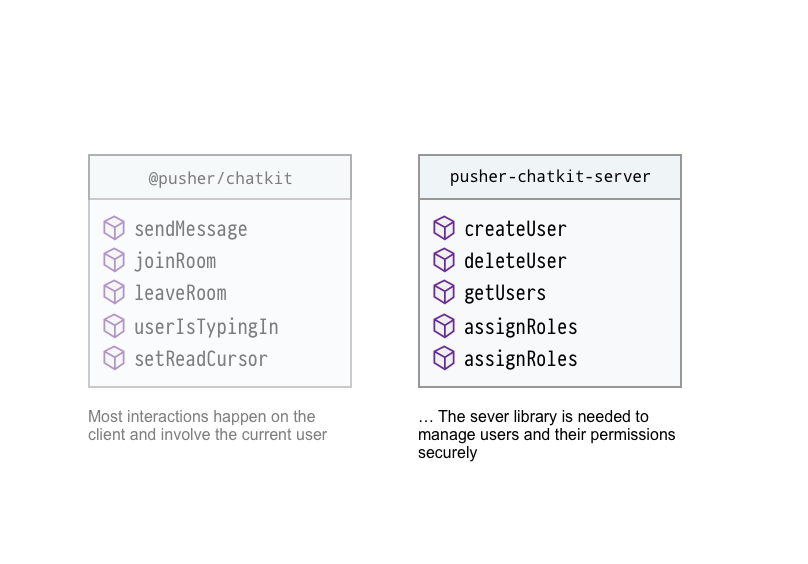
儘管大多數交互將發生在客戶端上,但Chatkit還需要服務器對應物來安全地創建和管理用戶:
我們不會在本教程中對用戶進行身份驗證,但是我們仍然需要定義一條路由,該路由在調用時會創建chatkit用戶。
首先安裝@pusher/chatkit-server :
npm install --save @pusher/chatkit-server
然後更新./server.js :
const express = require('express')
const bodyParser = require('body-parser')
const cors = require('cors')
+ const Chatkit = require('@pusher/chatkit-server')

const app = express()

+ const chatkit = new Chatkit.default({
+  instanceLocator: 'YOUR INSTANCE LOCATOR',
+  key: 'YOUR KEY',
+ })

app.use(bodyParser.urlencoded({ extended: false }))
app.use(bodyParser.json())
app.use(cors())

+ app.post('/users', (req, res) => {
+  const { username } = req.body
+  chatkit
+    .createUser({
+      id: username,
+      name: username
+    })
+    .then(() => res.sendStatus(201))
+    .catch(error => {
+      if (error.error === 'services/chatkit/user_already_exists') {
+        res.sendStatus(200)
+      } else {
+        res.status(error.status).json(error)
+      }
+    })
+ })

+ app.post('/authenticate', (req, res) => {
+  const authData = chatkit.authenticate({ userId: req.query.user_id })
+  res.status(authData.status).send(authData.body)
+ })


const PORT = 3001
app.listen(PORT, err => {
  if (err) {
    console.error(err)
  } else {
    console.log(`Running on port ${PORT}`)
  }
})切記用自己的值替換“您的實例定位器”和“密鑰” 。
從頂部開始,這裡有很多要打開包裝:
@pusher/chatkit-server導入Chatkitchatkit實例/users路由中,我們使用一個username並通過我們的chatkit實例創建chatkit用戶/authenticate以對其進行身份驗證。如果請求有效,服務器需要用令牌響應(由chatkit.authenticate返回)。在我們的情況下,我們 - 天真 - 假設每個人都是他們說的人,並從chatkit.authenticate返回一個令牌。繁榮? !這就是我們在服務器上需要做的全部。讓我們繼續前進...
當有人加載該應用程序時,我們想問他們他們是誰。
一旦達到提交,我們將將其用戶名發送到服務器(我們剛剛定義的/users路由),並在不存在的情況下創建chatkit用戶。
要收集用戶的名稱,請創建一個名為UsernameForm.js in ./src/components/ :
 + import React, { Component } from 'react'

+ class UsernameForm extends Component {
+ constructor(props) {
+   super(props)
+   this.state = {
+     username: '',
+   }
+   this.onSubmit = this.onSubmit.bind(this)
+   this.onChange = this.onChange.bind(this)
+ }

+ onSubmit(e) {
+   e.preventDefault()
+   this.props.onSubmit(this.state.username)
+ }

+ onChange(e) {
+    this.setState({ username: e.target.value })
+  }
+
+  render() {
+    return (
+      <div>
+        <div>
+          <h2>What is your username?</h2>
+          <form onSubmit={this.onSubmit}>
+            <input
+              type="text"
+              placeholder="Your full name"
+              onChange={this.onChange}
+            />
+            <input type="submit" />
+          </form>
+        </div>
+      </div>
+    )
+  }
+ }
+
+ export default UsernameForm然後更新App.js :
import React, { Component } from 'react'
+ import UsernameForm from './components/UsernameForm'

class App extends Component {
+  constructor() {
+    super()
+    this.state = {
+      currentUsername: '',
+    }
+    this.onUsernameSubmitted = this.onUsernameSubmitted.bind(this)
+  }

+  onUsernameSubmitted(username) {
+    fetch('http://localhost:3001/users', {
+      method: 'POST',
+      headers: {
+        'Content-Type': 'application/json',
+      },
+      body: JSON.stringify({ username }),
+    })
+      .then(response => {
+        this.setState({
+          currentUsername: username
+        })
+      })
+      .catch(error => console.error('error', error))
+  }

  render() {
-   return <h1>Chatly</h1>
+   return <UsernameForm onSubmit={this.onUsernameSubmitted} />
  }
}
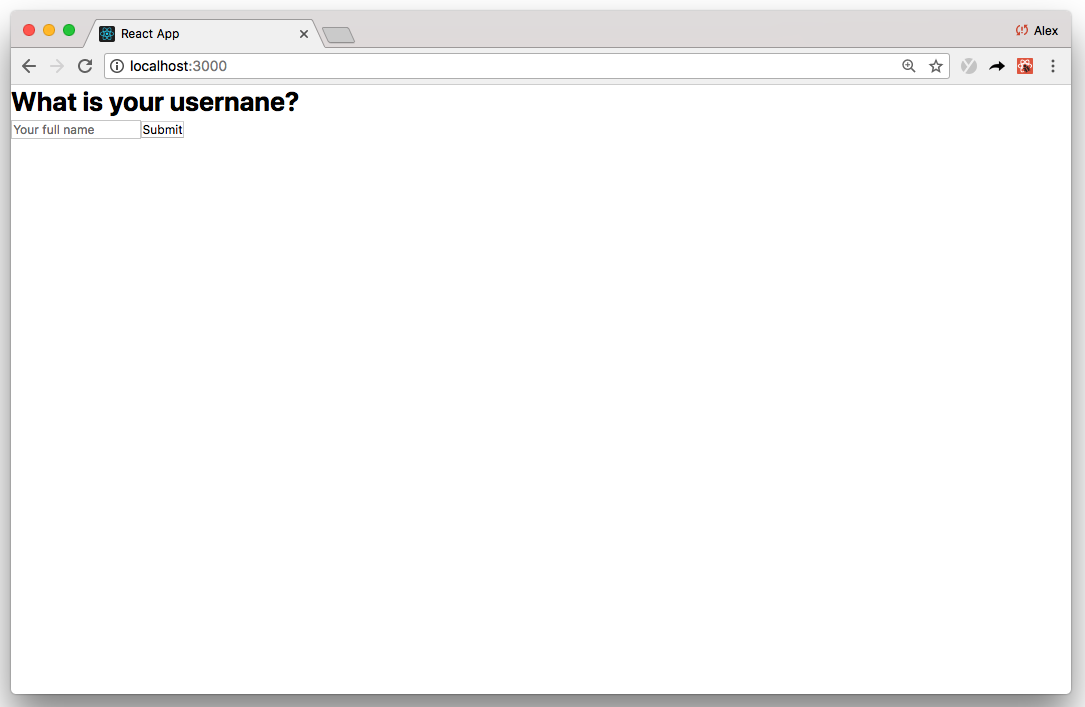
export default App使用npm start運行該應用程序,您會發現屏幕已呈現:
從App.js的頂部開始:
UsernameForm組件。它可能看起來很熟悉,因為它使用了稱為受控組件的常見反應模式。您可以在此處閱讀有關React表格的更多信息render函數中,我們渲染UsernameForm並連接onUsernameSubmitted事件處理程序onUsernameSubmitted時,我們將郵政請求發送給我們剛剛定義的/users路由。如果請求成功,我們將更新this.state.currentUsername ,以便以後引用它;否則,我們console.error錯誤目前,我們渲染了UsernameForm ,它佔據了整個屏幕(請參見上面的屏幕截圖)。
提交用戶名後,我們將要過渡到其他屏幕 - 即聊天屏幕。
為此,我們首先需要在./src中創建一個ChatScreen.js組件:
 + import React, { Component } from 'react'
+
+ class ChatScreen extends Component {
+  render() {
+    return (
+      <div>
+        <h1>Chat</h1>
+      </div>
+    )
+  }
+ }
+
+ export default ChatScreen然後更新App.js :
import React, { Component } from 'react'
import UsernameForm from './components/UsernameForm'
+ import ChatScreen from './ChatScreen'

class App extends Component {
  constructor() {
    super()
    this.state = {
      currentUsername: '',
+     currentScreen: 'WhatIsYourUsernameScreen'
    }
    this.onUsernameSubmitted = this.onUsernameSubmitted.bind(this)
 }

  onUsernameSubmitted(username) {
    fetch('http://localhost:3001/users', {
      method: 'POST',
      headers: {
        'Content-Type': 'application/json',
      },
      body: JSON.stringify({ username }),
    })
      .then(response => {
        this.setState({
          currentUsername: username,
+         currentScreen: 'ChatScreen'
        })
      })
      .catch(error => console.error('error', error))
  }

 render() {
+    if (this.state.currentScreen === 'WhatIsYourUsernameScreen') {
      return <UsernameForm onSubmit={this.onUsernameSubmitted} />
+    }
+    if (this.state.currentScreen === 'ChatScreen') {
+      return <ChatScreen currentUsername={this.state.currentUsername} />
+    }
  }
}

export default App我們沒有使用路由器,而是根據this.state.currentScreen條件渲染屏幕。
之前,我們安裝了@pusher/chatkit-server 。現在我們在客戶端,您還需要安裝@pusher/chatkit-client :
npm install --save @pusher/chatkit-client
然後更新ChatScreen.js :
import React, { Component } from 'react'
+ import Chatkit from '@pusher/chatkit-client'

class ChatScreen extends Component {
+  constructor(props) {
+    super(props)
+    this.state = {
+      currentUser: {}
+    }
+  }

+  componentDidMount () {
+    const chatManager = new Chatkit.ChatManager({
+      instanceLocator: 'YOUR INSTANCE LOCATOR',
+      userId: this.props.currentUsername,
+      tokenProvider: new Chatkit.TokenProvider({
+        url: 'http://localhost:3001/authenticate',
+      }),
+    })
+
+    chatManager
+      .connect()
+      .then(currentUser => {
+        this.setState({ currentUser })
+     })
+     .catch(error => console.error('error', error))
+  }

  render() {
    return (
      <div>
        <h1>Chat</h1>
      </div>
    )
  }
}

export default ChatScreen請記住,將“您的實例定位器”替換為您之前指出的。
同樣,從頂部開始:
ChatkitinstanceLocator , userId (來自this.props.currentUsername )和自定義的TokenProvider實例化我們的chatkit ChatManager 。 TokenProvider指向我們之前定義的/authenticate路由ChatManager後,我們可以調用connect 。 connect發生異步發生,並返回Promise 。如果您準確地遵循了這些步驟,則將連接。話雖這麼說,請注意任何console.error如果您錯過了什麼,請使用Chatkit時,所有消息都將發送到Chatkit室。
可以通過編程(使用createRoom在服務器或客戶室)或儀表板檢查員進行編程創建房間。
從檢查員創建房間並不是一個好練習(主要是用於測試),但是為了這次演練,我們還是要這樣做。
在儀表板中,前往“控制台”選項卡,您可以在其中找到檢查器並使用任何名稱創建用戶。我將我的稱為“管理員”。
然後,創建一個稱為“通用”的房間:
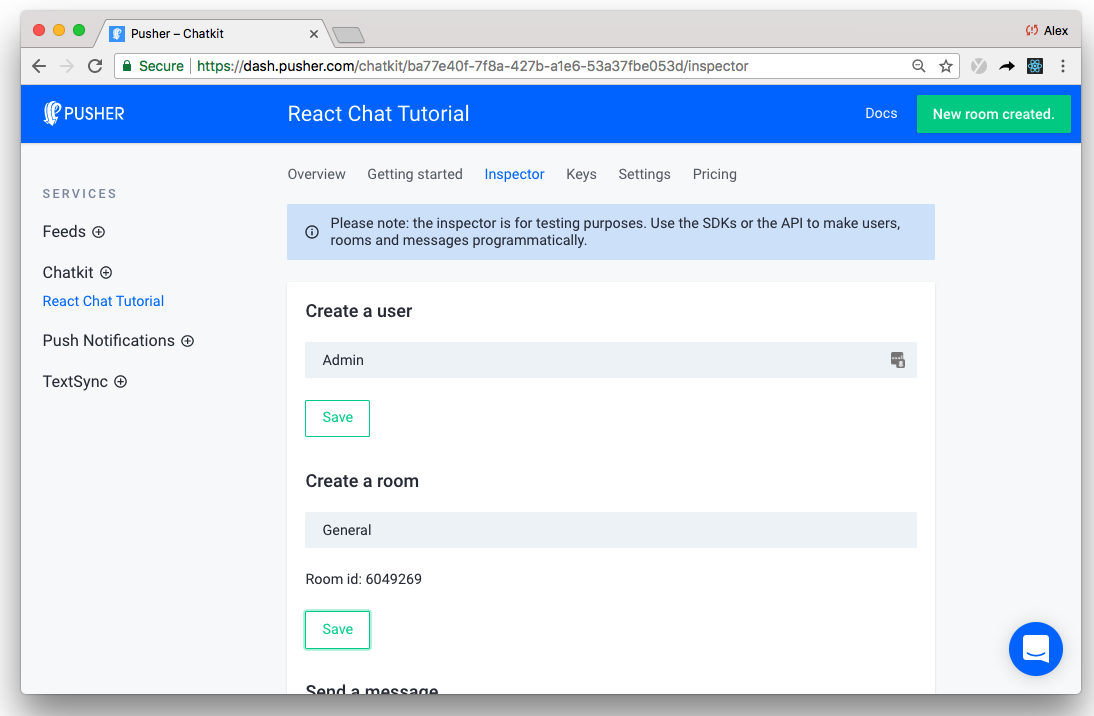
注意上面突出顯示的獨特房間ID確實很重要。
此步驟標誌著演練的重要一點。
現在,我們已經制定了樣板,我們可以迅速開始構建聊天功能。
展望未來,我們將將每個功能分解為獨立(如果需要的話,可重複使用!)React組件:
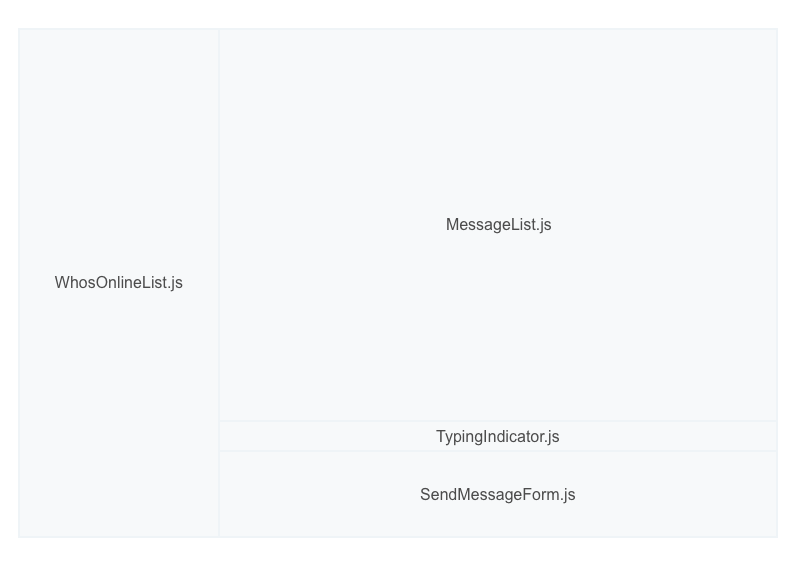
我們將在運行時創建每個組件,但是為了使教程更容易遵循,讓我們現在列出基本的組件UI佈局:
import React, { Component } from 'react'
import Chatkit from '@pusher/chatkit-client'
class ChatScreen extends Component {
constructor(props) {
super(props)
this.state = {
currentUser: {}
}
}
componentDidMount () {
const chatManager = new Chatkit.ChatManager({
instanceLocator: 'YOUR INSTANCE LOCATOR',
userId: this.props.currentUsername,
tokenProvider: new Chatkit.TokenProvider({
url: 'http://localhost:3001/authenticate',
}),
})
chatManager
.connect()
.then(currentUser => {
this.setState({ currentUser })
})
.catch(error => console.error('error', error))
}
render() {
- return (
- <div>
- <h1>Chat</h1>
- </div>
- )
+ const styles = {
+ container: {
+ height: '100vh',
+ display: 'flex',
+ flexDirection: 'column',
+ },
+ chatContainer: {
+ display: 'flex',
+ flex: 1,
+ },
+ whosOnlineListContainer: {
+ width: '300px',
+ flex: 'none',
+ padding: 20,
+ backgroundColor: '#2c303b',
+ color: 'white',
+ },
+ chatListContainer: {
+ padding: 20,
+ width: '85%',
+ display: 'flex',
+ flexDirection: 'column',
+ },
+ }
+ return (
+ <div style={styles.container}>
+ <div style={styles.chatContainer}>
+ <aside style={styles.whosOnlineListContainer}>
+ <h2>Who's online PLACEHOLDER</h2>
+ </aside>
+ <section style={styles.chatListContainer}>
+ <h2>Chat PLACEHOLDER</h2>
+ </section>
+ </div>
+ </div>
+ )
}
}
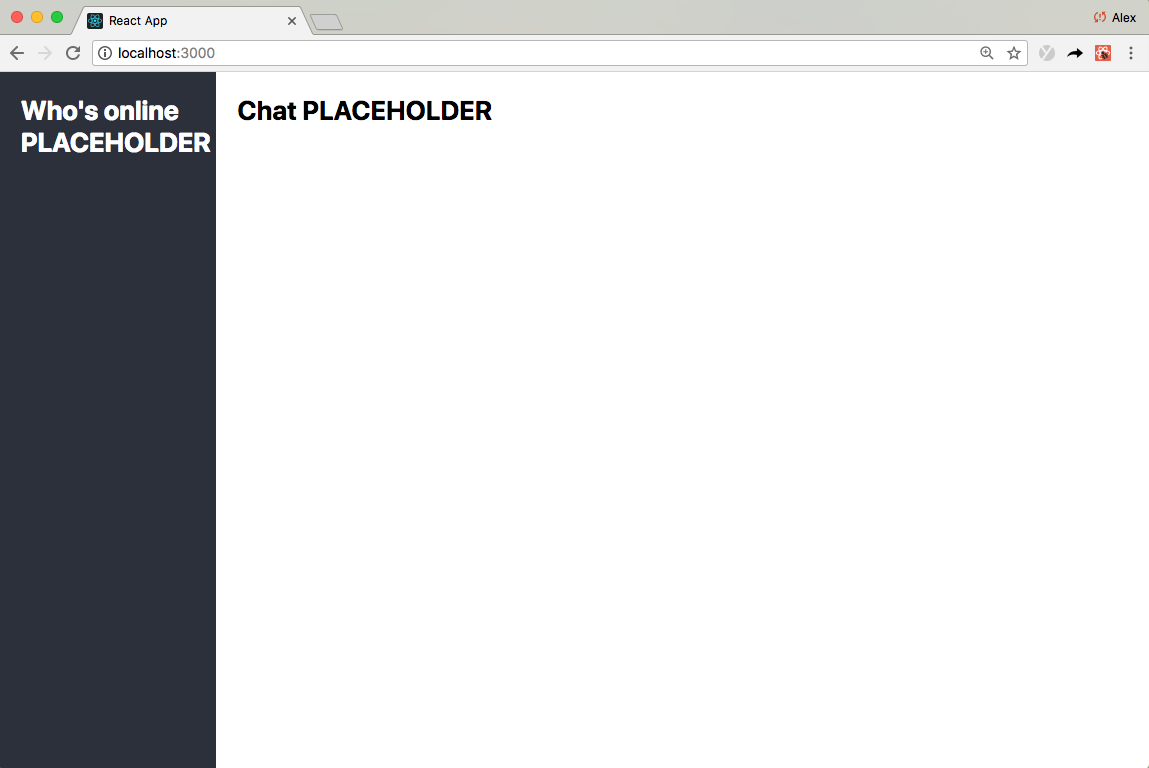
export default ChatScreen如果現在運行該應用程序,您將看到基本佈局發生:
驚人的!
我真的很高興向您展示這個!
現在,我們有了Chatkit連接,構建聊天功能變得像將聊天俱樂部事件相連為UI組件一樣簡單。在這裡,讓我告訴你。
首先,在./src/components中創建一個無狀態MessageList.js組件:
 + import React, { Component } from 'react'
+
+ class MessagesList extends Component {
+   render() {
+     const styles = {
+       container: {
+         overflowY: 'scroll',
+         flex: 1,
+       },
+       ul: {
+         listStyle: 'none',
+       },
+       li: {
+         marginTop: 13,
+         marginBottom: 13,
+       },
+       senderUsername: {
+         fontWeight: 'bold',
+       },
+       message: { fontSize: 15 },
+     }
+     return (
+       <div
+         style={{
+           ...this.props.style,
+           ...styles.container,
+         }}
+       >
+         <ul style={styles.ul}>
+           {this.props.messages.map((message, index) => (
+             <li key={index} style={styles.li}>
+               <div>
+                 <span style={styles.senderUsername}>{message.senderId}</span>{' '}
+               </div>
+               <p style={styles.message}>{message.text}</p>
+             </li>
+           ))}
+         </ul>
+       </div>
+     )
+   }
+ }
+
+ export default MessagesList然後更新ChatScreen.js :
import React, { Component } from 'react'
import Chatkit from '@pusher/chatkit-client'
+ import MessageList from './components/MessageList'


class ChatScreen extends Component {
  constructor(props) {
    super(props)
    this.state = {
      currentUser: {},
+     currentRoom: {},
+     messages: []
    }
  }

  componentDidMount () {
    const chatManager = new Chatkit.ChatManager({
      instanceLocator: 'YOUR INSTANCE LOCATOR',
      userId: this.props.currentUsername,
      tokenProvider: new Chatkit.TokenProvider({
        url: 'http://localhost:3001/authenticate',
      }),
    })

    chatManager
      .connect()
      .then(currentUser => {
        this.setState({ currentUser })
+        return currentUser.subscribeToRoom({
+          roomId: "YOUR ROOM ID",
+          messageLimit: 100,
+          hooks: {
+            onMessage: message => {
+              this.setState({
+                messages: [...this.state.messages, message],
+              })
+            },
+          },
+        })
+      })
+      .then(currentRoom => {
+        this.setState({ currentRoom })
+       })
      .catch(error => console.error('error', error))
  }

  render() {
    const styles = {
      ...
    }
    return (
      <div style={styles.container}>
        <div style={styles.chatContainer}>
          <aside style={styles.whosOnlineListContainer}>
            <h2>Who's online PLACEHOLDER</h2>
          </aside>
          <section style={styles.chatListContainer}>
-            <h2>Chat PLACEHOLDER</h2>
+            <MessageList
+              messages={this.state.messages}
+              style={styles.chatList}
+            />
          </section>
        </div>
      </div>
    )
  }
}

export default ChatScreen請記住,將您的房間ID替換為您之前提到的房間ID。
讓我們將其分解:
currentUser使用者對象currentUser上currentUser上撥打subscribeToRoom ( currentUser.subscribeToRoom )subscribeToRoom採用一個名為onMessage的事件處理程序,每次到達新消息時,都會實時調用messageLimit指定為100 , onMessage最多可追溯為100最新消息。在實踐中,這意味著,如果您刷新頁面,您將看到多達100最新聊天消息我們正在滾!
接下來,讓我們允許用戶通過首先創建SendMessageForm.js組件來發送消息: ./src/components components:
 + import React, { Component } from 'react'
+
+ class SendMessageForm extends Component {
+   constructor(props) {
+     super(props)
+     this.state = {
+       text: '',
+     }
+     this.onSubmit = this.onSubmit.bind(this)
+     this.onChange = this.onChange.bind(this)
+   }
+
+   onSubmit(e) {
+     e.preventDefault()
+     this.props.onSubmit(this.state.text)
+     this.setState({ text: '' })
+   }
+
+   onChange(e) {
+     this.setState({ text: e.target.value })
+     if (this.props.onChange) {
+       this.props.onChange()
+     }
+   }
+
+   render() {
+     const styles = {
+       container: {
+         padding: 20,
+         borderTop: '1px #4C758F solid',
+         marginBottom: 20,
+       },
+       form: {
+         display: 'flex',
+       },
+       input: {
+         color: 'inherit',
+         background: 'none',
+         outline: 'none',
+         border: 'none',
+         flex: 1,
+         fontSize: 16,
+       },
+     }
+     return (
+       <div style={styles.container}>
+         <div>
+           <form onSubmit={this.onSubmit} style={styles.form}>
+             <input
+               type="text"
+               placeholder="Type a message here then hit ENTER"
+               onChange={this.onChange}
+               value={this.state.text}
+               style={styles.input}
+             />
+           </form>
+         </div>
+       </div>
+     )
+   }
+ }
+
+ export default SendMessageForm
然後 - 您猜對了 - 更新ChatScreen.js :
import React, { Component } from 'react'
import Chatkit from '@pusher/chatkit-client'
import MessageList from './components/MessageList'
+ import SendMessageForm from './components/SendMessageForm'

class ChatScreen extends Component {
  constructor(props) {
    super(props)
    this.state = {
      currentUser: {},
      currentRoom: {},
      messages: []
    }
+    this.sendMessage = this.sendMessage.bind(this)
  }


+  sendMessage(text) {
+    this.state.currentUser.sendMessage({
+      text,
+      roomId: this.state.currentRoom.id,
+    })
+  }

 componentDidMount () {
    const chatManager = new Chatkit.ChatManager({
      instanceLocator: 'YOUR INSTANCE LOCATOR',
      userId: this.props.currentUsername,
      tokenProvider: new Chatkit.TokenProvider({
        url: 'http://localhost:3001/authenticate',
      }),
    })

    chatManager
      .connect()
      .then(currentUser => {
        this.setState({ currentUser })
        return currentUser.subscribeToRoom({
          roomId: YOUR ROOM ID,
          messageLimit: 100,
          hooks: {
            onMessage: message => {
              this.setState({
                messages: [...this.state.messages, message],
              })
            },
          },
        })
      })
      .then(currentRoom => {
        this.setState({ currentRoom })
       })
      .catch(error => console.error('error', error))
  }


  render() {
    const styles = {
     ...
    }
    return (
      <div style={styles.container}>
        <div style={styles.chatContainer}>
          <aside style={styles.whosOnlineListContainer}>
            <h2>Who's online PLACEHOLDER</h2>
          </aside>
          <section style={styles.chatListContainer}>
            <MessageList
              messages={this.state.messages}
              style={styles.chatList}
            />
+           <SendMessageForm onSubmit={this.sendMessage} />
          </section>
        </div>
      </div>
    )
  }
}

export default ChatScreen SendMessageForm組件與我們之前定義的WhatIsYourUsernameForm組件基本相同。
提交SendMessageForm時,我們訪問this.state.currentUser並調用sendMessage (請記住,大多數交互發生在currentUser上)
您可能可以看到出現的模式...
ChatScreen是一個容器組件,它可以管理我們的應用程序狀態,並使用介紹(通常是無狀態的)組件呈現UI。我們的大多數代碼都涉及連接Chatkit事件及其相關數據以反應UI組件。
如果您曾經嘗試實現自己的打字指標,那麼您會知道這可能很棘手。通常,更多的實時功能意味著更多的數據和更多的連接要管理。
使用Chatkit,您幾乎可以添加打字指標。
首先在./src/components中創建TypingIndicator.js組件:
 + import React, { Component } from 'react'
+
+ class TypingIndicator extends Component {
+  render() {
+    if (this.props.usersWhoAreTyping.length > 0) {
+      return (
+        <div>
+          {`${this.props.usersWhoAreTyping
+            .slice(0, 2)
+            .join(' and ')} is typing`}
+        </div>
+      )
+    }
+    return <div />
+  }
+ }
+
+ export default TypingIndicator然後更新ChatScreen.js :
import React, { Component } from 'react'
import Chatkit from '@pusher/chatkit-client'
import MessageList from './components/MessageList'
import SendMessageForm from './components/SendMessageForm'
+ import TypingIndicator from './components/TypingIndicator'

class ChatScreen extends Component {
  constructor(props) {
    super(props)
    this.state = {
      currentUser: {},
      currentRoom: {},
      messages: [],
+     usersWhoAreTyping: [],
    }
    this.sendMessage = this.sendMessage.bind(this)
+   this.sendTypingEvent = this.sendTypingEvent.bind(this)
  }

+  sendTypingEvent() {
+    this.state.currentUser
+      .isTypingIn({ roomId: this.state.currentRoom.id })
+      .catch(error => console.error('error', error))
+  }

  sendMessage(text) {
    this.state.currentUser.sendMessage({
      text,
      roomId: this.state.currentRoom.id,
    })
  }

  componentDidMount() {
    const chatManager = new Chatkit.ChatManager({
      instanceLocator: 'YOUR INSTANCE LOCATOR',
      userId: this.props.currentUsername,
      tokenProvider: new Chatkit.TokenProvider({
        url: 'http://localhost:3001/authenticate',
      }),
    })

    chatManager
      .connect()
      .then(currentUser => {
        this.setState({ currentUser })
        return currentUser.subscribeToRoom({
          roomId: YOUR ROOM ID,
          messageLimit: 100,
          hooks: {
            onMessage: message => {
              this.setState({
                messages: [...this.state.messages, message],
              })
            },
+            onUserStartedTyping: user => {
+              this.setState({
+                usersWhoAreTyping: [...this.state.usersWhoAreTyping, user.name],
+             })
+            },
+            onUserStoppedTyping: user => {
+              this.setState({
+                usersWhoAreTyping: this.state.usersWhoAreTyping.filter(
+                  username => username !== user.name
+                ),
+              })
+            },
          },
        })
      })
      .then(currentRoom => {
        this.setState({ currentRoom })
      })
      .catch(error => console.error('error', error))
  }

  render() {
    const styles = {
      ...
    }
    return (
      <div style={styles.container}>>
        <div style={styles.chatContainer}>
          <aside style={styles.whosOnlineListContainer}>
            <h2>Who's online PLACEHOLDER</h2>
          </aside>
          <section style={styles.chatListContainer}>
            <MessageList
              messages={this.state.messages}
              style={styles.chatList}
            />
+           <TypingIndicator usersWhoAreTyping={this.state.usersWhoAreTyping} />
            <SendMessageForm
              onSubmit={this.sendMessage}
+             onChange={this.sendTypingEvent}
            />
          </section>
        </div>
      </div>
    )
  }
}

export default ChatScreen
使用Chatkit時,打字指標歸結為兩個基本措施:
currentUser.userIsTyping ;然後,userStartedTyping和userStoppedTyping活動就是這樣。
“但是亞歷克斯,用戶何時停止打字呢?”
這是一個很好的問題。
Chatkit這樣聰明。如果該服務在幾秒鐘後沒有接收userIsTyping事件,則假設currentUser使用者已停止鍵入。因此,當有人停止打字時,無需手動提出活動。漂亮的光滑,對吧?
你能感覺到動力嗎?現在幾乎完成了嗎?
要完成聊天應用程序,讓我們使用Chatkit的“誰在線”功能來渲染用戶列表及其實時在線狀態。
首先創建/src/components中的WhosOnlineList.js組件:
 + import React, { Component } from 'react'
+
+ class WhosOnlineList extends Component {
+  renderUsers() {
+    return (
+      <ul>
+        {this.props.users.map((user, index) => {
+          if (user.id === this.props.currentUser.id) {
+            return (
+              <WhosOnlineListItem key={index} presenceState="online">
+                {user.name} (You)
+              </WhosOnlineListItem>
+            )
+          }
+          return (
+            <WhosOnlineListItem key={index} presenceState={user.presence.state}>
+              {user.name}
+            </WhosOnlineListItem>
+          )
+        })}
+      </ul>
+    )
+  }
+
+  render() {
+    if (this.props.users) {
+      return this.renderUsers()
+    } else {
+      return <p>Loading...</p>
+    }
+  }
+ }
+
+ class WhosOnlineListItem extends Component {
+  render() {
+    const styles = {
+      li: {
+        display: 'flex',
+        alignItems: 'center',
+        marginTop: 5,
+        marginBottom: 5,
+        paddingTop: 2,
+        paddingBottom: 2,
+      },
+      div: {
+        borderRadius: '50%',
+        width: 11,
+        height: 11,
+        marginRight: 10,
+      },
+    }
+    return (
+      <li style={styles.li}>
+        <div
+          style={{
+            ...styles.div,
+            backgroundColor:
+              this.props.presenceState === 'online' ? '#539eff' : '#414756',
+          }}
+        />
+        {this.props.children}
+      </li>
+    )
+  }
+ }
+
+ export default WhosOnlineList
然後 - 最後一次? - 更新ChatScreen.js :
import React, { Component } from 'react'
import Chatkit from '@pusher/chatkit-client'
import MessageList from './components/MessageList'
import SendMessageForm from './components/SendMessageForm'
import TypingIndicator from './components/TypingIndicator'
+ import WhosOnlineList from './components/WhosOnlineList'

class ChatScreen extends Component {
  constructor(props) {
    super(props)
    this.state = {
      currentUser: {},
      currentRoom: {},
      messages: [],
      usersWhoAreTyping: [],
    }
    this.sendMessage = this.sendMessage.bind(this)
    this.sendTypingEvent = this.sendTypingEvent.bind(this)
  }

  sendTypingEvent() {
    this.state.currentUser
      .isTypingIn(this.state.currentRoom.id)
      .catch(error => console.error('error', error))
  }

   sendMessage(text) {
    this.state.currentUser.sendMessage({
      text,
      roomId: this.state.currentRoom.id,
    })
  }

  comonentDidMount() {
    const chatManager = new Chatkit.ChatManager({
      instanceLocator: 'YOUR INSTANCE LOCATOR',
      userId: this.props.currentUsername,
      tokenProvider: new Chatkit.TokenProvider({
        url: 'http://localhost:3001/authenticate',
      }),
    })

    chatManager
      .connect()
      .then(currentUser => {
        this.setState({ currentUser })
        return currentUser.subscribeToRoom({
          roomId: YOUR ROOM ID,
          messageLimit: 100,
          hooks: {
            newMessage: message => {
              this.setState({
                messages: [...this.state.messages, message],
              })
            },
            userStartedTyping: user => {
              this.setState({
                usersWhoAreTyping: [...this.state.usersWhoAreTyping, user.name],
              })
            },
            userStoppedTyping: user => {
              this.setState({
                usersWhoAreTyping: this.state.usersWhoAreTyping.filter(
                  username => username !== user.name
                ),
              })
            },
+            onPresenceChange: () => this.forceUpdate(),
          },
        })
      })
      .then(currentRoom => {
        this.setState({ currentRoom })
      })
      .catch(error => console.error('error', error))
  }

  render() {
    const styles = {
      ...
    }
    return (
      <div style={styles.container}>
        <header style={styles.header}>
          <h2>Chatly</h2>
        </header>
        <div style={styles.chatContainer}>
          <aside style={styles.whosOnlineListContainer}>
-            <h2>Who's online PLACEHOLDER</h2>
+            <WhosOnlineList
+              currentUser={this.state.currentUser}
+              users={this.state.currentRoom.users}
+            />
          </aside>
          <section style={styles.chatListContainer}>
            <MessageList
              messages={this.state.messages}
              style={styles.chatList}
            />
            <TypingIndicator usersWhoAreTyping={this.state.usersWhoAreTyping} />
            <SendMessageForm
              onSubmit={this.sendMessage}
              onChange={this.sendTypingEvent}
            />
          </section>
        </div>
      </div>
    )
  }
}

export default ChatScreen在React狀態下管理用戶的狀態可能有些棘手,因此我們在currentRoom.users中為您管理它。
當用戶連接和斷開連接時,此屬性會動態更新。換句話說, currentRoom.users應該始終對聊天應用程序的當前狀態進行介紹。
因此,當用戶上網或離線( onPresenceChange )或新用戶加入( onUserAdded )時,我們要做的就是呼叫forceUpdate ,它告訴reacts revers inture currentRoom.users並更新UI。
同樣,這確實歸結為對一些簡單的數據和事件進行接線以反應組件,僅此而已!
在本演練中,您構建了一個完整的聊天應用程序
因為我們使用了chatkit,所以我們也免費獲得一些獎勵功能:
我們編寫了相當多的代碼,但這都不是特別複雜。
Chatkit具有最小但功能強大的API,可以為我們管理我們所有的聊天數據。我們要做的就是獲取這些數據並為用戶渲染。
想繼續建造嗎?為什麼不添加豐富的媒體支持並閱讀收據? Chatkit都支持:
您可能也有興趣查看我們強大的Chatkit Slack演示(250多個星星️)。它類似於我們剛剛構建但更完整的應用程序。
您將使用Chatkit構建什麼?我們很想看看!您的反饋指導我們改善Chatkit。讓我們知道什麼可以幫助您實現目標,妨礙您遇到的目標。


