build a slack clone with react and pusher chatkit
1.0.0
이 튜토리얼에서는 React and Chatkit과 채팅 앱을 구축하는 방법을 배웁니다.
우리가 완료되면 입력 표시기 , "Who 's Online"목록 및 메시지 이력이 포함 된 채팅 응용 프로그램이 완성됩니다.
이것이 하나의 튜토리얼에서 다루는 데 많은 것 같다고 생각되면, 당신은 일반적으로 옳을 것입니다!
그러나 Chatkit을 사용할 것이기 때문에 Chatkit은 무거운 리프팅을 수행하는 동안 프론트 엔드 반응 코드에만 초점을 맞출 수 있습니다.
Chatkit은 호스팅 된 API로 코드가 적은 응용 프로그램에 인상적인 채팅 기능을 구축 할 수 있습니다. 와 같은 기능
크로스 플랫폼 SDK를 사용하면 모든 채팅 데이터가 호스팅 된 API로 전송되어 채팅 상태를 관리하고 고객에게 방송합니다.

규모 나 인프라에 대해 걱정할 필요가 없으며, 우리는 당신을 위해 모든 것을 처리합니다.
아마도 chatkit을 배우는 가장 좋은 방법은 건축을 시작하는 것입니다. 그 과정에서 React와 함께 chatkit을 사용할 때 모범 사례를 배울 수 있습니다.
이 튜토리얼은 단계별로 따라갈 수 있도록 작성되었습니다. 총 12 단계가 있습니다.
다음은 빠른 요약이 있으므로 무엇을 기대 해야하는지 알 수 있습니다.
좋아, 코드하자!
이 연습은 절대 스크래치에서 시작하기보다는 최소한의 스타터 템플릿을 기반으로합니다.

보시다시피, 스타터 템플릿에는 흥미로운 논리가 포함되어 있지 않습니다. 보일러 플레이트 만 반응 응용 프로그램과 간단한 노드 서버를 실행해야합니다.
"서버? 서버를 언급 한 사람은 없습니다!"
노드에 너무 익숙하지 않다면 걱정하지 마십시오. 다음 섹션 후에는 서버를 터치 할 필요가 없습니다.
시작하려면 스타터 템플릿을 다운로드 한 다음 npm install 실행하십시오.
 git clone https://github.com/pusher/build-a-slack-clone-with-react-and-pusher-chatkit chatkit-tutorial
cd chatkit-tutorial
npm install
(참고 : 완성 된 코드를 보려면 completed 지점을 보거나 로컬로 git checkout complete 할 수 있습니다.)
(참고 :이 튜토리얼은 npm 의 사용을 가정하지만 동등한 yarn 명령도 작동합니다.)
이제 스타터 템플릿을 다운로드하여 chatkit 인스턴스를 만들어 봅시다.
나만의 chatkit 인스턴스를 만들려면 대시 보드로 가서 새로 칠 하십시오.
인스턴스에 이름을 알려주십시오 (나는 "내"React Chat Tutorial "이라고 불렀습니다. 그런 다음 키 탭에서 인스턴스 로케이터 및 비밀 키를 기록하십시오. 다음 섹션에서 둘 다 필요합니다.
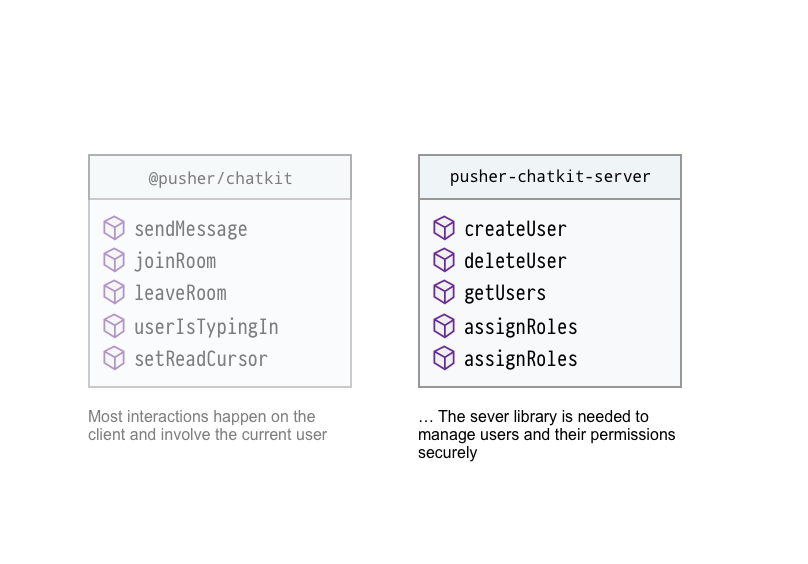
대부분의 상호 작용은 클라이언트에서 발생하지만 Chatkit은 사용자를 안전하게 생성하고 관리하기위한 서버 대응 장치가 필요합니다.
이 튜토리얼에서 사용자를 인증하지는 않지만 여전히 호출 할 때 Chatkit 사용자를 생성하는 경로를 정의해야합니다.
@pusher/chatkit-server 설치하여 시작하십시오.
npm install --save @pusher/chatkit-server
그런 다음 ./server.js 를 업데이트하십시오.
const express = require('express')
const bodyParser = require('body-parser')
const cors = require('cors')
+ const Chatkit = require('@pusher/chatkit-server')

const app = express()

+ const chatkit = new Chatkit.default({
+  instanceLocator: 'YOUR INSTANCE LOCATOR',
+  key: 'YOUR KEY',
+ })

app.use(bodyParser.urlencoded({ extended: false }))
app.use(bodyParser.json())
app.use(cors())

+ app.post('/users', (req, res) => {
+  const { username } = req.body
+  chatkit
+    .createUser({
+      id: username,
+      name: username
+    })
+    .then(() => res.sendStatus(201))
+    .catch(error => {
+      if (error.error === 'services/chatkit/user_already_exists') {
+        res.sendStatus(200)
+      } else {
+        res.status(error.status).json(error)
+      }
+    })
+ })

+ app.post('/authenticate', (req, res) => {
+  const authData = chatkit.authenticate({ userId: req.query.user_id })
+  res.status(authData.status).send(authData.body)
+ })


const PORT = 3001
app.listen(PORT, err => {
  if (err) {
    console.error(err)
  } else {
    console.log(`Running on port ${PORT}`)
  }
})
"인스턴스 로케이터" 와 "키"를 각자의 값으로 바꾸는 것을 잊지 마십시오.
여기에서 포장을 풀어야 할 것이 많습니다.
@pusher/chatkit-server 에서 Chatkit 가져옵니다chatkit 인스턴스를 인스턴스화합니다./users 노선에서 chatkit 인스턴스를 통해 username 사용하고 chatkit 사용자를 만듭니다./authenticate 됩니다. 요청이 유효한 경우 서버는 토큰으로 응답해야합니다 ( chatkit.authenticate ). 우리의 경우, 우리는 순진하게 - 모든 사람이 자신이 말하는 사람이라고 가정하고 chatkit.authenticate 에서 토큰을 돌려주십시오.붐?! 그것이 우리가 서버에서해야 할 전부입니다. 클라이언트로 넘어 가자 ...
누군가 앱을로드 할 때, 우리는 그들에게 누구인지 물어보고 싶습니다.
그들이 제출을 쳤을 때, 우리는 사용자 이름을 서버 (방금 정의한 /users 경로로)로 보내고 존재하지 않으면 chatkit 사용자를 만듭니다.
사용자 이름을 수집하려면 ./src/components/ 에서 UsernameForm.js 라는 구성 요소를 작성하십시오.
 + import React, { Component } from 'react'

+ class UsernameForm extends Component {
+ constructor(props) {
+   super(props)
+   this.state = {
+     username: '',
+   }
+   this.onSubmit = this.onSubmit.bind(this)
+   this.onChange = this.onChange.bind(this)
+ }

+ onSubmit(e) {
+   e.preventDefault()
+   this.props.onSubmit(this.state.username)
+ }

+ onChange(e) {
+    this.setState({ username: e.target.value })
+  }
+
+  render() {
+    return (
+      <div>
+        <div>
+          <h2>What is your username?</h2>
+          <form onSubmit={this.onSubmit}>
+            <input
+              type="text"
+              placeholder="Your full name"
+              onChange={this.onChange}
+            />
+            <input type="submit" />
+          </form>
+        </div>
+      </div>
+    )
+  }
+ }
+
+ export default UsernameForm
그런 다음 App.js 를 업데이트합니다.
import React, { Component } from 'react'
+ import UsernameForm from './components/UsernameForm'
class App extends Component {
+ constructor() {
+ super()
+ this.state = {
+ currentUsername: '',
+ }
+ this.onUsernameSubmitted = this.onUsernameSubmitted.bind(this)
+ }
+ onUsernameSubmitted(username) {
+ fetch('http://localhost:3001/users', {
+ method: 'POST',
+ headers: {
+ 'Content-Type': 'application/json',
+ },
+ body: JSON.stringify({ username }),
+ })
+ .then(response => {
+ this.setState({
+ currentUsername: username
+ })
+ })
+ .catch(error => console.error('error', error))
+ }
render() {
- return <h1>Chatly</h1>
+ return <UsernameForm onSubmit={this.onUsernameSubmitted} />
}
}
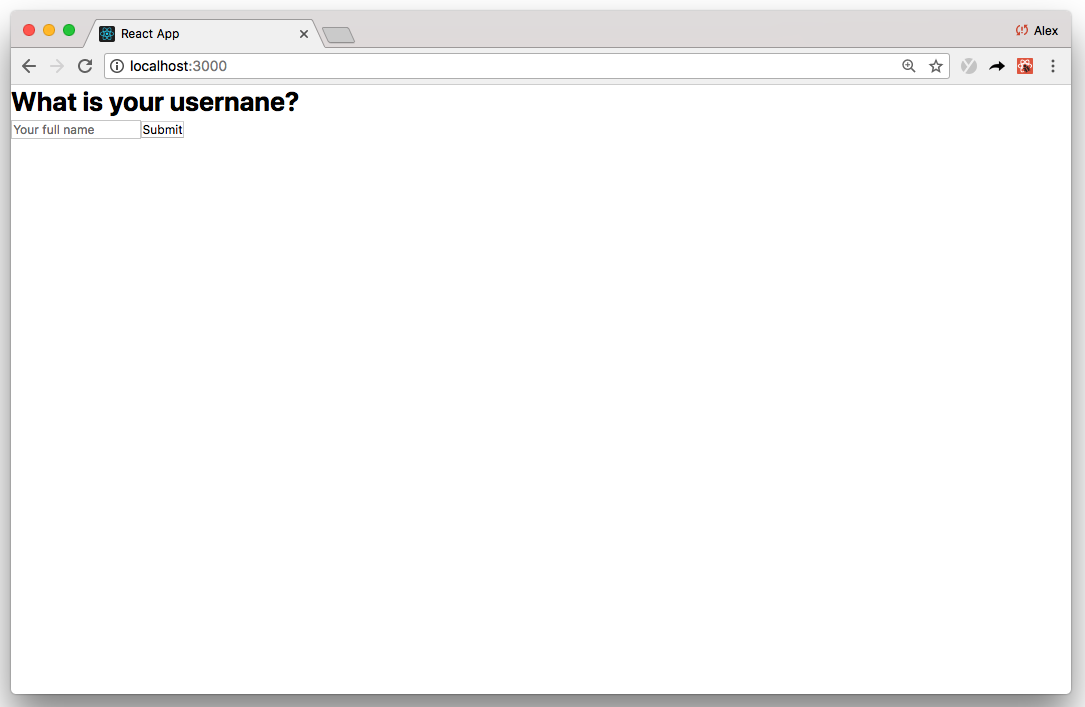
export default App npm start 사용하여 응용 프로그램을 실행하면 화면이 렌더링됩니다.
App.js 상단부터 시작 :
UsernameForm 구성 요소를 가져옵니다. 제어 구성 요소라는 일반적인 반응 패턴을 사용하기 때문에 친숙해 보일 것입니다. React Forms에 대한 자세한 내용은 여기를 참조하십시오render 함수에서 UsernameForm 렌더링하고 onUsernameSubmitted 이벤트 핸들러를 연결합니다.onUsernameSubmitted 호출되면 방금 정의한 /users 경로에 게시물 요청을 보냅니다. 요청이 성공하면 this.state.currentUsername 업데이트하여 나중에 참조 할 수 있습니다. 그렇지 않으면, 우리는 console.error 현재 UsernameForm 렌더링하고 전체 화면을 차지합니다 (위 스크린 샷 참조).
사용자 이름이 제출되면 다른 화면, 즉 채팅 화면으로 전환해야합니다.
이를 위해서는 먼저 ./src 에서 ChatScreen.js 구성 요소를 만들어야합니다.
 + import React, { Component } from 'react'
+
+ class ChatScreen extends Component {
+  render() {
+    return (
+      <div>
+        <h1>Chat</h1>
+      </div>
+    )
+  }
+ }
+
+ export default ChatScreen
그런 다음 App.js 를 업데이트합니다.
import React, { Component } from 'react'
import UsernameForm from './components/UsernameForm'
+ import ChatScreen from './ChatScreen'

class App extends Component {
  constructor() {
    super()
    this.state = {
      currentUsername: '',
+     currentScreen: 'WhatIsYourUsernameScreen'
    }
    this.onUsernameSubmitted = this.onUsernameSubmitted.bind(this)
 }

  onUsernameSubmitted(username) {
    fetch('http://localhost:3001/users', {
      method: 'POST',
      headers: {
        'Content-Type': 'application/json',
      },
      body: JSON.stringify({ username }),
    })
      .then(response => {
        this.setState({
          currentUsername: username,
+         currentScreen: 'ChatScreen'
        })
      })
      .catch(error => console.error('error', error))
  }

 render() {
+    if (this.state.currentScreen === 'WhatIsYourUsernameScreen') {
      return <UsernameForm onSubmit={this.onUsernameSubmitted} />
+    }
+    if (this.state.currentScreen === 'ChatScreen') {
+      return <ChatScreen currentUsername={this.state.currentUsername} />
+    }
  }
}

export default App
라우터를 사용하지 않고 this.state.currentScreen 기반으로 화면을 조건부로 렌더링합니다.
이전에 @pusher/chatkit-server 설치했습니다. 이제 우리는 Client-Land에 있으며 @pusher/chatkit-client 도 설치해야합니다.
npm install --save @pusher/chatkit-client
그런 다음 ChatScreen.js 업데이트합니다.
import React, { Component } from 'react'
+ import Chatkit from '@pusher/chatkit-client'

class ChatScreen extends Component {
+  constructor(props) {
+    super(props)
+    this.state = {
+      currentUser: {}
+    }
+  }

+  componentDidMount () {
+    const chatManager = new Chatkit.ChatManager({
+      instanceLocator: 'YOUR INSTANCE LOCATOR',
+      userId: this.props.currentUsername,
+      tokenProvider: new Chatkit.TokenProvider({
+        url: 'http://localhost:3001/authenticate',
+      }),
+    })
+
+    chatManager
+      .connect()
+      .then(currentUser => {
+        this.setState({ currentUser })
+     })
+     .catch(error => console.error('error', error))
+  }

  render() {
    return (
      <div>
        <h1>Chat</h1>
      </div>
    )
  }
}

export default ChatScreen
앞에서 언급 한 "인스턴스 로케이터"를 귀하의 것으로 바꾸는 것을 잊지 마십시오.
다시, 상단에서 시작 :
Chatkit 가져옵니다instanceLocator , userId ( this.props.currentUsername ) 및 사용자 정의 TokenProvider 와 함께 chatkit ChatManager 인스턴스화하십시오. TokenProvider 이전에 정의한 /authenticate 경로를 가리 킵니다.ChatManager 초기화되면 connect 호출 할 수 있습니다. connect 비동기 적으로 발생하며 Promise 반환됩니다. 이 단계를 정확하게 따라 가면 연결됩니다. 즉, 어떤 console.error 조심하십시오. chatkit을 사용할 때 모든 메시지가 chatkit room으로 전송됩니다.
객실은 프로그래밍 방식으로 ( createRoom 사용하여 서버 또는 클라이언트에서) 또는 대시 보드 검사관에서 만들 수 있습니다.
검사관으로부터 방을 만드는 것은 실제로 좋은 관행이 아닙니다 (주로 테스트를위한 것입니다). 그러나이 연습의 목적을 위해 어쨌든 우리는 그것을 할 것입니다.
대시 보드에서는 콘솔 탭으로 가서 검사관을 찾아 이름을 가진 사용자를 만듭니다. 나는 "관리"라고 부를 것입니다.
그런 다음 "일반"이라는 방을 만듭니다.
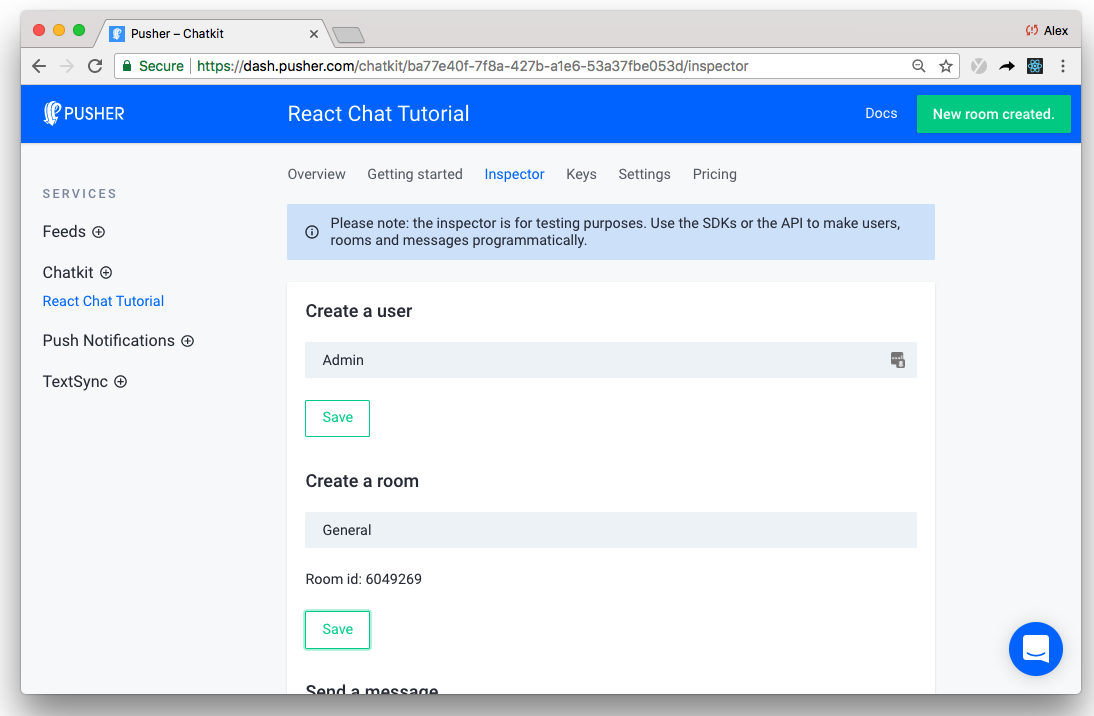
위에서 강조한 고유 한 방 ID 에 주목하는 것이 정말 중요합니다.
이 단계는 연습에서 중요한 지점을 나타냅니다.
이제 우리는 보일러 플레이트를 설치하여 채팅 기능을 신속하게 구축하기 시작할 수 있습니다.
앞으로, 우리는 각 기능을 독립적으로 분류합니다 (원하는 경우 재사용 가능합니다!) 반응 구성 요소 :
우리는 우리가 따라 갈 때 각 구성 요소를 만들 것이지만, 튜토리얼을 조금 더 쉽게 따르기 위해 기본 구성 요소 UI 레이아웃을 설정하겠습니다.
import React, { Component } from 'react'
import Chatkit from '@pusher/chatkit-client'

class ChatScreen extends Component {
  constructor(props) {
    super(props)
    this.state = {
      currentUser: {}
    }
  }

  componentDidMount () {
    const chatManager = new Chatkit.ChatManager({
      instanceLocator: 'YOUR INSTANCE LOCATOR',
      userId: this.props.currentUsername,
      tokenProvider: new Chatkit.TokenProvider({
        url: 'http://localhost:3001/authenticate',
      }),
    })

    chatManager
      .connect()
      .then(currentUser => {
        this.setState({ currentUser })
      })
      .catch(error => console.error('error', error))
  }

  render() {
-    return (
-      <div>
-        <h1>Chat</h1>
-      </div>
-    )
+    const styles = {
+      container: {
+        height: '100vh',
+        display: 'flex',
+        flexDirection: 'column',
+      },
+      chatContainer: {
+        display: 'flex',
+        flex: 1,
+      },
+      whosOnlineListContainer: {
+        width: '300px',
+        flex: 'none',
+        padding: 20,
+        backgroundColor: '#2c303b',
+        color: 'white',
+      },
+      chatListContainer: {
+        padding: 20,
+        width: '85%',
+        display: 'flex',
+        flexDirection: 'column',
+      },
+   }

+    return (
+      <div style={styles.container}>
+        <div style={styles.chatContainer}>
+          <aside style={styles.whosOnlineListContainer}>
+            <h2>Who's online PLACEHOLDER</h2>
+          </aside>
+          <section style={styles.chatListContainer}>
+            <h2>Chat PLACEHOLDER</h2>
+          </section>
+        </div>
+      </div>
+    )
  }
}

export default ChatScreen
지금 앱을 실행하면 기본 레이아웃이 발생합니다.
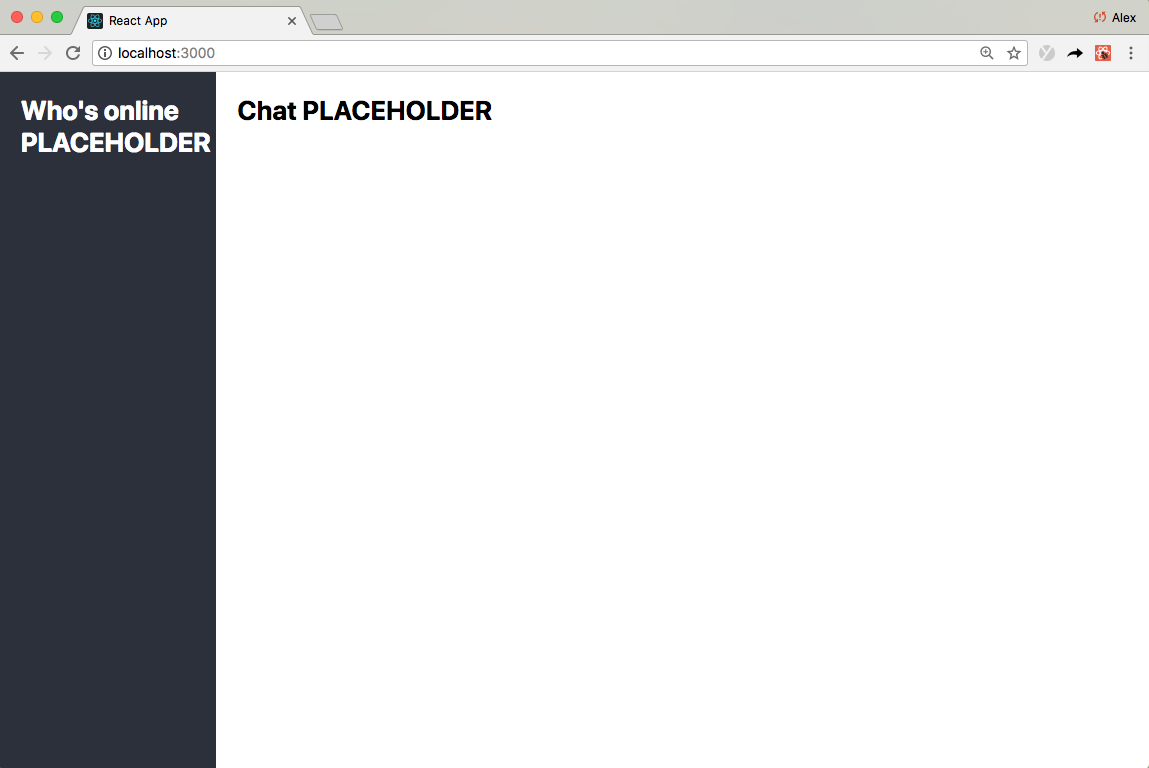
엄청난!
나는 당신에게 이것을 보여주게되어 정말 기쁩니다!
이제 우리는 Chatkit 연결을 가졌으며 채팅 기능을 구축하는 것이 Chatkit 이벤트를 UI 구성 요소에 연결하는 것만 큼 간단 해집니다. 여기를 보여 드리겠습니다.
먼저, ./src/components 에서 Sationeless MessageList.js 구성 요소를 만듭니다.
 + import React, { Component } from 'react'
+
+ class MessagesList extends Component {
+   render() {
+     const styles = {
+       container: {
+         overflowY: 'scroll',
+         flex: 1,
+       },
+       ul: {
+         listStyle: 'none',
+       },
+       li: {
+         marginTop: 13,
+         marginBottom: 13,
+       },
+       senderUsername: {
+         fontWeight: 'bold',
+       },
+       message: { fontSize: 15 },
+     }
+     return (
+       <div
+         style={{
+           ...this.props.style,
+           ...styles.container,
+         }}
+       >
+         <ul style={styles.ul}>
+           {this.props.messages.map((message, index) => (
+             <li key={index} style={styles.li}>
+               <div>
+                 <span style={styles.senderUsername}>{message.senderId}</span>{' '}
+               </div>
+               <p style={styles.message}>{message.text}</p>
+             </li>
+           ))}
+         </ul>
+       </div>
+     )
+   }
+ }
+
+ export default MessagesList
그런 다음 ChatScreen.js 업데이트합니다.
import React, { Component } from 'react'
import Chatkit from '@pusher/chatkit-client'
+ import MessageList from './components/MessageList'


class ChatScreen extends Component {
  constructor(props) {
    super(props)
    this.state = {
      currentUser: {},
+     currentRoom: {},
+     messages: []
    }
  }

  componentDidMount () {
    const chatManager = new Chatkit.ChatManager({
      instanceLocator: 'YOUR INSTANCE LOCATOR',
      userId: this.props.currentUsername,
      tokenProvider: new Chatkit.TokenProvider({
        url: 'http://localhost:3001/authenticate',
      }),
    })

    chatManager
      .connect()
      .then(currentUser => {
        this.setState({ currentUser })
+        return currentUser.subscribeToRoom({
+          roomId: "YOUR ROOM ID",
+          messageLimit: 100,
+          hooks: {
+            onMessage: message => {
+              this.setState({
+                messages: [...this.state.messages, message],
+              })
+            },
+          },
+        })
+      })
+      .then(currentRoom => {
+        this.setState({ currentRoom })
+       })
      .catch(error => console.error('error', error))
  }

  render() {
    const styles = {
      ...
    }
    return (
      <div style={styles.container}>
        <div style={styles.chatContainer}>
          <aside style={styles.whosOnlineListContainer}>
            <h2>Who's online PLACEHOLDER</h2>
          </aside>
          <section style={styles.chatListContainer}>
-            <h2>Chat PLACEHOLDER</h2>
+            <MessageList
+              messages={this.state.messages}
+              style={styles.chatList}
+            />
          </section>
        </div>
      </div>
    )
  }
}

export default ChatScreen
객실 ID를 이전에 언급 한 자신의 방 ID로 바꾸는 것을 잊지 마십시오.
분해합시다 :
currentUser 객체가 나타납니다.currentUser 에서 발생하는 것은 아닙니다.currentUser ( currentUser.subscribeToRoom )에서 subscribeToRoom 호출합니다.subscribeToRoom 새로운 메시지가 도착할 때마다 실시간으로 호출되는 onMessage 호출 된 이벤트 핸들러를 사용합니다.messageLimit 100 으로 지정했기 때문에 onMessage 최대 100 최신 메시지를 위해 소급 적으로 라고도합니다. 실제로 이것은 페이지를 새로 고치면 최대 100 가장 최근의 채팅 메시지를 볼 수 있습니다.우리는 롤 중입니다!
다음으로, 사용자가 ./src/components 에서 SendMessageForm.js 구성 요소를 먼저 만들어 메시지를 보낼 수 있도록하겠습니다.
 + import React, { Component } from 'react'
+
+ class SendMessageForm extends Component {
+   constructor(props) {
+     super(props)
+     this.state = {
+       text: '',
+     }
+     this.onSubmit = this.onSubmit.bind(this)
+     this.onChange = this.onChange.bind(this)
+   }
+
+   onSubmit(e) {
+     e.preventDefault()
+     this.props.onSubmit(this.state.text)
+     this.setState({ text: '' })
+   }
+
+   onChange(e) {
+     this.setState({ text: e.target.value })
+     if (this.props.onChange) {
+       this.props.onChange()
+     }
+   }
+
+   render() {
+     const styles = {
+       container: {
+         padding: 20,
+         borderTop: '1px #4C758F solid',
+         marginBottom: 20,
+       },
+       form: {
+         display: 'flex',
+       },
+       input: {
+         color: 'inherit',
+         background: 'none',
+         outline: 'none',
+         border: 'none',
+         flex: 1,
+         fontSize: 16,
+       },
+     }
+     return (
+       <div style={styles.container}>
+         <div>
+           <form onSubmit={this.onSubmit} style={styles.form}>
+             <input
+               type="text"
+               placeholder="Type a message here then hit ENTER"
+               onChange={this.onChange}
+               value={this.state.text}
+               style={styles.input}
+             />
+           </form>
+         </div>
+       </div>
+     )
+   }
+ }
+
+ export default SendMessageForm
그런 다음 - 당신은 그것을 추측했습니다 - ChatScreen.js 업데이트 :
import React, { Component } from 'react'
import Chatkit from '@pusher/chatkit-client'
import MessageList from './components/MessageList'
+ import SendMessageForm from './components/SendMessageForm'

class ChatScreen extends Component {
  constructor(props) {
    super(props)
    this.state = {
      currentUser: {},
      currentRoom: {},
      messages: []
    }
+    this.sendMessage = this.sendMessage.bind(this)
  }


+  sendMessage(text) {
+    this.state.currentUser.sendMessage({
+      text,
+      roomId: this.state.currentRoom.id,
+    })
+  }

 componentDidMount () {
    const chatManager = new Chatkit.ChatManager({
      instanceLocator: 'YOUR INSTANCE LOCATOR',
      userId: this.props.currentUsername,
      tokenProvider: new Chatkit.TokenProvider({
        url: 'http://localhost:3001/authenticate',
      }),
    })

    chatManager
      .connect()
      .then(currentUser => {
        this.setState({ currentUser })
        return currentUser.subscribeToRoom({
          roomId: YOUR ROOM ID,
          messageLimit: 100,
          hooks: {
            onMessage: message => {
              this.setState({
                messages: [...this.state.messages, message],
              })
            },
          },
        })
      })
      .then(currentRoom => {
        this.setState({ currentRoom })
       })
      .catch(error => console.error('error', error))
  }


  render() {
    const styles = {
     ...
    }
    return (
      <div style={styles.container}>
        <div style={styles.chatContainer}>
          <aside style={styles.whosOnlineListContainer}>
            <h2>Who's online PLACEHOLDER</h2>
          </aside>
          <section style={styles.chatListContainer}>
            <MessageList
              messages={this.state.messages}
              style={styles.chatList}
            />
+           <SendMessageForm onSubmit={this.sendMessage} />
          </section>
        </div>
      </div>
    )
  }
}

export default ChatScreen
SendMessageForm 구성 요소는 본질적으로 이전에 정의한 WhatIsYourUsernameForm 구성 요소와 동일합니다.
SendMessageForm 제출되면 this.state.currentUser 에 액세스하고 sendMessage 에 전화하십시오 (대부분의 상호 작용은 currentUser 에서 발생합니다).
아마도 패턴이 떠오르는 것을 볼 수 있습니다 ...
ChatScreen 응용 프로그램 상태를 관리하고 프리젠 테이션 - 정상 상태 - 구성 요소를 사용하여 UI를 렌더링하는 컨테이너 구성 요소 입니다. 대부분의 코드에는 Chatkit 이벤트와 관련 데이터를 연결하여 UI 구성 요소를 반응하는 것이 포함됩니다.
자신의 타이핑 지표를 구현하려고 시도한 적이 있다면 까다로울 수 있습니다. 일반적으로 더 많은 실시간 기능은 더 많은 데이터와 더 많은 관리를 의미합니다.
Chatkit을 사용하면 거의 노력하지 않고 입력 지표를 추가 할 수 있습니다.
./src/components 에서 TypingIndicator.js 구성 요소를 작성하여 시작하십시오.
 + import React, { Component } from 'react'
+
+ class TypingIndicator extends Component {
+  render() {
+    if (this.props.usersWhoAreTyping.length > 0) {
+      return (
+        <div>
+          {`${this.props.usersWhoAreTyping
+            .slice(0, 2)
+            .join(' and ')} is typing`}
+        </div>
+      )
+    }
+    return <div />
+  }
+ }
+
+ export default TypingIndicator
그런 다음 ChatScreen.js 업데이트합니다.
import React, { Component } from 'react'
import Chatkit from '@pusher/chatkit-client'
import MessageList from './components/MessageList'
import SendMessageForm from './components/SendMessageForm'
+ import TypingIndicator from './components/TypingIndicator'

class ChatScreen extends Component {
  constructor(props) {
    super(props)
    this.state = {
      currentUser: {},
      currentRoom: {},
      messages: [],
+     usersWhoAreTyping: [],
    }
    this.sendMessage = this.sendMessage.bind(this)
+   this.sendTypingEvent = this.sendTypingEvent.bind(this)
  }

+  sendTypingEvent() {
+    this.state.currentUser
+      .isTypingIn({ roomId: this.state.currentRoom.id })
+      .catch(error => console.error('error', error))
+  }

  sendMessage(text) {
    this.state.currentUser.sendMessage({
      text,
      roomId: this.state.currentRoom.id,
    })
  }

  componentDidMount() {
    const chatManager = new Chatkit.ChatManager({
      instanceLocator: 'YOUR INSTANCE LOCATOR',
      userId: this.props.currentUsername,
      tokenProvider: new Chatkit.TokenProvider({
        url: 'http://localhost:3001/authenticate',
      }),
    })

    chatManager
      .connect()
      .then(currentUser => {
        this.setState({ currentUser })
        return currentUser.subscribeToRoom({
          roomId: YOUR ROOM ID,
          messageLimit: 100,
          hooks: {
            onMessage: message => {
              this.setState({
                messages: [...this.state.messages, message],
              })
            },
+            onUserStartedTyping: user => {
+              this.setState({
+                usersWhoAreTyping: [...this.state.usersWhoAreTyping, user.name],
+             })
+            },
+            onUserStoppedTyping: user => {
+              this.setState({
+                usersWhoAreTyping: this.state.usersWhoAreTyping.filter(
+                  username => username !== user.name
+                ),
+              })
+            },
          },
        })
      })
      .then(currentRoom => {
        this.setState({ currentRoom })
      })
      .catch(error => console.error('error', error))
  }

  render() {
    const styles = {
      ...
    }
    return (
      <div style={styles.container}>>
        <div style={styles.chatContainer}>
          <aside style={styles.whosOnlineListContainer}>
            <h2>Who's online PLACEHOLDER</h2>
          </aside>
          <section style={styles.chatListContainer}>
            <MessageList
              messages={this.state.messages}
              style={styles.chatList}
            />
+           <TypingIndicator usersWhoAreTyping={this.state.usersWhoAreTyping} />
            <SendMessageForm
              onSubmit={this.sendMessage}
+             onChange={this.sendTypingEvent}
            />
          </section>
        </div>
      </div>
    )
  }
}

export default ChatScreen
chatkit을 사용할 때는 타이핑 표시기가 두 가지 기본 조치로 줄어 듭니다.
currentUser.userIsTyping 현재 사용자가 입력을 시작할 때 호출; 그 다음에,userStartedTyping 과 userStoppedTyping 이벤트를 듣습니다그리고 그것은 거의 그것입니다.
"그러나 Alex, 사용자가 타이핑을 중지 할 때 어떻습니까?"
그것은 아주 좋은 질문입니다.
chatkit은 그런 지능적입니다. 몇 초 후에 서비스가 userIsTyping 이벤트를받지 못하면 currentUser 타이핑을 중지했다고 가정합니다. 따라서 누군가가 타이핑을 중지 할 때 수동으로 이벤트를 제기 할 필요가 없습니다. 꽤 매끄럽지?
운동량을 느낄 수 있습니까? 지금 거의 끝났나요?
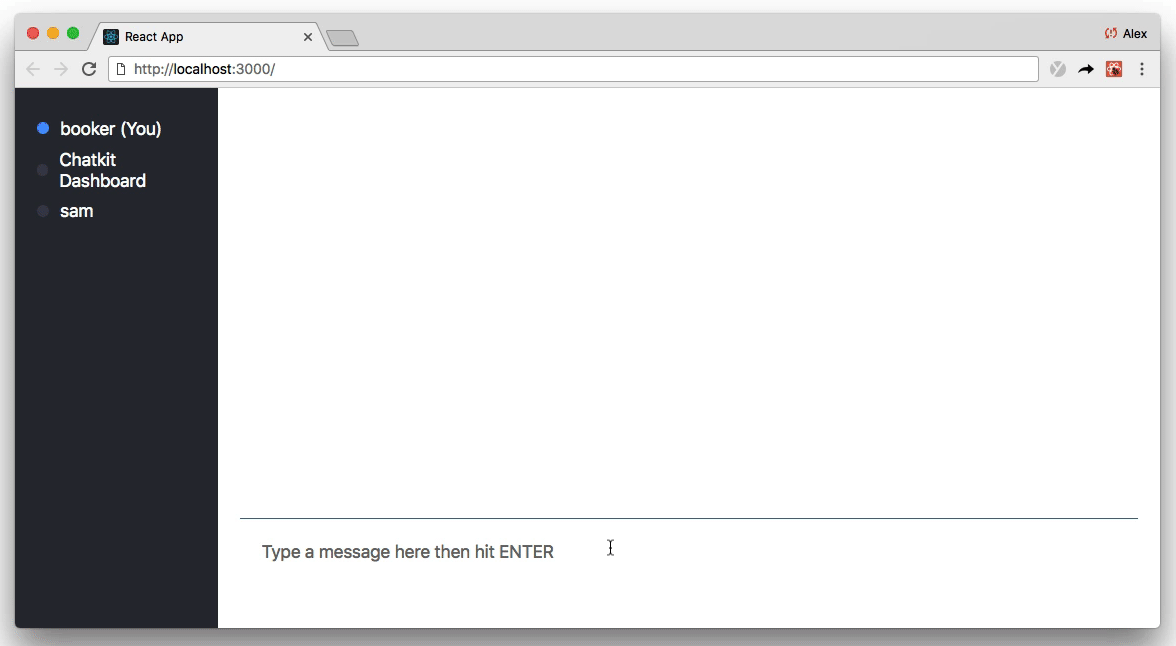
Chat 앱을 마치려면 Chatkit의 "Who 's Online"기능을 사용하여 사용자 목록과 실시간 온라인 상태를 렌더링하겠습니다.
/src/components 에서 WhosOnlineList.js 구성 요소를 만들어 시작하십시오.
 + import React, { Component } from 'react'
+
+ class WhosOnlineList extends Component {
+  renderUsers() {
+    return (
+      <ul>
+        {this.props.users.map((user, index) => {
+          if (user.id === this.props.currentUser.id) {
+            return (
+              <WhosOnlineListItem key={index} presenceState="online">
+                {user.name} (You)
+              </WhosOnlineListItem>
+            )
+          }
+          return (
+            <WhosOnlineListItem key={index} presenceState={user.presence.state}>
+              {user.name}
+            </WhosOnlineListItem>
+          )
+        })}
+      </ul>
+    )
+  }
+
+  render() {
+    if (this.props.users) {
+      return this.renderUsers()
+    } else {
+      return <p>Loading...</p>
+    }
+  }
+ }
+
+ class WhosOnlineListItem extends Component {
+  render() {
+    const styles = {
+      li: {
+        display: 'flex',
+        alignItems: 'center',
+        marginTop: 5,
+        marginBottom: 5,
+        paddingTop: 2,
+        paddingBottom: 2,
+      },
+      div: {
+        borderRadius: '50%',
+        width: 11,
+        height: 11,
+        marginRight: 10,
+      },
+    }
+    return (
+      <li style={styles.li}>
+        <div
+          style={{
+            ...styles.div,
+            backgroundColor:
+              this.props.presenceState === 'online' ? '#539eff' : '#414756',
+          }}
+        />
+        {this.props.children}
+      </li>
+    )
+  }
+ }
+
+ export default WhosOnlineList
그런 다음 - 마지막으로? ChatScreen.js 업데이트 :
import React, { Component } from 'react'
import Chatkit from '@pusher/chatkit-client'
import MessageList from './components/MessageList'
import SendMessageForm from './components/SendMessageForm'
import TypingIndicator from './components/TypingIndicator'
+ import WhosOnlineList from './components/WhosOnlineList'

class ChatScreen extends Component {
  constructor(props) {
    super(props)
    this.state = {
      currentUser: {},
      currentRoom: {},
      messages: [],
      usersWhoAreTyping: [],
    }
    this.sendMessage = this.sendMessage.bind(this)
    this.sendTypingEvent = this.sendTypingEvent.bind(this)
  }

  sendTypingEvent() {
    this.state.currentUser
      .isTypingIn(this.state.currentRoom.id)
      .catch(error => console.error('error', error))
  }

   sendMessage(text) {
    this.state.currentUser.sendMessage({
      text,
      roomId: this.state.currentRoom.id,
    })
  }

  comonentDidMount() {
    const chatManager = new Chatkit.ChatManager({
      instanceLocator: 'YOUR INSTANCE LOCATOR',
      userId: this.props.currentUsername,
      tokenProvider: new Chatkit.TokenProvider({
        url: 'http://localhost:3001/authenticate',
      }),
    })

    chatManager
      .connect()
      .then(currentUser => {
        this.setState({ currentUser })
        return currentUser.subscribeToRoom({
          roomId: YOUR ROOM ID,
          messageLimit: 100,
          hooks: {
            newMessage: message => {
              this.setState({
                messages: [...this.state.messages, message],
              })
            },
            userStartedTyping: user => {
              this.setState({
                usersWhoAreTyping: [...this.state.usersWhoAreTyping, user.name],
              })
            },
            userStoppedTyping: user => {
              this.setState({
                usersWhoAreTyping: this.state.usersWhoAreTyping.filter(
                  username => username !== user.name
                ),
              })
            },
+            onPresenceChange: () => this.forceUpdate(),
          },
        })
      })
      .then(currentRoom => {
        this.setState({ currentRoom })
      })
      .catch(error => console.error('error', error))
  }

  render() {
    const styles = {
      ...
    }
    return (
      <div style={styles.container}>
        <header style={styles.header}>
          <h2>Chatly</h2>
        </header>
        <div style={styles.chatContainer}>
          <aside style={styles.whosOnlineListContainer}>
-            <h2>Who's online PLACEHOLDER</h2>
+            <WhosOnlineList
+              currentUser={this.state.currentUser}
+              users={this.state.currentRoom.users}
+            />
          </aside>
          <section style={styles.chatListContainer}>
            <MessageList
              messages={this.state.messages}
              style={styles.chatList}
            />
            <TypingIndicator usersWhoAreTyping={this.state.usersWhoAreTyping} />
            <SendMessageForm
              onSubmit={this.sendMessage}
              onChange={this.sendTypingEvent}
            />
          </section>
        </div>
      </div>
    )
  }
}

export default ChatScreen
React 상태에서 사용자의 상태를 관리하는 것은 약간 까다로울 수 있으므로 currentRoom.users 에서 귀하를 위해 관리합니다.
사용자가 연결하고 연결을 끊으면이 속성은 동적으로 업데이트됩니다. 다시 말해서, currentRoom.users 항상 채팅 앱의 현재 상태를 다시 선택해야합니다.
따라서 사용자가 온라인으로 오거나 오프라인으로 이동하거나 ( onPresenceChange ), 새로운 사용자가 가입 ( onUserAdded )에 가입하면 Call currentRoom.users 평가하고 UI를 업데이트하도록 반응하는 Call forceUpdate 만 있으면됩니다.
다시 말하지만, 그것은 실제로 구성 요소에 반응하기 위해 간단한 데이터와 이벤트를 배선하는 것입니다.
이 연습에서 당신은
우리는 chatkit을 사용했기 때문에 무료로 보너스 기능도 제공합니다.
우리는 상당한 양의 코드를 썼지 만 그중 어느 것도 특히 복잡하지 않았습니다.
Chatkit에는 모든 채팅 데이터를 관리하는 최소하지만 강력한 API가 있습니다. 우리가해야 할 일은 그 데이터를 가져 와서 사용자를 위해 렌더링하는 것입니다.
건물을 계속하고 싶습니까? 풍부한 미디어 지원을 추가하고 영수증을 읽지 않겠습니까? chatkit은 다음을 모두 지원합니다.
강력한 Chatkit Slack 데모 (250+ Stars)를 확인하는 데 관심이있을 수도 있습니다. 방금 구축했지만 더 완전한 응용 프로그램과 유사합니다.
chatkit과 함께 무엇을 만들 것인가? 우리는보고 싶습니다! 귀하의 의견은 Chatkit을 개선하는 데 안내합니다. 목표에 도달하는 데 도움이되는 것을 알려주십시오.


