lightly
More and better Transforms
Lightly SSL是用於自學學習的計算機視覺框架。
對於具有更多功能的商業版本,包括Docker支持和用於嵌入,分類,檢測和細分任務的訓練型模型,請與[email protected]聯繫。
我們還在頂部構建了一個整個平台,並具有積極學習和數據策劃的其他功能。如果您對輕度工人解決方案感興趣,可以輕鬆處理數百萬個樣本並在數據上運行功能強大的算法,請Lightly.ai。可以免費入門!
這個自我監督的學習框架提供了以下功能:
您可以在此處找到所有受支持模型的示例代碼。我們為所有型號提供了Pytorch,Pytorch Lightning和Pytorch Lightning分佈式示例,以啟動您的項目。
型號:
| 模型 | 年 | 紙 | 文件 | Colab(Pytorch) | COLAB(Pytorch Lightning) |
|---|---|---|---|---|---|
| 目的 | 2024 | 紙 | 文件 | ||
| 巴洛雙胞胎 | 2021 | 紙 | 文件 | ||
| BYOL | 2020 | 紙 | 文件 | ||
| DCL和DCLW | 2021 | 紙 | 文件 | ||
| densecl | 2021 | 紙 | 文件 | ||
| 恐龍 | 2021 | 紙 | 文件 | ||
| 梅 | 2021 | 紙 | 文件 | ||
| MSN | 2022 | 紙 | 文件 | ||
| moco | 2019 | 紙 | 文件 | ||
| nnclr | 2021 | 紙 | 文件 | ||
| PMSN | 2022 | 紙 | 文件 | ||
| simclr | 2020 | 紙 | 文件 | ||
| simmim | 2022 | 紙 | 文件 | ||
| Simsiam | 2021 | 紙 | 文件 | ||
| 沃夫 | 2020 | 紙 | 文件 | ||
| Vicreg | 2021 | 紙 | 文件 |
是否想跳到教程並輕率地行動?
社區和合作夥伴項目:
輕輕需要python 3.7+ 。我們建議在Linux或OSX環境中輕輕安裝。 Python 3.13尚未得到支持,因為Pytorch本身缺乏Python 3.13兼容性。
由於輕度包裝的模塊化性質,一些模塊可以與較舊版本的依賴關係一起使用。但是,截至今天,使用所有功能都需要以下依賴性:
輕度與Pytorch和Pytorch Lightning v2.0+兼容!
您可以通過以下方式輕輕安裝PYPI的依賴項。
pip3 install lightly
我們強烈建議在專用的Virtualenv中輕輕安裝,以避免與您的系統軟件包發生衝突。
使用Pytorch的全部功能,您可以輕輕地以模塊化方式使用最新的自我監督學習方法。嘗試各種骨架,模型和損失功能。該框架的設計易於從頭開始。在我們的文檔中找到更多示例。
 import torch
import torchvision

from lightly import loss
from lightly import transforms
from lightly . data import LightlyDataset
from lightly . models . modules import heads


# Create a PyTorch module for the SimCLR model.
class SimCLR ( torch . nn . Module ):
    def __init__ ( self , backbone ):
        super (). __init__ ()
        self . backbone = backbone
        self . projection_head = heads . SimCLRProjectionHead (
            input_dim = 512 ,  # Resnet18 features have 512 dimensions.
            hidden_dim = 512 ,
            output_dim = 128 ,
        )

    def forward ( self , x ):
        features = self . backbone ( x ). flatten ( start_dim = 1 )
        z = self . projection_head ( features )
        return z


# Use a resnet backbone from torchvision.
backbone = torchvision . models . resnet18 ()
# Ignore the classification head as we only want the features.
backbone . fc = torch . nn . Identity ()

# Build the SimCLR model.
model = SimCLR ( backbone )

# Prepare transform that creates multiple random views for every image.
transform = transforms . SimCLRTransform ( input_size = 32 , cj_prob = 0.5 )


# Create a dataset from your image folder.
dataset = LightlyDataset ( input_dir = "./my/cute/cats/dataset/" , transform = transform )

# Build a PyTorch dataloader.
dataloader = torch . utils . data . DataLoader (
    dataset ,  # Pass the dataset to the dataloader.
    batch_size = 128 ,  # A large batch size helps with the learning.
    shuffle = True ,  # Shuffling is important!
)

# Lightly exposes building blocks such as loss functions.
criterion = loss . NTXentLoss ( temperature = 0.5 )

# Get a PyTorch optimizer.
optimizer = torch . optim . SGD ( model . parameters (), lr = 0.1 , weight_decay = 1e-6 )

# Train the model.
for epoch in range ( 10 ):
    for ( view0 , view1 ), targets , filenames in dataloader :
        z0 = model ( view0 )
        z1 = model ( view1 )
        loss = criterion ( z0 , z1 )
        loss . backward ()
        optimizer . step ()
        optimizer . zero_grad ()
        print ( f"loss: { loss . item ():.5f } " )
您可以通過交換模型和損耗函數來輕鬆使用Simsiam之類的另一個模型。
 # PyTorch module for the SimSiam model.
class SimSiam ( torch . nn . Module ):
    def __init__ ( self , backbone ):
        super (). __init__ ()
        self . backbone = backbone
        self . projection_head = heads . SimSiamProjectionHead ( 512 , 512 , 128 )
        self . prediction_head = heads . SimSiamPredictionHead ( 128 , 64 , 128 )

    def forward ( self , x ):
        features = self . backbone ( x ). flatten ( start_dim = 1 )
        z = self . projection_head ( features )
        p = self . prediction_head ( z )
        z = z . detach ()
        return z , p


model = SimSiam ( backbone )

# Use the SimSiam loss function.
criterion = loss . NegativeCosineSimilarity ()
您可以在此處找到Simsiam的更完整的示例。
使用Pytorch Lightning訓練模型:
 from pytorch_lightning import LightningModule , Trainer

class SimCLR ( LightningModule ):
    def __init__ ( self ):
        super (). __init__ ()
        resnet = torchvision . models . resnet18 ()
        resnet . fc = torch . nn . Identity ()
        self . backbone = resnet
        self . projection_head = heads . SimCLRProjectionHead ( 512 , 512 , 128 )
        self . criterion = loss . NTXentLoss ()

    def forward ( self , x ):
        features = self . backbone ( x ). flatten ( start_dim = 1 )
        z = self . projection_head ( features )
        return z

    def training_step ( self , batch , batch_index ):
        ( view0 , view1 ), _ , _ = batch
        z0 = self . forward ( view0 )
        z1 = self . forward ( view1 )
        loss = self . criterion ( z0 , z1 )
        return loss

    def configure_optimizers ( self ):
        optim = torch . optim . SGD ( self . parameters (), lr = 0.06 )
        return optim


model = SimCLR ()
trainer = Trainer ( max_epochs = 10 , devices = 1 , accelerator = "gpu" )
trainer . fit ( model , dataloader )
請參閱我們的文檔以獲取完整的Pytorch閃電示例。
或在4 GPU上訓練模型:
 # Use distributed version of loss functions.
criterion = loss . NTXentLoss ( gather_distributed = True )

trainer = Trainer (
    max_epochs = 10 ,
    devices = 4 ,
    accelerator = "gpu" ,
    strategy = "ddp" ,
    sync_batchnorm = True ,
    use_distributed_sampler = True ,  # or replace_sampler_ddp=True for PyTorch Lightning <2.0
)
trainer . fit ( model , dataloader )
我們提供具有分佈式聚集和同步batchnorm的多GPU培訓示例。看看我們有關分佈培訓的文檔。
在各種數據集上實現模型及其性能。沒有調整超級參數以提高準確性。有關詳細結果和有關基準測試的更多信息,請單擊此處。
ImagEnet1k基準
注意:評估設置基於以下論文:
有關詳細信息,請參見基準測試腳本。
| 模型 | 骨幹 | 批量大小 | 時代 | 線性top1 | Finetune Top1 | knn top1 | 張板 | 檢查點 |
|---|---|---|---|---|---|---|---|---|
| Barlowtwins | Res50 | 256 | 100 | 62.9 | 72.6 | 45.6 | 關聯 | 關聯 |
| BYOL | Res50 | 256 | 100 | 62.5 | 74.5 | 46.0 | 關聯 | 關聯 |
| 恐龍 | Res50 | 128 | 100 | 68.2 | 72.5 | 49.9 | 關聯 | 關聯 |
| 梅 | VIT-B/16 | 256 | 100 | 46.0 | 81.3 | 11.2 | 關聯 | 關聯 |
| Mocov2 | Res50 | 256 | 100 | 61.5 | 74.3 | 41.8 | 關聯 | 關聯 |
| simclr* | Res50 | 256 | 100 | 63.2 | 73.9 | 44.8 | 關聯 | 關聯 |
| SIMCLR* + DCL | Res50 | 256 | 100 | 65.1 | 73.5 | 49.6 | 關聯 | 關聯 |
| SIMCLR* + DCLW | Res50 | 256 | 100 | 64.5 | 73.2 | 48.5 | 關聯 | 關聯 |
| 沃夫 | Res50 | 256 | 100 | 67.2 | 75.4 | 49.5 | 關聯 | 關聯 |
| tico | Res50 | 256 | 100 | 49.7 | 72.7 | 26.6 | 關聯 | 關聯 |
| Vicreg | Res50 | 256 | 100 | 63.0 | 73.7 | 46.3 | 關聯 | 關聯 |
*我們使用平方根學習率縮放而不是線性縮放,因為它可以為較小的批量尺寸提供更好的結果。請參閱Simclr紙中的附錄B.1。
ImagEnet100基準測試詳細結果
成像基準測試詳細的結果
CIFAR-10基準測試詳細結果
在下面,您可以看到軟件包中不同概念的示意圖。在我們的文檔中,更詳細地說明了大膽的術語。
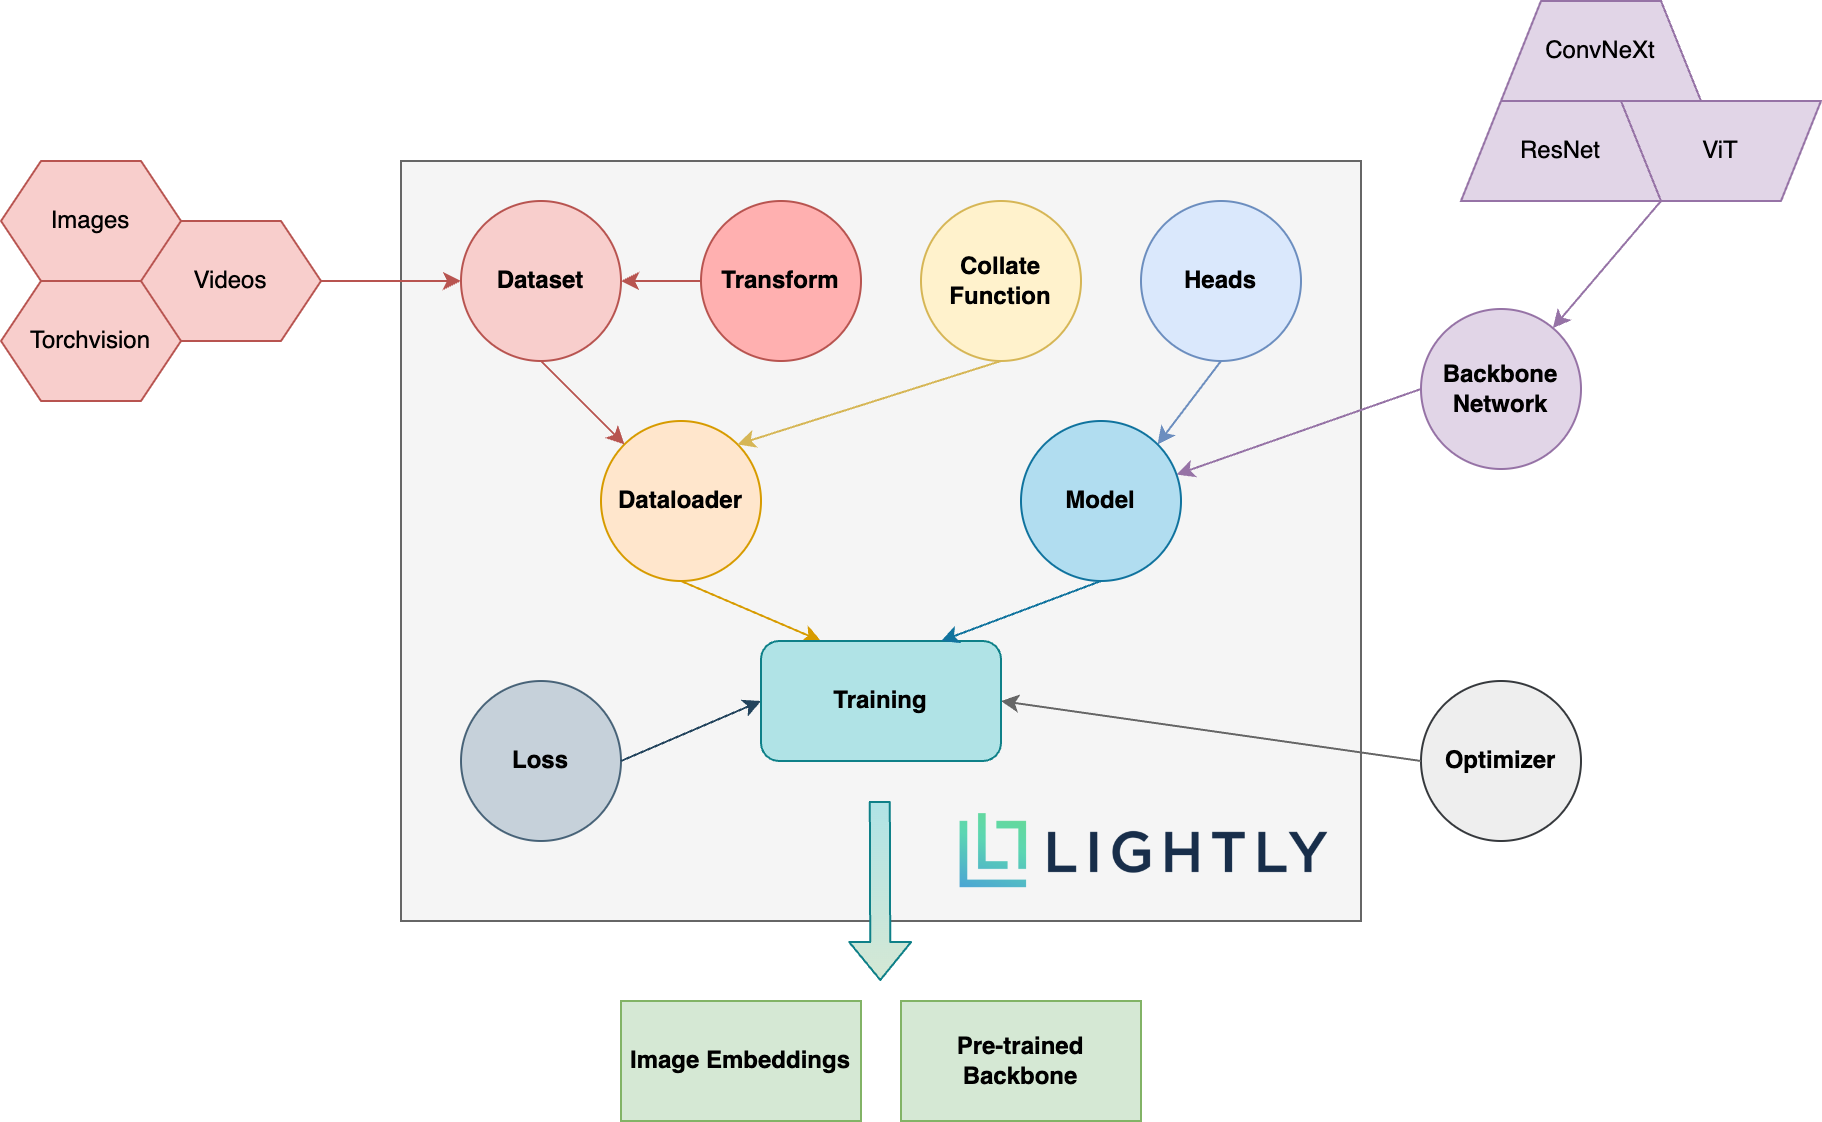
前往文檔,看看您可以輕鬆實現的目標!
要安裝DEV依賴項(例如,為框架做出貢獻),您可以使用以下命令:
pip3 install -e ".[dev]"
有關如何貢獻的更多信息,請在此處查看。
單位測試在測試目錄中,我們建議使用Pytest運行它們。有兩種測試配置。默認情況下,只能運行一個子集:
make test-fast
要運行所有測試(包括慢速測試),您可以使用以下命令:
make test
測試特定文件或目錄使用:
pytest <path to file or directory>
用黑色和ISORT運行格式代碼:
make format
自我監督的學習:
我為什麼要關心自我監督的學習?來自ImageNet的預訓練模型不是更好地用於轉移學習嗎?
我該如何貢獻?
這個框架是免費的嗎?
如果這個框架是免費的,那麼公司如何輕輕地賺錢?
Lightly是蘇黎世Eth Eth的衍生產品,可幫助公司建立有效的主動學習管道,以選擇其模型最相關的數據。
您可以通過遵循以下鏈接來了解有關公司及其服務的更多信息:
回到頂部


