tkpf
1.0.0
tkpf เป็นห้องสมุดสำหรับการสร้าง tkinter guis ในกระบวนทัศน์ที่ได้รับอิทธิพลจาก WPF (มูลนิธิการนำเสนอ Windows) และ Angular
คุณสมบัติหลักคือ:
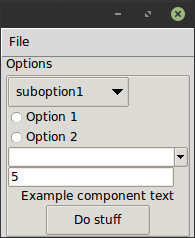
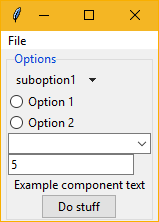
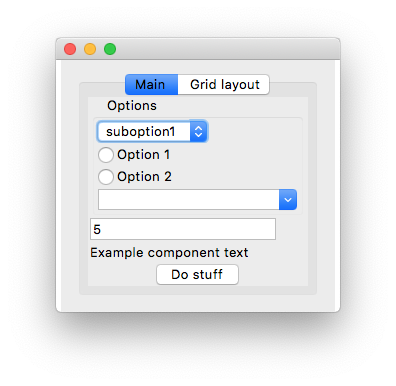
คุณระบุ GUI ในรูปแบบ XML หรือ YAML นี่คือตัวอย่างง่ายๆ ExampleWindow.xml :
< Frame pack-anchor = " nw " pack-padx = " 5 " >
     < LabelFrame text = " Options " pack-anchor = " w " pack-fill = " x " >
        < Radiobutton pack-anchor = " w " variable = " [(choice)] " value = " option1 " >
            Option 1
        </ Radiobutton >
        < Radiobutton pack-anchor = " w " variable = " [(choice)] " value = " option2 " >
            Option 2
        </ Radiobutton >
        < Combobox pack-anchor = " w " textvariable = " (selected_suboption) " values = " [available_suboptions] "
                  name = " combobox " />
        < Button command = " do_stuff " >Do stuff</ Button >
    </ LabelFrame >
</ Frame >
อย่างที่คุณเห็นชื่อแท็ก XML สอดคล้องกับชื่อคลาสวิดเจ็ต tkinter ในขณะที่แอตทริบิวต์ XML ไปยังอาร์กิวเมนต์ของพวกเขา tkpf มีความเห็นว่ามันใช้วิดเจ็ตธีม ttk ที่ดูดีขึ้นเสมอเมื่อพร้อมใช้งาน
ตัวเลือกเช่น pack-anchor="nw" หรือ grid-row="0" ระบุเค้าโครงและจะถูกส่งผ่านไปยังวิธีการจัดการเค้าโครง tkinter ที่เหมาะสมในกรณีนี้ .pack(anchor='nw')
เกี่ยวกับวิธีการระบุ GUI ในรูปแบบ YAML ดู example/ExampleWindow.yaml
คุณแสดง GUI โดยการสร้างคลาสที่ได้จาก Window และแสดง คุณต้องจัดหา ViewModel ในตัวสร้าง
 class ExampleWindow ( Window ):
    template_path = 'ExampleWindow.xml'  # 'ExampleWindow.yaml' works too

ExampleWindow ( ExampleModel ()). show ()
หากคุณต้องการเก็บเลย์เอาต์ XML ไว้ในไฟล์นี้คุณสามารถทำได้เช่นกัน:
 class ExampleWindow ( Window ):
    template = '<Label>Some text</Label>'
หรือ
 class ExampleWindow ( Window ):
    template_yaml = '''
    Label:
      text: Some text
    '''
การตั้งค่าชื่อหน้าต่าง:
    def __init__ ( self , model ):
        super (). __init__ ( model )
        self . title = 'My application'
ในคลาสดูคุณสามารถเขียนตัวจัดการกิจกรรม ทำให้ปุ่มนั้นใช้งานได้เช่น:
    def do_stuff ( self ):
        self . combobox . config ( state = 'disabled' )
นอกจากนี้ยังแสดงวิธีที่คุณสามารถเข้าถึงวิดเจ็ตด้วยชื่อในวิธีการของคลาสดู แต่ถ้าคุณต้องการคุณสามารถเข้าถึงได้แบบไดนามิกเช่นนี้:
self . named_widgets [ 'combobox' ] class ExampleModel ( ViewModel ):
choice = Bindable ( AutoProperty ( 1 ))
available_suboptions = Bindable ( AutoProperty ())
selected_suboption = Bindable ( AutoProperty ())
def __init__ ( self ):
super (). __init__ ()
self . available_suboptions = ( 'suboption1' , 'suboption2' ) AutoProperty คล้ายกับคุณสมบัติ C# autogenerated โดยค่าเริ่มต้นของประเภทข้อมูลคือ str คุณสามารถจัดหาค่าเริ่มต้นหรือประเภทให้กับตัวสร้าง
Bindable เป็นมัณฑนากรที่คุณสามารถใช้กับคุณสมบัติใด ๆ เพื่อส่งคืนคุณสมบัติที่มีประโยชน์ ต้องทราบประเภทข้อมูลของคุณสมบัติที่ห่อหุ้มดังนั้นโปรดระบุประเภทการส่งคืนด้วยคำอธิบายประกอบประเภท:
 @ Bindable
@ property
def foo () -> int :
    return 1
AutoProperty ดูแลสิ่งนั้นเพื่อคุณ
เฉพาะประเภท int , bool , float และ str เท่านั้นที่ได้รับการสนับสนุนสำหรับการผูก tkinter แม้ว่าสำหรับค่า comboBox คุณสามารถกำหนด tuple Python
หากไม่พบตัวจัดการเหตุการณ์ในคลาส View มันจะถูกค้นหาใน ViewModel เช่นกัน
ใน XML คุณระบุทิศทางของการเชื่อมข้อมูลด้วยไวยากรณ์คล้ายกับของ Angular:
values="[available_suboptions]"
เป็นการเชื่อมโยงทางเดียวจากแหล่งข้อมูลเพื่อดูเป้าหมาย
textvariable="(selected_suboption)"
เป็นการเชื่อมโยงทางเดียวจากเป้าหมายมุมมองไปยังแหล่งข้อมูลและ
variable="[(choice)]"
เป็นการผูกสองทาง
คุณสามารถใช้วิดเจ็ตที่กำหนดเองที่ได้จากคลาสวิดเจ็ต tkinter สิ่งเดียวที่คุณต้องทำคือโทร
Directive . Registry . register ( YourCustomWidgetClass )ก่อนโหลดเทมเพลตที่ใช้
tkpf สนับสนุนการแบ่ง GUI ของคุณเป็นส่วนประกอบ นี่คือตัวอย่างขององค์ประกอบ ProgressBar ที่มี ViewModel ของตัวเอง:
 class ProgressbarModel ( ViewModel ):
    value = BindableProperty ( 0 )
    target = BindableProperty ( 100 )


class CustomProgressbar ( Component ):
    template = '<Progressbar name="progressbar" variable="[value]" maximum="[target]"/>'
และคุณสามารถใช้มันได้เช่นนี้:
< CustomProgressbar tkpf-model = " [progressbar_model] " /> โดยที่ progressbar_model เป็นแอตทริบิวต์หรือคุณสมบัติใน ViewModel หลักของคุณ
บน Python 3.5 คุณต้องลงทะเบียนส่วนประกอบก่อนใช้งาน บน Python 3.6+ ที่เป็นไปโดยอัตโนมัติ
Directive . Registry . register ( CustomProgressbar )มีการวางแผนว่าคุณจะสามารถเพิ่มแอ็ตทริบิวต์ที่กำหนดเองและมีประโยชน์ให้กับส่วนประกอบเช่นนี้:
 class ExampleComponent ( Component ):
    template = '<Label name="thelabel">Example component text</Label>'

    def config ( self , ** kwargs ):
        self . thelabel . config ( text = kwargs [ 'custom-text' ])
จากนั้นใช้มันเช่นนี้:
< ExampleComponent custom-text = " Custom text " />ข้อกำหนดเพียงอย่างเดียวคือชื่อแอตทริบิวต์มียัติภังค์
tkpf รองรับ Python 3.5+ เท่านั้น
นี่คืองานที่กำลังดำเนินการ ความพยายามครั้งแรกของฉันในการสร้างห้องสมุด ดูปัญหาโครงการเพื่อดูสิ่งที่ยังไม่ได้รับการสนับสนุน


