tkpf
1.0.0
tkpf 는 WPF (Wind
주요 기능은 다음과 같습니다.
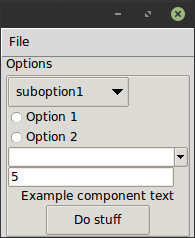
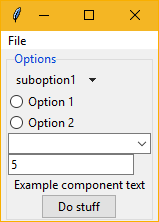
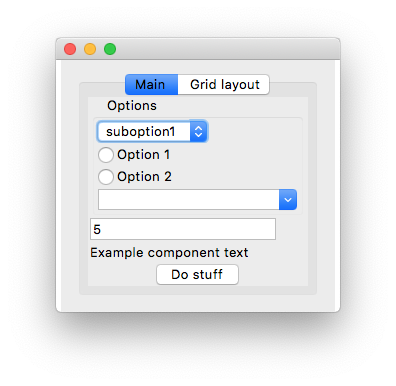
GUI를 XML 또는 YAML 형식으로 지정합니다. 다음은 간단한 예입니다. ExampleWindow.xml :
< Frame pack-anchor = " nw " pack-padx = " 5 " >
     < LabelFrame text = " Options " pack-anchor = " w " pack-fill = " x " >
        < Radiobutton pack-anchor = " w " variable = " [(choice)] " value = " option1 " >
            Option 1
        </ Radiobutton >
        < Radiobutton pack-anchor = " w " variable = " [(choice)] " value = " option2 " >
            Option 2
        </ Radiobutton >
        < Combobox pack-anchor = " w " textvariable = " (selected_suboption) " values = " [available_suboptions] "
                  name = " combobox " />
        < Button command = " do_stuff " >Do stuff</ Button >
    </ LabelFrame >
</ Frame >
보시다시피, XML 태그 이름은 Tkinter 위젯 클래스 이름에 해당하는 반면 XML은 인수의 속성에 해당합니다. tkpf 가능한 경우 항상 더 잘 보이는 ttk 테마 위젯을 사용한다는 의견이 있습니다.
pack-anchor="nw" 또는 grid-row="0" 과 같은 옵션 레이아웃을 지정하고 적절한 Tkinter 레이아웃 관리자 메소드 (이 경우 .pack(anchor='nw') 로 전달됩니다.
Yaml 형식으로 GUI를 지정하는 방법은 example/ExampleWindow.yaml 참조하십시오.
Window 에서 파생 된 클래스를 작성하여 표시하여 GUI를 표시합니다. 생성자에 뷰 모델을 공급해야합니다.
 class ExampleWindow ( Window ):
    template_path = 'ExampleWindow.xml'  # 'ExampleWindow.yaml' works too

ExampleWindow ( ExampleModel ()). show ()
이 파일의 레이아웃 XML을 인라인으로 유지하려면 다음을 수행 할 수 있습니다.
 class ExampleWindow ( Window ):
    template = '<Label>Some text</Label>'
또는
 class ExampleWindow ( Window ):
    template_yaml = '''
    Label:
      text: Some text
    '''
창 제목 설정 :
    def __init__ ( self , model ):
        super (). __init__ ( model )
        self . title = 'My application'
View 클래스에서는 이벤트 처리기를 쓸 수 있습니다. 예를 들어 해당 버튼이 작동합니다.
    def do_stuff ( self ):
        self . combobox . config ( state = 'disabled' )
또한 View 클래스의 메소드에서 이름으로 위젯에 액세스 할 수있는 방법도 보여줍니다. 그러나 원하는 경우 동적으로 액세스 할 수 있습니다.
self . named_widgets [ 'combobox' ] class ExampleModel ( ViewModel ):
choice = Bindable ( AutoProperty ( 1 ))
available_suboptions = Bindable ( AutoProperty ())
selected_suboption = Bindable ( AutoProperty ())
def __init__ ( self ):
super (). __init__ ()
self . available_suboptions = ( 'suboption1' , 'suboption2' ) AutoProperty 는 C# Autogenerated 속성과 유사합니다. 기본적으로 데이터 유형은 str 입니다. 기본값 또는 유형을 생성자에 제공 할 수 있습니다.
Bindable 바인딩 가능한 속성을 반환하기 위해 모든 속성에서 사용할 수있는 데코레이터입니다. 래핑 된 속성의 데이터 유형을 알아야하므로 유형 주석으로 리턴 유형을 지정하십시오.
 @ Bindable
@ property
def foo () -> int :
    return 1
AutoProperty 귀하를 위해이를 처리합니다.
int , bool , float 및 str 유형 만 Tkinter 바인딩을 위해 지원되지만 Combobox 값의 경우 파이썬 튜플을 할당 할 수 있습니다.
View 클래스에서 이벤트 핸들러를 찾을 수없는 경우 ViewModel에서도 조회됩니다.
XML에서는 각도와 유사한 구문으로 데이터 바인딩 방향을 지정합니다.
values="[available_suboptions]"
데이터 소스에서 대상을보기 위해 일방적 인 바인딩입니다.
textvariable="(selected_suboption)"
뷰 대상에서 데이터 소스로 일방적 인 바인딩이며
variable="[(choice)]"
양방향 바인딩입니다.
Tkinter 위젯 클래스에서 파생 된 사용자 정의 위젯을 사용할 수 있습니다. 당신이해야 할 유일한 일은 전화입니다
Directive . Registry . register ( YourCustomWidgetClass )그것을 사용하는 템플릿을로드하기 전에.
tkpf GUI를 구성 요소로 나누는 것을 지원합니다. 다음은 자체 ViewModel이있는 ProgressBar 구성 요소의 예입니다.
 class ProgressbarModel ( ViewModel ):
    value = BindableProperty ( 0 )
    target = BindableProperty ( 100 )


class CustomProgressbar ( Component ):
    template = '<Progressbar name="progressbar" variable="[value]" maximum="[target]"/>'
다음과 같이 사용할 수 있습니다.
< CustomProgressbar tkpf-model = " [progressbar_model] " /> 여기서 progressbar_model 기본 뷰 모델의 속성 또는 속성입니다.
Python 3.5에서는 구성 요소를 사용하기 전에 등록해야합니다. 파이썬 3.6+에서 자동입니다.
Directive . Registry . register ( CustomProgressbar )다음과 같이 구성 요소에 사용자 정의, 바인딩 가능한 속성을 추가 할 수있을 계획입니다.
 class ExampleComponent ( Component ):
    template = '<Label name="thelabel">Example component text</Label>'

    def config ( self , ** kwargs ):
        self . thelabel . config ( text = kwargs [ 'custom-text' ])
그런 다음 다음과 같이 사용하십시오.
< ExampleComponent custom-text = " Custom text " />유일한 요구 사항은 속성 이름에 하이픈이 포함되어 있다는 것입니다.
tkpf Python 3.5+ 만 지원합니다.
이것은 진행중인 작업입니다. 또한 도서관을 만드는 첫 번째 시도. 프로젝트 문제를보고 아직 지원되지 않은 내용을 확인하십시오.


