ex4nicegui
v0.8.6 ?
ภาษาจีนง่ายๆ | ภาษาอังกฤษ
ส่วนขยายห้องสมุดสำหรับ NiceGui ส่วนประกอบที่ตอบสนองในตัว, ใช้การเขียนโปรแกรมอินเทอร์เฟซที่ตอบสนองต่อข้อมูลได้อย่างสมบูรณ์
ดูตัวอย่างเพิ่มเติม
บทความพาดหัว - การใช้งานอย่างเป็นทางการของ Flash Sale, Python Interface Library, NiceGui ที่มีรหัสเหตุการณ์ 90% ลบออก
บัญชีอย่างเป็นทางการของ WeChat - การใช้งานอย่างเป็นทางการของ Flash Sale, Python Interface Library, NiceGui ที่มีรหัสเหตุการณ์ 90% ลบ
pip install ex4nicegui -U
เราเริ่มต้นด้วยแอปพลิเคชันเคาน์เตอร์อย่างง่ายที่ผู้ใช้สามารถเพิ่มหรือลดจำนวนลงด้วยการคลิกปุ่ม
นี่คือรหัสที่สมบูรณ์:
 from nicegui import ui
from ex4nicegui import rxui

# 数据状态代码
class Counter ( rxui . ViewModel ):
    count : int = 0

    def increment ( self ):
        self . count += 1

    def decrement ( self ):
        self . count -= 1

# 界面代码
counter = Counter ()

with ui . row ( align_items = "center" ):
    ui . button ( icon = "remove" , on_click = counter . decrement )
    rxui . label ( counter . count )
    ui . button ( icon = "add" , on_click = counter . increment )


ui . run ()
ดูรายละเอียดเพิ่มเติมตอนนี้ ex4nicegui เป็นไปตามวิธีที่ขับเคลื่อนด้วยข้อมูลเพื่อกำหนดอินเทอร์เฟซ ข้อมูลสถานะกำหนดข้อมูลทั้งหมดที่สามารถเปลี่ยนแปลงได้ในแอปพลิเคชัน
ต่อไปนี้เป็นคำจำกัดความข้อมูลสถานะ Counter :
 class Counter ( rxui . ViewModel ):
count : int = 0rxui.ViewModelcount ตัวแปรซึ่งแสดงถึงค่าปัจจุบันของตัวนับโดยมีค่าเริ่มต้นที่ 0ถัดไปกำหนดชุดของวิธีการจัดการข้อมูลในชั้นเรียน:
 def increment ( self ):
    self . count += 1

def decrement ( self ):
self . count -= 1count ได้ จากนั้นในรหัสอินเตอร์เฟสให้อินสแตนซ์วัตถุ Counter
counter = Counter () เราผูกตัวแปร count ผ่านส่วนประกอบ rxui.label ผูกวิธีการจัดการข้อมูลกับเหตุการณ์คลิกปุ่ม
 ui . button ( icon = "remove" , on_click = counter . decrement )
rxui . label ( counter . count )
ui . button ( icon = "add" , on_click = counter . increment )label ภายใต้เนมสเปซ rxui ไม่ใช่ส่วนประกอบ label ภายใต้เนมสเปซ niceguirxui.label ผูกตัวแปร counter.count และเมื่อ counter.count การเปลี่ยนแปลงการเปลี่ยนแปลงส่วนประกอบ rxui.label จะได้รับการอัปเดตโดยอัตโนมัติui.button เชื่อมโยง counter.decrement และ counter.increment และเรียกใช้วิธีการที่เกี่ยวข้องเมื่อคลิกปุ่มในโครงการที่
Counterสามารถวางรหัสที่กำหนดไว้ในโมดูลแยกต่างหากจากนั้นนำเข้าในรหัสอินเตอร์เฟส
โปรดทราบว่าเมื่อชื่อตัวแปรคลาสถูกขีดเส้นใต้สถานะข้อมูลจะไม่ได้รับการอัปเดตโดยอัตโนมัติ
 class Counter ( rxui . ViewModel ):
    count : int = 0 # 响应式数据,能自动同步界面
_count : int = 0 # 这里的下划线表示私有变量,不会自动同步界面ถัดจากตัวอย่างก่อนหน้านี้เราเพิ่มฟังก์ชั่นอื่น เมื่อค่าตัวนับน้อยกว่า 0 ตัวอักษรจะแสดงเป็นสีแดงเมื่อมากกว่า 0 มันจะแสดงเป็นสีเขียวมิฉะนั้นจะแสดงเป็นสีดำ
 # 数据状态代码
class Counter ( rxui . ViewModel ):
    count : int = 0

    def text_color ( self ):
        if self . count > 0 :
            return "green"
        elif self . count < 0 :
            return "red"
        else :
            return "black"

    def increment ( self ):
        self . count += 1

    def decrement ( self ):
        self . count -= 1

# 界面代码
counter = Counter ()

with ui . row ( align_items = "center" ):
    ui . button ( icon = "remove" , on_click = counter . decrement )
    rxui . label ( counter . count ). bind_color ( counter . text_color )
    ui . button ( icon = "add" , on_click = counter . increment )
ค่าสีถูกคำนวณตามค่าปัจจุบันของตัวนับ มันเป็นของการคำนวณทุติยภูมิ เพียงกำหนดฟังก์ชั่นอินสแตนซ์ธรรมดา
 def text_color ( self ):
    if self . count > 0 :
        return "green"
    elif self . count < 0 :
        return "red"
    else :
        return "black"
จากนั้นวิธี text_color จะถูกผูกไว้ผ่านวิธี bind_color ของส่วนประกอบ rxui.label เพื่อให้ค่าสีได้รับการปรับปรุงโดยอัตโนมัติ
rxui . label ( counter . count ). bind_color ( counter . text_color )ตอนนี้เราใช้ข้อความด้านล่างตัวนับเพื่อแสดงค่าข้อความสีของตัวนับปัจจุบัน
...
# 数据状态代码
class Counter ( rxui . ViewModel ):
    ...

# 界面代码
counter = Counter ()

with ui . row ( align_items = "center" ):
    ui . button ( icon = "remove" , on_click = counter . decrement )
    rxui . label ( counter . count ). bind_color ( counter . text_color )
    ui . button ( icon = "add" , on_click = counter . increment )

rxui . label ( lambda : f"当前计数器值为 { counter . count } , 颜色值为 { counter . text_color () } " ) ในรหัสข้างต้นมีสองสถานที่ที่ใช้วิธี counter.text_color เมื่อ counter.count เปลี่ยนไป counter.text_color จะทำการคำนวณสองครั้ง การคำนวณครั้งที่สองซ้ำซ้อน
เพื่อหลีกเลี่ยงการคำนวณที่ไม่จำเป็นเราสามารถแคช counter.text_color
 # 数据状态代码
class Counter ( rxui . ViewModel ):
    count : int = 0

    @ rxui . cached_var
    def text_color ( self ):
        if self . count > 0 :
            return "green"
        elif self . count < 0 :
            return "red"
        else :
return "black"rxui.cached_var สามารถแคชผลลัพธ์ของฟังก์ชั่นเพื่อหลีกเลี่ยงการคำนวณที่ไม่จำเป็นตัวอย่างต่อไปนี้แสดงวิธีใช้รายการ
 class AppState ( rxui . ViewModel ):
    nums = []
    # nums = [1,2,3]  如果需要初始化,必须在 __init__ 中设置

    def __init__ ( self ):
        super (). __init__ ()
        self . nums = [ 1 , 2 , 3 ]

    def append ( self ):
        new_num = max ( self . nums ) + 1
        self . nums . append ( new_num )

    def pop ( self ):
        self . nums . pop ()

    def reverse ( self ):
        self . nums . reverse ()

    def display_nums ( self ):
        return ", " . join ( map ( str , self . nums ))


# 界面代码
state = AppState ()

with ui . row ( align_items = "center" ):
    ui . button ( "append" , on_click = state . append )
    ui . button ( "pop" , on_click = state . pop )
    ui . button ( "reverse" , on_click = state . reverse )

rxui . label ( state . display_nums )
หากคุณต้องการเริ่มต้นรายการเมื่อกำหนดรายการขอแนะนำให้ตั้งค่าใน __init__
 class AppState ( rxui . ViewModel ):
    nums = []
    # nums = [1,2,3]  如果需要初始化,必须在 __init__ 中设置

    def __init__ ( self ):
        super (). __init__ ()
        self . nums = [ 1 , 2 , 3 ]

    ...
อีกวิธีหนึ่งคือใช้ rxui.list_var
 class AppState ( rxui . ViewModel ):
    # nums = []
    # nums = [1,2,3]  如果需要初始化,必须在 __init__ 中设置
    nums = rxui . list_var ( lambda : [ 1 , 2 , 3 ])

...rxui.list_var เป็นฟังก์ชันที่ส่งคืนรายการ หลังจากกำหนดรายการแล้วเราสามารถใช้ effect_refreshable.on Decorator เพื่อแสดงข้อมูลรายการในอินเทอร์เฟซ
ในตัวอย่างต่อไปนี้อินเทอร์เฟซจะแสดงไอคอนที่เลือกในกล่องแบบเลื่อนลงแบบไดนามิกแบบไดนามิก
 from ex4nicegui import rxui , effect_refreshable


class AppState ( rxui . ViewModel ):
    icons = []
    _option_icons = [ "font_download" , "warning" , "format_size" , "print" ]


state = AppState ()

# 界面代码
with ui . row ( align_items = "center" ):

    @ effect_refreshable . on ( state . icons )
    def _ ():
        for icon in state . icons :
            ui . icon ( icon , size = "2rem" )


rxui . select ( state . _option_icons , value = state . icons , multiple = True )
ในหมู่พวกเขา @effect_refreshable.on(state.icons) ระบุการพึ่งพาอย่างชัดเจน เมื่อ state.icons เปลี่ยนแปลงฟังก์ชั่น _ จะถูก execute อีกครั้ง
 @ effect_refreshable . on ( state . icons )
def _ ():
    # 这里的代码会在 state.icons 变化时重新执行
    ...
โปรดทราบว่าทุกครั้งที่คุณดำเนินการเนื้อหาภายในจะถูกล้าง นี่คือรุ่นที่ขับเคลื่อนด้วยข้อมูลของ
ui.refreshable
โดยหลักการแล้วข้อมูลที่ตรวจสอบสามารถตรวจสอบได้โดยอัตโนมัติโดยไม่ต้องระบุ. .on
 @ effect_refreshable # 没有使用 .on(state.icons)
def _ ():
    # 这里读取了 state.icons,因此会自动监控
    for icon in state . icons :
        ui . icon ( icon , size = "2rem" )
ขอแนะนำให้ระบุการพึ่งพาผ่าน
.onเสมอเพื่อหลีกเลี่ยงการรีเฟรชที่ไม่คาดคิด
ViewModel ใช้วัตถุพร็อกซีเพื่อสร้างข้อมูลที่ตอบสนอง เมื่อจำเป็นต้องบันทึกข้อมูลคุณสามารถใช้ rxui.ViewModel.to_value เพื่อแปลงเป็นข้อมูลปกติ
ในตัวอย่างต่อไปนี้การคลิกปุ่มจะแสดงพจนานุกรมข้อมูลสถานะของ MY_APP
 from nicegui import ui
from ex4nicegui import rxui


class MyApp ( rxui . ViewModel ):
    a = 0
    sign = "+"
    b = 0

    def show_data ( self ):
        # >> {"a": 0, "sign": '+, "b": 0}
        return rxui . ViewModel . to_value ( self )

    def show_a ( self ):
        # >> 0
        return rxui . ViewModel . to_value ( self . a )

my_app = MyApp ()

rxui . number ( value = my_app . a , min = 0 , max = 10 )
rxui . radio ([ "+" , "-" , "*" , "/" ], value = my_app . sign )
rxui . number ( value = my_app . b , min = 0 , max = 10 )

ui . button ( "show data" , on_click = lambda : ui . notify ( my_app . show_data ()))
เมื่อรวมกับ rxui.ViewModel.on_refs_changed ข้อมูลสามารถบันทึกไปยังพื้นที่ท้องถิ่นโดยอัตโนมัติเมื่อข้อมูลเปลี่ยนไป
 from nicegui import ui
from ex4nicegui import rxui
from pathlib import Path
import json


class MyApp ( rxui . ViewModel ):
    a = 0
    sign = "+"
    b = 0

    _json_path = Path ( __file__ ). parent / "data.json"

    def __init__ ( self ):
        super (). __init__ ()

        @ rxui . ViewModel . on_refs_changed ( self )
        def _ ():
            # a, sign, b 任意一个值变化时,自动保存到本地
            self . _json_path . write_text ( json . dumps ( self . show_data ()))

    def show_data ( self ):
        return rxui . ViewModel . to_value ( self )
...to_refdeep_refeffectref_computedasync_computedonnew_scopebi.data_source ใน v0.7.0 คลาส ViewModel ได้รับการแนะนำเพื่อจัดการชุดข้อมูลตอบสนอง
นี่คือตัวอย่างเครื่องคิดเลขง่าย ๆ :
 from ex4nicegui import rxui

class Calculator ( rxui . ViewModel ):
    num1 = 0
    sign = "+"
    num2 = 0

    @ rxui . cached_var
    def result ( self ):
        # 当 num1,sign,num2 任意一个值发生变化时,result 也会重新计算
        return eval ( f" { self . num1 } { self . sign } { self . num2 } " )

# 每个对象拥有独立的数据
calc = Calculator ()

with ui . row ( align_items = "center" ):
    rxui . number ( value = calc . num1 , label = "Number 1" )
    rxui . select ( value = calc . sign , options = [ "+" , "-" , "*" , "/" ], label = "Sign" )
    rxui . number ( value = calc . num2 , label = "Number 2" )
    ui . label ( "=" )
    rxui . label ( calc . result ). bind_color (
        lambda : "red" if calc . result () < 0 else "black"
) ในตัวอย่างต่อไปนี้แต่ละคนใช้การ์ดเพื่อแสดง ด้านบนแสดงอายุเฉลี่ยของทุกคน เมื่อแต่ละคนมีอายุมากกว่าอายุเฉลี่ยเส้นขอบด้านนอกของการ์ดจะเปลี่ยนเป็นสีแดง เปลี่ยนอายุผ่านส่วนประกอบ number และทุกอย่างจะได้รับการอัปเดตโดยอัตโนมัติ
 from typing import List
from ex4nicegui import rxui
from itertools import count
from nicegui import ui

id_generator = count ()

class Person ( rxui . ViewModel ):
    name = ""
    age = 0

    def __init__ ( self , name : str , age : int ):
        super (). __init__ ()
        self . name = name
        self . age = age
        self . id = next ( id_generator )


class Home ( rxui . ViewModel ):
    persons : List [ Person ] = []
    deleted_person_index = 0

    @ rxui . cached_var
    def avg_age ( self ) -> float :
        if len ( self . persons ) == 0 :
            return 0

        return round ( sum ( p . age for p in self . persons ) / len ( self . persons ), 2 )

    def avg_name_length ( self ):
        if len ( self . persons ) == 0 :
            return 0

        return round ( sum ( len ( p . name ) for p in self . persons ) / len ( self . persons ), 2 )

    def delete_person ( self ):
        if self . deleted_person_index < len ( self . persons ):
            del self . persons [ int ( self . deleted_person_index )]

    def sample_data ( self ):
        self . persons = [
            Person ( "alice" , 25 ),
            Person ( "bob" , 30 ),
            Person ( "charlie" , 31 ),
            Person ( "dave" , 22 ),
            Person ( "eve" , 26 ),
            Person ( "frank" , 29 ),
        ]


home = Home ()
home . sample_data ()

rxui . label ( lambda : f"平均年龄: { home . avg_age () } " )
rxui . label ( lambda : f"平均名字长度: { home . avg_name_length () } " )

rxui . number (
    value = home . deleted_person_index , min = 0 , max = lambda : len ( home . persons ) - 1 , step = 1
)
ui . button ( "删除" , on_click = home . delete_person )

with ui . row ():

    @ rxui . vfor ( home . persons , key = "id" )
    def _ ( store : rxui . VforStore [ Person ]):
        person = store . get_item ()
        with rxui . card (). classes ( "outline" ). bind_classes (
            {
                "outline-red-500" : lambda : person . age > home . avg_age (),
            }
        ):
            rxui . input ( value = person . name , placeholder = "名字" )
            rxui . number ( value = person . age , min = 1 , max = 100 , step = 1 , placeholder = "年龄" )

ui . run ()
หากคุณคิดว่ารหัส rxui.vfor นั้นซับซ้อนเกินไปคุณสามารถใช้งาน effect_refreshable Dorjisonator แทน
 from ex4nicegui import rxui , Ref , effect_refreshable
...

# 明确指定监控 home.persons 变化,可以避免意外刷新
@ effect_refreshable . on ( home . persons )
def _ ():

    for person in home . persons . value :
        ...
        rxui . number ( value = person . age , min = 1 , max = 100 , step = 1 , placeholder = "年龄" )
...
ควรสังเกตว่าเมื่อใดก็ตามที่ home.persons List มีการเปลี่ยนแปลง (เช่นการเพิ่มหรือลบองค์ประกอบ) ฟังก์ชั่นที่ตกแต่งโดย effect_refreshable จะถูก executeed อีกครั้ง หมายถึงองค์ประกอบทั้งหมดจะถูกสร้างขึ้นใหม่
สำหรับแอปพลิเคชันที่ซับซ้อนมากขึ้นคุณสามารถดูตัวอย่างได้
 from ex4nicegui import (
    to_ref ,
    ref_computed ,
    on ,
    effect ,
    effect_refreshable ,
    batch ,
    event_batch ,
    deep_ref ,
    async_computed
)
ใช้กันทั่วไป to_ref , deep_ref , effect , ref_computed , on , async_computed
to_ref กำหนดวัตถุที่ตอบสนองอ่านและเขียนผ่าน .value
 a = to_ref ( 1 )
b = to_ref ( "text" )

a . value = 2
b . value = 'new text'

print ( a . value )
เมื่อค่าเป็นวัตถุที่ซับซ้อนวัตถุที่ซ้อนกันจะไม่ตอบสนองโดยค่าเริ่มต้น
 a = to_ref ([ 1 , 2 ])

@ effect
def _ ():
    print ( 'len:' , len ( a . value ))

# 不会触发 effect
a . value . append ( 10 )

# 整个替换则会触发
a . value = [ 1 , 2 , 10 ]
เมื่อพารามิเตอร์ is_deep ถูกตั้งค่าเป็น True สามารถรับความสามารถในการตอบสนองที่ลึก
 a = to_ref ([ 1 , 2 ], is_deep = True )

@ effect
def _ ():
    print ( 'len:' , len ( a . value ))

# print 3
a . value . append ( 10 )
deep_refเทียบเท่ากับto_refเมื่อis_deepถูกตั้งค่าเป็นTrue
deep_ref เทียบเท่ากับ to_ref เมื่อ is_deep ถูกตั้งค่าเป็น True
มีประโยชน์อย่างยิ่งเมื่อแหล่งข้อมูลเป็นรายการพจนานุกรมหรือคลาสที่กำหนดเอง วัตถุที่ได้รับจาก .value เป็นวัตถุพร็อกซี
 data = [ 1 , 2 , 3 ]
data_ref = deep_ref ( data )

assert data_ref . value is not data
วัตถุต้นฉบับสามารถรับได้ผ่าน to_raw
 from ex4nicegui import to_raw , deep_ref

data = [ 1 , 2 , 3 ]
data_ref = deep_ref ( data )

assert data_ref . value is not data
assert to_raw ( data_ref . value ) is data effectยอมรับฟังก์ชั่นและตรวจสอบการเปลี่ยนแปลงในวัตถุที่ตอบสนองโดยอัตโนมัติที่ใช้ในฟังก์ชั่นดังนั้นจึงดำเนินการฟังก์ชั่นโดยอัตโนมัติ
 a = to_ref ( 1 )
b = to_ref ( "text" )


@ effect
def auto_run_when_ref_value ():
    print ( f"a: { a . value } " )


def change_value ():
    a . value = 2
    b . value = "new text"


ui . button ( "change" , on_click = change_value )
ครั้งแรกที่มีการดำเนินการเอฟเฟกต์ฟังก์ชั่น auto_run_when_ref_value จะถูกดำเนินการหนึ่งครั้ง หลังจากนั้นให้คลิกปุ่มและเปลี่ยนค่าของ a (ผ่าน a.value ) และฟังก์ชัน auto_run_when_ref_value จะถูกดำเนินการอีกครั้ง
อย่ากระจายตรรกะการประมวลผลข้อมูลจำนวนมากใน
onๆ หรือeffectส่วนใหญ่ของonหรือeffectควรเป็นตรรกะการทำงานของอินเทอร์เฟซแทนที่จะเป็นตรรกะการประมวลผลข้อมูลที่ตอบสนองได้
ref_computed ด้วยฟังก์ชั่นเดียวกับ effect ref_computed ยังสามารถส่งคืนผลลัพธ์จากฟังก์ชั่น โดยทั่วไปใช้ในการคำนวณกำลังสองจาก to_ref
 a = to_ref ( 1 )
a_square = ref_computed ( lambda : a . value * 2 )


@ effect
def effect1 ():
    print ( f"a_square: { a_square . value } " )


def change_value ():
    a . value = 2


ui . button ( "change" , on_click = change_value )
หลังจากคลิกปุ่มแล้วค่า a.value จะถูกแก้ไขซึ่งทำให้เกิดการคำนวณใหม่ a_square เนื่องจากค่าของ a_square ถูกอ่านใน effect1 การดำเนินการ effect1 จะถูกเรียกใช้
ref_computedเป็นการอ่านอย่างเดียวto_ref
เริ่มต้นจาก v0.7.0 ไม่แนะนำให้ใช้วิธีอินสแตนซ์แอปพลิเคชัน ref_computed คุณสามารถใช้ rxui.ViewModel และใช้ rxui.cached_var decorator
 class MyState ( rxui . ViewModel ):
    def __init__ ( self ) -> None :
        self . r_text = to_ref ( "" )

    @ rxui . cached_var
    def post_text ( self ):
        return self . r_text . value + "post"

state = MyState ()

rxui . input ( value = state . r_text )
rxui . label ( state . post_text )
async_computed เมื่อใช้ฟังก์ชั่นอะซิงโครนัสในการคำนวณทุติยภูมิให้ใช้ async_computed
 # 模拟长时间执行的异步函数
async def long_time_query ( input : str ):
    await asyncio . sleep ( 2 )
    num = random . randint ( 20 , 100 )
    return f"query result[ { input = } ]: { num = } "


search = to_ref ( "" )
evaluating = to_ref ( False )

@ async_computed ( search , evaluating = evaluating , init = "" )
async def search_result ():
    return await long_time_query ( search . value )

rxui . lazy_input ( value = search )

rxui . label (
    lambda : "查询中" if evaluating . value else "上方输入框输入内容并回车搜索"
)
rxui . label ( search_result )async_computed จะต้องระบุข้อมูลการตอบสนองที่ต้องตรวจสอบอย่างชัดเจน ใช้รายการเพื่อระบุข้อมูลที่ตอบกลับหลายข้อมูลในเวลาเดียวกันevaluating พารามิเตอร์เป็นข้อมูลตอบสนองของประเภทบูล เมื่อฟังก์ชั่นอะซิงโครนัสถูกดำเนินการค่าของตัวแปรนี้จะเป็น True และเป็น False หลังจากการคำนวณเสร็จสมบูรณ์init ระบุผลลัพธ์เริ่มต้น on คล้ายกับ effect แต่ on ต้องระบุวัตถุที่ตอบสนองการตรวจสอบ
 a1 = to_ref ( 1 )
a2 = to_ref ( 10 )
b = to_ref ( "text" )


@ on ( a1 )
def watch_a1_only ():
    print ( f"watch_a1_only ... a1: { a1 . value } ,a2: { a2 . value } " )


@ on ([ a1 , b ], onchanges = True )
def watch_a1_and_b ():
    print ( f"watch_a1_and_b ... a1: { a1 . value } ,a2: { a2 . value } ,b: { b . value } " )


def change_a1 ():
    a1 . value += 1
    ui . notify ( "change_a1" )


ui . button ( "change a1" , on_click = change_a1 )


def change_a2 ():
    a2 . value += 1
    ui . notify ( "change_a2" )


ui . button ( "change a2" , on_click = change_a2 )


def change_b ():
    b . value += "x"
    ui . notify ( "change_b" )


ui . button ( "change b" , on_click = change_b )onchanges เป็นจริง (ค่าเริ่มต้นเป็นเท็จ) ฟังก์ชั่นที่ระบุจะไม่ถูกเรียกใช้ระหว่างการเชื่อมโยงอย่ากระจายตรรกะการประมวลผลข้อมูลจำนวนมากใน
onๆ หรือeffectส่วนใหญ่ของonหรือeffectควรเป็นตรรกะการทำงานของอินเทอร์เฟซแทนที่จะเป็นตรรกะการประมวลผลข้อมูลที่ตอบสนองได้
new_scope โดยค่าเริ่มต้นฟังก์ชั่นการตรวจจับทั้งหมดจะถูกทำลายโดยอัตโนมัติเมื่อการเชื่อมต่อไคลเอนต์ถูกตัดการเชื่อมต่อ หากจำเป็นต้องมีการควบคุมที่ละเอียดมากขึ้นคุณสามารถใช้ new_scope
 from nicegui import ui
from ex4nicegui import rxui , to_ref , effect , new_scope

a = to_ref ( 0.0 )

scope1 = new_scope ()

@ scope1 . run
def _ ():
    @ effect
    def _ ():
        print ( f"scope 1: { a . value } " )


rxui . number ( value = a )
rxui . button ( "dispose scope 1" , on_click = scope1 . dispose )สร้างการเชื่อมโยงสองทางบนองค์ประกอบอินพุตแบบฟอร์มหรือส่วนประกอบ
ref ประเภทค่าง่าย ๆ รองรับการเชื่อมโยงสองทางโดยค่าเริ่มต้น
 from ex4nicegui import rxui , to_ref , deep_ref

data = to_ref ( "init" )

rxui . label ( lambda : f" { data . value = } " )
# 默认就是双向绑定
rxui . input ( value = data )str , int เมื่อใช้โครงสร้างข้อมูลที่ซับซ้อน deep_ref จะใช้เพื่อรักษาการตอบสนองของค่าซ้อนกัน
 data = deep_ref ({ "a" : 1 , "b" : [ 1 , 2 , 3 , 4 ]})

rxui . label ( lambda : f" { data . value = !s } " )

# 当前版本没有任何绑定效果.或许未来的版本可以解决
rxui . input ( value = data . value [ "a" ])

# 只读绑定.其他途径修改了 `data.value["a"]` ,此输入框会同步,但反过来不行
rxui . input ( value = lambda : data . value [ "a" ])

# 要使用 vmodel 才能双向绑定
rxui . input ( value = rxui . vmodel ( data , "a" ))

# 也可以直接使用,但不推荐
rxui . input ( value = rxui . vmodel ( data . value [ 'a' ]))rxui.input(value=1)rxui.vmodel สามารถบรรลุการผูกสองทางหากคุณใช้
rxui.ViewModelคุณอาจไม่จำเป็นต้องใช้vmodel
คุณสามารถอ้างถึงกรณีรายการสิ่งที่ต้องทำ
แสดงรายการรายการตามข้อมูลที่ตอบสนองรายการ แต่ละองค์ประกอบได้รับการปรับปรุงตามความต้องการ รายการข้อมูลสนับสนุนพจนานุกรมหรือวัตถุทุกประเภท
เริ่มจาก v0.7.0 ขอแนะนำให้ใช้กับ rxui.ViewModel ซึ่งแตกต่างจากการใช้ effect_refreshable Decorator, vfor ไม่ได้สร้างองค์ประกอบทั้งหมดใหม่ แต่อัปเดตองค์ประกอบที่มีอยู่
ด้านล่างเป็นตัวอย่างของการเรียงลำดับการ์ดการ์ดจะถูกจัดเรียงตามอายุเสมอ เมื่อคุณแก้ไขข้อมูลอายุในการ์ดการ์ดจะปรับการสั่งซื้อแบบเรียลไทม์ อย่างไรก็ตามโฟกัสเคอร์เซอร์ไม่ได้ออกจากกล่องอินพุต
 from typing import List
from nicegui import ui
from ex4nicegui import rxui , deep_ref as ref , Ref


class Person ( rxui . ViewModel ):
    def __init__ ( self , name : str , age : int ) -> None :
        self . name = name
        self . age = ref ( age )


class MyApp ( rxui . ViewModel ):
    persons : Ref [ List [ Person ]] = rxui . var ( lambda : [])
    order = rxui . var ( "asc" )

    def sort_by_age ( self ):
        return sorted (
            self . persons . value ,
            key = lambda p : p . age . value ,
            reverse = self . order . value == "desc" ,
        )

    @ staticmethod
    def create ():
        persons = [
            Person ( name = "Alice" , age = 25 ),
            Person ( name = "Bob" , age = 30 ),
            Person ( name = "Charlie" , age = 20 ),
            Person ( name = "Dave" , age = 35 ),
            Person ( name = "Eve" , age = 28 ),
        ]
        app = MyApp ()
        app . persons . value = persons
        return app


# ui
app = MyApp . create ()

with rxui . tabs ( app . order ):
    rxui . tab ( "asc" , "Ascending" )
    rxui . tab ( "desc" , "Descending" )


@ rxui . vfor ( app . sort_by_age , key = "name" )
def each_person ( s : rxui . VforStore [ Person ]):
    person = s . get_item ()

    with ui . card (), ui . row ( align_items = "center" ):
        rxui . label ( person . name )
        rxui . number ( value = person . age , step = 1 , min = 0 , max = 100 )
rxui.vfor decorator to custom functionapp.sort_by_agekey พารามิเตอร์ที่สอง: เพื่อติดตามตัวตนของแต่ละโหนดดังนั้นการใช้ซ้ำและจัดลำดับองค์ประกอบที่มีอยู่ใหม่คุณสามารถจัดเตรียมคีย์ที่ไม่ซ้ำกันสำหรับบล็อกที่สอดคล้องกันของแต่ละองค์ประกอบ รายการดัชนีองค์ประกอบถูกใช้โดยค่าเริ่มต้น ในตัวอย่างชื่อของทุกคนถือว่าไม่ซ้ำกันstore.get_item เนื่องจากบุคคลนั้นสืบทอดมาจาก rxui.ViewModel คุณสมบัติต่าง ๆ ของมันสามารถผูกพันโดยตรงกับส่วนประกอบ คลาสคอมโพเนนต์ทั้งหมดให้ bind_classes สำหรับ class การเชื่อมโยงสนับสนุนโครงสร้างข้อมูลที่แตกต่างกันสามแบบ
ผูกพจนานุกรม
 bg_color = to_ref ( False )
has_error = to_ref ( False )

rxui . label ( "test" ). bind_classes ({ "bg-blue" : bg_color , "text-red" : has_error })

rxui . switch ( "bg_color" , value = bg_color )
rxui . switch ( "has_error" , value = has_error )
ค่าคีย์พจนานุกรมคือชื่อคลาสและค่าที่สอดคล้องกันเป็นตัวแปรตอบสนองด้วยบูล เมื่อค่าตอบสนองเป็น True ชื่อคลาสจะถูกนำไปใช้กับคลาสส่วนประกอบ
ผูกตัวแปรที่ตอบสนองด้วยค่าส่งคืนเป็นพจนานุกรม
 bg_color = to_ref ( False )
has_error = to_ref ( False )

class_obj = ref_computed (
    lambda : { "bg-blue" : bg_color . value , "text-red" : has_error . value }
)

rxui . switch ( "bg_color" , value = bg_color )
rxui . switch ( "has_error" , value = has_error )
rxui . label ( "bind to ref_computed" ). bind_classes ( class_obj )
# or direct function passing
rxui . label ( "bind to ref_computed" ). bind_classes (
    lambda : { "bg-blue" : bg_color . value , "text-red" : has_error . value }
)
ตัวแปรตอบสนองที่ถูกผูกไว้กับรายการหรือสตริงเดียว
 bg_color = to_ref ( "red" )
bg_color_class = ref_computed ( lambda : f"bg- { bg_color . value } " )

text_color = to_ref ( "green" )
text_color_class = ref_computed ( lambda : f"text- { text_color . value } " )

rxui . select ([ "red" , "green" , "yellow" ], label = "bg color" , value = bg_color )
rxui . select ([ "red" , "green" , "yellow" ], label = "text color" , value = text_color )

rxui . label ( "binding to arrays" ). bind_classes ([ bg_color_class , text_color_class ])
rxui . label ( "binding to single string" ). bind_classes ( bg_color_class ) from nicegui import ui
from ex4nicegui . reactive import rxui
from ex4nicegui . utils . signals import to_ref
bg_color = to_ref ( "blue" )
text_color = to_ref ( "red" )
rxui . label ( "test" ). bind_style (
{
"background-color" : bg_color ,
"color" : text_color ,
}
)
rxui . select ([ "blue" , "green" , "yellow" ], label = "bg color" , value = bg_color )
rxui . select ([ "red" , "green" , "yellow" ], label = "text color" , value = text_color ) bind_style ส่งผ่านไปยังพจนานุกรม key คือชื่อสไตล์ value คือค่าสไตล์และสตริงตอบสนอง
ผูกแอตทริบิวต์เดียว
 label = to_ref ( "hello" )

rxui . button ( "" ). bind_prop ( "label" , label )
# 允许使用函数
rxui . button ( "" ). bind_prop (
    "label" , lambda : f" { label . value } world"
)

rxui . input ( value = label )ใช้ echarts เพื่อสร้างแผนภูมิ
 from nicegui import ui
from ex4nicegui import ref_computed , effect , to_ref
from ex4nicegui . reactive import rxui

r_input = to_ref ( "" )

# ref_computed 创建只读响应式变量
# 函数中使用任意其他响应式变量,会自动关联
@ ref_computed
def cp_echarts_opts ():
    return {
        "title" : { "text" : r_input . value }, #字典中使用任意响应式变量,通过 .value 获取值
        "xAxis" : {
            "type" : "category" ,
            "data" : [ "Mon" , "Tue" , "Wed" , "Thu" , "Fri" , "Sat" , "Sun" ],
        },
        "yAxis" : { "type" : "value" },
        "series" : [
            {
                "data" : [ 120 , 200 , 150 , 80 , 70 , 110 , 130 ],
                "type" : "bar" ,
                "showBackground" : True ,
                "backgroundStyle" : { "color" : "rgba(180, 180, 180, 0.2)" },
            }
        ],
    }

input = rxui . input ( "输入内容,图表标题会同步" , value = r_input )
# 通过响应式组件对象的 element 属性,获取原生 nicegui 组件对象
input . element . classes ( "w-full" )

rxui . echarts ( cp_echarts_opts )

ui . run ()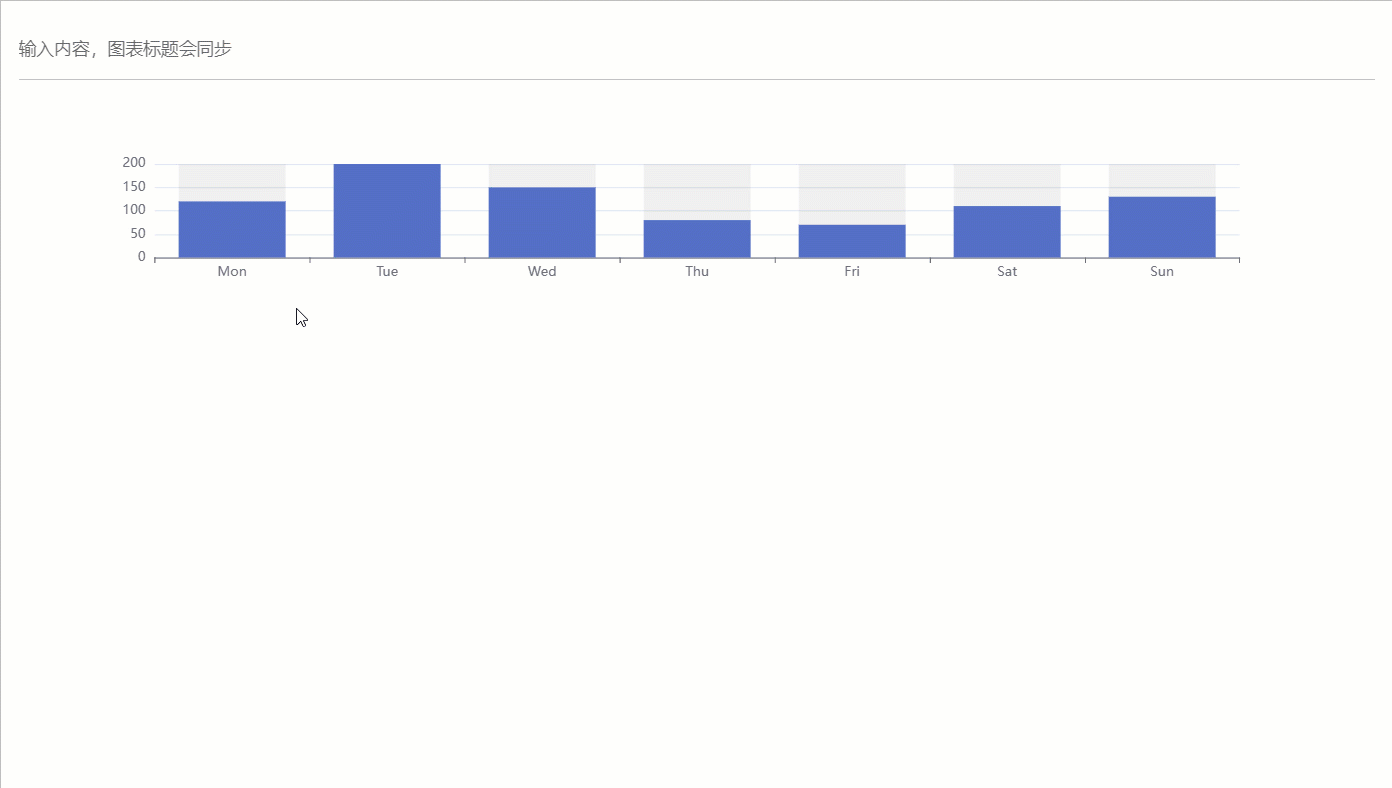
ใช้พารามิเตอร์ on FUNCTION event_name และ query เพื่อดูเอกสาร Events Events เอกสารภาษาจีน
ตัวอย่างต่อไปนี้เชื่อมโยงเหตุการณ์การคลิกเมาส์
 from nicegui import ui
from ex4nicegui . reactive import rxui

opts = {
    "xAxis" : { "type" : "value" , "boundaryGap" : [ 0 , 0.01 ]},
    "yAxis" : {
        "type" : "category" ,
        "data" : [ "Brazil" , "Indonesia" , "USA" , "India" , "China" , "World" ],
    },
    "series" : [
        {
            "name" : "first" ,
            "type" : "bar" ,
            "data" : [ 18203 , 23489 , 29034 , 104970 , 131744 , 630230 ],
        },
        {
            "name" : "second" ,
            "type" : "bar" ,
            "data" : [ 19325 , 23438 , 31000 , 121594 , 134141 , 681807 ],
        },
    ],
}

bar = rxui . echarts ( opts )

def on_click ( e : rxui . echarts . EChartsMouseEventArguments ):
    ui . notify ( f"on_click: { e . seriesName } : { e . name } : { e . value } " )


bar . on ( "click" , on_click )
ตัวอย่างต่อไปนี้ทริกเกอร์เหตุการณ์การปัดเมาส์เฉพาะสำหรับซีรีส์ที่ระบุ
 from nicegui import ui
from ex4nicegui . reactive import rxui

opts = {
    "xAxis" : { "type" : "value" , "boundaryGap" : [ 0 , 0.01 ]},
    "yAxis" : {
        "type" : "category" ,
        "data" : [ "Brazil" , "Indonesia" , "USA" , "India" , "China" , "World" ],
    },
    "series" : [
        {
            "name" : "first" ,
            "type" : "bar" ,
            "data" : [ 18203 , 23489 , 29034 , 104970 , 131744 , 630230 ],
        },
        {
            "name" : "second" ,
            "type" : "bar" ,
            "data" : [ 19325 , 23438 , 31000 , 121594 , 134141 , 681807 ],
        },
    ],
}

bar = rxui . echarts ( opts )

def on_first_series_mouseover ( e : rxui . echarts . EChartsMouseEventArguments ):
    ui . notify ( f"on_first_series_mouseover: { e . seriesName } : { e . name } : { e . value } " )


bar . on ( "mouseover" , on_first_series_mouseover , query = { "seriesName" : "first" })

ui . run ()สร้าง echart จากรหัส JavaScript
 from pathlib import Path

rxui . echarts . from_javascript ( Path ( "code.js" ))
# or
rxui . echarts . from_javascript (
    """
(myChart) => {

    option = {
        xAxis: {
            type: 'category',
            data: ['Mon', 'Tue', 'Wed', 'Thu', 'Fri', 'Sat', 'Sun']
        },
        yAxis: {
            type: 'value'
        },
        series: [
            {
                data: [120, 200, 150, 80, 70, 110, 130],
                type: 'bar'
            }
        ]
    };

    myChart.setOption(option);
}
"""
)setOption ในฟังก์ชั่น ฟังก์ชั่นนี้ยังมีพารามิเตอร์ที่สองซึ่งเป็นวัตถุ Global echarts คุณสามารถลงทะเบียนแผนที่ผ่าน echarts.registerMap
 rxui . echarts . from_javascript (
"""
(chart,echarts) =>{

    fetch('https://geo.datav.aliyun.com/areas_v3/bound/100000_full.json')
    .then(response => response.json())
    .then(data => {
            echarts.registerMap('test_map', data);

            chart.setOption({
                geo: {
                    map: 'test_map',
                    roam: true,
                },
                tooltip: {},
                legend: {},
                series: [],
            });
    });
}
"""
)ลงทะเบียนแผนที่
 rxui . echarts . register_map (
    "china" , "https://geo.datav.aliyun.com/areas_v3/bound/100000_full.json"
)

rxui . echarts (
    {
        "geo" : {
            "map" : "china" ,
            "roam" : True ,
        },
        "tooltip" : {},
        "legend" : {},
        "series" : [],
    }
)map_name เป็นชื่อแผนที่ที่กำหนดเอง โปรดทราบว่า map จะต้องลงทะเบียนในการกำหนดค่าแผนภูมิsrc เป็นลิงค์เครือข่ายข้อมูลแผนที่ที่ถูกต้อง หากเป็นข้อมูล SVG คุณต้องตั้งค่าพารามิเตอร์ type="svg"
rxui . echarts . register_map ( "svg-rect" , "/test/svg" , type = "svg" )นอกจากนี้คุณยังสามารถจัดเตรียมวัตถุพา ธ ไฟล์ JSON (พา ธ ) ของข้อมูลแผนที่ได้โดยตรง
 from pathlib import Path

rxui . echarts . register_map (
    "china" , Path ( "map-data.json" )
) เมื่อเทียบกับ nicegui.ui.tab_panels , rxui.tab_panels ไม่มี tabs พารามิเตอร์ ภายใต้กลไกการตอบสนองของข้อมูลการเชื่อมโยงระหว่าง tabs และ tab_panels ต้องการ value พารามิเตอร์เท่านั้น
 from nicegui import ui
from ex4nicegui import rxui , to_ref

names = [ "Tab 1" , "Tab 2" , "Tab 3" ]
current_tab = to_ref ( names [ 0 ])

with rxui . tabs ( current_tab ):
    for name in names :
        rxui . tab ( name )

with rxui . tab_panels ( current_tab ):
    for name in names :
        with rxui . tab_panel ( name ):
            ui . label ( f"Content of { name } " )
นี่เป็นเพราะภายใต้กลไกการตอบสนองข้อมูลการเชื่อมโยงส่วนประกอบทำได้ผ่านชั้นข้อมูลระดับกลาง ( to_ref ) ดังนั้น tab_panels สามารถเชื่อมโยงกับส่วนประกอบอื่น ๆ (เพียงให้แน่ใจว่าใช้วัตถุ ref เดียวกัน)
 names = [ "Tab 1" , "Tab 2" , "Tab 3" ]
current_tab = to_ref ( names [ 0 ])


with rxui . tab_panels ( current_tab ):
    for name in names :
        with rxui . tab_panel ( name ):
            ui . label ( f"Content of { name } " )

# tabs 不必在 panels 前面
with rxui . tabs ( current_tab ):
    for name in names :
        rxui . tab ( name )

rxui . select ( names , value = current_tab )
rxui . radio ( names , value = current_tab ). props ( "inline" )

rxui . label ( lambda : f"当前 tab 为: { current_tab . value } " )ในโหมดการโหลดขี้เกียจแท็บที่เปิดใช้งานในปัจจุบันเท่านั้นที่จะแสดงผล
 from ex4nicegui import to_ref , rxui , on , deep_ref

current_tab = to_ref ( "t1" )

with rxui . tabs ( current_tab ):
    ui . tab ( "t1" )
    ui . tab ( "t2" )

with rxui . lazy_tab_panels ( current_tab ) as panels :

    @ panels . add_tab_panel ( "t1" )
    def _ ():
        # 通过 `panels.get_panel` 获取当前激活的 panel 组件
        panels . get_panel ( "t1" ). classes ( "bg-green" )
        ui . notify ( "Hello from t1" )
        ui . label ( "This is t1" )

    @ panels . add_tab_panel ( "t2" )
    def _ ():
        panels . get_panel ( "t2" ). style ( "background-color : red" )
        ui . notify ( "Hello from t2" )
        ui . label ( "This is t2" )
หลังจากโหลดหน้าเว็บ "Hello from T1" จะปรากฏขึ้นทันที เมื่อเปลี่ยนไปใช้แท็บ "T2" "Hello from T2" จะปรากฏขึ้น
วิธี scoped_style ช่วยให้คุณสร้างสไตล์ที่ จำกัด เฉพาะส่วนประกอบ
 # 所有子元素都会有红色轮廓,但排除自身
with rxui . row (). scoped_style ( "*" , "outline: 1px solid red;" ) as row :
    ui . label ( "Hello" )
    ui . label ( "World" )


# 所有子元素都会有红色轮廓,包括自身
with rxui . row (). scoped_style ( ":self *" , "outline: 1px solid red;" ) as row :
    ui . label ( "Hello" )
    ui . label ( "World" )

# 当鼠标悬停在 row 组件时,所有子元素都会有红色轮廓,但排除自身
with rxui . row (). scoped_style ( ":hover *" , "outline: 1px solid red;" ) as row :
    ui . label ( "Hello" )
    ui . label ( "World" )

# 当鼠标悬停在 row 组件时,所有子元素都会有红色轮廓,包括自身
with rxui . row (). scoped_style ( ":self:hover *" , "outline: 1px solid red;" ) as row :
    ui . label ( "Hello" )
ui . label ( "World" )สร้างรายงานภาพข้อมูลแบบโต้ตอบด้วย API ที่มีความคล่องตัวที่สุด
 from nicegui import ui
import pandas as pd
import numpy as np
from ex4nicegui import bi
from ex4nicegui . reactive import rxui
from ex4nicegui import effect , effect_refreshable
from pyecharts . charts import Bar


# data ready
def gen_data ():
    np . random . seed ( 265 )
    field1 = [ "a1" , "a2" , "a3" , "a4" ]
    field2 = [ f"name { i } " for i in range ( 1 , 11 )]
    df = (
        pd . MultiIndex . from_product ([ field1 , field2 ], names = [ "cat" , "name" ])
        . to_frame ()
        . reset_index ( drop = True )
    )
    df [[ "idc1" , "idc2" ]] = np . random . randint ( 50 , 1000 , size = ( len ( df ), 2 ))
    return df


df = gen_data ()

# 创建数据源
ds = bi . data_source ( df )

# ui
ui . query ( ".nicegui-content" ). classes ( "items-stretch no-wrap" )

with ui . row (). classes ( "justify-evenly" ):
    # 基于数据源 `ds` 创建界面组件
    ds . ui_select ( "cat" ). classes ( "min-w-[10rem]" )
    ds . ui_select ( "name" ). classes ( "min-w-[10rem]" )


with ui . grid ( columns = 2 ):
    # 使用字典配置图表
    @ ds . ui_echarts
    def bar1 ( data : pd . DataFrame ):
        data = data . groupby ( "name" ). agg ({ "idc1" : "sum" , "idc2" : "sum" }). reset_index ()

        return {
            "xAxis" : { "type" : "value" },
            "yAxis" : {
                "type" : "category" ,
                "data" : data [ "name" ]. tolist (),
                "inverse" : True ,
            },
            "legend" : { "textStyle" : { "color" : "gray" }},
            "series" : [
                { "type" : "bar" , "name" : "idc1" , "data" : data [ "idc1" ]. tolist ()},
                { "type" : "bar" , "name" : "idc2" , "data" : data [ "idc2" ]. tolist ()},
            ],
        }

    bar1 . classes ( "h-[20rem]" )

    # 使用pyecharts配置图表
    @ ds . ui_echarts
    def bar2 ( data : pd . DataFrame ):
        data = data . groupby ( "name" ). agg ({ "idc1" : "sum" , "idc2" : "sum" }). reset_index ()

        return (
            Bar ()
            . add_xaxis ( data [ "name" ]. tolist ())
            . add_yaxis ( "idc1" , data [ "idc1" ]. tolist ())
            . add_yaxis ( "idc2" , data [ "idc2" ]. tolist ())
        )

    bar2 . classes ( "h-[20rem]" )

    # 绑定点击事件,即可实现跳转
    @ bar2 . on_chart_click
    def _ ( e : rxui . echarts . EChartsMouseEventArguments ):
        ui . open ( f"/details/ { e . name } " , new_tab = True )


# 利用响应式机制,你可以随意组合原生 nicegui 组件
label_a1_total = ui . label ( "" )


# 当 ds 有变化,都会触发此函数
@ effect
def _ ():
    # filtered_data 为过滤后的 DataFrame
    df = ds . filtered_data
    total = df [ df [ "cat" ] == "a1" ][ "idc1" ]. sum ()
    label_a1_total . text = f"idc1 total(cat==a1): { total } "


# 你也可以使用 `effect_refreshable`,但需要注意函数中的组件每次都被重建
@ effect_refreshable
def _ ():
    df = ds . filtered_data
    total = df [ df [ "cat" ] == "a2" ][ "idc1" ]. sum ()
    ui . label ( f"idc1 total(cat==a2): { total } " )


# 当点击图表系列时,跳转的页面
@ ui . page ( "/details/{name}" )
def details_page ( name : str ):
    ui . label ( "This table data will not change" )
    ui . aggrid . from_pandas ( ds . data . query ( f'name==" { name } "' ))

    ui . label ( "This table will change when the homepage data changes. " )

    @ bi . data_source
    def new_ds ():
        return ds . filtered_data [[ "name" , "idc1" , "idc2" ]]

    new_ds . ui_aggrid ()


ui . run ()bi.data_sourceแหล่งข้อมูลเป็นแนวคิดหลักของโมดูล BI และการเชื่อมโยงของข้อมูลทั้งหมดขึ้นอยู่กับสิ่งนี้ ในเวอร์ชันปัจจุบัน (0.4.3) มีสองวิธีในการสร้างแหล่งข้อมูล
DataFrame ที่ได้รับ pandas :
 from nicegui import ui
from ex4nicegui import bi
import pandas as pd

df = pd . DataFrame (
    {
        "name" : list ( "aabcdf" ),
        "cls" : [ "c1" , "c2" , "c1" , "c1" , "c3" , None ],
        "value" : range ( 6 ),
    }
)

ds =  bi . data_source ( df )
บางครั้งเราต้องการสร้างแหล่งข้อมูลใหม่ตามแหล่งข้อมูลอื่นและในเวลานี้เราสามารถใช้งานตกแต่งเพื่อสร้างแหล่งข้อมูลลิงก์:
 df = pd . DataFrame (
    {
        "name" : list ( "aabcdf" ),
        "cls" : [ "c1" , "c2" , "c1" , "c1" , "c3" , None ],
        "value" : range ( 6 ),
    }
)

ds =  bi . data_source ( df )

@ bi . data_source
def new_ds ():
    # df is pd.DataFrame
    df = ds . filtered_data
    df = df . copy ()
    df [ 'value' ] = df [ 'value' ] * 100
    return df

ds . ui_select ( 'name' )
new_ds . ui_aggrid ()
โปรดทราบว่าเนื่องจาก ds.filtered_data ถูกใช้ใน new_ds การเปลี่ยนแปลงของ ds จะกระตุ้นการเปลี่ยนแปลงการเชื่อมโยงของ new_ds ส่งผลให้เกิดการเปลี่ยนแปลงในส่วนประกอบของตารางที่สร้างโดย new_ds
ลบสถานะตัวกรองทั้งหมดผ่านวิธี ds.remove_filters :
 ds = bi . data_source ( df )

def on_remove_filters ():
    ds . remove_filters ()

ui . button ( "remove all filters" , on_click = on_remove_filters )

ds . ui_select ( "name" )
ds . ui_aggrid ()
รีเซ็ตแหล่งข้อมูลผ่านวิธี ds.reload :
 df = pd . DataFrame (
    {
        "name" : list ( "aabcdf" ),
        "cls" : [ "c1" , "c2" , "c1" , "c1" , "c3" , None ],
        "value" : range ( 6 ),
    }
)

new_df = pd . DataFrame (
    {
        "name" : list ( "xxyyds" ),
        "cls" : [ "cla1" , "cla2" , "cla3" , "cla3" , "cla3" , None ],
        "value" : range ( 100 , 106 ),
    }
)

ds = bi . data_source ( df )

def on_remove_filters ():
    ds . reload ( new_df )

ui . button ( "reload data" , on_click = on_remove_filters )

ds . ui_select ( "name" )
ds . ui_aggrid () from nicegui import ui
from ex4nicegui import bi
import pandas as pd
df = pd . DataFrame (
{
"name" : list ( "aabcdf" ),
"cls" : [ "c1" , "c2" , "c1" , "c1" , "c3" , None ],
"value" : range ( 6 ),
}
)
ds = bi . data_source ( df )
ds . ui_select ( "name" )คอลัมน์พารามิเตอร์แรกระบุชื่อคอลัมน์ของแหล่งข้อมูล
ตั้งค่าลำดับตัวเลือกโดยพารามิเตอร์ sort_options :
ds . ui_select ( "name" , sort_options = { "value" : "desc" , "name" : "asc" }) พารามิเตอร์ exclude_null_value ตั้งค่าว่าจะยกเว้นค่า null:
 df = pd . DataFrame (
    {
        "cls" : [ "c1" , "c2" , "c1" , "c1" , "c3" , None ],
    }
)

ds = bi . data_source ( df )
ds . ui_select ( "cls" , exclude_null_value = True )
คุณสามารถตั้งค่าพารามิเตอร์ขององค์ประกอบ NiceGui SELECT ดั้งเดิมผ่านพารามิเตอร์คำหลัก
ตั้งค่าเริ่มต้นผ่านแอตทริบิวต์ค่า:
 ds . ui_select ( "cls" , value = [ 'c1' , 'c2' ])
ds . ui_select ( "cls" , multiple = False , value = 'c1' )
เมื่อการเลือกหลายรายการ (พารามิเตอร์ multiple เป็นจริงโดยค่าเริ่มต้น) ต้องระบุ value เป็นรายการ
เมื่อเลือก value ตั้งค่าเป็นรายการที่ไม่ใช่รายการ
แผ่น
 from nicegui import ui
from ex4nicegui import bi
import pandas as pd

data = pd . DataFrame ({ "name" : [ "f" , "a" , "c" , "b" ], "age" : [ 1 , 2 , 3 , 1 ]})
ds = bi . data_source ( data )

ds . ui_table (
    columns = [
        { "label" : "new colA" , "field" : "colA" , "sortable" : True },
    ]
)ui.table field คีย์-ค่าสอดคล้องกับชื่อคอลัมน์ของแหล่งข้อมูล หากไม่มีอยู่การกำหนดค่าจะไม่มีผล from nicegui import ui
from ex4nicegui import bi
import pandas as pd
data = pd . DataFrame (
{
"colA" : list ( "abcde" ),
"colB" : [ f"n { idx } " for idx in range ( 5 )],
"colC" : list ( range ( 5 )),
}
)
df = pd . DataFrame ( data )
source = bi . data_source ( df )
source . ui_aggrid (
options = {
"columnDefs" : [
{ "headerName" : "xx" , "field" : "no exists" },
{ "headerName" : "new colA" , "field" : "colA" },
{
"field" : "colC" ,
"cellClassRules" : {
"bg-red-300" : "x < 3" ,
"bg-green-300" : "x >= 3" ,
},
},
],
"rowData" : [{ "colX" : [ 1 , 2 , 3 , 4 , 5 ]}],
}
)ui.aggrid field ค่าคีย์ใน columnDefs สอดคล้องกับชื่อคอลัมน์ของแหล่งข้อมูล หากไม่มีอยู่การกำหนดค่าจะไม่มีผลrowData จะไม่มีผล เนื่องจากแหล่งข้อมูลของตารางถูกควบคุมโดยแหล่งข้อมูลเสมอ โมดูล toolbox มีฟังก์ชั่นเครื่องมือที่ใช้กันทั่วไป
from ex4nicegui import toolbox เปลี่ยนโหมดมืด
 from ex4nicegui import rxui , toolbox as tb
from nicegui import ui


dark = tb . use_dark ( False )

rxui . label ( lambda : f"暗模式: { dark . value } " )
rxui . button (
    icon = lambda : "sunny" if dark . value else "dark_mode" ,
    color = lambda : "red" if dark . value else "blue" ,
    on_click = dark . toggle ,
). props ( "flat round" )จุดพักที่ตอบสนอง
 from ex4nicegui import rxui , toolbox as tb
from nicegui import ui


options = { "手机" : 0 , "平板" : 640 , "笔记本" : 1024 , "桌面" : 1280 }
bp = tb . use_breakpoints ( options )
active = bp . active
is_between = bp . between ( "手机" , "笔记本" )

with ui . card ():
    rxui . label ( lambda : f"当前断点: { active . value } " )
    rxui . label ( lambda : f"是否在手机-笔记本(不含)之间: { is_between . value } " ). bind_classes (
        { "text-red-500" : is_between }
    )

    rxui . label ( lambda : f'手机(0px - 640px): { active . value == "手机" } ' ). bind_classes (
        { "bg-red-300" : lambda : active . value == "手机" }
    )
    rxui . label ( lambda : f'平板(640px - 1024px): { active . value == "平板" } ' ). bind_classes (
        { "bg-red-300" : lambda : active . value == "平板" }
    )
    rxui . label (
        lambda : f'笔记本(1024px - 1280px): { active . value == "笔记本" } '
    ). bind_classes ({ "bg-red-300" : lambda : active . value == "笔记本" })
    rxui . label ( lambda : f'桌面(1280px+): { active . value == "桌面" } ' ). bind_classes (
        { "bg-red-300" : lambda : active . value == "桌面" }
    )
สร้างรหัส QR
 from ex4nicegui import rxui , to_ref , toolbox as tb
from nicegui import ui


text = to_ref ( "ex4nicegui" )
qr_code = tb . use_qr_code ( text )

rxui . input ( value = text )
rxui . image ( qr_code . code ). classes ( "w-20 h-20" ). props ( "no-transition" )

