ex4nicegui
v0.8.6 ?
Simplified Chinese | English
Extension library for nicegui. Built-in responsive components to fully implement data responsive interface programming.
See more examples
Headline article - official implementation of flash sale, python interface library, nicegui with 90% event code removed
WeChat official account - official implementation of flash sale, python interface library, nicegui with 90% event code removed
pip install ex4nicegui -U
We start with a simple counter application where users can increase or decrease the count by clicking a button.
Here is the complete code:
 from nicegui import ui
from ex4nicegui import rxui

# 数据状态代码
class Counter ( rxui . ViewModel ):
    count : int = 0

    def increment ( self ):
        self . count += 1

    def decrement ( self ):
        self . count -= 1

# 界面代码
counter = Counter ()

with ui . row ( align_items = "center" ):
    ui . button ( icon = "remove" , on_click = counter . decrement )
    rxui . label ( counter . count )
    ui . button ( icon = "add" , on_click = counter . increment )


ui . run ()
See more details now. ex4nicegui follows the data-driven method to define the interface. Status data defines all data that can be changed in the application.
The following is Counter status data definition:
 class Counter ( rxui . ViewModel ):
count : int = 0rxui.ViewModelcount , which represents the current value of the counter, with an initial value of 0.Next, define a series of methods for manipulating data in the class:
 def increment ( self ):
    self . count += 1

def decrement ( self ):
self . count -= 1count variable Then, in the interface code, instantiate Counter object.
counter = Counter () We bind the count variable through the rxui.label component. Bind the method of manipulating data to the button click event.
 ui . button ( icon = "remove" , on_click = counter . decrement )
rxui . label ( counter . count )
ui . button ( icon = "add" , on_click = counter . increment )label component under the rxui namespace, not label component under the nicegui namespace.rxui.label component binds the counter.count variable, and when counter.count changes, rxui.label component is automatically updated.ui.button component binds counter.decrement and counter.increment methods, and calls the corresponding method when clicking the button.In complex projects,
Counter-defined code can be placed in separate modules and then imported in interface code.
Note that when the class variable name is underlined, the data status will not be automatically updated.
 class Counter ( rxui . ViewModel ):
    count : int = 0 # 响应式数据,能自动同步界面
_count : int = 0 # 这里的下划线表示私有变量,不会自动同步界面Next to the previous example, we add another function. When the counter value is less than 0, the font is displayed in red, when it is greater than 0, it is displayed in green, otherwise it is displayed in black.
 # 数据状态代码
class Counter ( rxui . ViewModel ):
    count : int = 0

    def text_color ( self ):
        if self . count > 0 :
            return "green"
        elif self . count < 0 :
            return "red"
        else :
            return "black"

    def increment ( self ):
        self . count += 1

    def decrement ( self ):
        self . count -= 1

# 界面代码
counter = Counter ()

with ui . row ( align_items = "center" ):
    ui . button ( icon = "remove" , on_click = counter . decrement )
    rxui . label ( counter . count ). bind_color ( counter . text_color )
    ui . button ( icon = "add" , on_click = counter . increment )
The color value is calculated based on the current value of the counter. It belongs to a secondary calculation. Just define ordinary instance functions.
 def text_color ( self ):
    if self . count > 0 :
        return "green"
    elif self . count < 0 :
        return "red"
    else :
        return "black"
Then, text_color method is bound through the bind_color method of the rxui.label component, so that the color value is automatically updated.
rxui . label ( counter . count ). bind_color ( counter . text_color )Now, we use text below the counter to display the color text value of the current counter.
...
# 数据状态代码
class Counter ( rxui . ViewModel ):
    ...

# 界面代码
counter = Counter ()

with ui . row ( align_items = "center" ):
    ui . button ( icon = "remove" , on_click = counter . decrement )
    rxui . label ( counter . count ). bind_color ( counter . text_color )
    ui . button ( icon = "add" , on_click = counter . increment )

rxui . label ( lambda : f"当前计数器值为 { counter . count } , 颜色值为 { counter . text_color () } " ) In the above code, there are two places that use the counter.text_color method. When counter.count changes, counter.text_color performs two calculations. The second calculation is redundant.
To avoid unnecessary calculations, we can cache counter.text_color .
 # 数据状态代码
class Counter ( rxui . ViewModel ):
    count : int = 0

    @ rxui . cached_var
    def text_color ( self ):
        if self . count > 0 :
            return "green"
        elif self . count < 0 :
            return "red"
        else :
return "black"rxui.cached_var decorator can cache the function results to avoid unnecessary calculations.The following example shows how to use the list.
 class AppState ( rxui . ViewModel ):
    nums = []
    # nums = [1,2,3]  如果需要初始化,必须在 __init__ 中设置

    def __init__ ( self ):
        super (). __init__ ()
        self . nums = [ 1 , 2 , 3 ]

    def append ( self ):
        new_num = max ( self . nums ) + 1
        self . nums . append ( new_num )

    def pop ( self ):
        self . nums . pop ()

    def reverse ( self ):
        self . nums . reverse ()

    def display_nums ( self ):
        return ", " . join ( map ( str , self . nums ))


# 界面代码
state = AppState ()

with ui . row ( align_items = "center" ):
    ui . button ( "append" , on_click = state . append )
    ui . button ( "pop" , on_click = state . pop )
    ui . button ( "reverse" , on_click = state . reverse )

rxui . label ( state . display_nums )
If you need to initialize the list when defining the list, it is recommended to set it in __init__ .
 class AppState ( rxui . ViewModel ):
    nums = []
    # nums = [1,2,3]  如果需要初始化,必须在 __init__ 中设置

    def __init__ ( self ):
        super (). __init__ ()
        self . nums = [ 1 , 2 , 3 ]

    ...
Another way is to use rxui.list_var
 class AppState ( rxui . ViewModel ):
    # nums = []
    # nums = [1,2,3]  如果需要初始化,必须在 __init__ 中设置
    nums = rxui . list_var ( lambda : [ 1 , 2 , 3 ])

    ...
rxui.list_var parameter is a function that returns a list After defining the list, we can use the effect_refreshable.on decorator to display the list data in the interface.
In the following example, the interface will dynamically display the icons selected in the drop-down box.
 from ex4nicegui import rxui , effect_refreshable


class AppState ( rxui . ViewModel ):
    icons = []
    _option_icons = [ "font_download" , "warning" , "format_size" , "print" ]


state = AppState ()

# 界面代码
with ui . row ( align_items = "center" ):

    @ effect_refreshable . on ( state . icons )
    def _ ():
        for icon in state . icons :
            ui . icon ( icon , size = "2rem" )


rxui . select ( state . _option_icons , value = state . icons , multiple = True )
Among them, @effect_refreshable.on(state.icons) explicitly specifies the dependency. When state.icons changes, the _ function is re-execute.
 @ effect_refreshable . on ( state . icons )
def _ ():
    # 这里的代码会在 state.icons 变化时重新执行
    ...
Note that every time you execute, the content inside will be cleared. This is the data-driven version of
ui.refreshable
In principle, the data monitored can be automatically monitored without specifying .on .
 @ effect_refreshable # 没有使用 .on(state.icons)
def _ ():
    # 这里读取了 state.icons,因此会自动监控
    for icon in state . icons :
        ui . icon ( icon , size = "2rem" )
It is recommended to always specify dependencies through
.onto avoid unexpected refreshes
ViewModel uses proxy objects to create responsive data. When it is necessary to save data, you can use rxui.ViewModel.to_value to convert it into normal data.
In the following example, clicking the button will display the status data dictionary of my_app.
 from nicegui import ui
from ex4nicegui import rxui


class MyApp ( rxui . ViewModel ):
    a = 0
    sign = "+"
    b = 0

    def show_data ( self ):
        # >> {"a": 0, "sign": '+, "b": 0}
        return rxui . ViewModel . to_value ( self )

    def show_a ( self ):
        # >> 0
        return rxui . ViewModel . to_value ( self . a )

my_app = MyApp ()

rxui . number ( value = my_app . a , min = 0 , max = 10 )
rxui . radio ([ "+" , "-" , "*" , "/" ], value = my_app . sign )
rxui . number ( value = my_app . b , min = 0 , max = 10 )

ui . button ( "show data" , on_click = lambda : ui . notify ( my_app . show_data ()))
Combined with rxui.ViewModel.on_refs_changed , data can be automatically saved to the local area when the data changes.
 from nicegui import ui
from ex4nicegui import rxui
from pathlib import Path
import json


class MyApp ( rxui . ViewModel ):
    a = 0
    sign = "+"
    b = 0

    _json_path = Path ( __file__ ). parent / "data.json"

    def __init__ ( self ):
        super (). __init__ ()

        @ rxui . ViewModel . on_refs_changed ( self )
        def _ ():
            # a, sign, b 任意一个值变化时,自动保存到本地
            self . _json_path . write_text ( json . dumps ( self . show_data ()))

    def show_data ( self ):
        return rxui . ViewModel . to_value ( self )
...to_refdeep_refeffectref_computedasync_computedonnew_scopebi.data_source In v0.7.0 , ViewModel class was introduced to manage a set of responsive data.
Here is a simple calculator example:
 from ex4nicegui import rxui

class Calculator ( rxui . ViewModel ):
    num1 = 0
    sign = "+"
    num2 = 0

    @ rxui . cached_var
    def result ( self ):
        # 当 num1,sign,num2 任意一个值发生变化时,result 也会重新计算
        return eval ( f" { self . num1 } { self . sign } { self . num2 } " )

# 每个对象拥有独立的数据
calc = Calculator ()

with ui . row ( align_items = "center" ):
    rxui . number ( value = calc . num1 , label = "Number 1" )
    rxui . select ( value = calc . sign , options = [ "+" , "-" , "*" , "/" ], label = "Sign" )
    rxui . number ( value = calc . num2 , label = "Number 2" )
    ui . label ( "=" )
    rxui . label ( calc . result ). bind_color (
        lambda : "red" if calc . result () < 0 else "black"
) In the following example, each person uses a card to display. The top shows the average age of all people. When the individual is older than the average age, the outer border of the card will turn red. Change the age through number component and everything will be automatically updated.
 from typing import List
from ex4nicegui import rxui
from itertools import count
from nicegui import ui

id_generator = count ()

class Person ( rxui . ViewModel ):
    name = ""
    age = 0

    def __init__ ( self , name : str , age : int ):
        super (). __init__ ()
        self . name = name
        self . age = age
        self . id = next ( id_generator )


class Home ( rxui . ViewModel ):
    persons : List [ Person ] = []
    deleted_person_index = 0

    @ rxui . cached_var
    def avg_age ( self ) -> float :
        if len ( self . persons ) == 0 :
            return 0

        return round ( sum ( p . age for p in self . persons ) / len ( self . persons ), 2 )

    def avg_name_length ( self ):
        if len ( self . persons ) == 0 :
            return 0

        return round ( sum ( len ( p . name ) for p in self . persons ) / len ( self . persons ), 2 )

    def delete_person ( self ):
        if self . deleted_person_index < len ( self . persons ):
            del self . persons [ int ( self . deleted_person_index )]

    def sample_data ( self ):
        self . persons = [
            Person ( "alice" , 25 ),
            Person ( "bob" , 30 ),
            Person ( "charlie" , 31 ),
            Person ( "dave" , 22 ),
            Person ( "eve" , 26 ),
            Person ( "frank" , 29 ),
        ]


home = Home ()
home . sample_data ()

rxui . label ( lambda : f"平均年龄: { home . avg_age () } " )
rxui . label ( lambda : f"平均名字长度: { home . avg_name_length () } " )

rxui . number (
    value = home . deleted_person_index , min = 0 , max = lambda : len ( home . persons ) - 1 , step = 1
)
ui . button ( "删除" , on_click = home . delete_person )

with ui . row ():

    @ rxui . vfor ( home . persons , key = "id" )
    def _ ( store : rxui . VforStore [ Person ]):
        person = store . get_item ()
        with rxui . card (). classes ( "outline" ). bind_classes (
            {
                "outline-red-500" : lambda : person . age > home . avg_age (),
            }
        ):
            rxui . input ( value = person . name , placeholder = "名字" )
            rxui . number ( value = person . age , min = 1 , max = 100 , step = 1 , placeholder = "年龄" )

ui . run ()
If you think the rxui.vfor code is too complicated, you can use effect_refreshable decorator instead.
 from ex4nicegui import rxui , Ref , effect_refreshable
...

# 明确指定监控 home.persons 变化,可以避免意外刷新
@ effect_refreshable . on ( home . persons )
def _ ():

    for person in home . persons . value :
        ...
        rxui . number ( value = person . age , min = 1 , max = 100 , step = 1 , placeholder = "年龄" )
...
It should be noted that whenever home.persons list changes (such as adding or deleting elements), the function decorated by effect_refreshable will be re-executeed. Meaning all elements will be recreated.
For more complex applications, you can view examples
 from ex4nicegui import (
    to_ref ,
    ref_computed ,
    on ,
    effect ,
    effect_refreshable ,
    batch ,
    event_batch ,
    deep_ref ,
    async_computed
)
Commonly used to_ref , deep_ref , effect , ref_computed , on , async_computed
to_ref Define responsive objects, read and write through .value
 a = to_ref ( 1 )
b = to_ref ( "text" )

a . value = 2
b . value = 'new text'

print ( a . value )
When the value is a complex object, the nested object will not be responsive by default.
 a = to_ref ([ 1 , 2 ])

@ effect
def _ ():
    print ( 'len:' , len ( a . value ))

# 不会触发 effect
a . value . append ( 10 )

# 整个替换则会触发
a . value = [ 1 , 2 , 10 ]
When the parameter is_deep is set to True , deep response capability can be obtained.
 a = to_ref ([ 1 , 2 ], is_deep = True )

@ effect
def _ ():
    print ( 'len:' , len ( a . value ))

# print 3
a . value . append ( 10 )
deep_refis equivalent toto_refwhenis_deepis set toTrue
deep_ref Equivalent to to_ref when is_deep is set to True .
Especially useful when the data source is a list, dictionary, or a custom class. Objects obtained through .value are proxy objects
 data = [ 1 , 2 , 3 ]
data_ref = deep_ref ( data )

assert data_ref . value is not data
The original object can be obtained through to_raw
 from ex4nicegui import to_raw , deep_ref

data = [ 1 , 2 , 3 ]
data_ref = deep_ref ( data )

assert data_ref . value is not data
assert to_raw ( data_ref . value ) is data effectAccept a function and automatically monitor the changes in responsive object used in the function, thereby automatically executing the function
 a = to_ref ( 1 )
b = to_ref ( "text" )


@ effect
def auto_run_when_ref_value ():
    print ( f"a: { a . value } " )


def change_value ():
    a . value = 2
    b . value = "new text"


ui . button ( "change" , on_click = change_value )
The first time the effect is executed, the function auto_run_when_ref_value will be executed once. After that, click the button and change the value of a (through a.value ), and the function auto_run_when_ref_value will be executed again.
Do not disperse a large amount of data processing logic in multiple
onoreffect. Most ofonoreffectshould be interface operation logic, rather than responsive data processing logic.
ref_computed With the same function as effect , ref_computed can also return the result from the function. Generally used to perform quadratic calculations from to_ref
 a = to_ref ( 1 )
a_square = ref_computed ( lambda : a . value * 2 )


@ effect
def effect1 ():
    print ( f"a_square: { a_square . value } " )


def change_value ():
    a . value = 2


ui . button ( "change" , on_click = change_value )
After clicking the button, the a.value value is modified, which triggers a_square recalculation. Since the value of a_square is read in effect1 , effect1 execution is triggered.
ref_computedis read-onlyto_ref
Starting from v0.7.0 , it is not recommended to use ref_computed application instance method. You can use rxui.ViewModel and use rxui.cached_var decorator
 class MyState ( rxui . ViewModel ):
    def __init__ ( self ) -> None :
        self . r_text = to_ref ( "" )

    @ rxui . cached_var
    def post_text ( self ):
        return self . r_text . value + "post"

state = MyState ()

rxui . input ( value = state . r_text )
rxui . label ( state . post_text )
async_computed When using asynchronous functions in secondary calculations, use async_computed
 # 模拟长时间执行的异步函数
async def long_time_query ( input : str ):
    await asyncio . sleep ( 2 )
    num = random . randint ( 20 , 100 )
    return f"query result[ { input = } ]: { num = } "


search = to_ref ( "" )
evaluating = to_ref ( False )

@ async_computed ( search , evaluating = evaluating , init = "" )
async def search_result ():
    return await long_time_query ( search . value )

rxui . lazy_input ( value = search )

rxui . label (
    lambda : "查询中" if evaluating . value else "上方输入框输入内容并回车搜索"
)
rxui . label ( search_result )async_computed must explicitly specify the responsive data that needs to be monitored. Use lists to specify multiple responsive data at the same time.evaluating is responsive data of bool type. When the asynchronous function is executed, the value of this variable is True , and it is False after the calculation is completed.init specifies the initial result on Similar to effect , but on needs to specify the monitoring responsive object
 a1 = to_ref ( 1 )
a2 = to_ref ( 10 )
b = to_ref ( "text" )


@ on ( a1 )
def watch_a1_only ():
    print ( f"watch_a1_only ... a1: { a1 . value } ,a2: { a2 . value } " )


@ on ([ a1 , b ], onchanges = True )
def watch_a1_and_b ():
    print ( f"watch_a1_and_b ... a1: { a1 . value } ,a2: { a2 . value } ,b: { b . value } " )


def change_a1 ():
    a1 . value += 1
    ui . notify ( "change_a1" )


ui . button ( "change a1" , on_click = change_a1 )


def change_a2 ():
    a2 . value += 1
    ui . notify ( "change_a2" )


ui . button ( "change a2" , on_click = change_a2 )


def change_b ():
    b . value += "x"
    ui . notify ( "change_b" )


ui . button ( "change b" , on_click = change_b )onchanges is True (the default value is False), the specified function will not be executed during binding.Do not disperse a large amount of data processing logic in multiple
onoreffect. Most ofonoreffectshould be interface operation logic, rather than responsive data processing logic.
new_scope By default, all detection functions are automatically destroyed when the client connection is disconnected. If more fine-grained control is required, you can use new_scope
 from nicegui import ui
from ex4nicegui import rxui , to_ref , effect , new_scope

a = to_ref ( 0.0 )

scope1 = new_scope ()

@ scope1 . run
def _ ():
    @ effect
    def _ ():
        print ( f"scope 1: { a . value } " )


rxui . number ( value = a )
rxui . button ( "dispose scope 1" , on_click = scope1 . dispose )Create a two-way binding on a form input element or component.
ref of simple value types support two-way binding by default
 from ex4nicegui import rxui , to_ref , deep_ref

data = to_ref ( "init" )

rxui . label ( lambda : f" { data . value = } " )
# 默认就是双向绑定
rxui . input ( value = data )str , int When using complex data structures, deep_ref is used to maintain the responsiveness of nested values
 data = deep_ref ({ "a" : 1 , "b" : [ 1 , 2 , 3 , 4 ]})

rxui . label ( lambda : f" { data . value = !s } " )

# 当前版本没有任何绑定效果.或许未来的版本可以解决
rxui . input ( value = data . value [ "a" ])

# 只读绑定.其他途径修改了 `data.value["a"]` ,此输入框会同步,但反过来不行
rxui . input ( value = lambda : data . value [ "a" ])

# 要使用 vmodel 才能双向绑定
rxui . input ( value = rxui . vmodel ( data , "a" ))

# 也可以直接使用,但不推荐
rxui . input ( value = rxui . vmodel ( data . value [ 'a' ]))rxui.input(value=1)rxui.vmodel , can achieve two-way bindingIf you use
rxui.ViewModel, you probably don't need to usevmodel
You can refer to the todo list case
Render list components based on list responsive data. Each component is updated on demand. Data items support dictionaries or objects of any type.
Starting from v0.7.0 , it is recommended to use it with rxui.ViewModel . Unlike using effect_refreshable decorator, vfor does not recreate all elements, but updates existing elements.
Below is an example of card sorting, cards are always sorted by age. When you modify the age data in a card, the cards will adjust the order in real time. However, the cursor focus does not leave the input box.
 from typing import List
from nicegui import ui
from ex4nicegui import rxui , deep_ref as ref , Ref


class Person ( rxui . ViewModel ):
    def __init__ ( self , name : str , age : int ) -> None :
        self . name = name
        self . age = ref ( age )


class MyApp ( rxui . ViewModel ):
    persons : Ref [ List [ Person ]] = rxui . var ( lambda : [])
    order = rxui . var ( "asc" )

    def sort_by_age ( self ):
        return sorted (
            self . persons . value ,
            key = lambda p : p . age . value ,
            reverse = self . order . value == "desc" ,
        )

    @ staticmethod
    def create ():
        persons = [
            Person ( name = "Alice" , age = 25 ),
            Person ( name = "Bob" , age = 30 ),
            Person ( name = "Charlie" , age = 20 ),
            Person ( name = "Dave" , age = 35 ),
            Person ( name = "Eve" , age = 28 ),
        ]
        app = MyApp ()
        app . persons . value = persons
        return app


# ui
app = MyApp . create ()

with rxui . tabs ( app . order ):
    rxui . tab ( "asc" , "Ascending" )
    rxui . tab ( "desc" , "Descending" )


@ rxui . vfor ( app . sort_by_age , key = "name" )
def each_person ( s : rxui . VforStore [ Person ]):
    person = s . get_item ()

    with ui . card (), ui . row ( align_items = "center" ):
        rxui . label ( person . name )
        rxui . number ( value = person . age , step = 1 , min = 0 , max = 100 )
rxui.vfor decorator to custom functionapp.sort_by_agekey : In order to track the identity of each node, thereby reusing and reordering existing elements, you can provide a unique key for the corresponding block of each element. List element index is used by default. In the example, everyone's name is assumed to be unique.store.get_item . Since Person itself inherits from rxui.ViewModel , its various properties can be directly bound to the component. All component classes provide bind_classes for binding class , supporting three different data structures.
Bind Dictionary
 bg_color = to_ref ( False )
has_error = to_ref ( False )

rxui . label ( "test" ). bind_classes ({ "bg-blue" : bg_color , "text-red" : has_error })

rxui . switch ( "bg_color" , value = bg_color )
rxui . switch ( "has_error" , value = has_error )
The dictionary key value is the class name and the corresponding value is a responsive variable with bool. When the responsive value is True , the class name is applied to the component class
Bind responsive variables with return value as dictionary
 bg_color = to_ref ( False )
has_error = to_ref ( False )

class_obj = ref_computed (
    lambda : { "bg-blue" : bg_color . value , "text-red" : has_error . value }
)

rxui . switch ( "bg_color" , value = bg_color )
rxui . switch ( "has_error" , value = has_error )
rxui . label ( "bind to ref_computed" ). bind_classes ( class_obj )
# or direct function passing
rxui . label ( "bind to ref_computed" ). bind_classes (
    lambda : { "bg-blue" : bg_color . value , "text-red" : has_error . value }
)
Responsive variables bound to list or single string
 bg_color = to_ref ( "red" )
bg_color_class = ref_computed ( lambda : f"bg- { bg_color . value } " )

text_color = to_ref ( "green" )
text_color_class = ref_computed ( lambda : f"text- { text_color . value } " )

rxui . select ([ "red" , "green" , "yellow" ], label = "bg color" , value = bg_color )
rxui . select ([ "red" , "green" , "yellow" ], label = "text color" , value = text_color )

rxui . label ( "binding to arrays" ). bind_classes ([ bg_color_class , text_color_class ])
rxui . label ( "binding to single string" ). bind_classes ( bg_color_class ) from nicegui import ui
from ex4nicegui . reactive import rxui
from ex4nicegui . utils . signals import to_ref
bg_color = to_ref ( "blue" )
text_color = to_ref ( "red" )
rxui . label ( "test" ). bind_style (
{
"background-color" : bg_color ,
"color" : text_color ,
}
)
rxui . select ([ "blue" , "green" , "yellow" ], label = "bg color" , value = bg_color )
rxui . select ([ "red" , "green" , "yellow" ], label = "text color" , value = text_color ) bind_style passed into the dictionary, key is the style name, value is the style value, and responsive string
Bind a single attribute
 label = to_ref ( "hello" )

rxui . button ( "" ). bind_prop ( "label" , label )
# 允许使用函数
rxui . button ( "" ). bind_prop (
    "label" , lambda : f" { label . value } world"
)

rxui . input ( value = label )Use echarts to create charts
 from nicegui import ui
from ex4nicegui import ref_computed , effect , to_ref
from ex4nicegui . reactive import rxui

r_input = to_ref ( "" )

# ref_computed 创建只读响应式变量
# 函数中使用任意其他响应式变量,会自动关联
@ ref_computed
def cp_echarts_opts ():
    return {
        "title" : { "text" : r_input . value }, #字典中使用任意响应式变量,通过 .value 获取值
        "xAxis" : {
            "type" : "category" ,
            "data" : [ "Mon" , "Tue" , "Wed" , "Thu" , "Fri" , "Sat" , "Sun" ],
        },
        "yAxis" : { "type" : "value" },
        "series" : [
            {
                "data" : [ 120 , 200 , 150 , 80 , 70 , 110 , 130 ],
                "type" : "bar" ,
                "showBackground" : True ,
                "backgroundStyle" : { "color" : "rgba(180, 180, 180, 0.2)" },
            }
        ],
    }

input = rxui . input ( "输入内容,图表标题会同步" , value = r_input )
# 通过响应式组件对象的 element 属性,获取原生 nicegui 组件对象
input . element . classes ( "w-full" )

rxui . echarts ( cp_echarts_opts )

ui . run ()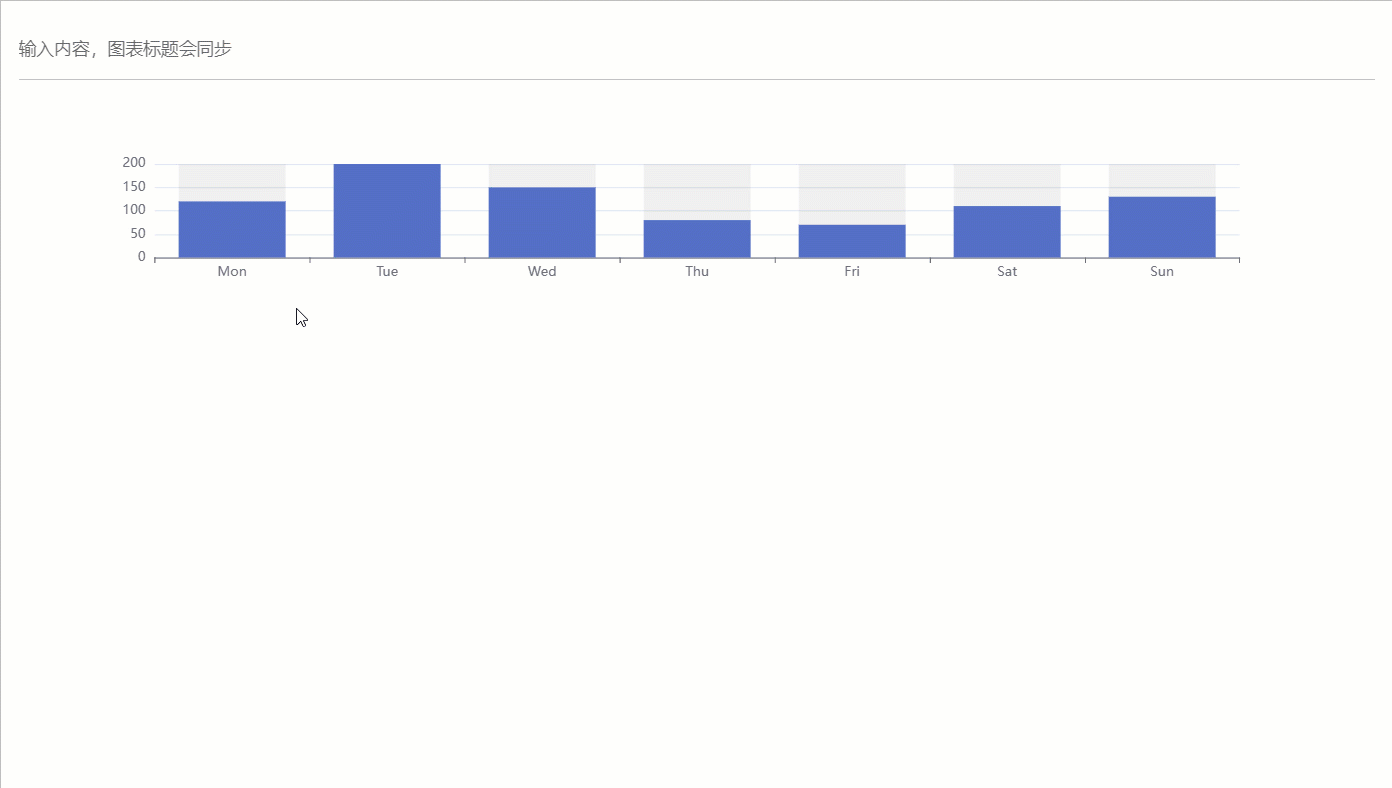
Use the on function parameter event_name and query to view the echarts event Chinese document
The following example binds the mouse click event
 from nicegui import ui
from ex4nicegui . reactive import rxui

opts = {
    "xAxis" : { "type" : "value" , "boundaryGap" : [ 0 , 0.01 ]},
    "yAxis" : {
        "type" : "category" ,
        "data" : [ "Brazil" , "Indonesia" , "USA" , "India" , "China" , "World" ],
    },
    "series" : [
        {
            "name" : "first" ,
            "type" : "bar" ,
            "data" : [ 18203 , 23489 , 29034 , 104970 , 131744 , 630230 ],
        },
        {
            "name" : "second" ,
            "type" : "bar" ,
            "data" : [ 19325 , 23438 , 31000 , 121594 , 134141 , 681807 ],
        },
    ],
}

bar = rxui . echarts ( opts )

def on_click ( e : rxui . echarts . EChartsMouseEventArguments ):
    ui . notify ( f"on_click: { e . seriesName } : { e . name } : { e . value } " )


bar . on ( "click" , on_click )
The following example triggers the mouse swipe event only for the specified series
 from nicegui import ui
from ex4nicegui . reactive import rxui

opts = {
    "xAxis" : { "type" : "value" , "boundaryGap" : [ 0 , 0.01 ]},
    "yAxis" : {
        "type" : "category" ,
        "data" : [ "Brazil" , "Indonesia" , "USA" , "India" , "China" , "World" ],
    },
    "series" : [
        {
            "name" : "first" ,
            "type" : "bar" ,
            "data" : [ 18203 , 23489 , 29034 , 104970 , 131744 , 630230 ],
        },
        {
            "name" : "second" ,
            "type" : "bar" ,
            "data" : [ 19325 , 23438 , 31000 , 121594 , 134141 , 681807 ],
        },
    ],
}

bar = rxui . echarts ( opts )

def on_first_series_mouseover ( e : rxui . echarts . EChartsMouseEventArguments ):
    ui . notify ( f"on_first_series_mouseover: { e . seriesName } : { e . name } : { e . value } " )


bar . on ( "mouseover" , on_first_series_mouseover , query = { "seriesName" : "first" })

ui . run ()Create an echart from javascript code
 from pathlib import Path

rxui . echarts . from_javascript ( Path ( "code.js" ))
# or
rxui . echarts . from_javascript (
    """
(myChart) => {

    option = {
        xAxis: {
            type: 'category',
            data: ['Mon', 'Tue', 'Wed', 'Thu', 'Fri', 'Sat', 'Sun']
        },
        yAxis: {
            type: 'value'
        },
        series: [
            {
                data: [120, 200, 150, 80, 70, 110, 130],
                type: 'bar'
            }
        ]
    };

    myChart.setOption(option);
}
"""
)setOption in the function. The function also has a second parameter, which is an echarts global object, you can register the map through echarts.registerMap .
 rxui . echarts . from_javascript (
"""
(chart,echarts) =>{

    fetch('https://geo.datav.aliyun.com/areas_v3/bound/100000_full.json')
    .then(response => response.json())
    .then(data => {
            echarts.registerMap('test_map', data);

            chart.setOption({
                geo: {
                    map: 'test_map',
                    roam: true,
                },
                tooltip: {},
                legend: {},
                series: [],
            });
    });
}
"""
)Register a map.
 rxui . echarts . register_map (
    "china" , "https://geo.datav.aliyun.com/areas_v3/bound/100000_full.json"
)

rxui . echarts (
    {
        "geo" : {
            "map" : "china" ,
            "roam" : True ,
        },
        "tooltip" : {},
        "legend" : {},
        "series" : [],
    }
)map_name is the customized map name. Note that map must be registered in the chart configurationsrc is a valid map data network link. If it is svg data, you need to set the parameter type="svg"
rxui . echarts . register_map ( "svg-rect" , "/test/svg" , type = "svg" )You can also directly provide the json file path object (Path) of local map data
 from pathlib import Path

rxui . echarts . register_map (
    "china" , Path ( "map-data.json" )
) Compared to nicegui.ui.tab_panels , rxui.tab_panels has no parameter tabs . Under the data responsive mechanism, the linkage between tabs and tab_panels only requires the parameter value .
 from nicegui import ui
from ex4nicegui import rxui , to_ref

names = [ "Tab 1" , "Tab 2" , "Tab 3" ]
current_tab = to_ref ( names [ 0 ])

with rxui . tabs ( current_tab ):
    for name in names :
        rxui . tab ( name )

with rxui . tab_panels ( current_tab ):
    for name in names :
        with rxui . tab_panel ( name ):
            ui . label ( f"Content of { name } " )
This is because, under the data response mechanism, component linkage is achieved through the intermediate data layer ( to_ref ). Therefore, tab_panels can be linked with other components (just be sure to use the same ref object)
 names = [ "Tab 1" , "Tab 2" , "Tab 3" ]
current_tab = to_ref ( names [ 0 ])


with rxui . tab_panels ( current_tab ):
    for name in names :
        with rxui . tab_panel ( name ):
            ui . label ( f"Content of { name } " )

# tabs 不必在 panels 前面
with rxui . tabs ( current_tab ):
    for name in names :
        rxui . tab ( name )

rxui . select ( names , value = current_tab )
rxui . radio ( names , value = current_tab ). props ( "inline" )

rxui . label ( lambda : f"当前 tab 为: { current_tab . value } " )In lazy loading mode, only the currently activated tab will render.
 from ex4nicegui import to_ref , rxui , on , deep_ref

current_tab = to_ref ( "t1" )

with rxui . tabs ( current_tab ):
    ui . tab ( "t1" )
    ui . tab ( "t2" )

with rxui . lazy_tab_panels ( current_tab ) as panels :

    @ panels . add_tab_panel ( "t1" )
    def _ ():
        # 通过 `panels.get_panel` 获取当前激活的 panel 组件
        panels . get_panel ( "t1" ). classes ( "bg-green" )
        ui . notify ( "Hello from t1" )
        ui . label ( "This is t1" )

    @ panels . add_tab_panel ( "t2" )
    def _ ():
        panels . get_panel ( "t2" ). style ( "background-color : red" )
        ui . notify ( "Hello from t2" )
        ui . label ( "This is t2" )
After the page loads, "Hello from t1" is displayed immediately. When switching to the "t2" tab, "Hello from t2" will be displayed.
scoped_style method allows you to create styles that are limited to the component.
 # 所有子元素都会有红色轮廓,但排除自身
with rxui . row (). scoped_style ( "*" , "outline: 1px solid red;" ) as row :
    ui . label ( "Hello" )
    ui . label ( "World" )


# 所有子元素都会有红色轮廓,包括自身
with rxui . row (). scoped_style ( ":self *" , "outline: 1px solid red;" ) as row :
    ui . label ( "Hello" )
    ui . label ( "World" )

# 当鼠标悬停在 row 组件时,所有子元素都会有红色轮廓,但排除自身
with rxui . row (). scoped_style ( ":hover *" , "outline: 1px solid red;" ) as row :
    ui . label ( "Hello" )
    ui . label ( "World" )

# 当鼠标悬停在 row 组件时,所有子元素都会有红色轮廓,包括自身
with rxui . row (). scoped_style ( ":self:hover *" , "outline: 1px solid red;" ) as row :
    ui . label ( "Hello" )
ui . label ( "World" )Create interactive data visual reports with the most streamlined apis
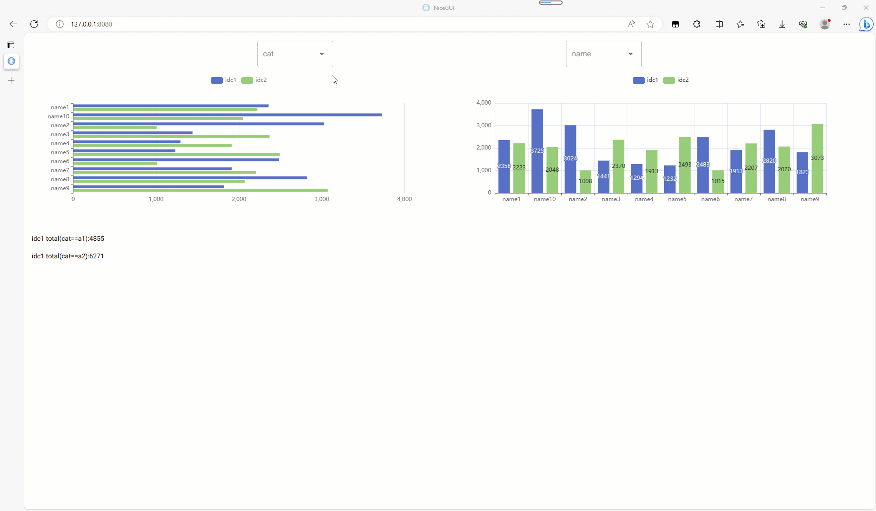
 from nicegui import ui
import pandas as pd
import numpy as np
from ex4nicegui import bi
from ex4nicegui . reactive import rxui
from ex4nicegui import effect , effect_refreshable
from pyecharts . charts import Bar


# data ready
def gen_data ():
    np . random . seed ( 265 )
    field1 = [ "a1" , "a2" , "a3" , "a4" ]
    field2 = [ f"name { i } " for i in range ( 1 , 11 )]
    df = (
        pd . MultiIndex . from_product ([ field1 , field2 ], names = [ "cat" , "name" ])
        . to_frame ()
        . reset_index ( drop = True )
    )
    df [[ "idc1" , "idc2" ]] = np . random . randint ( 50 , 1000 , size = ( len ( df ), 2 ))
    return df


df = gen_data ()

# 创建数据源
ds = bi . data_source ( df )

# ui
ui . query ( ".nicegui-content" ). classes ( "items-stretch no-wrap" )

with ui . row (). classes ( "justify-evenly" ):
    # 基于数据源 `ds` 创建界面组件
    ds . ui_select ( "cat" ). classes ( "min-w-[10rem]" )
    ds . ui_select ( "name" ). classes ( "min-w-[10rem]" )


with ui . grid ( columns = 2 ):
    # 使用字典配置图表
    @ ds . ui_echarts
    def bar1 ( data : pd . DataFrame ):
        data = data . groupby ( "name" ). agg ({ "idc1" : "sum" , "idc2" : "sum" }). reset_index ()

        return {
            "xAxis" : { "type" : "value" },
            "yAxis" : {
                "type" : "category" ,
                "data" : data [ "name" ]. tolist (),
                "inverse" : True ,
            },
            "legend" : { "textStyle" : { "color" : "gray" }},
            "series" : [
                { "type" : "bar" , "name" : "idc1" , "data" : data [ "idc1" ]. tolist ()},
                { "type" : "bar" , "name" : "idc2" , "data" : data [ "idc2" ]. tolist ()},
            ],
        }

    bar1 . classes ( "h-[20rem]" )

    # 使用pyecharts配置图表
    @ ds . ui_echarts
    def bar2 ( data : pd . DataFrame ):
        data = data . groupby ( "name" ). agg ({ "idc1" : "sum" , "idc2" : "sum" }). reset_index ()

        return (
            Bar ()
            . add_xaxis ( data [ "name" ]. tolist ())
            . add_yaxis ( "idc1" , data [ "idc1" ]. tolist ())
            . add_yaxis ( "idc2" , data [ "idc2" ]. tolist ())
        )

    bar2 . classes ( "h-[20rem]" )

    # 绑定点击事件,即可实现跳转
    @ bar2 . on_chart_click
    def _ ( e : rxui . echarts . EChartsMouseEventArguments ):
        ui . open ( f"/details/ { e . name } " , new_tab = True )


# 利用响应式机制,你可以随意组合原生 nicegui 组件
label_a1_total = ui . label ( "" )


# 当 ds 有变化,都会触发此函数
@ effect
def _ ():
    # filtered_data 为过滤后的 DataFrame
    df = ds . filtered_data
    total = df [ df [ "cat" ] == "a1" ][ "idc1" ]. sum ()
    label_a1_total . text = f"idc1 total(cat==a1): { total } "


# 你也可以使用 `effect_refreshable`,但需要注意函数中的组件每次都被重建
@ effect_refreshable
def _ ():
    df = ds . filtered_data
    total = df [ df [ "cat" ] == "a2" ][ "idc1" ]. sum ()
    ui . label ( f"idc1 total(cat==a2): { total } " )


# 当点击图表系列时,跳转的页面
@ ui . page ( "/details/{name}" )
def details_page ( name : str ):
    ui . label ( "This table data will not change" )
    ui . aggrid . from_pandas ( ds . data . query ( f'name==" { name } "' ))

    ui . label ( "This table will change when the homepage data changes. " )

    @ bi . data_source
    def new_ds ():
        return ds . filtered_data [[ "name" , "idc1" , "idc2" ]]

    new_ds . ui_aggrid ()


ui . run ()bi.data_sourceData source is the core concept of the BI module, and the linkage of all data is based on this. In the current version (0.4.3), there are two ways to create data sources.
DataFrame that receives pandas :
 from nicegui import ui
from ex4nicegui import bi
import pandas as pd

df = pd . DataFrame (
    {
        "name" : list ( "aabcdf" ),
        "cls" : [ "c1" , "c2" , "c1" , "c1" , "c3" , None ],
        "value" : range ( 6 ),
    }
)

ds =  bi . data_source ( df )
Sometimes, we want to create a new data source based on another data source, and at this time we can use the decorator to create a linkage data source:
 df = pd . DataFrame (
    {
        "name" : list ( "aabcdf" ),
        "cls" : [ "c1" , "c2" , "c1" , "c1" , "c3" , None ],
        "value" : range ( 6 ),
    }
)

ds =  bi . data_source ( df )

@ bi . data_source
def new_ds ():
    # df is pd.DataFrame
    df = ds . filtered_data
    df = df . copy ()
    df [ 'value' ] = df [ 'value' ] * 100
    return df

ds . ui_select ( 'name' )
new_ds . ui_aggrid ()
Note that since ds.filtered_data is used in new_ds , the change of ds will trigger the linkage change of new_ds , resulting in changes in the table components created by new_ds
Remove all filter status through the ds.remove_filters method:
 ds = bi . data_source ( df )

def on_remove_filters ():
    ds . remove_filters ()

ui . button ( "remove all filters" , on_click = on_remove_filters )

ds . ui_select ( "name" )
ds . ui_aggrid ()
Reset the data source through the ds.reload method:
 df = pd . DataFrame (
    {
        "name" : list ( "aabcdf" ),
        "cls" : [ "c1" , "c2" , "c1" , "c1" , "c3" , None ],
        "value" : range ( 6 ),
    }
)

new_df = pd . DataFrame (
    {
        "name" : list ( "xxyyds" ),
        "cls" : [ "cla1" , "cla2" , "cla3" , "cla3" , "cla3" , None ],
        "value" : range ( 100 , 106 ),
    }
)

ds = bi . data_source ( df )

def on_remove_filters ():
    ds . reload ( new_df )

ui . button ( "reload data" , on_click = on_remove_filters )

ds . ui_select ( "name" )
ds . ui_aggrid () from nicegui import ui
from ex4nicegui import bi
import pandas as pd
df = pd . DataFrame (
{
"name" : list ( "aabcdf" ),
"cls" : [ "c1" , "c2" , "c1" , "c1" , "c3" , None ],
"value" : range ( 6 ),
}
)
ds = bi . data_source ( df )
ds . ui_select ( "name" )The first parameter column specifies the column name of the data source
Set the order of options by parameter sort_options :
ds . ui_select ( "name" , sort_options = { "value" : "desc" , "name" : "asc" }) Parameter exclude_null_value sets whether to exclude null values:
 df = pd . DataFrame (
    {
        "cls" : [ "c1" , "c2" , "c1" , "c1" , "c3" , None ],
    }
)

ds = bi . data_source ( df )
ds . ui_select ( "cls" , exclude_null_value = True )
You can set the parameters of the native nicegui select component through keyword parameters.
Set the default value through the value attribute:
 ds . ui_select ( "cls" , value = [ 'c1' , 'c2' ])
ds . ui_select ( "cls" , multiple = False , value = 'c1' )
When multiple selection (the parameter multiple is True by default), value needs to be specified as list
When selecting value , set to non-list
sheet
 from nicegui import ui
from ex4nicegui import bi
import pandas as pd

data = pd . DataFrame ({ "name" : [ "f" , "a" , "c" , "b" ], "age" : [ 1 , 2 , 3 , 1 ]})
ds = bi . data_source ( data )

ds . ui_table (
    columns = [
        { "label" : "new colA" , "field" : "colA" , "sortable" : True },
    ]
)ui.table . The key-value field corresponds to the column name of the data source. If it does not exist, the configuration will not take effect. from nicegui import ui
from ex4nicegui import bi
import pandas as pd
data = pd . DataFrame (
{
"colA" : list ( "abcde" ),
"colB" : [ f"n { idx } " for idx in range ( 5 )],
"colC" : list ( range ( 5 )),
}
)
df = pd . DataFrame ( data )
source = bi . data_source ( df )
source . ui_aggrid (
options = {
"columnDefs" : [
{ "headerName" : "xx" , "field" : "no exists" },
{ "headerName" : "new colA" , "field" : "colA" },
{
"field" : "colC" ,
"cellClassRules" : {
"bg-red-300" : "x < 3" ,
"bg-green-300" : "x >= 3" ,
},
},
],
"rowData" : [{ "colX" : [ 1 , 2 , 3 , 4 , 5 ]}],
}
)ui.aggrid . The key value field in columnDefs corresponds to the column name of the data source. If it does not exist, the configuration will not take effect.rowData key value will not take effect. Because the data source of the table is always controlled by the data source toolbox module provides some commonly used tool functions.
from ex4nicegui import toolbox Switch dark mode
 from ex4nicegui import rxui , toolbox as tb
from nicegui import ui


dark = tb . use_dark ( False )

rxui . label ( lambda : f"暗模式: { dark . value } " )
rxui . button (
    icon = lambda : "sunny" if dark . value else "dark_mode" ,
    color = lambda : "red" if dark . value else "blue" ,
    on_click = dark . toggle ,
). props ( "flat round" )Responsive breakpoint
 from ex4nicegui import rxui , toolbox as tb
from nicegui import ui


options = { "手机" : 0 , "平板" : 640 , "笔记本" : 1024 , "桌面" : 1280 }
bp = tb . use_breakpoints ( options )
active = bp . active
is_between = bp . between ( "手机" , "笔记本" )

with ui . card ():
    rxui . label ( lambda : f"当前断点: { active . value } " )
    rxui . label ( lambda : f"是否在手机-笔记本(不含)之间: { is_between . value } " ). bind_classes (
        { "text-red-500" : is_between }
    )

    rxui . label ( lambda : f'手机(0px - 640px): { active . value == "手机" } ' ). bind_classes (
        { "bg-red-300" : lambda : active . value == "手机" }
    )
    rxui . label ( lambda : f'平板(640px - 1024px): { active . value == "平板" } ' ). bind_classes (
        { "bg-red-300" : lambda : active . value == "平板" }
    )
    rxui . label (
        lambda : f'笔记本(1024px - 1280px): { active . value == "笔记本" } '
    ). bind_classes ({ "bg-red-300" : lambda : active . value == "笔记本" })
    rxui . label ( lambda : f'桌面(1280px+): { active . value == "桌面" } ' ). bind_classes (
        { "bg-red-300" : lambda : active . value == "桌面" }
    )
Generate QR code
 from ex4nicegui import rxui , to_ref , toolbox as tb
from nicegui import ui


text = to_ref ( "ex4nicegui" )
qr_code = tb . use_qr_code ( text )

rxui . input ( value = text )
rxui . image ( qr_code . code ). classes ( "w-20 h-20" ). props ( "no-transition" )

