sdl stb font
1.0.0
stb_truetype을 사용하여 순수한 sdl2의 텍스트를 렌더링하기위한 헤더 전용 라이브러리. 이것은 빠른 텍스트 렌더링을 허용하는 글리프를 그려냅니다. 또한 더 빠른 텍스트 렌더링을 위해 문자열을 질감으로 렌더링하는 몇 가지 쉬운 방법을 제공합니다.
새로운 (2022)! producerConsumerFrontend.h 와 함께 멀티 스레드 환경에서 프레 렌더를 할 수 있습니다!
새로운 (2021)! bgfxFrontend.h 로 bgfx로 렌더링 할 수 있습니다!
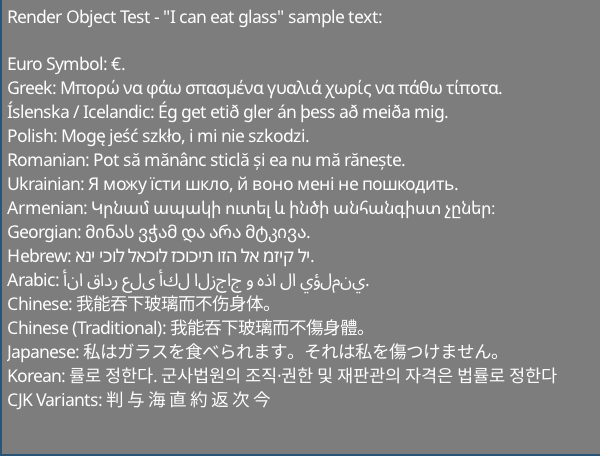
http://www.columbia.edu/~fdc/utf8/index.html의 샘플 텍스트
Liam Twigger- @snapperthetwig
fc.drawText(x, y, string)fc.renderTextToTexture(string, &widthOut, &heightOut)인텔 i7-8750H :
텍스처를 사용하는 경우 ( renderTextToTexture / renderTextToObject )를 사용하는 경우 이미지 예제 이미지는 0.7ms가 렌더링됩니다 (~ 1400 fps). 속도는 SDL2로 텍스처를 뒤집을 수있는 최대입니다.
예제 이미지는 직접 렌더링하는 경우 (~ 200 fps) ~ 5ms (~ 200 fps)가 필요합니다 ( drawText )
둘 이상의 프레임이 지속되는 텍스트의 경우 renderTextToTexture 또는 renderTextToObject 로 캐시해야합니다.
형식 텍스트 :
비 SDL 프론트 엔드 :
이것은 헤더 전용 라이브러리 - 빌드 시스템이 필요하지 않습니다.
모든 헤더에서 :
# include " path/to/sdlStbFont/sdlStbFont.h "하나 의 .cpp :
# define SDL_STB_FONT_IMPL
# include " path/to/sdlStbFont/sdlStbFont.h "
이 라이브러리는 stb_truetype에 의존합니다. 자동으로 이것을 포함합니다. 자동으로 포함하지 않으려면 #define STB_TRUETYPE_INCLUDE_HANDLED 사용하고 stb_truetype.h를 포함하여 처리하십시오.
# define SDL_STB_FONT_IMPL
# include " sdlStbFont.h "

...

// Load font
char * ttfFontFromMemory = loadFontFileSomehow( " path/to/file.ttf " );

sdl_stb_font_cache fc;
fc.faceSize = 24 ; // Must be set before loadFont()!
fc.tabWidthInSpaces = 8 ; // Optional
fc.loadFont(ttfFontFromMemory);

...

// Setup renderer
SDL_Renderer * mSdlRenderer = SDL_CreateRenderer( mWindow , SDL_RENDERER_SOFTWARE, 0 );
fc.bindRenderer( mSdlRenderer ); // Must bind a renderer before generating any glyphs

...

// Main loop
SDL_SetRenderDrawColor ( mSdlRenderer , 125 , 125 , 125 , 255 );
SDL_RenderClear ( mSdlRenderer );
fc.drawText( 5 , 5 , " Hello world! " );
SDL_RenderPresent ( mSdlRenderer );

// fc will clean itself up when it falls out of scope
delete[] ttfFontFromMemory; // You must manually remove the char buff when done
// if you want auto management use fc.loadFontManaged(), which will transfer
// ownership of ttfFontFromMemory to fc and be freed when done.
렌더링 된 문자열의 너비와 높이를 얻을 수도 있습니다.
 fc.drawText(5, 5, widthOut, heightOut, "Hello world!");
// Draws "hello world" and sets widthOut and heightOut to the size of the string
 class sdl_stb_font_cache {
...
public:
  int ascent;
  int descent;
  int lineGap;
  int baseline;
  int rowSize;
  int tabWidth;  // May be changed later
  float scale;
  float underlineThickness;
  float strikethroughThickness;
  float underlinePosition;
  float strikethroughPosition;
  // Must be set before loadFont() is called. Cannot be changed after
  int faceSize;      // Default is 20. All the parameters are calcualted based on this
  int tabWidthInSpaces;  // Default is 8, set this before loadFont(). Max 128. Sets tabWidth when font is loaded
...
  }
fc.loadFont(ttfFontFromMemory);
fc.addFont(someSecondFontFromMemory);
fc.addFont(someThirdFontFromMemory);
...
etc
첫 번째 글꼴로드는 "로드 폰트"와 함께 있어야합니다.
도면 함수가 호출되기 전에 모든 글꼴을로드해야합니다. 첫 번째 글꼴에서 글리프가 발견되지 않으면 두 번째 글꼴이 검색됩니다.
 int w, h;
fc.getTextSize(w, h, " Text " ); // Get width and height at same time

// Also
h = fc.getTextHeight( " Text " ); // Faster, if only height is needed
w = fc.getTextWidth( " Text " ); // Internally just a wrapper for getTextSize
int nRows = fc.getTextRows( " Text n More text " ); // UTF8 safe, returns the number of rows of text - here it's 2
int numNewlines = fc.getNumNewLines
팁 : drawText() 그려진 문자열 또는 형식의 텍스트 개체의 끝의 x 좌표를 반환합니다.
라인 랩핑의 경우 fc.breakString(stringIn, arrayOut, width) 기능을 사용하십시오. 이것은 문자열 또는 형식의 텍스트 객체를 문자열의 벡터 또는 형식의 텍스트 개체를 너비보다 작습니다. 이것은 Newlines와 Whitespace에서 먼저 끊어 지려고 시도하면 지정된 너비보다 길면 단어가 나뉩니다. 이것은 UTF8 안전합니다.
매뉴얼 관리 :
 char * mFontData = loadFontFromFileSomehow( " path/to/file.ttf " );
fc.loadFont( mFontData );
// You will have to free mFontData when you are done with it
// fc does not copy mFontData internally
// using fc after free'ing mFontData will result in undefined behaviour
자동 관리 :
filep * file = openFile( " path/to/file " );
sttfont_memory mFontData ;
mFontData .alloc(file_size);
fread (file, & mFontData .data);
fc.loadFontManaged( mFontData );
// fc now owns mFontData's contents and will free it when fc is destroyed
// You can safely let mFontData fall out of scope
// Also addFontManaged is avaliable for adding fallback fonts 첫 번째 방법 :
 // creating
int RTw, RTh;
SDL_Texture * RT;
RT = fc.renderTextToTexture ( " Text " , &RTw, &RTh);

// Rendering
SDL_Rect r;
r.x = 5 ;
r.y = 5 ;
r.w = RTw;
r.h = RTh;
SDL_RenderCopy ( mSdlRenderer , RT , NULL , &r);
두 번째 방법 (동일한 효과이지만 더 깨끗함)
 // creating
sdl_stb_prerendered_text prt;
prt. mRenderer = your__SDL_Render__instance;
fc.renderTextToObject(&prt, " Text " );

// Rendering
prt.draw(x, y);

// Rendering in colour & alpha
prt.drawWithColor(x, y, 255 , 185 , 85 , 255 );

// Cleanup
prt.freeTexture();
팁 : prt.draw() 객체 끝의 x 좌표를 반환합니다.
캐시 된 질감으로 SDL_SetTextureColorMod 사용하십시오. 또는 sdl_stb_prerendered_text::drawWithColor 사용하십시오.
getCaretPos(text, relativeMouseX, relativeMouseY) 사용
이것은 현재 Newlines가없는 문자열에서 Carret Lookup 만 지원합니다. 멀티 라인 문자열로 이것을 시도하면 잘못된 값을 반환 할 수 있습니다.
탭 너비는 변수 fc.tabWidth 로 처리됩니다. 탭 후 문자는 다음 탭 위치에 정렬됩니다.
fc.loadFont(...) 를 호출하기 전에 fc.tabWidthInSpaces = X 설정하여 fc.tabWidth 공간 너비의 일부로 자동 설정할 수 있습니다. 기본적으로 글꼴은 너비의 8 개의 공간으로 설정됩니다. 더 낮은 값은 모노 스페이스 글꼴의 경우 더 좋으며, 비 투자 공간 글꼴의 경우 더 높은 값이 더 좋습니다.
이 라이브러리는 글꼴 처리 백엔드 ( sttfont_* )와 SDL 렌더링 프론트 엔드 ( sdl_stb_* )의 두 부분으로 구성됩니다.
자신의 렌더링 프론트 엔드를 만들기 위해 관련 sttfont_* 클래스를 확장합니다. 자세한 내용은 SDL 구현을 참조하십시오. ~ 200 줄의 코드 라인은 SDL 특정 물건을 꺼내 렌더러 특정 물건을 넣기 만하면됩니다. 응용 프로그램에는 sdlStbFont.h 대신 sttFont.h 포함시킵니다
pregenGlyphs function 사용할 수 있습니다.
std::vector<sttfont_uint32_t_range> codepoint_ranges;
sttfont_uint32_t_range customRange;
customRange.start = 1337 ; customRange.end = 1444 ; // end is inclusive

sttfont_uint32_t_range::populateRangesLatin (codepoint_ranges); // add the Latin character set
sttfont_uint32_t_range::populateRangesCyrillic (codepoint_ranges); // add the Cyrillic character set
fc.pregenGlyphs(codepoint_ranges, 0 ); // generatess the glyps
SDL에서 소프트웨어 렌더링을하는 경우 필요하지 않으며 시작이 느려집니다. 텍스처 아틀라스 (예 : BGFX)를 사용하는 커스텀 프론트 엔드를 사용하는 경우 권장됩니다.
producerConsumerExample.h 사용하십시오. 작업 예제는 producerConsumerExample.cpp 참조하십시오.
아이디어는 생산자와 소비자 스레드간에 공유되는 producer_consumer_font_cache 객체를 인스턴스화한다는 것입니다. 이 개체는 소비자가 사용하는 실제 프론트 엔드를 가리키는 멤버가 있습니다.
비교 :
producer_consumer_font_cache mPcCache ;
sdl_stb_font_cache mSdlFontCache ;


mPcCache .consumer_font_cache = & mSdlFontCache ;

sttfont_memory m;
m.data = &fontData[ 0 ];
m.size = fontData.size();
m.ownsData = false ;

mPcCache .faceSize = 24 ;
mPcCache .loadFontManagedBoth(m); // Loads the font into both frontends
생산 :
pcfc_prerendered_text prt;
mPcCache .renderTextToObject(&prt, " Prerendered text from Producer Thread! " ); // prt.handle now holds a handle
pcfc_handle h = mPcCache .pushText( 5 , 5 , " Hello World! " ); // use this instead of "drawText"
mPcCache .submitToConsumer(); // sends to consumer
태워 버리는:
 // <somehow send prt.handle and h to consumer thread>
// Suggestion: use a concurrentqueue (https://github.com/cameron314/concurrentqueue)
// and/or some kind of command buffer (https://github.com/SnapperTT/nanovg_command_buffer)
mPcCache .receiveFromProducer();
mPcCache .dispatchPrerenderJobs<sdl_stb_prerendered_text>(); // takes the prerended text and creates sdl_stb_prerended_text objects (invokes mPcCache.consumer_font_cache->renderTextToObject)

mPcCache .dispatchSinglePrerendered(prt.handle, 5 , 5 ); // actually draws the prerendered text
mPcCache .dispatchSingleText(h); // Renders "hello world" at 5,5
대청소:
 // Cleanup - just let mPcCache fall out of scope
mPcCache .freeStoredPrerenderedText( true ); // deletes all prerendered text objects stored. true == also calls prt->freeTexture() for all prerendered text
										  // this is manual destruction as destroying a large number of objects can be expensive, esp. when you want to exit quickly
// Don't forget to delete mPcCache.consumer_font_cache if it was heap allocated
delete mPcCache .consumer_font_cache;
userData : 텍스트와 함께 원시 포인터를 제출할 수 있습니다.
 mPcCahce.pushUserdata(void*); // producer
void* foo = mPcCahce.getUserdata(); // consumer
이 작업을 수행하지 않으면 std::mutex 주를 생산자에서 소비자로 전달하는 데 사용됩니다. 일시적 버퍼에는 하나의 슬롯이 있습니다. 소비자보다 더 빨리 달리는 생산자를 멈출 수있는 기계가 있어야합니다.
대기열을 사용하려면 moodycamel :: readerwriterqueue를 권장합니다. producer_consumer_font_cache 로 다음을 활성화 할 수 있습니다.
#define SSF_CONCURRENT_QUEUE moodycamel::ReaderWriterQueue
변경에 대한 폴링 :
 if (mPcCache.receiveFromProducer()) { // wraps moodycamel::ReaderWriterQueue::try_dequeue()
	// have dequeued!
	}
정리 (큐 플러시)
 while (mPcCache.receiveFromProducer()) {
	// pulls stuff from the queue until its empty
	delete mPcCache.getUserdata(); // if we're using heap allocated userdata here is how to clear it
	}
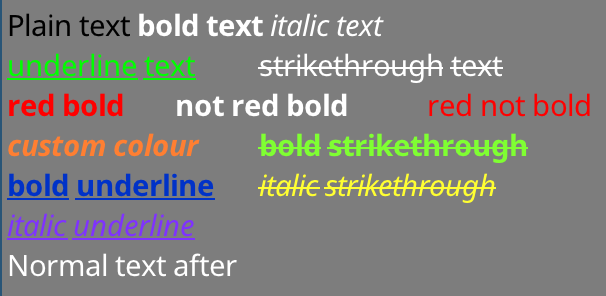
먼저 sttfont_formatted_text 만듭니다. 위의 예는 다음과 같이 작성되었습니다.
sttfont_formatted_text formattedText;
formattedText << sttfont_format::black << " Plain text "
<< sttfont_format:: bold << " bold text "
<< sttfont_format:: italic << " italic text n "
<< sttfont_format:: underline << sttfont_format::green << " underline text t "
<< sttfont_format::strikethrough << " strikethrough text n "
<< sttfont_format::red << sttfont_format:: bold << " red bold t "
<< sttfont_format:: bold << " not red bold t "
<< sttfont_format::red << " red not bold n "
<< sttfont_format:: bold << sttfont_format:: italic		<< sttfont_format::colour( 255 , 127 , 50 ) << " custom colour t "
<< sttfont_format:: bold << sttfont_format::strikethrough	<< sttfont_format::colour( 127 , 255 , 50 ) << " bold strikethrough n "
<< sttfont_format:: bold << sttfont_format:: underline		<< sttfont_format::colour(  0 , 50 , 200 ) << " bold underline t "
<< sttfont_format:: italic << sttfont_format::strikethrough	<< sttfont_format::colour( 255 , 255 , 50 ) << " italic strikethrough n "
<< sttfont_format:: italic << sttfont_format:: underline		<< sttfont_format::colour( 127 , 50 , 255 ) << " italic underline "
서식 옵션을 << 연산자와 결합 할 수 있습니다. 문자열이 삽입 된 후 형식이 재설정됩니다.
그런 다음 간단한 문자열 ( drawText(x, y, formattedText) 등에 사용되는 동일한 함수를 사용하여 렌더링 할 수 있습니다. 여기에는 renderTextToObject 로 텍스처 렌더링이 포함됩니다. 동일 한 함수로 할 수있는 간단한 문자열로 할 수있는 모든 것 ( getTextSize , getNumRows , getCaretPos 등)
대담한/이탤릭체 변형이 작동하려면 글꼴의 대담한/이탈리아 변형을로드해야합니다. Bold+Italic의 경우 글꼴의 Bold+Itatic 변형을로드해야합니다! 이 라이브러리에 의해 밑줄이 밑줄을 긋고 strikethroughs가 자동으로 생성됩니다.
변형을로드하려면 기본 글꼴을로드 한 후 addFormatFont 또는 addFormatFontManaged 사용하십시오. 대담한/이탤릭체로 사용할 수있는 글꼴에 관심이있는 경우 폴백 글꼴 (다국어 지원)에 대해서도 수행해야합니다.
fc.loadFontManaged(notoSans);	// First font - loadFont
	fc.addFormatFontManaged(sttfont_format::FORMAT_BOLD, notoSansBold);
	fc.addFormatFontManaged(sttfont_format::FORMAT_ITALIC, notoSansItalic);
	fc.addFormatFontManaged(sttfont_format::FORMAT_BOLD | sttfont_format::FORMAT_ITALIC, notoSansBoldItalic);
fc.addFontManaged(notoSansArmenian);	// Fallback fonts - addFont
	fc.addFormatFontManaged(sttfont_format::FORMAT_BOLD, notoSansArmenianBold);
	fc.addFormatFontManaged(sttfont_format::FORMAT_ITALIC, notoSansArmenianItalic);
fc.addFormatFontManaged(sttfont_format::FORMAT_BOLD | sttfont_format::FORMAT_ITALIC, notoSansArmenianBoldItalic);대담하거나 기울임 꼴 문자열을 요청하고 대담한 또는 이탤릭체 변형이 없으면 일반 변형이 사용됩니다. Bold+Italic String을 요청하고 하나의로드 된 (조합은 아님) 만 있으면 마지막로드 된 변형이 사용됩니다. 따라서 Bold+Italic을 요청하고 Bold를로드하면 이탤릭체 (Bold+Italic이 아님)가 렌더링됩니다.
라이브러리는 밑줄과 파업 변형 자체를 끌어들일 것입니다.이를 제공 할 필요가 없습니다.
bgfxFrontend.h 포함시키고 bgfx_stb_font_cache 인스턴스를 만듭니다.
이 프론트 엔드를 사용하는 방법을 보려면 bgfxExample.cpp 참조하십시오.
몇 가지 메모 :
sttfont_uint32_t_range::populateRangesLatin() 호출하는 것이 도움이 될 수 있으며 렌더링 전에 아틀라스를 채우는 것과 유사합니다. 아틀라스에 글리프가 채워지면 프론트 엔드는 새로운 아틀라스 페이지를 만듭니다. 생성 된 .h 파일이 아닌 .lzz 파일을 작성/편집해야합니다. .lzz 소스에서 헤더 파일을 생성하기위한 도구 + 스크립트가 제공됩니다.
SDL 및 STB 프로젝트에 대한 기여자 덕분에!
공개 도메인
STB_TRUETYPE는 공개 도메인입니다
Noto Fonts는 (c) Google이며 SIL Open Font 라이센스, 버전 1.1에 따라 출시됩니다. https://www.google.com/get/noto/를 참조하십시오.


