RemoteDebug
Version 3.0.5
Arduino가 WIFI를 통해 프로젝트를 디버깅 할 수있는 라이브러리, 웹 앱 또는 Telnet 클라이언트와 함께 직렬 모니터와 같은 인쇄 명령을 사용합니다.

기본적으로 Arduino는 직렬 포트를 통한 디버그 가능성 만 가지고 있습니다. 이것은 몇 가지 단점이 있습니다.
ESP8266 (NODEMCU) 또는 ESP32를 사용하면 이제 WIFI (Network Connectivity)가있어 디버깅 정보를 실시간으로 스트리밍하는 데 사용할 수 있습니다.
이 라이브러리는 IoT 프로젝트, 홈 자동화, 모바일 로봇 (케이블로 Moviment에서 디버깅 할 수 있음) 또는 다른 WiFi 프로젝트에 적합합니다.
실제로이 라이브러리는 홈 자동화의 IoT 프로젝트를 디버깅 할 필요성으로 태어났습니다. 이 프로젝트에는 중앙 모듈과 3 개의 보조 모듈이 있었으며 이들은 서로 멀었습니다. 하나는 집의 지붕 아래에서 도달하기가 어려웠습니다. USB 케이블로 메시지 교환과 함께이 프로젝트를 디버깅하는 것은 전통적인 방식으로는 불가능합니다.
MIP_ESP8266_Library와 내 ESP32 Wi -Fi 로봇은 RemotedeBug를 사용하는 프로젝트의 예입니다. MIP_ESP8266_LIBRARY 및 ESPLORER_V1에서 확인하십시오
ESP32 및 ESP8266 보드에서 Wi -Fi 네트워킹의 신비한 지연을 피하기 위해 RemotedeBug 가 클라이언트 버퍼링 (IS Last Send IS <= 10ms)으로 향상되었습니다.
참고 : 프로젝트가 Wi -Fi를 사용하지 않으면 다른 라이브러리 인 SerialDebug 라이브러리를 사용할 수 있습니다.이 라이브러리는 Arduino 보드와 함께 작동합니다.
참고 II : RemotedeBug 라이브러리는 이제 ESPRESPIIF 보드에만 해당됩니다. ESP32 및 ESP8266과 같이 다른 Wi -Fi 보드가 필요한 경우 이에 대한 문제를 추가하면 이사회의 포트가 가능한지 확인할 것입니다.
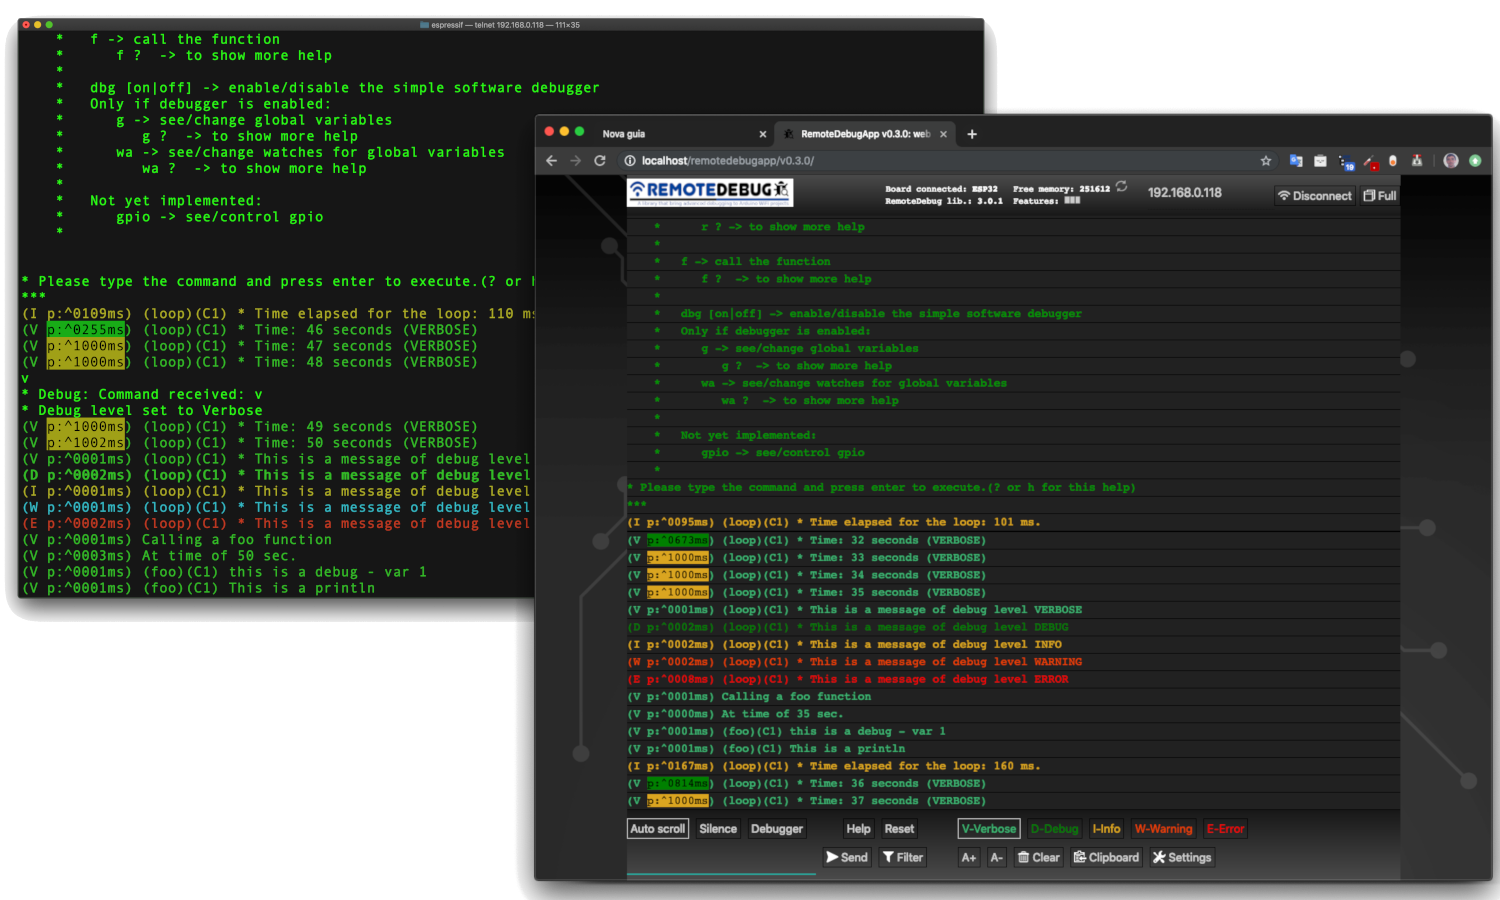
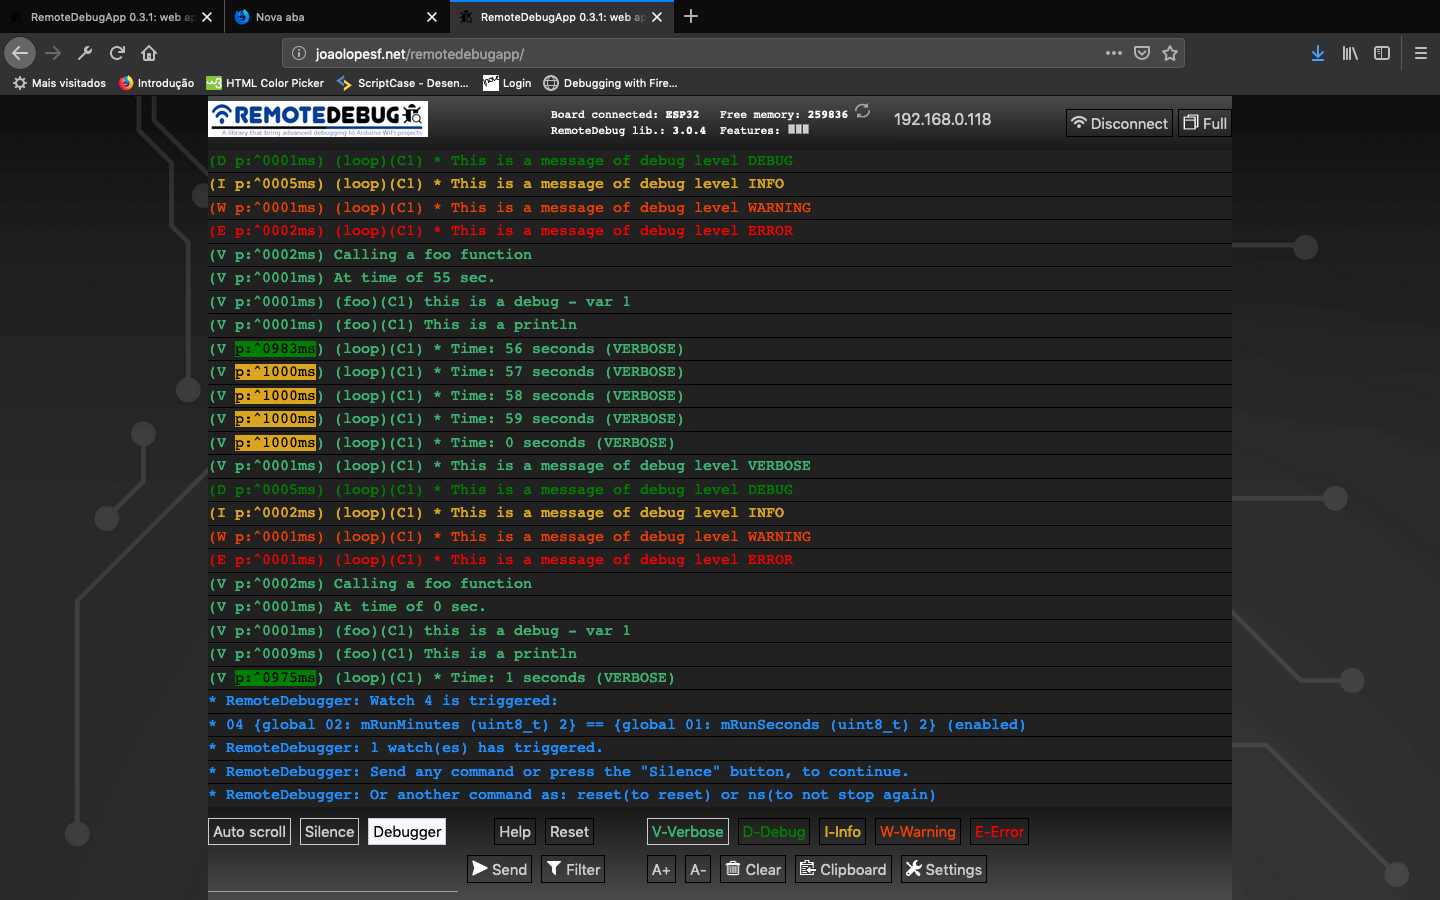
이미지 : RemotedeBugapp (웹 앱)에서
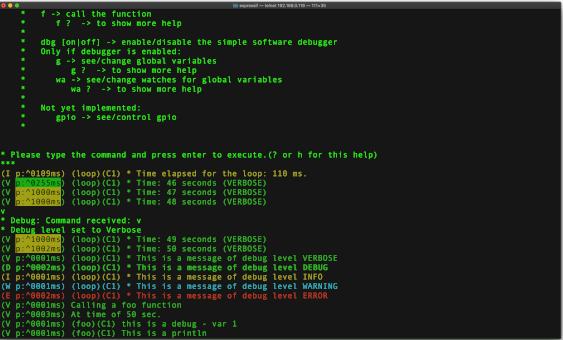
이미지 : Telnet 클라이언트에서
YouTube (RemotedeBug V2) :
YouTube (remotedeBug를 사용한 3 텔넷 연결) v1 :
GitHub에 계정을 만들어이 라이브러리 개발에 기여합니다.
스타를주세요.이 라이브러리가 유용하다고 생각되면 다른 사람들을 도와 주면서도 발견하십시오.
문제 나 제안에 대한 문제를 추가하십시오.
RemotedeBugapp 베타
이제 다른 저장소 인 RemotedeBugapp는 인터넷에서 웹 앱의 로컬 사본을위한 것입니다. Web Server (http://joaolopesf.net/remotedebugapp)에 게시 된 후 가장 마지막 버전의 Web App으로 업데이트됩니다. 인터넷이 오프라인 상태 일 때 사용하려면 다운로드하십시오. 로컬 사본이므로 앱은 정기적으로 새 버전을 확인합니다.
웹 소켓을 사용하여 Comunicate를 사용하는 Telnet Client에서 웹 브라우저에서 디버깅에 사용할 HTML5 웹 앱.
이제 RemotedeBug v3에는 RemotedeBugapp 연결을 지원하기 위해 웹 소켓 서버도 있습니다.
RemotedeBugapp은 베타 버전에 있습니다. 문제 나 제안이 있으면 이에 대한 문제를 추가하십시오.
텔넷 연결은이를 원하는 모든 또는 인터넷 오프라인 용도로 유지됩니다.
버전 2.1.1
버전 2.0.0
이제 RemotedeBug는 SerialDebug 라이브러리와 동일한 간단한 소프트웨어 디버거를 가질 수 있습니다. 이 작업은 다른 라이브러리를 설치하고 RemotedeBugger RemotedeBugger는 RemotedeBug 에 추가하는 역할을합니다. 이 애드온을 지원하기 위해 RemotedeBug 의 변경 사항은 최소입니다. 몇 가지 콜백만으로도 디버거가 필요없는 프로젝트에 추가 오버 헤드를 추가하지 않아도됩니다. 더 많은 정보를 얻으려면 RemotedeBugger Github 저장소에 액세스하십시오.
이제 RemotedeBug는 SerialDebugapp 에서 수행 한 것처럼 더 많은 색상을 사용하는 새로운 색상 시스템을 가지고 있습니다.
참고 : RemotedeBug 라이브러리로 인해 "SRC"폴더가있는 Arduino 1.5 형식으로 마이그레이션되므로 RemotedeBug 소스 파일의 복제를 피하기 위해 라이브러리를 삭제하고 다시 설치하십시오.
버전 1.5.*
1.5.0 버전에는 Debug* 및 Rdebug* Macros (아래 참조)가 자동으로 부르고 Core ID (Core ID는 ESP32 용입니다).
SerialDebug 는 Serial.print 명령에 의한 Arduino 기본 디버깅보다 낫습니다.
USB 케이블을 통해 디버깅되거나 디버깅하지 않으면 Serial.print Command Allways가 처리됩니다. Microcontroller에서 CPU 시간을 폐기합니다. 다시 말해, 디버그 명령은 직렬에 연결된 사람과 함께 처리됩니다.
RemotedeBug를 사용하면 모든 디버그 출력은 Telnet 또는 웹 앱 연결을 통해 디버깅하는 사람이있는 경우에만 처리됩니다.
리소스의 디버그 레벨을 사용하면 메시지에 표시된 볼륨이 더 높은 수준으로 줄어 듭니다. 예를 들어, 레벨이 가장 낮은 경우 모든 메시지 만 처리합니다.
RemotedeBug는 CPU 및 메모리에서 오버 헤드를 줄이고 클라이언트 버퍼링 기능을 포함하도록 고정되어 있습니다.
개발 중에 많은 디버그 메시지를 넣을 수 있습니다 ...
그러나 RemotedeBug를 사용하면 각각의 레벨을 올릴 수 있습니다.
모든 메시지 (항상 레벨 (Debuga) 또는 오류 (Debuge)를 제외하고, 디버그 레벨이 레벨과 같거나 높으면 메시지가 처리되고 표시됩니다.
RemotedeBug는 우선 순위로 6 개의 디버그 레벨을 가지고 있습니다.
alway는 다음과 같이 보여 주었다.
오류 : 임계 오류
항상 : 중요한 메시지
다른 레벨 (레벨이 실제 것과 같거나 더 높은지 보여 주면) :
경고 : 오류 조건이지만 중요하지는 않습니다
정보 : 정보 메시지
디버그 : 추가 정보
Verbose : 평소보다 더 많은 정보
따라서 모든 메시지를 볼 수 있도록 레벨을 장황으로 변경할 수 있습니다. 또는 디버그 또는 더 높은 레벨 만 볼 수 있도록 디버그.
디버깅을 도와주기 위해 프로젝트가 생성 할 수있는 수량의 메시지를 줄이는 것이 매우 좋습니다.
RemotedeBug에는 Arduino 코드를 Serial.Prints 에서이 라이브러리로 마이그레이션하는 데 도움이되는 변환기가 있습니다.
RemotedeBugConverter
이 작업을 수동으로하고 싶더라도 매우 간단합니다. 위의 주제를 참조하십시오.
간단한 디버그 :
debugV ( " * Run time: %02u:%02u:%02u (VERBOSE) " , mRunHours , mRunMinutes , mRunSeconds );직렬 모니터 에서이 출력을 생성 할 수 있습니다.
    (V p:3065 loop C1) * Run time: 00:41:23 (VERBOSE)

    Where:  V: is the level
            p: is a profiler time, elased, between this and previous debug
            loop: is a function name, that executed this debug
            C1: is a core that executed this debug (and a function of this) (only for ESP32)
            The remaining is the message formatted (printf)
ESP32의 경우 각 디버그의 핵심 ID는 최적화 멀티 코어 프로그래밍에 매우 좋습니다.
예를 들어:
도움을 보여주세요 ( ? )
더 이상 메시지를 표시하려면 디버그 수준 ( v , d , i , w , e )을 변경하십시오.
메모리보기 ( m )
보드 재설정 ( 재설정 )
아래 RemotedeBug 명령에 대해 참조하십시오.
자신의 명령을 추가 할 수 있습니다. 예제를 참조하십시오.
프로젝트가 RemotedeBugger 가 설치된 경우 새로운 명령이있는 경우 기능을 호출하고 변수를 참조/변경하십시오.
이제 RemotedeBug (버전> = 2.0.0)에는 SerialDebug 라이브러리 코드를 기반으로 간단한 소프트웨어 디버거가 있습니다.
이것은 RemotedeBug 의 애드온 역할을하는 또 다른 도서관입니다.
RemotedeBugger 저장소를 더 많은 정보를 제공하십시오 : RemotedeBugger
 For release your device, just uncomment DEBUG_DISABLED in your project
Done this, and no more debug processing.
And better for DEBUG_DISABLED, __RemoteDebug__ have ZERO overhead,
due is nothing of this is compiled.
SerialDebug로서, 이제 RemotedeBug (v3)에는 웹 브라우저에서 디버깅 할 앱인 remotedebugapp가 있습니다.
이 앱은 HTM5 웹 앱이며 WebSocket은 Arduino 보드로 구성됩니다.
이를 위해 RemotedeBug v3에는 웹 소켓 서버가 있습니다 (비활성화 될 수 있음). ArduinoNOWEBSOCKETS Library의 현지 사본을 사용했는데, Arduino Library Manager에 있지 않아서.
웹 서버의 대형 웹 페이지로 Arduino의 솔루션은 Spiffs와 같은 스토리지에 저장됩니다. 그러나 이러한 방식으로 저장된 데이터의 새 버전을 자동으로 업데이트하지는 않지만이 Spiffs 데이터는 프로젝트에 적합하지만 라이브러리에는 적합하지 않습니다.
이 앱은 보드가 저장하고 제공되지 않으며 대신 앱은 웹에 있습니다 : http://joaolopesf.net/remotedebugapp 참고 : Arduino의 웹 서버 소켓 인 SSL (https)을 사용하지 않으며 SSL (WSS)을 지원하지 않습니다. 그러나 페이지로드 후 모든 트래픽은 로컬 네트워크에 있으며 인터넷에는 데이터가 노출되지 않습니다.
RemotedeBugapp은 현대적인 HTML5이며 작업하려면 최신 브라우저가 필요합니다. Internet Explorer 11 및 Safari 10은 지원되지 않는 예입니다. 그러나 Chrome, Edge, Firefox와 같은 사람을 사용할 수 있습니다.
웹 앱은 베타 버전에 있습니다. 문제 또는 제안에 대한 문제를 추가하십시오.
이제 다른 저장소 인 RemotedeBugapp는 인터넷에서 웹 앱의 로컬 사본을위한 것입니다. Web Server (http://joaolopesf.net/remotedebugapp)에 게시 된 후 가장 마지막 버전의 Web App으로 업데이트됩니다. 인터넷이 오프라인 상태 일 때 사용하려면 다운로드하십시오. 로컬 사본이므로 앱은 새 버전을 정기적으로 확인하므로 새 버전을 다운로드 할 수 있습니다.
Telnet은 원하는 경우 또는 웹 앱에서 실패한 작업으로 남아 있습니다.
Telnet은 서버에 원격으로 연결하는 표준 방법이며 모든 운영 체제 (Windows, Mac, Linux ...)에서 지원됩니다.
MacOSX와 Linux에는 기본 텔넷 클라이언트가 있습니다.
Windows의 경우 일반적인 Telnet 클라이언트는 Putty : Putty입니다.
모바일을위한 좋은 도구가 있습니다 : 손가락 , 모바일 스토어에서 찾으십시오. 로컬 네트워크 (WiFi)의 모든 장치를 표시, 쇼 포트가 열리고 Telnet 클라이언트 (외부 앱)도 실행할 수 있습니다.
RemotedeBug 연결하려는 Telnet 클라이언트를 듣는 Telnet 서버를 설정합니다. 연결 후 로깅이 Telnet 클라이언트로 스트리밍됩니다.
RemotedeBug는 사용하기가 매우 간단합니다. 몇 줄의 초기화 코드 후에는 잘 알려진 "인쇄"명령을 사용하여 로깅을 원격 클라이언트로 스트리밍 할 수 있습니다.
RemotedeBug는 디버그 레벨을 기반으로 로깅 필터링을 지원합니다.
실제 디버그 레벨 만 표시합니다.
참고 :이 수준은 가장 로깅-> 최소 로깅 순서입니다.
또는 항상 표시 (실제 디버그 레벨에 따라 다르지 않음) :
참고 : 모든 디버그는 처리되며 클라이언트 연결이있는 경우에만 표시됩니다.
Telnet 클라이언트 또는 웹 앱은 몇 가지 간단한 명령을 입력하여 디버그 레벨을 설정할 수 있습니다.
RemotedeBug 에는 간단한 프로파일 러가 포함되어 있습니다. Connected Client (Telnet 또는 Web App) 또는 Arduino 코드 자체가 활성화 할 수 있습니다.
활성화되면 경과 시간에 따라 다른 색상을 사용하여 2 개의 디버그 문의 시간이 표시됩니다.
일반적인 예는 함수 직전과 직후 로그를 삽입 한 후 기능에 소비되는 금액을 확인할 수 있습니다.
RemotedeBug는 클라이언트 (Telnet 또는 웹 앱)가 연결된 경우 최소한의 오버 헤드 (연결 여부)를 제공하고 처리 디버그 만 제공하도록 설계되었습니다.
RemotedeBug는 클라이언트 (Telnet 또는 웹 앱)에 입력 할 수있는 사용자 정의 명령을 지원합니다. 이것은 Arduino 코드에서 사용자 정의 함수의 실행을 트리거합니다. 예를 들어 클라이언트의 요청에 따라 상태를 다시 보내는 데 사용될 수 있습니다.
RemotedeBug 의 현재 버전에는 아직 암호화 된 인증이 포함되어 있지 않으며 일반 텍스트 만 포함되어 있으며 생산/릴리스에 사용되지 않는 개발을위한 것입니다.
가능한 경우 향후 버전에는 인증을위한 안전한 방법과 생산 환경을 지원하기위한 추가 테스트 방법이 포함됩니다.
 - An app to RemoteDebug like SerialDebug have.
- Http page to begin/stop the telnet server or websocket server.
- Authentication as telnet support (kerberos, etc.) to support production environment
이 저장소를 다운로드하거나 복제하십시오.
또는 Arduino IDE의 경우 라이브러리 관리자를 사용하여 라이브러리를 설치하고 업데이트 할 수 있습니다.
도움말을 설치하려면 다음을 클릭하십시오.
다른 IDE 또는 Arduino IDE의 라이브러리 관리자를 사용하지 않으려면 GitHub 데스크탑 앱을 사용하여 클론을 사용하는 것이 좋습니다.
예제 폴더에서 프로젝트를 열고 작동하는 것을 확인하십시오.
# include " RemoteDebug.h " // https://github.com/JoaoLopesF/RemoteDebugRemotedeBug 디버그;
Wi -Fi 초기화 후 설정 기능에서
 // Initialize the server (telnet or web socket) of RemoteDebug

Debug.begin(HOST_NAME);

// OR

Debug.begin(HOST_NAME, startingDebugLevel);

// Options

Debug.setResetCmdEnabled( true ); // Enable the reset command

// Debug.showProfiler(true); // To show profiler - time between messages of Debug
참고 : RemotedeBugger의 디버거를 활성화하려면이 Github 리포지토리 : RemotedeBugger를 사용하십시오.
루프 기능의 꼬리에서
 // Remote debug over WiFi

Debug.handle();

// Or

debugHandle (); // Equal to SerialDebug
코드의 어느 곳에서나 :
# ifndef DEBUG_DISABLED
if (Debug.isActive(Debug.<level>)) {
    Debug. printf ( " bla bla bla: %d %s " , number, str); // OR
    Debug. printf ( " bla bla bla: %d %s " , number, str. c_str ()); // Note: if type is String need c_str() // OR
    Debug. println ( " bla bla bla 2 ln " );
    Debug. printf ( " float: %f n " , value); // Not works in ESP8266 :-(
    // Note: to show floats with printf (ESP8266 only),
    // you can use my ArduinoUtil library -> https://github.com/JoaoLopesF/ArduinoUtil
    Debug. printf ( " float: %s n " , Util. formatFloat (value, 0 , 5 ). c_str ());
}
# endif
참고 : Isactive를 사용하면 생산/출시를 위해 컴파일하지 않으려면 Debug_disable Precompile 조건으로 코드를 둘러싸고 있습니다.
또는 짧은 길 (SerialDebug와 동일) (시간에 하나의 디버그 만 선호) :
 debugA ( " This is a any (always showed) - var %d " , var);
debugV ( " This is a verbose - var %d " , var);
debugD ( " This is a debug - var %d " , var);
debugI ( " This is a information - var %d " , var);
debugW ( " This is a warning - var %d " , var);
debugE ( " This is a error - var %d " , var);

debugV ( " This is a println " );
또는 프로젝트가 여러 serial.print 명령을 사용하여 단일 디버그 메시지를 생성하는 경우 :
Serial.print( " a = " );
Serial.print(a);
Serial.print( " b = " );
Serial.print(b);
Serial.print( " c = " );
Serial.println(c);
rdebug* macros를 사용할 수 있습니다.
 rdebugV ( " a = " );
rdebugV (a);
rdebugV ( " b = " );
rdebugV (b);
rdebugV ( " c = " );
rdebugVln (c);
참고 : 앞으로 이것을 단일 디버그 명령으로 마이그레이션하는 것이 좋습니다.
debugV (a = %d b = %d c = %d " , a, b, c);사용 디버그 레벨의 예 : (데이터가 많은 문자라고 가정)
 if (Debug.isActive(Debug.VERBOSE)) { // Debug message long
    Debug. printf ( " routine: data received: %s n " , data. c_str ()); // Note: if type is String need c_str()
} else if (Debug.isActive(Debug.DEBUG)) { // Debug message short
    Debug. printf ( " routine: data received: %s ... n " , data. substring ( 0 , 20 ). c_str ()); // %.20s not working :-|
}
버전 1.5.0에서 시작하여 Macros 디버그 매크로 (Debug* 및 Rdebug*)는 매크로라고 불리는 기능의 이름과 코어 ID (ESP32의 경우 코어 ID)를 자동으로 넣습니다.
그래서:
 void foo () {

    uint8_t var = 1 ;
    debugV ( " this is a debug - var %u " , var);
}
 It will show in client (telnet or web app):

    (V p:^0000ms) (foo)(C1) this is a debug - var 1

Where:

    V -> verbose
    p -> profiler time
    (foo) -> this is a function name that calls the debug macro
    (C1) -> It is running it Core 1 (only for ESP32)
직렬 활성화와 함께 사용 디버그의 예
 Useful to see messages if setup or
in cause the ESP8266/ESP32 is rebooting (client connection stop before received all messages)
Only for this purposes I suggest it
 // Setup after Debug.begin

Debug.setSerialEnabled( true ); // All messages too send to serial too, and can be see in serial monitor
오버 헤드 감소를 위해 RemotedeBug는 활성화되지 않은 경우 클라이언트 (Telnet 또는 Web App)를 분리합니다.
 - Please press enter or any key if you need keep the connection
- The default is 5 minutes (You can change it in RemoteDebug.h)
- You can use mDNS to register each node with different name, it helps to connect without know the IP.
Debug.isActive (Debug Macros를 사용하지 않는 경우)와 함께 IF 절을 사용하는 것을 잊지 마십시오.
---> This is very important to reduce overheads and work of debug levels
사용 방법을 배우려면 기본 또는 고급 샘플을 참조하십시오.
고급 샘플에서는 Wifimanager Library, Arduinoota 및 MDN을 사용했습니다.
- Ajustment on debugA macro, thanks @jetpax and @cmidgley to add this issue.
 - All public configurations (#defines) have moved to RemoteDebugCfg.h, to facilitate changes for anybody.
- Changed examples, with warnings on change any #define in project,
  with workarounds if it not work. (thanks to @22MarioZ for added this issue)
- Adjustments if web socket is disabled
- Adjustments in examples, added one for debugger
 - Adjustments in silente mode
- Commands from RemoteDebugApp now is treated
- Adjusts to RemoteDebugger support connection by web sockets
 - If not disabled, add a web socket server to comunicate with RemoteDebugApp (HTML5 web app)
- The standard telnet still working, to debug with internet offline
- Ajustment on debugA macro, thanks @jetpax to add this issue
- Add empty rprint* macros, if debug is disabled
 - Create option DEBUG_DISABLE_AUTO_FUNC
- Create macros to be used for code converter: rprint and rprintln
  RemoteDebug now have an code converters to help migrate codes
 - Create precompiler DEBUG_DISABLED to compile for production/release,
  equal that have in SerialDebug
- Adjustments in examples
 - Adjustments for the debugger: it still disable until dbg command, equal to SerialDebug
- The callback will to be called before print debug messages now
- And only if debugger is enabled in RemoteDebugger (command dbg)
-  Changed handle debugger logic
 - Added support to RemoteDebug addon library: the RemoteDebugger, an simple software debugger, based on SerialDebug
- New color system
 - Bug -> sometimes the command is process twice
- Workaround -> check time
- New macros to compatibility with SerialDebug (can use RemoteDebug or SerialDebug) thanks to @phrxmd
- Fixed bug for MAX_TIME_INACTIVE, thanks to @achuchev to add this issue
- Adjustments based on pull request from @jeroenst (to allow serial output with telnet password and setPassword method)
 - Serial output is now not allowed if telnet password is enabled
- Few adjustments
- Few adjustment in write logic
- Serial output adjustments (due bug in password logic)
- Correct rdebug macro (thanks @stritti)
- New silent mode (command s)
 - Auto function name and ESP32 core id for rdebug* macros
- begin method have a option for port number
- Few adjustments
- Added new rdebug?ln to put auto new line
 - Simple text password request feature (disabled by default)

    Notes:
      It is very simple feature, only text, no cryptography,
      and the password is echoed in screen (I not discovery yet how disable it)

      telnet use advanced authentication (kerberos, etc.)
      Such as now RemoteDebug is not for production (releases),
      this kind of authentication will not be done now.
- Adjustments in precompiler macros
 - Bug in write with latest ESP8266 SDK
- Port number can be modified in project Arduino (.ino file)
-  Few adjustments as ESP32 includes
 - Adjustments, as avoid ESP32 include errors
- Telnet port of server can be modified by project
  Just put it in your .ino, before the include:
- Shortcuts and client buffering to avoid mysterious delay of ESP networking
- Adjustments and now runs in Esp32 too.
 - Adjustments and improvements from Beta versions.

  New features:

    - Filter
    - Colors
    - Support to Windows telnet client
- First Beta
 - Sometimes (rarely) the connection over telnet becomes very slow.
  Especially right after uploading firmware.
  Reset command in telnet connection or turn off/on can be resolve it.
  But I need find why it occurs
 First thanks a lot for Igrr for bring to us the Arduino ESP8266 and to Espressif to Arduino ESP32

Thanks to Links2004 for a good web server socket, used for web app connection.

For the logo: thanks to a freepik and pngtree sites for free icons that have in logo

Resources:

  - Example of TelnetServer code in http://www.rudiswiki.de/wiki9/WiFiTelnetServer
  - arduinoWebSockets library in https://github.com/Links2004/arduinoWebSockets
2019-03-03에서 시작 하여이 파일의 카운터를 누르십시오.


