RemoteDebug
Version 3.0.5
ArduinoがWifiを介してプロジェクトをデバッグするライブラリ、WebアプリまたはTelnetクライアントを使用して、シリアルモニターのような印刷コマンドを使用します。

デフォルトでは、Arduinoはシリアルポートを介してデバッグの可能性としてのみあります。これにはいくつかの欠点があります:
ESP8266(Nodemcu)またはESP32を使用すると、デバッグ情報のストリーミングにリアルタイムで使用できるネットワーク接続(WIFI)があります。
このライブラリは、IoTプロジェクト、ホームオートメーション、モバイルロボット(ケーブルで移動してデバッグできますか?)または別のWiFiプロジェクトに適しています。
実際、このライブラリは、ホームオートメーションのIoTプロジェクトをデバッグする必要性から生まれました。このプロジェクトでは、中央モジュールと3つの補助モジュールがあり、これらは互いにはほど遠いものでした。家の屋根の下で、手を伸ばすのが困難でした。このプロジェクトをデバッグすることは、リアルタイムでメッセージの交換を伴うことは、USBケーブルで従来の方法で行うことは不可能です。
MIP_ESP8266_LIBRARYと私のESP32 WiFiロボットは、 RemotedeBugを使用するプロジェクトの例です。それを参照してください:mip_esp8266_libraryおよびesplorer_v1
ESP32およびESP8266ボードでのWiFiネットワーキングの不思議な遅延を避けるために、クライアントバッファリング(IS Last Send IS <= 10ms)によりRemotedeBugが改善されます。
注:プロジェクトがWiFiを使用していない場合は、別のライブラリであるSerialDebugライブラリを使用できます。このライブラリはArduinoボードで動作します。
注II: RemotedeBug Libraryは、ESP32およびESP8266としてのEspressifボードのみになります。別のWiFiボードが必要な場合は、これについて問題を追加してください。
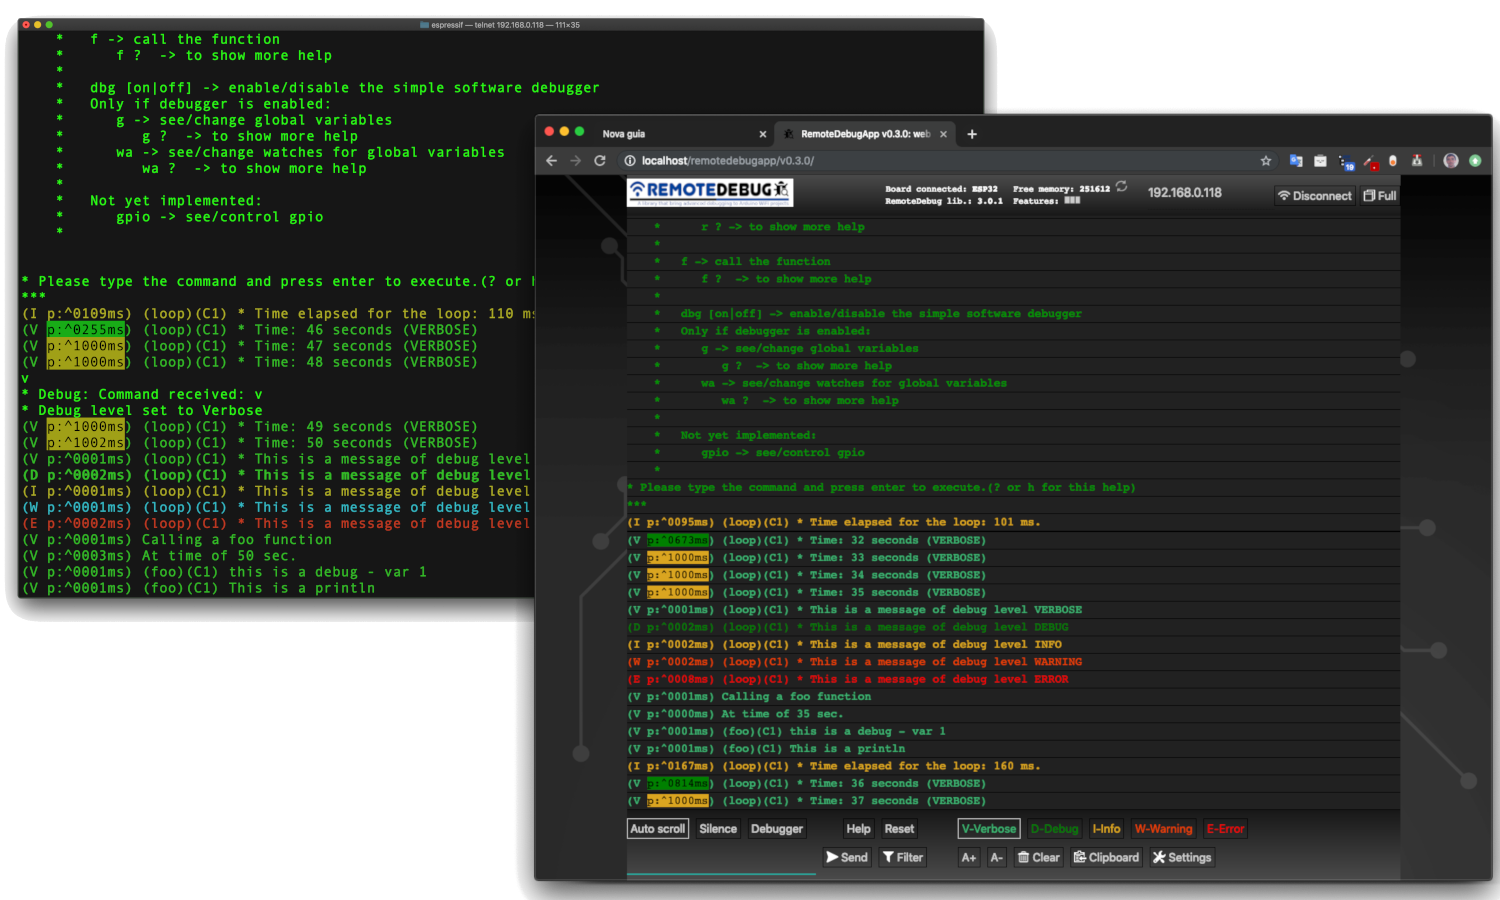
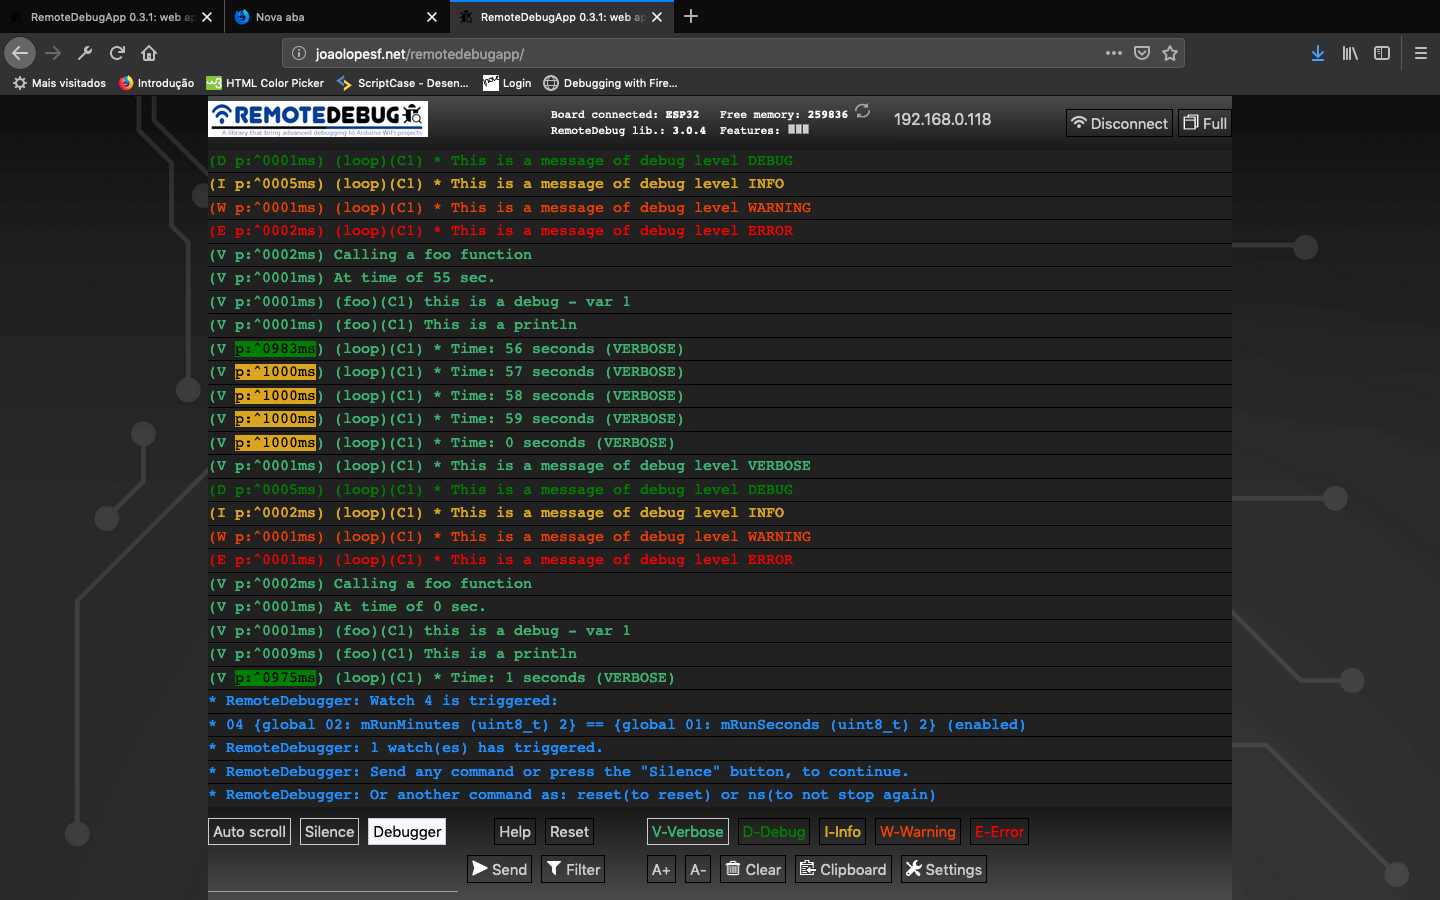
画像:RemotedeBugapp(Webアプリ)
画像:Telnetクライアントで
YouTube(RemotedeBug V2):
YouTube(RemotedeBugとの3 Telnet接続)v1:
GitHubでアカウントを作成することにより、このライブラリ開発に貢献します。
このライブラリが便利だと思う場合は、星に渡してください。これは、他の人がそれを発見するのに役立ちます。
問題や提案について問題を追加してください。
RemotedeBugappベータ
これで、別のリポジトリ、RemotedeBugAppがインターネット内のWebアプリのローカルコピー用です。 Webサーバーで公開された後、Webアプリの最新バージョンで更新されます:http://joaolopesf.net/remotedebugapp。インターネットがオフラインである場合に使用するために、ダウンロードしてください。ローカルコピーなので、アプリは定期的に新しいバージョンをチェックします。
Web Socketを使用してComunicateを使用する代わりに、TelnetクライアントであるWebブラウザーでのデバッグに使用するHTML5 Webアプリ。
RemotedeBug v3にも、RemotedeBugApp接続をサポートするWebソケットサーバーもあります。
RemotedeBugAppはベータ版です。問題や提案がある場合は、これについて問題を追加してください。
Telnet接続は、これを必要とするもの、またはインターネットオフラインの使用に残ります。
バージョン2.1.1
バージョン2.0.0
これで、 RemotedeBugには、 SerialDebugライブラリが持っているのと同じ単純なソフトウェアデバッガーを持つことができます。これは、別のライブラリをインストールし、 RemotedeBuggerがRemotedeBugに追加するように機能します。このアドオンをサポートするために、 RemotedeBugの変更は最小であり、デバッガーを必要としないプロジェクトに追加のオーバーヘッドを追加するために行われないコールバックがいくつかあります。その他の情報には、 RemotedeBugger GitHubリポジトリにアクセスしてください。
remotedebugには、 Serialdebugappで行われたように、より多くの色を使用して新しいカラーシステムがあります。
注: RemotedeBugライブラリは、フォルダー「SRC」を使用してArduino 1.5形式に移行します。RemotedeBugソースファイルの複製を避けるために、ライブラリを削除および再インストールしてください。
バージョン1.5。*
1.5.0バージョンでは、Debug*およびrdebug* Macros(以下を参照)があります。これは自動的に、呼び出された関数の名前とCore ID(Core IDはESP32専用です)があります。
SerialDebugは、serial.printコマンドによるArduinoのデフォルトデバッグよりも優れています。
USBケーブルを介してデバッグするかどうか、シリアル.printコマンドは常に処理され、マイクロコントローラーのCPU時間を無駄にします。言い換えれば、デバッグコマンドは処理され、誰かがシリアルに接続されているかどうかといます。
RemotedeBugを使用すると、すべてのデバッグ出力は、TelnetまたはWebアプリ接続を介してデバッグする人が存在する場合にのみ処理されます。
また、リソースのデバッグレベルでは、メッセージの表示ボリュームがより高いレベルで削減されます。たとえば、レベルが最低の場合、すべてのメッセージのみを処理します。
RemotedeBugは、CPUおよびメモリでオーバーヘッドを減らし、クライアントバッファリング機能を含むように断続されます。
開発中、私たちは多くのデバッグメッセージを配置することができます...
しかし、 RemotedeBugを使用すると、それぞれにレベルを入れることができます。
すべてのメッセージ(常にレベル(debuga)またはエラー(debuge)を除く、デバッグレベルがITレベルよりも等しいまたはそれ以上の場合、メッセージのみが処理されて表示されます
RemotedeBugには、優先度の順に6つのデバッグレベルがあります。
常に示した:
エラー:重大なエラー
常に:重要なメッセージ
別のレベル(レベルが実際のレベルと同じかそれ以上であるかを示します):
警告:エラー条件ですが、重要ではありません
情報:情報メッセージ
デバッグ:追加情報
冗長:通常よりも多くの情報
そのため、すべてのメッセージを表示するために、レベルを冗長に変更できます。または、デバッグまたは高レベルのみを表示するためにデバッグします。
プロジェクトが生成できるメッセージを減らして、デバッグを支援するのは非常に良いことです。
RemotedeBugには、Serial.printsからこのライブラリまで、Arduinoコードの移行を支援するコンバーターがあります。
RemotedeBugConverter
これを手動でやりたいとしても、非常に簡単です。上記のトピックをご覧ください。
簡単なデバッグ:
debugV ( " * Run time: %02u:%02u:%02u (VERBOSE) " , mRunHours , mRunMinutes , mRunSeconds );シリアルモニターでこの出力を生成できます。
    (V p:3065 loop C1) * Run time: 00:41:23 (VERBOSE)

    Where:  V: is the level
            p: is a profiler time, elased, between this and previous debug
            loop: is a function name, that executed this debug
            C1: is a core that executed this debug (and a function of this) (only for ESP32)
            The remaining is the message formatted (printf)
ESP32の場合、各デバッグのコアIDは、オプティマイザーマルチコアプログラミングに非常に優れています。
例えば:
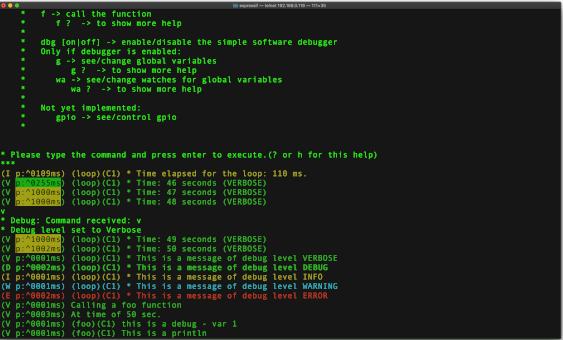
ヘルプを示す( ? )
デバッグのレベル( v 、 d 、 i 、 w 、 e )を変更して、より少ないかそれ以上のメッセージを表示します。
メモリ( m )を参照してください
ボードをリセットする(リセット)
以下のRemotedeBugコマンドについては、参照してください。
独自のコマンドを追加できます。例をご覧ください
プロジェクトがRemotedeBuggerをインストールしている場合は、新しいコマンドを持っています。たとえば、関数を呼び出し、変数を参照/変更、...
現在、 RemotedeBug (バージョン> = 2.0.0)に、SerialDebug Libraryのコードに基づいたシンプルなソフトウェアデバッグガーがあります。
これは別のライブラリであり、リモートバグのアドオンとして機能します。
RemotedeBuggerリポジトリをより多くの情報: RemotedeBuggerにアクセスしてください
 For release your device, just uncomment DEBUG_DISABLED in your project
Done this, and no more debug processing.
And better for DEBUG_DISABLED, __RemoteDebug__ have ZERO overhead,
due is nothing of this is compiled.
SerialDebugとして、RemotedeBug(V3)には、Webブラウザーでデバッグするアプリ、RemotedeBugAppがあります。
このアプリはHTM5 Webアプリで、WebSocketはArduinoボードと同意します。
そのため、RemotedeBug V3にはWebソケットサーバーがあります(無効にすることができます)。 Arduino Library Managerにはないため、Arduinowebsocketsライブラリのローカルコピーを使用しました。
Webサーバー上の大規模なWebページとして、ArduinoのソリューションはSpiffsのようなストレージに保存されます。ただし、この方法で保存されたデータの新しいバージョンを自動的に更新していないため、このSpiffsデータはプロジェクトに適していますが、ライブラリでは適していません。
そのため、このアプリはボードによって保存されていないため、アプリはWebにあります:http://joaolopesf.net/remotedebugapp注:これは、SSL(https)、arduinoの正当なWebサーバーソケットを使用していない、SSL(WSS)をサポートしていません。しかし、ページの読み込み後、すべてのトラフィックはローカルネットワークにあり、インターネット上でデータは公開されません。
RemotedeBugAppは最新のHTML5であり、動作するには最新のブラウザが必要です。 Internet Explorer 11とSafari 10は、サポートされていない例です。ただし、Chrome、Edge、Firefoxなどの人を使用できます。
Webアプリはベータ版です。問題や提案については問題を追加してください。
これで、別のリポジトリ、RemotedeBugAppがインターネット内のWebアプリのローカルコピー用です。 Webサーバーで公開された後、Webアプリの最新バージョンで更新されます:http://joaolopesf.net/remotedebugapp。インターネットがオフラインである場合に使用するために、ダウンロードしてください。ローカルコピーなので、アプリは定期的に新しいバージョンをチェックします。新しいバージョンをダウンロードできます。
Telnetは、これが必要なとき、またはWebアプリで失敗するために、仕事のままです。
Telnetは、サーバーにリモートで接続する標準的な方法であり、すべてのオペレーティングシステム(Windows、Mac、Linux ...)でサポートされています。
MacOSXとLinuxには、ネイティブのTelnetクライアントがいます。
Windowsの場合、典型的なTelnetクライアントはPutty :Pattyです。
携帯電話に適したツールがあります: Fing 、モバイルストアで見つけてください。ローカルネットワーク(WIFI)のすべてのデバイスを表示し、オープンしたポートを表示し、Telnetクライアント(外部アプリ)も実行できます
RemotedeBugは、接続を希望するTelnetクライアントを聞いているTelnetサーバーを設定します。接続後、ロギングはTelnetクライアントにストリーミングされます。
RemotedeBugは非常に簡単に使用できます。数行の初期化コードの後、よく知られている「印刷」コマンドを使用して、ロギングをリモートクライアントにストリーミングできます。
RemotedeBugは、デバッグレベルに基づいてロギングのフィルタリングをサポートしています。
実際のデバッグレベルのみを表示します:
注:これらのレベルは、ほとんどログ - >最小ログの順にあります。
または常に表示する場合(実際のデバッグレベルに依存しません):
注:すべてのデバッグは処理され、クライアント接続がある場合にのみ表示されます。
TelnetクライアントまたはWebアプリは、いくつかの簡単なコマンドを入力することにより、デバッグレベルを設定できます。
RemotedeBugには、シンプルなプロファイラーが含まれています。接続されたクライアント(TelnetまたはWebアプリ)またはArduinoコード自体で有効にすることができます。
有効にすると、経過時間に応じて異なる色を使用して、2つのデバッグステートメントの間の時間を示します。
典型的な例は、関数の直前と直後にロギングを挿入することです。その後、関数にどれだけの量が費やされているかを確認できます。
RemotedeBugは、クライアント(TelnetまたはWebアプリ)が接続されている場合、最小限のオーバーヘッド(接続または接続)を提供し、プロセスデバッグのみを提供するように設計されています。
RemotedeBugは、クライアント(TelnetまたはWebアプリ)に入力できるカスタムコマンドをサポートしています。これらは、Arduinoコードのカスタム関数の実行をトリガーします。たとえば、これは、クライアントのリクエストに応じてステータスを送信するために使用できます。
RemotedeBugの現在のバージョンには、暗号化された認証のみがまだ含まれておらず、プレーンテキストのみが含まれておらず、開発/リリースで使用しない開発専用です。
将来のバージョンには、可能であれば、認証のための安全な方法と、生産環境をサポートするためのさらなるテストが含まれます。
 - An app to RemoteDebug like SerialDebug have.
- Http page to begin/stop the telnet server or websocket server.
- Authentication as telnet support (kerberos, etc.) to support production environment
このリポジトリをダウンロードまたはクローンするだけです。
または、Arduino IDEの場合、ライブラリマネージャーを使用してライブラリをインストールして更新できます。
インストールヘルプについては、これをクリックしてください。
別のIDEの場合、またはArduino IDEのライブラリマネージャーを使用しない場合、Githubデスクトップアプリを使用してクローンを使用することをお勧めします。
プログラムを使用するために、プロジェクトをサンプルフォルダーで開いてください。
# include " RemoteDebug.h " // https://github.com/JoaoLopesF/RemoteDebugRemotedeBug Debug;
WiFi初期化後のセットアップ機能で
 // Initialize the server (telnet or web socket) of RemoteDebug

Debug.begin(HOST_NAME);

// OR

Debug.begin(HOST_NAME, startingDebugLevel);

// Options

Debug.setResetCmdEnabled( true ); // Enable the reset command

// Debug.showProfiler(true); // To show profiler - time between messages of Debug
注:RemotedeBuggerによってデバッガーを有効にするには、このgithubリポジトリ: RemotedeBuggerをアクセスしてください
ループ関数の尾
 // Remote debug over WiFi

Debug.handle();

// Or

debugHandle (); // Equal to SerialDebug
あなたの任意の場所でコード:
# ifndef DEBUG_DISABLED
if (Debug.isActive(Debug.<level>)) {
    Debug. printf ( " bla bla bla: %d %s " , number, str); // OR
    Debug. printf ( " bla bla bla: %d %s " , number, str. c_str ()); // Note: if type is String need c_str() // OR
    Debug. println ( " bla bla bla 2 ln " );
    Debug. printf ( " float: %f n " , value); // Not works in ESP8266 :-(
    // Note: to show floats with printf (ESP8266 only),
    // you can use my ArduinoUtil library -> https://github.com/JoaoLopesF/ArduinoUtil
    Debug. printf ( " float: %s n " , Util. formatFloat (value, 0 , 5 ). c_str ());
}
# endif
注:ISACTIVEを使用して、debug_disable precompile条件でコードを囲む必要があります。
または短い方法(SerialDebugに等しい)(時間に1つのデバッグのみを好む場合):
 debugA ( " This is a any (always showed) - var %d " , var);
debugV ( " This is a verbose - var %d " , var);
debugD ( " This is a debug - var %d " , var);
debugI ( " This is a information - var %d " , var);
debugW ( " This is a warning - var %d " , var);
debugE ( " This is a error - var %d " , var);

debugV ( " This is a println " );
または、プロジェクトがいくつかのserial.printコマンドを使用して単一のデバッグメッセージを生成する場合、例えば次のようになります。
Serial.print( " a = " );
Serial.print(a);
Serial.print( " b = " );
Serial.print(b);
Serial.print( " c = " );
Serial.println(c);
rdebug*マクロを使用できます:
 rdebugV ( " a = " );
rdebugV (a);
rdebugV ( " b = " );
rdebugV (b);
rdebugV ( " c = " );
rdebugVln (c);
注:将来、これを単一のデバッグコマンドに移行することをお勧めします。
debugV (a = %d b = %d c = %d " , a, b, c);デバッグレベルの使用例:(データが多くの文字であると仮定)
 if (Debug.isActive(Debug.VERBOSE)) { // Debug message long
    Debug. printf ( " routine: data received: %s n " , data. c_str ()); // Note: if type is String need c_str()
} else if (Debug.isActive(Debug.DEBUG)) { // Debug message short
    Debug. printf ( " routine: data received: %s ... n " , data. substring ( 0 , 20 ). c_str ()); // %.20s not working :-|
}
バージョン1.5.0から、デバッグマクロ(デバッグ*およびrdebug*)は、マクロとコアID(ESP32のみのコアID)と呼ばれる関数の名前を自動的に配置します。
それで:
 void foo () {

    uint8_t var = 1 ;
    debugV ( " this is a debug - var %u " , var);
}
 It will show in client (telnet or web app):

    (V p:^0000ms) (foo)(C1) this is a debug - var 1

Where:

    V -> verbose
    p -> profiler time
    (foo) -> this is a function name that calls the debug macro
    (C1) -> It is running it Core 1 (only for ESP32)
シリアルを有効にしたデバッグの使用例
 Useful to see messages if setup or
in cause the ESP8266/ESP32 is rebooting (client connection stop before received all messages)
Only for this purposes I suggest it
 // Setup after Debug.begin

Debug.setSerialEnabled( true ); // All messages too send to serial too, and can be see in serial monitor
オーバーヘッドを減らすために、RemotedeBugは、アクティブでない場合、クライアント(TelnetまたはWebアプリ)を切断します。
 - Please press enter or any key if you need keep the connection
- The default is 5 minutes (You can change it in RemoteDebug.h)
- You can use mDNS to register each node with different name, it helps to connect without know the IP.
debug.isactiveで句を使用することを忘れないでください(デバッグマクロを使用していない場合)
---> This is very important to reduce overheads and work of debug levels
基本的または高度なサンプルをご覧ください。
高度なサンプルでは、Wifimanagerライブラリ、Arduinoota、MDNSを使用しました。
- Ajustment on debugA macro, thanks @jetpax and @cmidgley to add this issue.
 - All public configurations (#defines) have moved to RemoteDebugCfg.h, to facilitate changes for anybody.
- Changed examples, with warnings on change any #define in project,
  with workarounds if it not work. (thanks to @22MarioZ for added this issue)
- Adjustments if web socket is disabled
- Adjustments in examples, added one for debugger
 - Adjustments in silente mode
- Commands from RemoteDebugApp now is treated
- Adjusts to RemoteDebugger support connection by web sockets
 - If not disabled, add a web socket server to comunicate with RemoteDebugApp (HTML5 web app)
- The standard telnet still working, to debug with internet offline
- Ajustment on debugA macro, thanks @jetpax to add this issue
- Add empty rprint* macros, if debug is disabled
 - Create option DEBUG_DISABLE_AUTO_FUNC
- Create macros to be used for code converter: rprint and rprintln
  RemoteDebug now have an code converters to help migrate codes
 - Create precompiler DEBUG_DISABLED to compile for production/release,
  equal that have in SerialDebug
- Adjustments in examples
 - Adjustments for the debugger: it still disable until dbg command, equal to SerialDebug
- The callback will to be called before print debug messages now
- And only if debugger is enabled in RemoteDebugger (command dbg)
-  Changed handle debugger logic
 - Added support to RemoteDebug addon library: the RemoteDebugger, an simple software debugger, based on SerialDebug
- New color system
 - Bug -> sometimes the command is process twice
- Workaround -> check time
- New macros to compatibility with SerialDebug (can use RemoteDebug or SerialDebug) thanks to @phrxmd
- Fixed bug for MAX_TIME_INACTIVE, thanks to @achuchev to add this issue
- Adjustments based on pull request from @jeroenst (to allow serial output with telnet password and setPassword method)
 - Serial output is now not allowed if telnet password is enabled
- Few adjustments
- Few adjustment in write logic
- Serial output adjustments (due bug in password logic)
- Correct rdebug macro (thanks @stritti)
- New silent mode (command s)
 - Auto function name and ESP32 core id for rdebug* macros
- begin method have a option for port number
- Few adjustments
- Added new rdebug?ln to put auto new line
 - Simple text password request feature (disabled by default)

    Notes:
      It is very simple feature, only text, no cryptography,
      and the password is echoed in screen (I not discovery yet how disable it)

      telnet use advanced authentication (kerberos, etc.)
      Such as now RemoteDebug is not for production (releases),
      this kind of authentication will not be done now.
- Adjustments in precompiler macros
 - Bug in write with latest ESP8266 SDK
- Port number can be modified in project Arduino (.ino file)
-  Few adjustments as ESP32 includes
 - Adjustments, as avoid ESP32 include errors
- Telnet port of server can be modified by project
  Just put it in your .ino, before the include:
- Shortcuts and client buffering to avoid mysterious delay of ESP networking
- Adjustments and now runs in Esp32 too.
 - Adjustments and improvements from Beta versions.

  New features:

    - Filter
    - Colors
    - Support to Windows telnet client
- First Beta
 - Sometimes (rarely) the connection over telnet becomes very slow.
  Especially right after uploading firmware.
  Reset command in telnet connection or turn off/on can be resolve it.
  But I need find why it occurs
 First thanks a lot for Igrr for bring to us the Arduino ESP8266 and to Espressif to Arduino ESP32

Thanks to Links2004 for a good web server socket, used for web app connection.

For the logo: thanks to a freepik and pngtree sites for free icons that have in logo

Resources:

  - Example of TelnetServer code in http://www.rudiswiki.de/wiki9/WiFiTelnetServer
  - arduinoWebSockets library in https://github.com/Links2004/arduinoWebSockets
2019-03-03から、このファイルでカウンターを押します。


